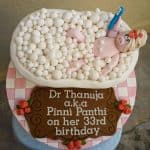
Pig Birthday Cake - A Cute Piggy Cake Design
A cute pig birthday cake with a 3D fondant piggy in hot tub shaped cake. A cool cake decorating idea and tutorial for a pink pig themed cake.
Servings: 1 8 inches by 6 inches cake
Calories: 4767.6kcal
Equipment
- Flower plunger cutter
- Square plunger cutter
- Pizza cutting wheel
- FMM Block Letters cutter
- Wilton Pattern Press set
- Sugar craft knife
- Shortening
- CMC Powder
Ingredients
Cake
- 300 g self-raising flour
- 300 g castor sugar
- 300 g butter at room temperature
- 5 eggs at room temperature
- 75 ml milk
- ⅓ teaspoon baking powder
- ¼ teaspoon salt
- 1 teaspoon vanilla essence
Frosting and Decoration
- Buttercream
- Fondant
- Gum Paste
Instructions
Baking the cake
- Preheat oven to 170 °Celsius.
- Beat butter and sugar till soft and creamy for about 2 minutes. Add eggs, one at a time, beating well after each addition.
- In a separate bowl, sift flour, baking powder, and salt. Fold in the sifted ingredients into the creamed mixture alternately with milk, starting and ending with flour.
- Finally, add in vanilla essence and combine well. Pour batter into two greased and floured cake pans and bake for 45 to 50 minutes until the top of the cakes spring back when lightly pressed. The cakes are done when a skewer inserted in the center of the cakes come out without any wet batter.
- Remove the cakes from the oven and let them cool completely before icing and decorating.
The checkered cake board design
- While waiting for the cakes to bake, prepare the checkered cake board. To achieve the checkered pattern on the board, I use a square plunger cutter and cut out a reasonable amount of pink and white squares. Arrange them on the cake board that has been generously applied with shortening. The shortening acts as glue to hold the fondant cutouts in place. For best results, let the cut outs dry out a little. That way, the squares don’t lose their shape as you lift and arrange them on the cake board.
- For the edges, go on and add the square cutouts even though parts of them stick outside the cake board. Once the entire cake board is covered, turn the cake board over. Use a pizza cutting wheel to trim off all the excess square cutouts that are sticking outside the perimeter of the cake board.
- Turn the cake board over again and leave it aside for later use, while you decorate the rest of the pig birthday cake.
Carving the hot tub cake
- Once the cakes are baked and have cooled down, level and sandwich them together with buttercream. Trim and refine the shape of the cake to assemble that of a bathtub. To do this, round the top edges of the cake. This will become the bottom of the cake (i.e. the bathtub). With the cake still in the same upside-down position, apply a thin layer of buttercream. After that, cover it with white fondant.
- Smooth the fondant well, trim off the excess and then, turn the cake over onto a cake board. Upon turning, the bottom of the cake will now the earlier rounded top of the cake and the earlier bottom of the cake will now become the top.
- Next, add the trimming to the top edges of the bath tub. To do this, roll a long thick piece of white strip. Attach it all around the top edges of the bath tub. Carefully lifted the bathtub and transfered it onto the prepared pink and white checked cake board. Apply some fondant glue to the cake board, where the hot tub cake is to be placed. Place the bathtub cake towards the end of the cake board. This is to allow some space on the front on the cake for the birthday wordings.
The 3D fondant pig
- To make the fondant pig, start by mixing some CMC powder into pink tinted fondant. The CMC will help the piggy hold its shaped and dry firmer. Start with the body and then make the head. After that, add all the facial features including the towel wrapping. The towel is made with thinly rolled gum paste. Gum paste is much more elastic and can be twisted without tearing.
- Attach the head to the body using glue and add both its arms. And then place the body (without the legs) onto the bathtub cake. Position it such that the head rests on the edge of the bathtub.
- Next, form the legs and add them on. After that, attach the large blue fondant brush to the pig’s hand with some glue. The brush bristles are made with tiny white hand-shaped balls.
The bubbles in the hot tub cake
- To make the bubbles, pinch lots of white fondant pieces in random sizes. Form them into smooth round balls and add them randomly into the bathtub. Where needed, use shortening or fondant glue to them to hold them in place.
The birthday cake wordings
- For the birthday cake wordings, cut the letters in white gum paste using the FMM block letter cutters. Arrange them on a brown fondant plaque. The plaque can be cut by hand using the pizza cutting wheel. For added deco, I used my old Wilton pattern press tools to press the scrolls designs around the edges of the brown cut out. Attach the letters plaque on the cake board, right in front of the hot tub cake.
Hand rolled roses
- Finally, add some tiny hand-rolled red roses and hand-formed green leaves on 3 sides of the fondant plaque cut out. Secure these in place with fondant glue.
Nutrition
Calories: 4767.6kcal | Carbohydrates: 523.8g | Protein: 68.5g | Fat: 271.7g | Saturated Fat: 163.1g | Polyunsaturated Fat: 15.7g | Monounsaturated Fat: 72.1g | Trans Fat: 9.9g | Cholesterol: 1470.9mg | Sodium: 3218.7mg | Potassium: 786.9mg | Fiber: 7.2g | Sugar: 305.6g | Vitamin A: 8812.5IU | Calcium: 407.1mg | Iron: 6.9mg