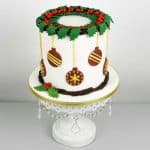
Easy Christmas Cake
This simple Christmas cake decoration features completely edible wreath with holly leaves and berries, and pretty maroon baubles. Includes recipe too!
Servings: 1 Six inches round cake
Calories: 9480.1kcal
Equipment
- Fondant extruder tool
- Sugarcraft knife
- Round cutter set
- Holly leaf plunger cutter
- Snowflakes plunger cutter
- Square plunger cutter
Ingredients
Cake
- 360 g self raising flour
- 360 g granulated sugar
- 360 g butter
- 6 eggs
- 90 ml milk
- ¾ teaspoon baking powder
- ¼ teaspoon salt
- 1 teaspoon vanilla extract
Buttercream
- 500 g powdered sugar (icing sugar)
- 250 g butter (salted)
- 2 tablespoon milk (optional)
- 1 teaspoon vanilla extract
Decoration
- Fondant
- CMC powder
- Shortening and fondant glue
- Lemon extract
- Edible gold dust
- Pearl luster dust
- Gold Dragees
Instructions
Bake the cakes
- Preheat oven to 170 °Celsius.
- Beat butter and sugar till soft and creamy for about 2 minutes. Add eggs, one at a time, beating well after each addition.
- In a separate bowl, sift flour, baking powder, and salt. Fold in the sifted ingredients into the creamed mixture alternately with milk, starting and ending with flour.
- Finally, add in vanilla extract and combine well. Pour batter into 3 well greased and floured cake pans and bake for 45 to 50 minutes until the top of the cake springs back when lightly pressed. The cakes are done when a skewer inserted in the center of the cake comes out without any wet batter.
- Remove cakes from oven and let them cool completely before icing and decorating (see Note 1).
Make the buttercream
- Measure butter into a mixing bowl. Cream well.
- Sift in the powdered sugar. Beat the sugar into the creamed butter until the icing turns light and fluffy.
- Add vanilla extract and beat well. If the icing is too stiff, add some milk (in small increments) and beat again.
Stack the cake layers, crumb coat and cover with fondant
- Once the cakes are baked and have completely cooled down, level and sandwich them with buttercream before covering them with fondant. Also cover the cake board with fondant.
The fondant wreath
- Pinch out tiny pieces of chocolate fondant and roll them into thin strips (see Note 2). Gather all the strips together and gently twist them.
- Apply a coat of shortening on the edges of the cake top and place the twisted strips on top. Repeat the process until you achieve a complete wreath that is about the same size as the cake diameter.
- In joining the Christmas wreath pieces together, adjust the ends so that they look as natural as possible.
- Where it is too thin, roll out additional chocolate strips and attach them to the wreath especially at the joints.
The gold strips on the fondant baubles
- Use the extruder tool and pipe out white strips of fondant. Make 2 different shapes, one a flat wide strip and the other, small plain thin round strip.
- The small plain thin round strips are also to be used as the ropes from which the baubles hang around the cake, so make sure to pipe some of these strips long enough to fit as the ropes. For the rest, pipe the strips in random lengths making sure their lengths were at least as long as the diameter of the baubles (see Note 3).
- Next, straighten all the strips properly before leaving them aside to set. Once set, paint them gold. To make the gold paint, mix a few drops of lemon extract into some edible gold dust. The consistency should be like a paste and not to liquid.
The edible gold snowflakes
- Roll some white fondant thin and use the snowflakes plunger cutter to cut out the snowflakes (see Notes 3 & 4). Paint them gold and leave them aside to dry.
The fondant bauble strings
- Measure and mark your cake at regular intervals to position the strings. Firstly, measure the circumference of the cake. And then divide and mark it into equal intervals, making sure the intervals were neither too narrow nor too wide, just nice to evenly space the baubles on the cake.
- As for the length, since some are short and some were long, mark these on the cake as well.
- And then apply a thin coat of glue at the back of the thin fondant strips and carefully attach them to the cake.
- Cut off any excess using the sugar craft knife.
The fondant baubles
- Once the gold strings are in place, make the baubles. If you are using red fondant, mix a little black fondant to achieve the maroon color. Roll the fondant thin and cut out the baubles (see Notes 2 & 3).
- Dust each of the round maroon cutouts with pearl luster dust. This will give them a pretty luster shine.
- Attach the gold snowflakes to half of the baubles. Use shortening to hold the flakes in place. And then, using the opposite end of one of a thin cake decorating brush or a skewer, mark tiny little dents around the edges.
- Fill the dents with gold dragees, one dragee into each hole. To hold the beads securely in place, apply a light coat of fondant glue into each dent before placing a gold dragee into each of them.
- Leave these aside and decorate the remaining maroon circles with the second design, i.e., the gold geometrical lines. Start with the wider strips, followed by 2 thin strips on either side. After that, attach these to the circles with glue. Use the sugar craft knife to cut the excess strips off them.
- Once the baubles are done, cut out small pieces of square maroon cutouts, and using the same round cutter used to cut the baubles, cut off a portion of the squares. These are to become the tiny top portion of each of the maroon circles. Dust these with pearl luster dust.
- Once done, attach these small pieces to the cake, one piece at the end of each fondant strip, followed by the snowflakes baubles at the end of each long strip and the geometrical lined ones at the end of the short strips.
The holly leaves and berries
- Roll some green fondant thin and cut out holly leaves using the medium-sized plunger cutter (see Notes 2 & 3).
- Once the leaves are all cut, arrange them onto the cake. Start with the leaves on the outer edge of the wreath. And apply a layer of shortening to the back of each leaf before putting them on the cake.
- Once the outer layer of leaves is done, do the inner layer. Apply a thin coat of shortening at the back of each leaf to hold them in place.
- To complete the wreath, add tiny holly berries made out of red fondant to it. To make sure the berries don’t go rolling all over the cake top, apply glue to each of them so that they are held in place securely.
- Once the wreath on the cake top is complete, repeat the brown wreath at the base of the cake. Add 2 holly leaves and 3 holly berries to it. And finally, attach a gold ribbon around the cake board with hot glue.
Notes
- As soon as the cakes cool down to a warm temperature, wrap them with plastic wrap and refrigerate until completely cooled down. This helps keep the cake layers moist.
- To keep the fondant decorations from drying out (especially the baubles, twigs for the wreath and the holly leaves, keep them covered in a container).
- Make extras to give allowance for any breakages.
- You can use snowflake cookie cutters if you do not have the plunger cutters.
- Fondant glue and shortening are both used to hold or 'glue' fondant pieces together. Fondant glue is stronger and should be used for larger and heavier fondant pieces.
Nutrition
Calories: 9480.1kcal | Carbohydrates: 1128.5g | Protein: 85.6g | Fat: 530.9g | Saturated Fat: 325g | Polyunsaturated Fat: 26.3g | Monounsaturated Fat: 139.1g | Trans Fat: 20.1g | Cholesterol: 2308.3mg | Sodium: 5264.7mg | Potassium: 1084.7mg | Fiber: 8.7g | Sugar: 857.7g | Vitamin A: 16875.7IU | Calcium: 685.4mg | Iron: 8.8mg