DIY Cake Board (How to Make)
Learn how to make and cover cake boards with foil and other decorative papers with this awesome & easy to follow cake boards DIY tutorial!
Servings: 1 cake
Calories: 870kcal
Equipment
- Cardboard - This should be at least one or one and a half inches larger than the size of the cake you want to make the cake board for.
- Cake pan - To draw out the cake board template. You can also freehand the drawing.
- Ruler - To measure the one inch / one and a half inch allowance at the sides of the cake board accurately so that the cake board is correctly sized.
- Cake board foil - this is material that will be used to cover the base board.
- Glue - To stick the wrapping paper or foil to the cardboard.
- Scissors - To cut the cardboard and the wrapping foil or paper
Ingredients
- 1 cake
Instructions
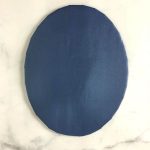
- The first step for making the cake boards is to get the template ready. For instance, if you are going to bake an oval-shaped cake and need an oval-shaped cake board, you would need to trace your oval cake tin outline on a piece of cardboard.
- Next, remove the tin and draw another outline, this time, approximately 1 inch to 1.5 inches away from the earlier outline. The 1 to 1.5 inches allowance is to make sure the cake board is slightly bigger than the cake itself. Cut the board following the second outline (the outer outline).
- Repeat the process for another board cut out of the same size. I make sure I use at least 2 boards stacked together to hold my cakes, but if you are ok with one, you need not cut 2 pieces of board. One would suffice.
- Glue both the board pieces together. This would form the base of your cake board.
- Next, place the cardboard cutouts on your foil and trace the pattern onto the back of the foil.
- Now, the foil piece that you use to wrap the board template cannot be in the exact same size as the cardboard. This is because it needs to be wrapped around the cake board. This is not a full wrap. However, the sides need to be folded underneath so that the cake board looks neat and the cardboard is not visible.
- For this purpose, when you cut your foil, give it an extra allowance of about 2 inches on the sides. This is so that there is enough foil to fold over the board sides.
- To make it easier to fold over, make short snips all around the foil. When doing this, make sure the cut does not go beyond the outline of the cake pan you made on it earlier. You can keep each snipping to a distance of about 1 to 2 inches each.
- Finally, wrap the foil around the board and secure the bottom neatly. Now foil does not need glue to hold it in place. But, if you use paper or other material, you would definitely use glue to hold everything in place.
- Once the gluing is all done, turn the board over. The cake board is ready.
Notes
- Always remember to make sure the cake boards are thick and sturdy enough to support your cake weight. I only use cardboards for small cakes (i.e. less than 8 inches in diameter). Even then, I stack at least 2 cardboards together to make sure they are able to hold the weight of the cakes. A few stacks of MDF cake boards will be able to give enough support for a 12 to 15 inches round/square cake. For larger cakes, it is advisable to use plywood boards.
- The color and design of the wrapping paper or foil you use for your cakes should complement your cake design.
- Cake base boards or cake drums should be at least one inch wider than the side of your cake (bottom edge of the cake on all sides of the cake.
- If you are using a foil to wrap your cake boards, you can use a bench scraper to smoothen the lines, but don’t apply too much pressure or you might tear it.
- Wrap the cake board with a transparent food grade plastic wrap for added food safety measures before placing your cake on.
Nutrition
Calories: 870kcal | Carbohydrates: 183g | Protein: 16.2g | Fat: 8.1g | Saturated Fat: 2.4g | Polyunsaturated Fat: 1.3g | Monounsaturated Fat: 2.9g | Cholesterol: 306mg | Sodium: 1869mg | Potassium: 297mg | Fiber: 1.5g | Sugar: 110.1g | Vitamin A: 462IU | Calcium: 210mg | Iron: 8.2mg