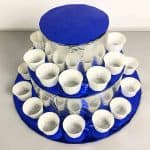
DIY Cupcake Stand (How to Make)
This DIY cupcake stand is not only easy to make, it can be customized to your party theme colors and can even hold a cake on its topmost tier.
Servings: 26 cupcakes
Calories: 187kcal
Equipment
- Styrofoam dummies - Two Styrofoam dummies measuring 4 inches high. One with a 6 inches in diameter and the other with a 10 inches diameter.
- Wrapping papers - Silver and royal blue colors You can use any colors your like, or use scrapbook paper if you like.
- Cake boards or cardboard cake circle - 3 round cake boards measuring 6 inches, 10 inches and 15 inches in diameter.
- Hot glue gun & glue stick, paper glue - Paper glue is to stick the wrapping papers around the cake boards and Styrofoam and the hot glue is to assemble the cupcake stand.
- Scissors and ruler - To measure and cut the wrapping papers.
Ingredients
- 26 cupcakes
- 1 cake
Instructions
Measuring the cake boards
- Measure the diameter of your cake. Choose a cake board that is one inch larger than the cake. For example, if your cake is 5 inches in diameter, choose first cake board 1 inch larger, i.e. 6 inches in diameter.
- Next, measure the diameter of your cupcakes. Choose the next cake board to with the diameter that adds the diameter of the cake board in the step above, plus 2 times the diameter of your cupcakes. For example, if your cupcakes are 2 inches in diameter, choose a cake board that is at least 10 inches in diameter (i.e. 6 inches plus (2 X 2 inches)).
- And finally, for the third tier (which was just a layer of cake board), add another 2 times of your cupcakes diameter to the measurement of the earlier second cake board. For example, if the 2nd tier cake board is 10 inches and your cupcakes measure 2 inches in diameter, the diameter of the third cake board should be at least 14 inches (10 inches + 4 inches).
Preparing the cake boards
- The first step is to wrap the cake boards. I used blue colored wrapping paper for this purpose. Start with the smallest cake board. Place it on the reverse side of the blue wrapping paper. Draw a circle following the size of your cake board. And then draw another circle around the first one, giving an extra allowance of 1 inch all around the cake board. Cut it out.
- The extra 1-inch allowance is for wrapping the paper around your cake board. Since its a circle, for ease of wrapping, snip the paper in about one-inch intervals all around. Make sure the snipping does not go beyond the inside circle.
- And then place your cake board in the center. Apply paper glue on the wrapping paper that shows around the cake board.
- And then, wrap the paper all around your cake board. You would need to adjust and make smaller folds on the wrapping paper as you go around your cake board. The idea is to make sure its snugly wrapped.
- Wrap the remaining 2 cake boards in the same way.
Preparing the dummy blocks
- Next, prepare the Styrofoam dummies. I wrapped mine in silver wrapping paper. The first step you need to do is to measure the height of the dummies. And then, mark it on the reverse side of your wrapping paper, giving one-inch allowance at the top and bottom. The idea is to basically cut a strip of paper that is long enough to wrap the sides of the Styrofoam dummy. The extra 1 inch allowances at the top and bottom are to secure the edges neatly once it's wrapped around the dummies. Make small snips on both ends of the strip. This is to ease the wrapping process.
- After that, apply paper glue all over the strip. Place the dummy right in the center, and wrap the paper securely around it.
- Once you have the paper all around the sides, cut off the excess. Secure the ends, similar to the cake boards earlier. Wrap the remaining dummy in the same way.
Assembling the stand
- Next is the assembly process. Start with the largest cake board. Place the larger of the 2 wrapped cake dummies on top, right in the center. Glue these together with hot glue. And then attach your second-largest cake board on top of the dummy. This should be the same size as the Styrofoam dummy it is placed on.
- Continue with the smaller cake dummy and then the smallest cake board right on top. Secure all in place with hot glue.
- Let the glue dry completely before using the stand to place your cake and cupcakes.
Nutrition
Calories: 187kcal | Carbohydrates: 31.6g | Protein: 2.9g | Fat: 5.6g | Saturated Fat: 1.5g | Polyunsaturated Fat: 1.4g | Monounsaturated Fat: 2.4g | Cholesterol: 12.6mg | Sodium: 212.5mg | Potassium: 52.3mg | Fiber: 0.4g | Sugar: 19.5g | Vitamin A: 40.1IU | Vitamin C: 0.1mg | Calcium: 64mg | Iron: 1mg