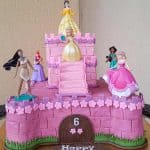
Buttercream Castle Cake with Princess Toppers
This buttercream castle cake is perfectly magical for any girl's birthday. Learn how to decorate the cake with this easy step by step guide.
Servings: 1 Two tier square cake
Calories: 3480kcal
Equipment
- Plaque cutter
- Round cutter set
- Alphabet cutter set
- Flower plunger cutter set
- Square plunger cutter
- Needle scriber tool
- Pizza cutter tool
- Fondant extruder tool
- Princess toy toppers
Ingredients
- 4 eight inch square cake layers (each measuring approximately 2 inches high)
- Buttercream
- Fondant
- Gum paste
Instructions
Preparing and stacking the cakes
- Bake 4 layers of 8 inches square cakes measuring approximately 2 inches high each. Once the cakes are completely cooled down to room temperature, level the tops.
- Stack two of the layers together with some buttercream in between. This is for the bottom tier of the castle.
- For the top tier, use the 3rd cake layer. Level the top and cut it into a 5 inch by 5 inch square and a 5 inch by 3 inch rectangle. Stack the smaller 5 inch by 3 inch rectangle onto the 5 inch square layer with some buttercream in between. Crumb coat the whole cake. Keep the remaining cake for the stairs.
- Stack the top tier of the cake onto the bottom tier with the support of bubble straws. In stacking the top tier, position it in the center but towards the back edge of the cake. This is to give enough space to position the stairway for the castle at the front.
- Use the remaining cake from the 3rd layer to cut out the stairs and attach them to the stacked cakes with buttercream. Crumb coat the stairs.
Making the castle turrets
- For the castle turrets on the bottom tier, use the 4th cake layer. Cut out circles using the round cutter set (choose a cutter with a diameter of approximately 2.5 inches and make sure that you are able to get 8 cut outs from the cake (You will need to stack 2 cutouts for each turret and there are 4 turrets in the castle).
- Stack the cutouts, 2 each with buttercream in between.
- Use the same cutter used to cut out the turrets, cut off a portion of each of the corners of the bottom tier to fit the turrets. And then use buttercream to attach the turrets to the corners of the castle cake. Crumb coat the turrets and make sure the top and sides of the cake is level.
Covering the castle cake in buttercream
- Divide your buttercream into 2. Tint the first portion with pink food coloring and the second with Americolor Electric Purple . Cover the top tier with the pink buttercream and the bottom tier with the purple buttercream.
Making the bricks pattern on the cake
- Once the castle cake is completely covered in buttercream, use the needle scriber tool to mark the brick lines all around both tiers. Start by marking the horizontal lines. Use a ruler as a guide to make sure the lines are consistently sized. Once the horizontal lines are done, mark the vertical lines.
- Next, make the battlements. Roll a long strip of pink fondant. Cut into into a long rectangle strip measuring approximately 1 inch or 1 and half inch wide. Use the square plunger cutter to cut out alternate squares on the strip. Attach these strips to the top edges of the castle cake and along the sides of the stairs. Repeat the process with purple fondant for the bottom tier.
- After that, cut out the tiny 5 petal flowers and attach them all around the battlement border.
The castle door
- Roll some chocolate fondant to about one eighth of an inch thick. Cut the door out of the fondant, free hand with the sugar craft knife or the pizza cutter.
- Use the needle scriber tool to mark the wood grain pattern on the door. Also mark a long line in the center of the door.
- Attach the door to the front of the castle. No glue is required as the buttercream is able to hold the door in place.
- For the door frame, pipe it out using the fondant extruder tool in brown fondant.
The grass border
- To make the grass, cut out a long piece of green fondant strip and use the pizza cutter to cut the grass pattern. Attach to the cake.
- And then add the borders for both tiers.
The lettering on the cake
- Cut out a fondant plaque in chocolate fondant and attach the gum paste lettering to it using shortening. And then, attach the plaque onto the cake board, also with shortening.
- To make the gum paste lettering, roll the gum paste as thin as possible and let it rest for a few minutes (about 5 minutes) before cutting the alphabets for neater cut outs.
- And finally, arrange the princess toy toppers on the cake. And that completes the buttercream castle cake.
Notes
- When attaching fondant cut outs (small and light decorations) to buttercream covered cake, no special glue is required as the grease from the butter in the buttercream is able to hold these pieces in place.
- For best results, FMM Tappit alphabet cutters require the fondant or gum paste used to be rolled paper tin. For this purpose, gum paste is a better option as it more flexible and is able to be rolled super thin without tearing unlike fondant. For best results also, let the gum paste dry slightly (for about 5 minutes) after rolling before cutting the alphabets for neater cut outs.
- If you are transporting this buttercream castle cake to a different venue or location, only add the Princess cake toppers once you reach your venue. That will avoid the toppers from keep falling and ruining the decoration on the cake.
Nutrition
Calories: 3480kcal | Carbohydrates: 732g | Protein: 64.8g | Fat: 32.4g | Saturated Fat: 9.6g | Polyunsaturated Fat: 5.4g | Monounsaturated Fat: 11.4g | Cholesterol: 1224mg | Sodium: 7476mg | Potassium: 1188mg | Fiber: 6g | Sugar: 440.4g | Vitamin A: 1848IU | Calcium: 840mg | Iron: 32.6mg