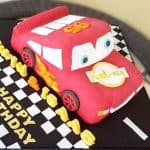
3D Lightning McQueen Cake
This 3D Lightning McQueen cake is perfect for Disney Cars fans. Learn how to make this iconic red car cake with this easy decorating guide!
Servings: 1 car shaped cake
Calories: 1740kcal
Equipment
- Alphabet & number cutters
- Clikstix Letter Cutters
- Sugar craft knife
- Pizza cutter wheel
- Round plunger cutters
- Round cutter set
Ingredients
- 2 rectangle cake layers measuring 6 inches by 10 inches approximately 2 inches high each.
- Buttercream
- Fondant
- Shortening
- Fondant glue
- Edible food marker in yellow
- CMC powder
Instructions
Carving the cake
- Bake and let the cakes cool completely to room temperature before decorating. Level the first cake layer and place it on a cake board. This is to form the body of the car cake from front to back.
- For the second layer, cut it into 2. And then slice the first portion in a slanting manner such that you get 2 triangle blocks of cake slanting at approximately 45 degrees angle each. Set one piece aside to make the top of the car.
- Use the second slanting piece to cut out a long piece of triangle. The length should be 6 inches to be in line with the width of the car body. Apply some buttercream and attach this triangle block to make the spoiler for the car.
- Next, attach the earlier cut larger triangle block next to the spoiler. Apply buttercream between the cake layers.
- To shape the bonnet, start by marking 2 lines on the bonnet section of the cake. The lines should be approximately 1 inch from the sides of the cake. Carve out a very thin layer of cake in between the 2 lines. Following that, carve out 4 circles, 2 on each side of the cake for the wheels. To do this, press the round cutter at the bottom layer of the cake. And carve out about 1cm depth of cake following the markings of the round cutter.
Covering the cake with icing
- Once the carving is done, clean the cake and the board of any loose crumbs. Apply a thin layer of buttercream crumb coat all over the cake.
- After that, roll some red fondant to about one eight of an inch thick and cover the whole car.
- Next, cut out 4 circles in black fondant that has been kneaded some CMC into. Cut with a thickness of about 1 cm each using the same round cutter used to carve the cake for its wheels. Decorate the wheels with red fondant rims and attach them to the wheels with shortening.
Windscreen, windows, front grill and Rust-eze logo
- For the windscreens, windows and front grill, cut them by hand in white fondant. Use a ruler as a guide in cutting all straight lines.
- For the Rust-eze logo on the bonnet of the Lightning McQueen cake, start with the white fondant pieces first. After that, use the yellow edible marker to write the words on. Roll a strip on thin yellow fondant and attach it as a yellow border around the round white fondant circle.
The Lightning McQueen logo
- As for the lightning logo on the side of the car, draw out the design on a piece of paper. YOu can also download the image from an internet search. Cut the logo along its outline.
- Place it on thinly rolled orange and yellow fondant separately and cut the pieces out to make the logo. Use the sugar craft knife to do the cutting.
- As for the number '95' on the sides of the car and the roof, use the number cutters. Finish off the car cake decoration by adding the eyes on the front windscreen. Cut the eyes out of fondant using the round plunger cutters. Finally, add the lights, both on the front as well as the back to complete the Lightning McQueen car.
Decorating the cake board
- To make the 3D names on the cake board, knead some CMC into yellow fondant. Roll it thick and cut the letters out. Let these letters set in a horizontal position until they are set and the rest of the cake board decoration is completed.
- For the cake board, cover it entirely in black. And then, measure the width of the car cake. Make sure that the width of the road on the cake board is the same as the car. For the divider lines on the road, add short white strips of fondant in the center of the road. And then, carefully lifted and placed the Lightning McQueen car cake on the cake board road.
Happy Birthday lettering on the cake
- Once the cake is in place, make the “Happy Birthday” letters using the FMM block letters cutter. Place them on the cake board (with the help of shortening). And then I attached the 3D alphabets cut earlier to make the 3D name on the cake board. Attach these with fondant glue.
- Finally, cut out white squares using the square plunger cutter. Attach these to the cake board in alternate order to create a checkerboard pattern using shortening.
Notes
- To make carved cakes, use cakes that are sturdy. Sponge and chiffon cakes are not suitable. Pound cakes are preferred.
- Fondant tends to get sticky and saggy in humid environment. To avoid any issues, work in an airconditioned room.
Nutrition
Calories: 1740kcal | Carbohydrates: 366g | Protein: 32.4g | Fat: 16.2g | Saturated Fat: 4.8g | Polyunsaturated Fat: 2.7g | Monounsaturated Fat: 5.7g | Cholesterol: 612mg | Sodium: 3738mg | Potassium: 594mg | Fiber: 3g | Sugar: 220.2g | Vitamin A: 924IU | Calcium: 420mg | Iron: 16.3mg