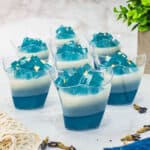
Butterfly Pea Jelly
This delectable butterfly pea jelly makes blue and white, naturally colored layered agar agar. It is quick, easy and absolutely refreshing.
Servings: 14 cups
Calories: 168.8kcal
Ingredients
Clear Blue Jelly Layer
- 10 g agar agar powder
- 250 g white sugar
- 1 l water
- 15 butterfly pea flowers (dried)
Coconut Milk Jelly Layer
- 10 g agar agar powder
- 200 ml coconut milk (thick)
- 800 ml water
- 250 g white sugar
- 20 butterfly pea flowers
Decoration (optional)
- Edible gold flakes
Instructions
The clear blue jelly layer
- Measure the sugar into a bowl. Add the agar agar powder into the sugar and mix well (see Note 1).
- In a medium saucepan, measure the water. Add the sugar and agar-agar mixture into the water and stir to disperse.
- Turn on the heat to medium flame and stir the agar agar solution until the sugar is dissolved.
- Add the butterfly pea flowers and stir briefly. Let the jelly solution cook until it reaches a rolling boil stage (see Note 2).
- Reduce the heat and let the jelly simmer for about one minutes. Turn off the heat and strain the jelly solution with a fine mesh strainer into a measuring jug.
- Pour half of the jelly solution into a square tin (approximately 7 inches by 7 inches square). Set it aside to let it cool slightly before placing it in the fridge to set completely.
- Divide the remaining jelly into prepared jelly cups or molds. Divide the jelly equally for even layers (see Note 3). Set them aside to allow the jelly to set before adding the next layers.
The coconut milk jelly layers
- Similar to the first layer of jelly, measure the sugar and agar agar powder into a bowl. Mix them well so that the agar agar powder is well dispersed in the sugar.
- Next, measure water into a saucepan. Add the agar agar and sugar mixture into the water and stir.
- Turn on the heat to a medium flame and stir to avoid the agar agar powder from clumping at the bottom of the pan. Let the jelly solution cook to a rolling boil.
- Turn the heat to low and add the coconut milk. Stir to mix.
- Let the jelly cook on low heat until it comes to a very light simmer (see Note 4). Turn off the heat.
- Transfer half of the jelly solution into another pan. Add the blue pea flowers into the pan and stir lightly.
- Turn on the heat to a very low flame and let the flowers cook in the hot jelly for about one minute. Make sure the solution does not simmer. If it does, turn off the flame.
- Cover the pan with a lid and let the flowers steep for about 3 minutes. Stir occasionally. Once the jelly has reached the desired blue hue, strain the flowers.
- Test the clear blue jelly in the cups by touching the surface with your finger tips. The jelly should have set. If not, place it in the fridge for about 5 minutes to quicken the setting process. You can do this process simultaneously as you are preparing the coconut milk jelly above.
- Once the first layer is set, divide the blue tinted coconut milk jelly into the jelly cups. Place the cups in the fridge to allow the jelly to set (see Note 5).
- Once the second layer is set, pour the final white layer into each cup. Place the cups back in the fridge for this white layer to set completely.
The topping
- Remove the clear blue jelly (poured into square jelly tray earlier) from the fridge and turn the jelly out onto a plate. For easy release, use a thin spatula to run through the sides of the jelly and the tin. And then, place 2 toothpicks on the sides. This will create air pockets on the sides and help release the jelly better.
- Place a large plate (facing down) on the tin.
- Turn the tin over (while holding the plate on the top) to release the jelly onto the plate.
- Cut the jelly into small cubes and triangles.
- Scoop the cut jelly onto each jelly cup. Decorate with tiny pieces of edible gold flakes if preferred. Keep the jelly chilled until ready to serve.
- The jelly should be allowed to set completely before serving. This can take at least 2 to 3 hours at room temperature and will be quicker if refrigerated (about 2 hours). Jelly poured in deeper containers like the jelly cups will take a longer time to set as compared to those set in shallower molds.
Notes
- Mixing agar agar powder with sugar before adding to any liquid will prevent it from clumping.
- Cooking the jelly to a rolling boil stage will make sure the jelly powder is properly dissolved. If the jelly powder is not completely dissolved, your jelly will not set properly.
- For even jelly layers in all cups, measure the solution in a measuring cup before pouring into the molds.
- When making agar agar with coconut milk, it is important to note that boiling the solution for too long will cause the coconut milk to separate. When poured into a mold, the separated coconut milk solids will float to the top leaving the bottom of the jelly with a layer of clear jelly.
- Placing the jelly in the fridge will quicken the process and this is necessary to prevent the remaining (untinted) coconut milk jelly solution from cooling down too much and setting at room temperature. If you notice it cooling down, heat it up again on low heat to keep it warm.
Nutrition
Calories: 168.8kcal | Carbohydrates: 37.1g | Protein: 0.4g | Fat: 3g | Saturated Fat: 2.6g | Polyunsaturated Fat: 0.03g | Monounsaturated Fat: 0.1g | Sodium: 10mg | Potassium: 46.8mg | Fiber: 0.1g | Sugar: 35.7g | Vitamin C: 0.1mg | Calcium: 15.6mg | Iron: 0.8mg