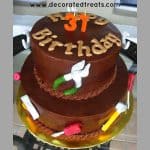
Tools Cake Design
This tools cake design is perfect for men. Decorated with fondant handyman tools, this cake is really fun to make. Here's how to make it.
Servings: 1 Two tier cake
Calories: 3480kcal
Equipment
- Cake decorating brush
- Bubble tea straws
- Star piping tip and disposable piping bag
- Alphabet molds
- Toothpicks
Ingredients
- 2 round cakes measuring 6 inches in diameter
- 2 round cake measuring 9 inches in diameter
- Buttercream
- Fondant
- CMC powder (tylose)
- Food coloring
- Silver edible dust
- Lemon extract
- Fondant glue
Instructions
Shape the handyman tools
- Knead some CMC powder into white fondant. Shape the tools in white fondant, by hand.
- To make the pliers, roll 2 long strips of fondant. Cross both at one third mark (for the pivot point). Press lightly and attach them together with fondant glue. Bend the jaws slightly and flatten the tips to make the teeth. Attach 2 toothpicks, one at the pivot point and another one at one of the handles (see Note 1).
- Set aside for the pliers to set completely. Repeat the process to make 2 more fondant pliers (see Note 2).
- To make the fondant hammer, roll white fondant into a sausage, with one end thicker than the other. Shape the hammer head at the thicker end. Attach 2 tooth picks at the back, one at the head and the other at the handle. Set aside to set completely. Make 5 hammers.
- To make the fondant screwdriver, make a short fat sausage with white fondant for the handle. Use the end of a cake decorating brush to mark the lines on the handle.
- Take another piece of white fondant and roll and shape it into the shank and blade. Use the end of a dowel rod or the cake decorating brush to make a dent at the end of the handle. Apply some fondant glue and attach the shank into the handle. Lay the screwdriver flat and support the shank with folded kitchen towel until the glue sets. Make 5 screwdrivers.
- To make the spanner, roll white fondant into a slightly thick sausage with slightly fatter ends than the middle. Flatten it to make the shaft and heads on ends. Use a toothpick to imprint the lines on the spanner. Attach 2 toothpicks at the back, on each head and set the spanner aside to set completely. Make 3 spanners.
Paint the tools
- Use gel based food coloring and dilute slightly with water when painting. Paint the hammer handle in yellow, the pliers handle in green and the screwdriver handle in pink. For the rest of the parts including the spanner, paint them in silver (mix a few drops of lemon extract into about one eighth teaspoon of silver edible dust. Mix to form a thick paste to paint the fondant).
- Set the tools aside again until the paint is completely dry. Use the toothpicks attached to each of the tools to hold them by poking them into a styrofoam block (see Note 3) to allow the paint to dry on both sides.
- Bake the cakes and make the chocolate buttercream
- Bake 2 layers of 6 inch round cakes and 2 layers of 9 inch round cakes. Each layer should be approximately 2 inches high. These will form the top tier and bottom tier of the cake. Cool all the cake layers completely before carving and decorating.
- Make the buttercream.
Frost and stack the cake tiers
- Once completely cooled down, level all 4 cake layers. Sandwich the 6 inch layers together with buttercream to make the top tier and the 9 inch layers together to form the bottom tier. Place the 9 inch tier on a cake board measuring 12 or 13 inches. Place the 6 inch tier on a 6 inch round cake board.
- Give the cakes a light crumb coat to lock the crumbs on the cake. Refrigerate the cakes for 20 to 30 minutes before frosting them with the chocolate buttercream (see Note 4).
- Poke 4 bubble tea straws into the bottom tier, making sure the straws are within 5 inch diameter from the center of the cake (see Note 5). Cut the straws so that they are all of the same height and level with the cake.
- Carefully place the top tier cake onto the bottom tier. Pipe rope border for both tiers.
Make the letters on the cake
- Dust the mold with cornstarch or powdered sugar. Press fondant into the mold and level the top. Gently tap or push the letters out (see Note 6)
- Place the letters on the cake top. The buttercream icing should be able to hold them in place without any need for fondant glue.
Attach the handyman tools to the cake
- Once the paint on the tools have dried completely, attach them all around the cake in alternate order with 2 spanners and 2 pliers on the top tier and 4 screwdrivers and 4 hammers on the bottom tier (see Note 7) to complete the cake.
Notes
- It is advisable to add 2 toothpicks to each fondant tool instead of one to better support the weight of the tools on the sides of the cake.
- Make at least one extra tool for each tool to give allowance for breakages.
- Make the tools in advance to allow sufficient time for them to set and for the paint to set.
- Refrigerating the cake after crumb coat with keep the crumbs in place while you apply the final layer frosting.
- The bubble tea straws are meant to provide support for the bottom tier to hold the weight of the top tier without getting compressed. The straws should not be visible once the cakes are stacked.
- I used one of Wilton lettering tools for the letters. You can use any other alphabet cutters or molds you like. If using silicone molds, see my post on how to use silicone molds for cake decorating.
- If the cake is to be transported to a different location, it is best to attach the tools to the cake at the destination. This is to avoid the risk of the tools falling off the cake and breaking.
Nutrition
Calories: 3480kcal | Carbohydrates: 732g | Protein: 64.8g | Fat: 32.4g | Saturated Fat: 9.6g | Polyunsaturated Fat: 5.4g | Monounsaturated Fat: 11.4g | Cholesterol: 1224mg | Sodium: 7476mg | Potassium: 1188mg | Fiber: 6g | Sugar: 440.4g | Vitamin A: 1848IU | Calcium: 840mg | Iron: 32.6mg