

Looking for romantic heart cookies for Valentines? Here is a set of delicious, chocolate dipped heart shaped sugar cookies you can make. The cookies are covered in decadent dark chocolate and decorated with bright red hearts and bows, all shaped by hand without any molds. They make perfect choice as Valentine's Day cookies.
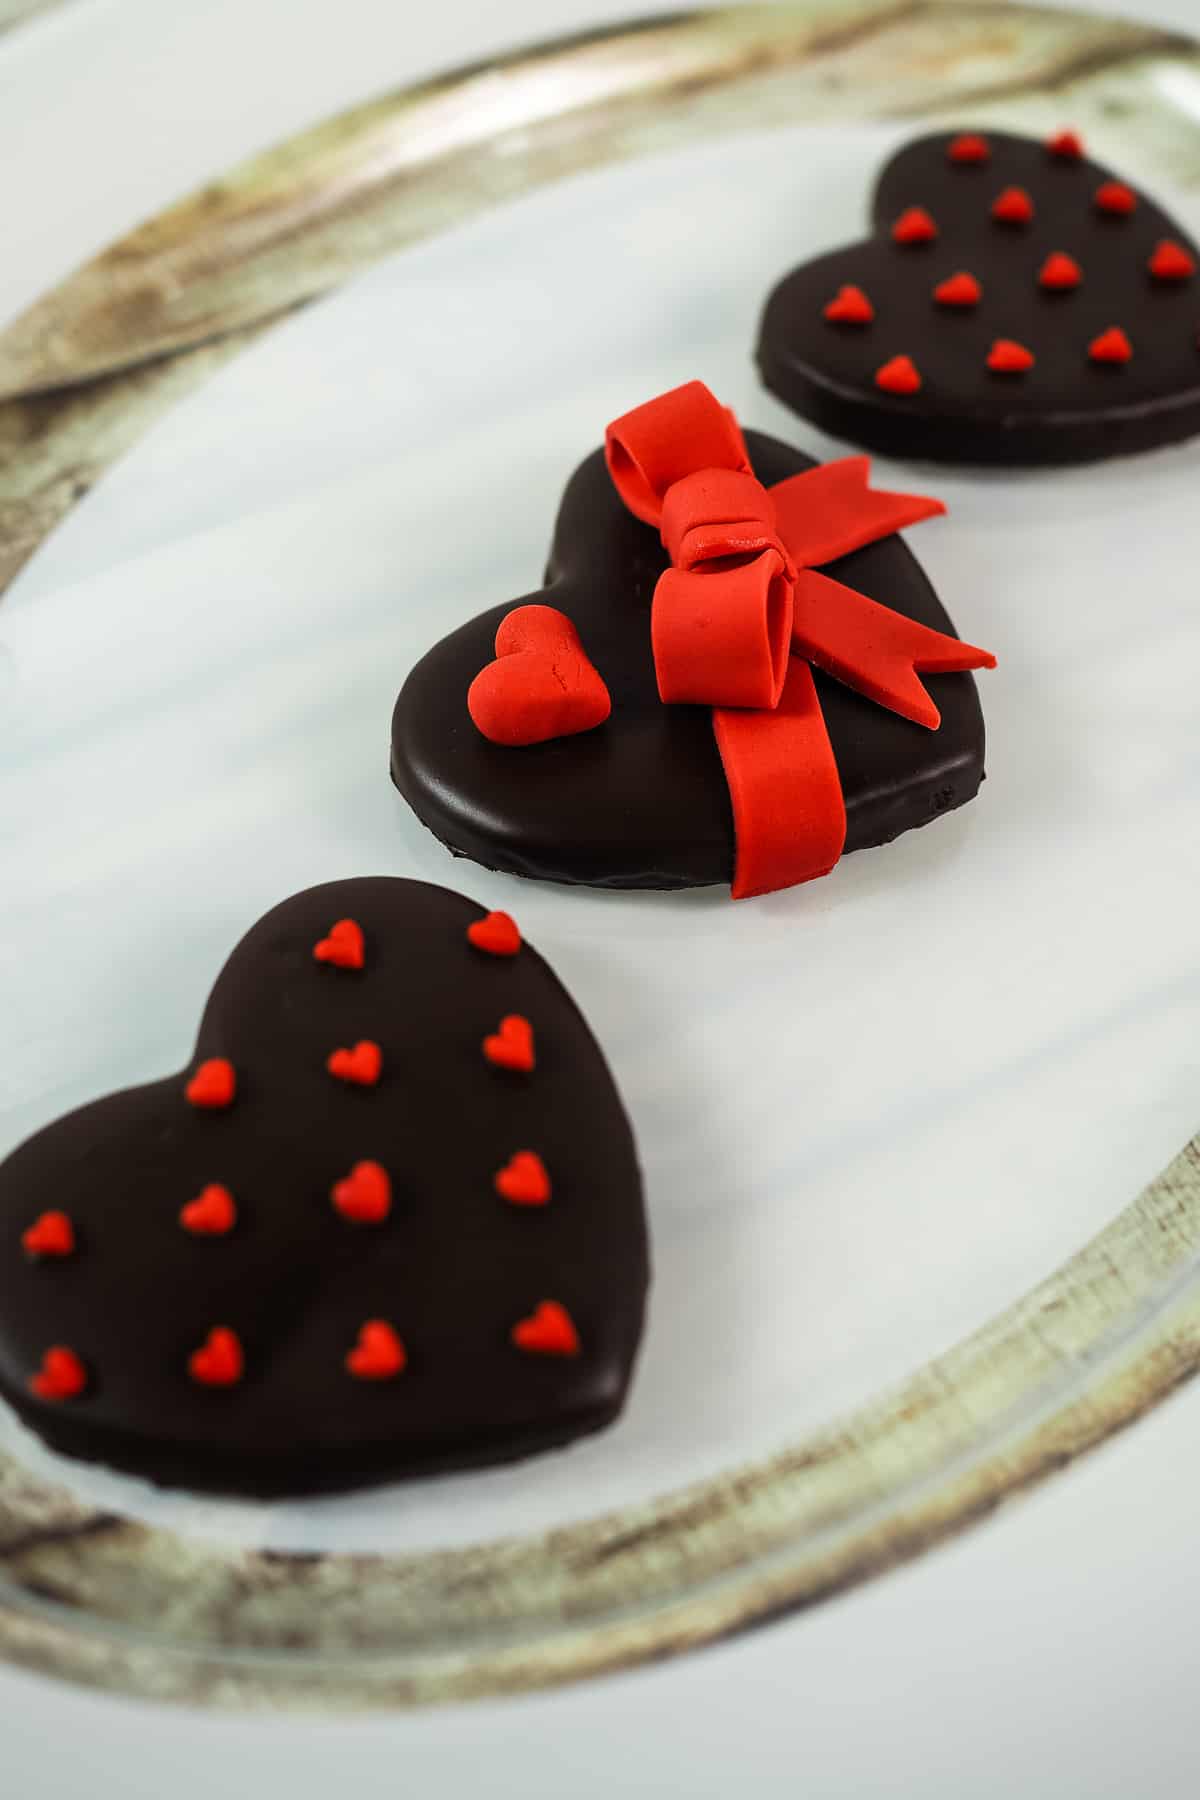
These decorated sugar cookies come is a set of 2 designs, and are perfect for gifting. You can gift them as individually wrapped Valentine cookies. They can also be packed together in a set of 2 cookies or 3 cookies.
The heart cookies are in vanilla flavor. I made them using my perfect homemade sugar cookies recipe. I call it perfect because its is just that – perfect in taste (rich buttery taste) and the cookies hold their shaped so well during baking, they are in the exact same shape after baking as they go into the oven.
Once baked and completely cooled down, each cookie is dipped in melted dark chocolate. I used dark compound chocolate to coat the cookies and decorated with handmade fondant hearts.
If you like these cookies, you should also check out my heart sugar cookies decorated in pink and these mini heart shaped cakes. They make great treats for Valentine's Day too.
Jump to:
❤️Why You Will Love These Cookies
- They are rich and buttery.
- The dark chocolate coating gives the cookies a decadent taste.
- The cookies hold their shape perfectly after baking.
- You do not require any special cutters to make the fondant hearts on the cookies.
- The cookies make great gifts for Valentine's Day.
🧾Ingredients
For the Cookies:
- All purpose flour - sift before using.
- Granulated sugar (caster sugar) - fine sugar works best for these cookies. Coarse sugar will leave speck of sugar marks on the surface of the cookies after baking.
- Butter - use salted butter. Salt enhances the taste of the cookies. If using unsalted butter, add one eighth teaspoon of salt when creaming the butter and sugar.
- Egg - binds all the ingredients for the cookies into a soft dough. Use large egg.
- Vanilla extract - for the flavoring.
For the Decoration:
- Chocolate – Used to coat the cookies. You can use any chocolate you want, and I used dark chocolate.
- Fondant – I only used one color which is Satin Ice fondant in red. You can make also make your own fondant with this homemade fondant recipe or this marshmallow fondant recipe and tint the fondant red. However, this will take quite a lot of coloring to achieve the bright red color.
- Fondant glue - to make the bow.
Tools and Other Supplies:
- Heart shape cookie cutter - to cut the cookies.
- Pizza cutting wheel– Use this to cut the fondant when making the bow on the cookies.
- Fondant shaping tools
- Toothpicks – these were used to help in making the miniature puffed fondant hearts on the cookies as well as to apply chocolate to the hearts to stick them to the cookies.
- FMM Sugarcraft Pattern Press for polka dots– This tool is to help mark the dots on the chocolate covered cookies for the placement of the miniature puffed hearts.
- Wire racks– These are to place the cookies after dipping them in chocolate.
- Parchment squares - to place the cookies after covering with chocolate.
- Sugarcraft knife - to cut the fondant.
*Refer to the recipe card below for full list of ingredients and exact quantities. For best results, use a digital kitchen scale where applicable*
👩🍳How to Make
Step 1: Mix the cookie dough
Prepare the baking trays and clear some space in your fridge as you need to chill your cookies in the baking trays before baking. Pre heat oven to 175 degrees Celsius.
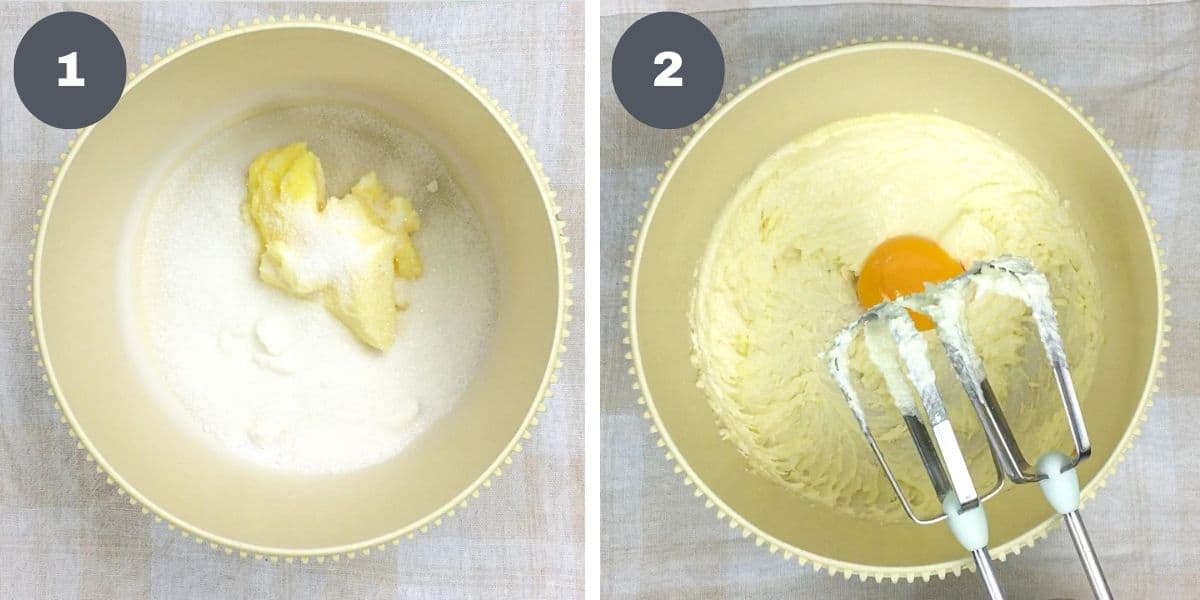
Place butter in a large bowl. Add the granulated sugar (image 1) and cream both on medium-high speed until the mixture turns light and creamy with an electric mixer (hand mixer or stand mixer). If using a stand mixer, use the paddle attachment. Do not over mix.
Next, add the egg (image 2) and continue beating on medium speed until it is well incorporated into the creamed mixture. Scrape the sides and bottom of the bowl. Add vanilla extract and mix again.
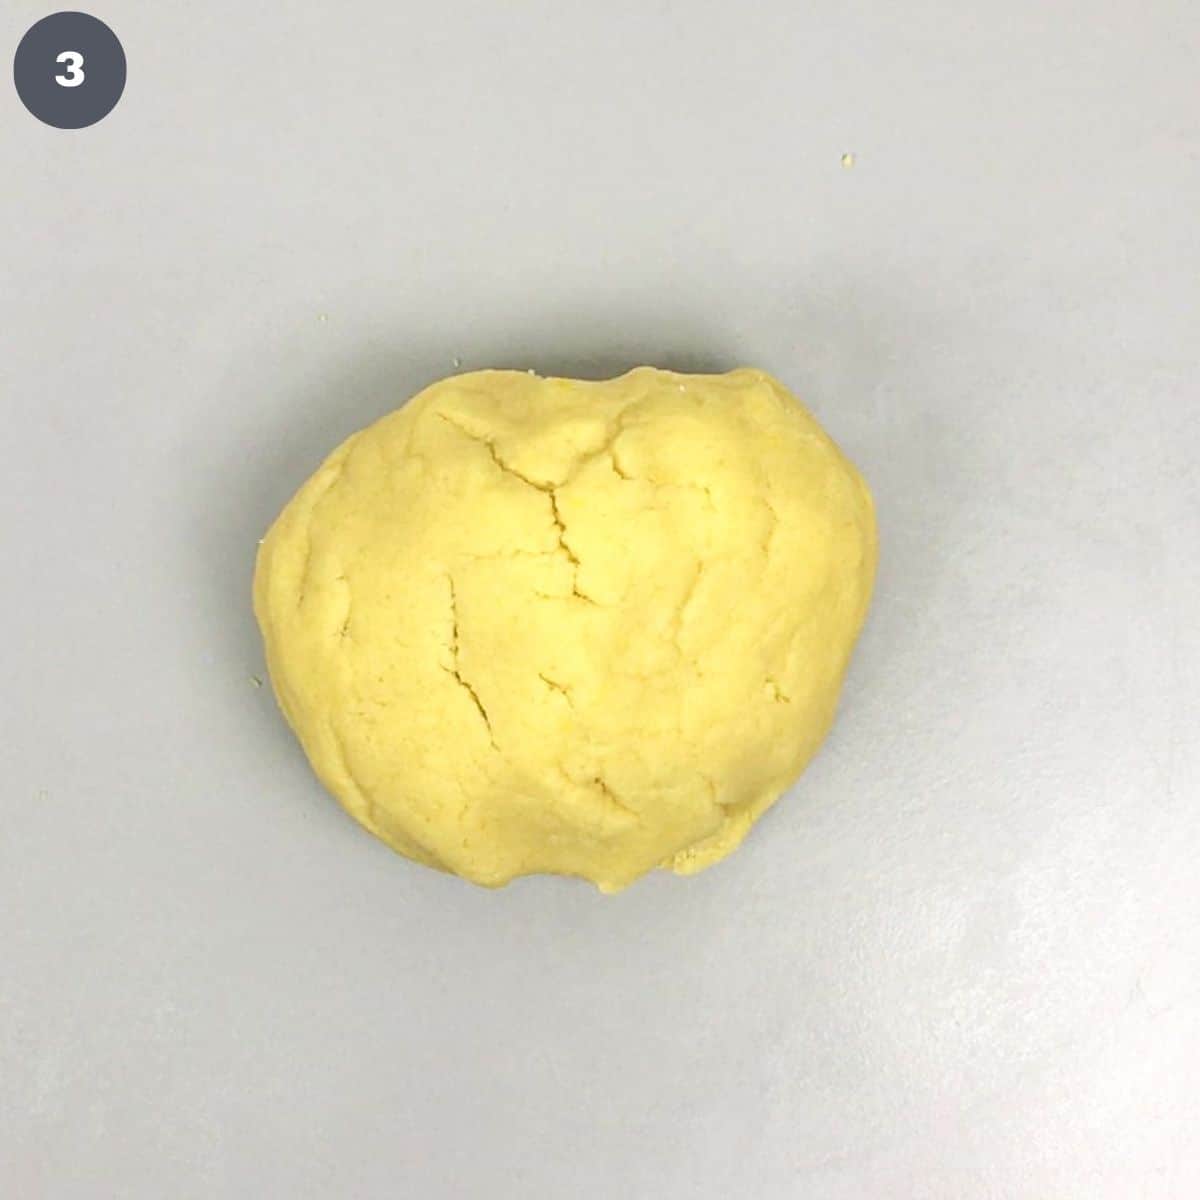
Finally, add the flour in batches into the creamed wet ingredients and mix these flour mixture until the dough comes together (image 3). Place the dough in a cling wrap (plastic wrap) covered bowl and refrigerate until it is firm. This step helps give the dough enough time to rest and is easier to handle.
Step 2: Shape and bake the cookies
Remove dough from the fridge and divide it into smaller sections for easy rolling.
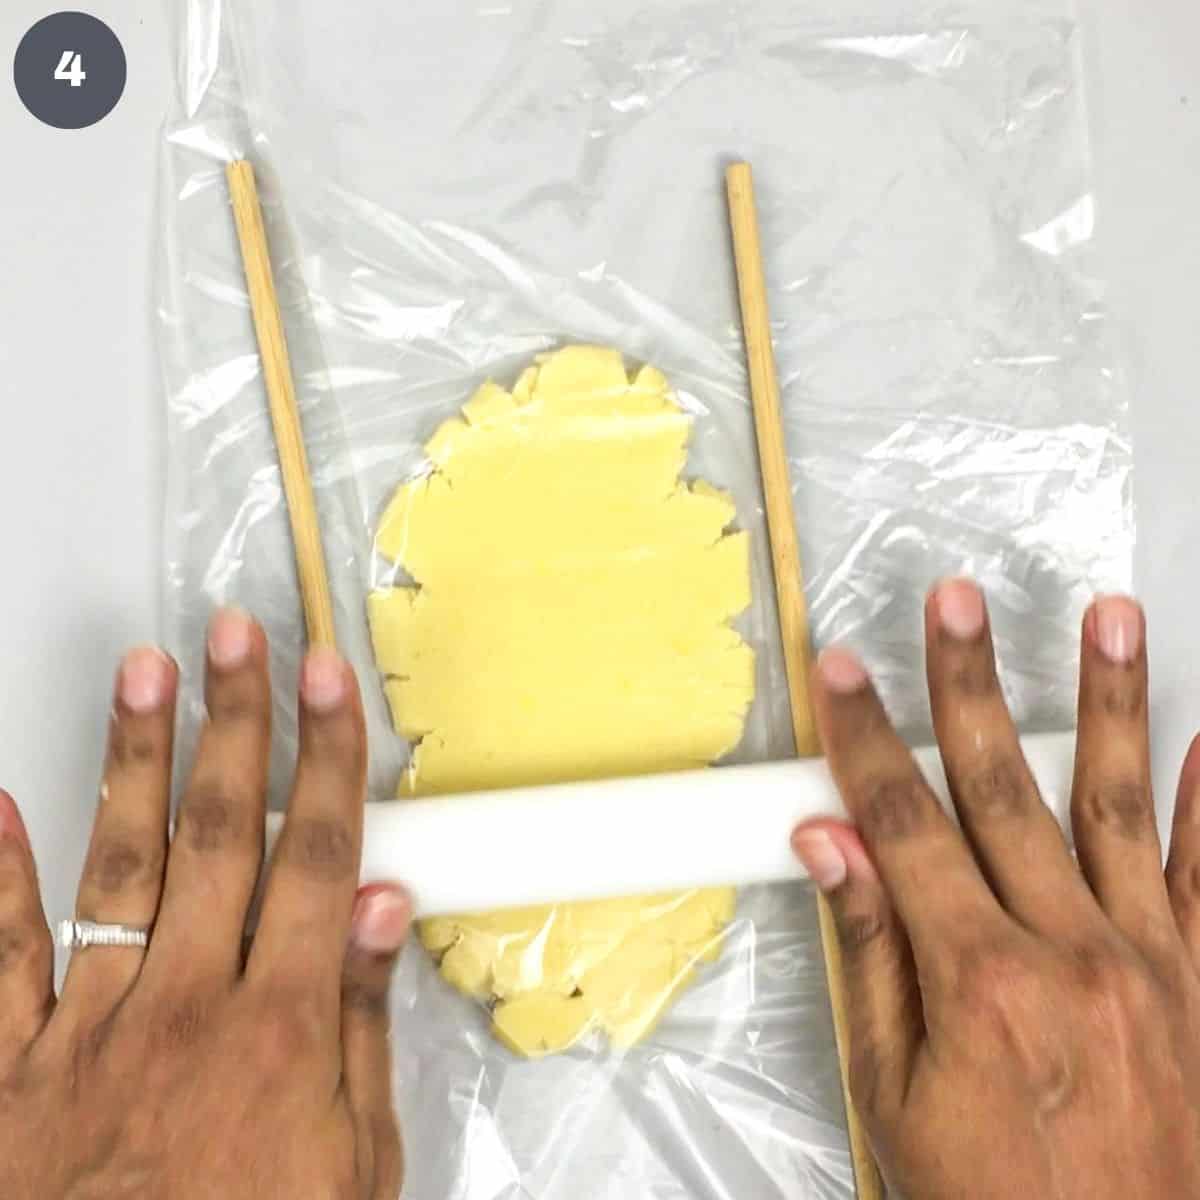
To ensure the heart sugar cookies were all in even thickness, roll dough the on lightly floured surface in between 2 dowel sticks. In doing this, you place your rolling pin on both the dowel rods as you roll the dough (image 4).
Note: That way, you will get a uniform thickness for all the cookies.
Cut the rolled sugar cookie dough using the heart-shaped cookie cutter. Place cutouts on a parchment paper or baking sheet lined baking tray.
Refrigerate the unbaked heart shaped cookies for about 30 minutes before placing them in the oven for baking.
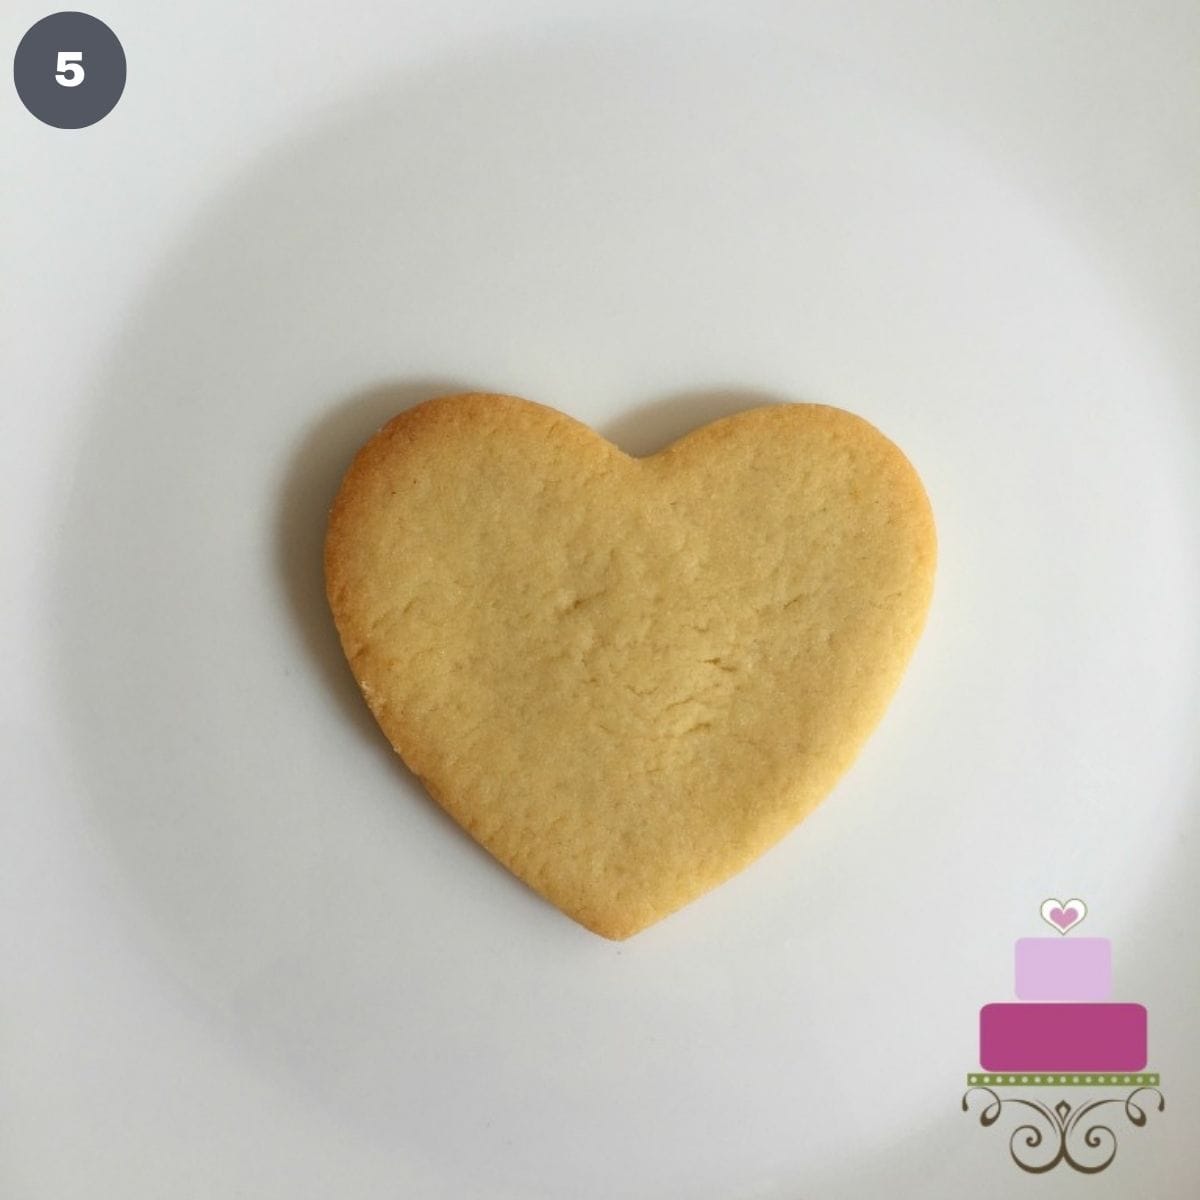
Bake cookies for a bake time of 10 to 15 minutes (baking time will depend on your cookie size) until the sides start turning golden brown. Remove the cookies from the oven and let them rest for 2 minutes before removing them to a wire rack (cooling rack) to cool (image 5).
Once the heart sugar cookies have cooled down to room temperature, you can start to decorate them. If not using immediately, store cookies in an airtight container.
Step 3: Coat the Cookies in Chocolate

For this, melt the chocolate over a double boiler (see my post here on how to melt chocolate) or in a microwave. To make your own double boiler, place water in a small pot (image 6).
Place the chocolate in a heat proof bowl (medium bowl) and place it on the pot, making sure the water is not touching the bowl. Turn on the heat and let the chocolate melt. Turn off the heat and let the bowl remain on the pot. This will help ensure the chocolate does not set as you are dipping the cookies in (image 7).

And then dip the cookies, one by one into the chocolate. Lift them with a fork and place them on a wire rack to let excess drip off (image 8). After that, transfer them to a parchment paper to let the chocolate set completely.
Once transferred onto the parchment squares, place them in the refrigerator for about 30 minutes to let the chocolate set. Remove them from the refrigerator and trim off the excess chocolate that has settled at the edges of the cookies. To do this, while holding the cookie on one hand, carefully remove the parchment paper underneath in sections and trim off the excess chocolate (image 9).
Note: Another option for covering the cookies with chocolate is to arrange them on a wire rack and pour the melted chocolate over the top of the cookies. With this option, only the top and sides of the cookies will be coated with chocolate. The bottom will remain uncoated. I chose the first option because I wanted the cookies to be completely covered in chocolate.
Step 4: Decorate with Mini Fondant Hearts
Note: Since this cookie set comes in 2 different designs, it is easier to complete the first design and then move on to the second design.
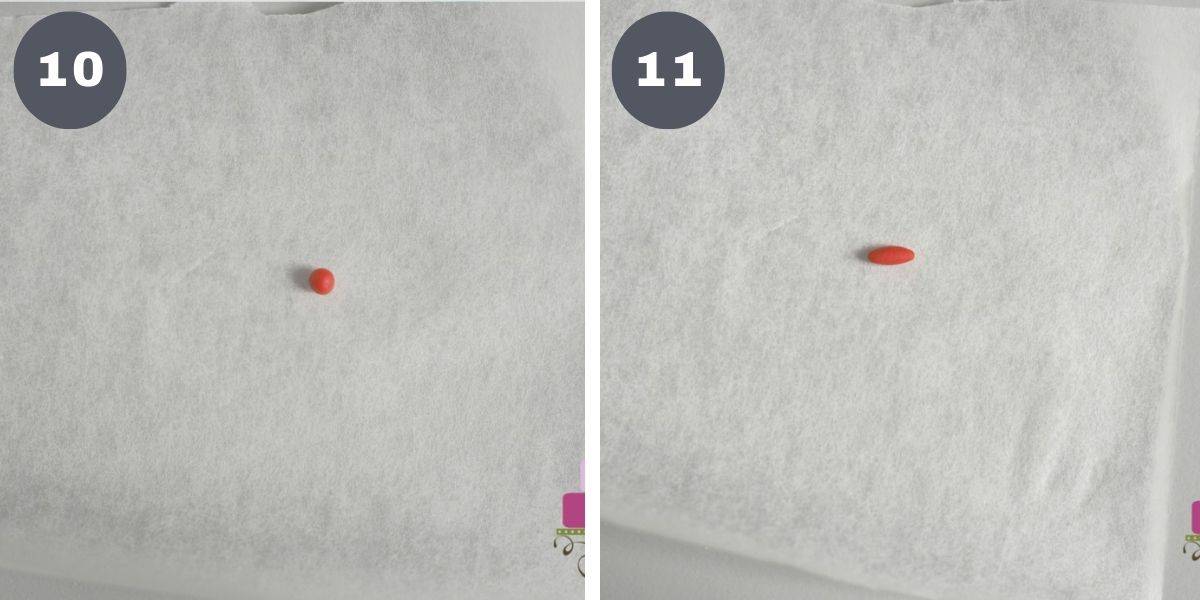
The first design is the cookies decorated with miniature red puffed fondant hearts without the bow. To make the hearts, pinch shape the fondant pieces into smooth balls and then roll the balls into tiny sausages (images 10 & 11).

Next, use a toothpick or a skewer to gently press the center of the sausages to form a dent. In forming the dent, make sure you do not press it too hard that it becomes flat in the center. Suffice if you make a tiny dent (images 12 & 13).
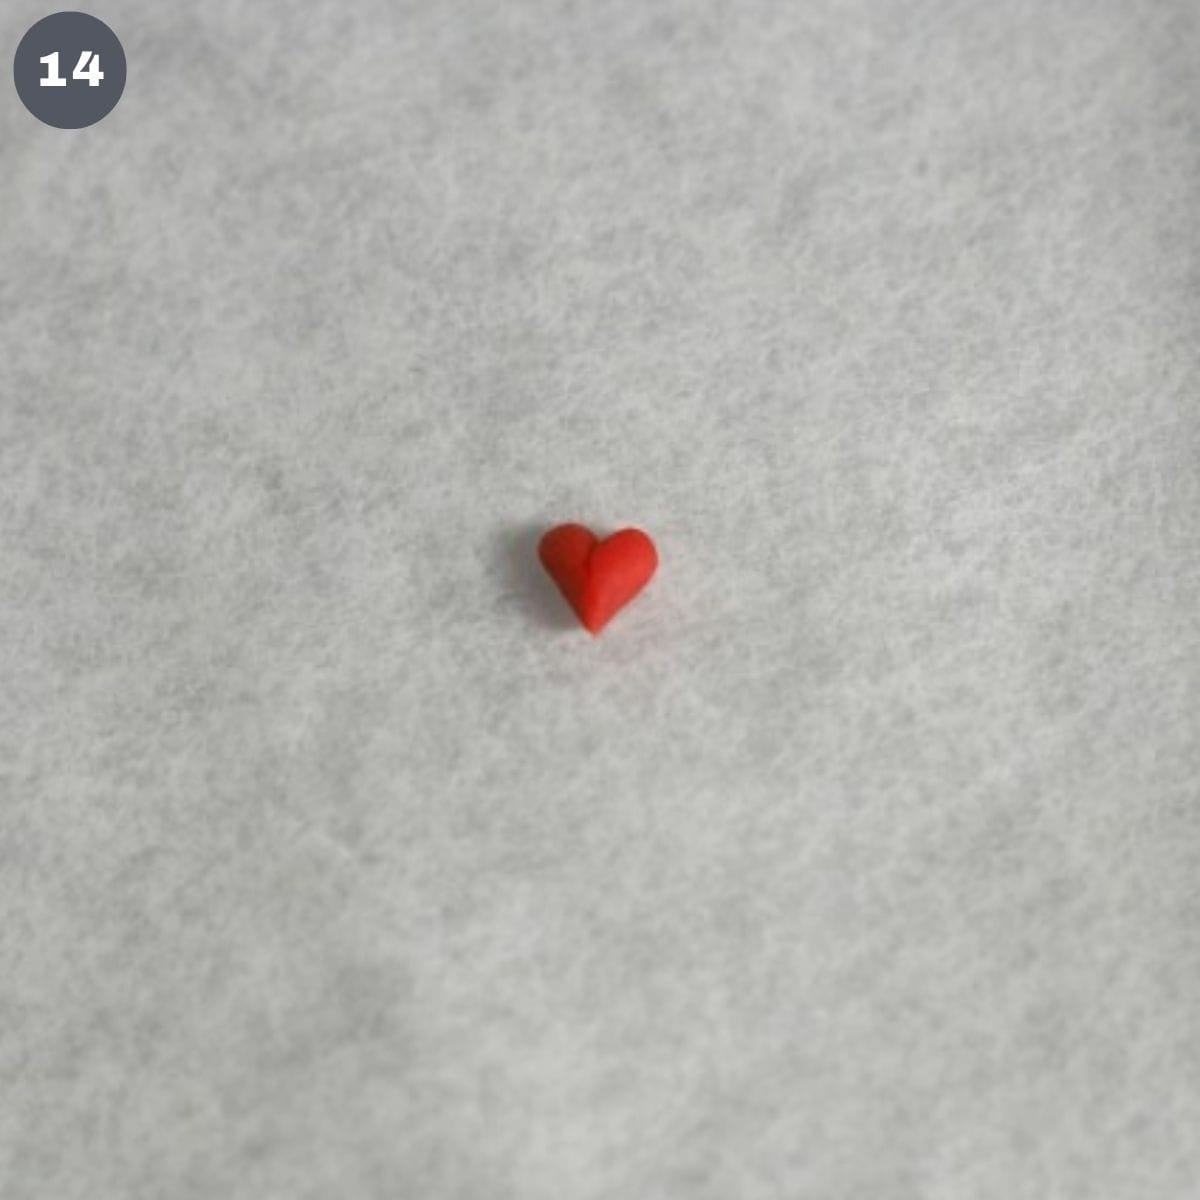
Fold the fondant sausage upwards to form a 'v' shape (image 14). Gently pinch the pointed end to make it nice and pointy and adjust the round tops of the heart until you achieve a cute puffed heart.
(I have a separate tutorial on how to make the puffed hearts and you can read it here).
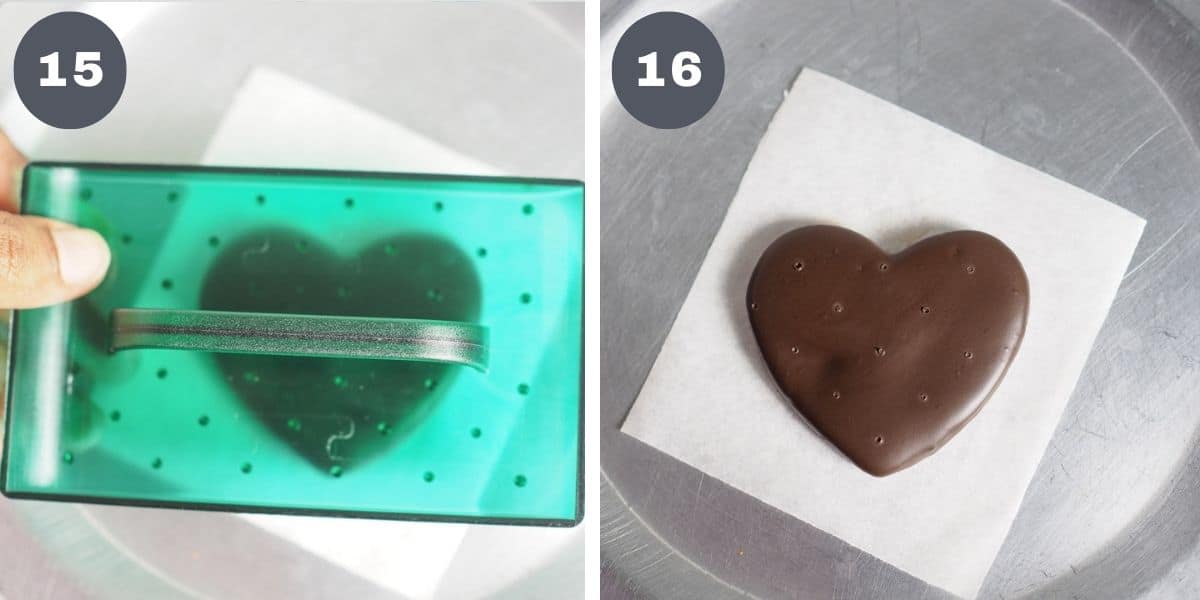
Mark the dots on the chocolate covered cookies. You can do this with a special tool like the FMM Sugarcraft pattern press tool or free hand it on the cookies (image 15 & 16).
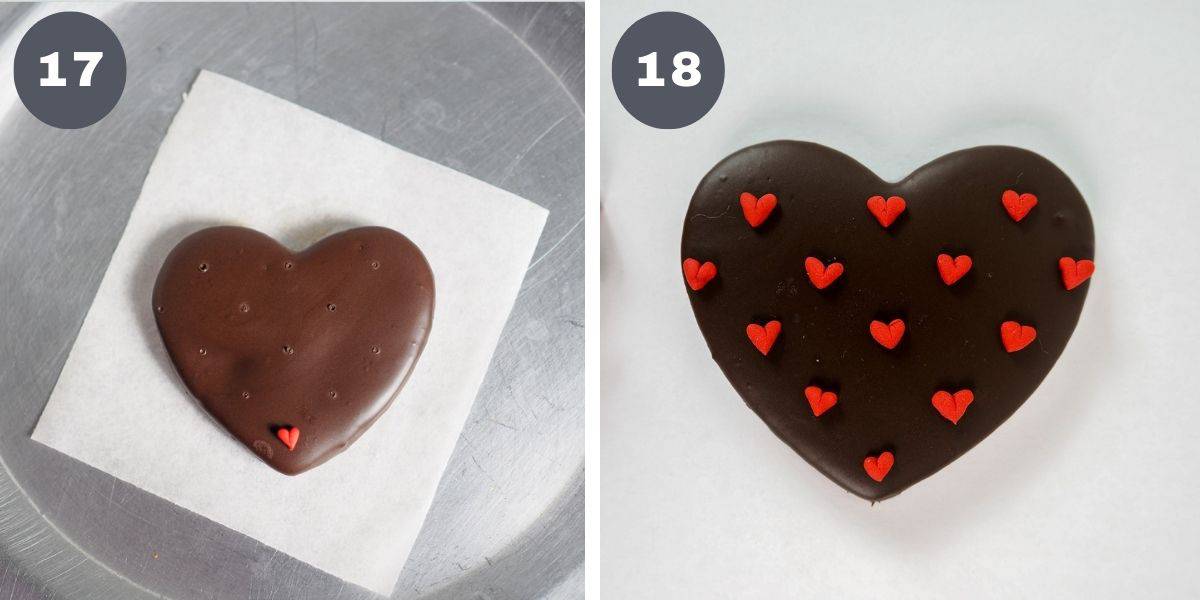
Next attach the fondant hearts on the cookies. To do that, if the chocolate on the cookie as totally set, use a toothpick to apply a tiny amount of chocolate at the back of each heart and attach them to the cookie (images 17 & 18).
Step 5: Make the Red Fondant Bow
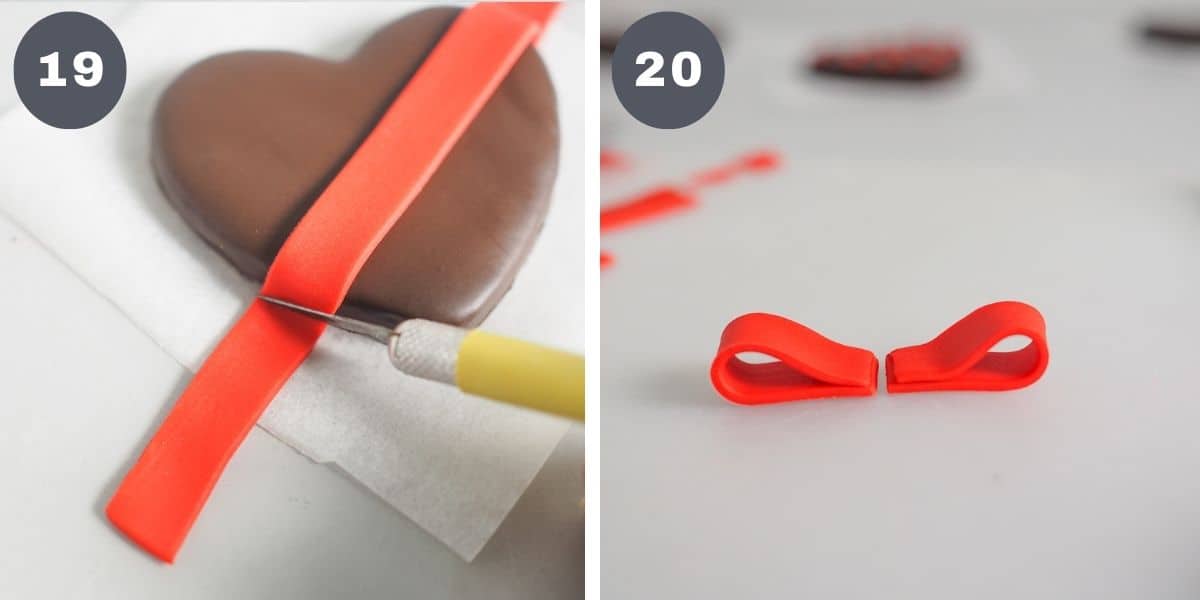
Roll some red fondant and cut out a few thin strips in the same width. Place one piece in a slanting position on the cookie. Trim off the excess at the sides. If the chocolate on the cookie has totally set, lightly brush some melted chocolate at the back of the fondant strip before attaching it to the cookie (image 19).
Next, cut out 2 equal sized strips of fondant for the bow loops. Loop them and cut off excess fondant (image 20).
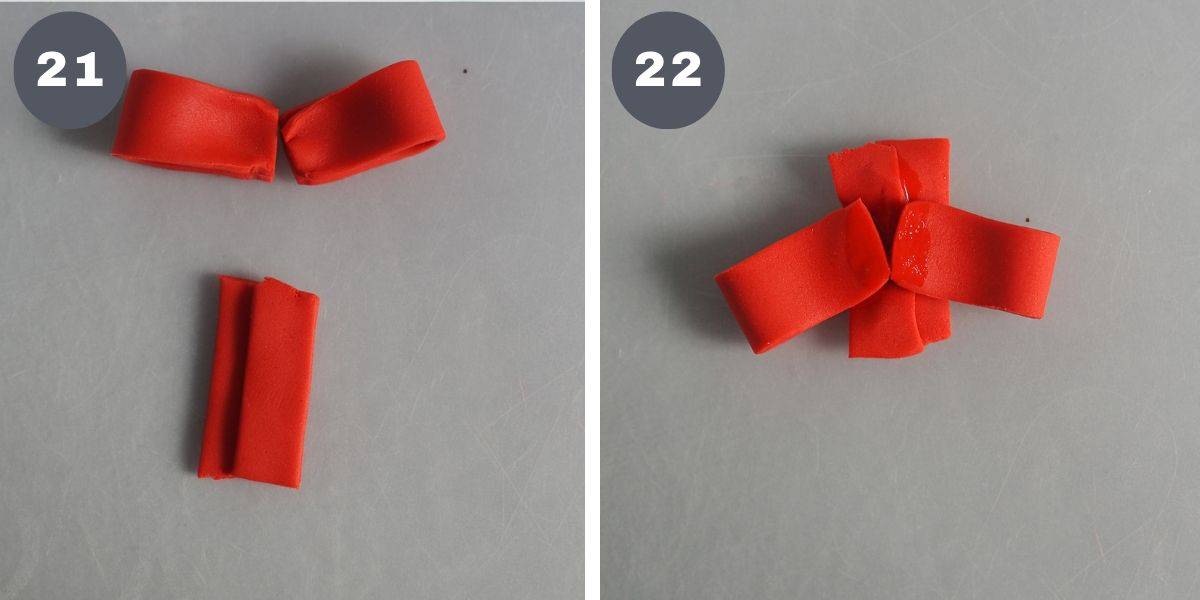
Next, cut out 2 more strips. Place one halfway overlapping on the other (image 21).
Place the loops formed earlier on the strips as shown (image 22).
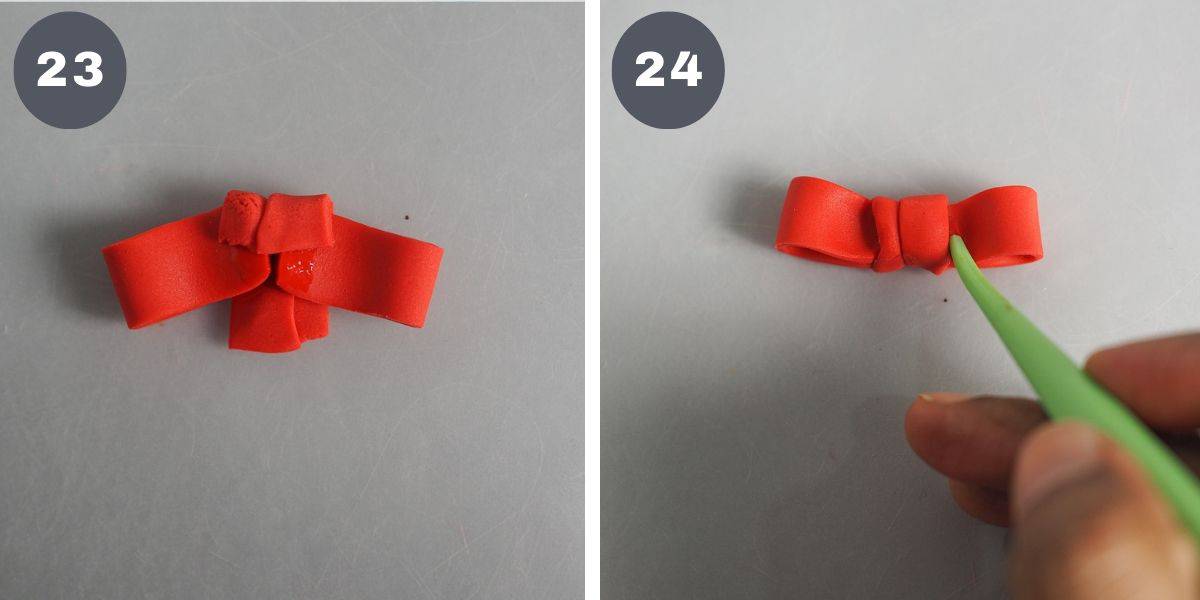
And wrap the loops. Start with the top. And then wrap the bottom (image 23).
Turn the loops over and use a fondant tool to smooth and adjust the bow (image 24).
Step 6: Attach the Fondant Bow to the Cookies
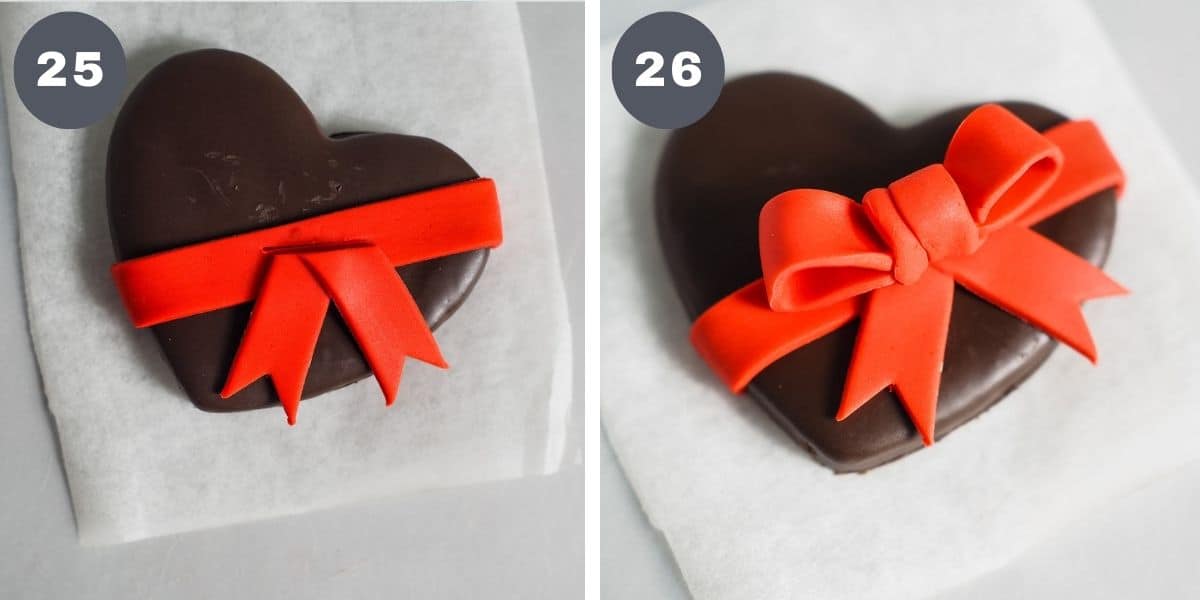
Before adding the bow onto the cookie, cut out another 2 strips of fondant. For each strip, cut out a tiny triangle piece at the end. Attach them to the slanting fondant strip on the cookie. To hold them in place, use fondant glue (image 25).
And then attach the loops (also with the help of some fondant glue) and adjust the bow so that it is in the exact position you want it to be on the cookie (image 26).
Step 7: Make and Attach the Fondant Puffed Heart

And finally, add a red puffed fondant heart on the top left corner of the cookie. The heart can formed by hand without any tools or cutters just like the miniature red hearts in the first design above (get the fondant heart tutorial here) and attached to the cookie with some melted chocolate (image 27).
And that completes the hearts cookie set for Valentine's Day.
💡Expert tips
- This recipe makes cookies crisp and crumby cookies. If you wish to make chew cookies, reduce the baking time.
- If you increase or decrease the cookie sizes, adjust the baking time accordingly. Bake a small batch to decide on the baking time.
❤️More Recipes You Will Love
Do you like this tutorial? Please leave a 5-star ⭐⭐⭐⭐⭐rating in the recipe card below and consider a review further down this page. I would love to hear from you. Thank you!
📖Recipe

Heart Cookies for Valentine's Day
Equipment
- Pizza cutting wheel
- Fondant shaping tools
- Toothpicks
- FMM Sugarcraft Pattern Press for polka dots
- Wire racks
- Parchment squares
- Sugarcraft knife
For best results, use the metrics measurements. US customary measurements have not been tested and are only meant for guide.
Ingredients
Cookies
- 400 g all purpose flour
- 180 g granulated sugar
- 200 g butter (salted)
- 1 egg
- ½ teaspoon vanilla extract
Decoration
- Dark chocolate
- Red fondant
- Fondant glue
Instructions
Bake the cookies
- Line baking tray with parchment paper and pre-heat oven to 175 °Celsius. Place butter in a clean bowl.
- Add the granulated sugar and cream both until the mixture turns light and creamy. Do not over mix.
- Next, add the egg and continue beating until it is well incorporated into the creamed mixture. Add vanilla extract and mix again.
- Finally, add the flour in batches and mix until the dough comes together. Place the dough in a covered bowl and refrigerate for 15 to 20 minutes (see Note 1).
- Remove dough from the fridge and roll it between parchment paper or plastic sheets. Use dowel rods as a guide for the thickness of your cookies (see Note 2).
- Cut the dough with the heart cookie cutter. Transfer onto a parchment lined baking tray and refrigerate them again until they are firm for about 20 minutes or more.
- Bake the cookies in a pre-heated oven for about 10 to 15 minutes (depending on the size of your cookies) until they have turned golden brown.
- Remove the cookies from the oven and cool them on a wire rack. Keep cookies in an airtight container until ready to be decorated.
Coat the cookies in chocolate
- Melt the chocolate over double boiler and dip the cookies, one by one into the chocolate (see Note 3).
- Transfer the chocolate dipped cookies onto parchment paper squares. Place the cookies in the refrigerator for about 30 minutes to allow the chocolate to set.
- Once removed from the refrigerator, trim off the excess chocolate that has settled at the edges of the cookies. To do this, use the sugar craft knife and while holding the cookie on one hand, carefully remove the parchment paper underneath in sections and carefully trim off the excess chocolate.
Decorate the chocolate heart cookies
- Use a pattern press tool to mark the dots on the cookies. You can also mark the dots without the tool, by hand.
- To make the fondant hearts, start by pinching tiny pieces of red fondant.
- Shape the fondant pieces into smooth balls and then roll the balls into tiny sausages.
- Using a toothpick, gently press the center of the sausages to form a dent. In forming the dent, make sure you do not press it too hard that it becomes flat in the center. Suffice if you make a tiny dent.
- Fold the fondant sausage such that both ends of the sausage meet and stick together.
- Gently pinch the pointed end to make it nice and pointy and adjust the round tops of the heart until you achieve a cute puffed heart.
- Attach the fondant hearts to the cookies (on the markings made to the cookie earlier) with tiny dots of melted chocolate.
Make the fondant bow
- Roll some red fondant and cut out a few thin strips in the same width. Place one strip on the cookie is a slanting position. And then trim off the excess at the sides. If the chocolate on the cookie has totally set, lightly brush some melted chocolate at the back of the fondant strip before attaching it to the cookie.
- Next, cut out 2 equal sized strips of fondant for the bow loops. Loop them and cut off excess fondant. Use fondant glue to hold the loops in place.
- Next, cut out 2 more strips. Place one halfway on the other strip and wrap it around the earlier made loops.
- Turn the bow over and use the fondant tool to smooth and adjust the bow.
Attach the fondant bow to the cookies
- Before adding the bow onto the cookies, cut out 2 more strips of fondant. For each strip, cut out a tiny triangle piece at the end and attach them to the fondant strip on the cookie. To hold them in place, use fondant glue.
- And then attach the loops (also with the help of some fondant glue) and adjust the bow so that it is in the correct position on the cookie.
- And finally, add a puffed fondant heart on the top left corner of the cookie. Form the heart by hand without any tools or cutters just like the miniature red hearts in the first design above and attach it to the cookie with some melted chocolate.
Notes
- Chilling the dough for too long will make it difficult to roll. If that happens, leave the dough at room temperature for a few minutes until it softens before rolling again.
- Place dowel rods on either side of the dough and roll the dough with the rolling pin resting on the rods on either side of the rolling pin. Also make sure you roll the dough on a flat surface. That way, the thickness of the rolled cookies will be uniform all over and so would your cookies, after cutting them out.
- Another option for covering the cookies with chocolate is to arrange them on a wire rack and pour the melted chocolate over the top of the cookies. With this option, only the top and sides of the cookies will be coated with chocolate. The bottom will remain uncoated.
- This recipe makes crumbly cookies. If you wish to make chewy cookies, reduce the baking time by at least 2 to 3 minutes. If you wish to make larger or smaller cookies, adjust the baking time accordingly.
- Since this cookie set comes in 2 different designs, it is easier to complete the first design and then move on to the second design.


Leave a Reply