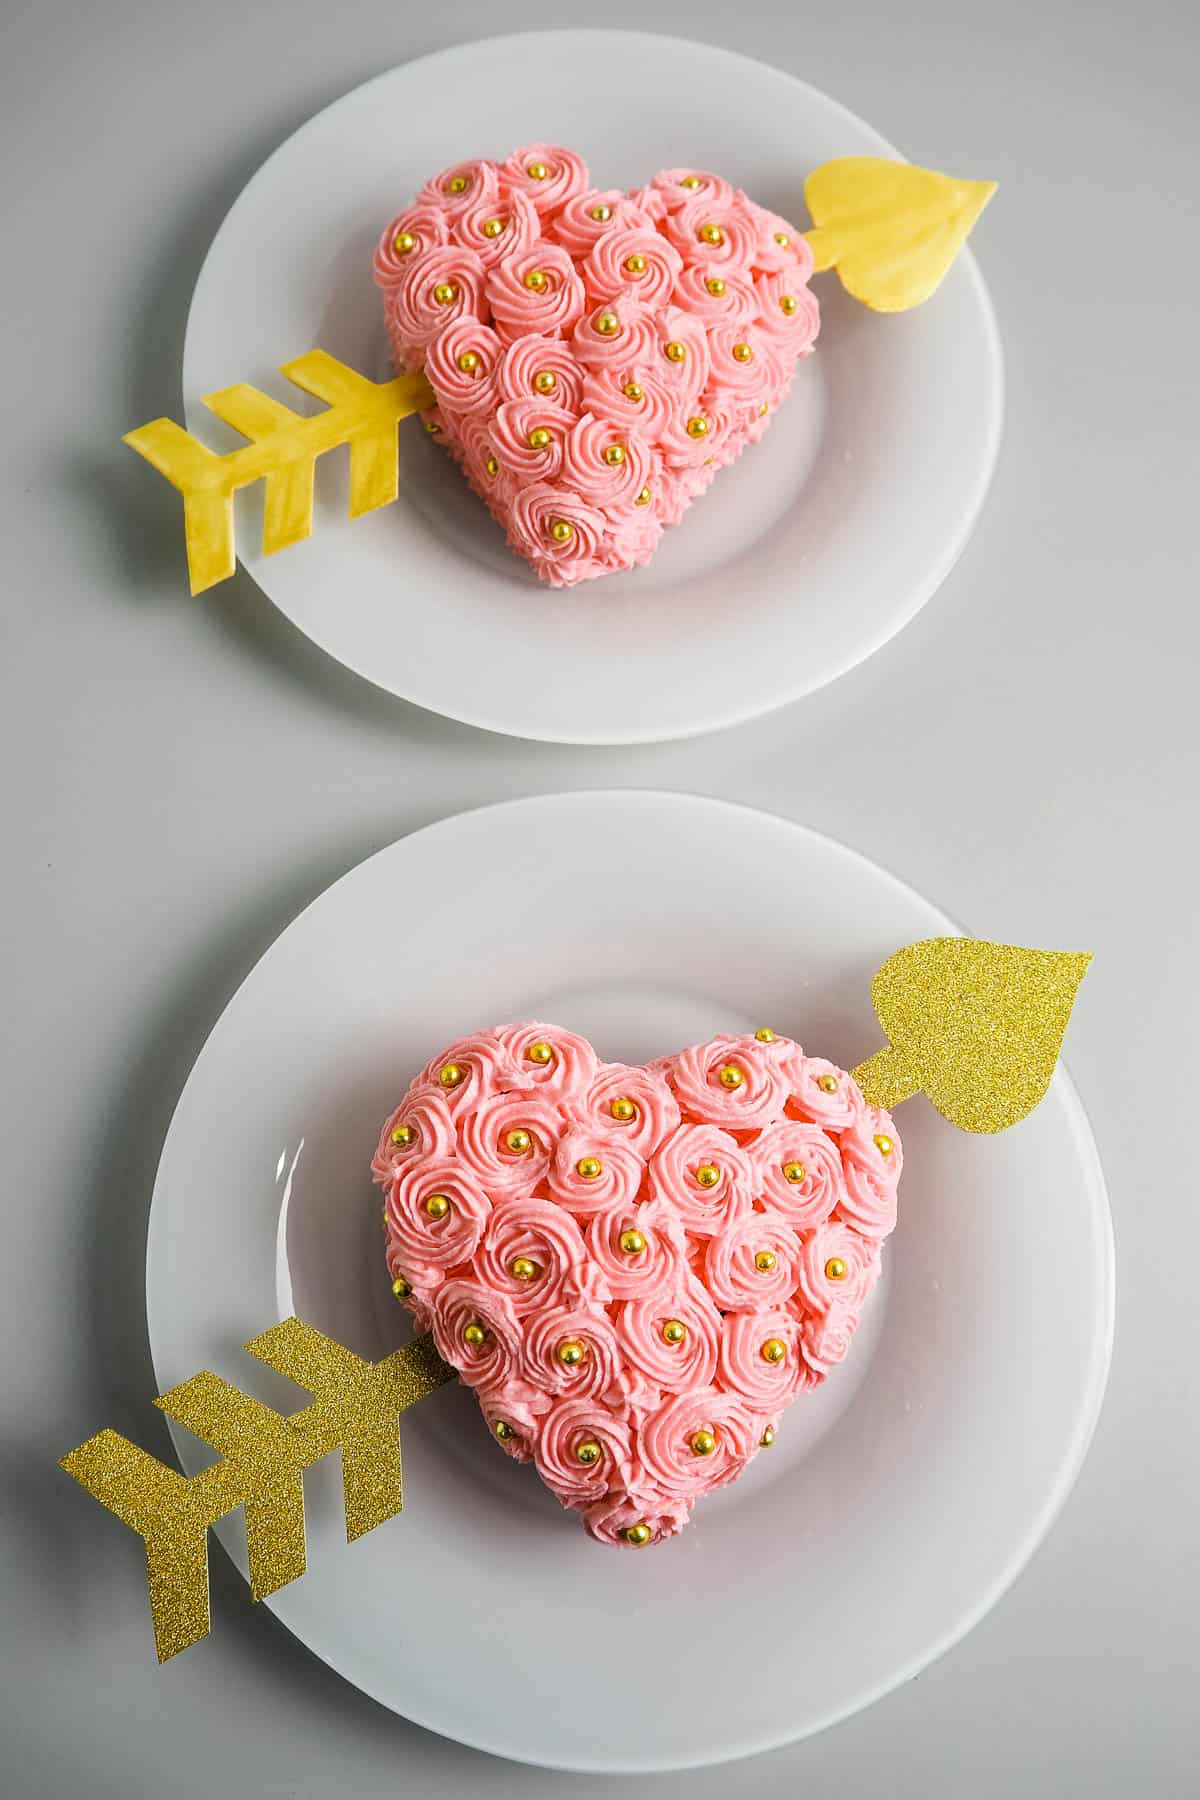
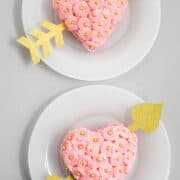
This mini heart shaped cakes tutorial makes two charming mini cakes decorated with simple and delicate pink buttercream rosettes, gold sprinkles and cute 3D cupid arrows. They are easy to make (you can make them without a heart-shaped cake pan) and are perfect for Valentine's Day, anniversaries and other special occasions.
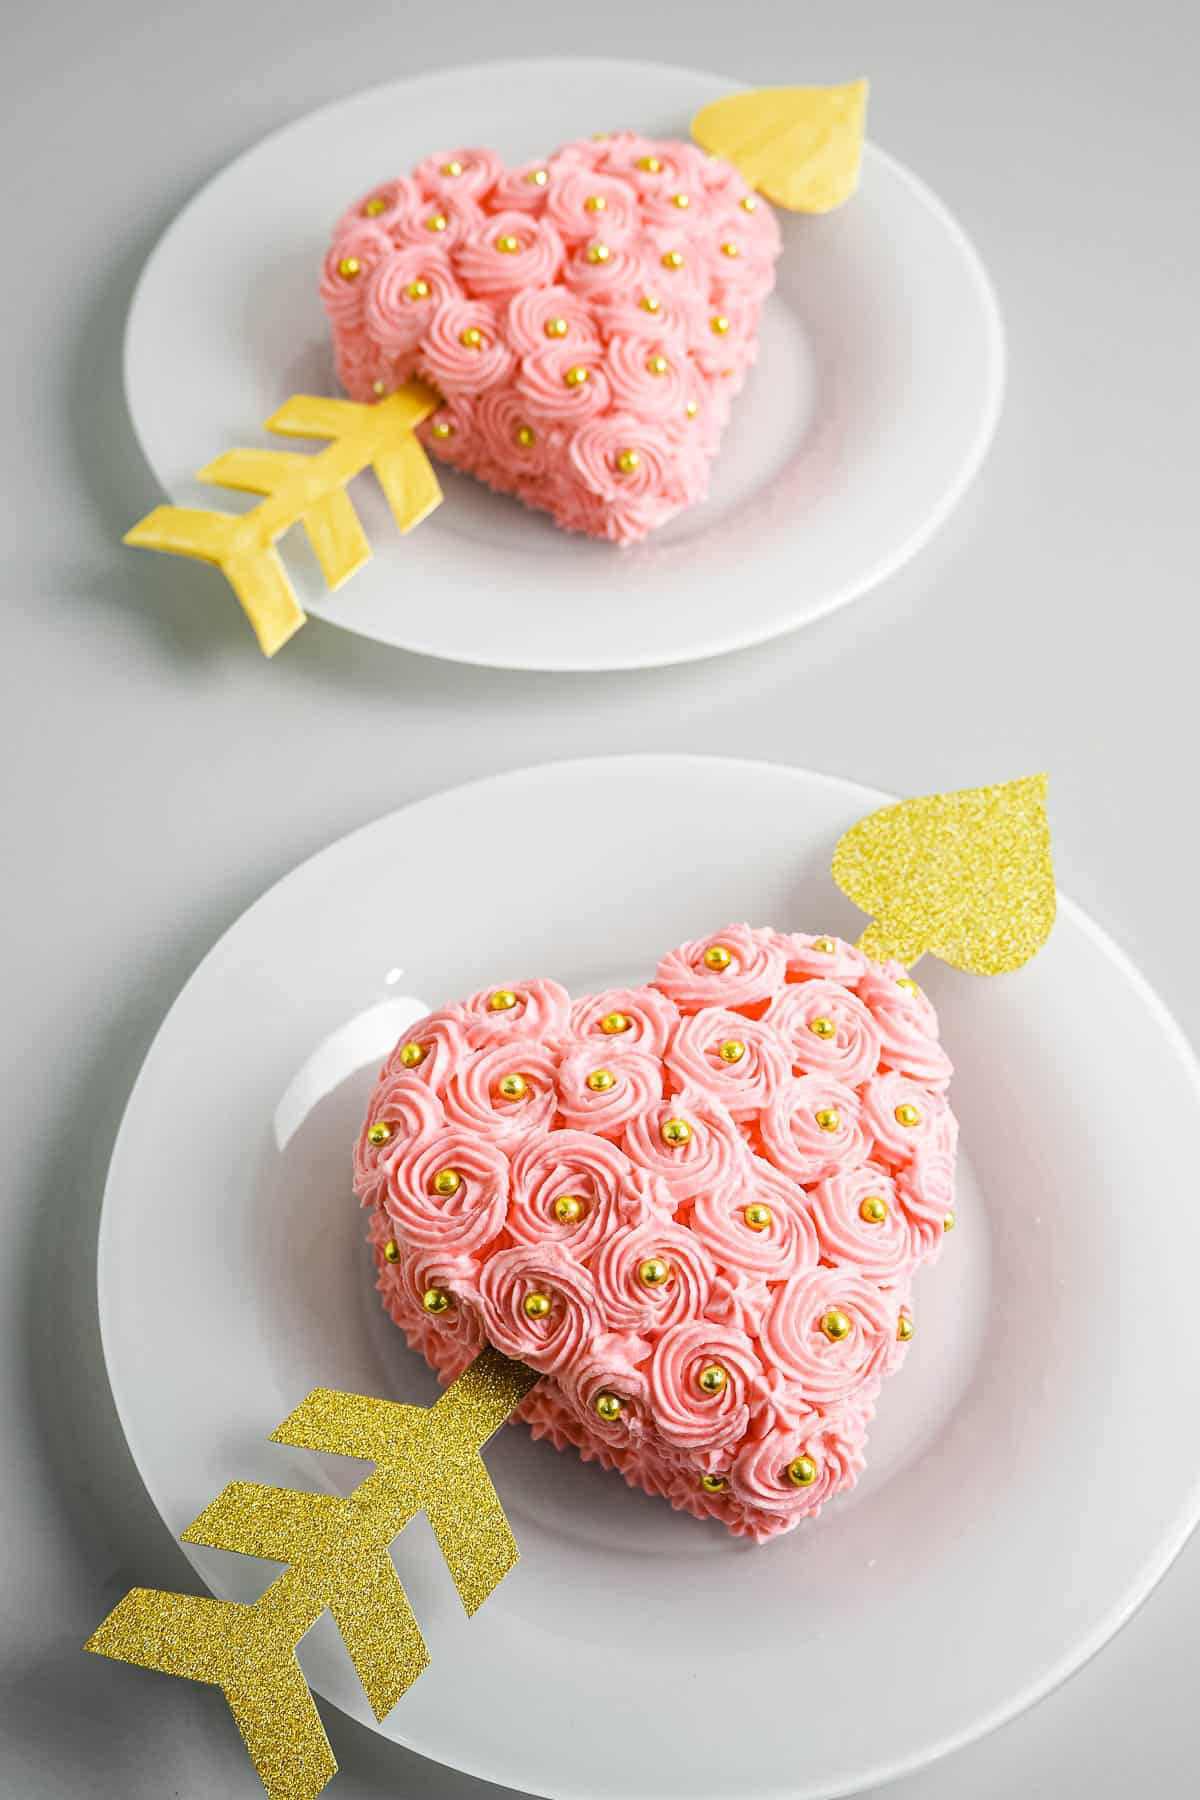
This recipe makes 2 mini heart cakes. Each of the cakes measure 4 inches wide and 3.5 inches long. They are carved out of a single layer 6 inch cake (baked in a square pan) with a height of approximately 1.5inches.
The tutorial also provides steps for making the 3D arrows in both gum paste and craft paper. You can choose one based on your preference.
The cake recipe is adapted from my pound cake recipe and covered in vanilla buttercream. You can use any other cake recipes you like. Some good options include chocolate cake, marble pound cake, coffee flavored pound cake and orange cake. These recipes come with guides for various tin sizes so you can even use the decorating techniques here to decorate a large cake. As for the frosting, you can use cream cheese frosting or chocolate ganache.
Jump to:
❤️Why You Will Love This Tutorial
- These are mini sized and perfect for small servings. Each cake measures 4.5 inches in width, 4 inches in length and 2 inches in height (with frosting).
- The cakes are soft and fluffy and have a lovely moist texture.
- You do not need a heart shaped cake pan to make these cakes. A single layer of 6 inch cake (square) is sufficient to make 2 cute mini heart cakes.
- The cakes easy to decorate. No special cake decorating skills required other than very basic piping skills.
- They make perfect romantic treat and perfect gift for Valentine's day.
If you like these heart shaped cakes, do check out my other heart shaped treats like these chocolate heart cookies and heart sugar cookies. They are both great for Valentine's day too. And for more rosette designs, check out this equally easy buttercream rosette cake.
📋Supplies Required
- Butter pound cake - 1 layer of 6 inches square cake (Refer the recipe card below for list of ingredients and exact measurements).
- Buttercream - I used buttercream for the pink rosettes (Refer to the recipe card at the bottom of the page for the list of ingredients and exact measurements)
- Gold dragees (gold sprinkles)
- Pink food coloring - to tint the buttercream. Both gel based or liquid food coloring will work.
- Disposable piping bags & Wilton star tip 18 - to pipe the buttercream rosettes.
- Heart and arrow templates - you can draw these free hand or print them off the internet. Make sure to resize the templates so that the hearts fit a 6 inches square cake. Alternatively, for the hearts, you can also use a large heart shaped cookie cutter.
- Lollipop sticks - these are to make the 3D arrows. You need them for both the gum paste version as well as the craft paper version.
- Gum paste, fondant glue, edible gold dust + lemon extract, cake decorating brush - these are required to make the 3D arrow in gum paste. If you prefer to make the arrow with craft paper, these are not required. Refer to the next list instead.
- Gold glitter craft paper + cellophane tape + scissors - these are required for making the 3D arrow in craft paper. Refer to the list above if making the arrow with gum paste.
- Scissors - to cut the craft paper.
- Rolling pin & sugar craft knife - to roll and cut the gum paste.
👩🍳How to Make
Step 1a: Make the 3D Gum Paste Arrows (skip to Step 1b if you prefer to make craft paper arrows instead)
Prepare the arrow template and cut it out following its outline.
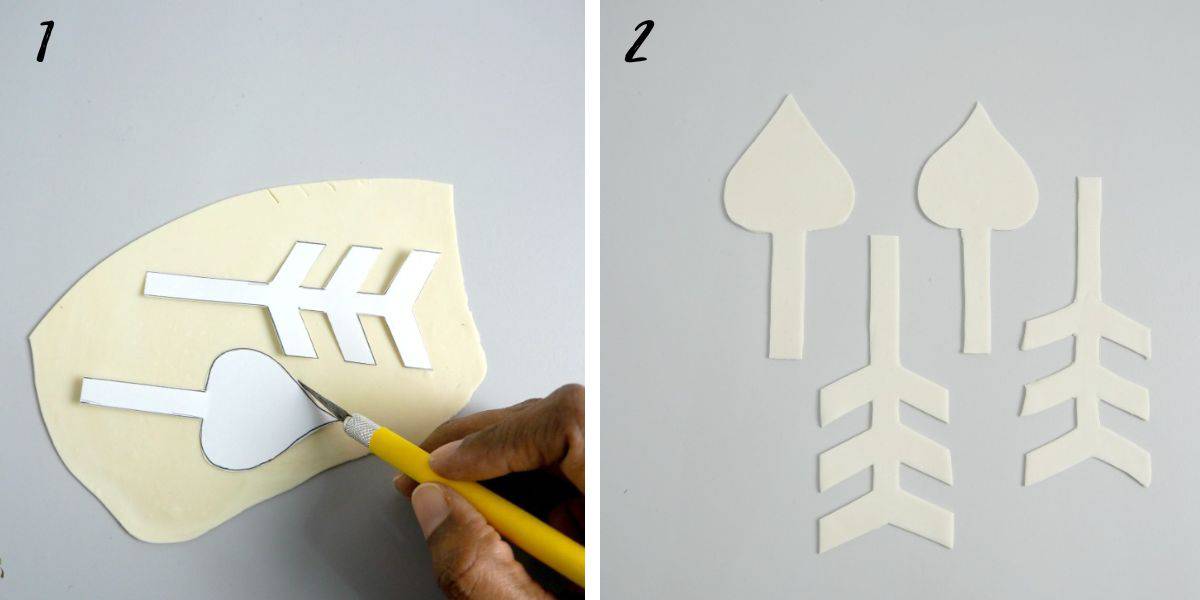
Roll gum paste into a thin sheet. And then place the arrow template on the gum paste and cut it out (image 1).
For each arrow, cut out two pieces of arrow head and 2 pieces of the tail (image 2). To make 2 arrows for the 2 cakes, you will need 4 pieces of gum paste arrow heads and 4 pieces of the tail.
Note: You may want to make an extra arrow for contingency.
Let one set sit in open air (for about 10 minutes) so that it would dry up a little quicker while the other set, keep it covered as we do not that one to dry out.
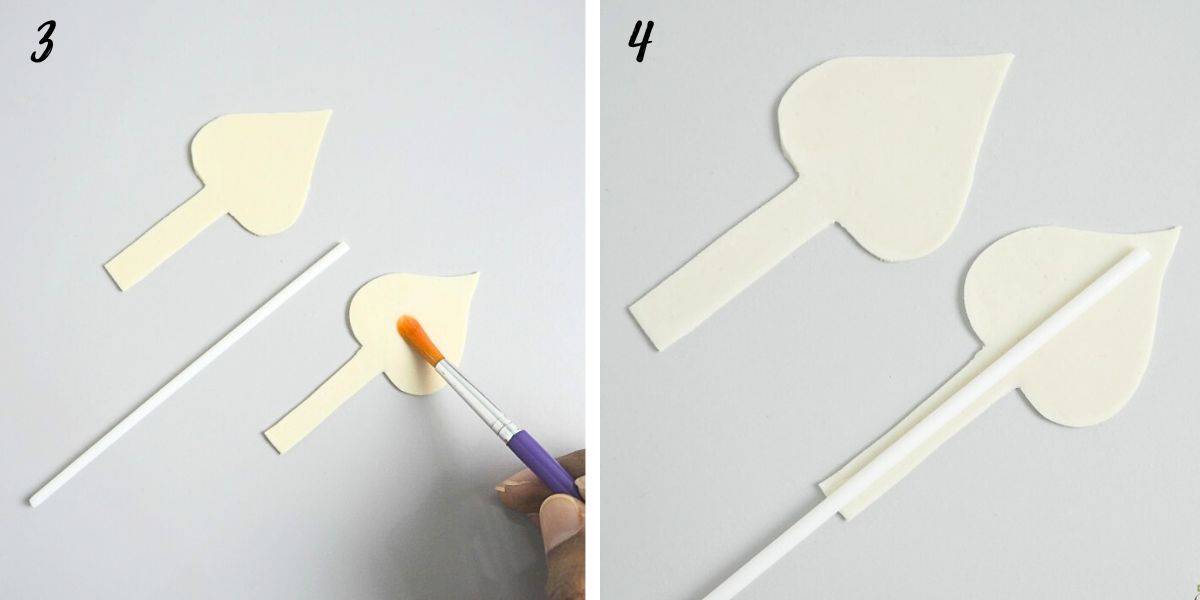
To assemble, apply fondant glue all over the piece of gum paste that you kept covered and attached a lollipop stick to it (image 3 & 4).
Note: While it is important to apply glue all over the gum paste cut out, you need not use too much. Suffice to hold the lollipop stick in place. Also, make sure you place it starting as close as practical from the tip of the arrow.
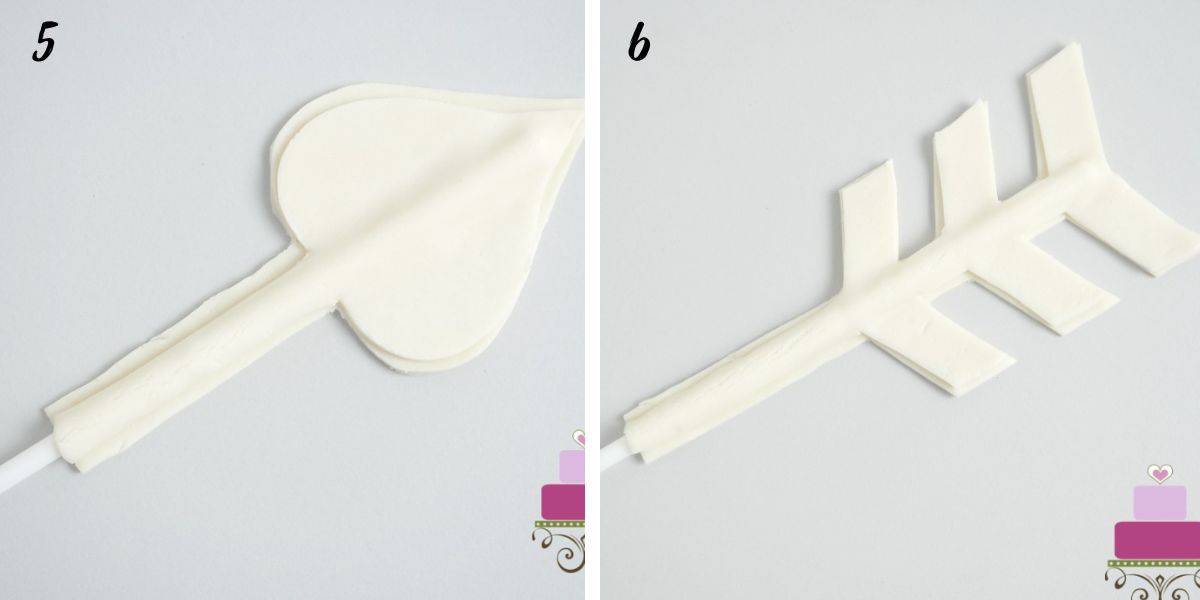
And then lift the lollipop stick (with the arrow head attached to it) and place it on the other arrow head cut out, with the lollipop stick positioned in between the 2 cut outs. Stick both pieces together, making sure the bottom piece is flat and the top piece closely adjusted to the shape of the lollipop stick. Doing this will automatically result in the top gum paste piece to be smaller in size compared to the bottom piece (image 5).
Note: This is intentional as the top piece is meant to become the bottom surface of the arrow in the end. It being slightly smaller makes sure there are no extras on the side that would later show from the bottom surface of the arrow.
Repeat the process for the rear end of the gum paste arrow (image 6).
Once the gluing is complete, leave the arrow aside to firm up. Place the top surface of the arrow facing down. This is to ensure the surface remains flat while drying. By doing this, you get a smooth flat surface for the arrow.
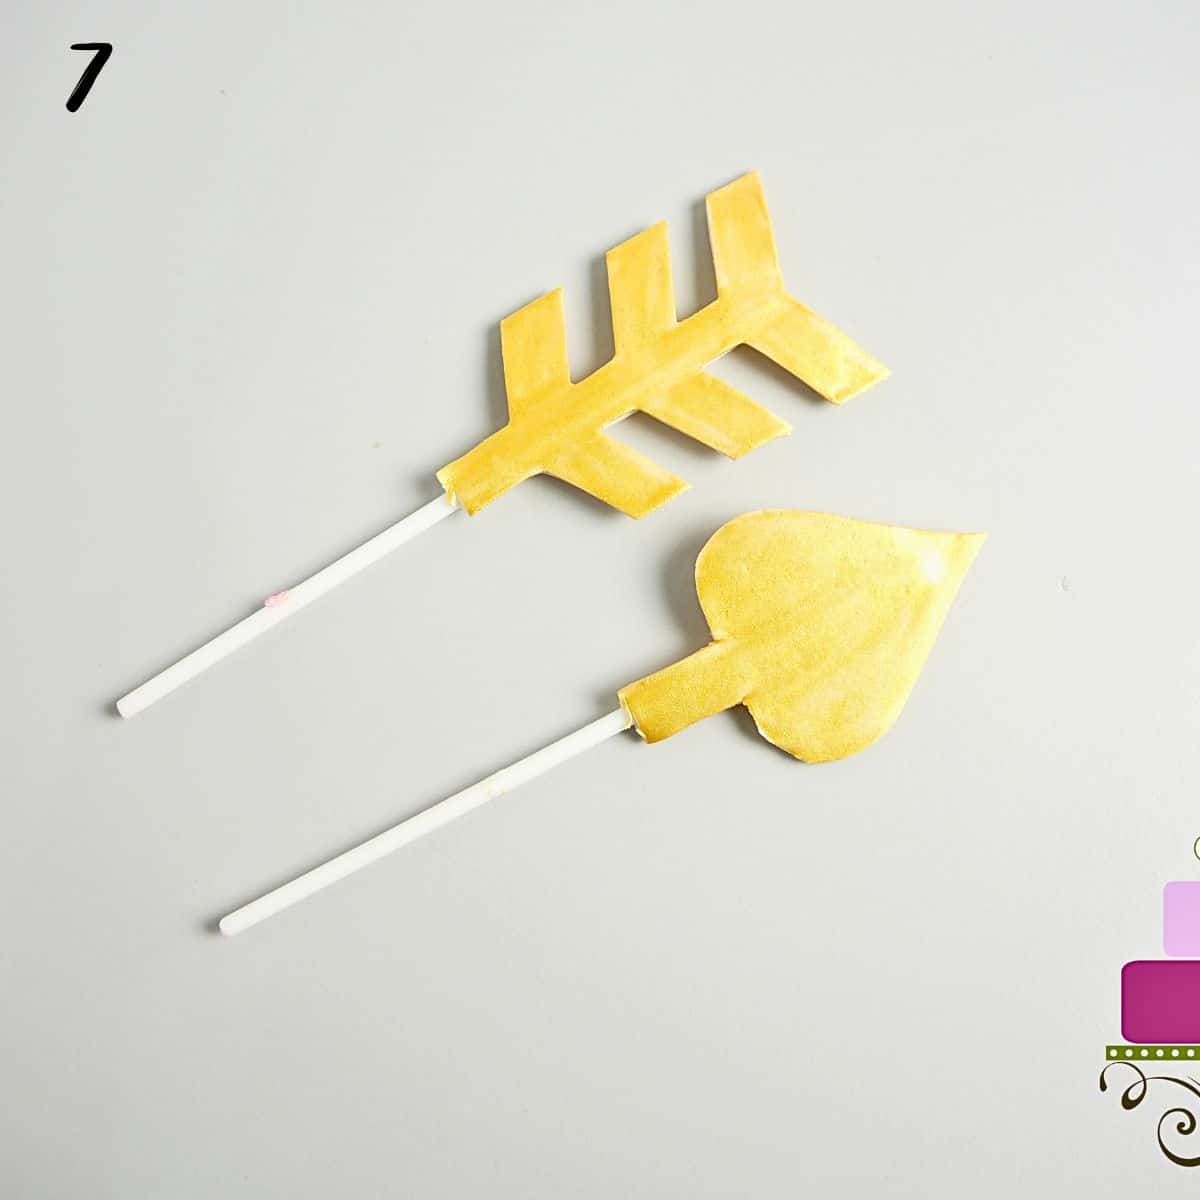
Next, mix some gold dust with lemon extract to form thick gold paint. Paint it on the arrow and let the paint dry completely before putting it on the cake (image 7).
Note: In mixing the paint, suffice if you add a few drops of the lemon extract into about ⅛ teaspoon of gold dust until it forms a thick paste. Mix it in a small container so that you can keep the balance for other decorating projects.
Step 2b: Make the 3D Craft Paper Arrows (refer above to step 2a if you prefer to make gum paste arrows instead)
Prepare the arrow template and cut it out following its outline.
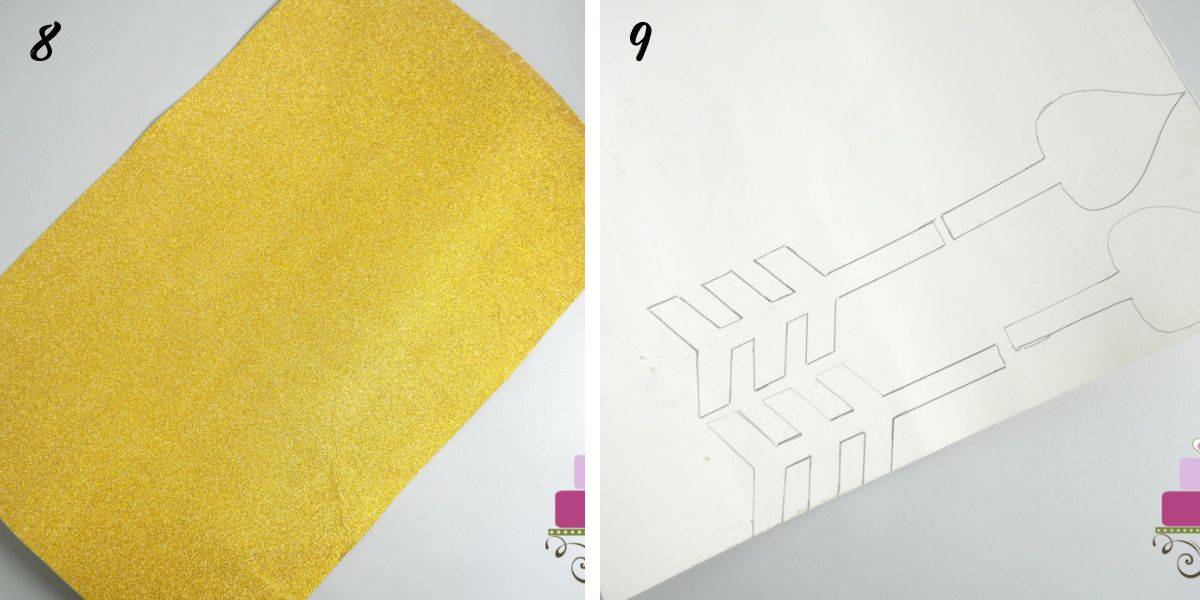
Use the paper cutouts as a guide to trace the arrow pattern on your craft paper. In my case, I used a gold craft paper (image 8).
Turn your craft paper over, and trace the outlines of the arrow (image 9).
Note: You may wish to make an extra arrow for contingency.
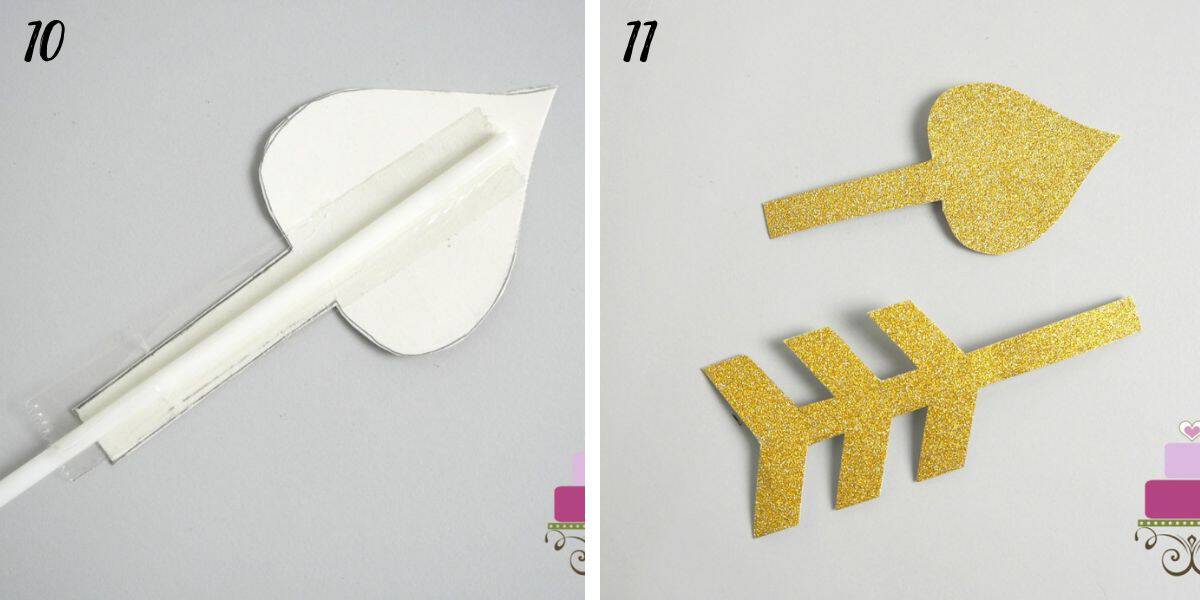
Attach one lollipop stick onto the back of each cutout. Place a lollipop stick on the cut out and secure it in place with cellophane tape (image 10). Cut off excess tape on the sides with a pen knife or scissors.
Repeat the process for the other end of the arrow. Turn the arrow parts over and they were ready for use (image 11).
Step 2: Bake the Cake and Make the Frosting
Grease and flour a 6 inches square cake pan or line it with parchment paper. Mix the cake batter (see the details in the recipe below) and bake it in a preheated oven (at 170 degrees Celsius).
Remove the cake from oven and let it rest in the cake tin for a few minutes before inverting onto a cooling rack (wire rack) to cool completely.
While the cake is baking, make the buttercream (see the steps in the recipe card below). Tint it pink.
Step 3: Cut (carve) the Heart Cakes
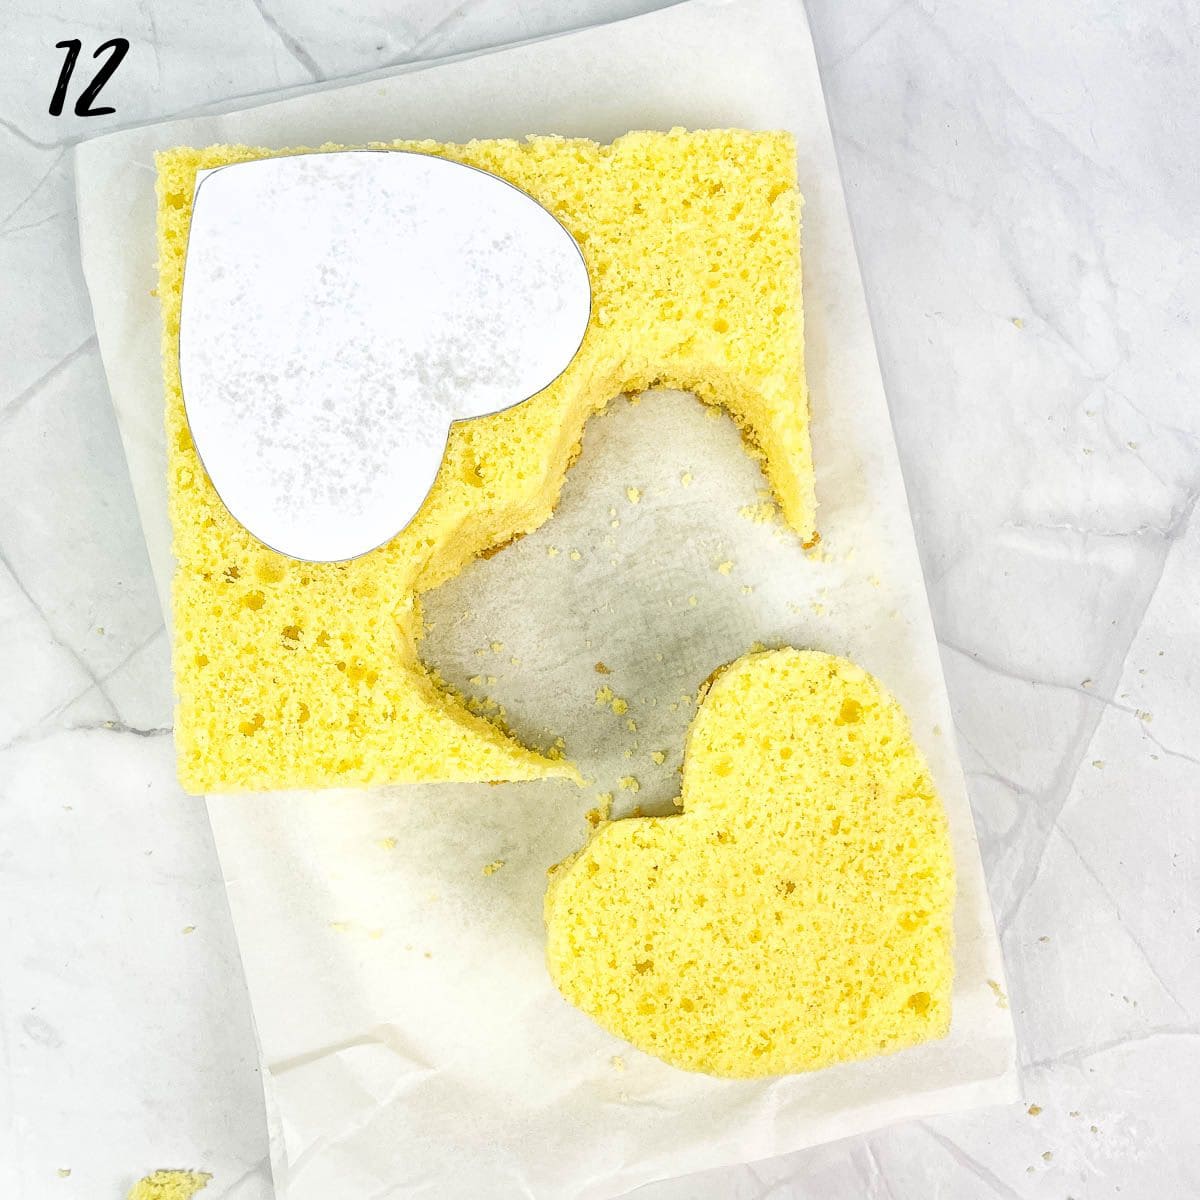
Once the cake is completely cool (to room temperature), cut out the heart template (measuring approximately 4 inches wide and 3.5 inches long). Place it on top of the cake and cut out 2 heart shapes out of the cake (see image 12).
Note: Level the cake first before carving if the cake is not level.
Step 4: Frost the Cake Layers
Place each heart shaped cake on a separate plate or cake board. Apply a thin layer of crumb coat on the top and sides of the cake. Refrigerate for 10 minutes.
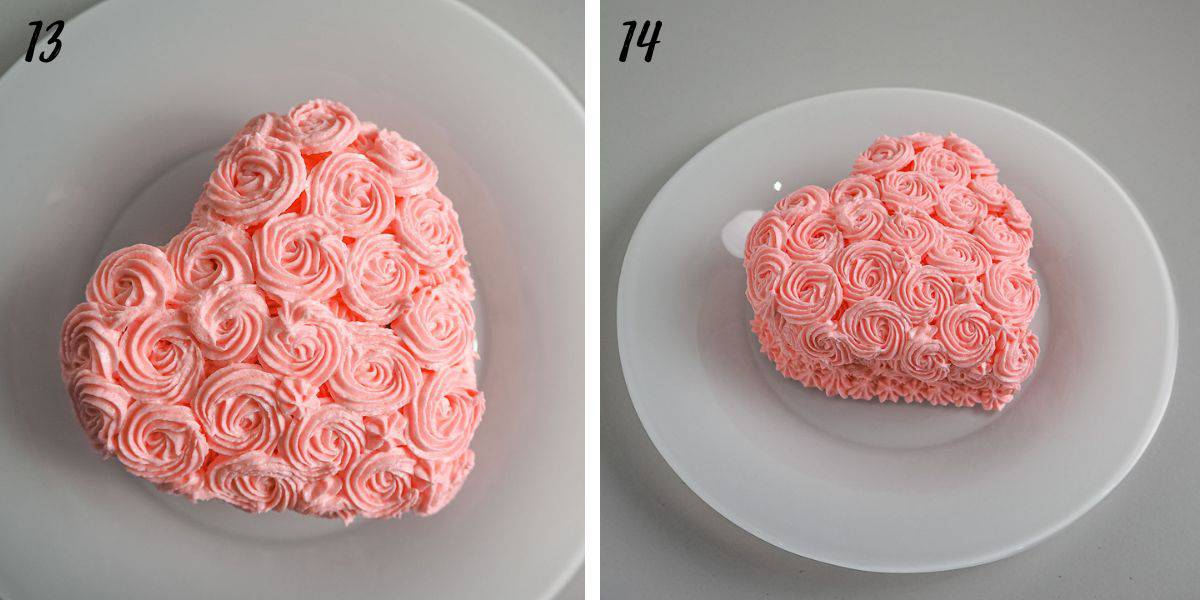
Transfer the remaining pink buttercream into a piping bag fitted with star tip #18. Pipe rosettes all over the top and sides of cake. Pipe them as close as possible, and if there are any gaps, you can pipe overlapping rosettes and stars (image 13).
Note: You can make your own custom sized cake boards for these mini cakes. See my tutorial on how to make cake boards.
For the border, pipe a row of stars using the same pink icing and star piping tip (image 14).
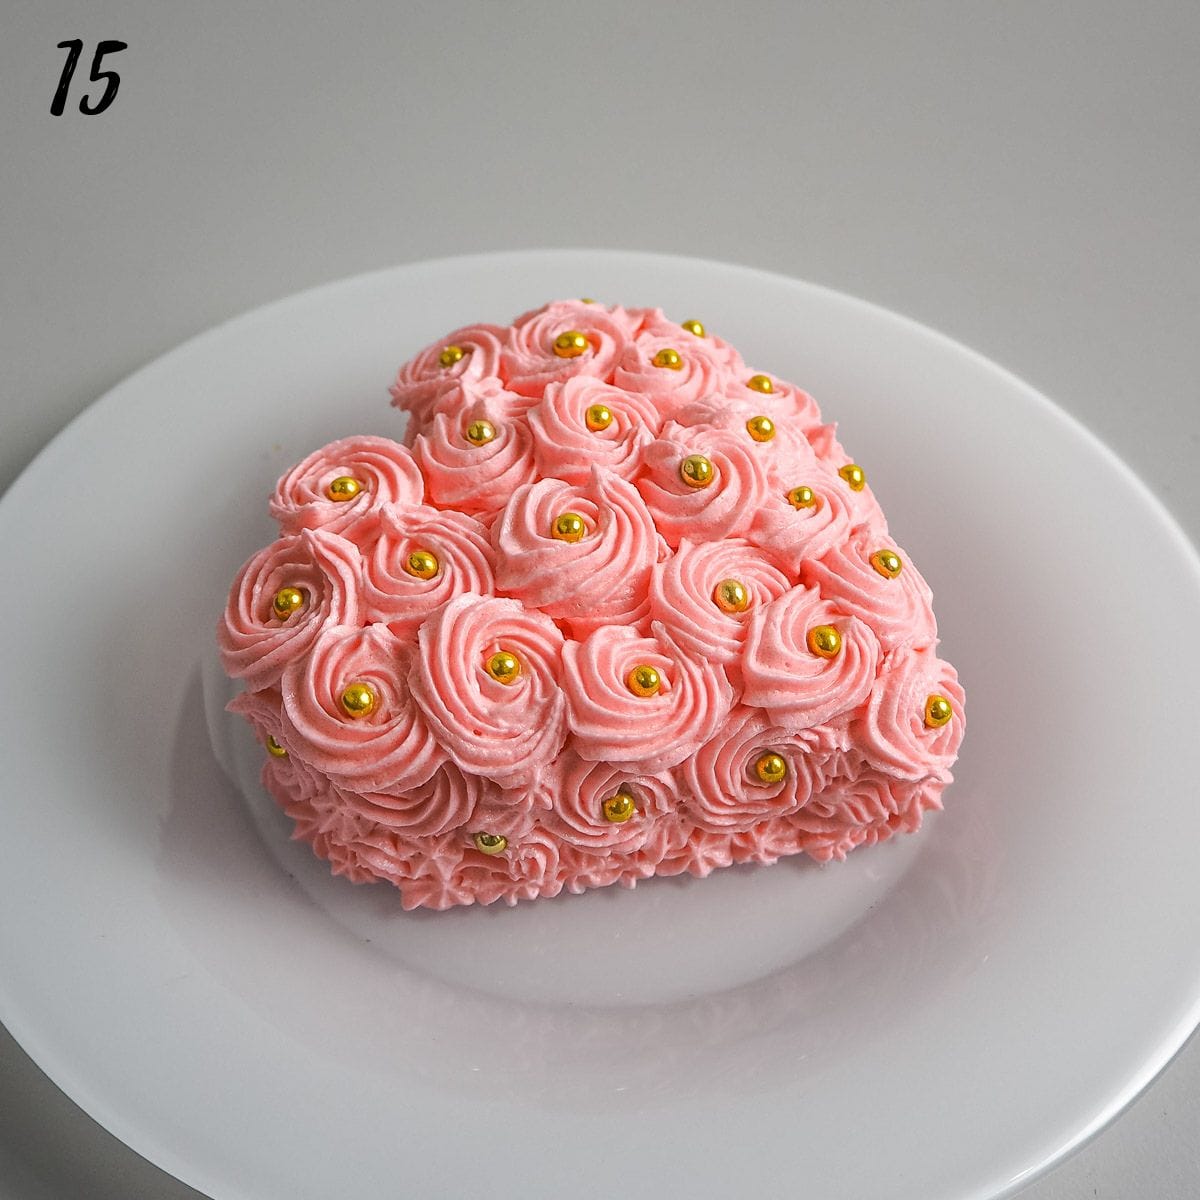
Add one gold sprinkle (dragee) in the center of each rosette on the cakes (image 15).
Step 5: Attach the Arrows to the Cakes
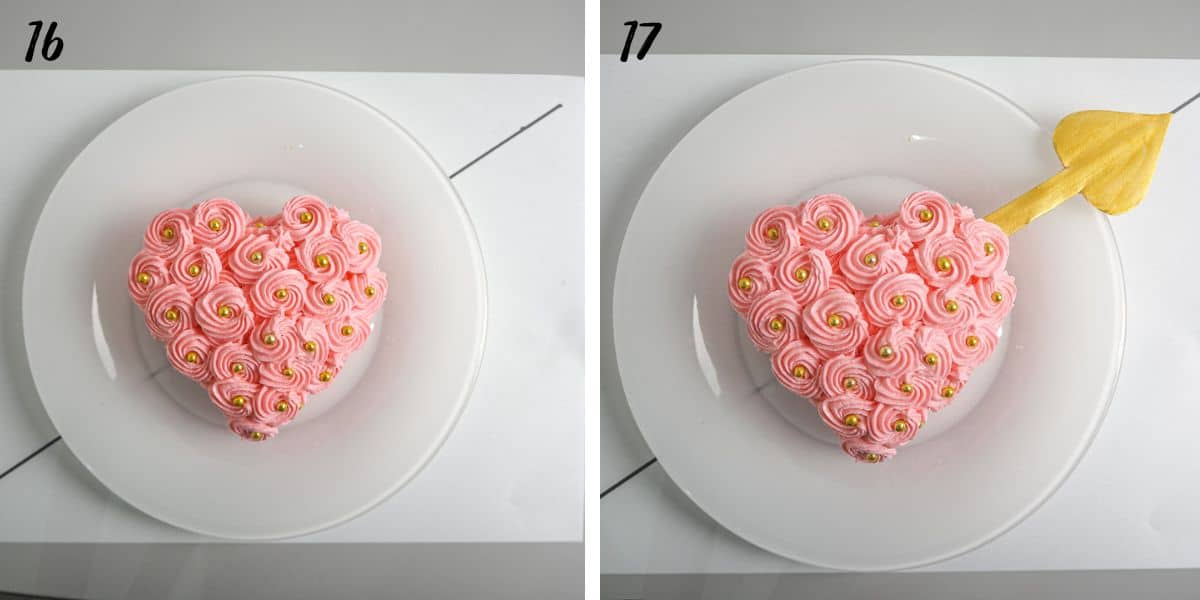
To make sure the lollipop sticks were poked into the cakes in a perfect straight line, draw a straight line on a piece of paper and use it as a guide for poking them into the cakes (image 16).
Place the cake plates on the paper (one at a time) and adjusted the position such that the line on the paper runs in a diagonal position underneath the cake plate, in the exact position you want the arrows to be positioned on the cake.
Carefully insert the front part, using the line on the paper underneath as a guide, and do the same for the rear end. Push both sticks into the cake right until the sticks are no longer visible (image 17).
Step 6: Adjust the Arrows Size
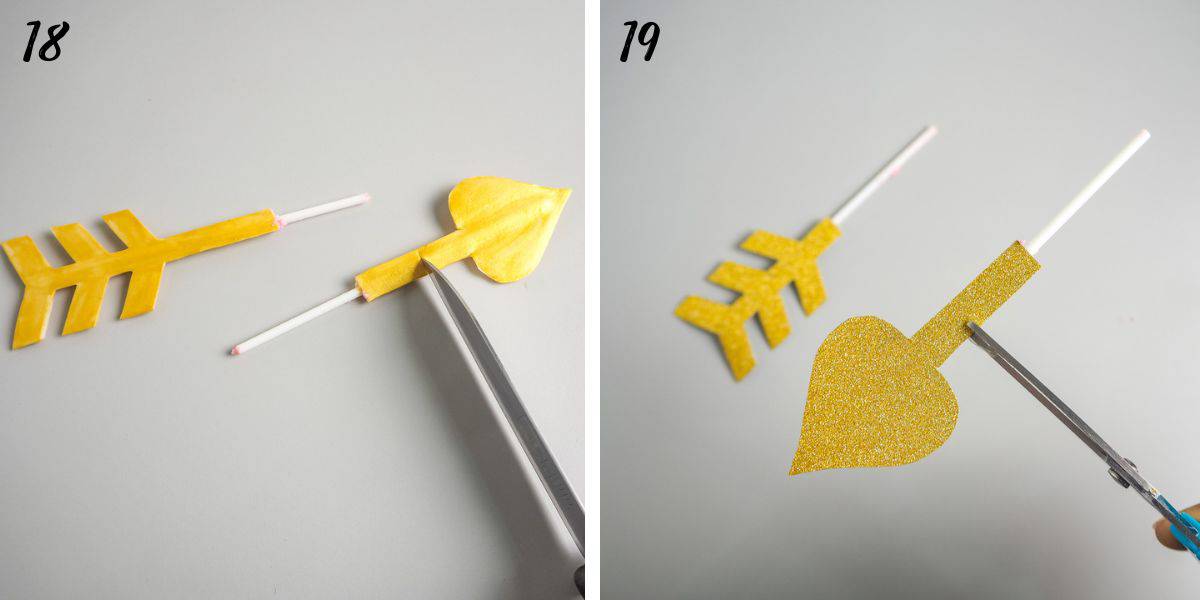
If you find the arrows too long for the cakes, you can adjust them. Remove them from the cakes and cut off a portion of the sticks, both the craft paper and the gum paste (image 18 &19).
Reattach them to the mini heart shaped cakes to complete the cakes.
💡Expert Tips
- You can make the arrows in advance so that it is easier to assemble when the cake is ready.
- The cake and buttercream can also be prepared at least one day in advance.
- To keep the cake moist, keep it covered with a kitchen towel as it cools down. And as soon as it turns warm, wrap with a plastic wrap and keep it refrigerated until it cools down completely. You can leave the cake in the fridge until it is ready for carving.
- It is easier to carve the cake when it is straight out of the fridge as it will be firmer and these will be less crumbs.
❤️More Tutorials & Recipes You Will Love
📖Recipe
Mini Heart Shaped Cakes
Equipment
- Wilton star tip 18
- Disposable piping bags
- Lollipop sticks
- Edible gold dust & lemon extract
- Gold glitter craft paper
- Cellophane tape
- Scissors
- Rolling Pin
- Cake decorating brush
- Sugar craft knife
- Arrow template
- Heart template
For best results, use the metrics measurements. US customary measurements have not been tested and are only meant for guide.
Ingredients
Cake
- 120 g self raising flour
- 120 g granulated sugar
- 120 g butter
- 2 eggs
- 30 ml milk
- ¼ teaspoon baking powder
- ½ teaspoon vanilla extract
- A pinch salt
Buttercream
- 500 g powdered sugar
- 250 g butter (salted)
- 1 teaspoon vanilla extract
- 1 tablespoon milk
- Pink food coloring
Decoration
- Gum paste
- Gold sprinkles (dragees)
Instructions
Make the 3D gum paste arrows (skip to section section for craft paper arrows)
- Prepare the arrow template and cut it out following the outline.
- Roll the gum paste into a thin sheet. Place the arrow template on the gum paste and cut it out following the outlines. Make 4 sets of cut outs - 4 pieces of each of the front and rear sections of the arrows (see Note 1).
- Leave 2 sets in open air (for about 10 minutes) so that they dry up and set a little quicker. Keep the other 2 sets covered as these should be soft.
- To assemble, start with the arrow heads. Apply fondant glue all over the pieces of arrows that were kept covered. Attach a lollipop sticks to them (see Note 2).
- Once the sticks are firm in place, lift them ( along with the gum paste pieces attached to it), turn over and place each one on the other arrow heads that were left to dry earlier. The lollipop stick should be positioned in between the 2 cut outs. Stick both pieces together. Make sure the bottom piece is flat and the top piece closely adjusted to the shape of the lollipop stick. Doing this will automatically result in the top gum paste piece to be smaller in size compared to the bottom piece (see Note 3).
- Set the arrows aside to firm up. Place the top surface of the arrows facing down. This is to ensure the surface remains flat while drying. By doing this, you get a smooth flat surface for the arrow.
- Mix gold dust with lemon extract to form thick gold paint (see Note 4). Paint it on the arrow and let it dry completely.
Make the 3D craft paper arrows (refer to section above for gum paste arrows)
- Prepare the arrow template and cut it out following its outline.
- Turn your craft paper over, and trace the outlines of the arrow using the template as a guide (see Note 5). You will need 2 sets of heads and 2 sets of tails.
- Attach one lollipop stick onto the back of each cutout. Start with the arrow heads. Secure the stick it in place with cellophane tape and cut off any excess on the sides.
- Repeat the process for the other end of the arrow. Turn the arrow parts over and they were ready for use.
Bake the cakes
- Preheat oven to 170 °Celsius.
- Grease and flour a 6 inches square cake tin or line it with parchment paper.
- In a clean bowl, cream butter and sugar till light and fluffy. Add eggs, one at a time, beating well after each addition.
- Sift the flour and fold it into the creamed mixture alternately with milk, starting and ending with flour.
- Finally add in the vanilla extract and combine well. Pour batter into the prepared cake pan and bake until a skewer inserted in the center of the cake come without any wet batter. Do not over bake the cake.
- Remove the cake from oven and let it rest in the cake tin for a few minutes before inverting onto a cooling rack to cool completely.
Make the buttercream
- Measure butter into a large bowl. Beat on medium speed until it turns creamy. Sift in the powdered sugar.
- Mix into the butter with a spoon (see Note 6).
- Once the sugar is fairly incorporated into the butter, cream it on medium high speed until the mixture turns light and fluffy.
- Add the vanilla extract. Continue beating until the extract is well combined.
- If the buttercream appears too stiff, add some milk of cream. Start with one teaspoon and increase in very small quantities until your buttercream is of a pipeable consistency.
Cut (Carve) the heart cakes
- Once the cakes are completely cool, cut out the heart template (measuring approximately 4 inches wide and 3.5 inches long).
- Place it on the cake and cut out 2 heart shapes out of the cake (see Note 7).
Frost the cakes
- Place each heart shaped cake on a separate plate or cake board (see Note 8). Apply a thin crumb coat on the sides and top of each cake. Refrigerate for 10 minutes.
- Transfer the remaining pink buttercream into a piping bag fitted with star tip #18. Pipe rosettes all over the top and sides of cake. Pipe them as close as possible, and if there are any gaps, pipe overlapping rosettes and stars.
- For the border, pipe a row of stars using the same pink icing and star piping tip.
- Add one gold sprinkle (dragee) in the center of each rosette on the cakes.
Attach the arrows
- Draw a straight line on a piece of paper (to use as a guide for poking the arrows).
- Place the cakes on the paper (one at a time) and adjust the position such that the line on the paper runs diagonally underneath the cakes.
- Carefully insert the front section of the arrow, using the line on the paper underneath as a guide, and do the same for the tail section. Push both sticks into the cake right until the sticks are no longer visible.
- If the arrows too long for the cakes, remove from the cakes and cut off a portion of arrows to make them shorter and reattach to the cakes.
Notes
- You will need 2 sets of cut outs to make one arrow (2 head sections and 2 tail sections). It is also advisable to make an extra one set (one head and one tail) for contingency.
- Do not use too much glue or it will take the arrows a long time to set and dry. Also, place them starting as close as practical from the tip of the arrow.
- This is intentional as the top piece is meant to become the bottom surface of the arrow in the end. It being slightly smaller makes sure there are no extras on the side that would later show from the top. Repeat the process for the tails of the arrows.
- In mixing the paint, suffice if you add a few drops of the lemon extract into about ⅛ teaspoon of gold dust until it forms a thick paste. Mix it in a small container so that you can keep the balance for other decorating projects.
- You may wish to make an extra arrow for contingency.
- This step will avoid the sugar from flying when you turn on your mixer.
- Level the cake first before carving if the cake is not level.
- You can make your own custom sized cake boards for these mini cakes. See my tutorial on how to make cake boards.
- To keep the cake moist, keep it covered with a kitchen towel as it cools down. As soon as it turns warm, wrap with a plastic wrap and keep it refrigerated until it cools down completely. You can leave the cake in the fridge until it is ready for carving.
- It is easier to carve the cake when it is straight out of the fridge as it will be firmer and these will be less crumbs.



Leave a Reply