

This homemade, bake-from-scratch orange cake recipe is one of my best cake recipes. It is soft, fluffy, moist and has a refreshingly rich, fresh orange flavor from fresh orange juice and grated orange zest.
A true and tried homemade recipe, I have baked this moist orange cake so many times and have perfected the recipe for various baking pan sizes. All you need to do is follow the cake tin guides in my recipe card below be on your way to baking the best orange cake everyone is going to rave about!
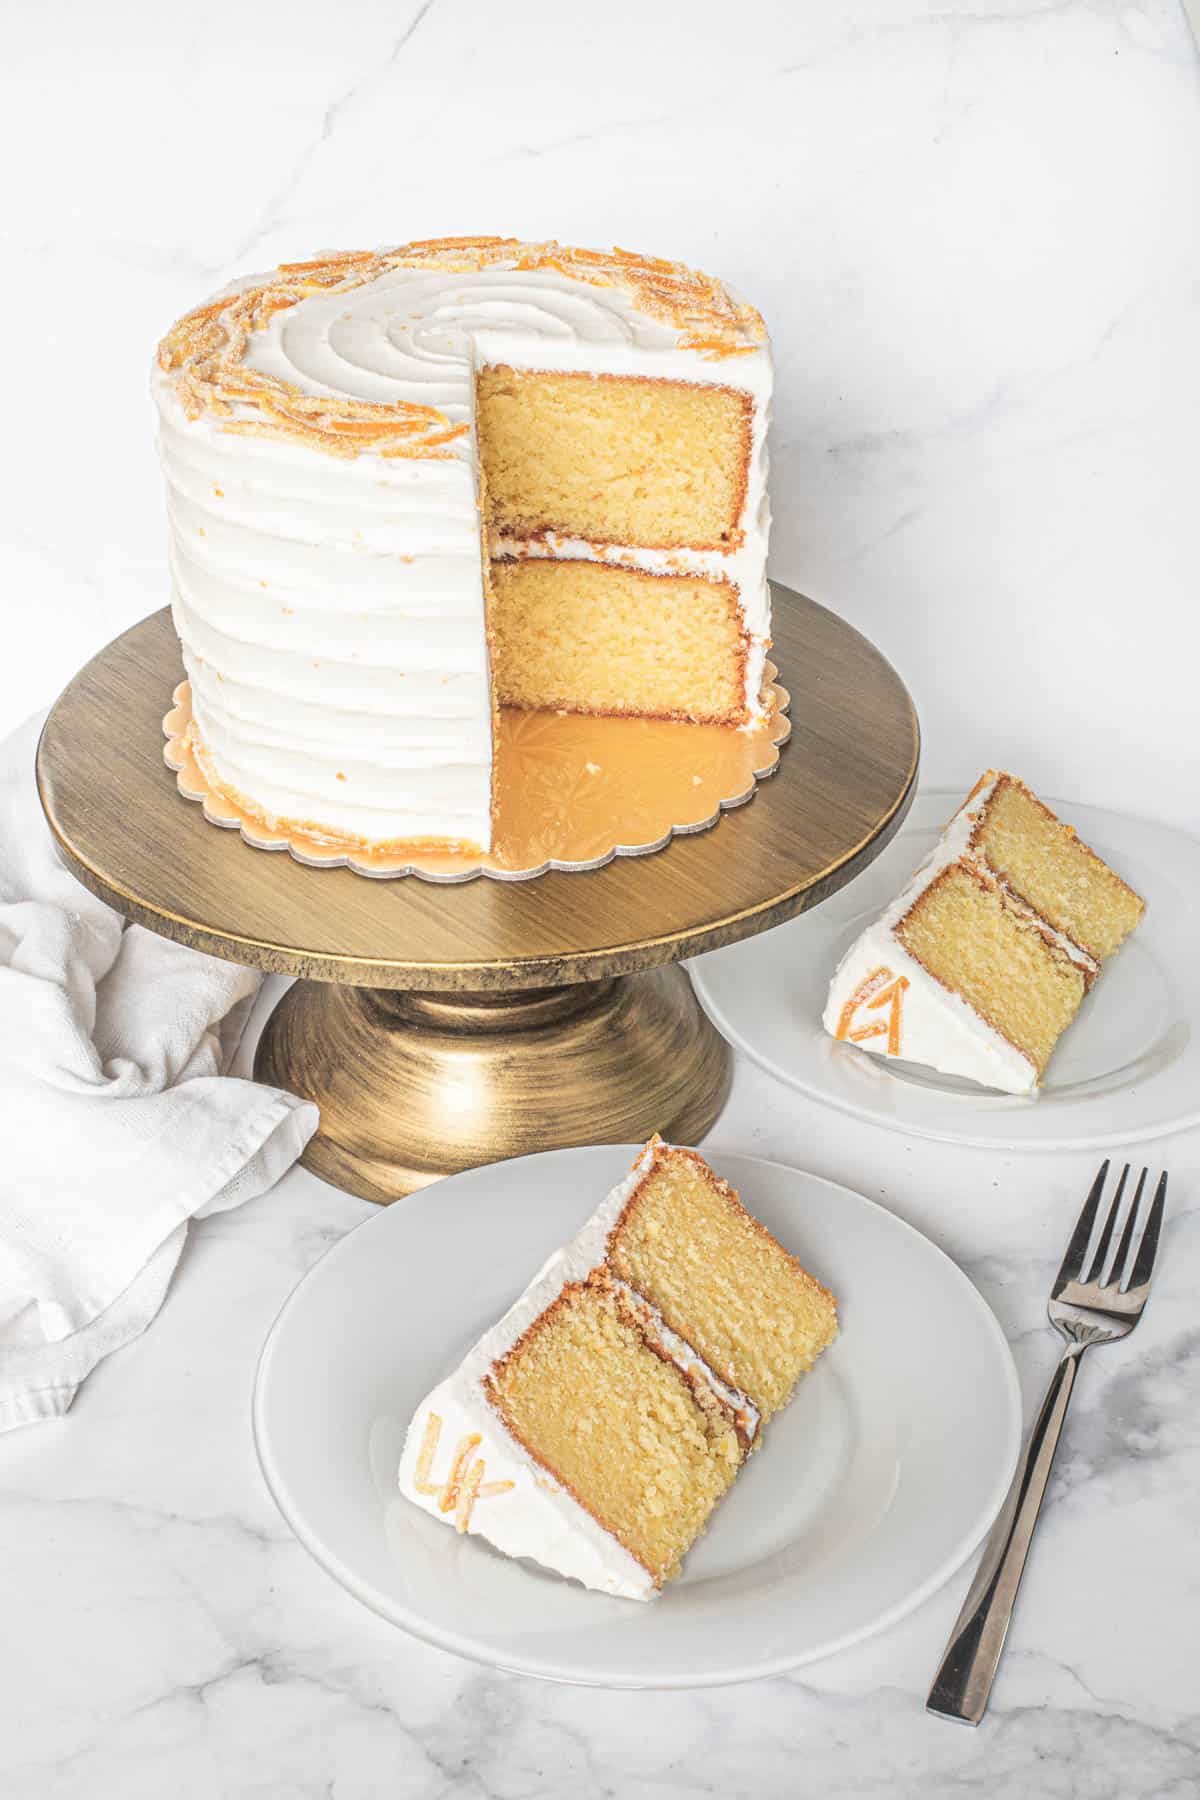
This orange cake is adapted from my butter pound cake and has a moist and firm texture, making it most suitable for stacking and even carving. It makes a perfect cake for birthdays and weddings!
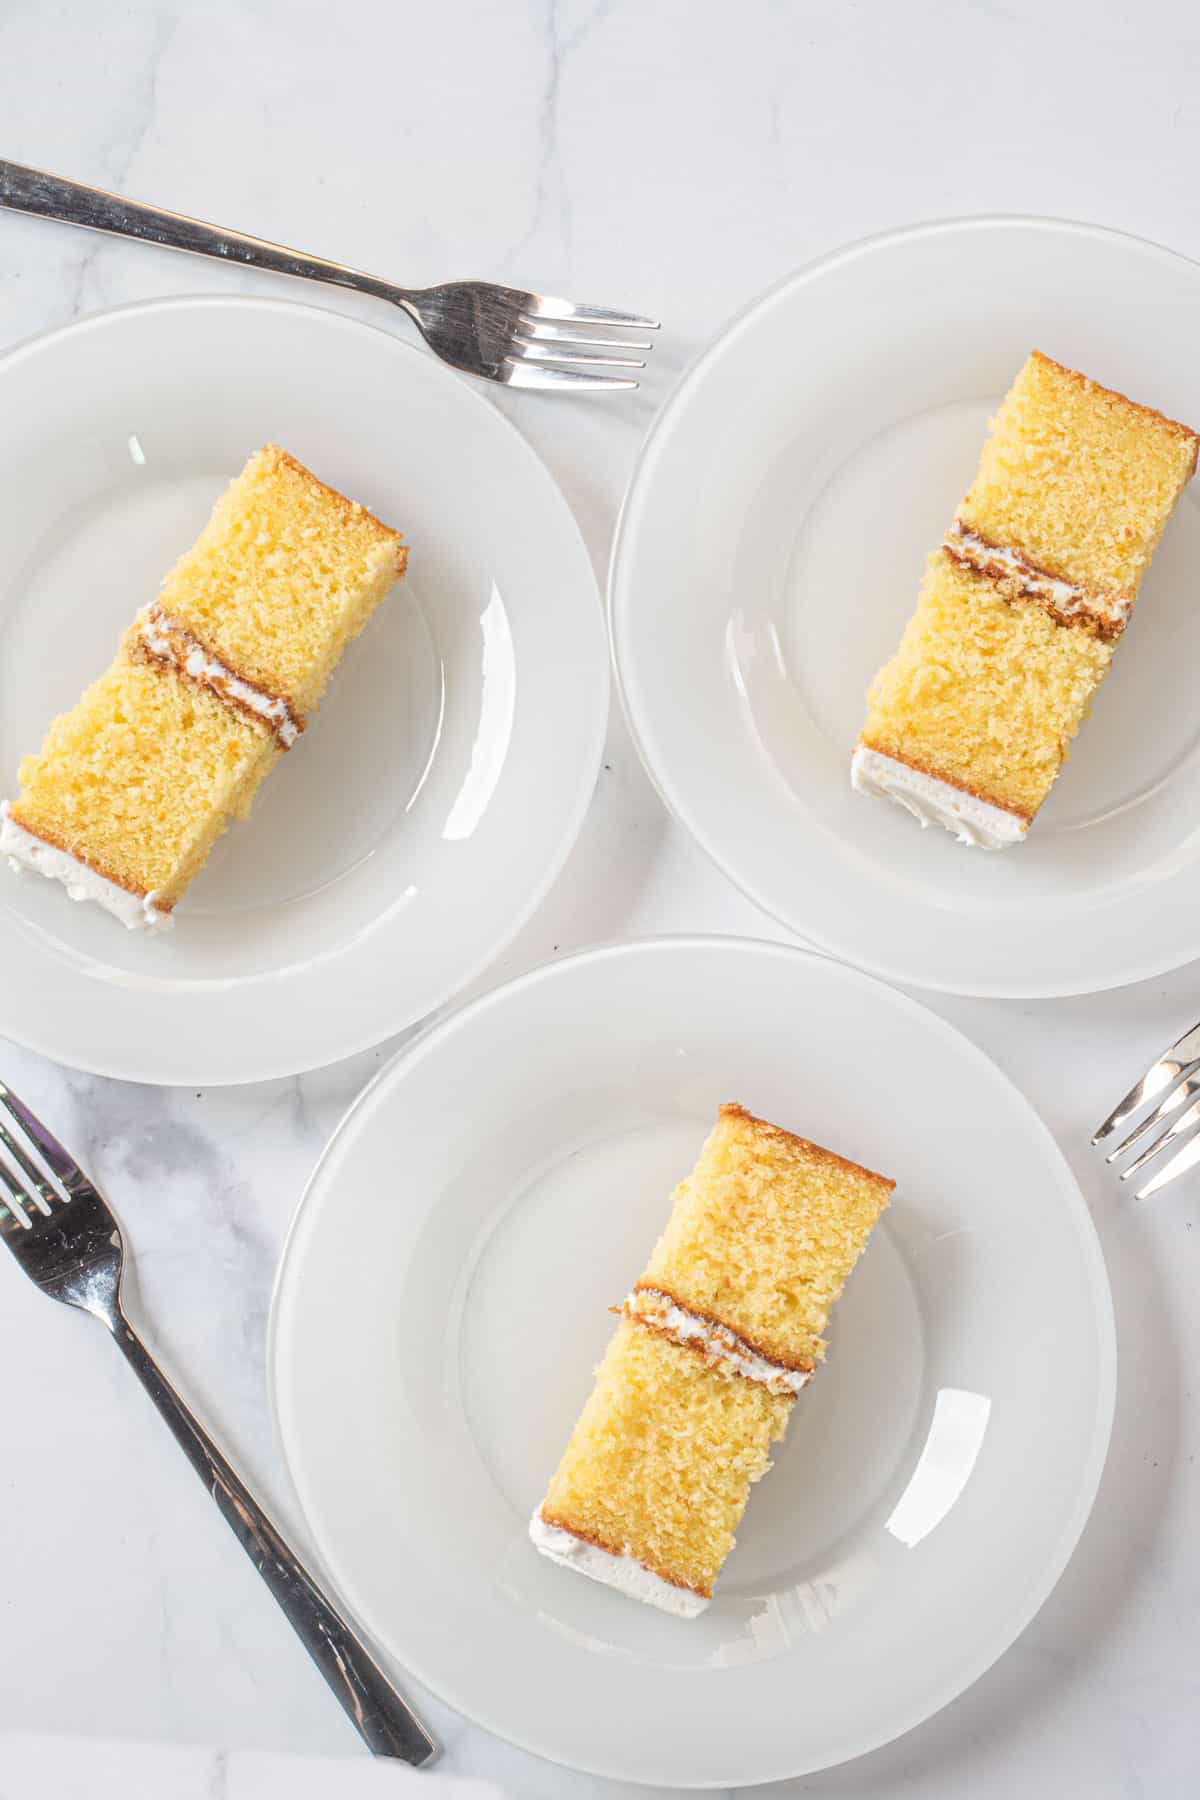
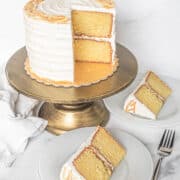
Seen on this page is the image of the cake baked into a layer cake, filled and frosted with orange buttercream frosting and decorated with homemade candied orange peel.
Jump to:
❤️Why you will love this recipe
- This recipe makes a soft and fluffy butter cake, filled with lovely orange flavor and aroma.
- The taste is absolutely divine, with a perfect balance of sweetness and tanginess.
- The texture of the cake is soft and sturdy, making it a perfect cake for stacking. You can make this cake into a delicious tiered birthday cake.
- The recipe is very versatile, you can bake this cake into a simple loaf cake (without any frosting) as a snack cake or bake it into a bundt cake with a simple orange glaze for an afternoon tea treat. See 'substitution and variation' section below.
- The refreshing citrus flavor of the orange complements the rich buttery taste of the cake, making it an irresistible treat.
📋Ingredients

Cake
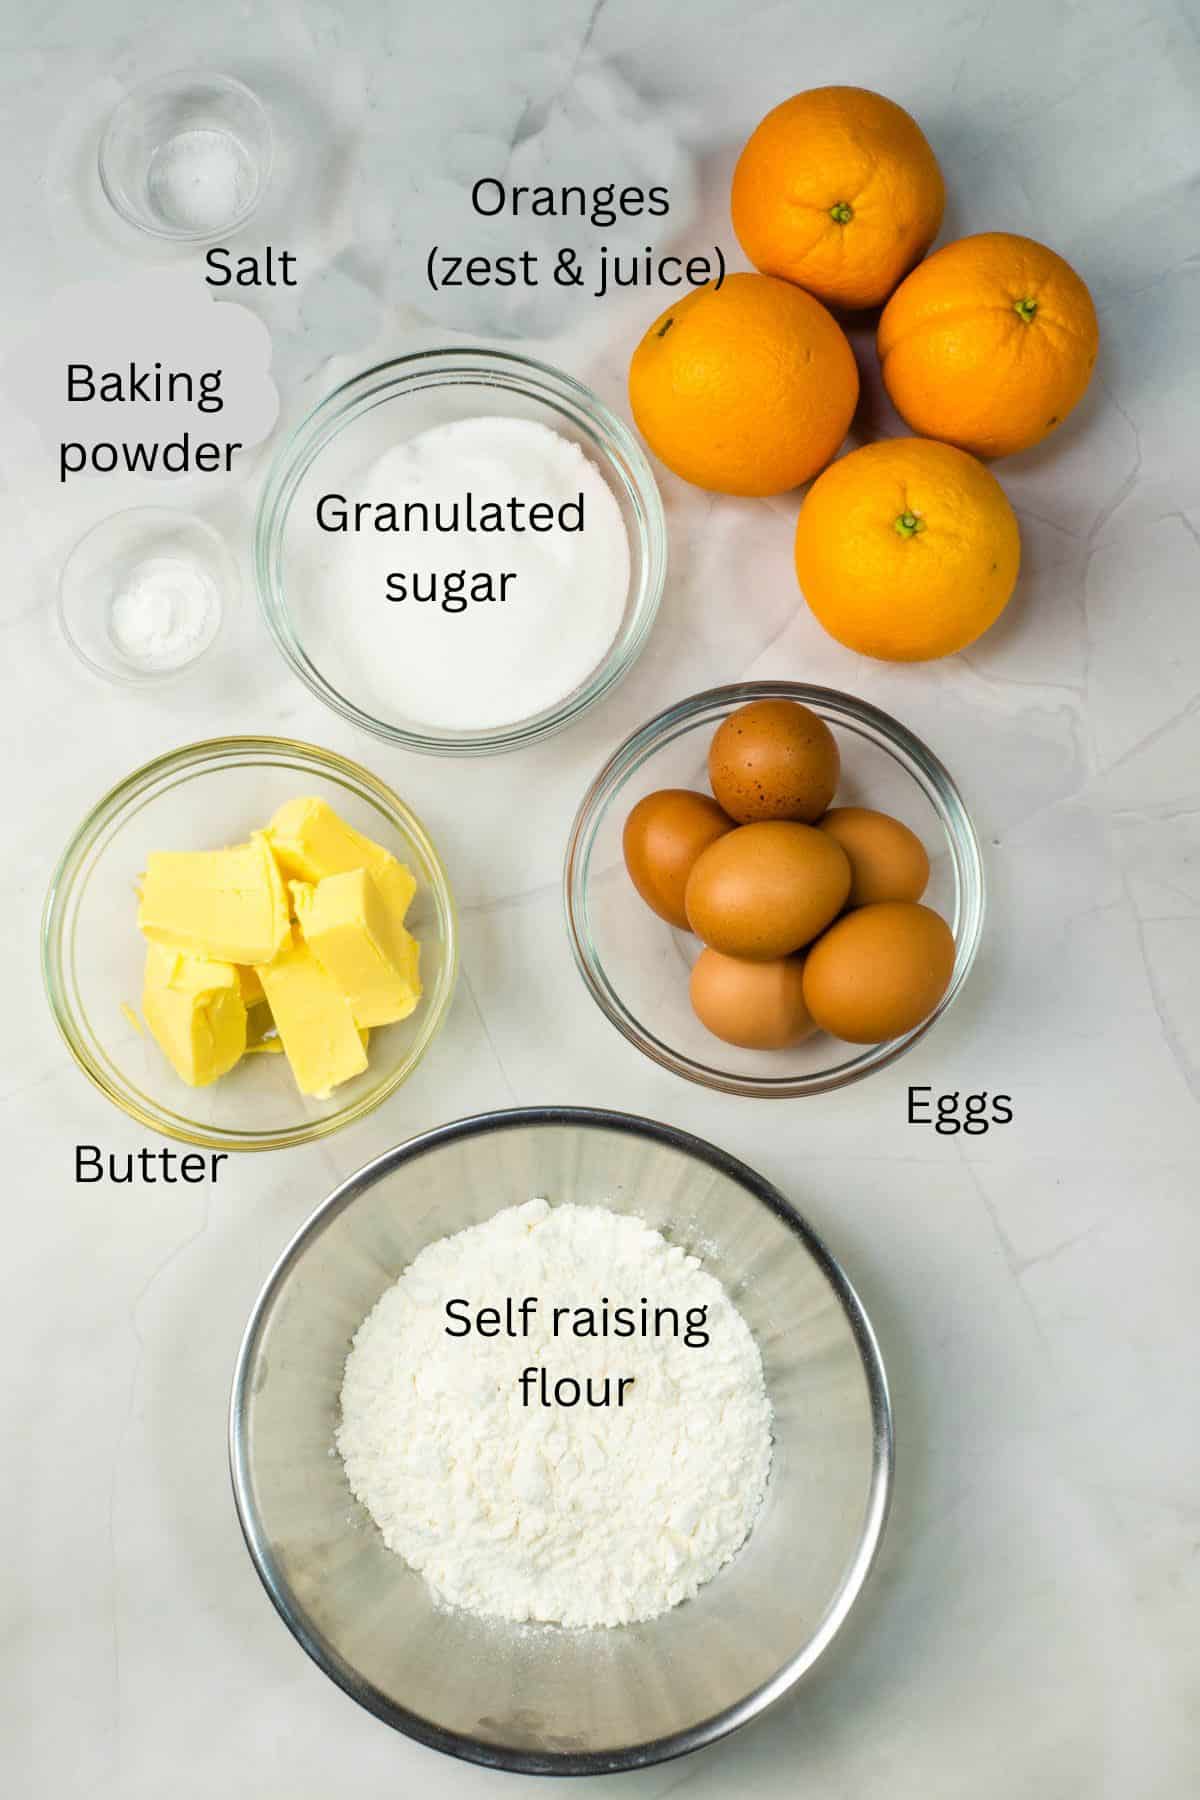
- Self raising flour + baking powder + salt - mix these and sift them together before adding into the cake batter.
- Granulated sugar (caster sugar) - Granulated white sugar is the best. Coarse sugar will leave you with visible specks of sugar on the cake top after baking.
- Butter - I use salted butter. If using unsalted butter, add an extra one eighth teaspoon of salt into the recipe. Scale accordingly for larger cakes.
- Eggs - use large size.
- Orange juice + orange zest - use fresh oranges. Strain the juice to remove any seeds.
Frosting & decoration
- Buttercream frosting made using shortening - buttercream made with shortening is more stable to warm temperatures and also gives you a whiter buttercream.
- Grated orange zest - to flavor the buttercream into an orange buttercream.
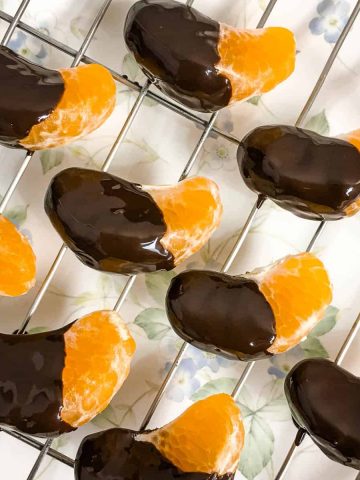
- Candied orange peels - these are optional and meant to decorate the cake.
*Refer to the recipe card below for full list of ingredients and exact quantities. For best results, use a digital kitchen scale where applicable*
🧾Substitution and Variations
- Self raising flour can be substituted with all purpose flour and baking powder. For every 225g of all purpose flour, add one and half teaspoons of baking powder. Mix well and sift 3 times before using. To make 360g of self raising flour (as per recipe card below), mix 360g of plain flour and two and a half teaspoons of baking powder.
- To make a loaf cake, cut the recipe below into half and bake the cake in an 8 inches by 4 inches loaf pan.
- To make an orange bundt cake, half the recipe and bake the cake in a 6 cups capacity bundt tin. Make sure not to fill the cake tin all the way until it is full (ideally, fill only about two thirds of the cake tin height) to avoid overflow. Bake the cake at 160 degrees Celsius for 30 minutes.
- Shortening in the buttercream can be replaced with butter for an all butter buttercream.
- Buttercream frosting can be replaced with other frosting of choice. Cream cheese frosting and chocolate ganache are 2 great options. Orange glaze made with orange juice is another great option especially for orange loaf cake or orange bundt cake. Follow my cake glaze recipe here and replace the lemon juice with orange juice. Also add 1 teaspoon of finely grated orange zest to the glaze.
This recipe has not been tested with other substitutions or variations. If you do try, please let me know in the comments section below!
👩🍳How to Make
Mixing the cake batter
Start by grating the zest of the oranges and setting it aside. And then cut the oranges and squeeze the juice into a measuring cup. Strain the juice and set aside.
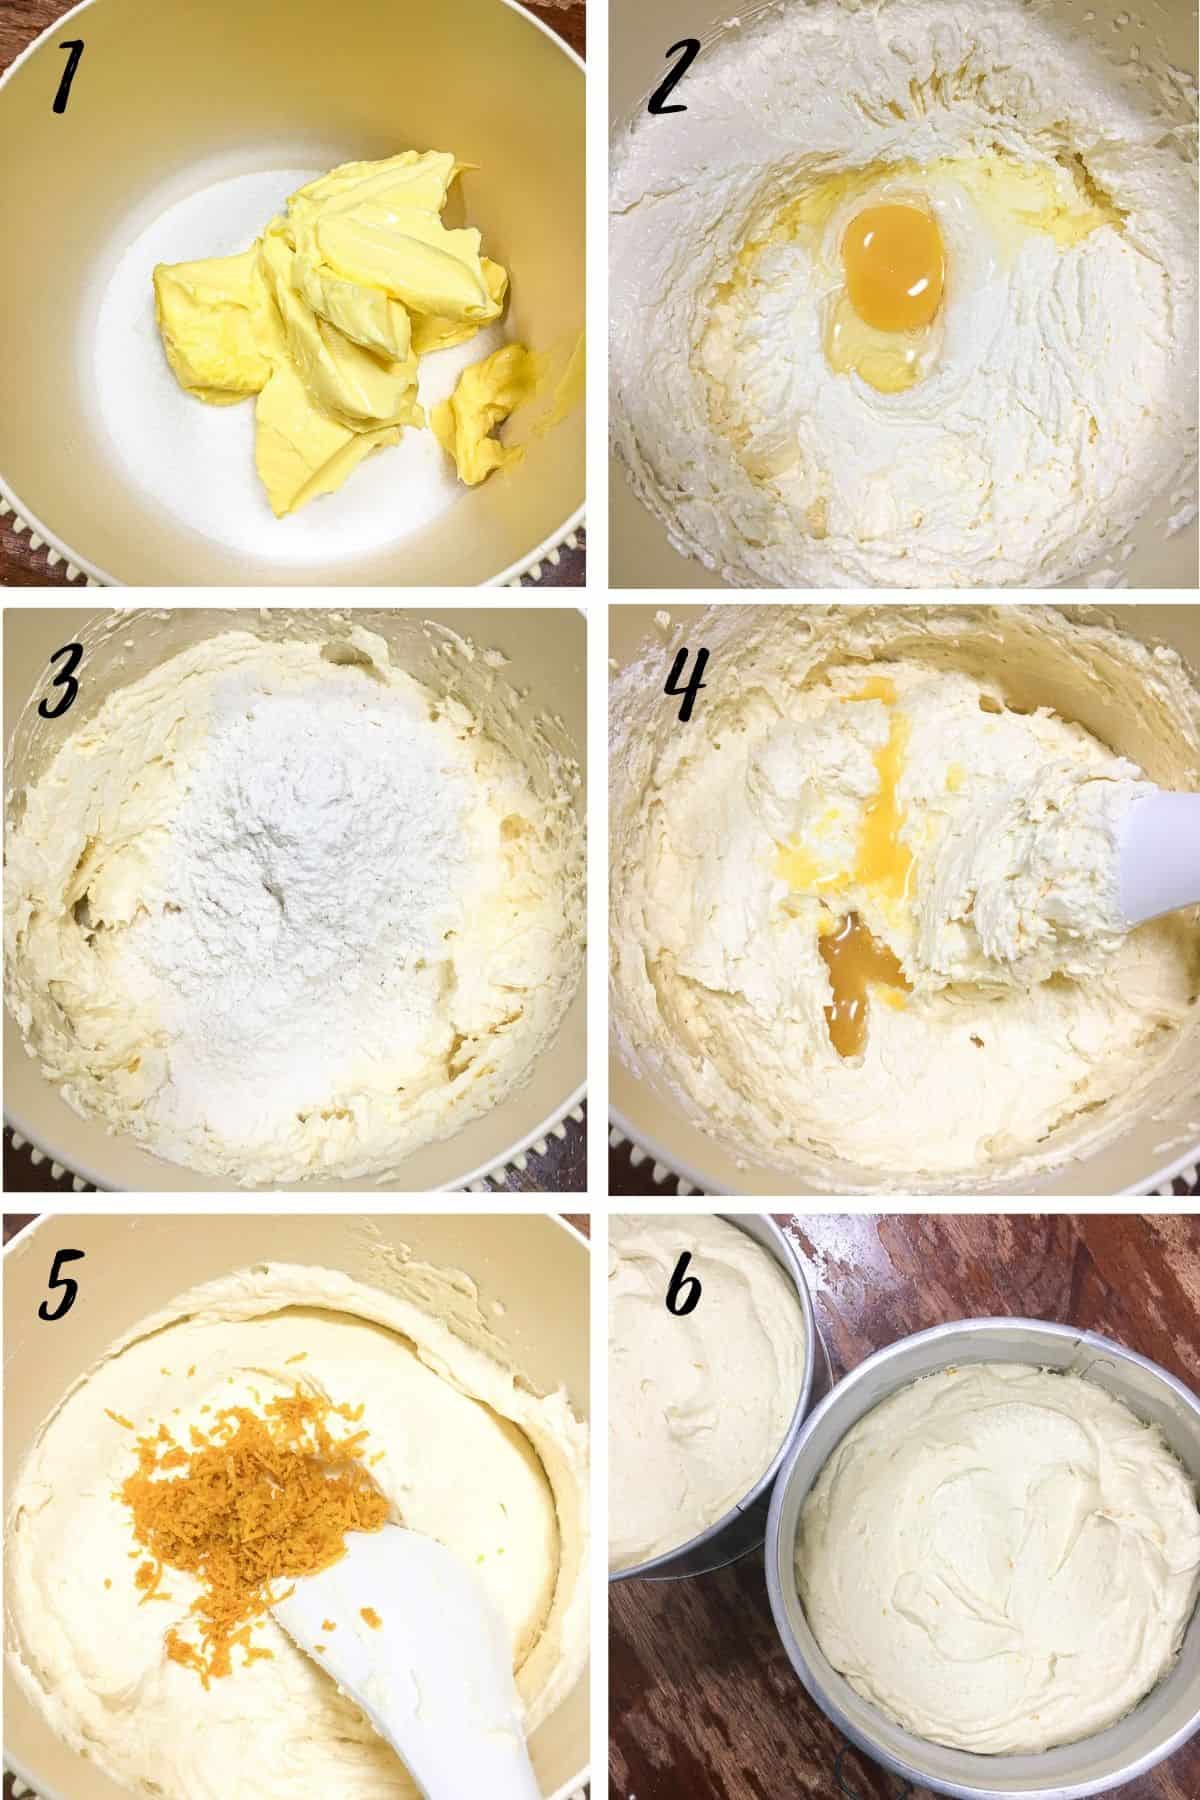
- Combine sugar and butter in a medium mixing bowl of a stand mixer. Beat both until they turn light and fluffy. This should take a good 2 minutes (scrape the sides of the bowl at least twice).
- Next, add the eggs. These should be added one at a time, making sure they are well incorporated before adding more. Scrape the sides of the bowl.
- Sift the flour, baking powder and salt into a bowl. Fold in the dry ingredients into the creamed wet ingredients mixture in 3 batches.
- Alternate each batch with the orange juice, staring and ending with flour.
- And finally, fold in the grated orange zest.
- Pour the orange cake batter into 2 prepared cake tins (well greased and lined cake pans). Bake for about 40 to 45 minutes, until a toothpick or cake tester inserted in the centers come out without any wet batter sticking to it. Remove the cakes from the oven onto a wire rack (cooling rack) and cool completely before frosting.
Frosting the cake
- This moist orange layer cake goes very well with buttercream frosting or cream cheese frosting. It will also match perfectly with any chocolate-based icings like chocolate ganache or chocolate icing.
- I chose to frost mine with orange zest buttercream made entirely with shortening (instead of butter) and powdered sugar. This is why you can see that the buttercream is white instead of the normal pale yellow color of buttercream. The shortening can always be substituted with butter. See my buttercream recipe here.
- I decorated the orange cake with a simple buttercream design and homemade candied orange peels.
Decorating the cake with simple palette knife design

- To start the orange cake decoration, prepare your buttercream. Level the top of each cake layer. Sandwich the cake layers with buttercream and give the stacked cake layers a crumb coat. Refrigerate until firm, about 15 minutes.
- Apply a second layer of buttercream, this time a thicker coating. At this stage, the buttercream layer does not have to be entirely smooth on the cake. Suffice if it is generally well coated as shown above.
- To make the horizontal lines on the cake, I used a palette knife. You can also use a jam knife that has a rounded end. Place the cake on a turntable and start by placing your knife at the base of the cake. The knife should be touching the buttercream but only lightly.
- The next step requires you to use both hands. One to turn the turntable while the other hand to hold the knife and gently move it up the sides of the cake, marking the horizontal lines pattern on the sides of the cake as you turn the turntable. You don't have to lift the knife. Just continue moving the knife in a slightly slanted horizontal position as you move it up the sides of the cake. In marking the lines, make sure they are close to one another. They should not be overlapping and not too far apart that there is a gap between each line. The lines look the best when the width is consistent all around.
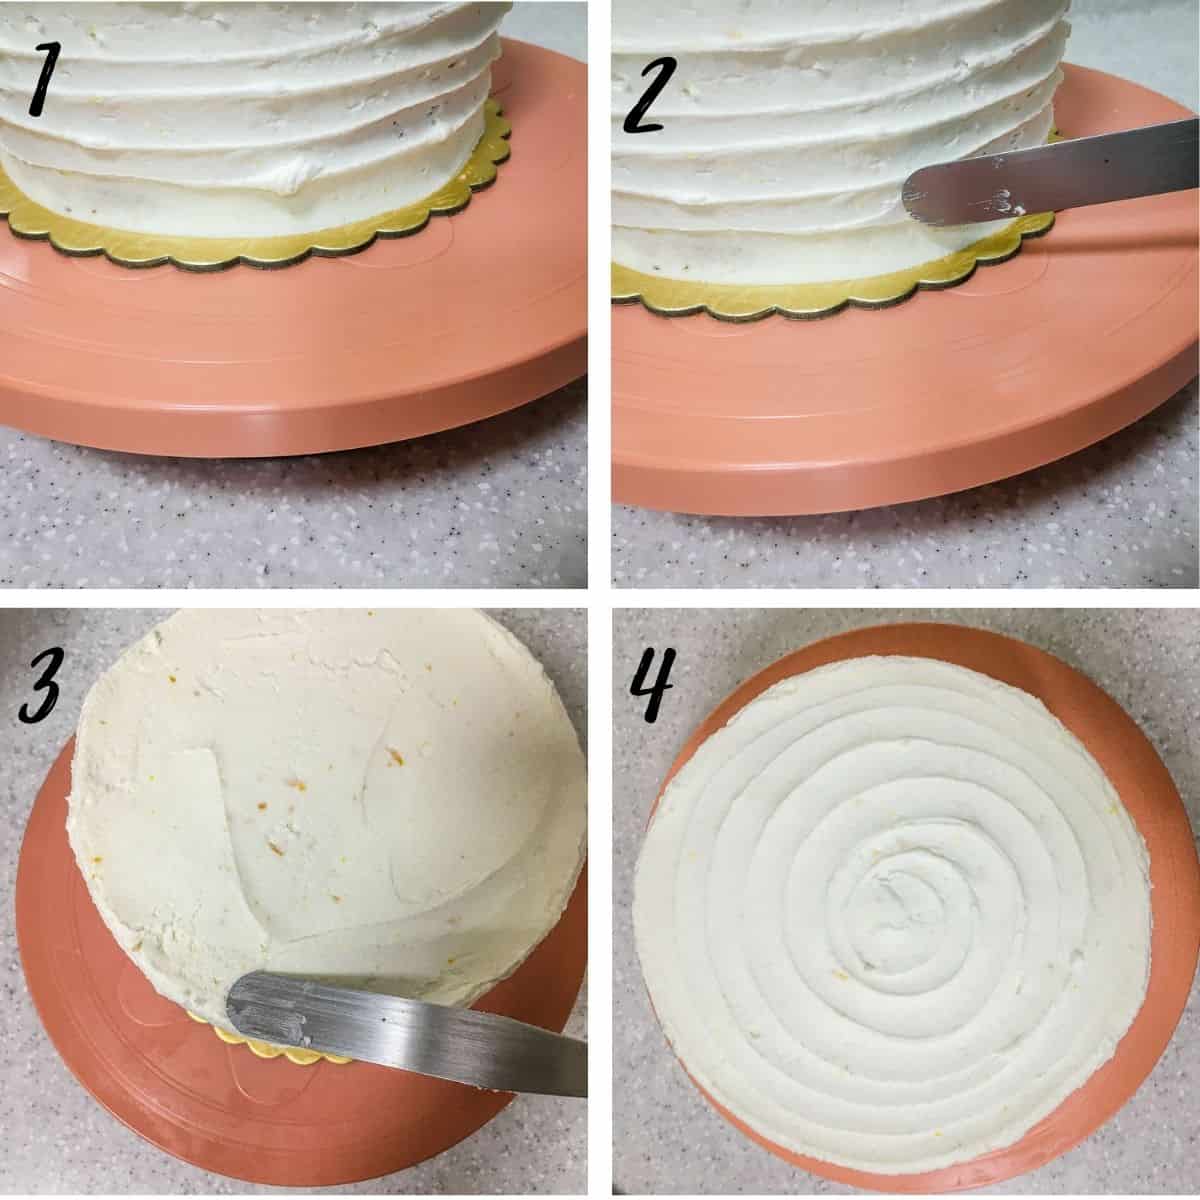
- Also, when marking the lines, there could be bulges of icing that are formed along the horizontal lines as shown above.
- To remove them, use your knife to gently scrape them off. Redo the horizontal line if necessary.
- Next is the cake top. Make similar lines in a circular pattern on the cake top, starting from the sides to the center.
- Once that is done, clean the sides of your cake board of any icing marks.
Adding the candied orange peels decoration

- Prepare the candied orange peels in advance.
- Arrange them on top of the cake as shown. Press them down lightly with the back of a spoon so that they get attached to the icing.
- For the cake border, arrange a single layer of the candied fruit peel all around the base. Press them lightly into the icing so that they remain in place.
- And that's pretty much how I decorated the orange layer cake with orange flavored buttercream and homemade candied peels. A simple orange cake design for birthdays, weddings and any special occasion.
🍽️Serving & storage
- This moist orange cake can be served on the very same day it is baked, even while it is still warm (without any frosting). It is also equally good when baked in advance and stored in the fridge until it is ready for use, within one week.
- For best results, when storing the cake in the fridge, wrap it tightly with plastic wrap while it is still warm and refrigerate. Wrapping the cake while it is warm locks and distributes the moisture in the cake, making in soft and moist after refrigeration. When you need to use it, remove the cake from the fridge and with the cling wrap still intact, let it warm up to room temperature. Remove the wrapping only after the cake has reached room temperature to prevent condensation on the cake which can reduce its shelf life.
- Leftovers of this cake can be stored at room temperature for a good 4 to 5 days provided it is handled without any moisture. The leftovers can last up to one week if refrigerated (in an airtight container). If you wish to use this cake for carving, the cake is best left to rest for at least one day after baking for the texture to stabilize for easy carving with fewer crumbs.
💡Expert Tips
- Make sure your cake tins are well greased and lined.
- This may sound unimportant, but nothing is more frustrating than having a beautifully baked cake stuck to the cake tin. I normally prepare my cake tins by applying a layer of shortening and then dusting with flour.
- Well prepared pan help release cakes very quickly from the tins, but it is important for every nook and corner of the cake tin to be well greased or there is a high chance for parts of the cake to be stuck to the tin at the not-so-well greased parts.
- You can also line your tins with parchment paper, the choice is up to you so long as your cake tins are well prepared. You can see the many ways of lining cake tins in my post here.
- Use unwaxed oranges.
- Fresh oranges give better citrus flavor to the cake and un-waxed ones are very important as you don’t want waxed orange rind in your cakes! Orange rind is basically the thin orange layer on the skin of an orange.
- When taking the rind, you can use a grater to grate only the orange part of the skin. The white part (white pith) underneath the orange layer is bitter and you would definitely want to avoid grating that into your cake.
- If you don’t have a grater, use a sharp knife to slice the orange skin layer of the fruit (carefully avoiding the white layer underneath) and then chop it up into tiny bits with a knife.
- As for the orange juice in the recipe, always use freshly squeezed orange juice. You can add the pulps in the fresh juice as well but be sure to avoid the seeds!
- It's always easier to grate an orange before squeezing out its juice as it is easier to hold a plump fruit, so be sure to process your oranges in this order.
- If you wish to double or triple this easy orange cake recipe, follow the tin size guide in the recipe card below.
- Each calculated recipe produces 2 layers of orange cake that measure approximately 2 inches high each. It is advisable to not bake all the batter in one cake tin as the cake would take much longer to bake in the middle causing the sides to be dry. Also to avoid the cake batter from overflowing as you bake the cakes.
- Also, if you intend to make cakes larger than 10 inches in diameter, it is highly advisable to use cake strips or a heating core. These will prevent the sides of the cakes from drying out due to longer baking time for larger cakes. See my post here on how to achieve leveled cakes to learn more about using cake strips and heating cores.
- Don’t over bake the cakes.
- Baking time is another very important success factor for this orange layer cake recipe. If you want a soft, fluffy, and moist cake with tender crumb, avoid over baking.
- Place the cake on the 3rd rack in your oven and check if the cake is done at least 5 to 10 minutes before the baking time is up by inserting a long skewer in the center of the cake.
- If the skewer comes out without any wet batter sticking to it, the cake is done and can be removed from the oven. Ideally, there should be soft cake crumbs sticking to your skewer. If the skewer comes out totally clean, the cake could have been over cooked.
- Also, when the cake is done, the sides will pull away from the tin.
💭FAQs
If you have include the white part of the orange (orange pith) when grating the zest, it is possible for your cake to be bitter as the pith is bitter. When zesting the orange, make sure to avoid the white part.
❤️More Recipes You Will Love


Do you like this recipe? Please leave a 5-star ⭐⭐⭐⭐⭐rating in the recipe card below and consider a review further down this page. I would love to hear from you. Thank you!
📖Recipe

Easy Orange Cake with Buttercream Frosting (the BEST ever!)
For best results, use the metrics measurements. US customary measurements have not been tested and are only meant for guide.
Ingredients
Cake
- 360 g self raising flour
- 360 g granulated sugar
- 360 g butter at room temperature
- 6 eggs at room temperature
- 90 ml freshly squeezed orange juice
- 4 oranges grated rind only
- ¼ teaspoon salt
- ¾ teaspoon baking powder
Orange Buttercream
- 300 g shortening
- 600 g powdered sugar
- 1 teaspoon orange zest grated
Decoration
- Candied Orange Peel
Instructions
- Preheat oven to 170 °Celsius.
- Beat butter and sugar till soft and creamy.
- Add eggs, one at a time, beating well after each addition.
- In a separate bowl, sift flour, baking powder, and salt. Fold in the sifted ingredients into the creamed mixture alternately with orange juice, starting and ending with flour.
- Finally, add in grated orange zest and combine well. Pour batter into two greased and floured cake tins of the same size and bake for 40 to 45 minutes until a skewer inserted in the center of the cakes comes out clean.
- Baking time for larger cakes may be slightly longer than smaller ones. Use a skewer to check that your cakes have cooked completely. Your cakes are also done when they start to separate from the sides of the cake tins and the top of the cakes spring back when lightly pressed with finger.
- Remove cakes from oven and let them cool completely before decorating.
- Baking time may vary slightly for larger cakes.
- To make the buttercream, add shortening into a large bowl. Beat until creamy.
- Add icing sugar in 2 batches. Beat until the buttercream turns fluffy. Add grated orange zest and beat for another 30 seconds until well mixed.
- Fill the cake layers with buttercream and use the remaining to cover the top and sides of the cake.
- Decorate with candied orange peel.
Notes
- Self raising flour can be substituted with all purpose flour and baking powder. To make 360g of self raising flour (as per recipe card above), mix 360g of plain flour with two and a half teaspoons of baking powder. Mix well and sift 3 times before using.
- To make a loaf cake, cut the recipe above into half and bake the cake in an 8 inches by 4 inches loaf pan.
- To make an orange bundt cake, half the recipe and bake the cake in a 6 cups capacity bundt tin. Make sure not to fill the cake tin all the way until it is full (ideally, fill only about two thirds of the cake tin height) to avoid overflow. Bake the cake at 160 degrees Celsius for 30 minutes.
- Shortening in the buttercream can be replaced with butter for an all butter buttercream.
- Buttercream frosting can be replaced with other frosting of choice. Cream cheese frosting and chocolate ganache are 2 great options. Orange glaze made with orange juice is another great option especially for orange loaf cake or orange bundt cake. Follow my cake glaze recipe here and replace the lemon juice with orange juice. Also add 1 teaspoon of finely grated orange zest to the glaze.
Calculated Tin Sizes
6 inches round/ 5 inches square (makes 2 layers of approximately 2 inch high cakes)- 240 g butter
- 240 g castor sugar
- 240 g self-raising flour
- 4 eggs
- Grated zest of 2 ½ oranges
- 60ml freshly squeezed orange juice
- ⅛ teaspoon salt
- ½ teaspoon baking powder
- 480 g butter
- 480 g castor sugar
- 480 g self-raising flour
- 8 eggs
- Grated zest of 5 ½ oranges
- 120ml freshly squeezed orange juice
- ⅓ teaspoon salt
- 1 teaspoon baking powder
- 600 g butter
- 600 g castor sugar
- 600 g self-raising flour
- 10 eggs
- Grated zest of 6 ½ oranges
- 150ml freshly squeezed orange juice
- ⅓ teaspoon salt
- 1 ¼ teaspoon baking powder
- 720 g butter
- 720 g castor sugar
- 720 g self-raising flour
- 12 eggs
- Grated zest of 8 oranges
- 180ml freshly squeezed orange juice
- ½ teaspoon salt
- 1 ½ teaspoon baking powder
- 840 g butter
- 840 g castor sugar
- 840 g self-raising flour
- 14 eggs
- Grated zest of 9 ½ oranges
- 210 ml freshly squeezed orange juice
- ½ teaspoon salt
- 1 ¾ teaspoon baking powder
- 960 g butter
- 960 g castor sugar
- 960 g self-raising flour
- 16 eggs
- Grated zest of 10 ½ oranges
- 240 ml freshly squeezed orange juice
- ⅔ teaspoon salt
- 2 teaspoon baking powder
- Larger cakes may take a longer time to bake.
- Use cake tins that are at least 3 inches high.
Amy Liu Dong
It looks like a perfect treat to make for the kids, and I am sure they will love this.
nancy
delicious cake! I wish mine looked so nice!
Hannah
Looks yummy! I'm baking at the weekend, what size tin did you use for the original recipe?
Priya Maha
Hi Hannah, I used 7 inches round tins.