

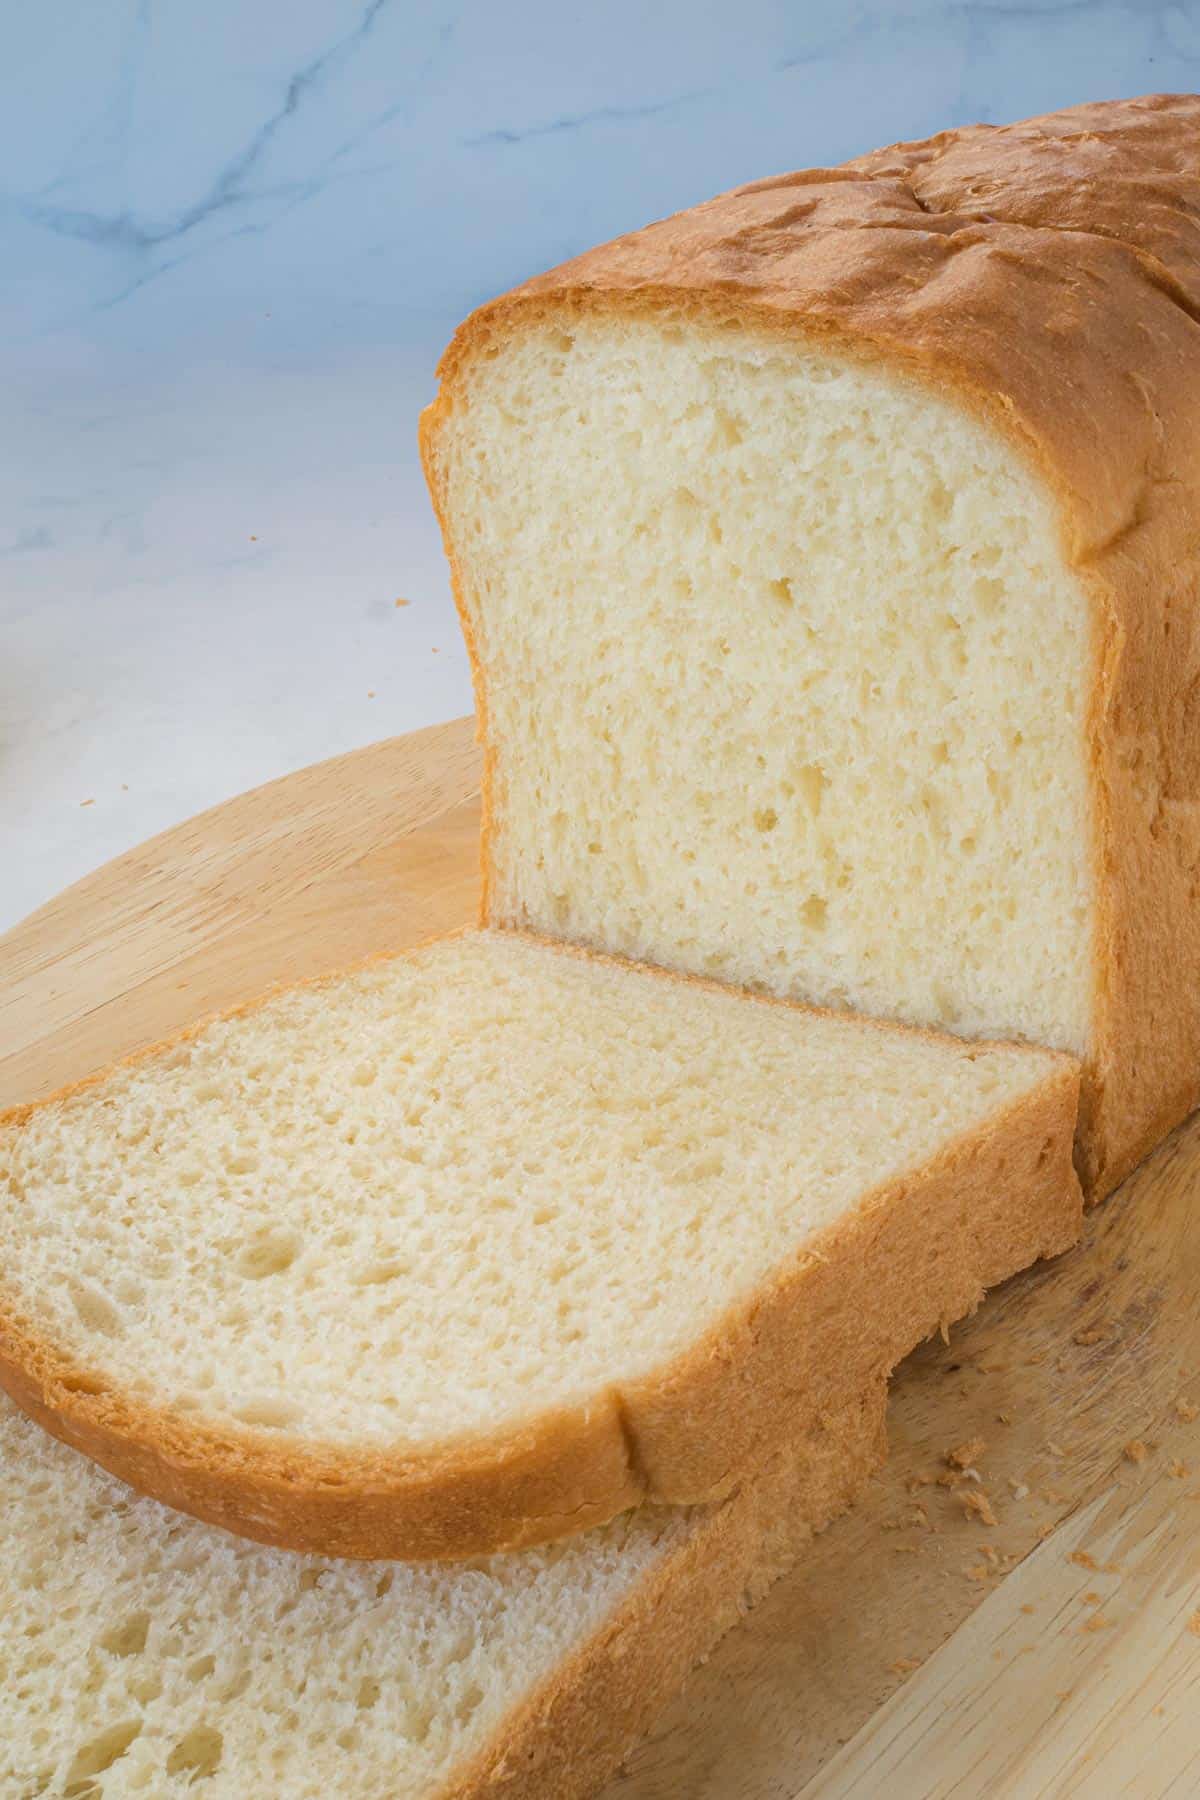
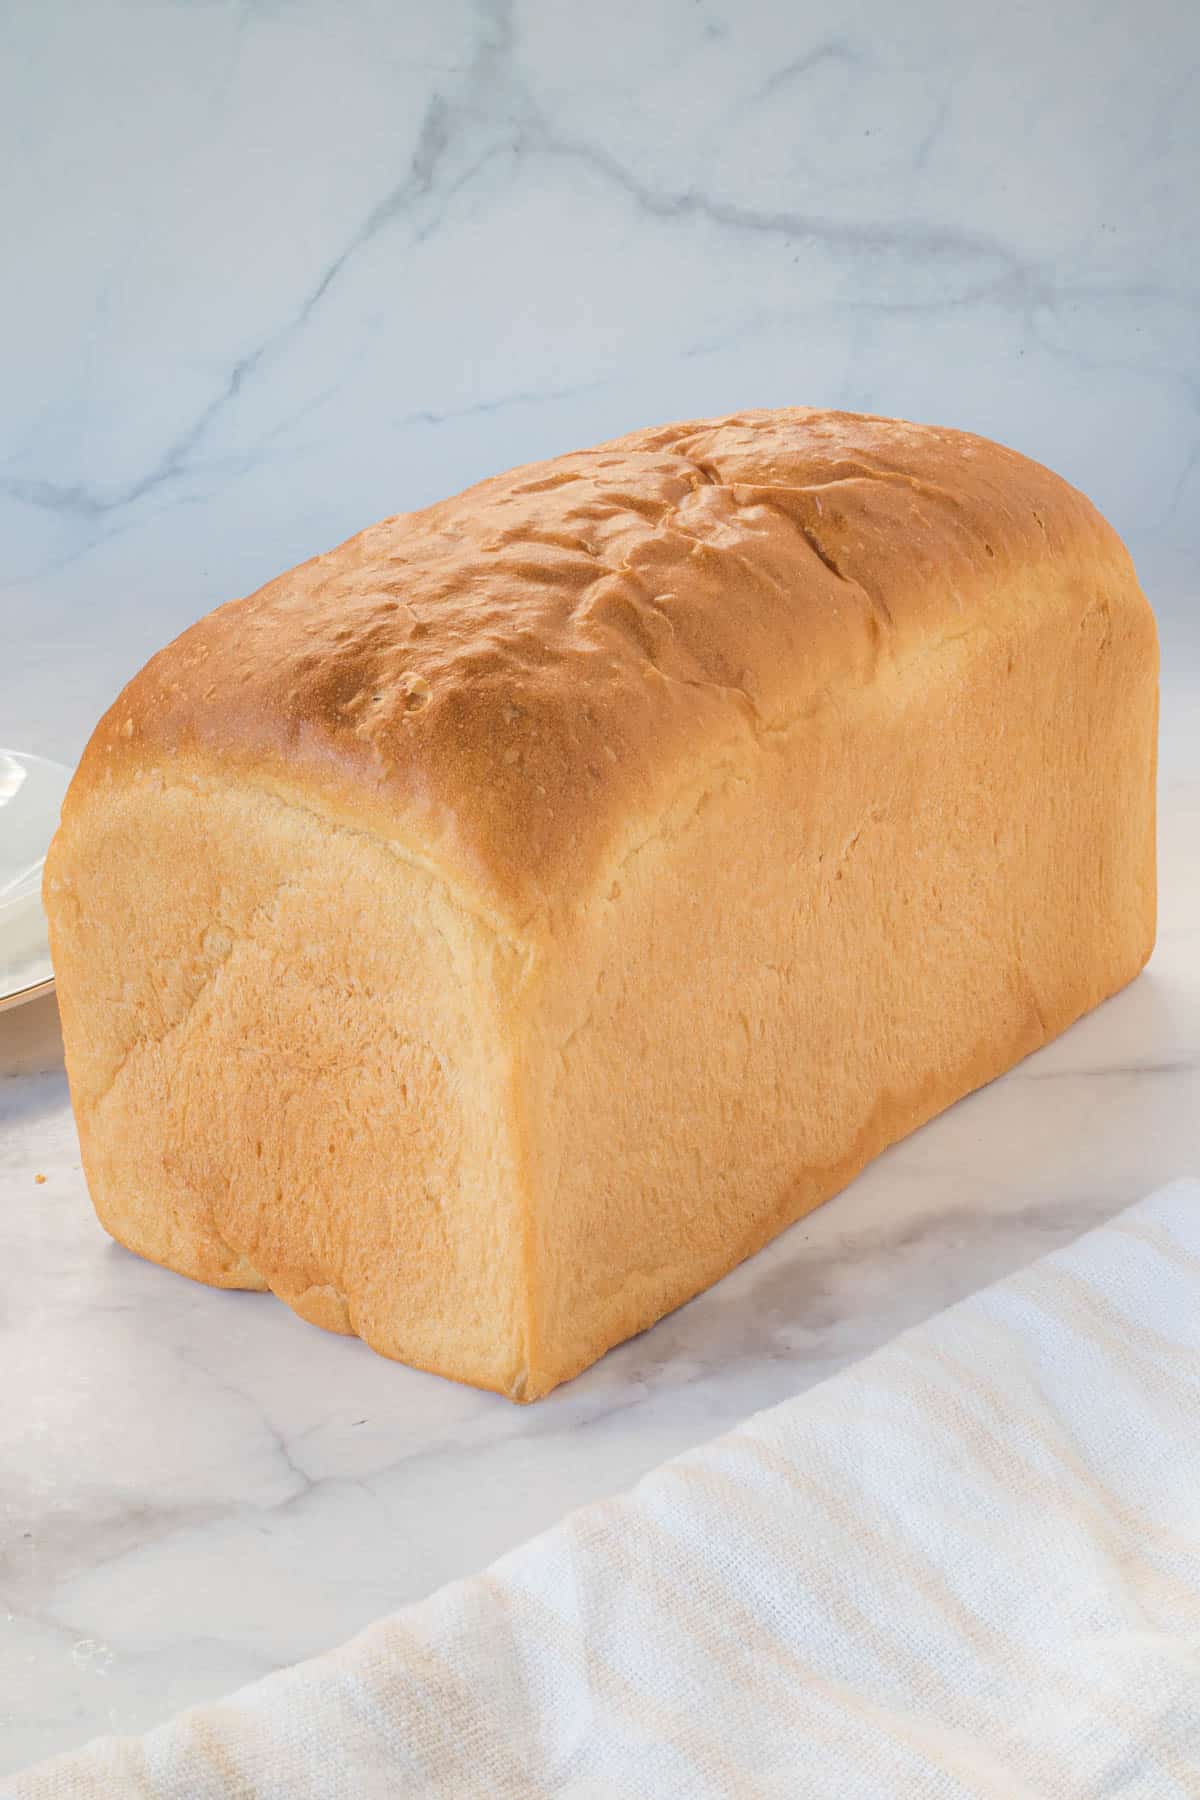
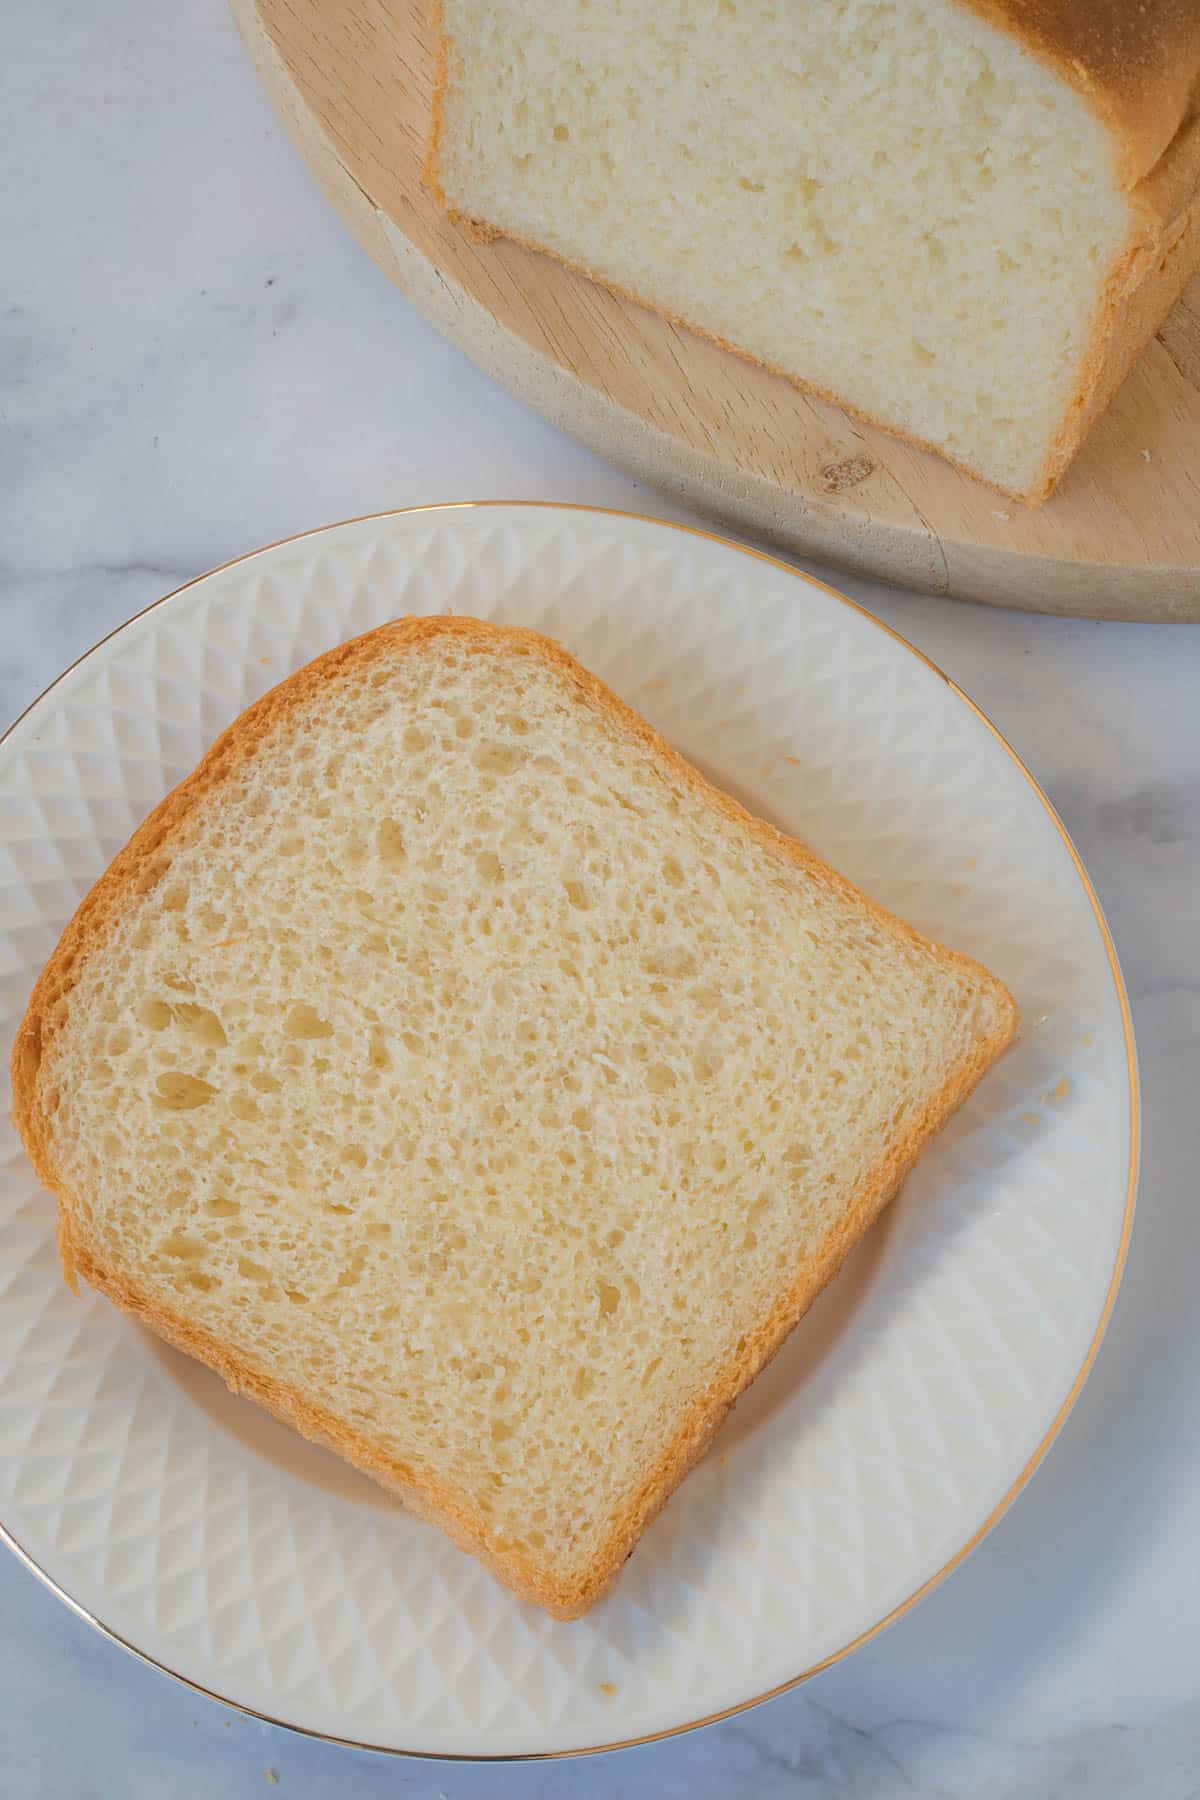
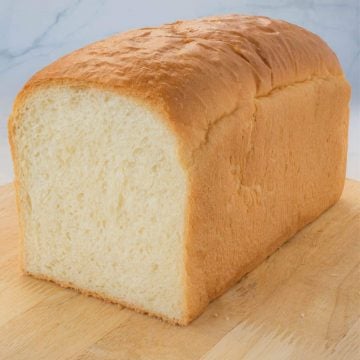
This homemade white bread recipe makes a pleasantly soft and fluffy bread loaf. It is perfect for toast and sandwiches and equally awesome when dipped in curries too!
The bread requires only 4 simple ingredients (excluding salt and water) and is so easy to make, it can be mastered by anyone, including those who are new to baking bread.
Making this white bread does not take too long either. It requires 2 stages of proofing, with each stage taking about an hour. So all in all, you can make and bake this basic homemade white bread loaf in under 3 hours.
Jump to:
❤️Why you will love this recipe
- You only need 6 basic ingredients (including water and salt) to make this easy bread recipe.
- You get to learn to make your own bread with simple ingredients and basic steps.
- The recipe makes the best bread and will become your go-to recipe for perfect white bread.
- You can enjoy the bread toasted with jam and peanut butter or any other spreads of your choice. The bread can also be used to make french toast or bread pudding.
- You get to make your own fresh homemade bread anytime you want with this easy white bread recipe.
- You don't need bread flour to make this white bread. All purpose flour is sufficient, which is very convenient.
- This an eggless bread and is a great recipe for vegetarians and those on egg free diet.
Like this recipe? Here are my other posts you might want to check out:
📋Ingredients
- All-purpose flour + salt - Salt cannot be added directly to yeast as it can kill the yeast. It is best mixed with flour and add as such or added after the flour.
- Instant yeast - this dry yeast does not require activation, which means once you dissolve it in liquid, you can mix in all the other ingredients and knead it. There is no need to wait for the yeast to froth or bloom. Also, instant yeast can work with room temperature liquid.
- Granulated sugar - fine sugar is preferred over coarse sugar as it dissolves more readily. Sugar is only used in very little quantity.
- Butter - butter is used in the dough as well as to brush the top of loaf after baking. I use salted butter, but unsalted butter will also work fine.
- Water - use filtered water.
*Refer to the recipe card below for full list of ingredients and exact quantities. For best results, use a digital kitchen scale where applicable*
🧾Substitution and Variations
- I used all purpose flour to make this white bread loaf. You can always substitute it with bread flour if you wish.
- If you are using active dry yeast, mix it with half of the warm water and leave it aside for at least 5 minutes until it turns frothy before adding the rest of the ingredients. If it does not turn frothy, it is no longer active and cannot be used. You need to discard and restart with a new batch of yeast.
This recipe has not been tested with other substitutions or variations. If you do try, please let me know in the comments section below!
👩🍳How to Make
Mixing and kneading the bread
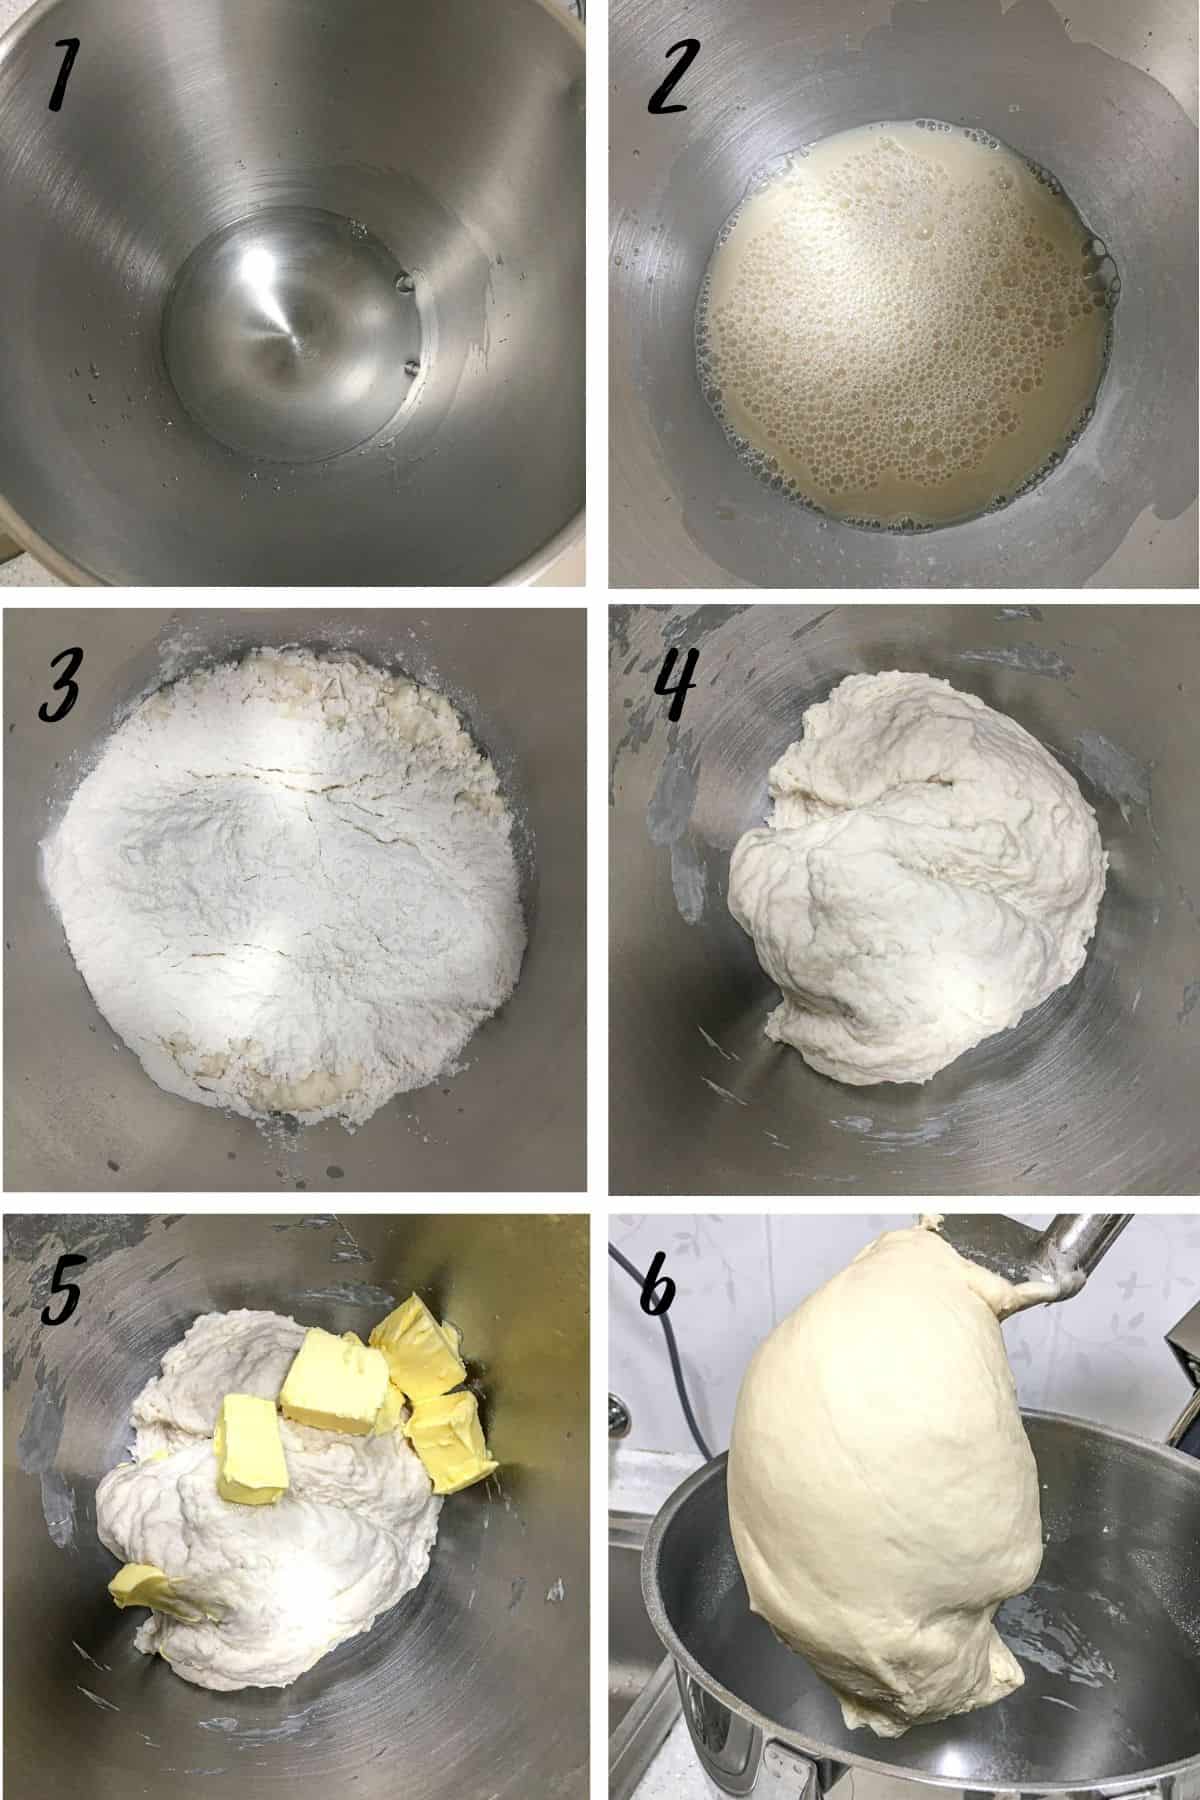
- Start by adding half of the water into your mixing bowl.
- Add yeast and mix with a spoon until the yeast appears dissolved.
- Once the yeast is dissolved, add the remaining water and sugar, followed by sifted flour and salt.
- Knead the dough with your electric stand mixer on medium-high speed with a dough hook attachment for approximately 2 minutes. At this stage, it should come together nicely and appear stretchy.
- Cut butter into small pieces and add to the mixing bowl.
- Continue the machine kneading for an additional 7 to 8 minutes (on medium high speed) until the butter is fully incorporated. At this point, the dough should be soft and stretchy.
First rise (proofing)

- Turn the dough out of the bowl.
- Form into a ball. Dust with flour if it is sticky.
- Place it in a large bowl. Cover the bowl with a kitchen towel or plastic wrap and leave the dough to proof in a warm place until it is almost triple in size.
- This can take anywhere between 1 hour to 2 hours depending on the temperature.
Second rise and shaping
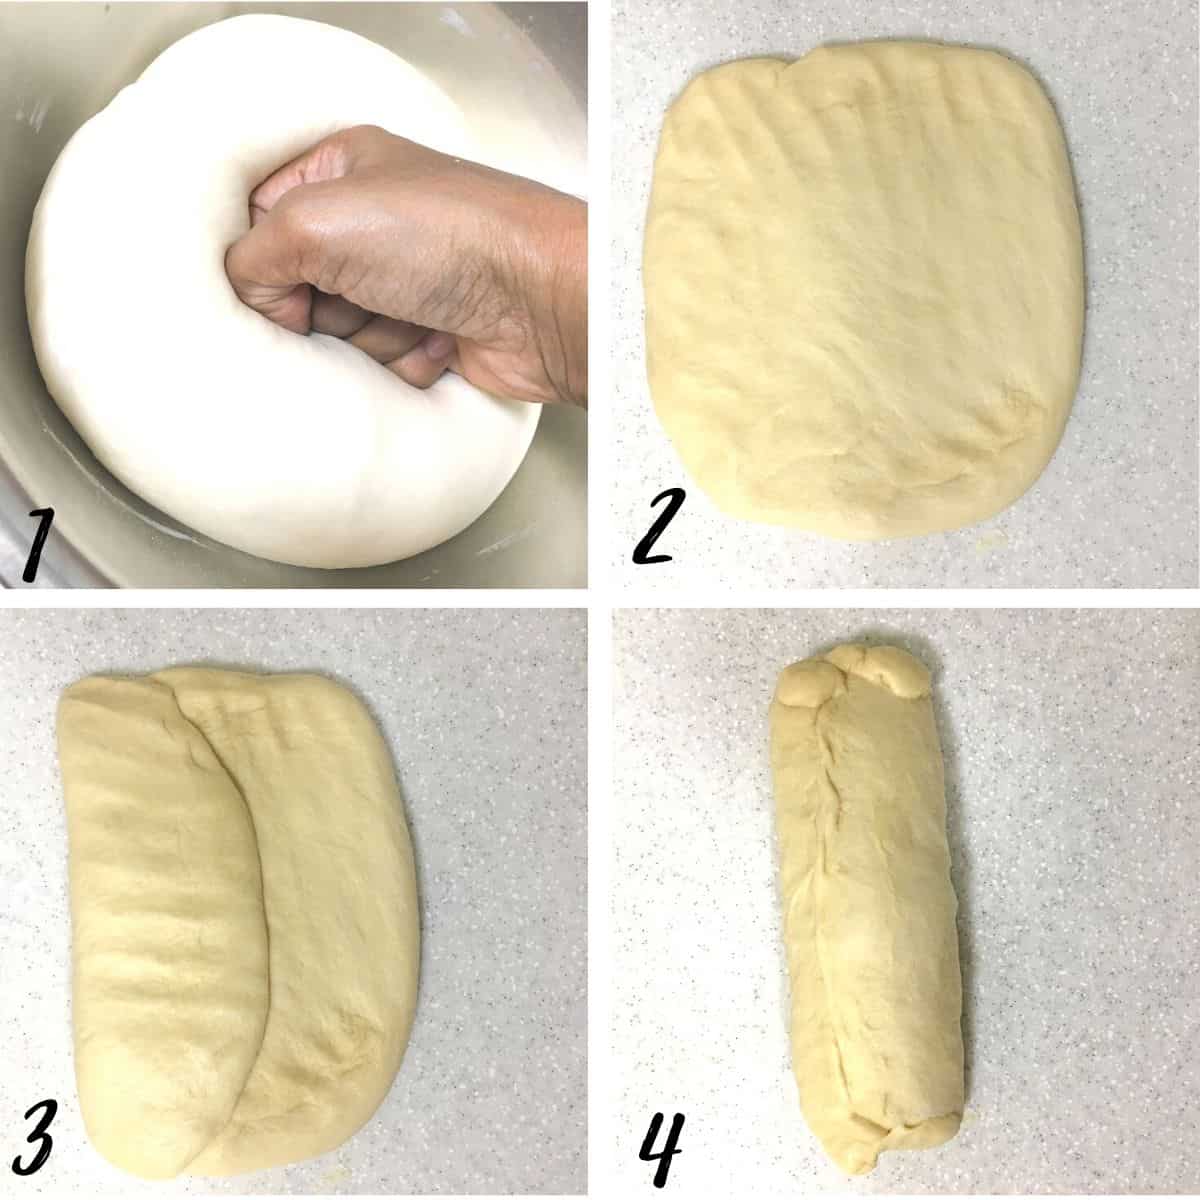
- Once the dough as almost tripled in size, press it down (or punch it down) to release the air bubbles. Turn it out onto a lightly floured surface.
- Press it into a rectangle with the short side measuring the same as the long side of your bread tin.
- Roll it tightly.
- Tuck the ends and sides.
Baking the bread
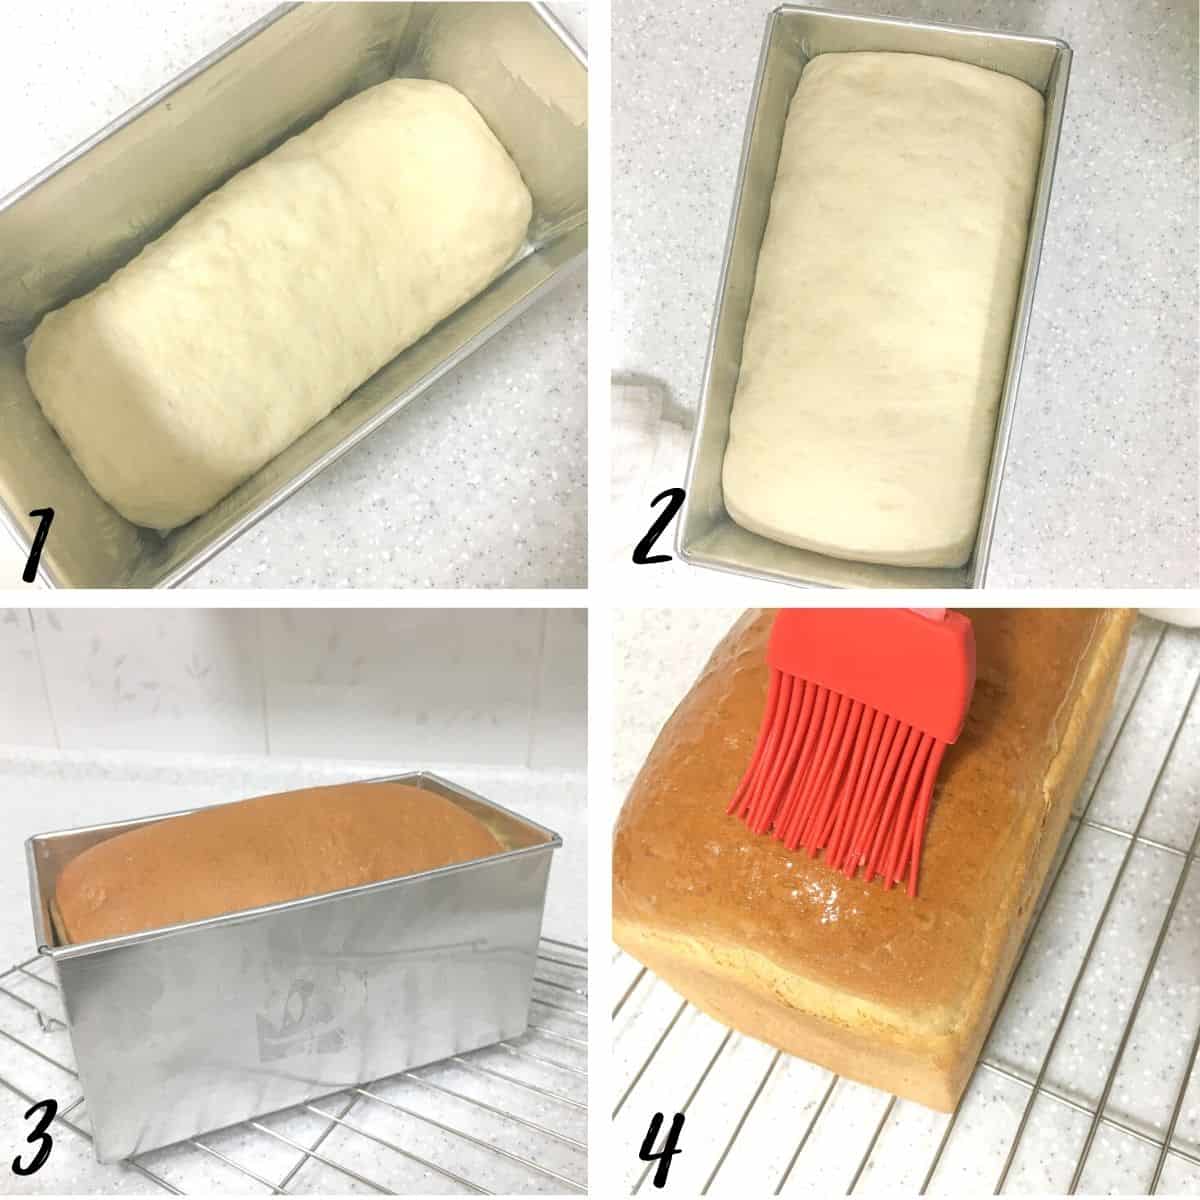
- Place the roll into a well-greased bread loaf tin with the seam side at the bottom.
- Cover the bread with a kitchen towel and leave it in a warm place to proof again, this time until it has doubled in size.
- Bake the bread in a preheated oven at 165 degrees Celsius for 30 minutes. Place it on the lowest rack in your oven to avoid the top from browning too much. Remove the baked bread from the oven. Let the freshly baked loaf rest in the bread tin for approximately 1 to 2 minutes before turning it out onto a wire rack (cooling rack).
- Brush the golden brown top with melted butter immediately. Cool the bread completely before slicing it.
🍽️Serving & storage
- This white bread loaf is best cut after the loaf has completely cooled down. If you cut the bread immediately after it is baked, it will be crumbly.
- It can last at room temperature for a good 2 to 3 days. If refrigerated, it can keep for at least 4 to 5 days. It tends to become a little dry when consumed after 24 hours. A light toast helps to make it all soft and fluffy again.
💡Expert Tips
- I use a mixer with a dough hook to knead my bread. The timing indicated in the recipe below is for kneading with a mixer. If you knead this homemade white bread by hand, a longer knead time would be required. Ideally, the dough needs to be kneaded until it turns stretchy. To test if the dough is ready, do a windowpane test. Take some dough and gently stretch it with your fingers until it forms a thin film. If you can stretch it without tearing, it is ready, otherwise, more kneading is recommended.
- This homemade white bread requires 2 stages of proofing. Proofing is the process of letting the bread dough rest to allow it to increase in size, often double its original size. Proofing requires a warm spot or temperature so place your bowl of dough somewhere warm to help it rise well. For the first stage, it helps to cover the bowl with plastic wrap.
- For the second proofing stage, the loaf need not be covered, but you can always place a light kitchen towel on it if you wish. You can also proof this homemade white bread loaf in the oven, just don't turn it on until the bread is ready to be baked. The closed oven helps keep the air in there warm to help with the dough to rise in size.
💭FAQs
Yes, you can. Bread flour will work great for this bread recipe.
One obvious reason is using too much flour. Make sure to measure the flour accurately. Use a kitchen scale (instead of cups) for best results.
Also, do not add too much flour when kneading.
Yes, you can. Your bread will turn out great with milk too.
If your dough did not rise well, it could be because the yeast is not active or because the temperature is not warm enough. In most cases, it is the former reason.
If you are using an already opened pack of yeast (even though it is not expired), it is a good idea to test it first. To test, simply measure the yeast as per the recipe card below and mix it with warm water (not hot water). Leave it for 10 to 15 minutes. If the yeast is still active, it should start to froth or bloom. If nothing happens after 15 minutes, it is best to use a new batch of yeast.
❤️More Recipes You Will Love
Do you like this recipe? Please leave a 5-star ⭐⭐⭐⭐⭐rating in the recipe card below and consider a review further down this page. I would love to hear from you. Thank you!
📖Recipe
Homemade White Bread Loaf
For best results, use the metrics measurements. US customary measurements have not been tested and are only meant for guide.
Ingredients
- 7 g instant dry yeast
- 180 ml water (lukewarm)
- 310 g all purpose flour
- 30 g granulated sugar
- 30 g butter
- ⅔ teaspoon salt
- Extra butter to brush the top of the bread after baking
Instructions
- Prepare a loaf tin. Grease it well and set aside.
- Add yeast to a large mixing bowl. Add half of the water and mix with a spoon until the yeast is dissolved.
- Add the remaining water, sugar, and flour and knead on medium speed for 2 minutes (with a dough hook attachment).
- Add the butter and continue to knead until the butter gets fully incorporated into the dough and the dough turns stretchy. This should take approximately 7 to 8 minutes on medium high speed.
- Form the dough into a ball and place it in a large bowl. If the dough is sticky, add a little more flour.
- Cover the bowl with a kitchen towel or plastic wrap and place it is a warm place to proof. This should take approximately 1 hour depending on the surrounding temperature. The dough should almost triple in size.
- Press the proofed dough to release air bubbles.
- Turn the dough onto a lightly floured surface. Flatten with your fingers into a rectangle with the short side of the rectangle measuring the same as the long side of your loaf tin.
- Roll the dough into a tight roll, tuck the ends underneath and pinch the sides. You can also fold the dough into 3. Place the rolled dough in the prepared loaf tin.
- Let the loaf proof again until slightly more than double in size.
- Bake the bread at 165°Celcius on the lowest rack in the oven.
- Once baked, remove the loaf from the oven and brush the top with melted butter.
- Let the bread loaf rest in the tin for about 1 minute. Turn it out onto a wire rack to cool completely.
- Slice the bread after it has completely cooled down for neater slices.
Notes
- I use a mixer with a dough hook to knead my bread. The timing indicated in the recipe below is for kneading with a mixer. If you knead this homemade white bread by hand, a longer knead time would be required. Ideally, the dough needs to be kneaded until it turns stretchy. To test if the dough is ready, do a windowpane test. Take some dough and gently stretch it with your fingers until it forms a thin film. If you can stretch it without tearing, it is ready, otherwise, more kneading is recommended.
- This homemade white bread requires 2 stages of proofing. Proofing is the process of letting the bread dough rest to allow it to increase in size, often double its original size. Proofing requires a warm spot or temperature so place your bowl of dough somewhere warm to help it rise well. For the first stage, it helps to cover the bowl with plastic wrap.
- For the second proofing stage, the loaf need not be covered, but you can always place a light kitchen towel on it if you wish. You can also proof this homemade white bread loaf in the oven, just don't turn it on until the bread is ready to be baked. The closed oven helps keep the air in there warm to help with the dough to rise in size.
Leave a Reply