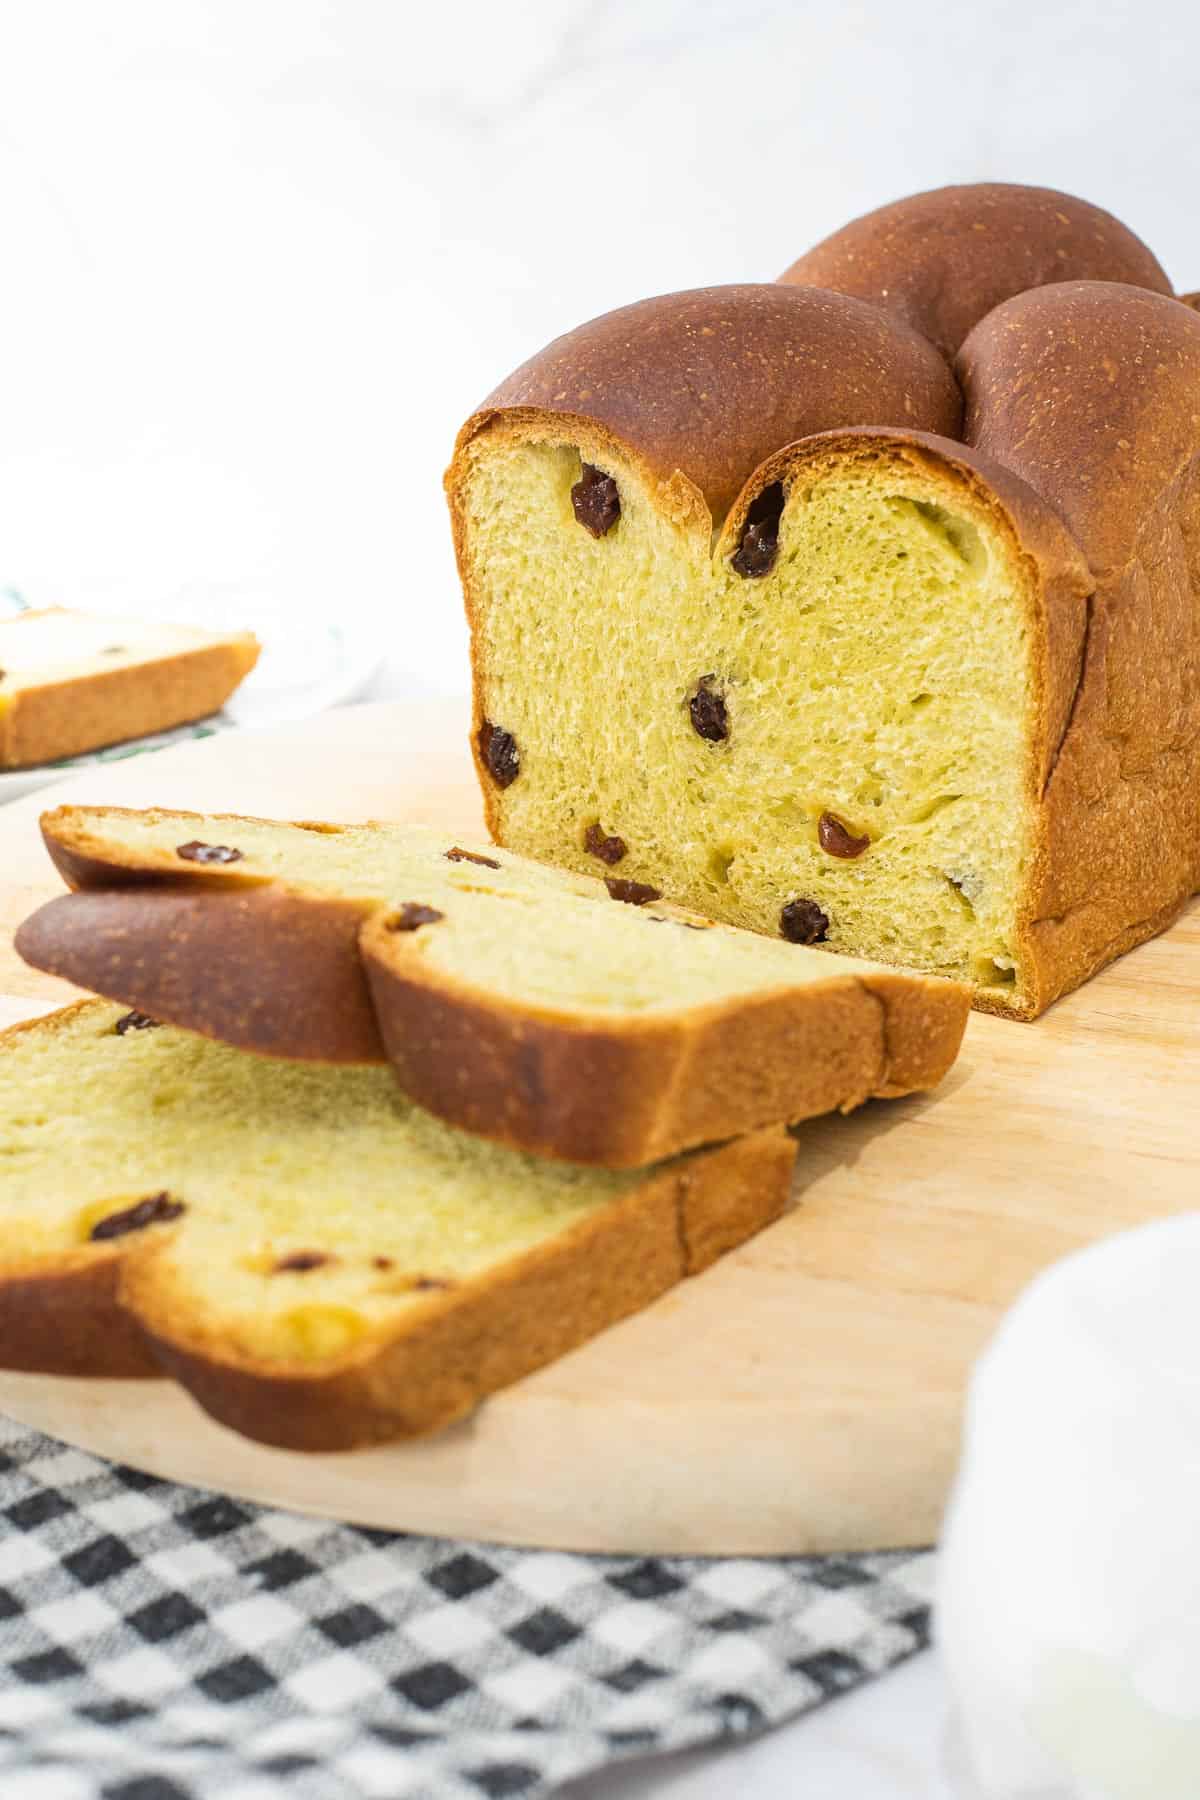
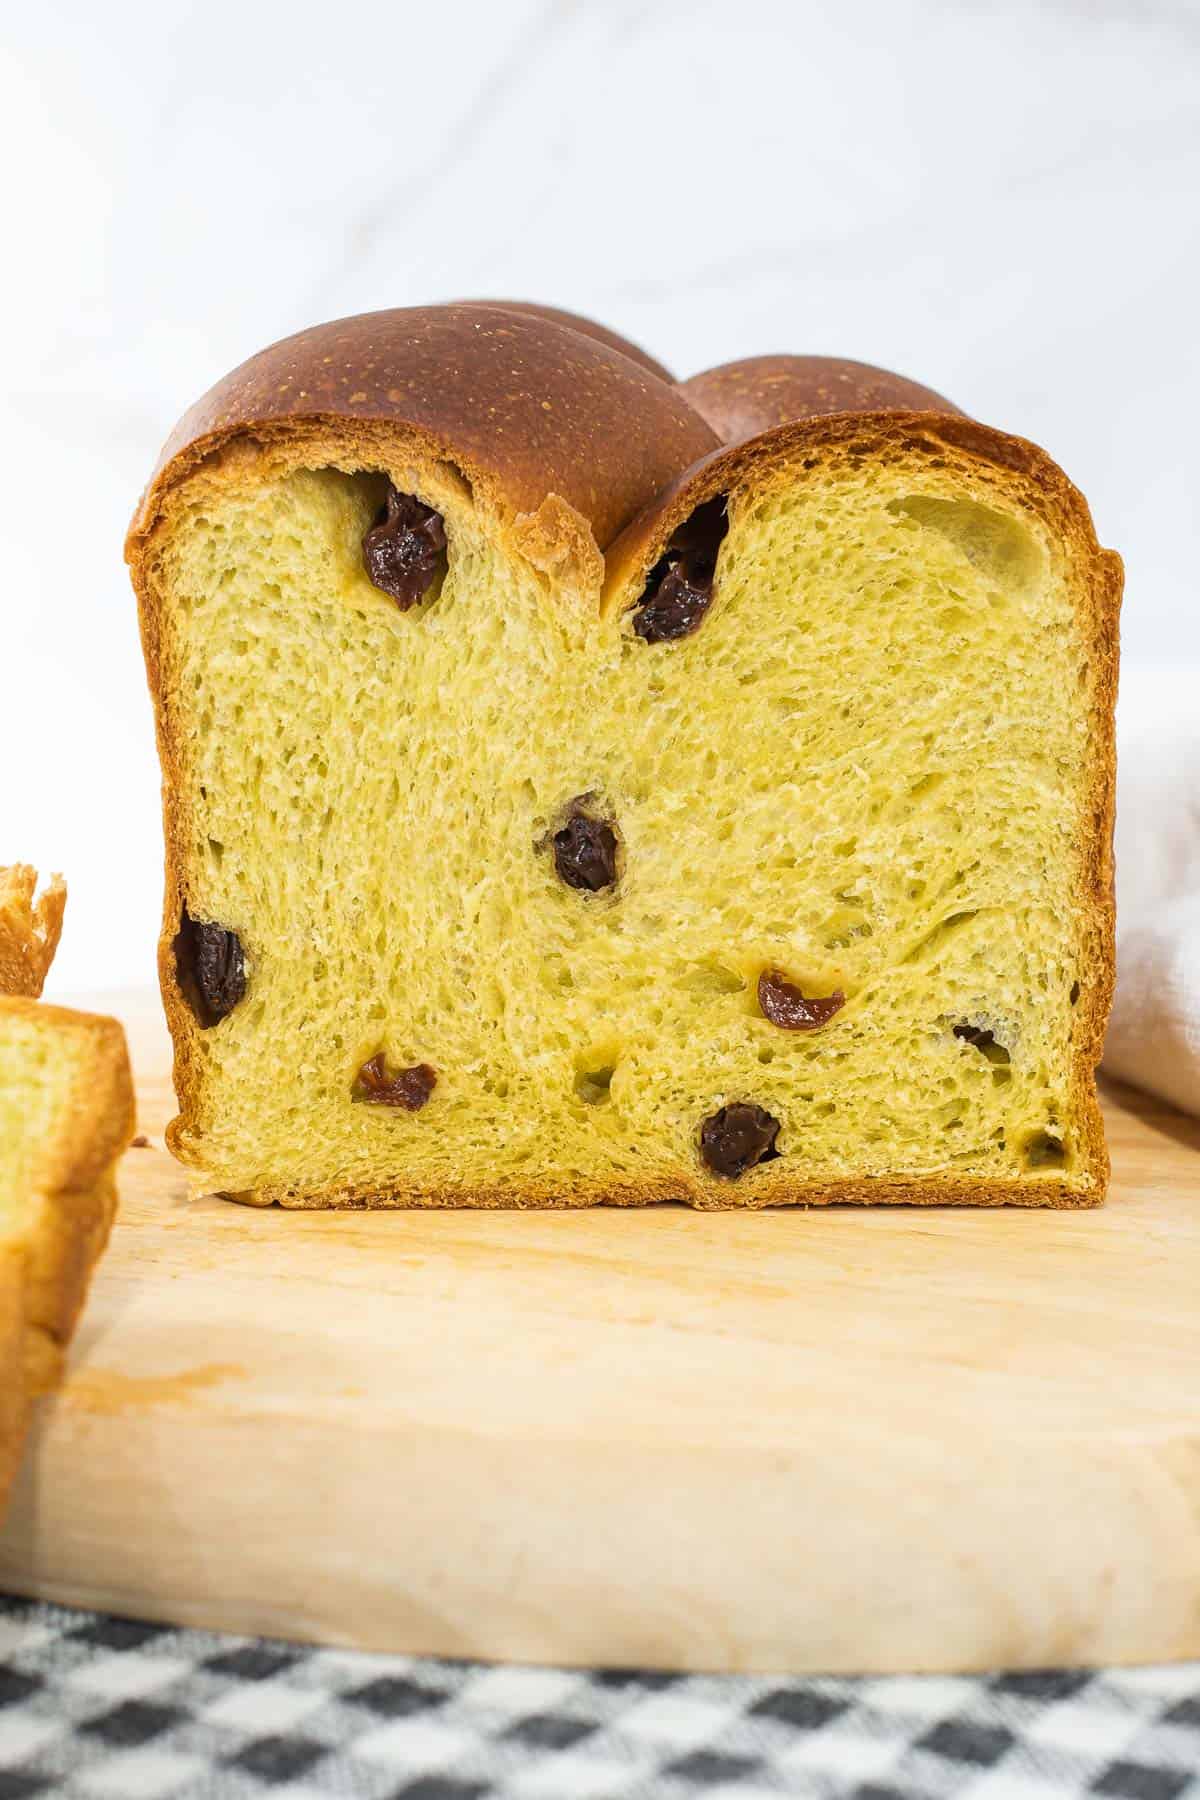
This pandan bread recipe is a sweet milk bread loaf filled generously with sweet raisins. Naturally flavored with fresh pandan extract, this bread is super easy to make and super yummy too!
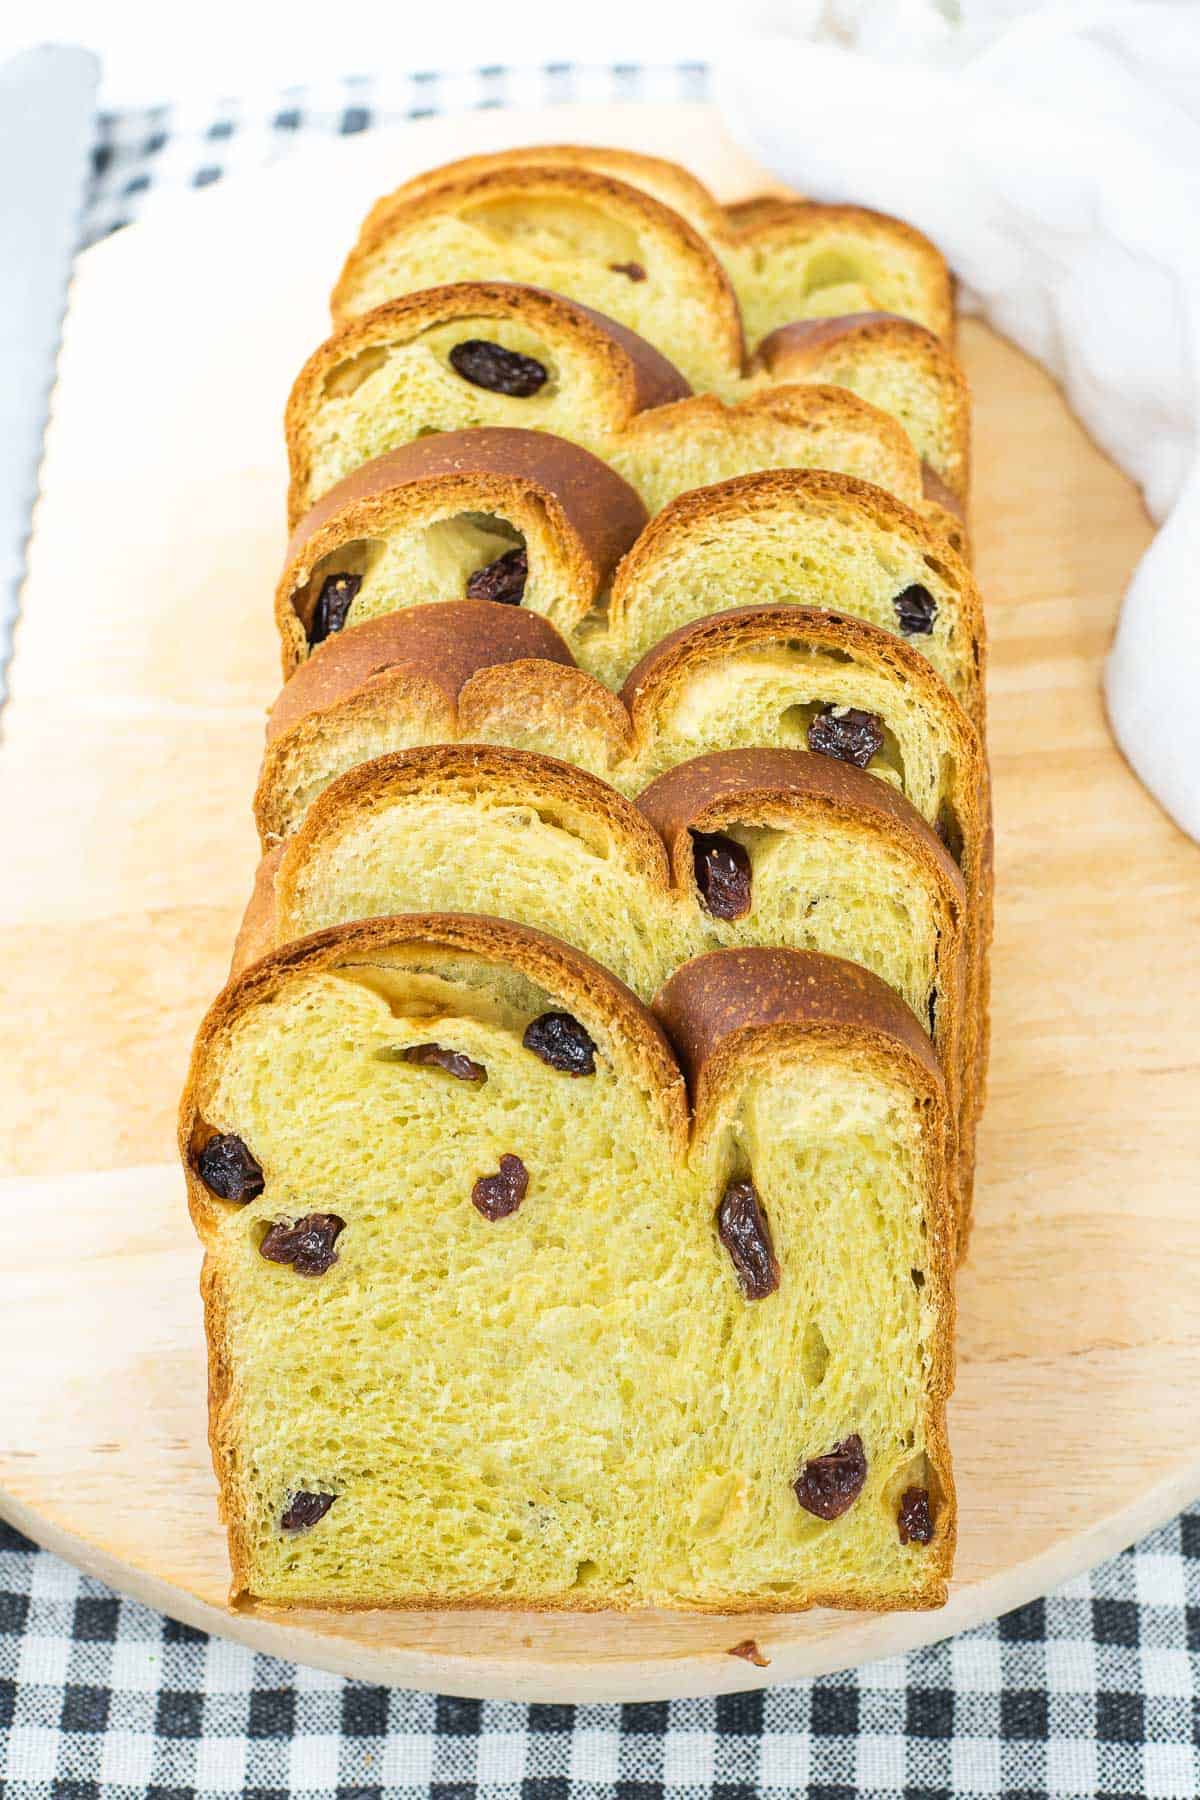
The bread is adapted from my easy homemade white loaf recipe which requires only 5 ingredients (excluding the water). In making this pandan bread, I replaced the water with pandan juice and added raisins.
The raisins are optional, and you can always omit them from the recipe. Forming the loaf into a braid is also optional, you can form the bread into a normal loaf and it will be great either way!
Jump to:
❤️Why you will love this recipe
- This is an easy bread recipe with simple ingredients.
- It has a lovely green color and aromatic pandan flavor.
- The bread is made with all natural pandan flavor, using fresh pandan leaves.
- The recipe yields soft fluffy bread with subtle sweetness and delicious pandan smell, perfect to be enjoyed on its own as a toast or with a light spread of any fruit jam or honey.
Like this recipe? Here are my other posts you might want to check out:
- Homemade White Bread Loaf (Basic Bread Recipe)
- Easy Moist Banana Bread with Oil (No Butter)
- Pandan Cake (Easiest Pandan Flavored Pound Cake)
- Pandan Syrup (How to Make)
- Lemongrass Pandan Tea
- Pandan Milk Tea (Easy Homemade Bubble Tea Recipe)
- Pandan Cheesecake (Perfectly Baked & the Creamiest Ever!)
- Pandan Jelly with Coconut
- Pandan Cookies with Coconut and Gula Melaka
- Easy Yeast Rolls for Beginners
- Brioche Donuts (Doughnuts)
- Cinnamon Raisin Rolls (Soft & Fluffy)
📋Ingredients
- Instant dry yeast - this is the key ingredient in making breads. Make sure the yeast is still active. To test, sprinkle some yeast (about one eighth of a teaspoon into quarter cup of water (warm water). Check after 10 minutes. If the yeast has turned frothy, it is still active and can be used. Otherwise, discard the yeast and get a fresh batch.
- Water (lukewarm) - water should not be hot as it will kill the yeast. Ensure the water is just warm by testing it with your finger before using.
- Bread flour (or all purpose flour) + salt - salt cannot be added directly into yeast, hence it is best mixed with flour before adding to the yeast solution. Both bread flour and all purpose flour will work for this recipe.
- Milk powder (powdered milk) - gives the bread a lovely milk taste.
- Sugar - acts as a sweetener for the bread as well as help the yeast to work. Both coarse sugar or granulated sugar will work.
- Butter - I use salted butter. Unsalted butter will also work fine. There is no need to adjust the amount of salt in the recipe.
- Pandan leaves (30 cm each) - you can use both fresh or frozen ones.
- Raisins - these are optional but definitely add to the taste of this sweet bread.
*Refer to the recipe card below for full list of ingredients and exact quantities. For best results, use a digital kitchen scale where applicable*
🧾Substitution and Variations
- Raisins are optional. If you prefer your pandan milk bread to be plain, simply omit the raisins. You can also increase or decrease the raisins in the recipe as you wish.
- Fresh pandan leaves can be substituted with frozen pandan leaves. Use them in the exact same way as the fresh leaves.
- If you cannot find both the fresh and the frozen pandan leaves, or if you do not want to make your own pandan juice, you can still make this pandan bread with pandan paste or pandan extract. Pandan paste / extract is a commercially produced thick paste that has the color and aroma of pandan. Add one teaspoon of pandan extract to the water.
- Milk powder or powdered milk can be replaced with fresh milk or even coconut milk. If using fresh milk or coconut milk, omit the milk powder in the recipe and replace water with the milk in the exact same quantity. Use warm milk.
- To make the loaf into a plain loaf instead of a braided loaf, you can follow the same steps as in this white bread loaf recipe.
This recipe has not been tested with other substitutions or variations. If you do try, please let me know in the comments section below!
👩🍳How to Make
Preparing the pandan extract
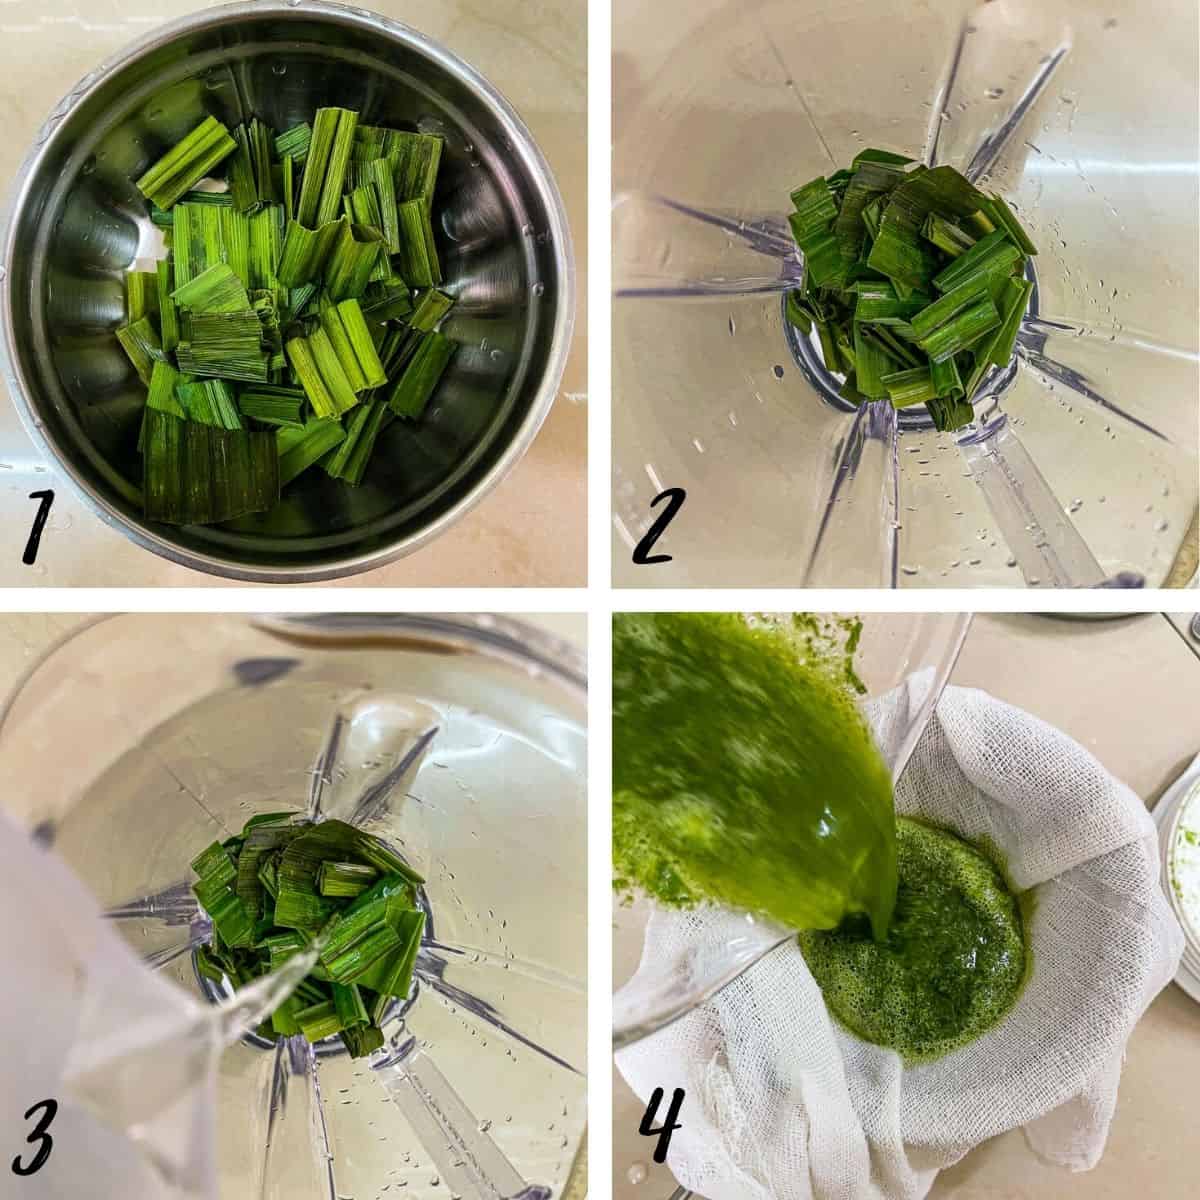
- Wash and pat the leaves dry. Cut them into 1-inch sizes.
- Place them in a blender.
- Add the water indicated in the recipe and process the leaves until fine.
- Strain the pandan juice in a fine mesh sieve or a cheesecloth. Squeeze out as much extract as you can and discard the pulp.
Measure the juice to make sure it still makes up the original amount of water you added to the pandan leaves. In most cases, it might get reduced. If that happens, top up the pandan juice with more water until it reaches to the amount of water specified in the recipe.
Mixing the dough
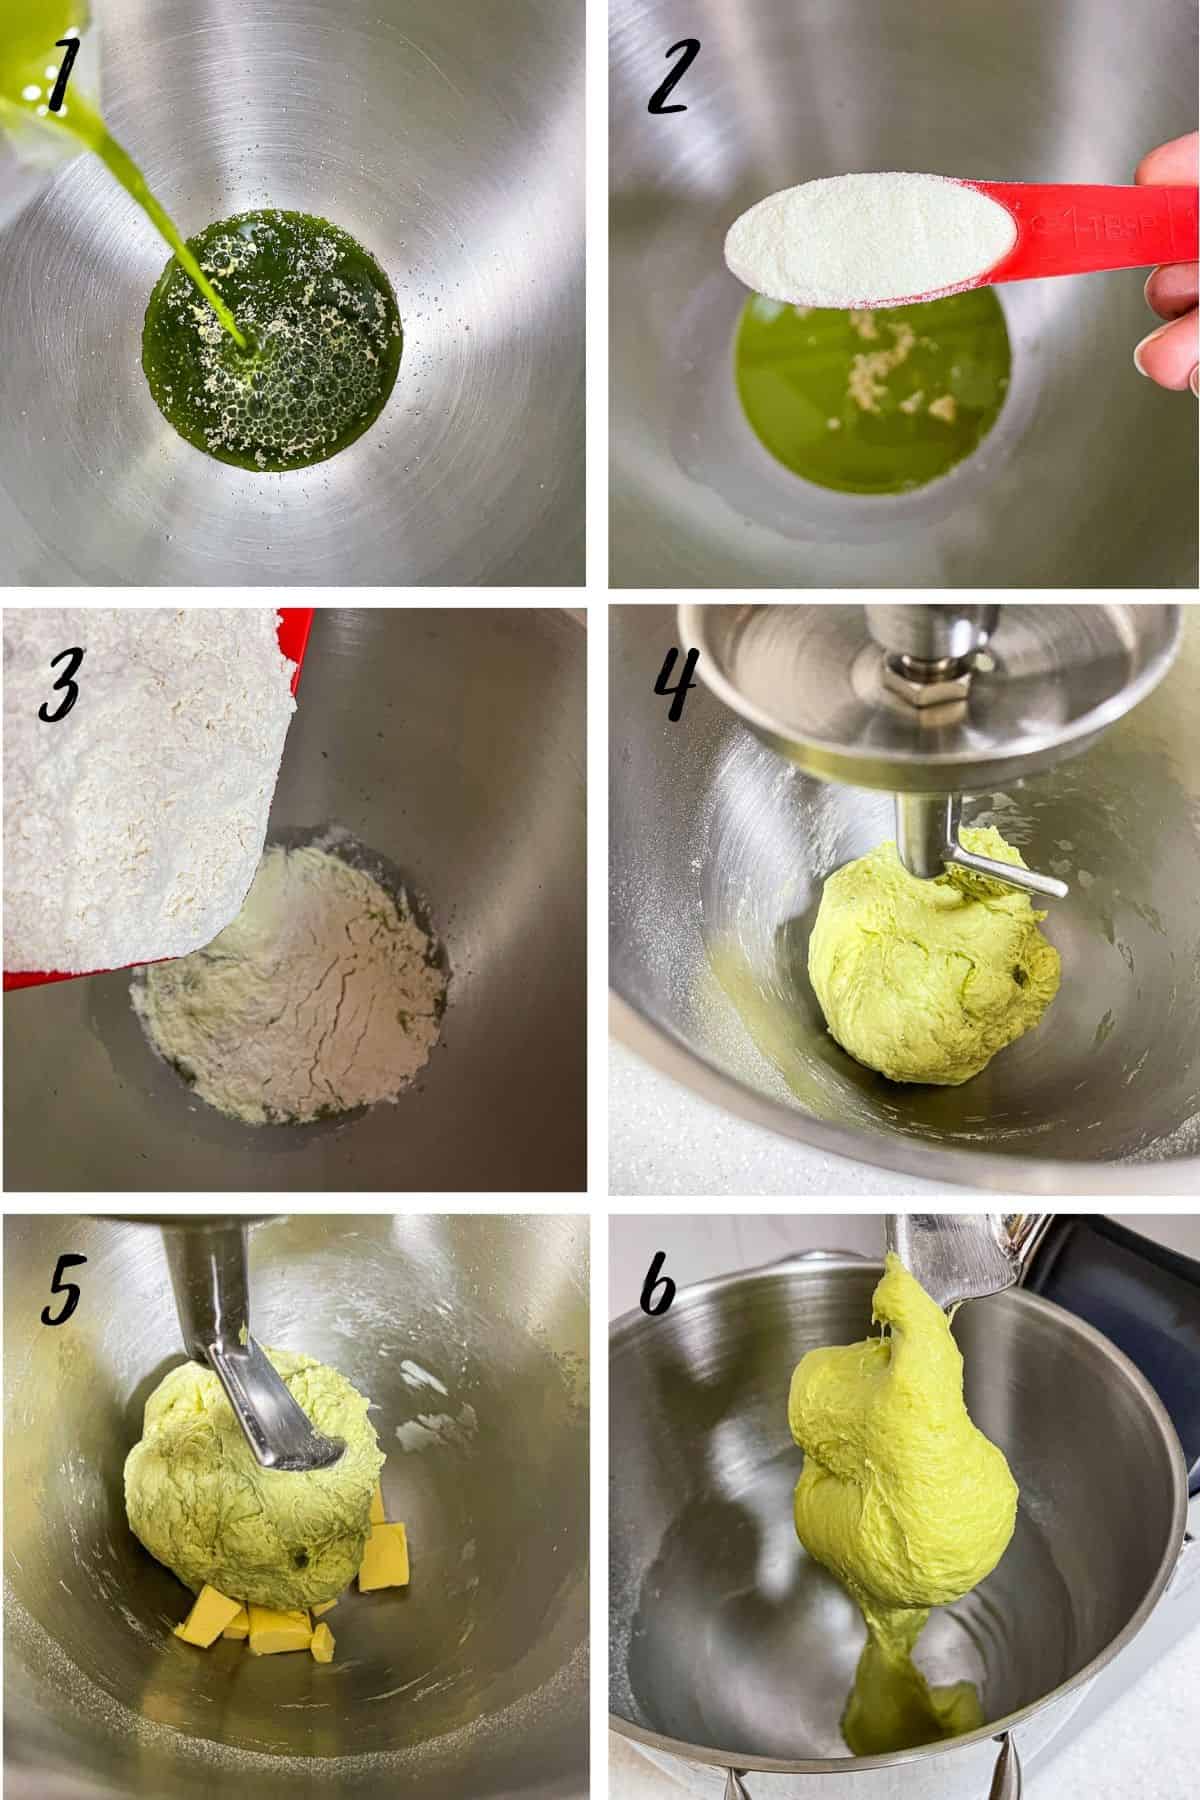
- Add instant yeast into a large bowl of a stand mixer with dough hook attachment. Pour in the pandan juice.
- Add sugar, followed by the milk powder into the wet ingredients.
- Next, mix flour and the salt (remaining dry ingredients) into the yeast mixture.
- Mix the ingredients on medium speed for 2 minutes, until the dough comes together.
- Cut or break the softened butter into small pieces and add into the dough gradually.
- Continue to knead on medium speed for 15 minutes until it becomes a nice kneadable bread dough.
The first proofing
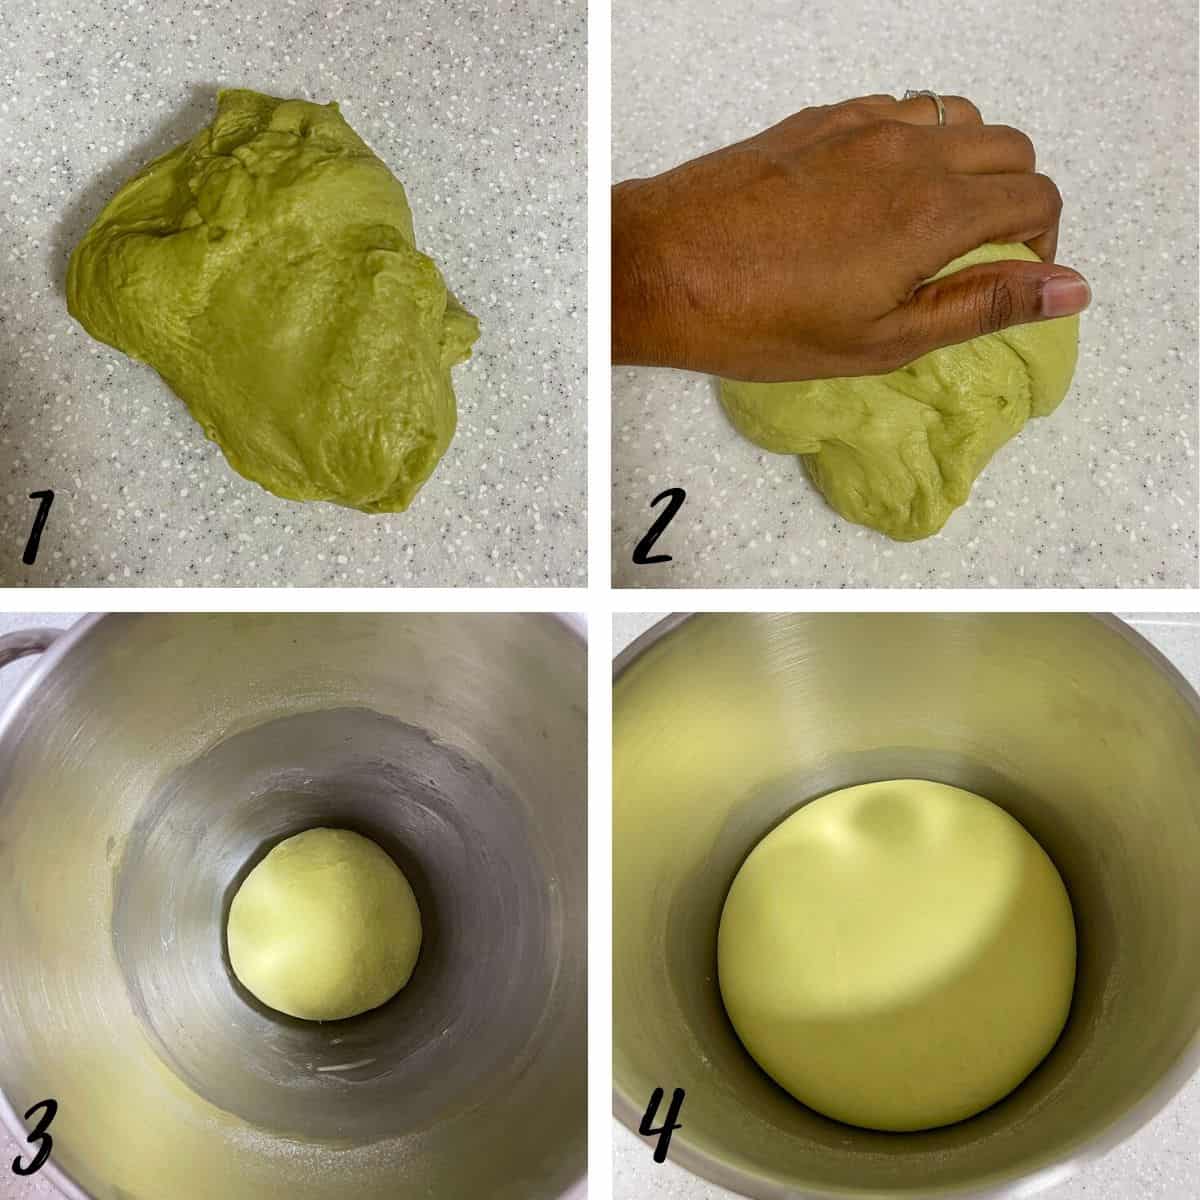
- Turn the pandan bread dough out onto a clean working space.
- Knead lightly to form a ball shape.
- Grease the mixing bowl with vegetable oil or butter and place dough in it.
- Cover and let the green dough rise until at least double in size in a warm place. You can cover with a plastic wrap or a kitchen towel.
Shaping the bread loaf
Once the dough as doubled in size, it is time to braid it.
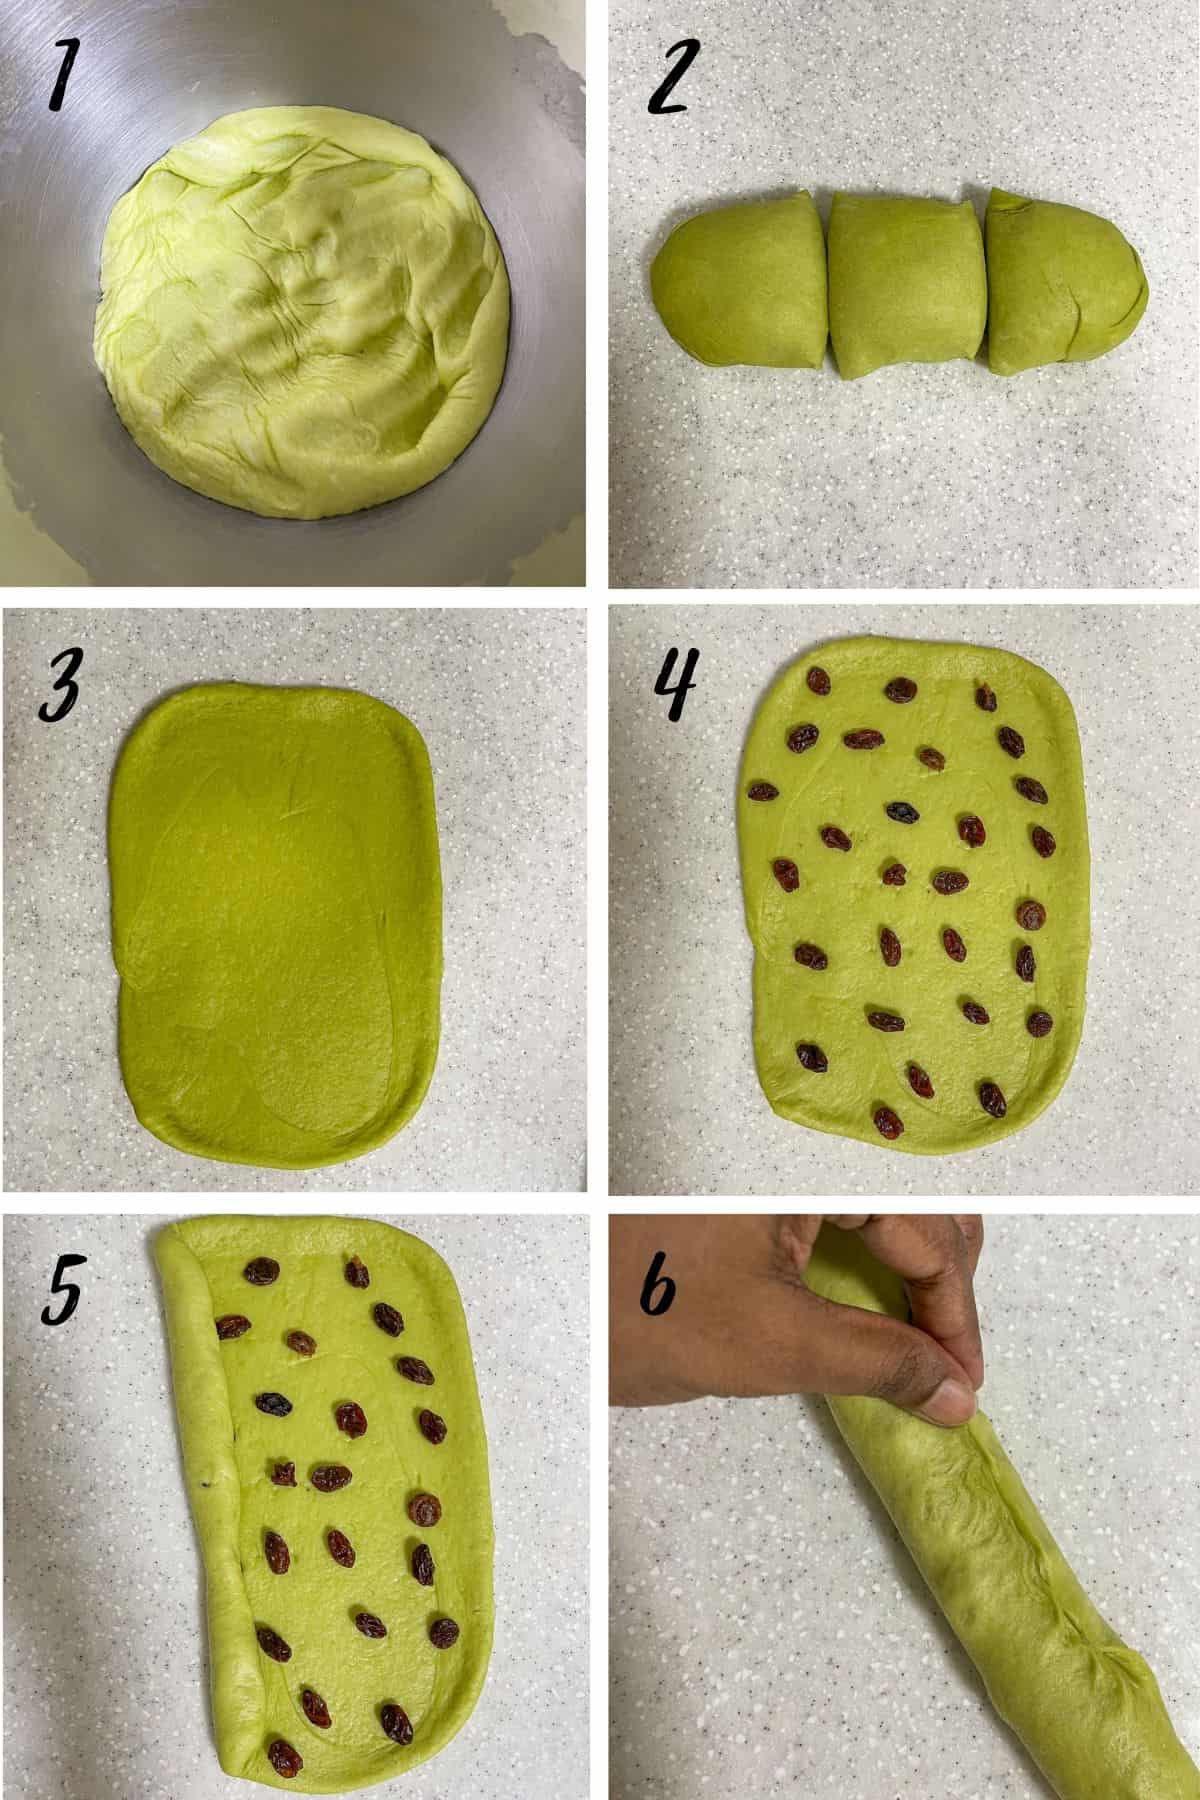
- Press the dough to release the air bubbles.
- Turn it out onto a clean workspace and divide dough into 3 equal pieces.
- Roll each portion with a rolling pin into approximately 9 inches by 6 inches rectangle.
- Divide the raisins into 3 portions and sprinkle the first portion all over the rolled pandan bread dough.
- Roll the dough tightly along its longer edge. You need to make sure you roll the dough tightly as any loose space will trap air and cause a hollow in your baked bread.
- Pinch the ends. Repeat the rolling process with the remaining 2 dough portions.
Making the 1st part of the pandan braid
Once you have all the 3 rolls of the dough, it is time to braid them.
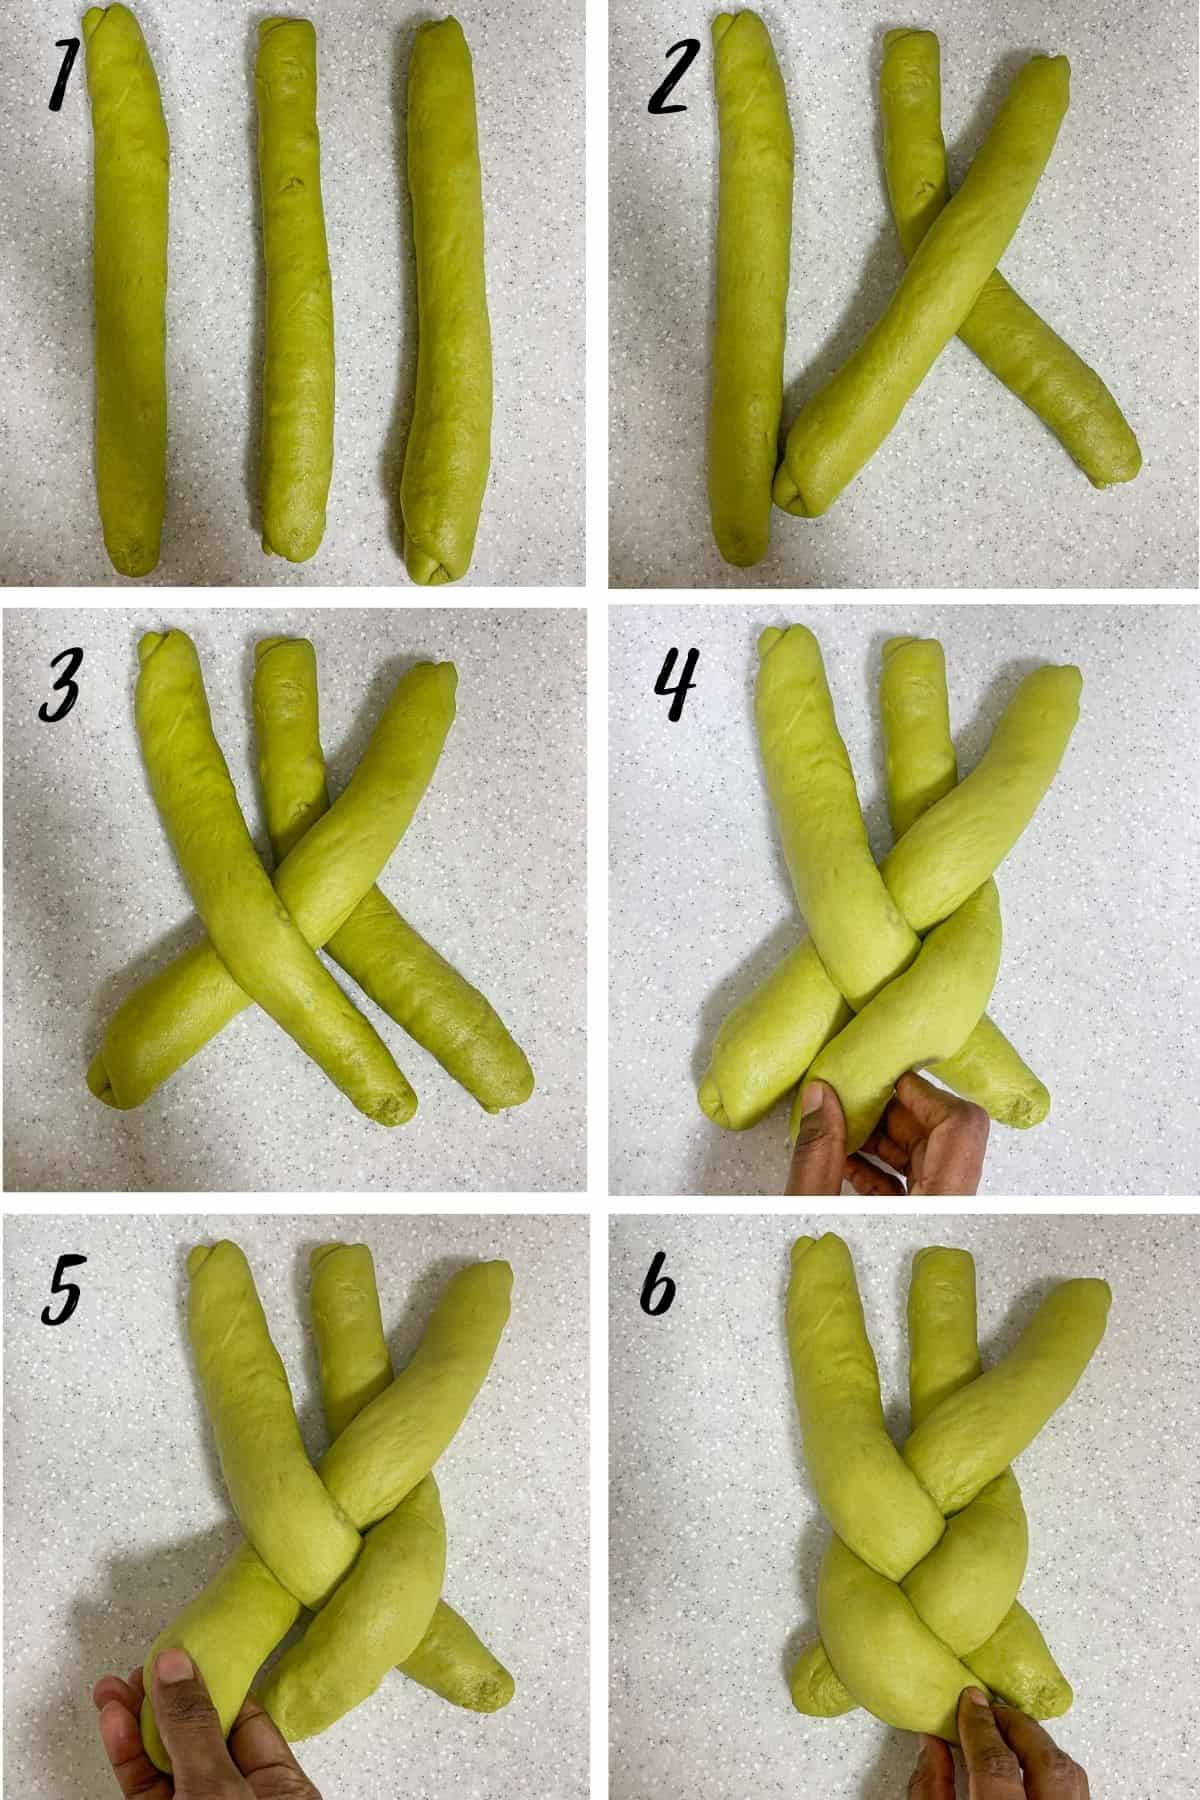
- Place all 3 dough logs in a vertical line as shown.
- Lift the dough log on the right and place it on the center log as shown.
- Next, lift the log on the left and place it on the earlier right log as shown.
- Move the dough log on the right onto the log in the center as shown.
- Next, lift the left most log.
- Place it on the center log.
Making the 2nd part of the pandan braid
Next, move to the top section of the braid.
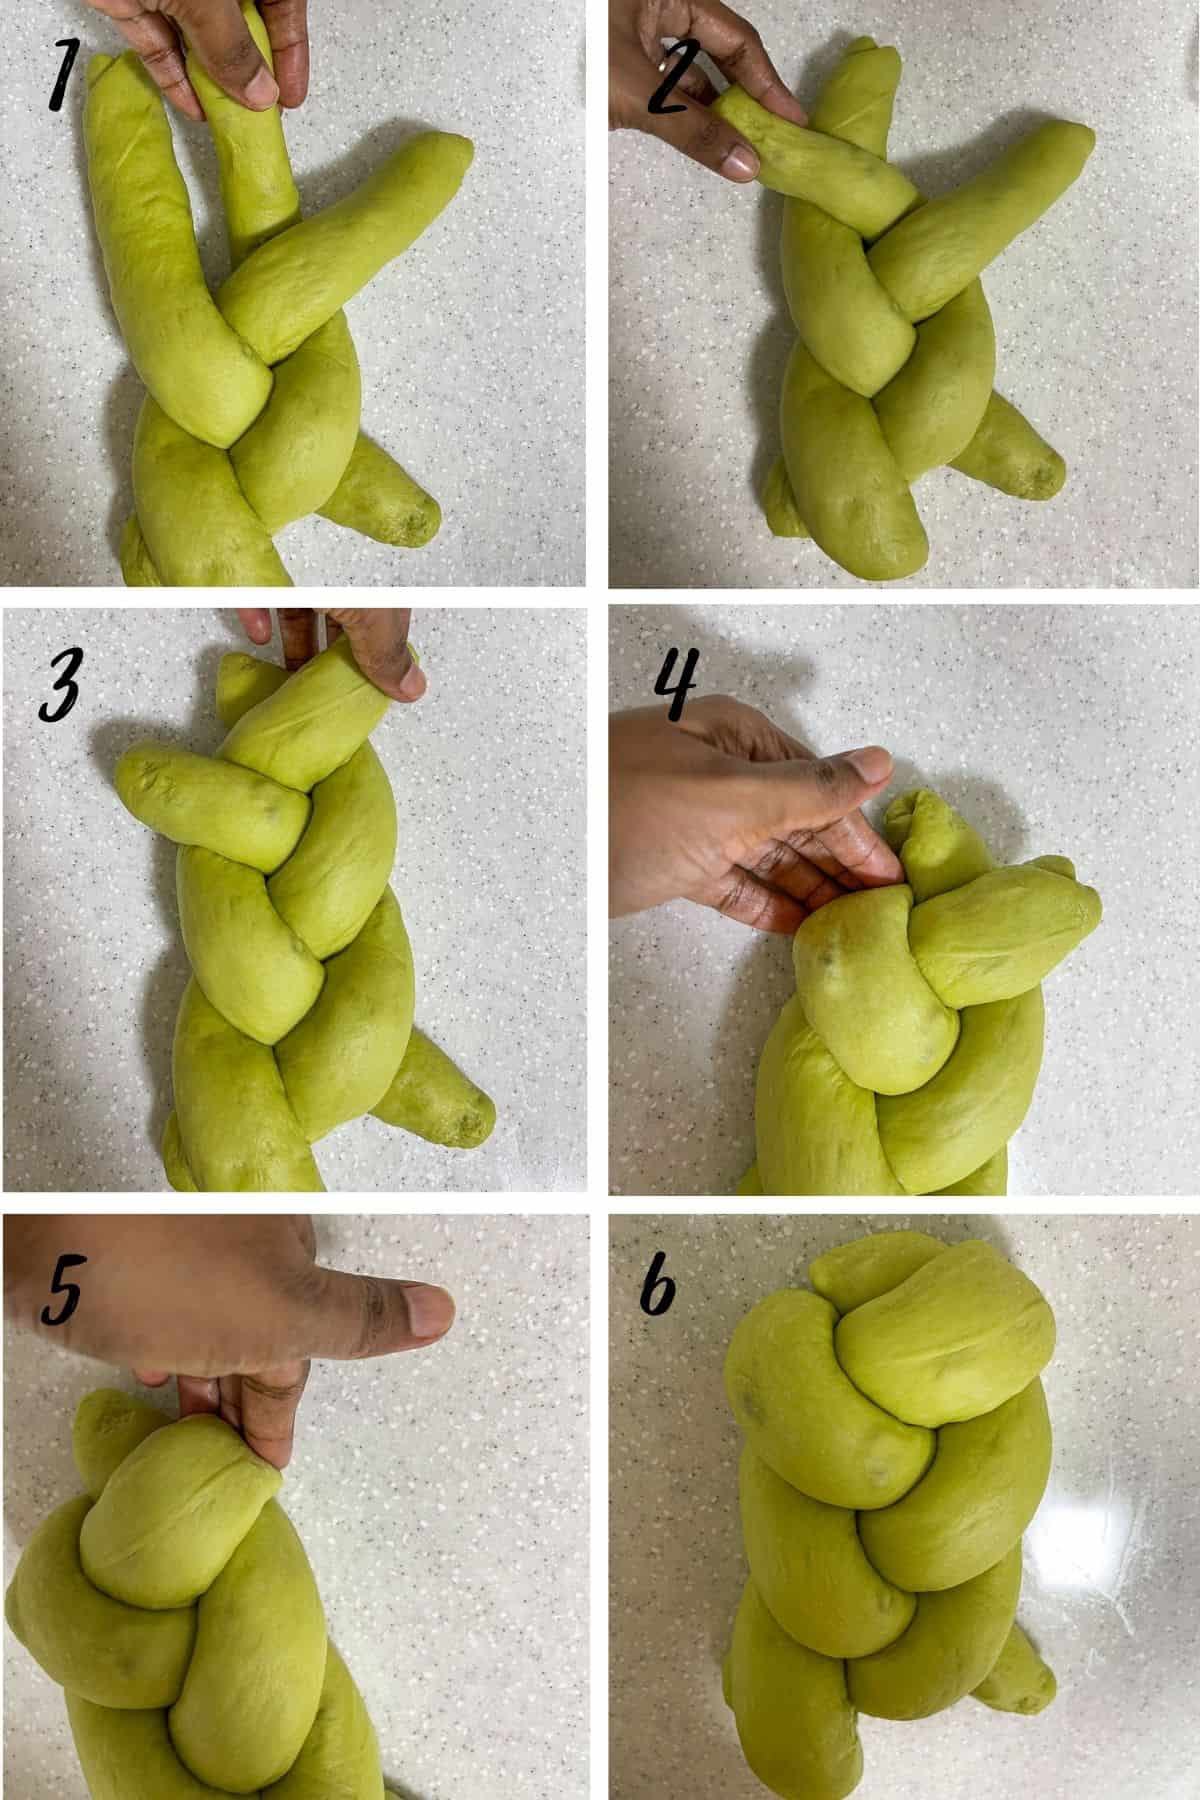
- Lift the center log.
- Place it on the left log.
- And then lift the now center log and place it on the right log.
- Lift the left log and tuck it underneath the center log. Pinch to the bottom of the braid to hold it in place.
- Repeat the same with the log on the right.
- And finally, tuck in the log in the center.
Completing the braid and second proofing
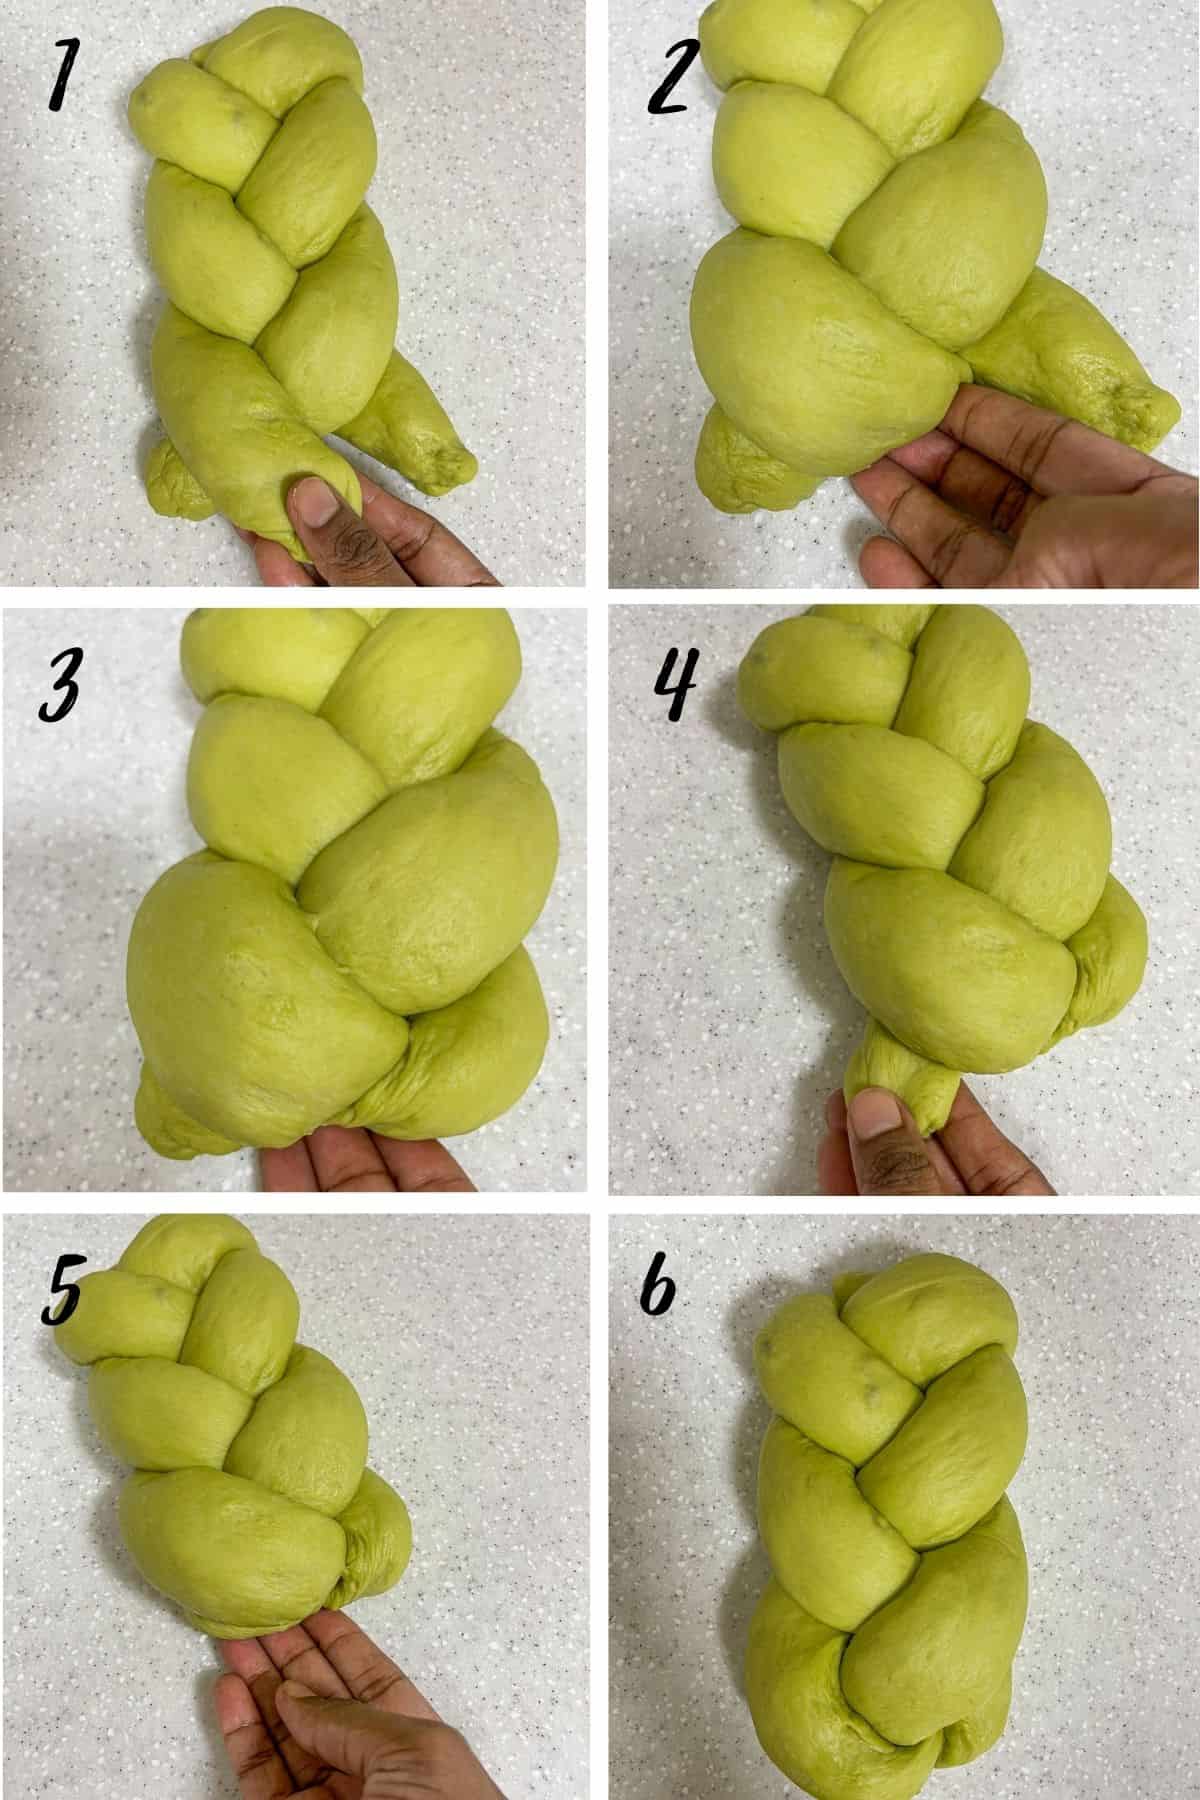
- Repeat the same tucking in process at the bottom section of the braid. Lift the log in the center.
- Tuck it underneath the log that is pointing towards left.
- And then lift the log on the right and tuck it towards the center of the braid.
- Finally, lift the log on the left to the center of the braided pandan bread dough.
- Tuck it underneath the loaf neatly.
- This is how the completed braid should look like.
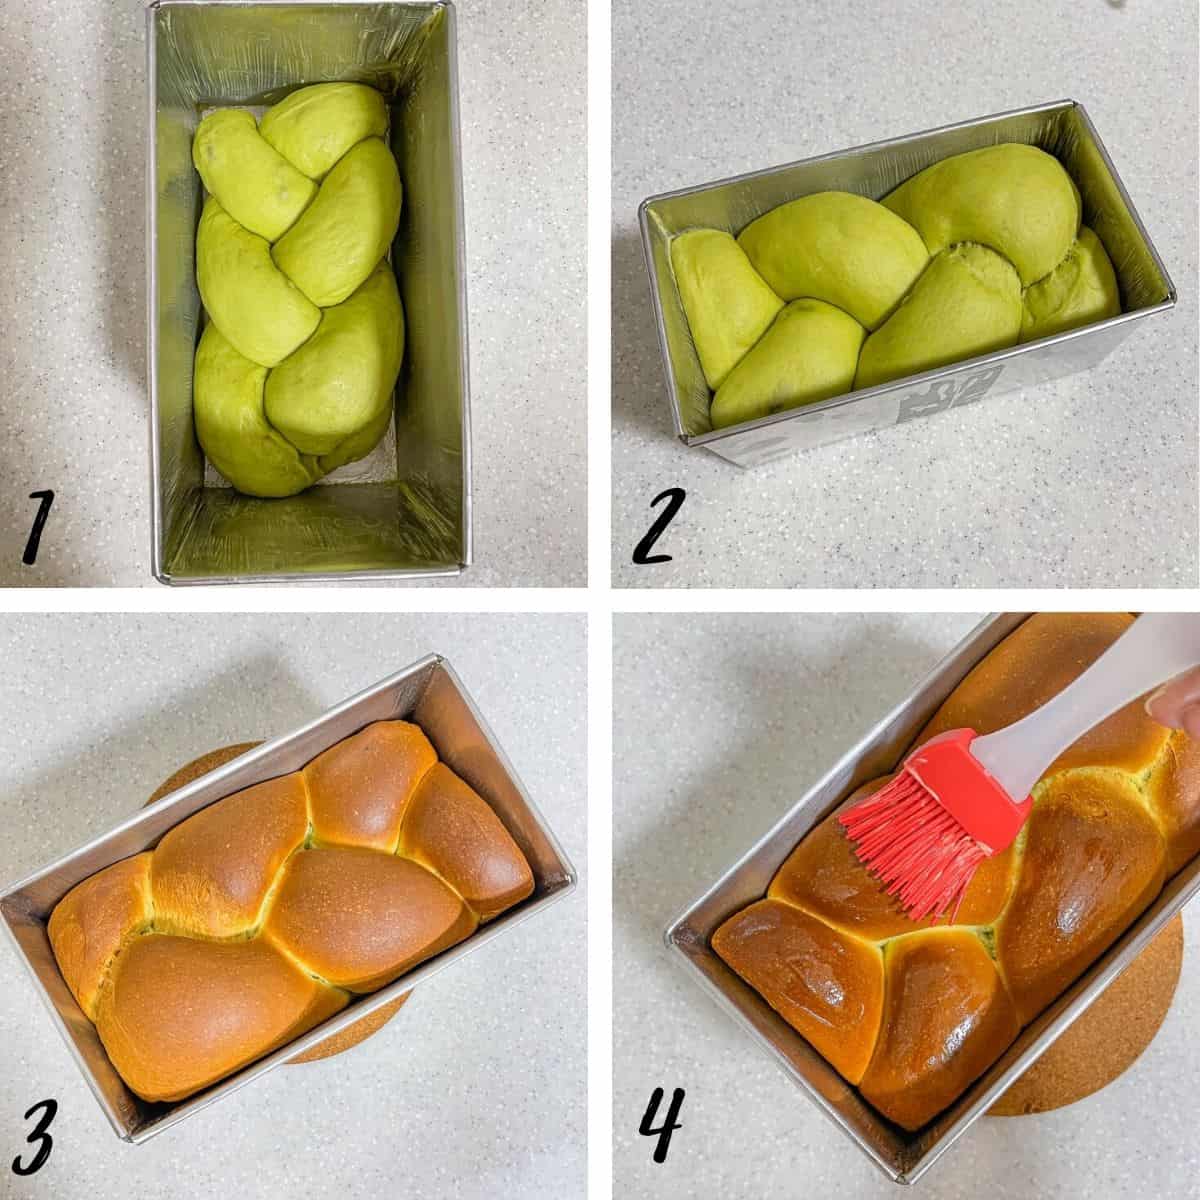
- Lift the braid and gently place it in a well greased rectangle bread loaf pan.
- Cover with a kitchen towel and let it proof until double in size.
- Bake the pandan raisin braid for 30 minutes at 160 degrees Celsius.
- Once baked, remove the loaf from the oven and brush the top with melted butter for a soft and shinier top.
Remove the pandan bread loaf from the tin and let it cool completely on a cooling rack before cutting.
🍽️Serving & storage
- This pandan milk loaf lasts at room temperature for a good 2 to 3 days.
- If refrigerated, it can keep for at least 4 to 5 days. It tends to become a little dry when consumed after 24 hours. Quick toasting of the bread with a spread of butter will help to make it all soft and fluffy again.
💡Expert Tips
- Do not cut short the kneading process. Kneading helps develop gluten, which gives this bread its structure and texture. Knead the dough until it becomes smooth, supple, and elastic. Follow the instructions and timing provided in the recipe.
- Do not also cut short on the proofing process too. Proofing is crucial for achieving a light and fluffy texture in this bread. Give the dough enough time to rise and double in size. The proofing time can vary depending on the temperature and humidity of your kitchen, hence you may need to adjust the proofing time accordingly.
💭FAQs
Pandan is a leafy plant and is known as screwpine in English. It has long, thin, blade-like leaves that can grow up to 60 to 70 cm long.
Pandan leaves are widely used in the both sweet and savory dishes in the Southeast Asia region. It has a lovely aroma and is also referred to as the vanilla of the East. Despite its wide usage in cooking, pandan leaves are never consumed on their own. They are often knotted and added into dishes when cooking and discard after cooking. The lovely aroma of the pandan is imparted into the dishes while cooking.
Another than the aroma, pandan leaves are also widely used as a natural colorant in food. To get the green color, the leaves are often processed with some liquid (often it is water) and then strained to remove the pulp, leaving fresh pandan juice or extract to be used as a natural colorant in cooking and baking.
If you cannot get fresh pandan leaves, you can try for the frozen ones. And if those are also not available, you can use the commercially made pandan paste and pandan essence to flavor and color your dishes.
The pandan bread recipe on this page is made using fresh pandan juice. It is blended with water and the juice is then strained and used to make the bread.
You don't really get to taste the pandan flavor in the bread but you definitely will be enjoying the fragrant pandan smell. This is a sweet bread and is therefore slightly sweeter than a normal white bread loaf.
Yes, you can. If you do not have bread flour, simply substitute with plain all purpose flour.
❤️More Recipes You Will Love
Do you like this recipe? Please leave a 5-star ⭐⭐⭐⭐⭐rating in the recipe card below and consider a review further down this page. I would love to hear from you. Thank you!
📖Recipe
Pandan Bread with Raisins
For best results, use the metrics measurements. US customary measurements have not been tested and are only meant for guide.
Ingredients
- 7 g instant dry yeast
- 180 ml water (lukewarm)
- 310 g bread flour (or all purpose flour)
- 2 tablespoon milk powder (powdered milk)
- 50 g sugar
- 30 g butter
- ½ teaspoon salt
- 5 pandan leaves (30 cm each)
- 50 g raisins
Instructions
- Prepare a loaf tin. Grease it well and set aside.
Making the pandan juice
- Wash and pat the pandan leaves dry. Cut them into 1 inch pieces and place them in the food processor. Add water.
- Process the leaves until fine. Strain the pandan juice in a fine mesh sieve or a cheesecloth. Squeeze out all the juice and discard the pulp.
- Measure the pandan juice in a measuring jug. If the amount is lesser than 180ml (water indicated in the recipe), top it up with plain water until it reaches 180ml.
Mixing the bread dough
- In a large mixing bowl, add the yeast.
- Pour the pandan juice and stir lightly.
- Next, add the sugar, milk powder, flour and salt.
- Knead on medium speed for 2 minutes (with a dough hook attachment) until the dough comes together.
- Add the butter and continue to knead until the butter gets fully incorporated into the dough and the dough turns stretchy. This should take approximately 15 minutes on medium high speed.
- Form the dough into a ball and place it in a large, greased bowl.
- Cover the bowl with a kitchen towel or cling wrap and place it is a warm place to proof. This should take approximately 1 hour depending on the surrounding temperature.
- Press the proofed dough to release air bubbles.
- Turn the dough onto a lightly floured surface and divide it into 3. Roll each section into rectangles measuring approximately 9 inches by 6 inches.
- Divide the raisin into 3 and sprinkle them onto the rolled dough (one portion of the raisins for each dough roll).
- Roll the dough into a tight rolls, tuck the ends underneath and pinch the sides.
Making the braid - 1st part
- Place all 3 dough logs in a vertical line. Cross the middle log and the one of the right at the center.
- Place the dough log on the left onto the log in the center. Next, lift the right most log and place it on the center log. And then lift the left most log and place it on the now center log.
Making the braid - 2nd Part
- Next, move to the top section of the braid. Lift the center log and place it on the left log.
- And then lift the now center log and place it on the right log. Lift the left log and tuck it underneath the center log. Pinch to the bottom of the braid to hold it in place.
- Repeat the same with the log on the right. And finally, tuck in the log in the center. Pinch all the logs to the bottom of the pandan bread braid.
- Repeat the same tucking in process at the bottom section of the braid. Lift the log in the center, and tuck it underneath the log that is pointing towards left.
- And then lift the log on the right and tuck it towards the center of the braid. Finally, tuck the log on the left to the center of the braided pandan bread dough.
- Lift the braid and gently place it in a well greased loaf tin.
Baking the pandan bread
- Let the bread loaf proof again until slightly more than double in size.
- Bake the bread at 165°Celcius on the lowest rack in the oven.
- Once baked, remove the loaf from the oven and brush the top with melted butter.
- Let the pandan bread rest in the tin for about 1 minute. Turn it out onto a wire rack to cool completely.
- Slice the bread after it has completely cooled down for neater slices.
Notes
- Do not cut short the kneading process. Kneading helps develop gluten, which gives this bread its structure and texture. Knead the dough until it becomes smooth, supple, and elastic. Follow the instructions and timing provided in the recipe.
- Do not also cut short on the proofing process. Proofing is crucial for achieving a light and fluffy texture in this bread. Give the dough enough time to rise and double in size. The proofing time can vary depending on the temperature and humidity of your kitchen, hence you may need to adjust the proofing time accordingly.





Leave a Reply