

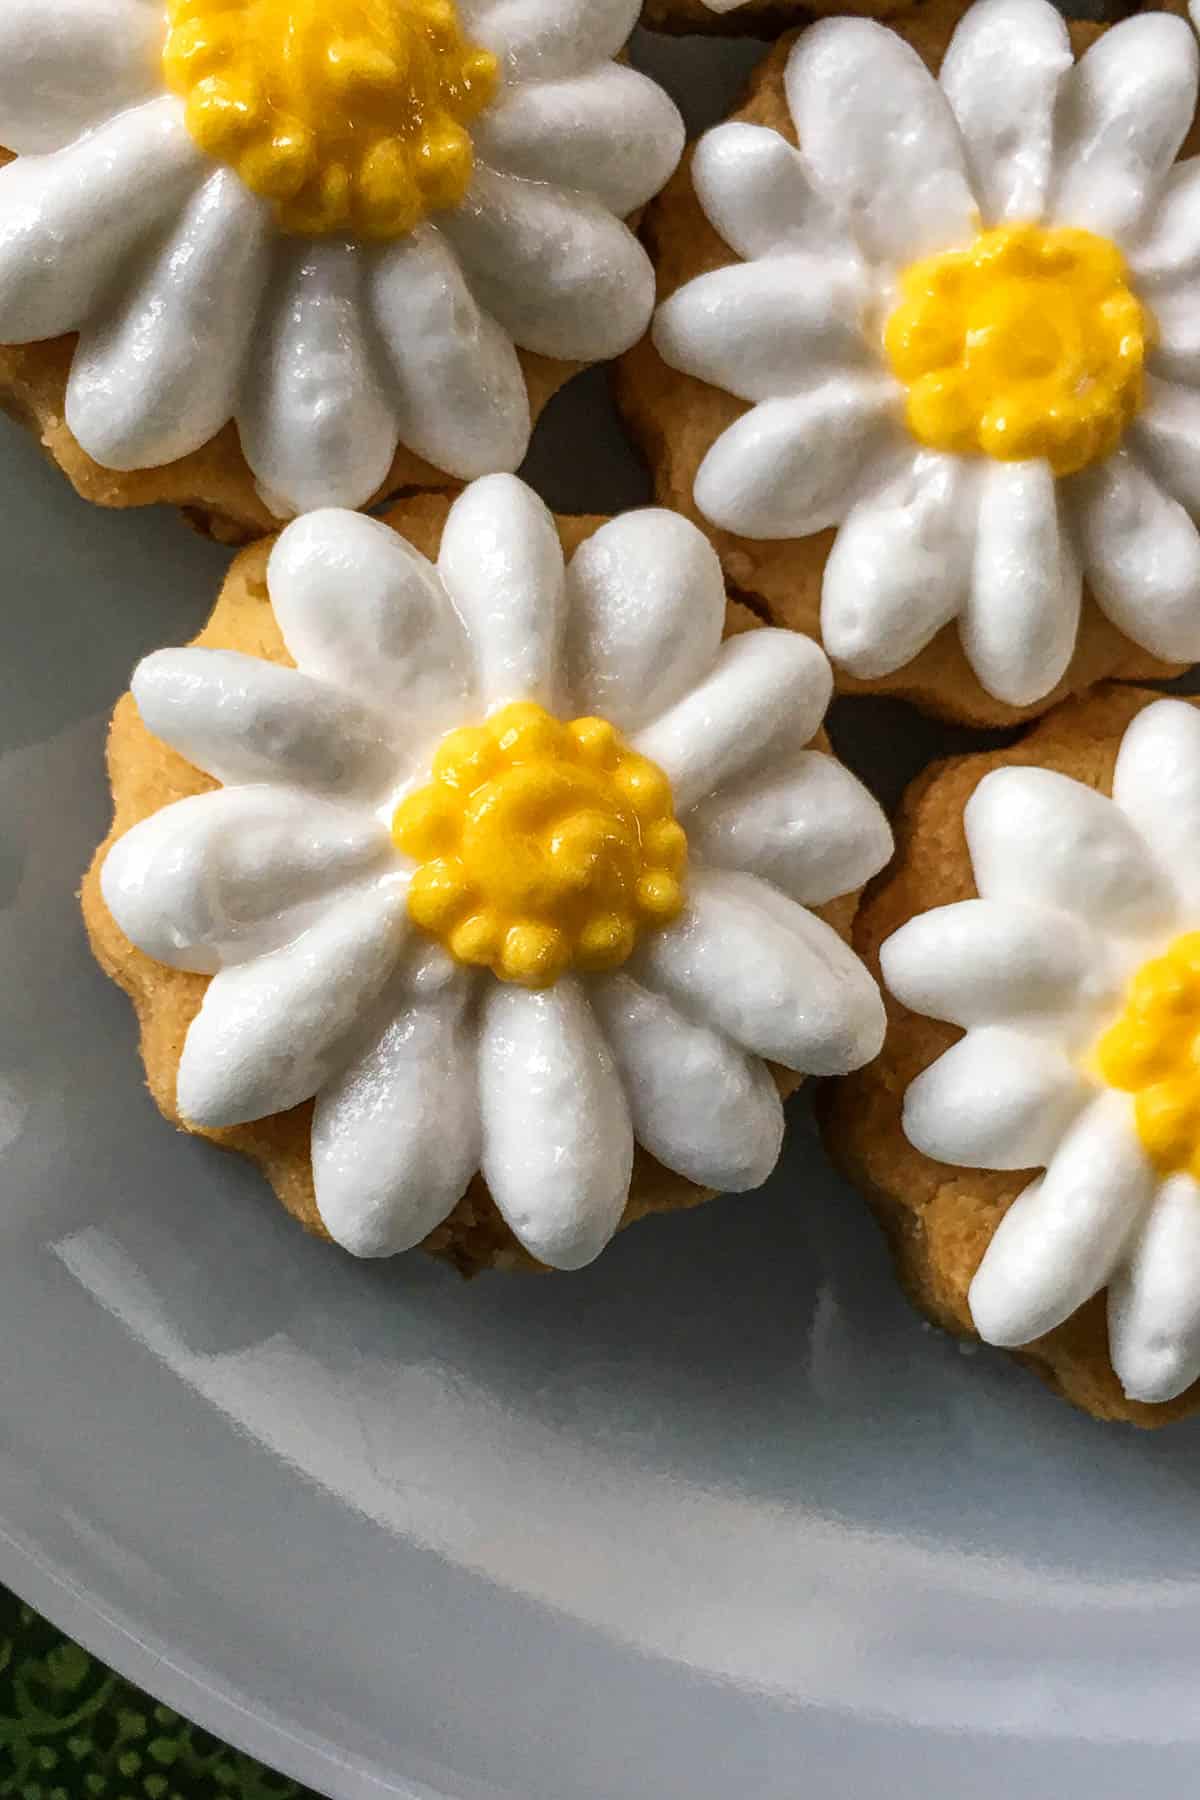
These daisy cookies are simply the best! With a deliciously buttery lemon flavored sugar cookie base and sweet, bright white and yellow piped royal icing daisy flowers, these bite-sized cookies are easy to make, delicious and make great treats for Easter, Christmas and perfect for gifting too!

If you like these flower cookies, do check out my buttercream sunflower cupcakes and daisy cupcakes that are equally easy to make. And you might also be interest to check out my rosette cake and this pretty blue buttercream flowers cake.
Jump to:
❤️Why You Will Love This Recipe
- The recipe is simple and requires only 5 ingredients - flour, butter, sugar, egg, lemon and salt. The dough is easy to mix, roll and cut.
- The cookies are delicious. They have a rich buttery taste and a light crumbly texture.
- The lemon zest in the cookies give them a lovely lemon flavor.
- The daisy flowers are piped with royal icing and set well, so there is no need to worry about the icing smearing on the cookies once it is set.
- The cookies are very pretty and fairly easy to pipe. They make great treats for the Holidays and perfect gifts too!
📋Ingredients
For the cookies:
- All purpose flour - creates the perfect structure for these cut out cookies to maintain the same size after baking. Do not use self raising flour as it is not suitable for this recipe.
- Butter - I use salted butter. If you prefer unsalted butter, add an extra pinch of salt to the recipe.
- Granulated sugar (caster sugar) - white sugar works best for this recipe. Avoid coarse sugar as it will leave marks of sugar specks on your cookies after baking.
- Egg yolk - Binds all the ingredients together. Use large eggs. Do not use the egg white in the recipe. Separate the white and yolk while the egg is cold (it is easier to do it when the egg is cold) and bring the yolk to room temperature before using.
- Grated lemon rind - this is optional, but adds a lovely citrus flavor to the cookies. Use fresh lemon.
- Salt - do not skip this as it enhances the taste.
For the royal icing:
- Powdered sugar (sifted) - Powdered sugar tend to clump and must be sifted before using, particularly for this recipe as the tiny sugar lumps
- Egg white - make sure to use pasteurized eggs to prevent the risk of food poisoning from the raw egg.
- Lemon juice - use juice from fresh lemons. Make sure to strain it to remove any pulp or seeds. You will need the icing to be smooth for piping.
- Yellow food coloring - this is to color the icing for the flower centers. Both gel based or liquid food coloring will work for this recipe.
Decorating tools:
- Petal tip 104 & round tip 3 - to pipe the flower petals and the centers
- Disposable piping bags & Piping tip coupler
*Refer to the recipe card below for full list of ingredients and exact quantities. For best results, use a digital kitchen scale where applicable*
🧾Substitution and Variations
- Fresh egg whites can be replaced with meringue powder. Add 1 tablespoon of the powder into the powdered sugar and mix well. Add 2 tablespoons of water and whip until the mixture turns white and glossy.
- The lemon zest in the cookies and the lemon juice in the icing is optional. You can replace them with vanilla extract for vanilla flavored cookies.
This recipe has not been tested with other substitutions or variations. If you do try, please let me know in the comments section below!
👩🏻🍳How to Make
Step 1: Mix the cookie dough. Preheat your oven to 170 degrees Celsius and line baking trays with parchment paper. Grate the lemon rind and set it aside.
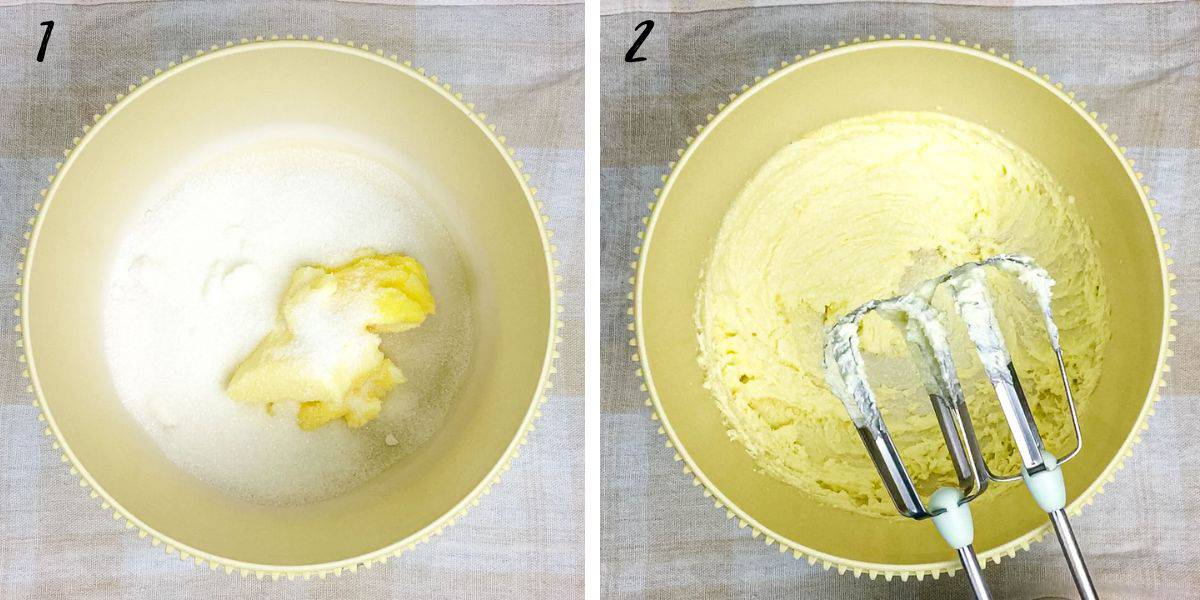
Measure butter into a mixing bowl. Add the granulated sugar to it (image 1)and beat until creamy (image 2).
Note: Butter should be at room temperature but firm. If it is too soft, place it back in the fridge for a few minutes until it firms up.
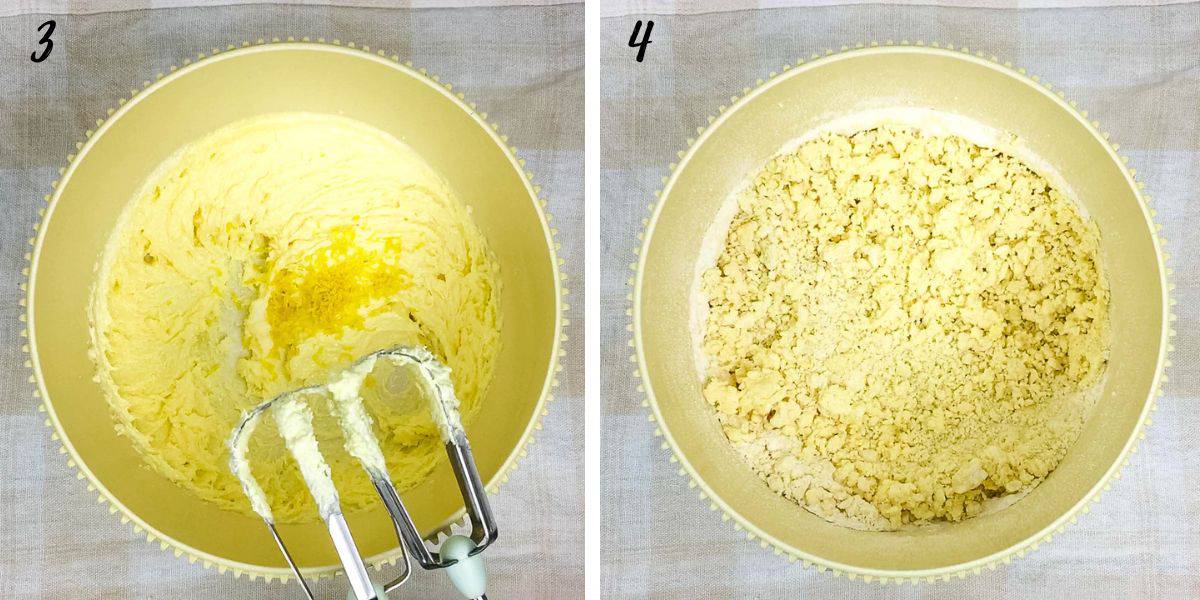
Add the yolk and beat again until all the traces of the egg are no longer visible. Do not overbeat. Add the salt and lemon zest next. Beat again for about 10 to 15 seconds until well combined (image 3).
Note: Scrape the sides and bottom of the bowl to make sure all the ingredients are well combined.
Sift in the flour and mix on low speed. The dough will appear crumbly at this stage(image 4).
Note: Start with low speed to avoid the flour from flying all over as you turn on your mixer.
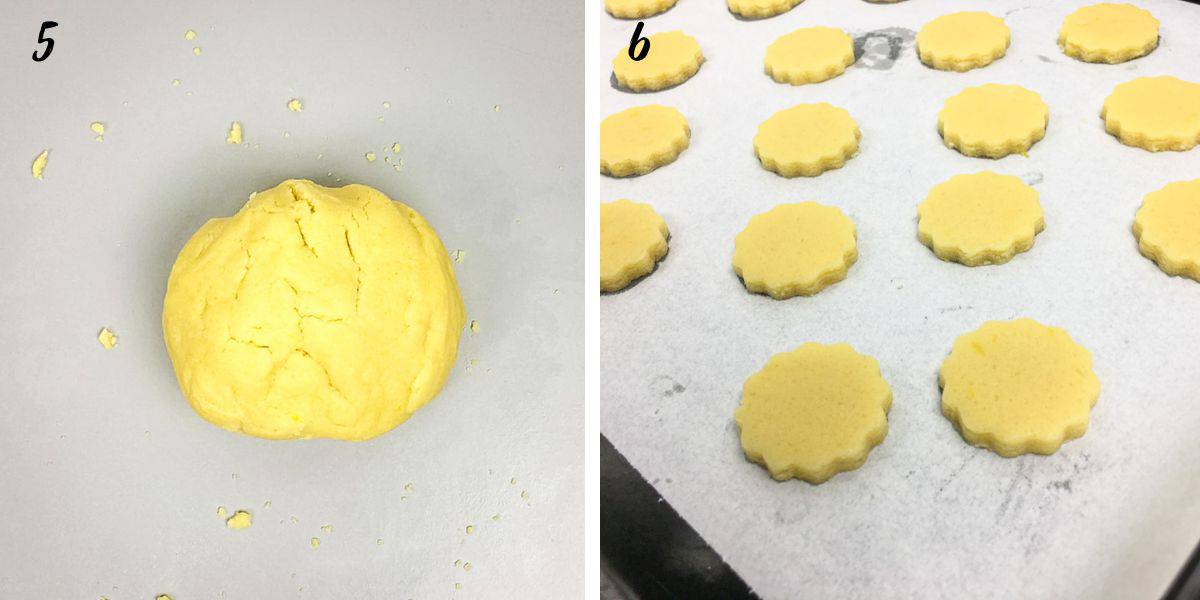
Turn it out onto your workspace and knead it lightly to bring it together into a ball (image 5). Cover and let it rest for approximately 10 minutes.
Note: This resting time allows the dough to come together and makes it easier to roll and cut.
Step 2: Roll, cut and bake the cookies. Portion the dough for easy rolling. Place it between 2 plastic sheets or parchment paper and roll it flat to about a quarter inch thick. Cut the dough into circles (image 6).
Note: If you do not want to roll and cut the cookies, you can always form them into small balls (about half a tablespoon size) and press them flat with your hands or the back of a drinking glass into round discs.
Place the cut out cookies onto the prepared tin. You need not space them out much as they will not rise during baking (since there are no leavening agents used in the recipe). Bake them in the preheated oven for approximately 10 minutes, until the edges start to turn golden brown.
Let the cookies cool down to room temperature before decorating. You can even make the cookies a day or two in advance before decorating them.
Step 3: Make the royal icing. Decorating the cookies is the fun part of making these pretty flower cookies. I used royal icing made using fresh egg white, but if you want, you can always make the royal icing using meringue powder too.
Note: When making royal icing, it is always important to make sure all utensils that are used for mixing are absolutely grease-free. Otherwise, the egg whites will not whisk well and you will end up with runny royal icing.
Add egg white into a grease-free mixing bowl and whisk it on medium speed until it turns frothy. Gradually add the sifted powdered sugar while whisking. And then add the lemon juice.
Continue to whisk until the icing reaches a stiff peak consistency.
Step 4: Decorate the cookies. Transfer a quarter of the royal icing into a small bowl and tint it yellow. Fill the white icing into a piping bag fitted with petal tip #104 and the yellow into a piping bag fitted with round tip #3.

Start with the white icing for the white petals. Hold the wider end of the petal tip pointing upwards and narrower end to point towards the center of the cookies (image 7). Move the tip from the edges towards the center as you pipe the petals (image 8).
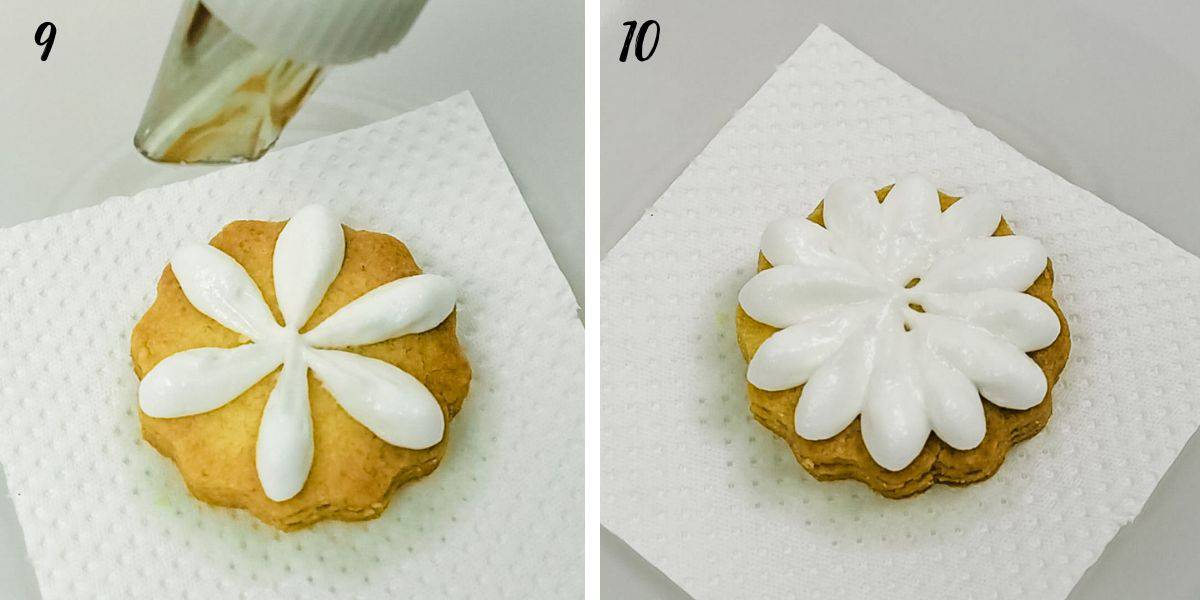
Do these petal piping in 2 cycles as it is easier to space them out consistently that way (images 9 & 10).
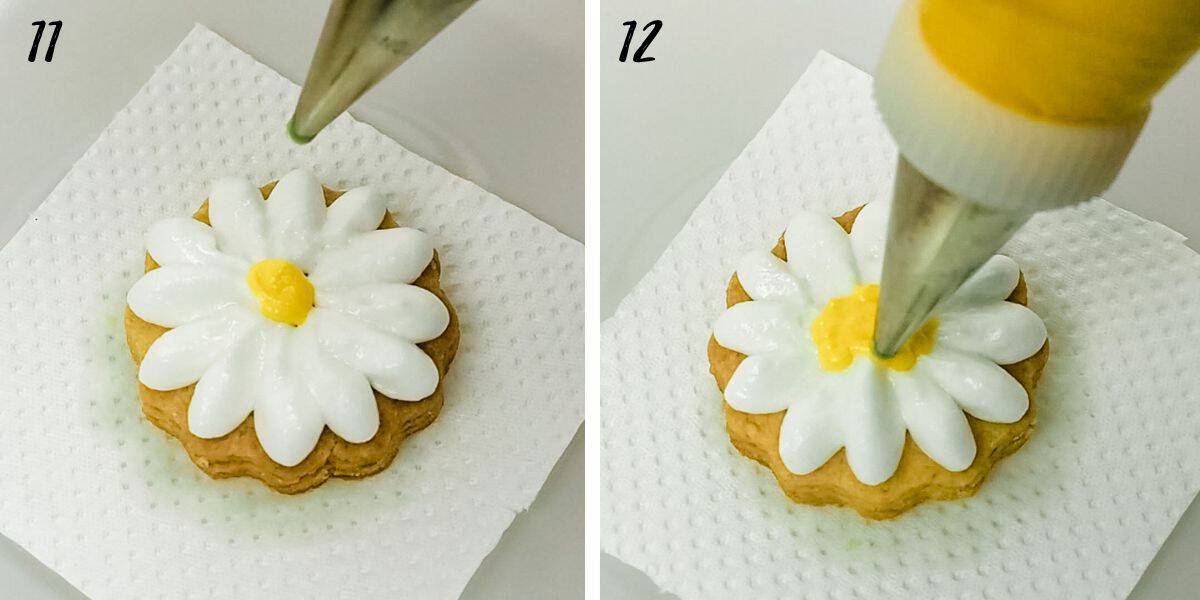
Once the petals are done, use the yellow to pipe the centers. For added texture, start with a medium-sized dot in the center (image 11) and then add tiny dots of yellow around the initial yellow center (image 12).
Let the royal icing daisies set completely before storing the cookies.
💡Expert Tips
- When creaming the butter and sugar, it should only be long enough until it appears creamy. No need to wait until it becomes light and fluffy. Too much mixing is often associated with cookies spreading during baking.
- Placing the dough between plastic sheets or parchment paper will prevent it from sticking to your workspace and rolling pin. It will also be easy to lift them after rolling.
- For consistent thickness when rolling the dough, use rolling pin guides (attached to your rolling pin) or dowel rods on either side of your dough, but within the width of the rolling pin so that you roll on the rods. That way, your cookie dough will not get any thinner than the diameter of the rods.
- Oven temperatures may vary, and it is advisable to test the baking temperature and time with a small batch of cookies before adjusting for subsequent batches.
- Baking time will vary depending on the size of your cookies. Mine measure 4cm in diameter.
- Eggs whites will not whip well if there is any trace of grease in the bowl or the beaters. Rinse your bowl and the beaters with hot water and wipe them dry before making the royal icing.
- Always sift your powdered sugar before making royal icing or any other frosting as it tends to be lumpy and these do not break easily. They can get stuck to your piping tips when piping.
💭FAQs
These cookies are best stored in an airtight container to maintain their crumbly texture.
These cookies last well for up to 2 weeks. Store in an airtight container.
Yes you can. However, buttercream does not set and harden like royal icing and will remain soft. You will not be able to stack the cookies on top of one another.
❤️More Recipes You Will Love


Do you like this recipe? Please leave a 5-star ⭐⭐⭐⭐⭐rating in the recipe card below and consider a review further down this page. I would love to hear from you. Thank you!
📖Recipe

Daisy Cookies (Flower Cookies with Royal Icing)
For best results, use the metrics measurements. US customary measurements have not been tested and are only meant for guide.
Ingredients
Cookies
- 225 g all purpose flour
- 125 g butter
- 125 g granulated sugar
- 1 egg yolk
- 1 teaspoon lemon rind grated
- ¼ teaspoon salt
Royal Icing
- 150 g powdered sugar sifted
- ½ egg white
- ¼ teaspoon lemon juice
Instructions
Bake the cookies
- Preheat oven to 160℃. Line baking trays with parchment paper.
- Grate the lemon rind and set it aside.
- Measure butter (should be at room temperature but not too soft) into a mixing bowl (see Note 1). Add granulated sugar and beat until creamy.
- Add egg yolk and beat again until all the traces of the egg are no longer visible. Do not overbeat.
- Add salt and lemon zest. Beat again for about 10 to 15 seconds until well combined. Scrape the sides and bottom of the bowl to make sure all the ingredients are well combined.
- Sift in the flour and mix on low speed (see Note 2). The dough will appear crumbly at this stage.
- Turn it out onto your workspace and knead lightly to bring it together into a ball. Cover and let it rest for approximately 10 minutes.
- Portion the dough for easy rolling. Place each portion between 2 plastic sheets or parchment paper and roll flat to about a quarter inch thick and cut into circles (see Note 3).
- Place the cut out cookies onto the prepared tin. Bake in the preheated oven for approximately 10 minutes, until the edges start to turn golden brown.
- Remove cookies from oven and place them on a wire rack to cool completely before decorating.
Decorate the cookies
- Add egg white into a grease-free mixing bowl and whisk it on medium speed until it turns frothy (see note 4).
- Gradually add the sifted powdered sugar while whisking, followed by lemon juice.
- Continue to whisk until the icing reaches a stiff peak consistency.
- Transfer a quarter of the royal icing into a small bowl and tint it yellow. Fill the white icing into a piping bag fitted with petal tip #104 and the yellow into a piping bag fitted with round tip #3.
- Start with the white icing for the white petals. Hold the wider end of the petal tip pointing upwards and narrower end to point towards the center of the cookies. Move the tip from the edges towards the center as you pipe the petals.
- Do these petal piping in 2 cycles as it is easier to space them out consistently that way.
- For the yellow centers, pipe a large dot in the center of each flower, followed by tiny dots around it.
- Let the royal icing daisies set completely before storing the cookies in an airtight container.
Video
Notes
- Butter should be at room temperature but firm. If it is too soft, place it back in the fridge for a few minutes until it firms up. When creaming the butter and sugar, it should only be long enough until it appears creamy. No need to wait until it becomes light and fluffy. Too much mixing is often associated with cookies spreading during baking.
- Start with low speed to avoid the flour from flying all over as you turn on your mixer.
- Placing the dough between plastic sheets or parchment paper will prevent it from sticking to your workspace and rolling pin. It will also be easy to lift them after rolling. For consistent thickness when rolling the dough, use rolling pin guides (attached to your rolling pin) or dowel rods on either side of your dough. If you do not want to roll and cut the cookies, form them into small balls (about half a tablespoon size) and press flat with your hands or the back of a drinking glass into round discs.
- When making royal icing, it is always important to make sure all utensils that are used for mixing are absolutely grease-free. Otherwise, the egg whites will not whisk well and you will end up with runny royal icing. Rinse your bowl and the beaters with hot water and wipe them dry before making the royal icing.
- Always sift your powdered sugar before making royal icing or any other frosting as it tends to be lumpy and these do not break easily. They can get stuck to your piping tips when piping.
- Oven temperatures may vary, and it is advisable to test the baking temperature and time with a small batch of cookies before adjusting for subsequent batches.
- Baking time will vary depending on the size of your cookies. Mine measure 4cm in diameter.

Amanda
These cookies turned out so cute! They were super fun to decorate and si delicious.
Jeri
These were so fun to make and almost too pretty to eat! Thank you for the fantastic step-by-step instructions, they turned out great!
Sunrita
These cookies look exquisite. Just so beautiful
Jessica
These are so pretty! Definitely adding these to my spring baking list. Can't wait to share these with my girlfriends for our weekly meet-up. I just hope my turn out as good to look at as yours.
Andréa Janssen
This was a delicious cookie. We loved the royal icing topping and the kids were very fond of the daisy flowers.