

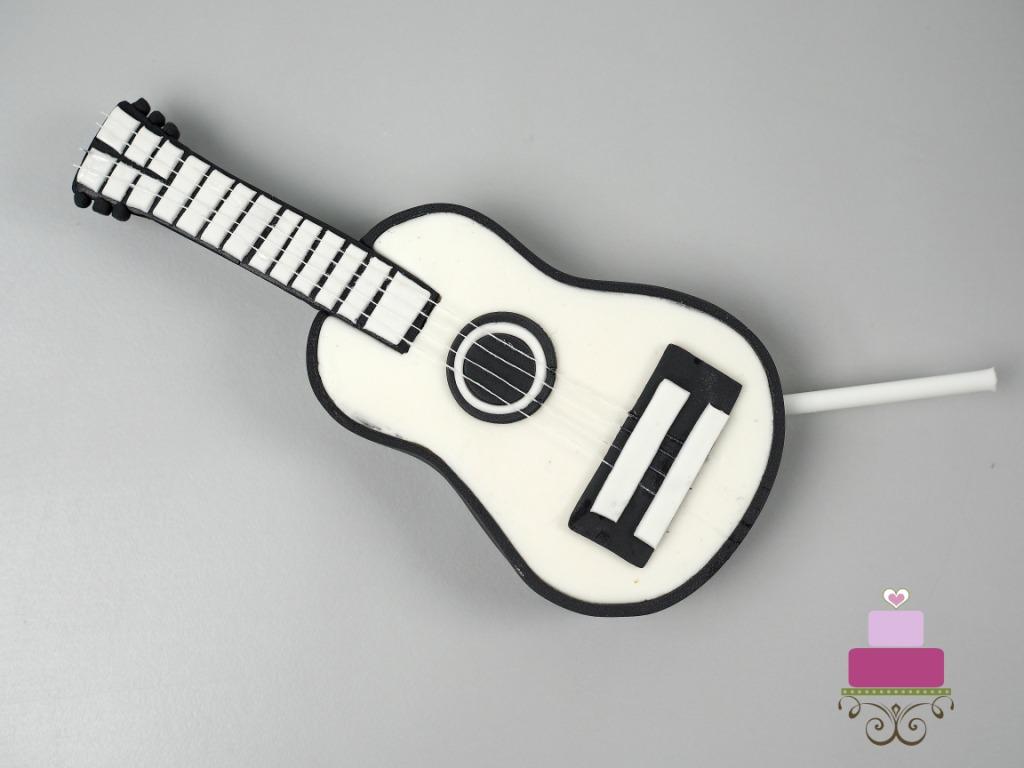
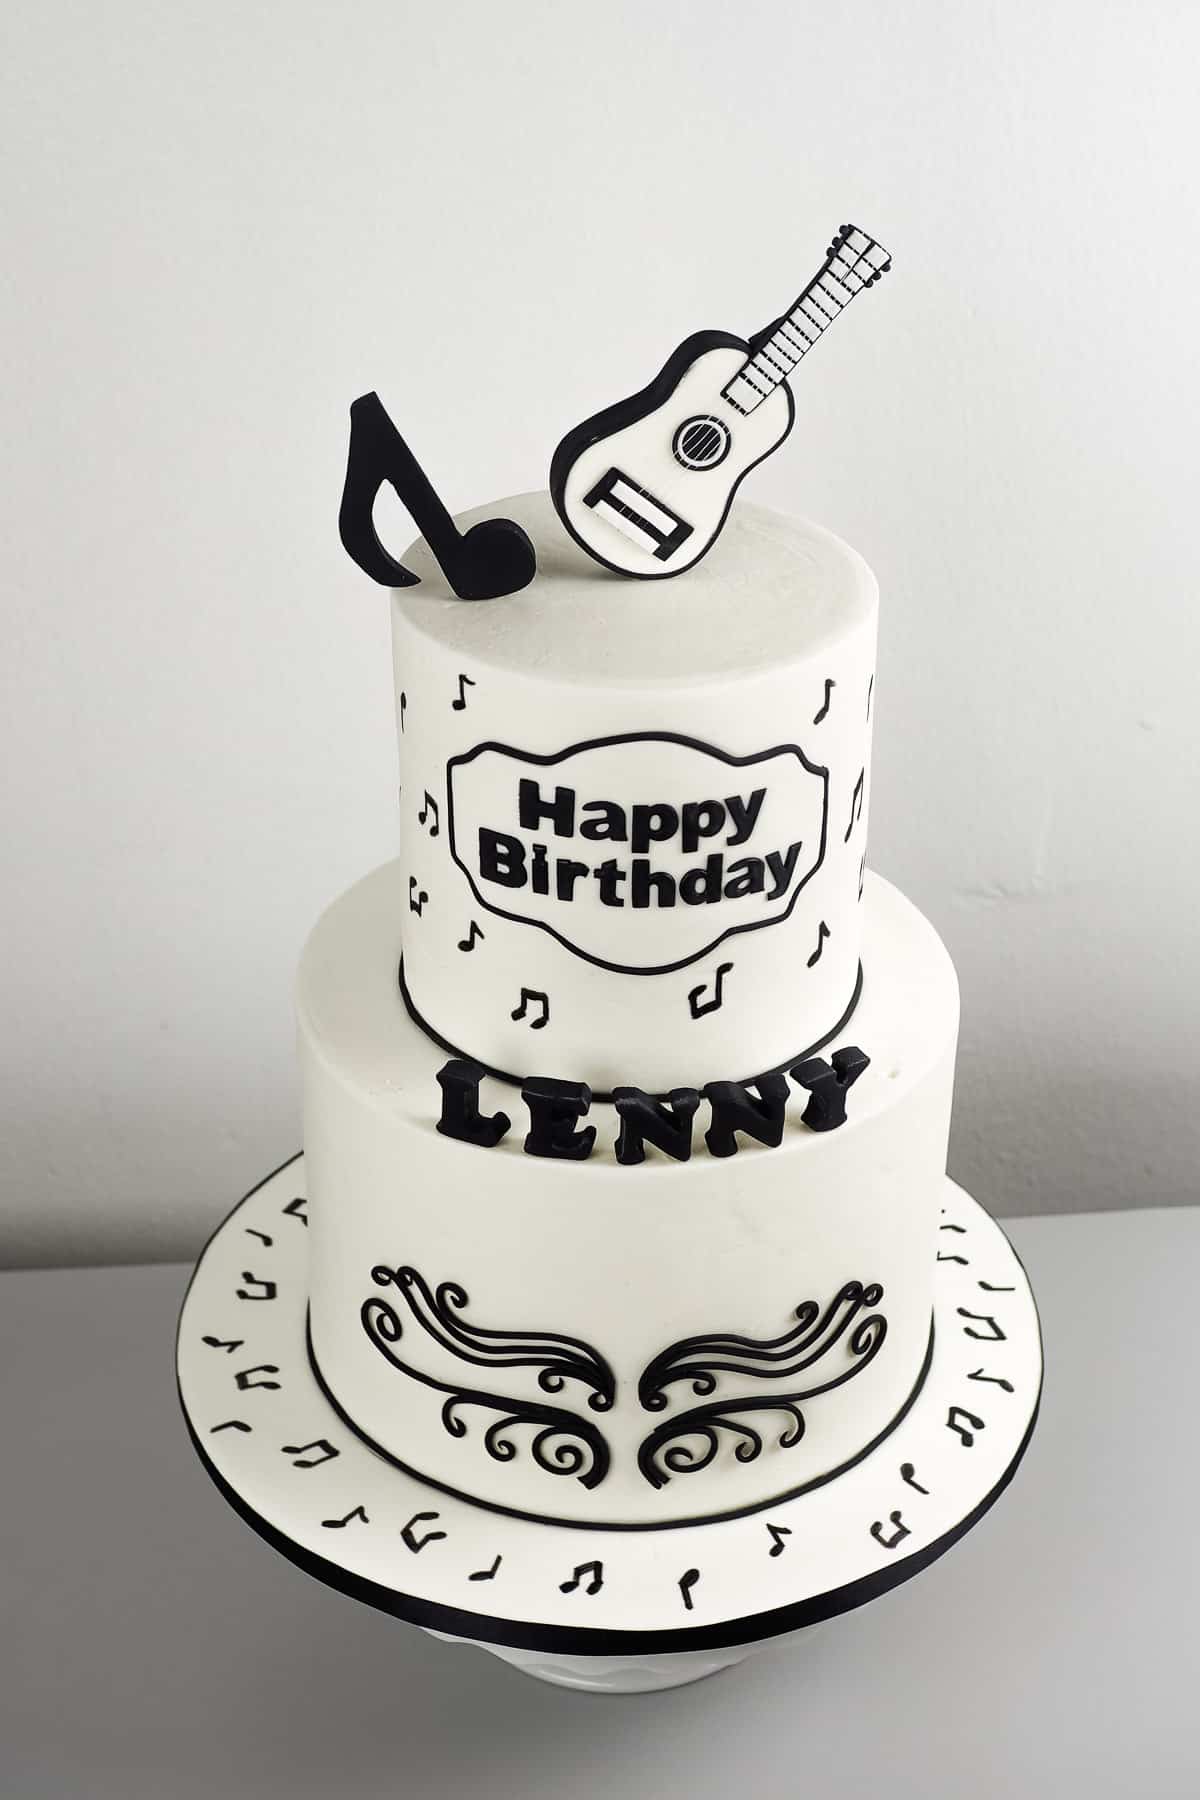
Fancy making a guitar cake with a cute guitar topper? Here is a one such cake idea for birthdays. Decorated in black and white colors, the cake is topped with a cute 3D handmade fondant guitar and a large musical note. This makes a perfect cake for guitar fans!

This was not a very difficult cake to decorate. If you read below as well as my tutorial on the guitar cake topper, you will see that it is pretty straightforward to decorate. All the musical notes on the cake (except for the 3D one on the cake top) and the cake board were drawn by hand using a black edible marker.
The black swirls on the front of the bottom tier were made using fondant. However, I used a paper template as a guide in forming those. So that made it easy to get them all consistent.
🧾Supplies Required
- Cake - this was a 2 tier cake made using my butter pound cake recipe. The top tier measured 6 inches in diameter and the bottom tier was a 9 inches round cake. Each tier measured approximately 6 inches high.
- Buttercream - I used buttercream to fill the cake layers as well as to crumb coat them.
- Fondant - The entire cake was decorated in fondant. I used Satin Ice in white and black.
- CMC powder - I used CMC powder in fondant to help my 3D decorations firmer and more stable.
- Shortening and fondant glue.
- Extruder tool - I used this for the black swirls on the cake as well as all the border work.
- Guitar template - This was a hand-drawn template. I used it to cut my guitar topper.
- Musical note template - This was also a hand-drawn template. I used it to cut out the black 3D musical note on the cake.
- Swirls template - The black swirls on the front of the second cake tier were guided by a hand-drawn template.
- Parchment paper
- Sugar craft knife
- Alphabet cutters - I used 2 different cutters, one for the 3D name on the guitar cake and the other for the 'Happy Birthday' wordings.
- Plaque cutter
- Lollipop stick
- Styrofoam dummy
👩🍳How to Make
Step 1: Prepare the Templates for the Guitar and Musical Note Toppers
There were a total of 3 templates required to make this guitar birthday cake. One for the guitar topper, one for the musical note topper, and one for the swirls pattern on the front of the bottom tier.
I did a Google search for the images and then resized and modified them to suit my liking. And then I traced them onto parchment paper. For the guitar and the musical note, I cut them out following their outlines. These were to be used as paper templates to cut out in fondant.
Step 2: Make the Musical Note Topper
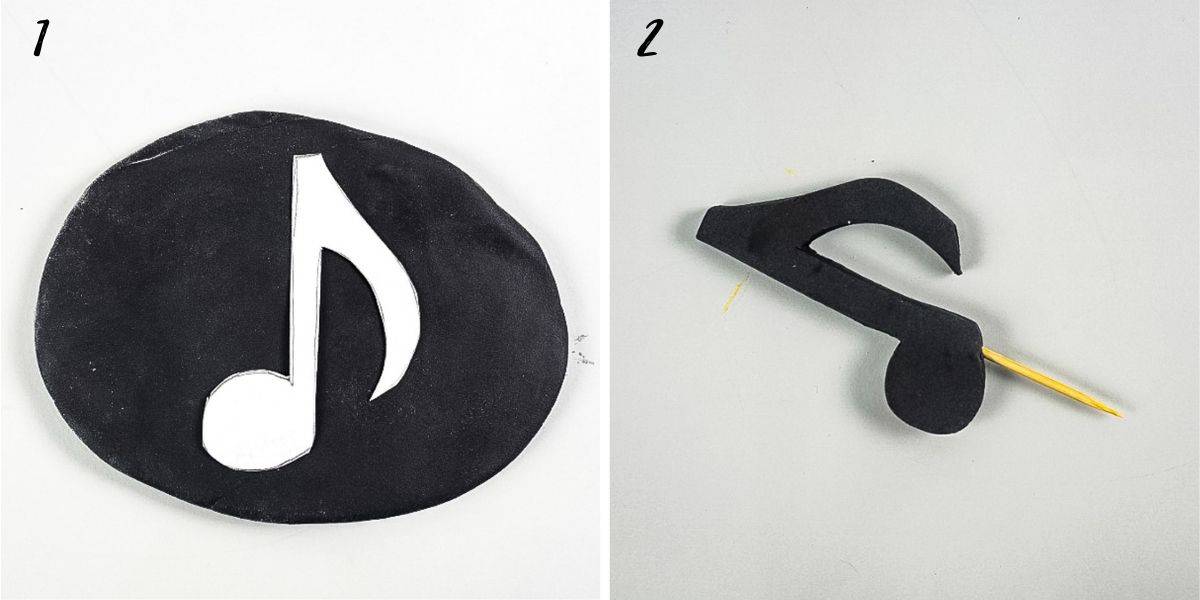
As for the musical note, I used my paper template to cut it out in black. I added CMC powder to the fondant so that my note would dry hard and firm. I rolled it to a thickness of about 1cm before cutting it out using my paper template as a guide (image 1).
And then I attached a toothpick to the bottom and let it firm up in a horizontal position (image 2).
Step 3: Make the Fondant Guitar Cake Topper
I have prepared a separate detailed tutorial on how to make the guitar cake topper. Here is the summary:
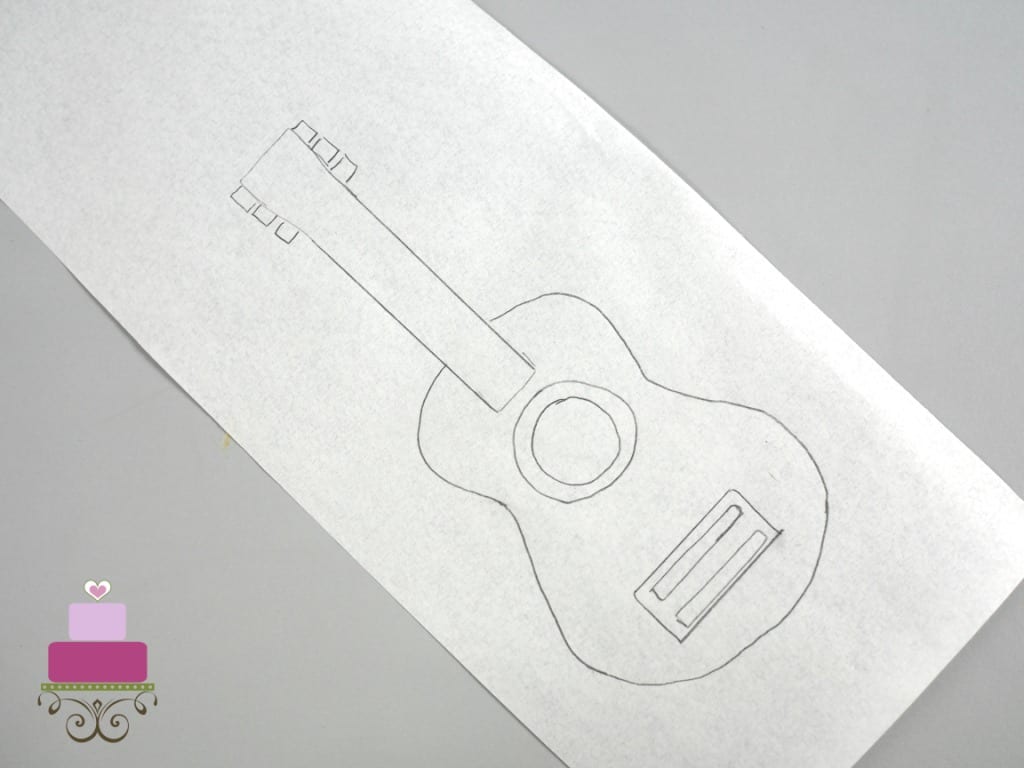
Draw the template on a parchment paper and cut it out following its outline into 2 sections.
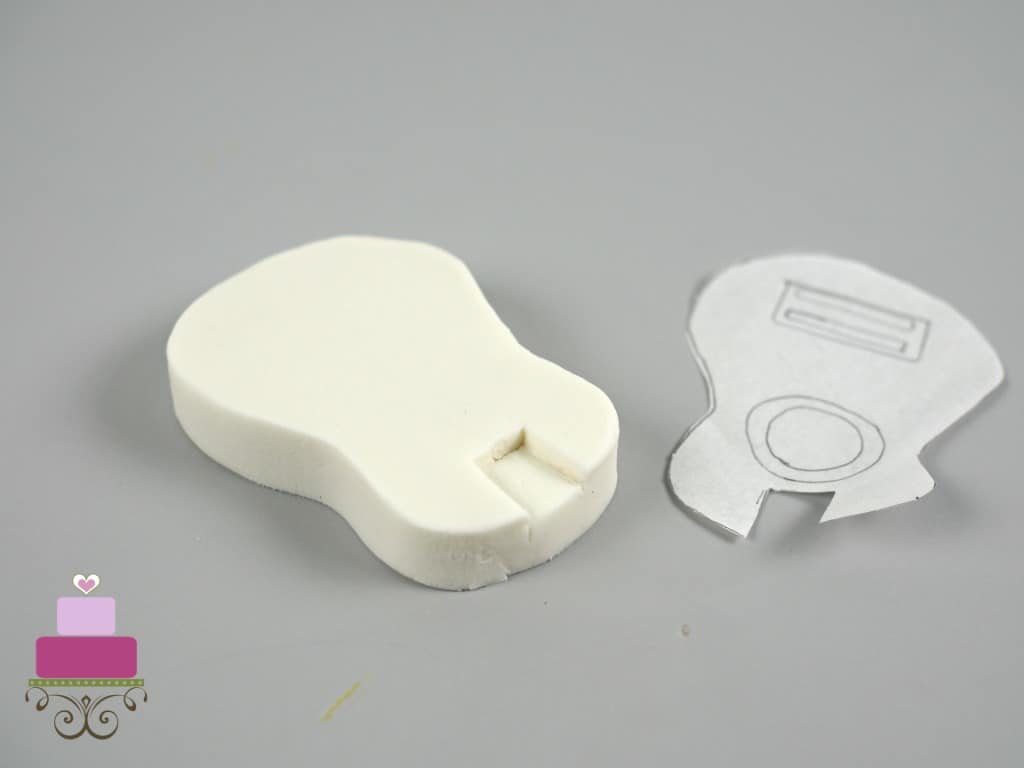
Cut out the first section in fondant.
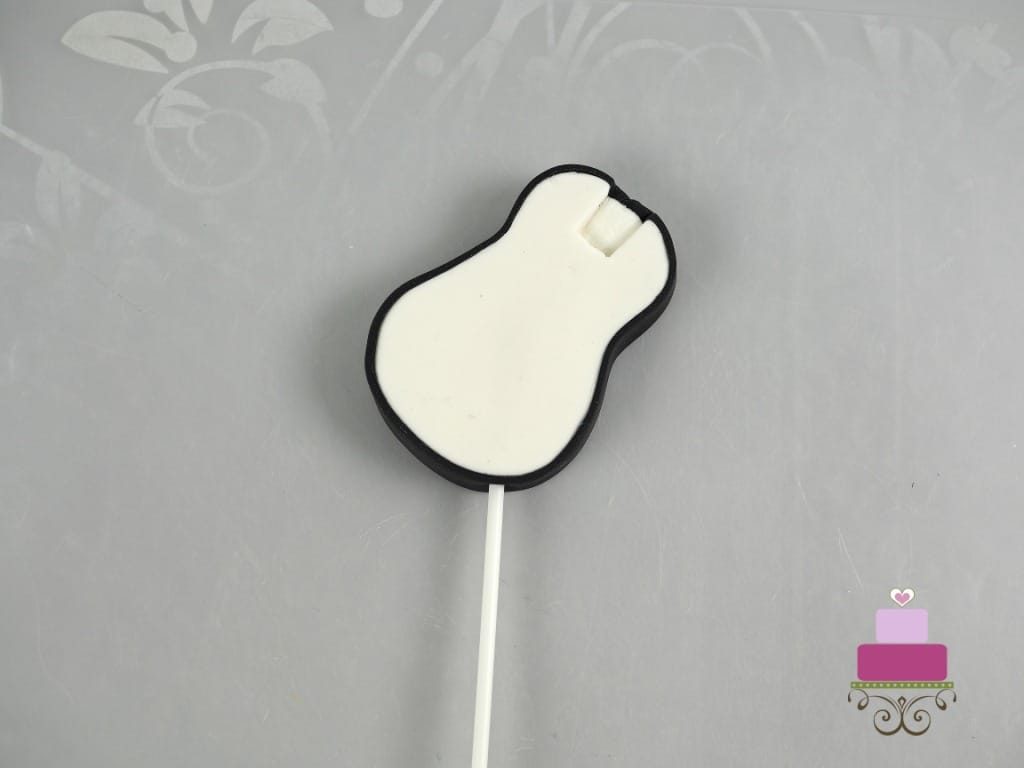
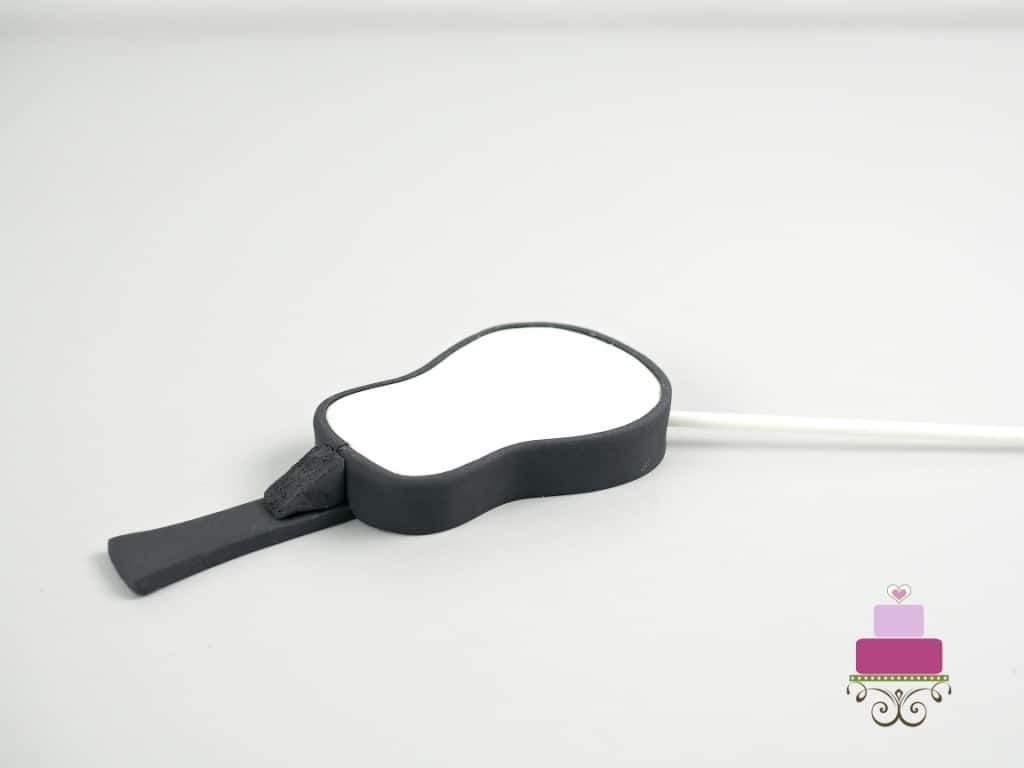
Wrap a black fondant strip all around and insert a lollipop stick at an angle you wish to place the guitar on the cake.
Cut the second part of the guitar (the finger board) in black and attach to the guitar.
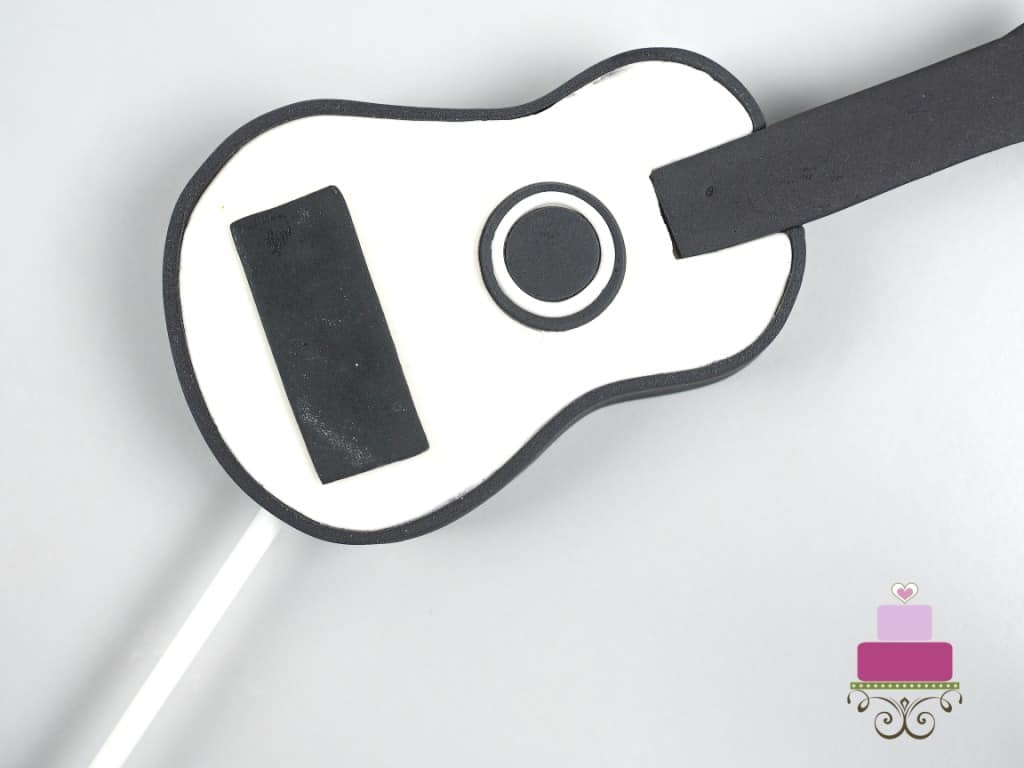
Turn the guitar over and add the fondant circles (sound hole) and the black rectangle piece.
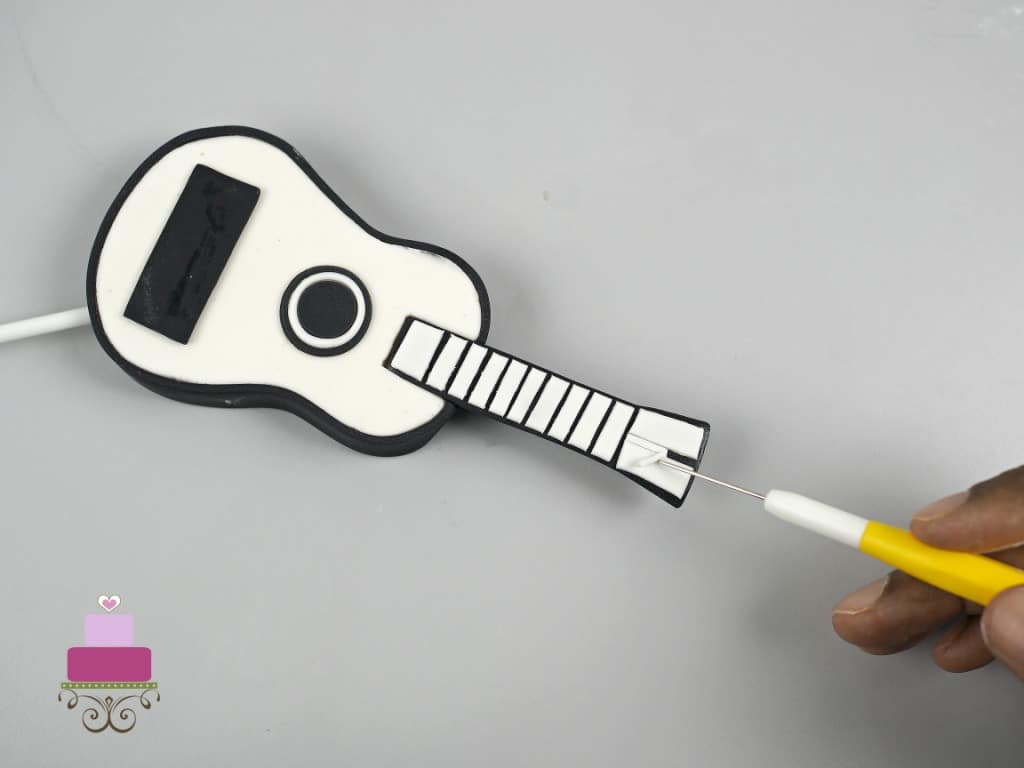
Next, attach a white fondant stripe on the finger board and use the sugar craft knife to cut stripes. Remove the cut strips to form the pattern on the finger board.
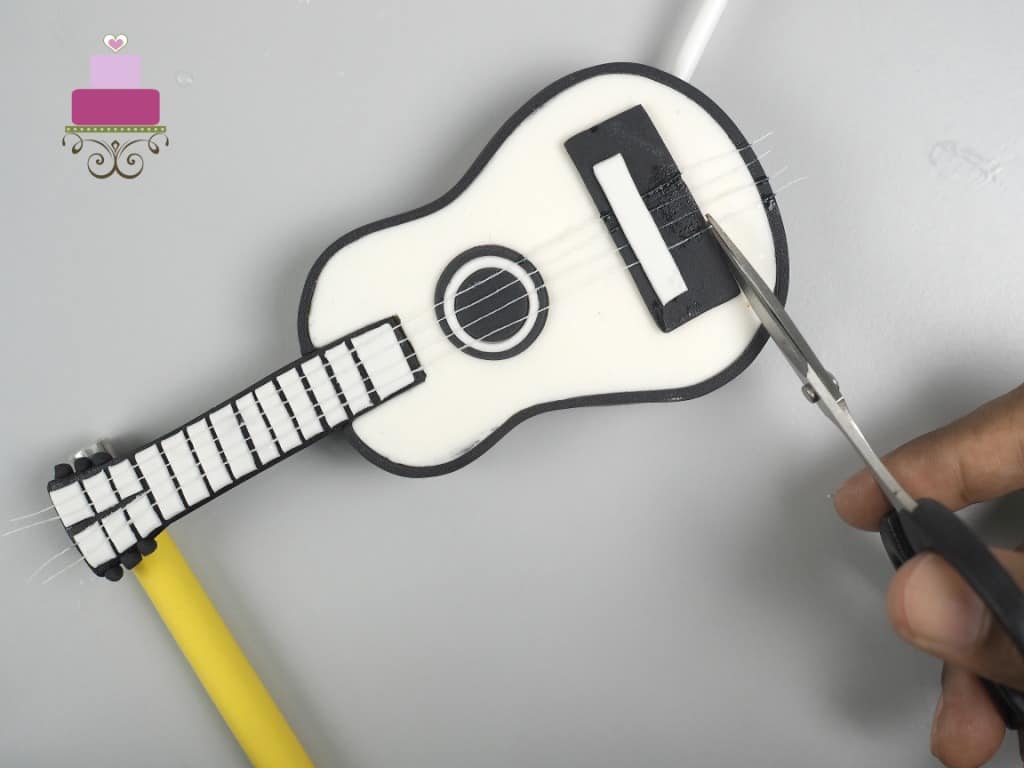
Next, cut some white tread, dip in fondant glue and attach to the guitar. Trim off excess thread. Also form tiny black balls and attach to the top of the finger board to mark the tuning keys.
Finally, attach another piece of white rectangle to hold the threads in place to complete the topper.
Step 4: Make the 3D Alphabets
Next where the 3D letters for the birthday name, LENNY. I cut the letters out in the same black fondant that has been added CMC. And I let the letters firm up in a horizontal position until they too were ready to be put onto the guitar cake.

Step 5: Make the Fondant Swirls on the Cake
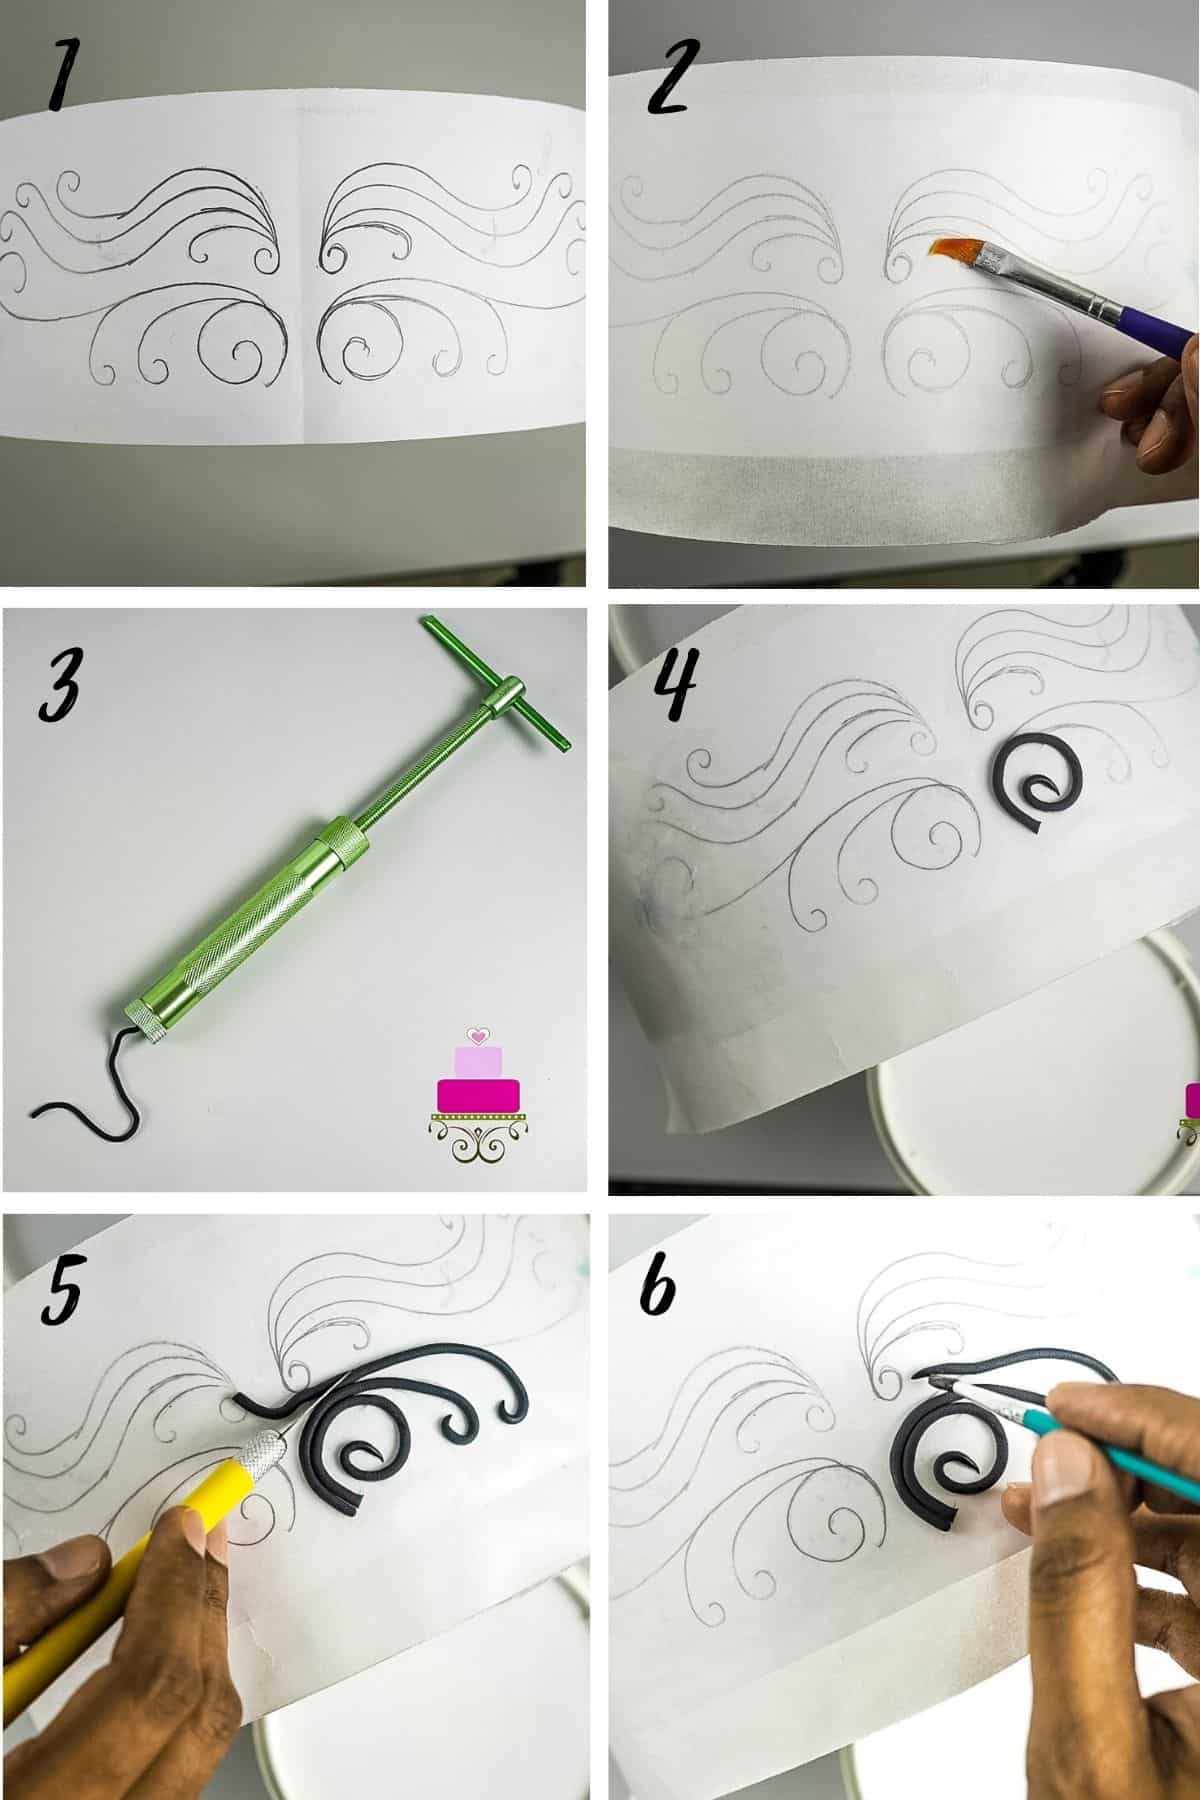
To make the fondant swirls, I glued my paper template onto the sides of a 9 inches round cake dummy. The dummy has to be of the same diameter as the cake you intend to put the swirls on. And then I placed a layer of parchment paper on it. Since the parchment paper is see-through, I did not have to redraw the pattern on the parchment paper (image 1).
And then I applied shortening all over the parchment paper where the pattern was (image 2).
And then I filled my extruder tool with black fondant and fit it with a medium circle disc (image 3).
To create the swirls, I piped out short strips of black. I arranged them onto my prepared template, using the drawing as a guide to place the strips (image 4).
I used my sugar craft knife to cut the strips (image 5).
Where there were joints, I used fondant glue to secure them in place(image 6) .
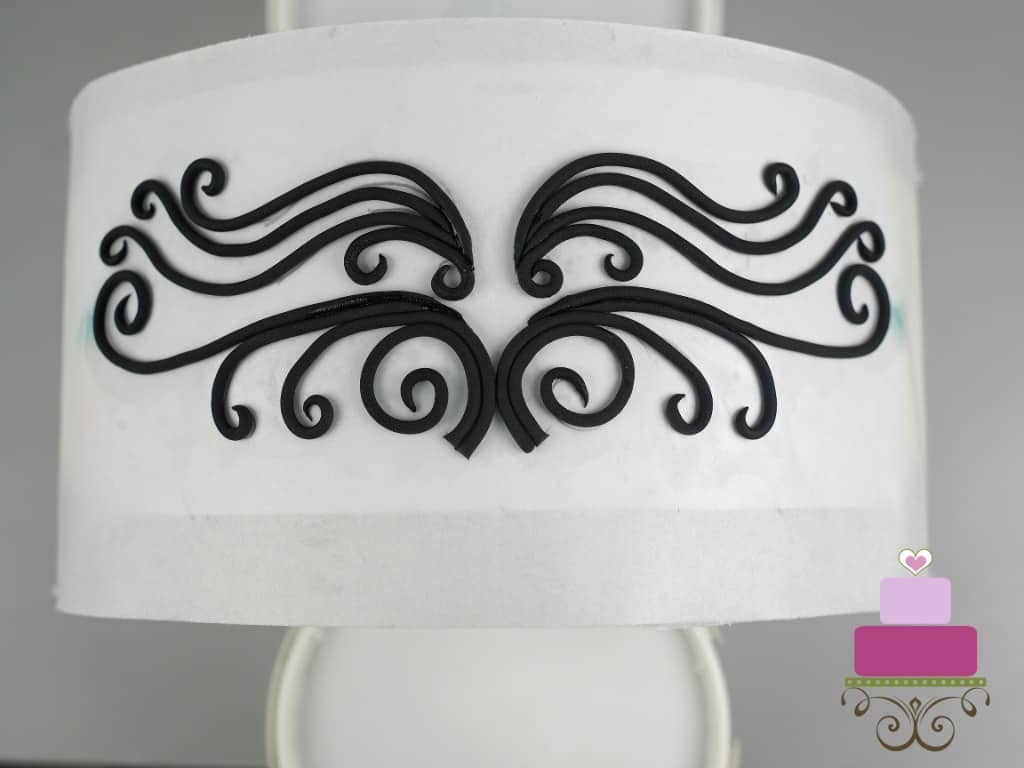
Once the entire swirls pattern was done, I left it to firm up on the dummy.
Step 6: Bake and Stack the Cakes
Once the cakes were baked and completely cooled down, leveled and sandwiched them with buttercream before covering them with fondant. And then I stacked them using bubble tea straws and set aside.
Step 7: Add the 'Happy Birthday' Lettering
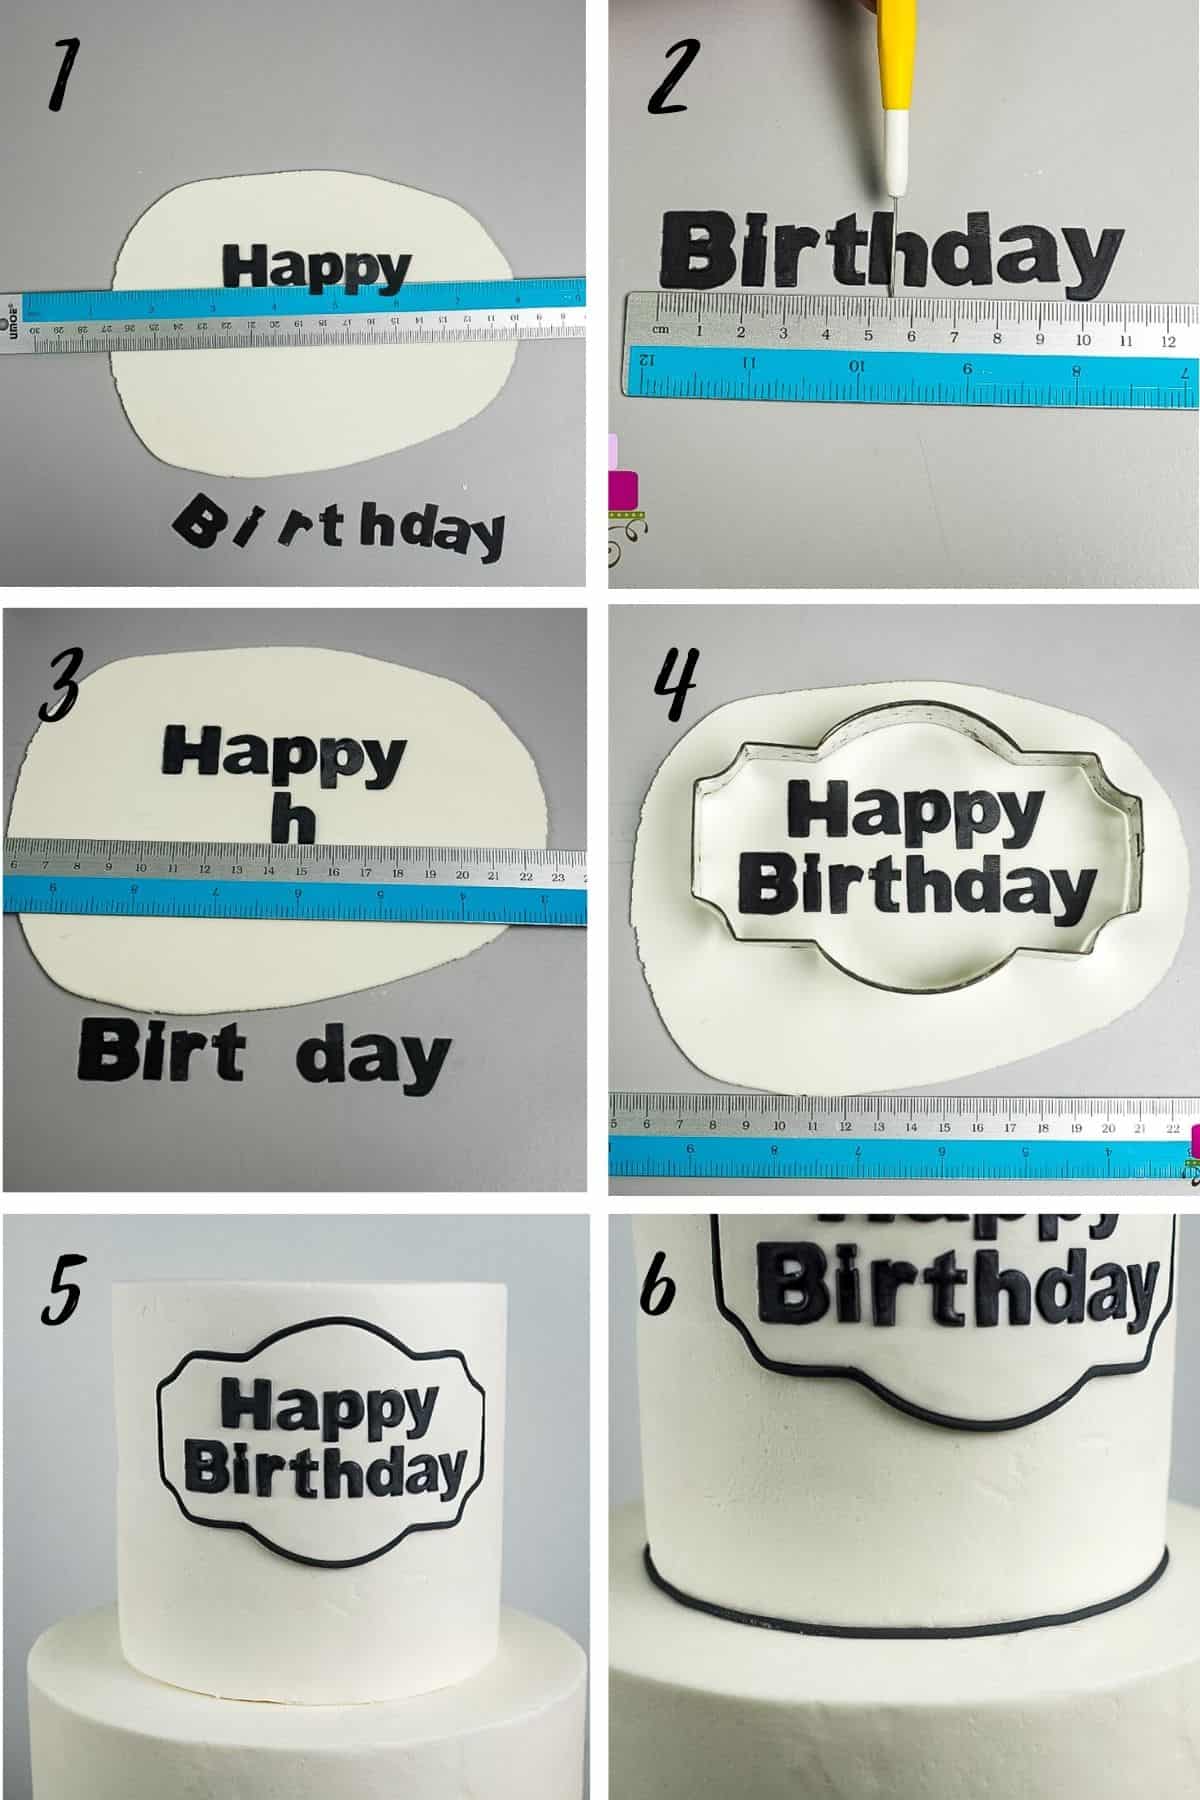
The first deco to go on the guitar cake was the 'Happy Birthday' words. I cut the letters in black using my letter cutters. And I attached them to a piece of white rolled fondant. The idea was to put the letters onto a fondant plaque and attach the plaque to the cake. To make sure I had the lettering perfectly centered on my fondant plaque, I arranged and attached the letters for 'Happy' on the rolled white fondant with shortening. And then I measured the length to determine the mid point (image 1).
Next, I arranged the letters for 'Birthday' on my workspace and measured the midpoint. The mid point was the letter 'h' (image 2).
I then placed the letter 'h' from the word 'birthday' directly below the mid point in the word 'happy' (image 3).
Determining and aligning the mid point for both words helped me to arrange the rest of the letters such that both words are perfectly centered on the guitar cake. All the letters were secured to the white fondant piece with shortening. And then, I used my plaque cutter to cut the birthday plaque out (image 4).
I applied some shortening to the back of the plaque and carefully attached it to the cake. And then I piped a long strip of black using the same circle disc I used for the swirls patterns. This, I attached it around the plaque with shortening as a border (image 5).
I also used the same black strip to add border for the top tier of the guitar cake (image 6).
Step 8: Attach the Birthday Name
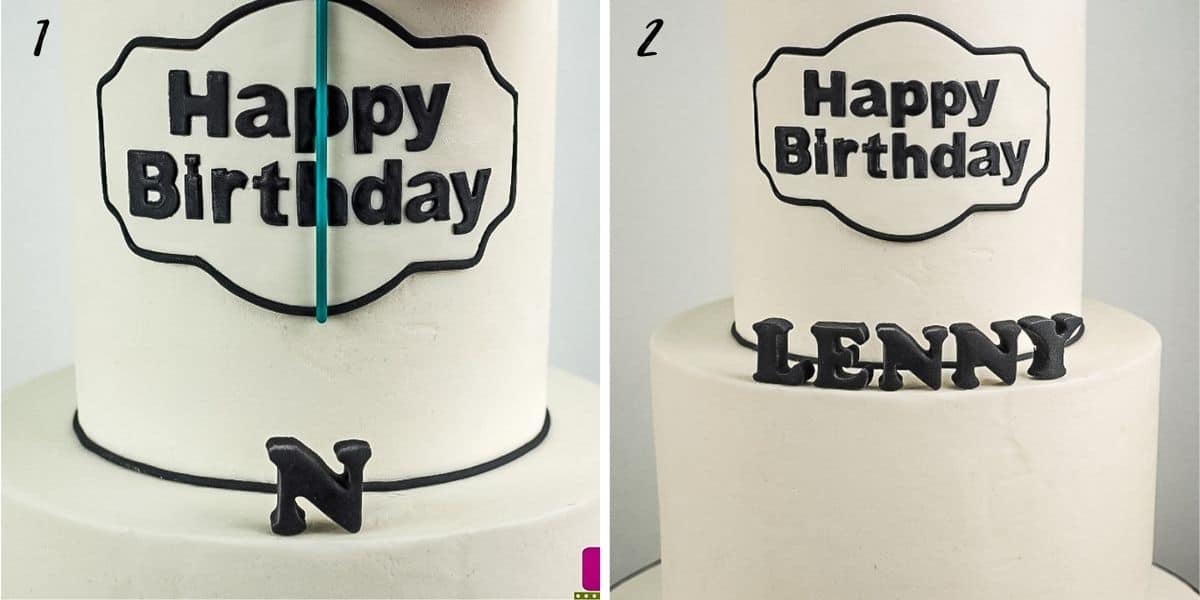
Next I added the birthday persons name on the guitar cake. To make sure the name is in a consistently centered position as the 'Happy Birthday' wordings, I measured the name in full to determine its mid point, which was the letter N. I placed it on the cake, consistent with the mid points of the 'Happy Birthday' wordings that are already on the cake (image 1).
And then I added the remaining letters to complete the name. I used glue to make sure the letters stay firmly in place (image 2).
Step 9: Attach the Swirls to the Cake
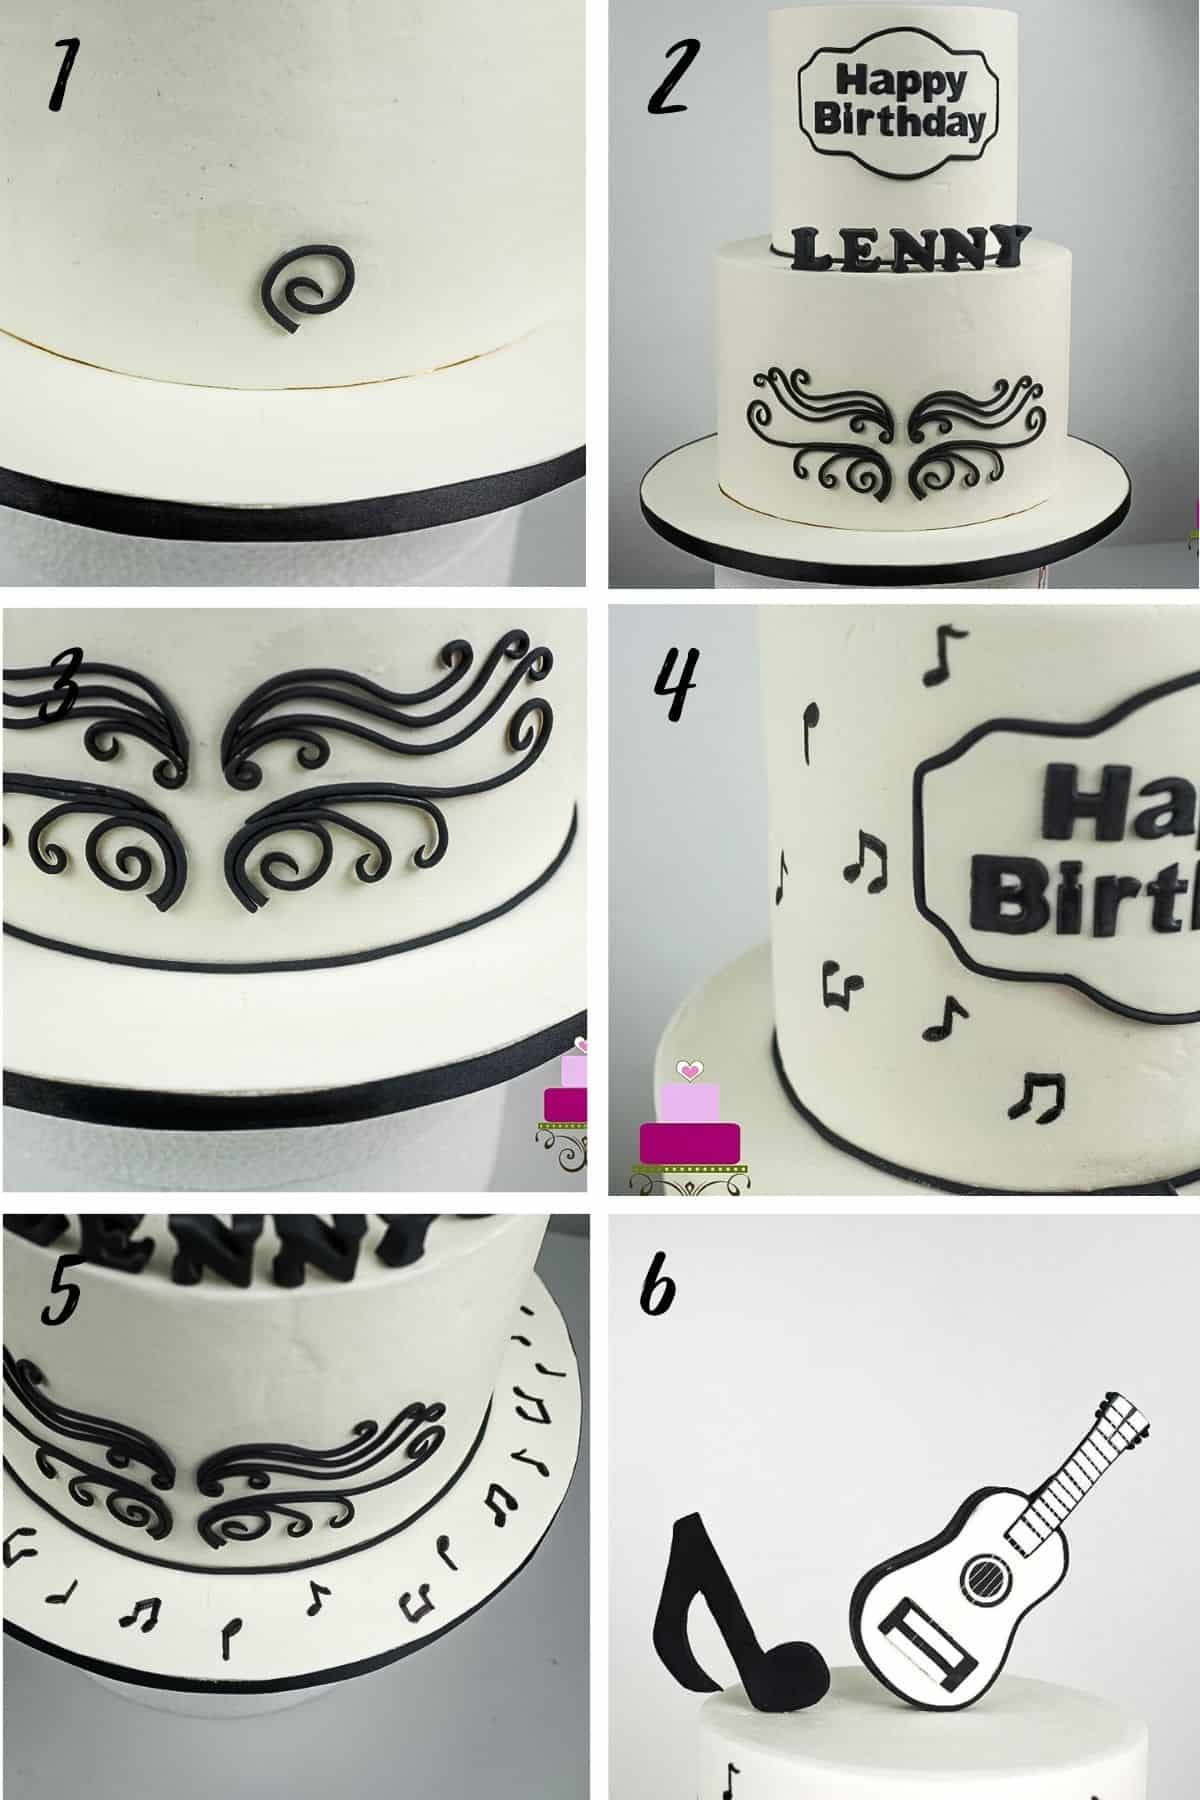
Next to go onto the guitar cake was the swirl pattern. I applied shortening onto the cake where I wanted to place the pattern, and carefully, lifted the piped pieces one by one from the styrofoam dummy, and arranged them onto the cake. Since I used shortening as the glue, it was easy to adjust the strips until I got their position perfect (image 1).
I started with the bottom of the pattern and slowly worked my way up until it was complete. And this was how the cake looked with the swirls on (image 2).
After that, I added the border for the bottom tier, which was similar to the top tier earlier (image 3).
Next were the musical notes. Like I mentioned earlier, these were hand-drawn directly onto the cake with a black edible marker and I did it freehand, making sure the notes were well spaced out (image 4).
I drew these notes on the top tier and cake board, leaving the bottom tier free of any deco except the black swirls pattern (image 5).
And finally, I added the guitar cake topper and the musical note topper (image 6).
This was how my completed guitar cake looked like:
❤️More Tutorials You Will Love


Do you like this tutorial? Please leave a 5-star ⭐⭐⭐⭐⭐rating in the recipe card below and consider a review further down this page. I would love to hear from you. Thank you!
📖Recipe

Guitar Cake
Equipment
- Extruder tool
- Guitar template
- Musical note template
- Swirls template
- Parchment paper
- Sugar craft knife
- Alphabet cutters
- Plaque cutter
- Lollipop stick
- Styrofoam dummy
For best results, use the metrics measurements. US customary measurements have not been tested and are only meant for guide.
Ingredients
Cake 1 (6 inches round)
- 420 g self-raising flour
- 420 g granulated sugar
- 420 g butter
- 7 eggs
- 105 ml milk
- ¾ teaspoon baking powder
- ⅔ teaspoon salt
- 1 ¼ teaspoon vanilla extract
Cake 2 (9 inches round)
- 600 g butter
- 600 g granulated sugar
- 600 g self-raising flour
- 10 eggs
- 150 ml milk
- ½ teaspoon salt
- 1 ¼ teaspoon baking powder
- 1 ⅔ teaspoon vanilla extract
Frosting and Decoration
- Buttercream
- Fondant
- CMC powder
- Shortening and fondant glue
Instructions
Baking the cakes (you may need to bake the cakes in 2 batch due to the volume).
- Preheat oven to 170 °Celsius.
- Beat butter and sugar till soft and creamy for about 2 minutes. Add eggs, one at a time, beating well after each addition.
- In a separate bowl, sift flour, baking powder, and salt. Fold in the sifted ingredients into the creamed mixture alternately with milk, starting and ending with flour.
- Finally, add in vanilla extract and combine well. Pour batter into well greased and floured cake pans and bake for 45 to 50 minutes until the top of the cake springs back when lightly pressed. The cakes are done when a skewer inserted in the center of the cake comes out without any wet batter.
- Remove cakes from oven and let them cool completely before icing and decorating.
The templates
- There were a total of 3 templates required to make this guitar birthday cake. One for the guitar topper, one for the musical note topper, and one for the swirls pattern on the front of the bottom tier.
- Draw the patterns by hand or trace them from a book or download from the internet. Resize the images to fit the cake size.
- Trace the patterns onto parchment paper. For the guitar and musical note, cut them following their outlines. These are to be used as paper templates to cut the fondant.
The musical note topper and guitar cake topper
- Follow the tutorial on how to make the fondant guitar topper.
- As for the musical note, mix some CMC powder into black fondant. Roll it thick (about 1 cm) and use the paper template to cut it out with a sugar craft knife.
- Dip a toothpick in fondant glue and attach it to the bottom. Let it firm up in a horizontal position.
The 3D birthday name alphabets
- Using the same black fondant that has been added CMC, cutter the letter out. Let them firm up in a horizontal position until they are ready to be put onto the cake.
The swirls pattern on the guitar cake
- To make the fondant swirls, glue the swirls pattern paper template onto the sides of a 9 inches round cake dummy. The dummy has to be of the same diameter as your cake. Next, place a layer of parchment paper on it. Secure the sides with tape so that it does not move.
- Apply shortening all over the parchment paper where the pattern can be seen through.
- Fill the extruder tool with black fondant and fit it with a medium circle disc. Pipe out short strips of black fondant and arrange them onto the parchment paper, using the template underneath as a guide. Use the sugar craft knife to cut the strips as required.
- For the joints, use fondant glue to secure them in place. Once the entire swirls pattern is done, leave it to firm up on the dummy.
Assembling the guitar cake
- Once the cakes are baked and have completely cooled down, level and sandwich them with buttercream before covering them with fondant. And then stack them (using bubble tea straws for support) and set aside.
The 'Happy Birthday' wording
- Cut the letters in black using the letter cutters. Attach the word 'Happy' to a piece of thinly rolled white fondant. The idea was to put the letters onto a fondant plaque and attach the plaque to the cake. To make sure the lettering is perfectly centered on the fondant plaque, measure the mid points of both words. Start with the word Happy that is already attached to the white fondant. Measure the full length of the word to determine its mid point.
- Next, arrange the letters for ‘Birthday’ on your workspace and measure the midpoint. The mid point for mine was the letter ‘h’. Placed the letter ‘h’ from the word ‘birthday’ directly below the mid point for the word ‘happy’.
- Determining and aligning the mid point for both words will help in arrange the rest of the letters such that both words are perfectly centered. Secure all letters to the white fondant piece with shortening. And then, use the plaque cutter to cut the birthday plaque out.
- Apply shortening to the back of the plaque and carefully attache it to the cake. And then pipe a long black strip using the same circle disc used for the swirls pattern. Attach it around the plaque as a border, with shortening. Do the same for the border of the first cake tier.
The birthday name
- To make sure the name is in a consistently centered position as the ‘Happy Birthday’ wordings, measure the name in full to determine its mid point. Mine was letter N. Placed it on the cake, consistent with the mid points of the ‘Happy Birthday’ wordings that are already on the cake.
- And then add the remaining letters to complete the name. Use glue to make sure the letters stay firmly in place.
Attaching the swirls to the cake
- Apply shortening onto the bottom tier cake where you want to place the pattern, and carefully, lift the piped pieces one by one from the styrofoam dummy, and arrange them onto the cake.
- After that, add the border for the bottom tier, similar to the top tier earlier.
The musical notes
- Draw the musical notes randomly on the first tier cake with a black edible marker. Make sure the notes are well spaced out.
- I drew these notes on the top tier and cake board, leaving the bottom tier free of any deco except the black swirls pattern.
- Finally, insert the guitar cake topper and the musical note topper to complete the cake.

Leave a Reply