

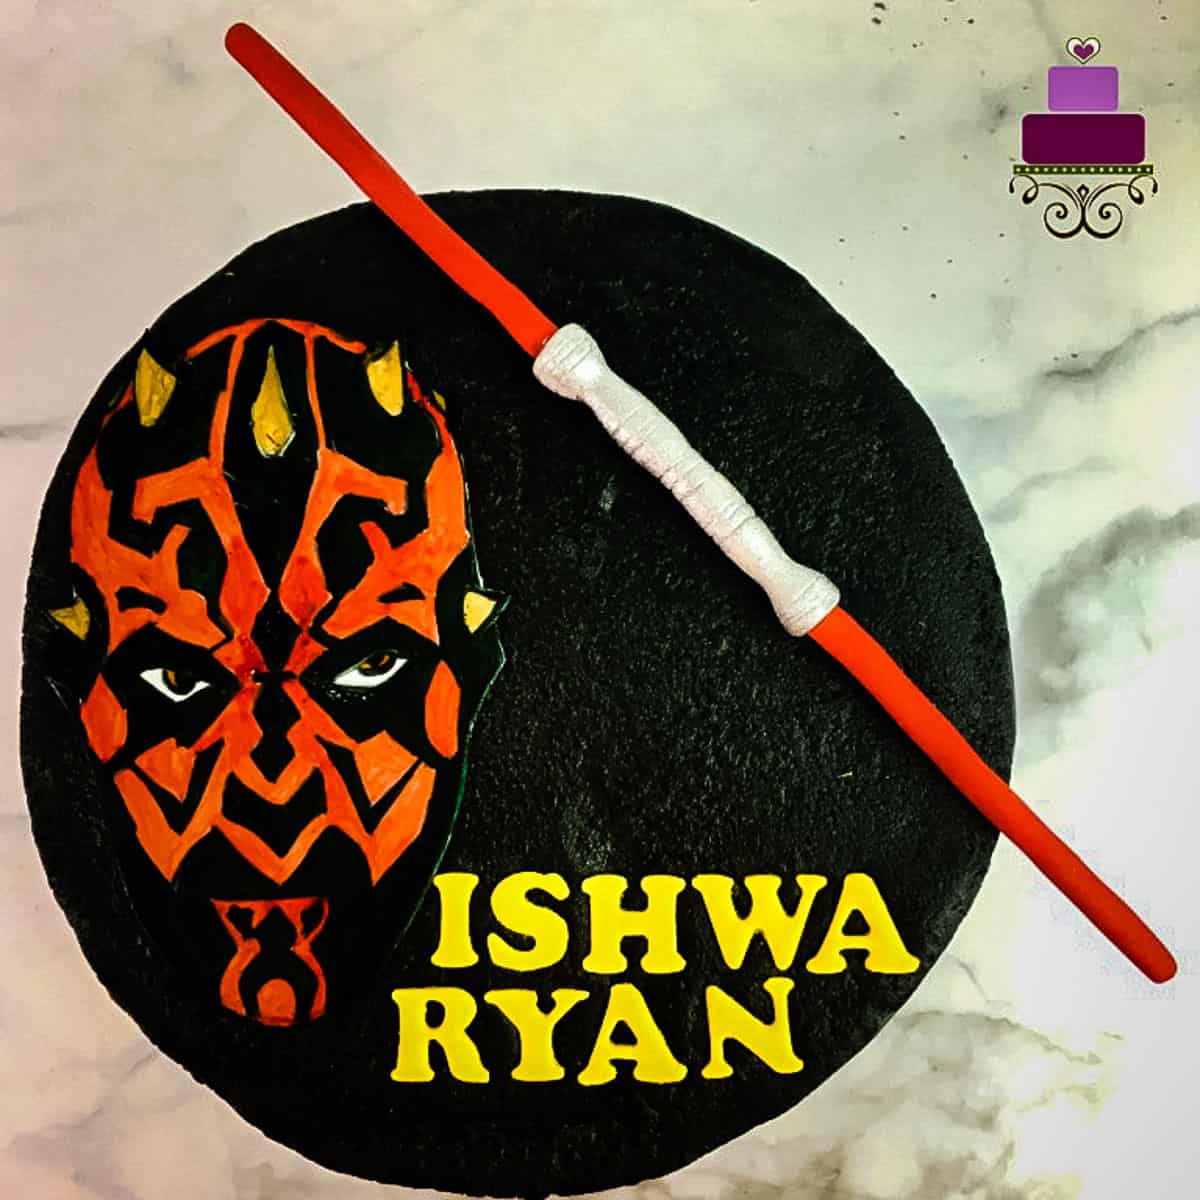
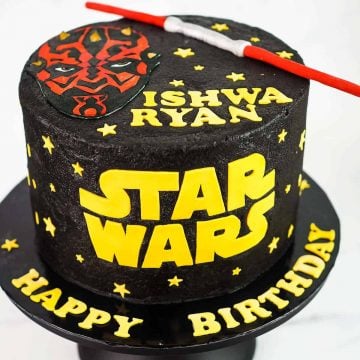
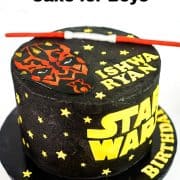
Finally, a Star Wars birthday cake featuring Darth Maul and his lightsaber! This is an awesome Star Wars cake design idea, one that will surely delight all Darth Maul and Star Wars fans!
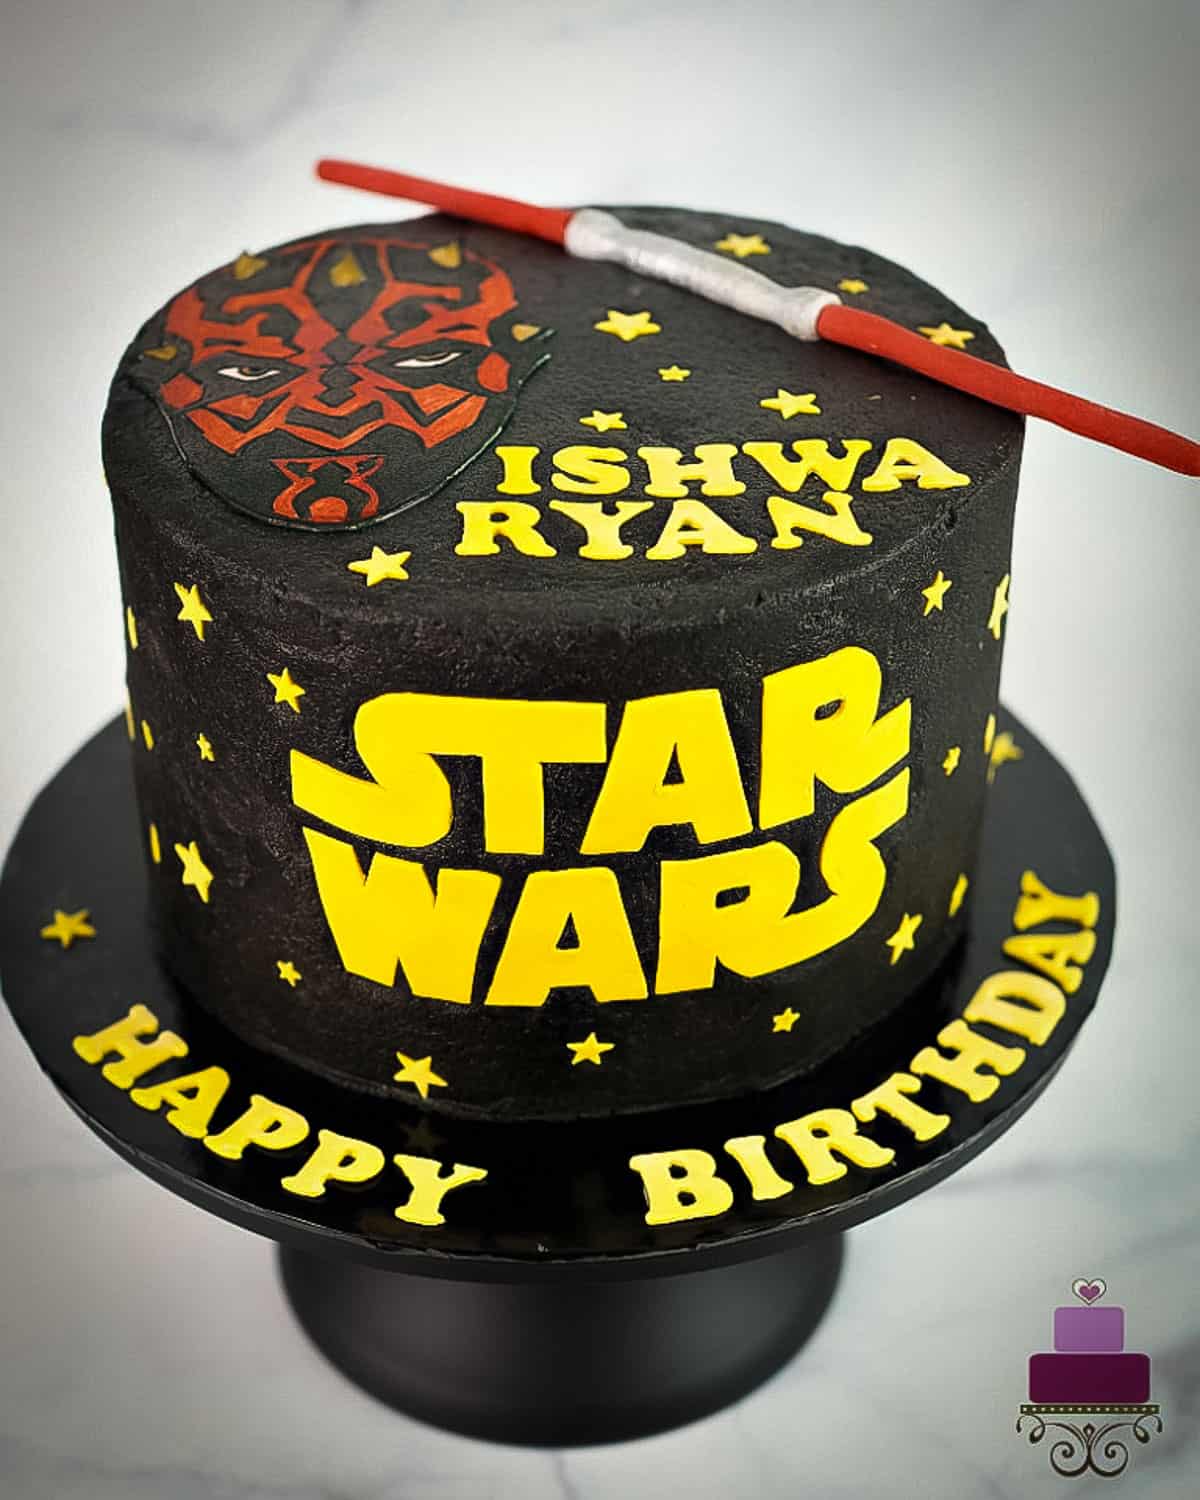
This cake was for a 7 year old, die hard Star Wars fan. The cake is covered in black chocolate buttercream and decorated with Darth Maul fondant image and a 3D fondant lightsaber. The Star Wars logo is also cut out by hand with guide from paper template.
If you like this cake, you should also check out this Star Wars Lego cake. And for more birthday cakes, check out this Minion cake, Transformers Cake, Marvel Superhero cake and Superhero cupcakes.
🧾Supplies Required
- Cake - this was a small 6 inches round cake, measuring 4 inches in height. I used my butter pound cake recipe for the cake.
- Buttercream - I used vanilla buttercream to sandwich the Star Wars cake layers. I also used chocolate buttercream (tinted with black cocoa powder and black food coloring) to cover the cake.
- Black cocoa powder - I added this to the buttercream to give it the dark base for a truly black buttercream.
- Black and golden yellow food color - I used Americolor Black and Wilton Golden Yellow.
- Edible silver dust + Lemon extract - I mixed these to form a thick silver paint.
- Fondant - I used Satin Ice in white and red.
- CMC powder - I added this to fondant when making the 3D lightsaber
- Edible food marker - This was used to trace the Darth Maul image onto fondant.
- Darth Maul face template - This is a paper template I used to make Darth Maul's face.
- Star Wars Logo template - This is also a paper template used as a guide when cutting out the logo in fondant.
- Star plunger cutter - I used the entire set of 3 cutters for the yellow stars in 3 different sizes.
- Alphabet cutters - This is a plunger cutter set which comes in a full set of capital letters.
- Pizza cutting wheel - I used this to cut out Darth Maul's face in fondant
- Sugar craft knife
- Food grade brush
- Fondant glue
👩🍳How to Make
Step 1: Prepare the Darth Maul and Star Wars Templates
I started by getting the Darth Maul and Star Wars logo templates ready. I got both from an internet search and resized and printed them to fit onto my cake (see here for my tips on how to resize images for cake decorating).
The printed paper templates were basically what I used to cut out the Star Wars logo and Darth Maul's face on fondant.
Step 2: Bake the Cake
Next was the birthday cake itself. I baked 2 layers of my vanilla pound cake, let it cool down, and then leveled and sandwiched it with vanilla buttercream.
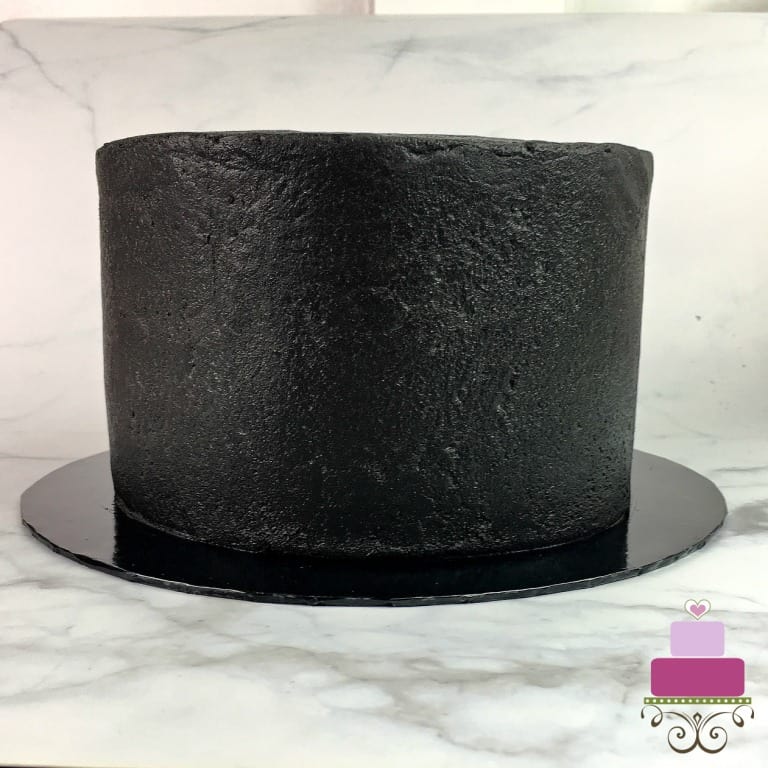
Step 3: Make the Black Buttercream
I then covered the entire cake with black buttercream. To make my buttercream totally black, I added some black cocoa powder to my vanilla buttercream. And then I added some black food coloring for a perfectly black buttercream.
The buttercream will take some time to turn to its final color. So after adding the food color, let the buttercream rest for about 20 minutes. The color will darken significantly when you let it rest as opposed to the color you see immediately after adding food color to it.
I used this black buttercream to cover my entire cake smoothly.
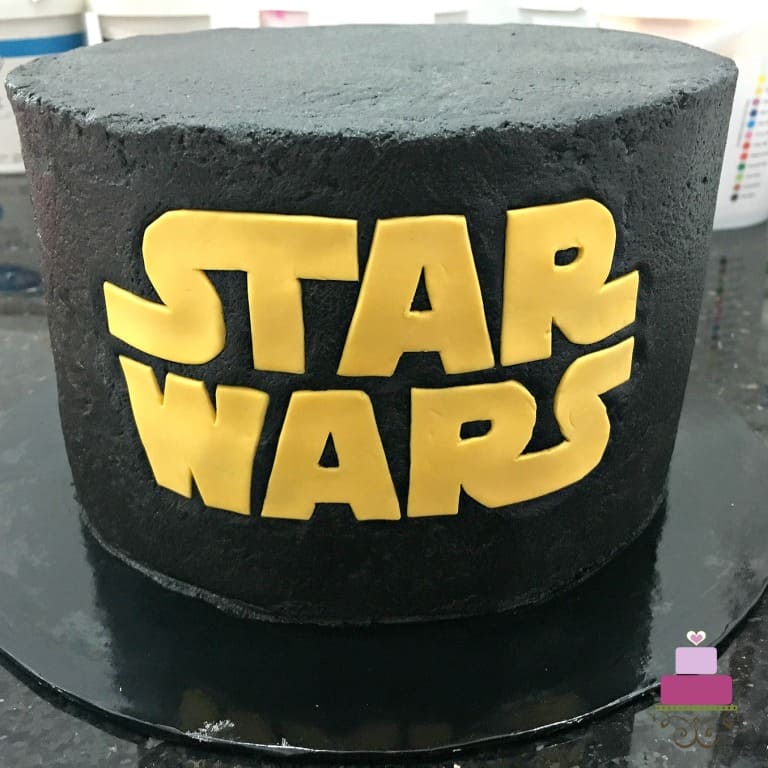
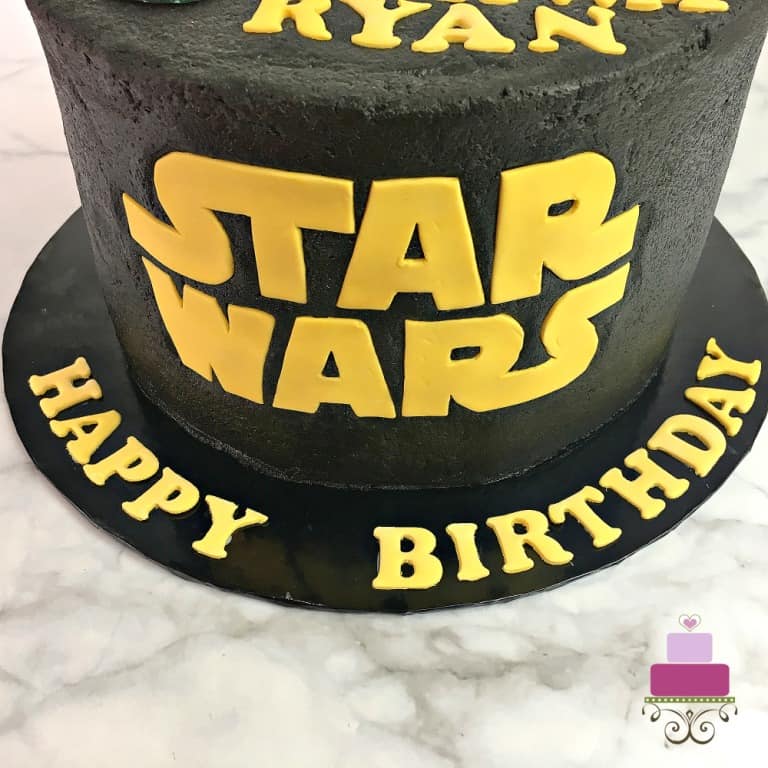
Step 4: Add the Star Wars Logo on the Birthday Cake
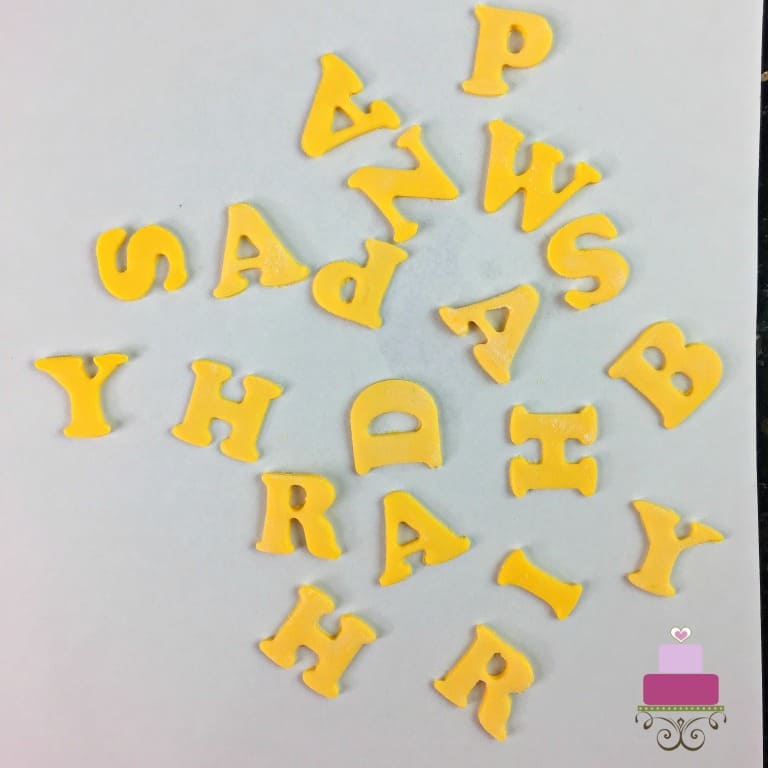
Next was the Star Wars logo. I cut the logo I resized and printed earlier along the outline of each letter. I placed each letter on thinly rolled yellow fondant (white tinted with golden yellow) and cut them out with my sugar craft knife.
The letters are a lot easier to cut when the fondant is slightly dry. So if you find it hard to cut the fondant, leave it out for a few minutes.
Also, if you find it hard to keep the paper template in place, apply some shortening to the paper and attach it to the fondant. That way, the paper would not move much while you are working on it. Once done, simply peel off the paper.
Once all the letters were done, I attached them to the birthday cake. Since they were going onto a buttercream covered cake, attaching the letters was easy. All I had to do is press the letters into the buttercream until they are the same level as the icing.
Pushing the letters in also helped to keep them in place without having to apply any special glue to them.
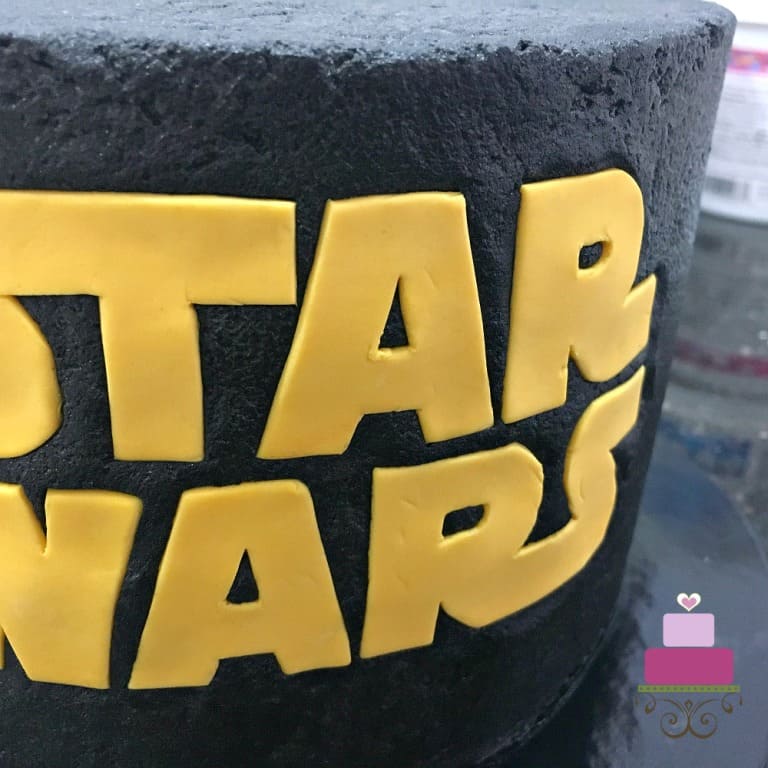
This is a close up of the logo on the sides of the Star Wars birthday cake:
Step 5: Make the Darth Maul Image on Fondant
Next was the Darth Maul image. Initially, I tried to mark the lines of Darth Maul's face onto a piece of white rolled fondant by placing the paper template on it and using my sugar craft knife to cut through the lines on the template so that they lines were imprinted onto the fondant.
After a couple of lines, I decided that there were too many lines of his face. It was taking too long.
I then changed my plan. I rolled another piece of white fondant, this time as thin as possible to the point that it was almost 'see-through'. Then, I placed the Darth Maul template underneath it. And I literally traced the pattern onto my fondant with a black edible mark. This was a much easier way to transfer the pattern.
Once the face was completely traced, I used a pizza cutting wheel to cut the face out. And then I painted it red and yellow using slightly diluted red and yellow food coloring.
After that, I used my black edible marker to draw out all the lines again. This was how the Darth Maul looked like upon completion. I let him rest aside to set :
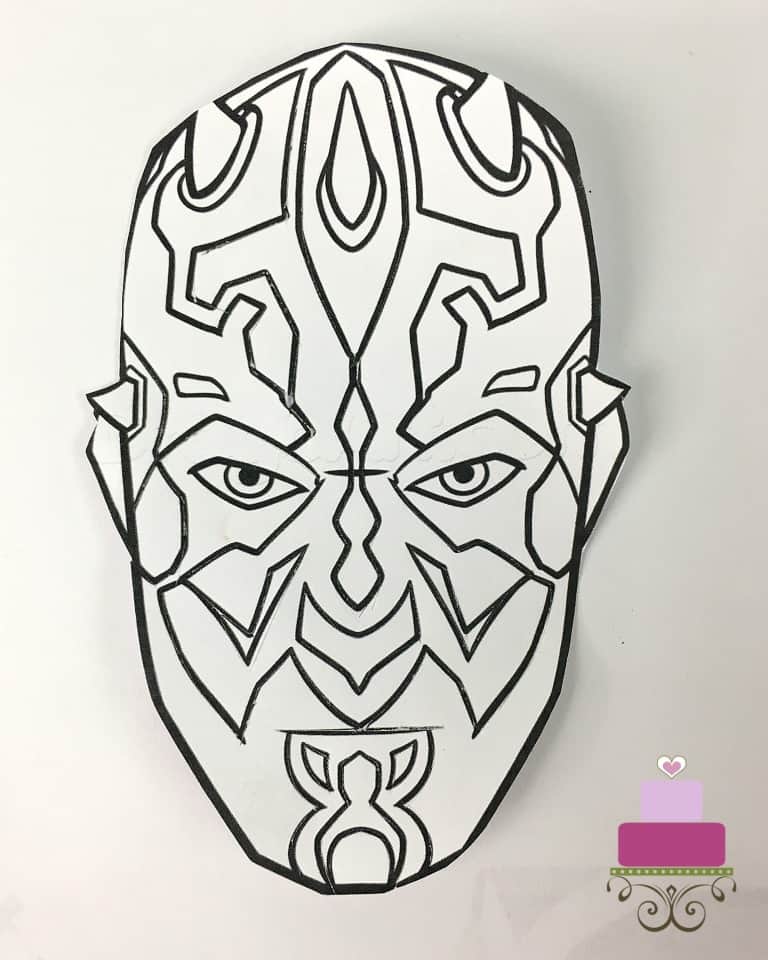
Paper template.
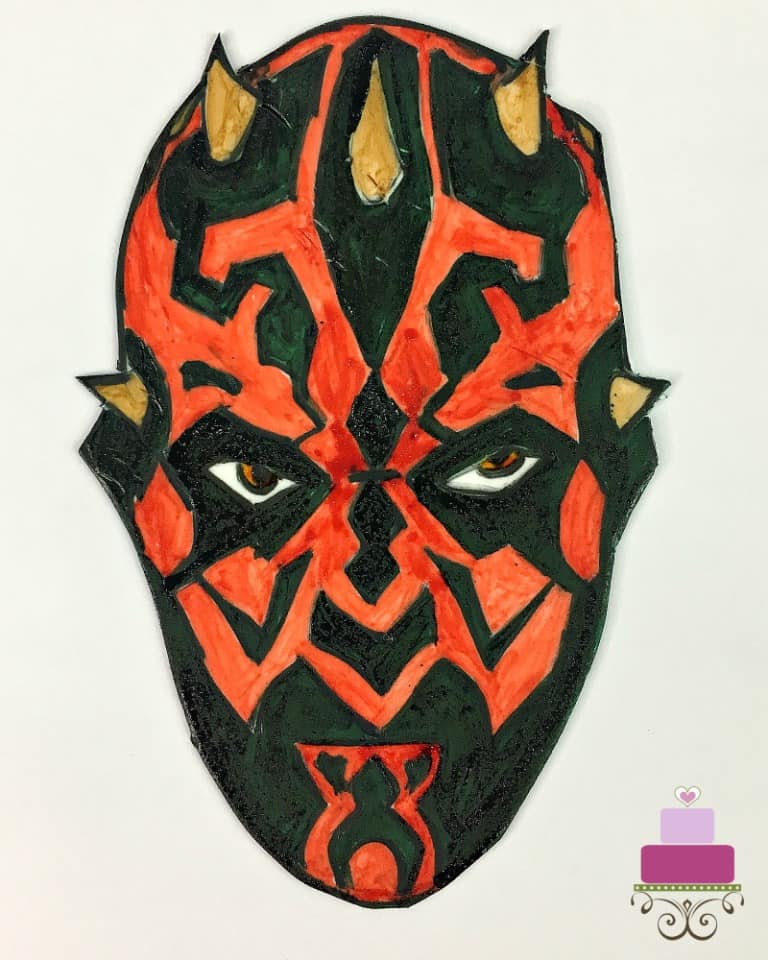
Completed topper in fondant.
Step 6: Make the Fondant Lightsaber Cake Topper
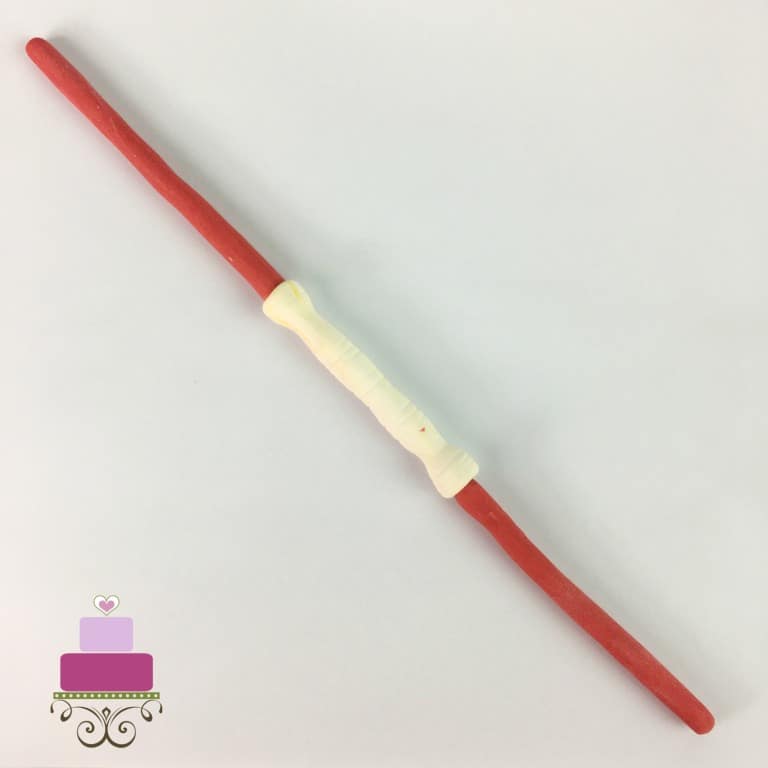
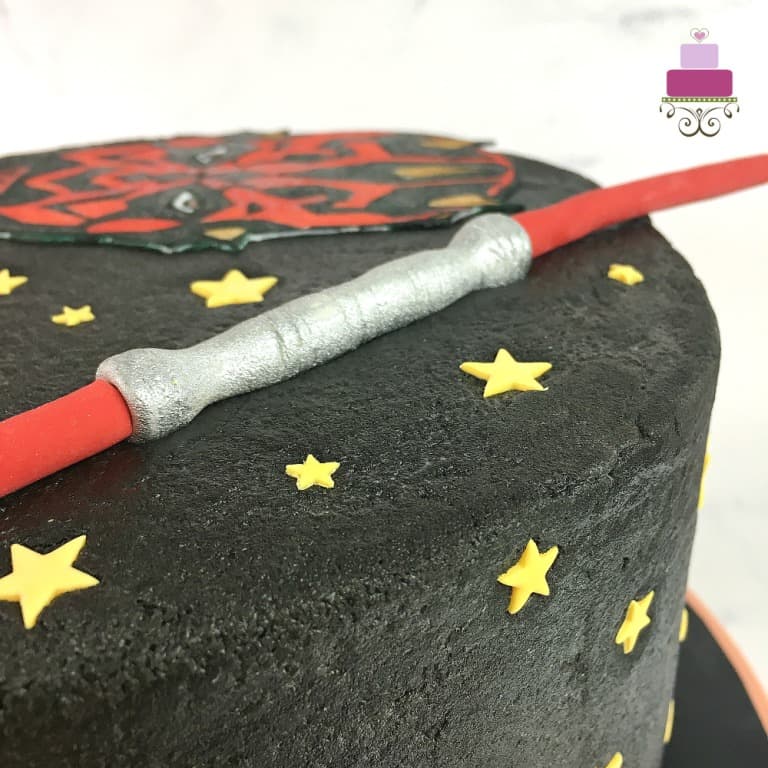
Next, I made the lightsaber. The saber was formed in fondant, by hand in white and red.
I started with the center part of the lightsaber in white. I shaped it by hand and imprinted a couple of lines on both ends. After that, I formed deep indentations on the ends of each side. I did this with the back of one of my larger food painting brushes. Once that was done, I attached the red part of the lightsaber.
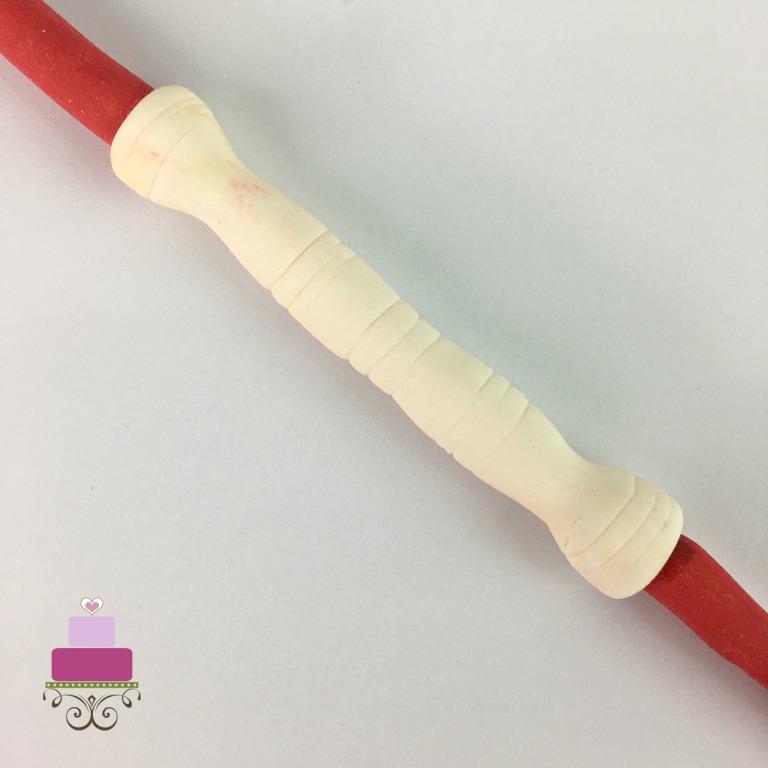
I then rolled 2 equal-sized thin long strips in red. And attached them to ends of the white fondant earlier with a touch of glue.
Once completed, I set the lightsaber aside to let the glue dry completely and all the components attached securely.
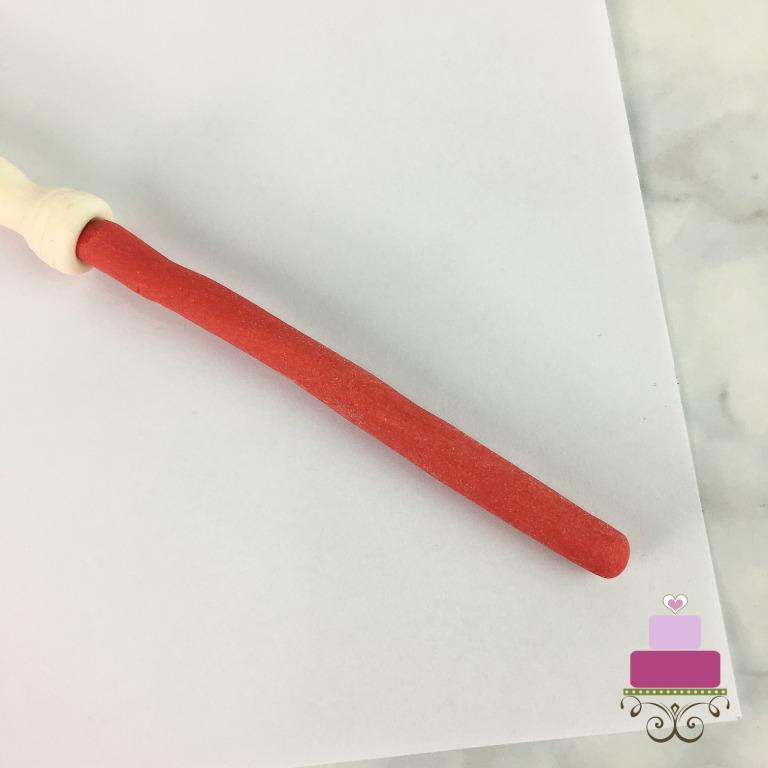
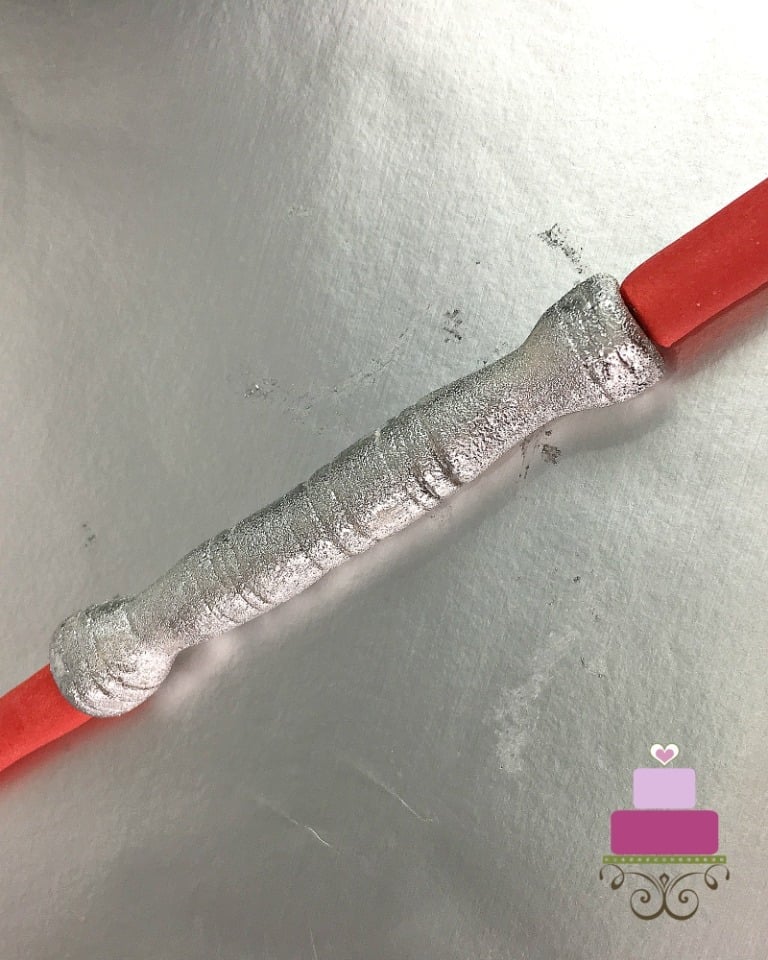
Only after it has set completely that I painted the white part of the lightsaber in silver edible paint. To make the paint, I mixed silver edible dust with a few drops of lemon extract.
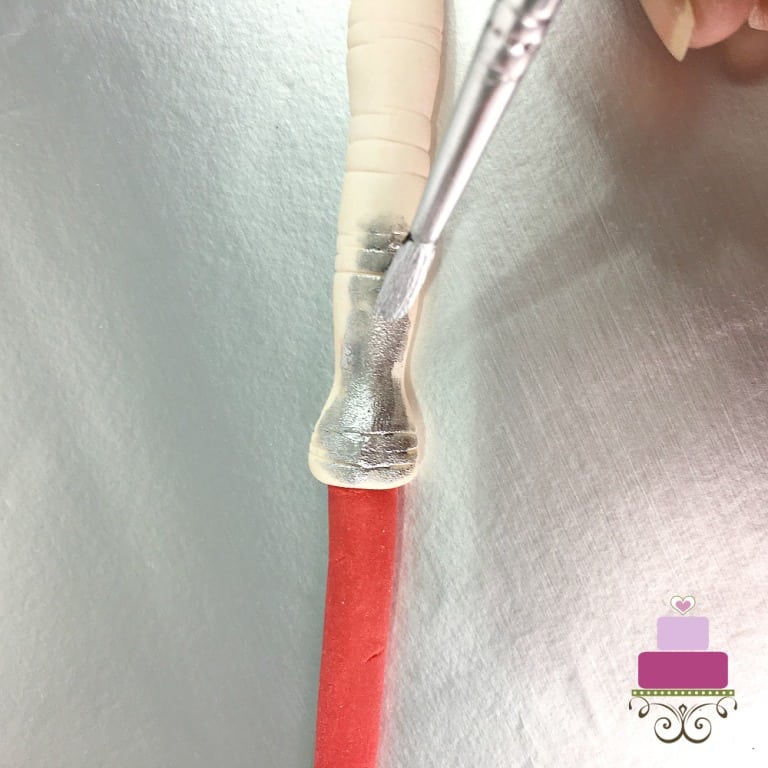
Again, I set the lightsaber aside for the paint to dry completely before putting it onto the Star Wars birthday cake.
Step 7: Make the Stars and Attach the Alphabets on the Cake
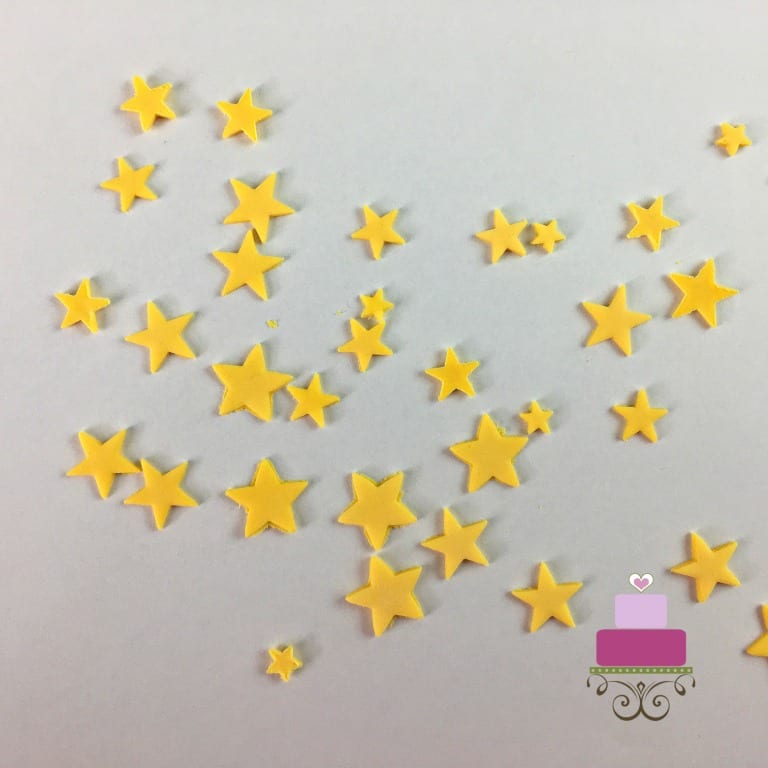
While waiting, I cut out my stars and lettering for the birthday cake. The stars were in 3 different sizes using my star plunger set.
And I used the same yellow for the letters on the Star Wars cake.
Step 8: Assemble the Star Wars Birthday Cake
To assemble the Star Wars birthday cake, I carefully lifted the Darth Maul's image onto the cake with my icing scraper and placed him on the cake. And then, I placed the letters to form my nephew's name. Finally, with the remaining space on top of the cake, I positioned the lightsaber.
Similar to how I secured the Star Wars logo on the side of the cake, I pressed the Darth Maul image, the birthday boy's name as well as the lightsaber into the buttercream on the cake. That way, I did not have to use any special glue to hold these in place.
Once the top of the Star Wars birthday cake was done, I attached the 'Happy Birthday' wording on the cake board on the front side of the cake. I used glue to hold these in place on the cake board.
Step 9: Attach the Fondant Stars
And finally, the last deco that was put on the Star Wars birthday cake were the stars. I pressed these into the buttercream all around the cake. This was done in random order, making sure they were well distributed all around the cake.
Letting the stars to set slightly before putting them on the cake helped in making sure they did not lose their shape as I lifted and pressed each one of them onto the buttercream.
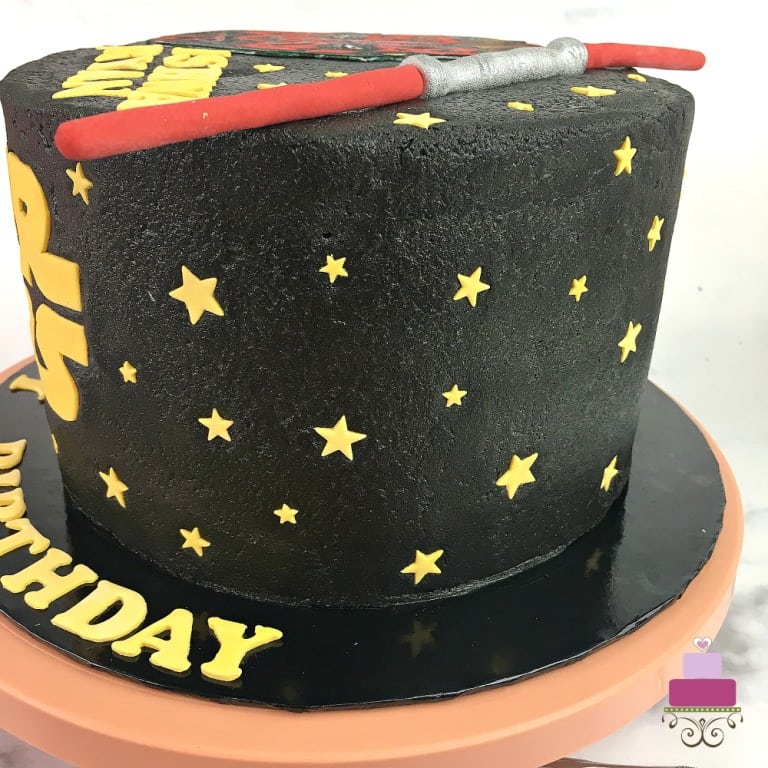
And with that, the Star Wars birthday cake was complete.
❤️More Cake Designs You Will Love


Do you like this tutorial? Please leave a 5-star ⭐⭐⭐⭐⭐rating in the recipe card below and consider a review further down this page. I would love to hear from you. Thank you!
📖Recipe
Star Wars Birthday Cake
Equipment
- Edible food marker – To trace the Darth Maul image onto fondant.
- Darth Maul face template – To make Darth Maul’s face.
- Star Wars Logo template – As a guide to cut out the logo in fondant.
- Star plunger cutter
- Alphabet cutters
- Pizza cutting wheel
- Sugar craft knife
- Food grade brush
For best results, use the metrics measurements. US customary measurements have not been tested and are only meant for guide.
Ingredients
Cake
- 360 g self-raising flour
- 360 g granulated sugar
- 360 g butter at room temperature
- 6 eggs at room temperature
- 90 ml milk
- ¾ teaspoon baking powder
- ¼ teaspoon salt
- 1 teaspoon vanilla extract
Frosting and Decoration
- 600 g powdered sugar sifted
- 300 g butter salted
- 2 tablespoon milk optional
- 1 teaspoon vanilla extract
- 1 tablespoon Black cocoa powder Add to the buttercream for a truly black buttercream.
- Black and golden yellow food color Americolor Black and Wilton Golden Yellow.
- Edible silver dust + Lemon extract Mix these to form a thick silver paint.
- Fondant Satin Ice in white and red.
- CMC powder Added to fondant when making the 3D lightsaber
Instructions
Star Wars Cake Topper - Darth Maul
- Start by getting the Darth Maul and Star Wars logo templates ready. You can either draw these by hand or print them off the internet. Resize them to fit your cake size.
Baking the Cake
- Preheat oven to 170 °Celsius.
- Beat butter and sugar till soft and creamy for about 2 minutes. Add eggs, one at a time, beating well after each addition.
- In a separate bowl, sift flour, baking powder, and salt. Fold in the sifted ingredients into the creamed mixture alternately with milk, starting and ending with flour.
- Finally, add in vanilla extract and combine well. Pour batter into two greased and floured cake pans and bake for 45 to 50 minutes until the top of the cake springs back when lightly pressed. The cakes are done when a skewer inserted in the center of the cake comes out without any wet batter.
- Remove cakes from oven and let them cool completely before icing and decorating.
- Baking time may vary slightly for larger cakes.
- To make the buttercream frosting, place butter in a large bowl. Beat until creamy.
- Add the sifted powdered sugar and continue to beat until the icing turns light and fluffy. Add the vanilla extract and sifted black cocoa powder and beat again until the vanilla is well incorporated.
- Add the black food coloring. The icing color will deepen when left to rest for about 20 minutes, so do not add too much coloring. Let the icing rest for 20 minutes and if the color is not deep enough, add more. If the icing is too stiff, add some milk and beat again.
- To decorate the cake, fill the cake layers with buttercream. Use the remaining buttercream to cover the whole cake and smoothen it.
Star Wars Logo on the Cake
- Roll some yellow fondant (white fondant tinted with golden yellow food color) thin. Place the Star Wars logo paper template on the rolled fondant and cut it out with a sugar craft knife. The letters are a lot easier to cut when the fondant is slightly dry. So if you find it hard to cut the fondant, leave it out for a few minutes after rolling. Also, if you find it hard to keep the paper template in place, apply some shortening to the paper and attach it to the fondant. That way, the paper would not move much while you are working on it. Once done, simply peel off the paper.
- Once all the letters were done, attach to the birthday cake. Since they were going onto a buttercream covered cake, no special glue is required. Simply press the letters into the buttercream until they are the same level as the icing. This will help to keep them in place without having to apply any special glue to them.
Darth Maul Image on Fondant
- Roll a piece of white fondant, thin enough to be able to see through the Darth Maul template image when place underneath it.
- Trace the face pattern along with all the lines on the face with a black edible marker.
- Once the face is completely traced, use a pizza cutting wheel to cut the face out. And then paint it red and yellow using slightly diluted red and yellow food coloring.
- After that, use the black edible marker to draw out all the lines again.
Making the Fondant Lightsaber
- Start with the center part of the lightsaber in white fondant. Shape it by hand and imprint a couple of lines on both ends. After that, form deep indentations on the ends of each side. You can do this with a fondant shaping tool or simply with the back of large food painting brush.
- Next, roll 2 equal-sized thin long strips in red. Attach them to ends of the white fondant earlier with a touch of glue.
- Once completed, set the lightsaber aside to let the glue dry completely and all the components attach securely.
- Only after it has set completely that you painted the white part of the lightsaber in silver edible paint. To make the paint, mix silver edible dust with a few drops of lemon extract. Mix until it forms a thick paint.
- Again, set the lightsaber aside for the paint to dry completely before putting it onto the Star Wars cake.
The Stars and the Alphabets on the Cake
- While waiting for the paint on the lightsaber to dry, cut out the stars and lettering for the cake. Cut the stars in a few different sizes.
- Use the same yellow fondant for the letters on the cake.
Assembling the Star Wars Birthday Cake
- To assemble the cake, carefully lifted the Darth Maul’s image onto the cake with a wide icing scraper or a cake board and placed the topper on the cake. And then, place the letters to form the birthday person's name. Finally, with the remaining space on top of the cake, position the lightsaber.
- To secured the cake toppers, gently press the Darth Maul image, the fondant letters name as well as the lightsaber into the buttercream on the cake such that they are all the same level as the buttercream covering on the cake. That way, the toppers will be held securely in place without the need for any special glue.
- Once the top of the cake is done, attach the ‘Happy Birthday’ wording on the cake board on the front side of the cake. Use fondant glue to hold these in place on the cake board.
Adding the Stars
- And finally, press in the fondant stars into the buttercream all around the cake. This can be done in random order, making sure they were well distributed all around the cake. Letting the stars to set slightly before putting them on the cake helped in making sure they do not lose their shape as you lift and press each one of them onto the buttercream.
Leave a Reply