

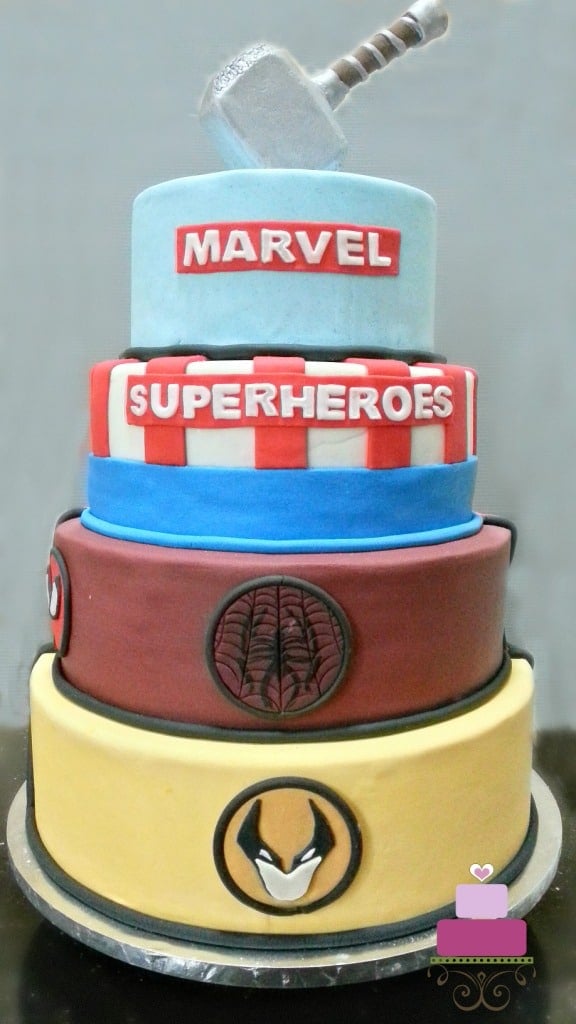
Need a superhero birthday cake idea? Here is a 4 tier Marvel Avengers themed birthday cake design you can use.

I made this cake for a 12th birthday. The party theme was Marvel Superheroes and so I incorporated as many of the birthday boy's favorite superheroes on the birthday cake as possible.
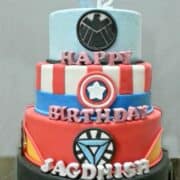
This was a large superheroes birthday cake. The top tier was 8 inches in diameter, and the bottom tier was 14 inches in diameter. There was not need for so much of cake for the party, so I made the 2nd and 3rd tiers with real cake, which was 10 inches and 12 inches cake each. The top and bottom tiers were styrofoam dummies.
If you like this cake, you should also check out these Star Wars birthday cake, Lego Star Wars cake, Ultraman cake and Marvel Superheroes cupcakes.
🧾Supplies Required
- Cake – Out of the 4 tiers, only the middle 2 tiers were real cake. Both measured 10 inches and 12 inches in diameter and about 4 inches high each. I used my butter pound cake recipe for the 10-inch tier and chocolate cake recipe for the 12 inches tier.
- Buttercream icing – I used buttercream to fill the cakes as well as to crumb coat them.
- Royal Icing- I used this to make some of the logos on the cake
- Fondant – the entire cake was covered in fondant. I used Satin Ice in white , red , black and baby blue. For the rest of the colors, I tinted white fondant with Wilton and Americolor food coloring.
- Edible silver mist
– I used Wilton Silver Color Mist to spray paint Thor’s hammer as well as the 3D letters on the side of the cake.
- Styrofoam dummies – The topmost and bottom-most tier of this cake were Styrofoam dummies measuring 8 inches and 14 inches in diameter each.
- Pizza cutting wheel – This, together with my sugar craft knife were used to make most of the logos and deco on the cake.
- Extruder tool
- Alphabet cutters – I used two types in this project. The first set in block letters for the 3D upright standing Happy Birthday message, my son’s name, and the number 12 on the cake. I purchased this set from a local cake decorating shop. The other type was Clikstix alphabet cutters in block letters. I used this for the words “MARVEL SUPERHEROES”.
- Round cutter set
- Marvel superheroes logo templates
- Styrofoam block and Styroam cutter – I used this to make Thor’s hammer and used a battery-operated styrofoam cutter to shape the hammer.
- Fondant glue
- Hot glue – I used this to stick together the Styrofoam pieces I used to make Thor’s hammer cake topper.
👩🍳How to Make
Step 1: Prepare the Logo Templates
To begin with, I got all my templates ready. I got these from the internet and resized them. This is so that that they were all of the same sizes on the cake.
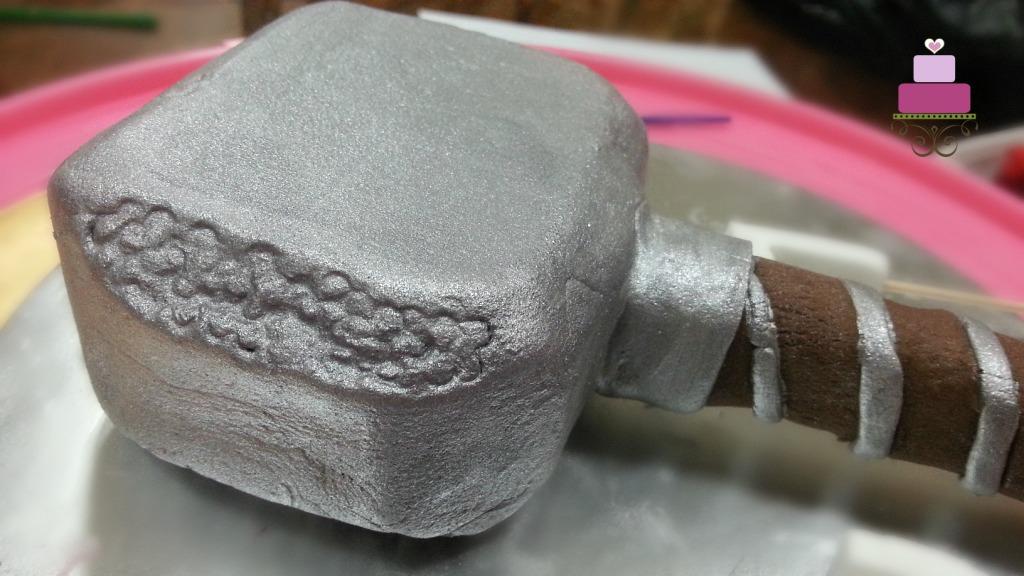
Step 2: Make the Thor Hammer Cake Topper
Next, I made Thor’s hammer. I drew the hammer by hand (by looking at images on the internet) and used it as a template to cut out my Styrofoam block. I had to stick a few layers of the Styrofoam sheet in order to achieve the required thickness. And then I used my Styrofoam cutter to cut out the shape of a hammer.
I then covered it with white and brown fondant and painted the white in silver. As you can see, there are some designs on the edges of the hammer. I made these by randomly imprinting my 5 petal flower cutter into fondant.
Step 3: Decorate the Dummy Cakes
Next were the cake dummies. I made and decorated this much in advance as compared to the actual cake. I covered the smaller one in light blue and the bottom one in a combination of yellow and very dark green.
Step 4: Make the Logos
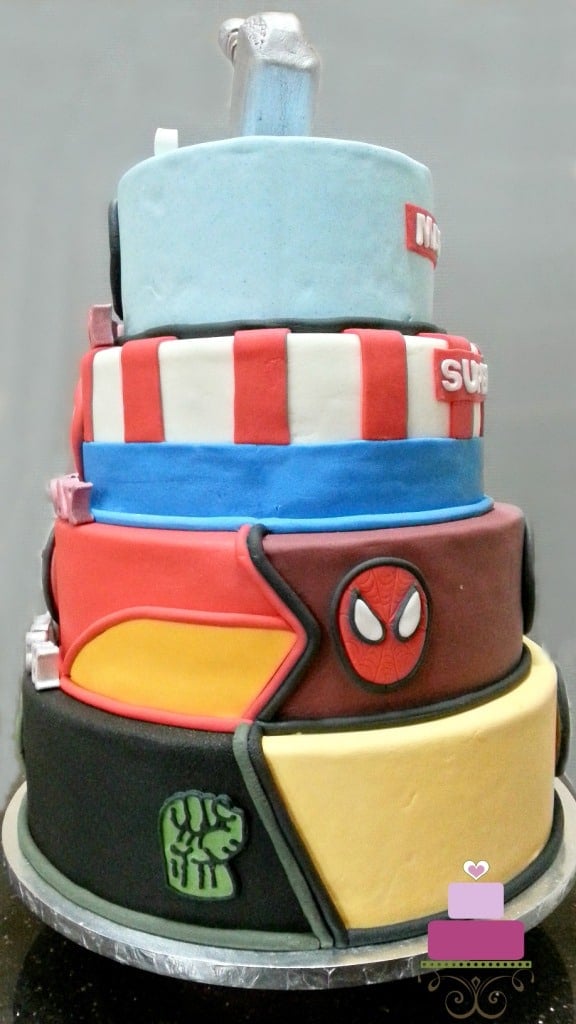
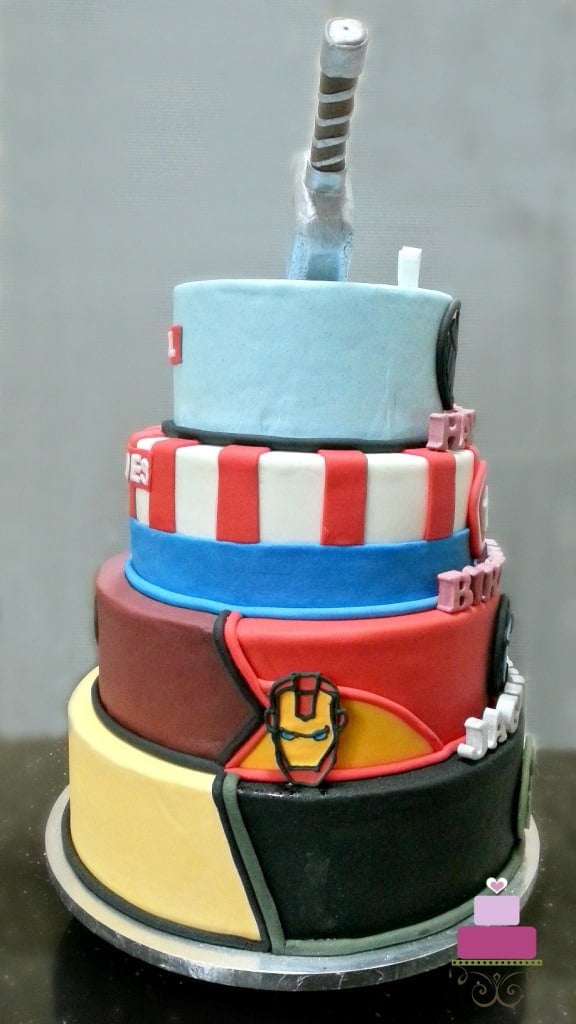
And then I prepared my Avengers logos. I used royal icing color flow technique to create 2 of my logos i.e. the Hulk’s fist and the Iron Man face.
Step 5: Bake and Prepare the Cakes
Three days before the party, I baked the cakes. Once cooled, I leveled, filled, and coated them with buttercream. And then I covered them in fondant. For the second tier, I covered it in white. And the third tier, I covered half in maroon and half in bright red.
At the corner of the bright red section, I cut out a small section and added some yellow fondant. This was for Iron Man.
And then I went on to decorate the rest of the Marvel Avengers superhero birthday cake. I cut out all the logos in fondant and used my extruder tool to pipe our borders for each of them. I also used the extruder tool to pipe out the cake borders as well as to cover the joints where two different colors were on the cake.
Step 6: Attach the Alphabets on the Cake
As for the wordings, I made the 3D upright standing ones in advance so that they have time to set and harden. I used maroon for the “HAPPY BIRTHDAY’ and then painted them in silver edible paint. My son’s name was entirely white which I then painted in silver.
As for the ‘MARVEL SUPERHEROES’, I used Clikstix cutters and attached the alphabets to the cake with glue.
I finished off the Marvel Avengers cake by attaching all the deco pieces together including Thor’s hammer.


Leave a Reply