

Looking to make a Lego Star Wars cake that's sure to impress? If you're Star Wars fan and a Lego fan, this is the perfect cake for you! The cake features cute toy toppers with handmade fondant Lego blocks and star toppers. It is a perfect cake for Lego Star Wars fans.
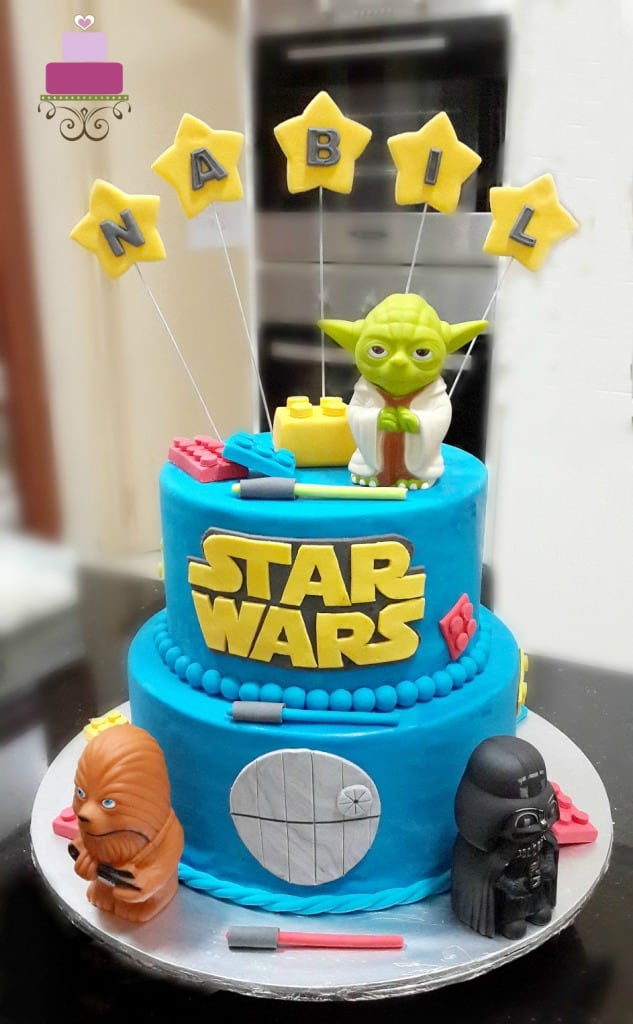
This is 2 tier cake measuring 6 and 9 inches in diameter with each tier measuring approximately 4 inches in height. The cake is covered in fondant and all the Star War Lego characters (Darth Vader, Yoda, Chewbacca) are toy toppers.
You can add your other favorite Star Wars characters (Princess Leia, Death Star, Darth Vader, etc) too. The rest of the decorations like the Lego blocks and the lightsabers are made in fondant and completely edible.
If you like this cake, you should also check out this Darth Vader cake!
Note: This is an intermediate cake decorating tutorial and some basic knowledge about frosting a cake with buttercream and fondant is required.
Jump to:
❤️Why You Will Love This Tutorial
- It is easy to follow with all the detailed list of supplies and instructions.
- The cake toppers are toys, so the cake can be put together fairly quickly and easily.
- It is a lot cheaper to make the cake yourself than to custom order it.
- You get to tweak the design and customize it to your liking.
📋Supplies Required
- Chocolate cake – Two tier cake measuring 6 inches and 9 inches in diameter. Each tier consists of 2 layer of cake.
- Buttercream – As a filling for the cake and to crumb coat it.
- Fondant – to cover the entire cake as well as to make the decorations on the cake. I used Satin Ice.
- CMC - Add to the yellow fondant to make the stars on the cake. This is to make sure they harden quicker and hold their shape when put on the cake.
- Black edible food marker - to draw the line and the dot on the grey marbled door.
- Fondant glue and shortening – glue for the project.
- Round cutters – To make the grey door on the second tier and for the small round dots on the Lego blocks.
- Star cutter – For the star toppers on the cake.
- Star Wars logo template – To guide in cutting the logo on the cake. You can search for the logo on the internet.
- Sugar craft knife – To cut out the Star Wars logo in fondant.
- Clikstix block letters alphabet cutters - to cut the birthday boy’s name.
- Gauge 18 white floral wire – To hold the star toppers.
- Fondant extruder tools – To make the border on the bottom tier of the cake.
- Star Wars character figurines (toy toppers)
👩🍳How to Make
Step 1: Bake and Prepare the Cakes
Bake the cakes and let them cool completely to room temperature before decorating.
Once baked and cooled down, level each cake layer.
Stack the 6 inch layers together with some buttercream in between and crumb coat them. Next, roll the blue fondant to about ⅛ of an inch thick and cover the cake.
Repeat the process for the 9 inch tier and then stack the 6 inch tier onto the 9 inch tier. Support the top cake tier by inserting bubble straws into the bottom tier (here is the comprehensive guide on how to make tiered cakes).
Step 2: Make the Star Wars Logo Template
To make the logo, you need a template. You can get this off the internet. Choose a logo design you like, resize it to fit the size of the cake and print 2 copies out. Use one copy as a reference for the complete logo, and for the other copy, cut it out following the outline of the black background.
Roll some black fondant onto a cake board and place the template on it. Use the sugar craft knife to cut it out, following the outline. Leave the black cut out aside without moving it so that the shape does not get altered.
Next, cut out each of the alphabets on the logo. Where the letters are combined (liek the 's & t' and 'r & s', do not separate them.
Roll some yellow fondant, place the paper templates for each of the alphabets and cut them out with the sugar craft knife.
Apply some shortening onto the black cut out earlier and arrange the yellow alphabets onto it to make the logo.
Next, apply some shortening onto the front of the top tier cake. Gently lift the logo and attach it to the cake. Make sure it is well centered.
Step 3: Make the Star Toppers
To make the stars, knead some CMC into the yellow fondant. Roll and use the star cutters to cut out the stars. Cut as many as you need depending on the length of the birthday person's name.
Next, dip the end the floral wires and poke them into the stars. Attach one wire into each star. Leave these aside (lay them horizontally for the glue to dry and for the stars to firm up.
Next, roll some black fondant and cut out the alphabets for the name. Attach each of these letters onto the stars with shortening. Continue to let the stars lay horizontally on a flat surface until they harden.
Step 4: Make the Grey Fondant Door
The door has a marbled look. To make this, knead some white and black fondant together until just right to show the marble effect. If you knead too much, you will lose the marble effect. The whole thing will turn into a monotonous grey piece.
Roll the marbled fondant thin. Cut it into a circle using the round cutter.
And then, using the sugar craft knife, mark vertical lines on it, followed by one horizontal line right in the middle. And then use the black food marker to mark the horizontal line in black. Attach the door to the side of the cake with shortening. In doing this, make sure it is positioned such that the vertical lines are really straight and the horizontal line is perfectly horizontal.
Next, add a small knob to the door using the remaining marbled grey fondant. Again, use the craft knife to mark the lines on the knob. And mark a black dot in the center with the edible food marker. Once done, attach the knob to the door on the cake.
Step 5: The Lego Blocks
Make the Lego blocks in red, blue and yellow. Roll the fondant and cut out rectangle pieces of cut outs for the blocks by hand. The ones placed on the sides of the cake should be rolled thinner and the ones on the cake can be thicker.
Next, roll the fondant again, and this time cut out the small round dots using the round plunger cutter. Attach 6 of these onto each of the rectangle cut outs earlier.
Let the thicker blocks set completely before placing them on the cake, so that they do not bend when slanted against each other.
Step 6: Add the Cake Border
For the bottom tier, use the extruder tool to piped out the rope border for my bottom tier. For the top tier, form round balls by hand and arrange them into a border all around the base of the tier. Hold them in place on the cake with shortening.
Step 7: Make the Light Sabers
As for the lightsabers roll some blue, red, and green fondant into thin strips. And then wrap a thin piece of grey rectangle on one end each. Place these on the front side of the cake. Place one on the top tier, one on the second tier, and one on the board.
Step 8: Add the Star Toppers
Finally, poke the attach the stars to the cake and place the toy figurines on to complete the cake.
💡Expert Tips
- When making 3d figures and upright standing decorations like the stars on the cake, it helps to add some CMC or tylose powder. CMC helps the fondant to dry and hold its shape without sagging.
- Fondant turns sticky and sags in humid environment. If you are in a humid environment, it helps to work in an air conditioned room.
- When using floral wires in cakes, always wrap them in plastic wrap or insert them into lollipop sticks before inserting into cakes to avoid direct contact of the wires with cake.
- Fondant work (3D decoration) on the cake can be made a few days in advance. That way, you save a lot of time when assembling the cake before your party or event.
❤️More Tutorials You Will Love


Do you like this tutorial? Please leave a 5-star ⭐⭐⭐⭐⭐rating in the recipe card below and consider a review further down this page. I would love to hear from you. Thank you!
📖Recipe
Lego Star Wars Cake
Equipment
- Round cutters
- Star cutter
- Star Wars Logo template
- Sugar craft knife
- Clikstix block letters alphabet cutters
- Gauge 18 white floral wire
- Fondant extruder tools
- Star Wars character figurines (toy toppers)
For best results, use the metrics measurements. US customary measurements have not been tested and are only meant for guide.
Ingredients
- 2 six inch round cakes measuring 2 inches high each
- 2 nine inch round cakes measuring 2 inches high each
- Buttercream
- Fondant Satin Ice fondant
- CMC powder
- Black edible food marker
- Fondant glue
- Shortening
Instructions
Preparing the cake and covering in fondant
- Bake the cakes and let them cool completely to room temperature before decorating.
- Once baked and cooled down, level each layer.
- Stack the 6 inch layers together with some buttercream in between and crumb coat them. Next, roll the blue fondant to about ⅛ of an inch thick and cover the cake.
- Repeat the process for the 9 inch tier and then stack the 6 inch tier onto the 9 inch tier. Support the top tier by inserting bubble straws into the bottom tier.
Making the Star War logo
- To make the logo, you need a template. You can get this off the internet. Choose a logo design you like, resize it to fit the size of the cake and print 2 copies out. Use one copy as a reference for the complete logo, and for the other copy, cut it out following the outline of the black background.
- Roll some black fondant onto a cake board and place the template on it. Use the sugar craft knife to cut it out, following the outline. Leave the black cut out aside without moving it so that the shape does not get altered.
- Next, cut out each of the alphabets on the logo. Where the letters are combined (liek the 's & t' and 'r & s', do not separate them.
- Roll some yellow fondant, place the paper templates for each of the alphabets and cut them out with the sugar craft knife.
- Apply some shortening onto the black cut out earlier and arrange the yellow alphabets onto it to make the logo.
- Next, apply some shortening onto the front of the top tier cake. Gently lift the logo and attach it to the cake. Make sure it is well centered.
Making the star toppers
- To make the stars, knead some CMC into the yellow fondant. Roll the fondant and use the star cutters to cut out the stars. Cut as many as you need depending on the length of the birthday person's name.
- Next, dip the end the floral wires and poke them into the stars. Attach one wire into each star. Leave these aside (lay them horizontally for the glue to dry and for the stars to firm up.
- Next, roll some black fondant and cut out the alphabets for the name. Attach each of these letters onto the stars with shortening. Continue to let the stars lay horizontally on a flat surface until they harden.
Making the marbled door
- The door has a marbled look. To make this, knead some white and black fondant together until just right to show the marble effect. If you knead too much, you will lose the marble effect. The whole thing will turn into a monotonous grey piece of fondant.
- Roll the marbled fondant thin. Cut it into a circle using the round cutter.
- And then, using the sugar craft knife, mark vertical lines on it, followed by one horizontal line right in the middle. And then use the black food marker to mark the horizontal line in black. Attach the door to the side of the cake with shortening. In doing this, make sure it is positioned such that the vertical lines are really straight and the horizontal line is perfectly horizontal.
- Next, add a small knob to the door using the remaining marbled grey fondant. Again, use the craft knife to mark the lines on the knob. And mark a black dot in the center with the edible food marker. Once done, attach the knob to the door on the cake.
Making the Lego blocks
- Make the Lego blocks in red, blue and yellow fondant. Roll the fondant and cut out rectangle pieces of cut outs for the blocks by hand. The ones placed on the sides of the cake should be rolled thinner and the ones on the cake can be thicker.
- Next, roll the fondant again, and this time cut out the small round dots using the round plunger cutter. Attach 6 of these onto each of the rectangle cut outs earlier.
- Let the thicker blocks set completely before placing them on the cake, so that they do not bend when slanted against each other.
The cake border
- For the bottom tier, use the extruder tool to piped out the rope border for my bottom tier. For the top tier, form round balls by hand and arrange them into a border all around the base of the tier. Hold them in place on the cake with shortening.
- Making the light sabers
- As for the lightsabers roll some blue, red, and green fondant into thin strips. And then wrap a thin piece of grey rectangle on one end each. Place these on the front side of the cake. Place one on the top tier, one on the second tier, and one on the board.
Adding the cake toppers
- Finally, poke the attach the stars to the cake and place the toy figurines on to complete the cake.
Notes
- When making 3d figures and upright standing fondant decorations like the stars on the cake, it helps to add some CMC or tylose powder to the fondant. CMC helps the fondant to dry and hold its shape without sagging.
- Fondant turns sticky and sags in humid environment. If you are in a humid environment, it helps to work in an air conditioned room.
- When using floral wires in cakes, always wrap them in plastic wrap or insert them into lollipop sticks before inserting into cakes to avoid direct contact of the wires with cake.
- 3D fondant decoration on the cake can be made a few days in advance. That way, you save a lot of time when assembling the cake before your party or event.
Leave a Reply