

Here is a simple Lion King cake design decorated in buttercream and fondant. This is a pretty easy cake to put together and makes an awesome Lion King themed birthday cake for Simba and Lion King fans!
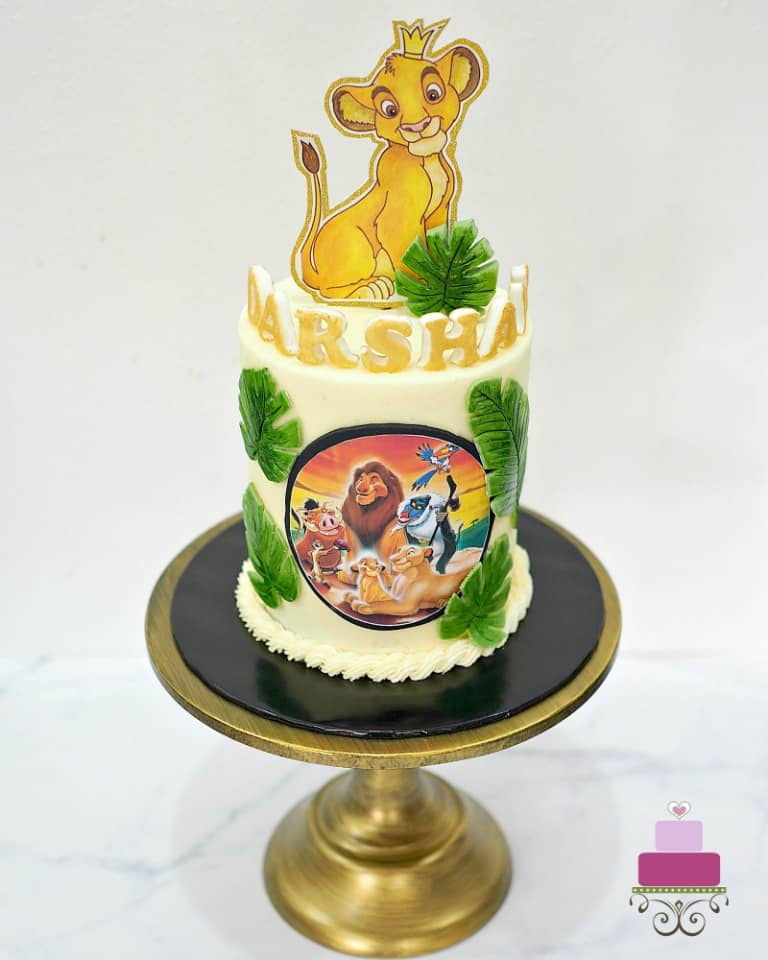
This Lion King cake has Simba as the main character and along with Simba, the entire Lion King family in Pride Rock including Timon, Pumba, Zazu, Rafiki, Nala and Mufasa.
The cake is covered in buttercream and decorated with an easy DIY Simba cake topper (made with paper), Lion King themed edible image, and fondant jungle leaves and letters.
If you like this cake, you should also check out this lion cake with cute lion topper, lion birthday cake, lion cupcakes, jungle animals cake, penguin cake and this simple dog cake design.
🧾Supplies Required
- Cake - this was a 6 inches round cake that was also 6 inches tall. The cake was made up of 4 layers i.e 2 layers of vanilla pound cake and 2 layers of chocolate cake.
- Buttercream - I used buttercream to sandwich the cake layers, cover the cake as well as to the pipe the rope border for the cake.
- Fondant - I used Satin Ice for this project. I used white (tinted in Wilton Juniper Green ) for the leaves and black for the background of the edible image on the side of the cake.
- Edible gold paint + lemon extract - I mixed these to form a thick gold paint to paint the 3D alphabets on my Lion King cake.
- Juniper Green food color - I used this to tint the white fondant for the leaves. I also used this food color to paint the leaves.
- CMC powder - I added CMC powder to the white fondant to make the letters on the cake as well as to the green fondant when cutting out the jungle leaf topper.
- Lion King edible image - This was ordered from a local edible images supply shop.
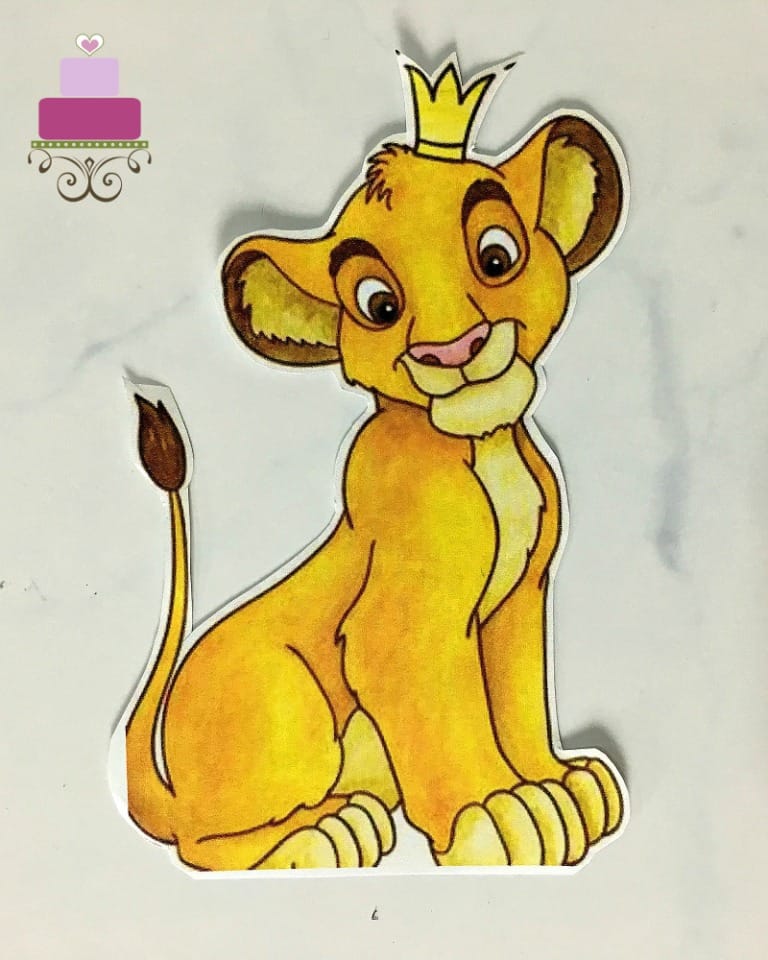
- Simba paper template - I sourced this from the internet and resized it to fit the top of my cake. Read more on how to resize images for cake decorating in my post here.
- Jungle leaves paper template - These were sourced from the internet as well and resized to fit the cake.
- Alphabet cutters - I purchased this from a local cake decorating shop and used them for the alphabets on the cake.
- Needle scriber tool
- Gum paste tools
- Sugarcraft knife
- Piping tip number 18 - This was used to pipe the rope border for the cake.
- Round cutter - I used this to cut out my black fondant for the edible image.
- Glitter craft paper - This was used to support the Simba cake topper
- Scissors and glue
- Long wooden skewers and toothpicks - These were for the Simba cake topper, the leaf cake topper as well as the 3D alphabets.
👩🍳How to Make
Step 1: Make the Cake Topper
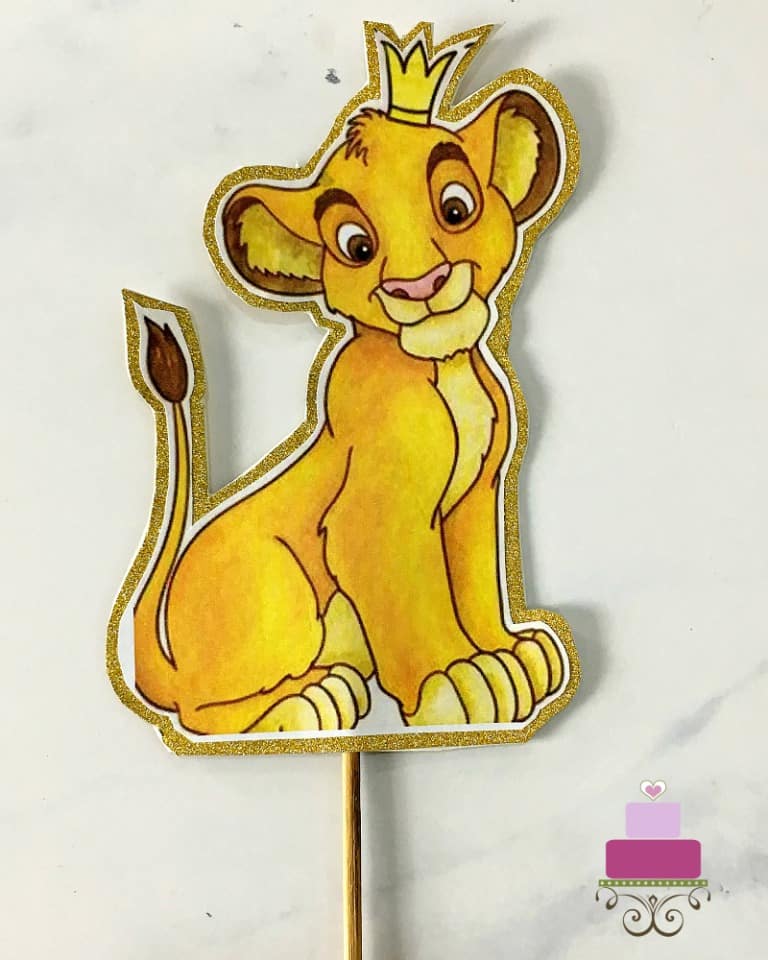
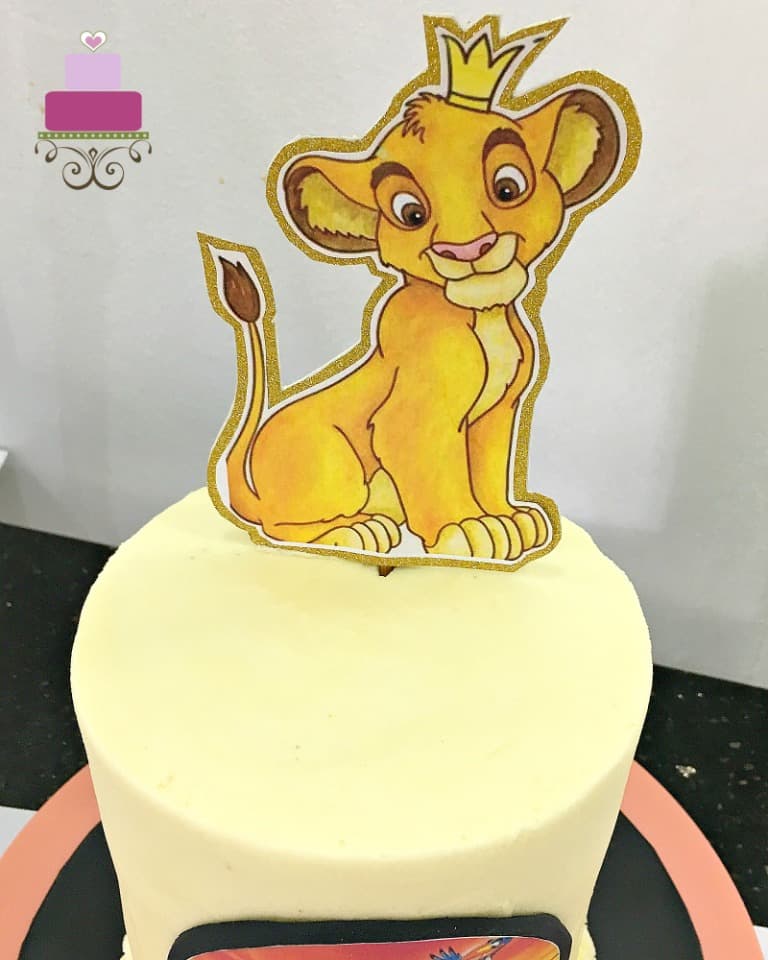
The first step was to find a printable image of Simba to make the topper. Again, the internet was my source. Once I had the image I liked (Simba in a sitting position with a cute crown on his head), I resized it (see my post here on how to resize images and templates for cake decorating) and printed out in color, on a piece of normal A4 sized paper. I then cut it along its outline.
Since this was a normal A4 paper, I had to paste it onto a thicker cardboard in order for it to stand upright on the cake, so I choose a gold glitter cardboard as the backing.
I applied glue to my Simba cut out and pasted it onto the cardboard.
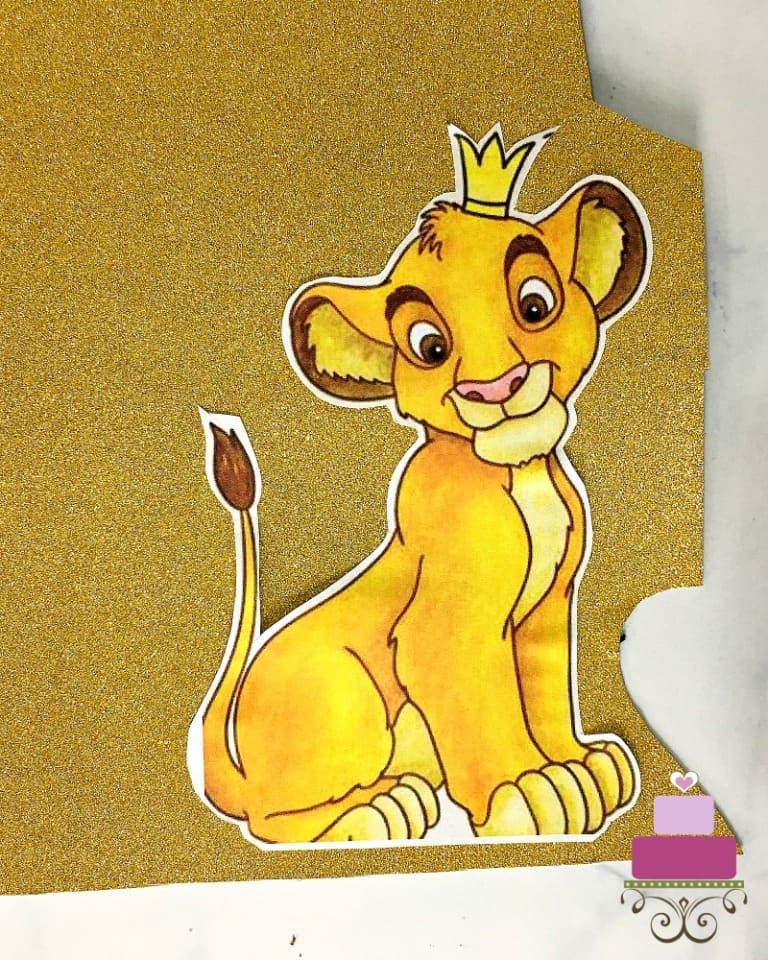
And then I cut the cardboard, leaving a thin outline of the gold visible around Simba after cutting.
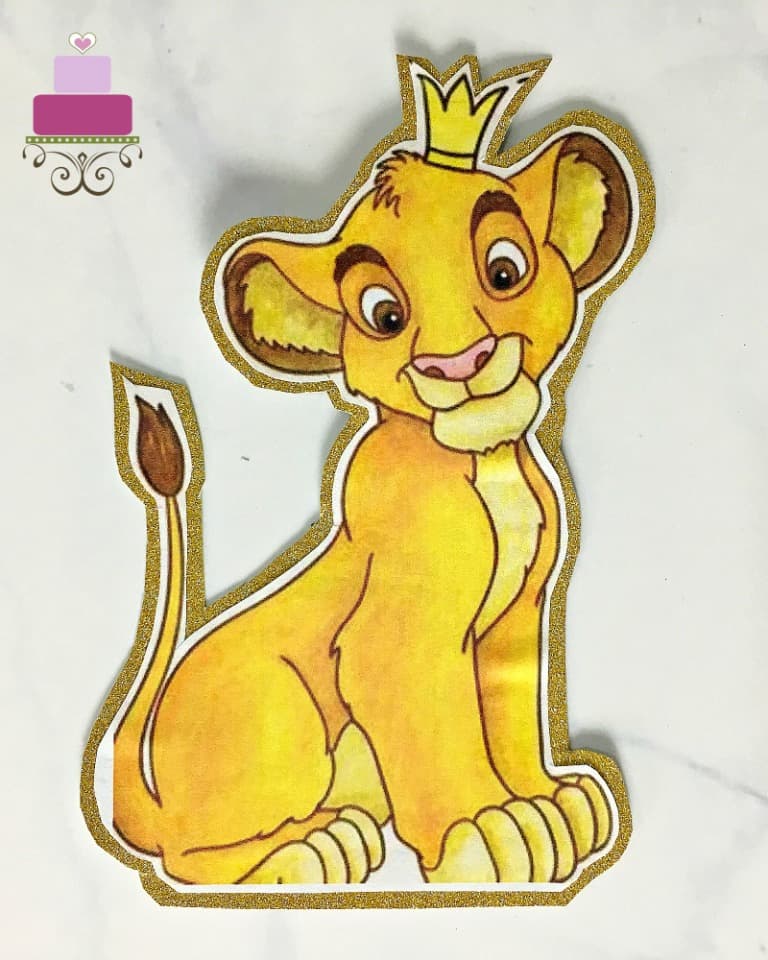
In order for the topper to stand upright onto the cake, I had to attach a long thin skewer to the back of Simba cut out with some tape. And to make sure the tape and the skewer did not show on the reverse side of the Simba topper, I decided to attach another piece of glitter cardboard at the back.
To do this, I attached the skewer first. And then I applied glue all over the back of the topper and attached it to the reverse side of my glitter card board.
And then I cut the cardboard out, following the Simba topper outline as closely as possible.
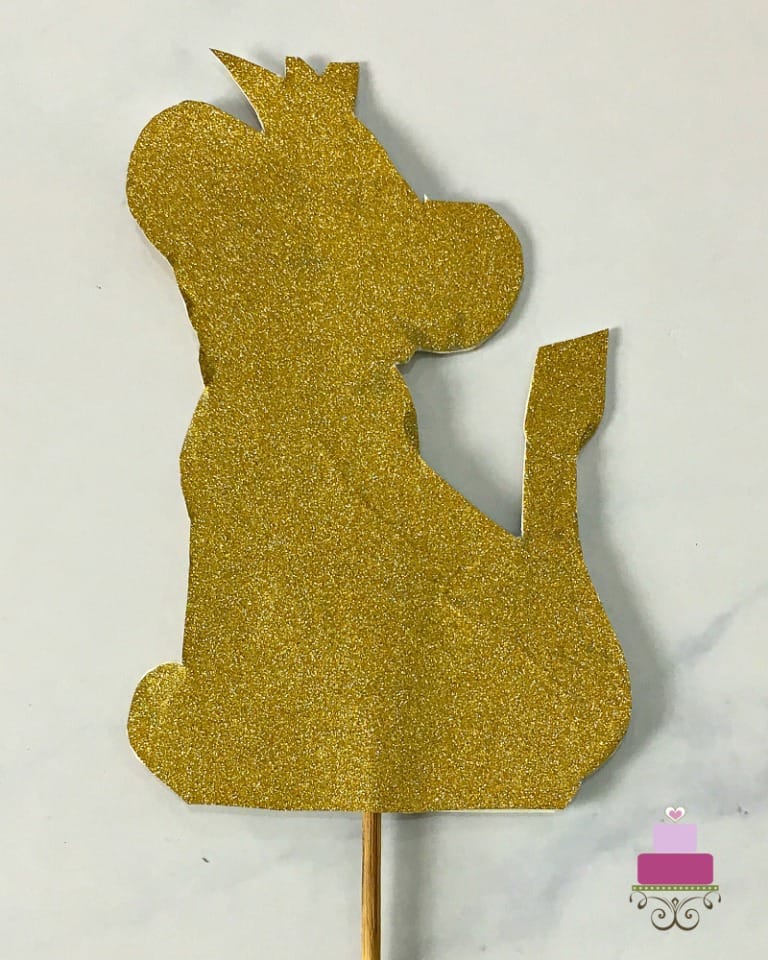
And this was how the completed Simba topper looked like:
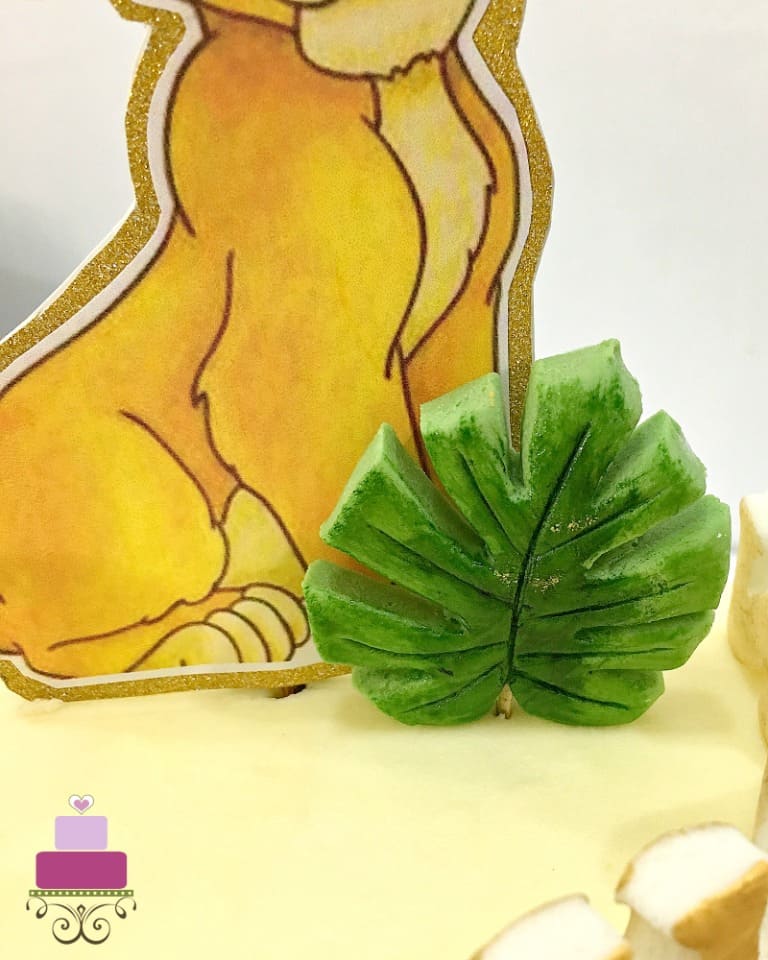
Step 2: Make the Fondant Jungle Leaves & Fondant Palm Leaves
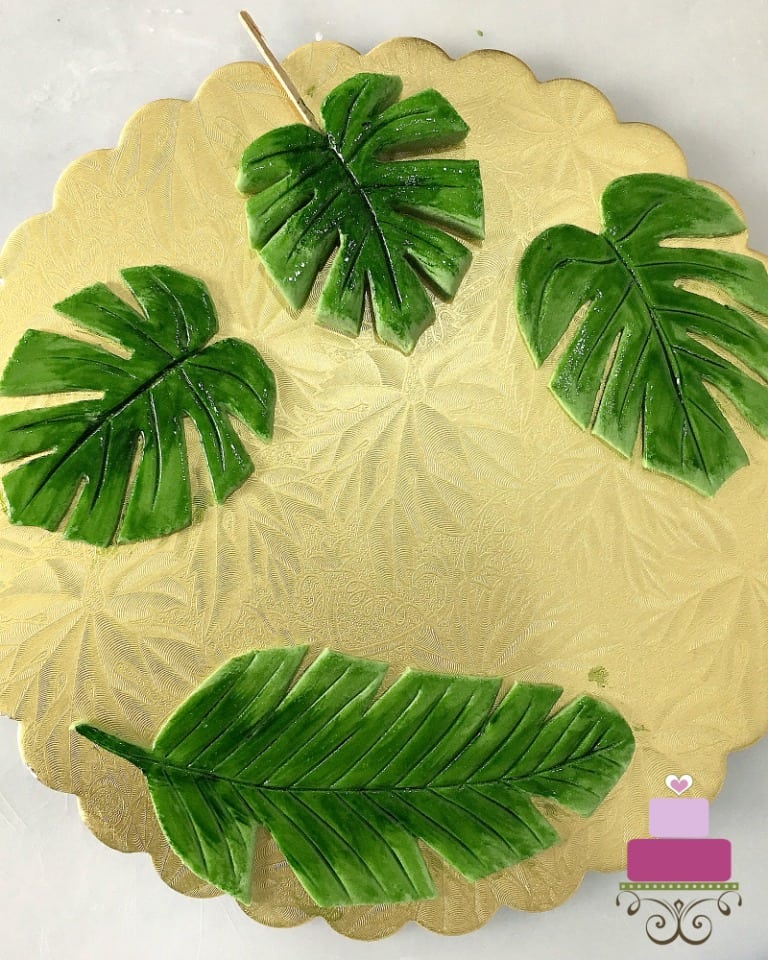
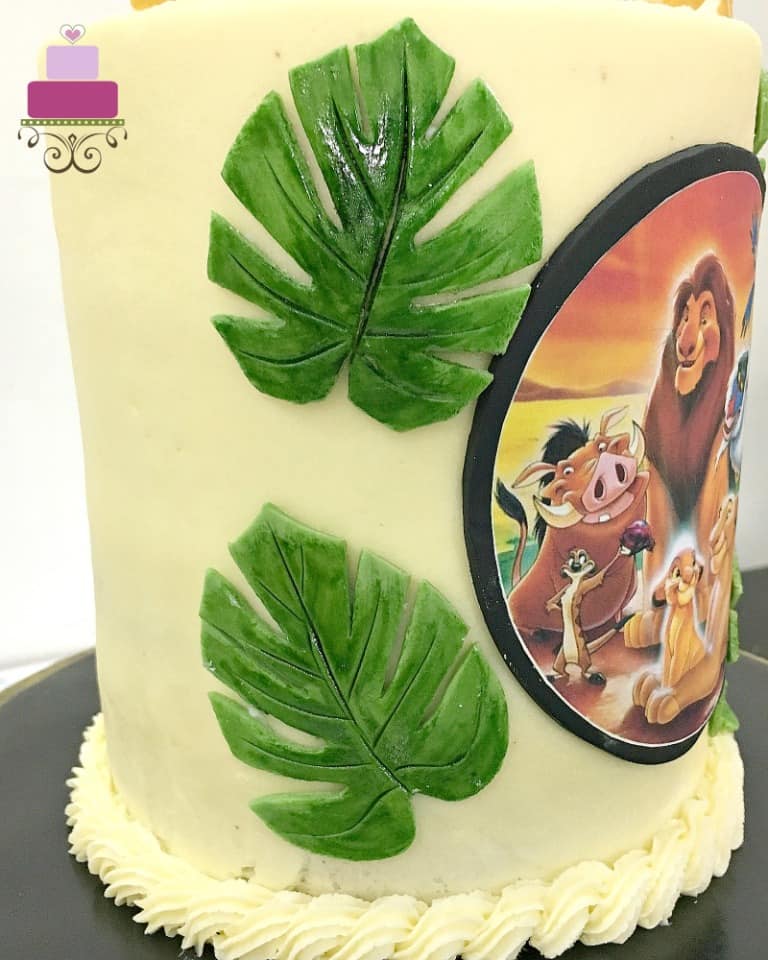
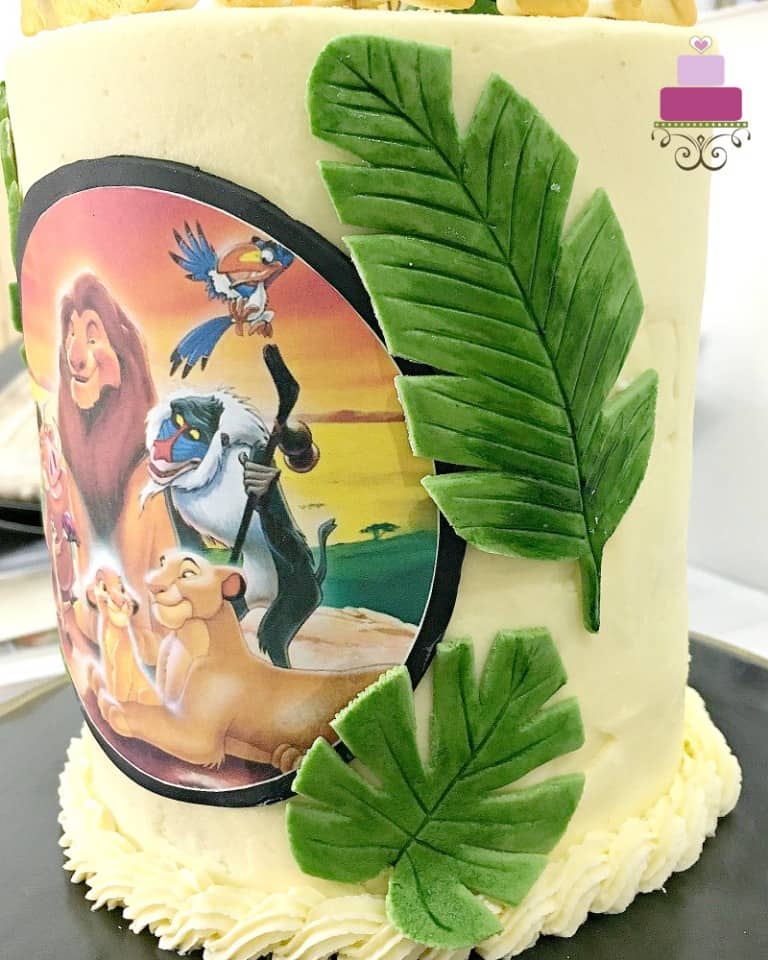
All the leaves on the cake were made using fondant. I had a total of 5 leaves. 4 were attached to the side of the cake and one placed in an upright position (as a cake topper) next to the Simba topper.
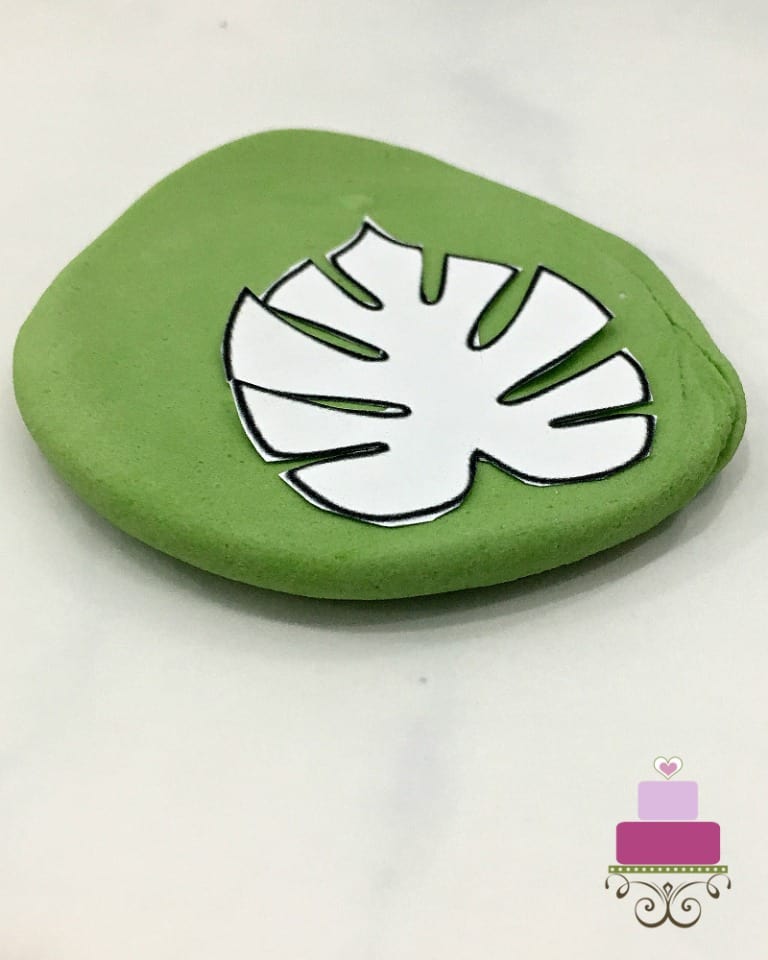
I did not have any special cutters for the leaves. So I used paper templates as a guide in cutting them out. These jungle leaves are pretty easy to draw, but I chose to get mine from the internet.
I printed the leaves images and cut them out following their outlines.
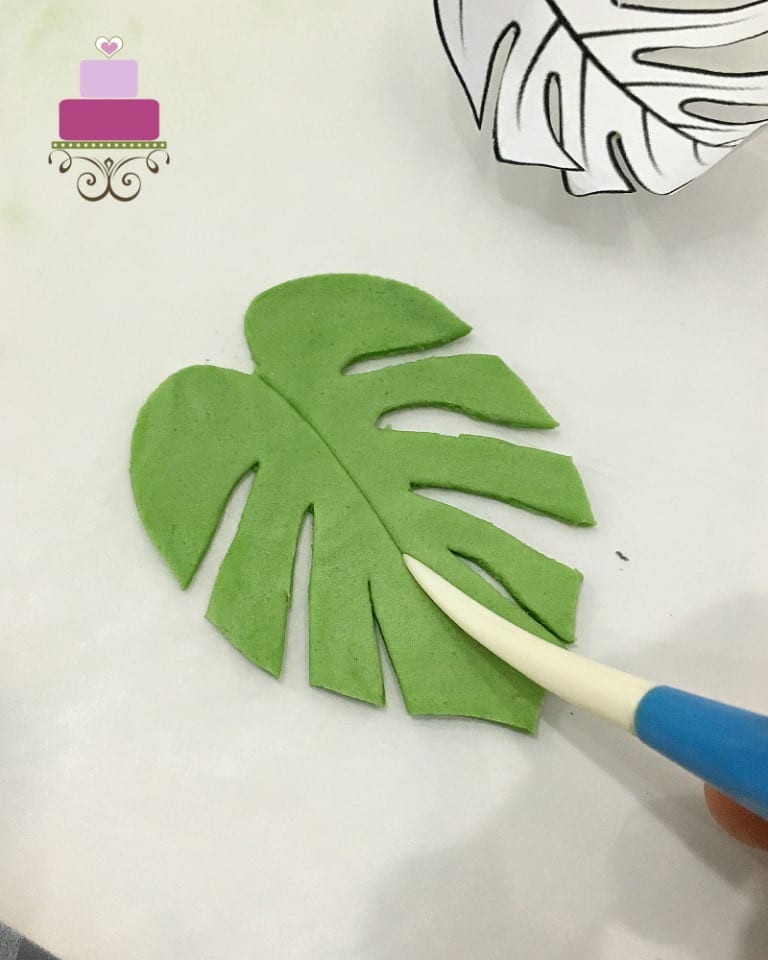
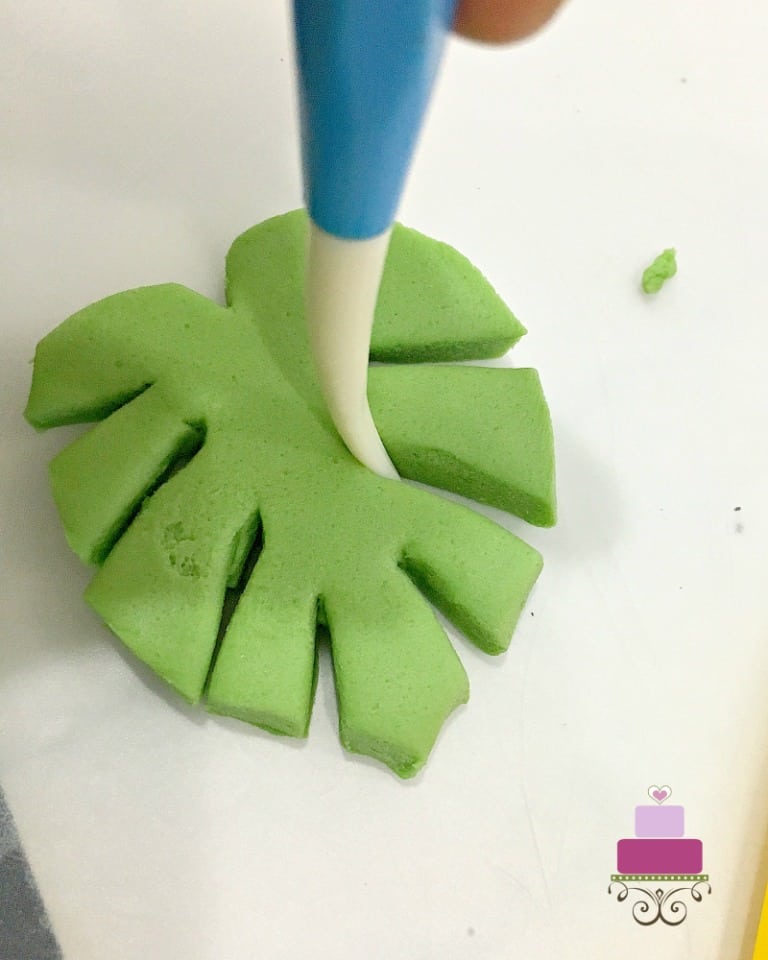
Next, I tinted my white fondant green and rolled it thin. Using my paper templates as guide, I cut out the leaves using my sugar craft knife.
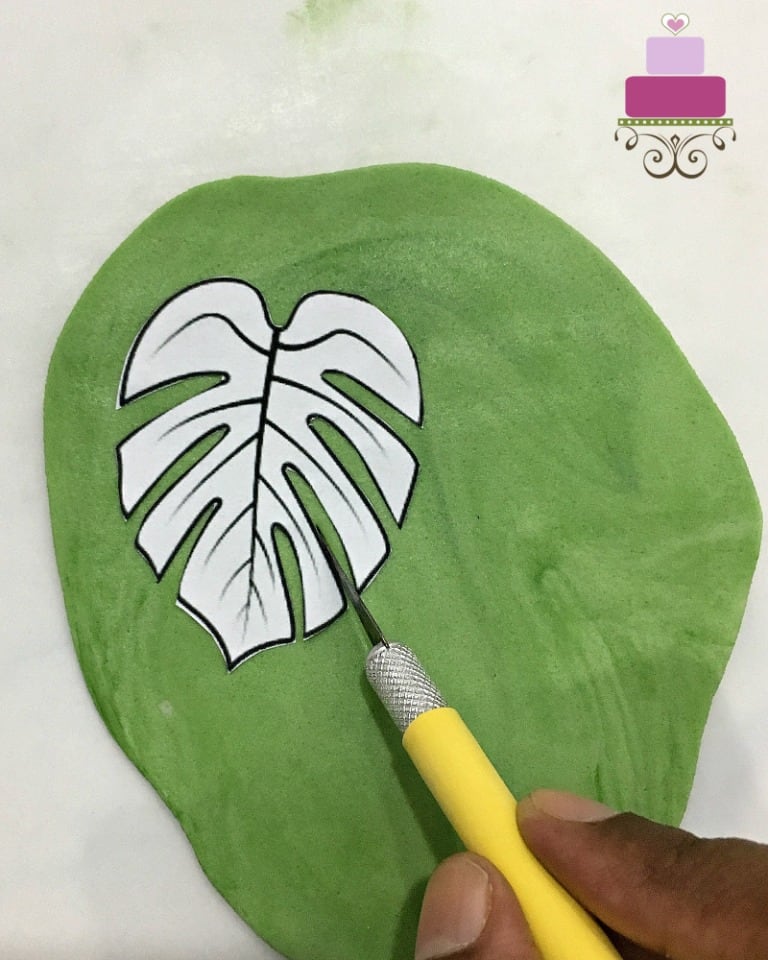
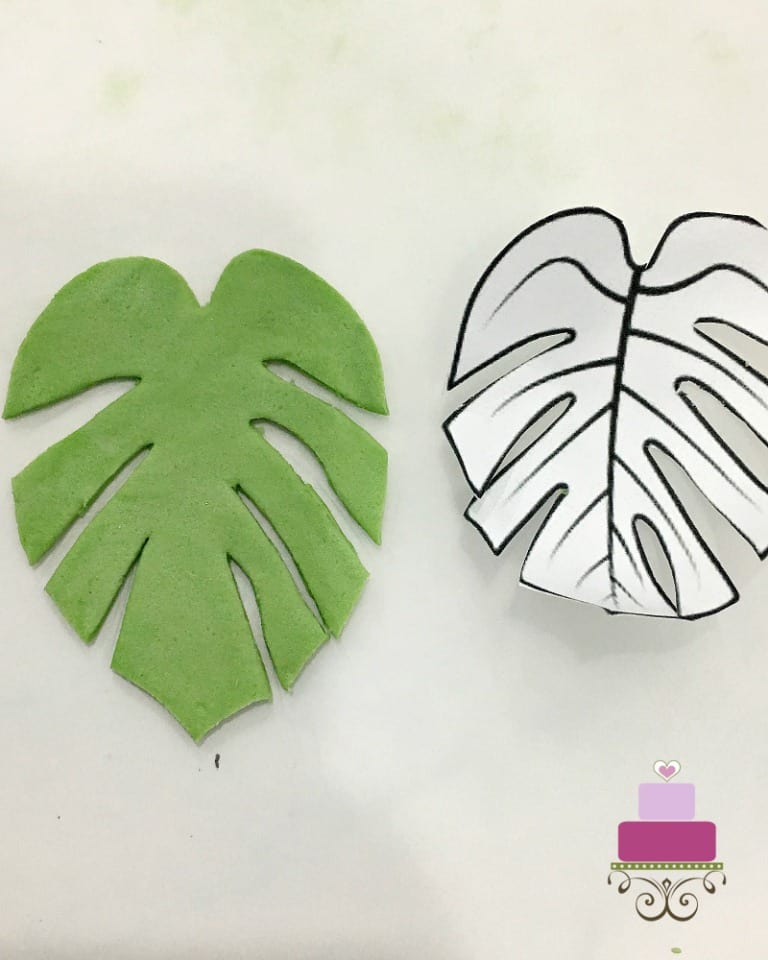
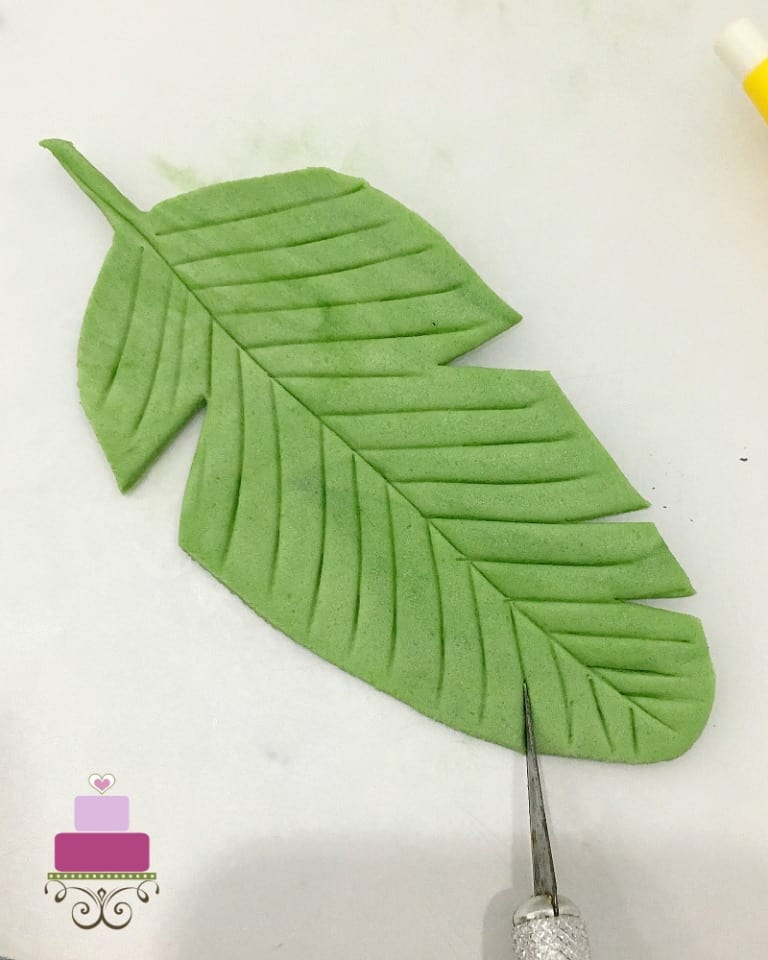
And then I used my sugar craft tools to draw the veins on my leaves.
Once I had all my leaves cut out, next was painting them. You don't have to paint them if you choose so, but painting gave the leaves a bit of depth so I used my green gel food color and painted the centers. I diluted the food color with some water so that the color was not too concentrated.
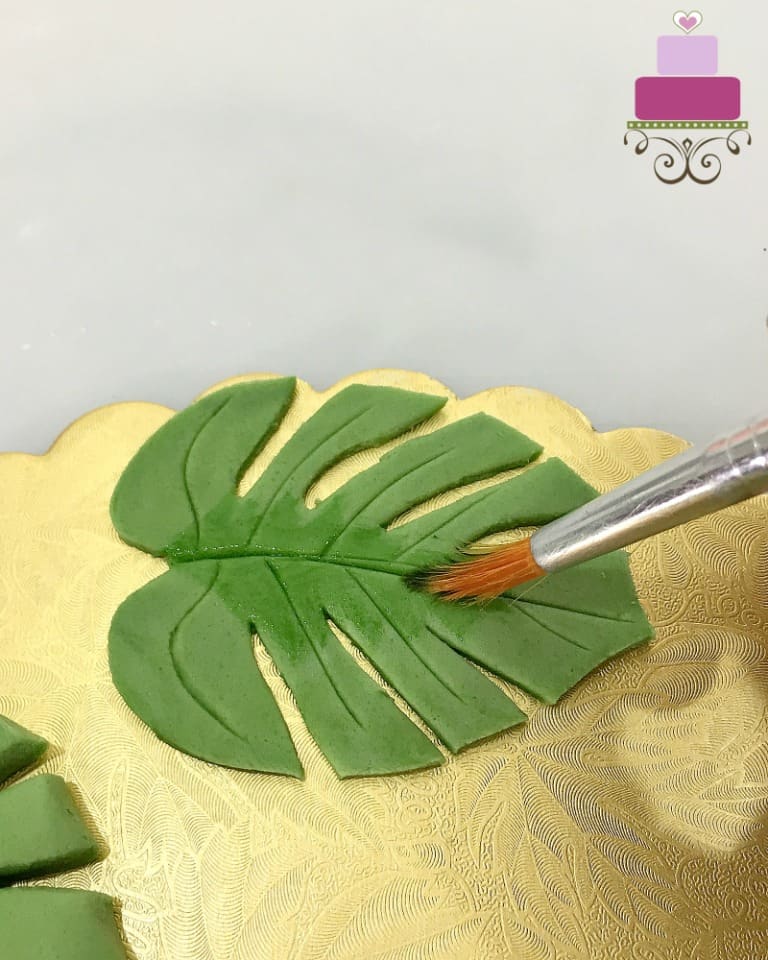
Once the painting was done, I let the leaves aside for the paint to dry. I kept them covered as I did not want the fondant to dry out completely.
As for the topper on the cake, since it was going to be placed upright on the cake, I added some CMC into the green fondant before cutting it out. And I also rolled it slightly thicker than the rest. This was so that I could attach a toothpick to it.
And because the leaf was thick, cutting it out with a sugar craft knife needed a bit more effort and I also had to smooth the sides with my sugar craft tools after cutting for smooth edges.
I then painted it just like the other leaves but attached a toothpick to the bottom of this one. I left it to set and dry so that it could stand upright on the cake.
Step 3: Assemble the Lion King Cake
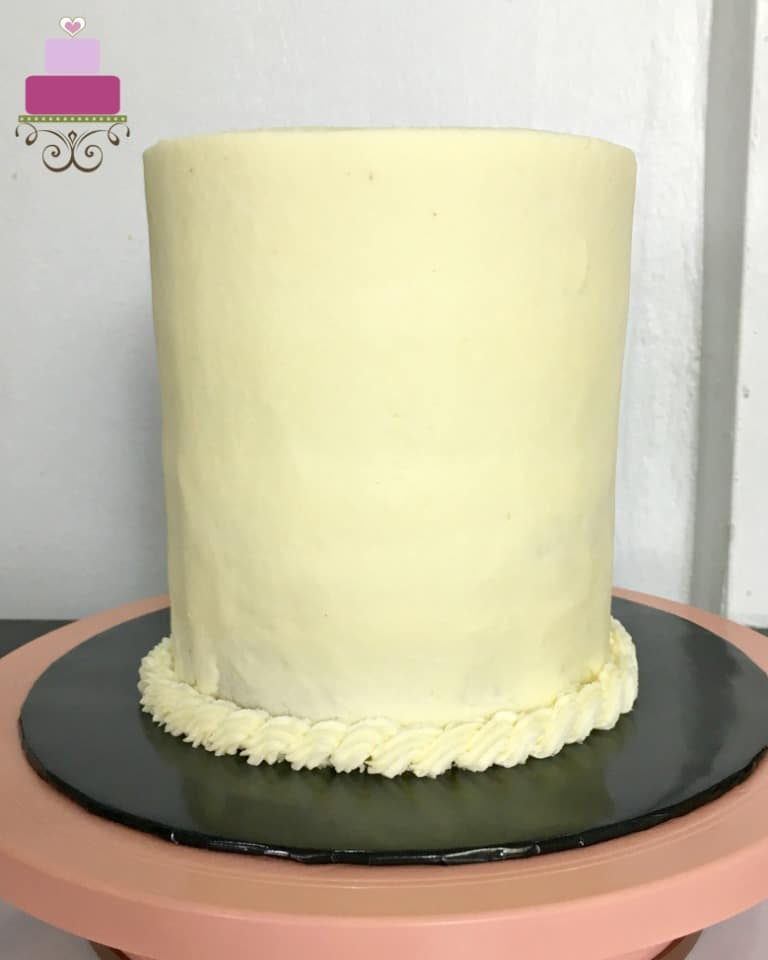
A day before the birthday, I baked the cakes. I let them cool completely, before leveling and layering them with buttercream.
I then covered and smoothed the entire cake with buttercream and piped a small rope border all around the sides with the star tip number 18.
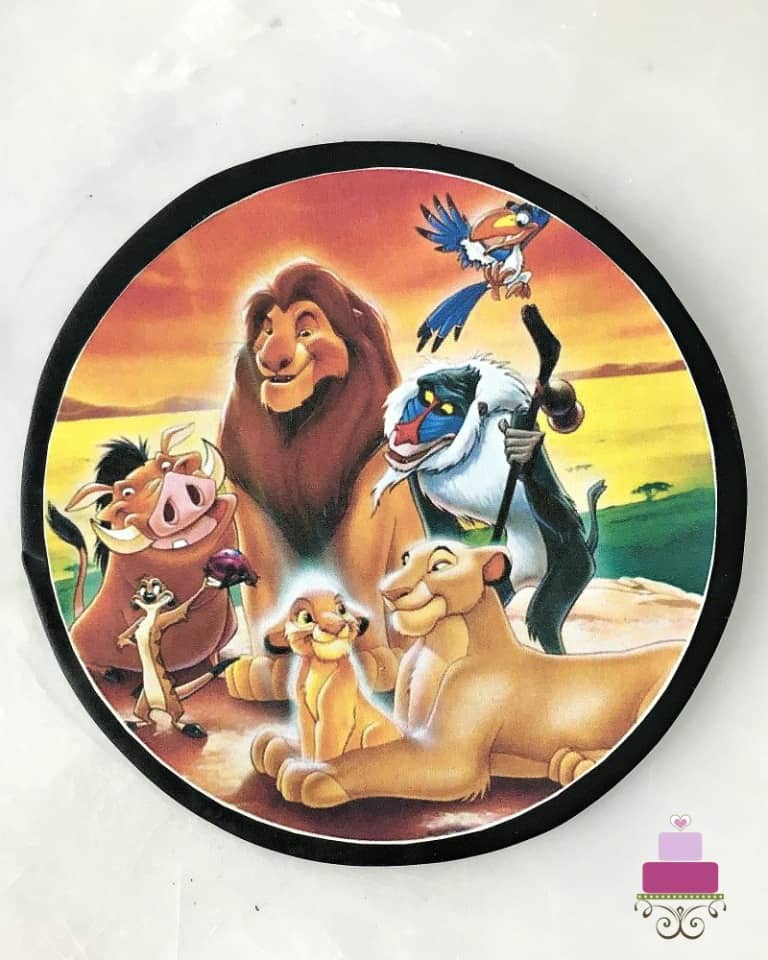
The first decoration on the cake was the edible image of the Lion King characters in Pride Rock.
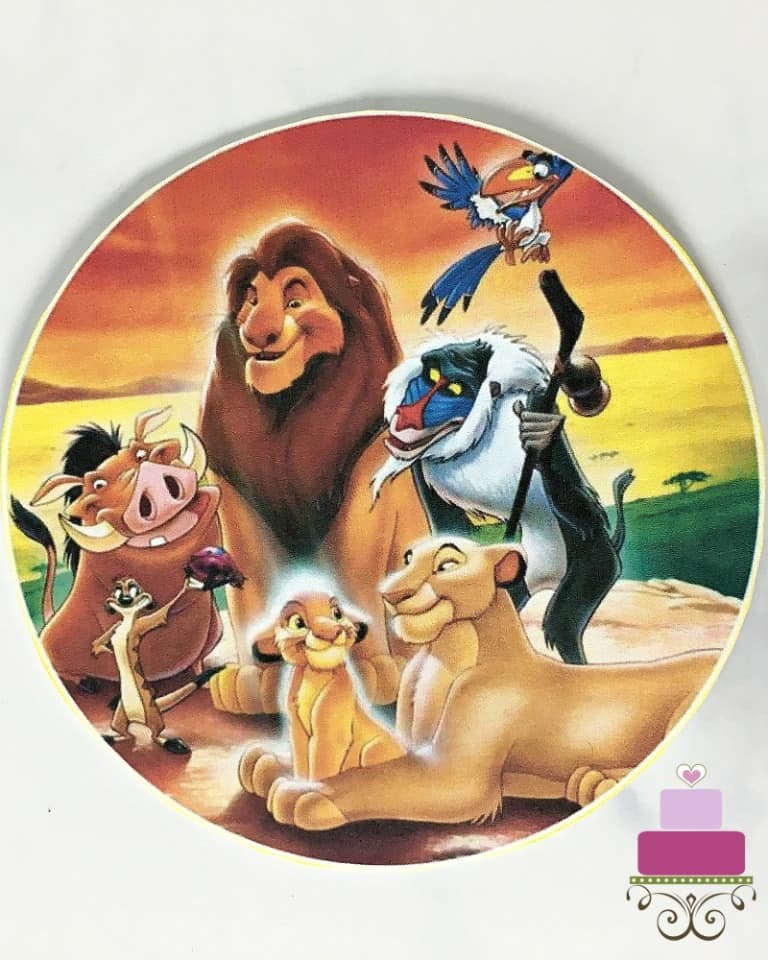
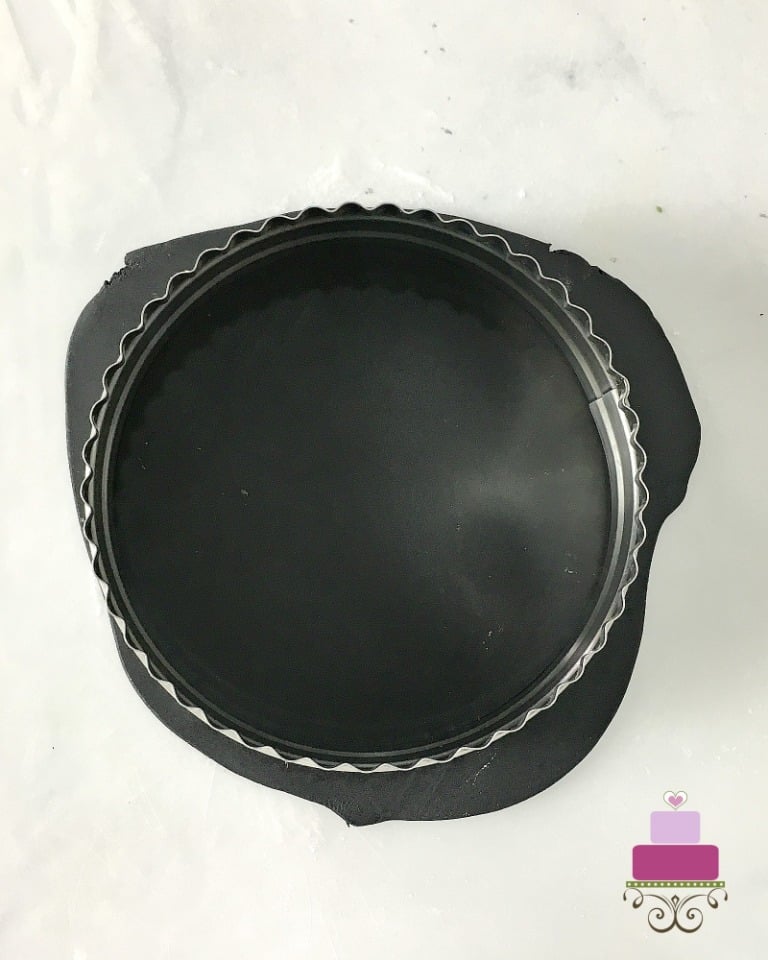
I wanted to image to have a thin black background so I rolled some black fondant thin and cut a circle out of it. In cutting the background, I made sure the circle was large enough to fit the edible image. I then attached the edible image onto it with a damp brush.
I attached the edible image (along with the black background) onto the front side of the cake with some buttercream.

After that, I attached the 4 leaves around the edible image, 2 on the left and 2 on the right, as shown below:
The Simba cake topper went on next followed by the leave topper. Since both these toppers had wooden picks attached to them, attaching these to the cake was just a matter of poking the picks into the cake.
Step 4: Add the 3D Alphabets
Next, I made the letters. I added the birthday boy's name in 3D block letters all around the front top of the cake. To make the letters, I kneaded some CMC into white fondant. And then I rolled it to about 1 cm thick, and cut the letters out using my alphabet letter cutter. For ease of attaching them to the cake, I inserted a toothpick into the bottom of each letter.
I then painted the front surface of each letter in gold, to match the gold border of the Simba topper.
I had to let the letters rest for a few hours to set and hold shape before I put them on the cake. In fact, I prepared these letters while waiting for my cake to bake. So right after adding all the remaining decorations to the cake, I was able to put the letters on.

And with that, the Lion King cake was complete.
More Cake Designs You Will Love


Do you like this tutorial? Please leave a 5-star ⭐⭐⭐⭐⭐rating in the recipe card below and consider a review further down this page. I would love to hear from you. Thank you!
📖Recipe

Lion King Cake
Equipment
- Lion King edible Image
- Simba paper template
- Jungle leaves paper templates
- Alphabet cutters
- Needle scriber tool
- Gum paste tools
- Sugarcraft knife
- Piping tip number 18
- Round cutter
- Glitter craft paper
- Scissors and glue
- Long wooden skewers and toothpicks
For best results, use the metrics measurements. US customary measurements have not been tested and are only meant for guide.
Ingredients
Chocolate Cake
- 275 g self raising flour
- 25 g cocoa powder
- 300 g granulated sugar
- 300 g butter
- 5 eggs
- 75 ml milk
- ¼ teaspoon salt
- ¾ teaspoon baking powder
- 1 teaspoon vanilla extract
Vanilla Cake
- 300 g self-raising flour
- 300 g granulated sugar
- 300 g butter
- 5 eggs
- 75 ml milk
- ¾ teaspoon baking powder
- ¼ teaspoon salt
- 1 teaspoon vanilla extract
Frosting and Decoration
- Buttercream
- Fondant
- Edible gold paint & lemon extract
- Juniper Green food color
- CMC powder
Instructions
Baking the chocolate cakes
- Preheat oven to 170 degrees Celsius.
- Beat butter and sugar till soft and creamy. Add eggs, one at a time, beating well after each addition.
- In another separate bowl, sift flour, cocoa powder, baking powder and salt 3 times. Fold in the sifted ingredients into the creamed mixture alternately with milk, starting and ending with flour.
- Finally add vanilla extract and combine well.
- Pour the batter into two well greased and floured 6 inch cake tins. Level the top and bake the cakes for 45 to 50 minutes or until a skewer inserted in the center of the cakes come out clean.
- Remove the cakes from the oven and let them cool completely before decorating.
Baking the vanilla cakes
- Preheat oven to 170 °Celsius.
- Beat butter and sugar till soft and creamy for about 2 minutes. Add eggs, one at a time, beating well after each addition.
- In a separate bowl, sift flour, baking powder, and salt. Fold in the sifted ingredients into the creamed mixture alternately with milk, starting and ending with flour.
- Finally, add in vanilla extract and combine well. Pour batter into two greased and floured 6 inch cake pans and bake for 45 to 50 minutes until the top of the cakes spring back when lightly pressed. The cakes are done when a skewer inserted in the center of the cake come out without any wet batter.
- Remove the cakes from the oven and let them cool completely before icing and decorating.
Simba Cake Topper
- The first step is to find a printable image of Simba to make the topper. I found mine on the internet. Resize the image to fit the cake and print it in color on a piece of white paper.
- Cut the image along its outline.
- Apply glue to the back of the image (Simba cut out) and paste it onto the front side of a gold glitter cardboard.
- And then cut the cardboard, leaving a thin outline of the gold visible around the Simba image after cutting.
- In order for the topper to stand upright onto the cake, attach a long thin skewer to the back of Simba cut out with some tape. And then apply glue all over the back of the topper and attached it to the reverse side of another piece of glitter card board.
- Cut the cardboard out, following the Simba topper outline as closely as possible. Set aside until ready for use.
The 3D alphabets
- To make the letters, knead some CMC into white fondant. And then roll it to about 1 cm thick, and cut the letters out using the alphabet cutters. For ease of attaching them to the cake, insert a toothpick halfway into the bottom of each letter.
- Paint the front surface of each letter in gold, to match the gold border of the Simba topper.
- Let the letters rest for a few hours to set and hold shape before putting them on the cake.
Making the fondant jungle leaves and palm leaves
- Tint some white fondant green and roll it thin.
- Using the leaves paper templates as guide, cut out the leaves using a sugar craft knife.
- And then use your sugar craft tools to draw the veins on each leaf.
- Dilute some green food color with water and paint the fondant leaves. Leave them aside for the paint to dry.
- As for the leaf that is used as a topper on the cake, since it was going to be placed upright on the cake, add some CMC into the green fondant before cutting it out. And roll it slightly thicker than the rest so that a toothpick can be inserted into it.
- Cutting the leave will require a bit more effort since it is thick. You may also need to use your sugar craft tools to smooth the sides of the leaf after cutting for smooth edges.
- And then paint it just like the other leaves but attach a toothpick to the bottom of this one. Leave it aside to set and dry so that it could stand upright on the cake.
Assembling the Lion King cake
- Once all the cakes are baked, let them cool completely before leveling and layering them with buttercream.
- Cover and smooth the entire cake with buttercream and pipe a small rope border all around the sides with the star tip number 18.
- The first decoration on the cake is the edible image of the Lion King characters in Pride Rock.
- Roll some black fondant thin. Attach the edible image onto the fondant with a damp brush. Using a large round cutter, cut out the fondant, making sure the image is right in the center and there is a thin black border around it.
- Attach the edible image (along with the black background) onto the front side of the cake with some buttercream. Make sure it is properly centered.
- After that, attach all the 4 leaves around the edible image, 2 on the left and 2 on the right. Use buttercream to help attach the leaves if they do not stick to the cake without it.
- Next, poke in the Simba cake topper followed by the leave topper.
- And finally, finish of the Lion King cake decoration by attaching the alphabets to the cake.
Leave a Reply