

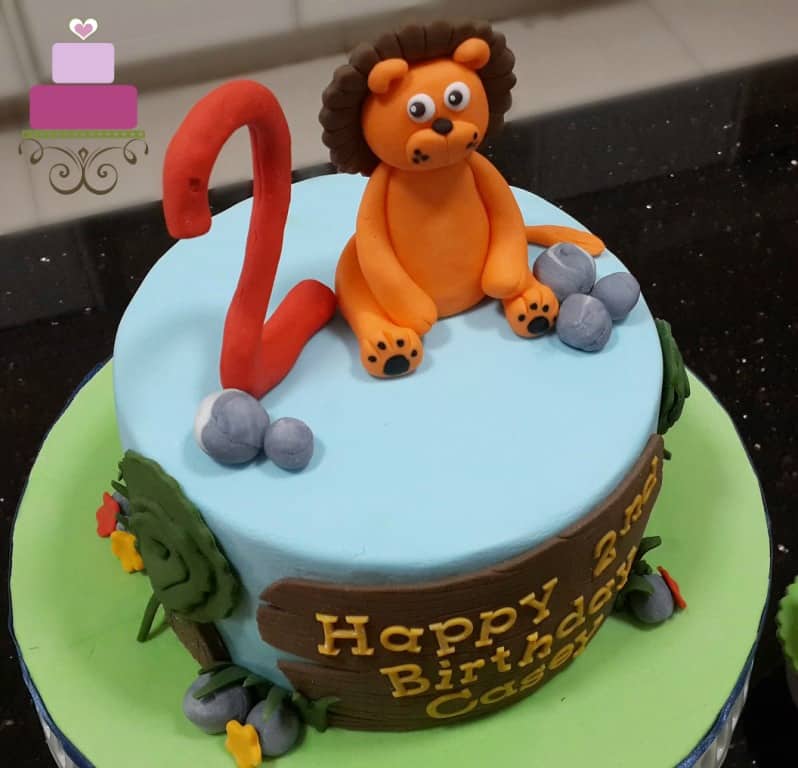
Here's a cute lion cake with edible fondant lion cake topper for a 2 year old boy. Learn how to make this birthday cake with my easy decorating guide below.

I made this lion cake for a 2-year-old boy. This was one of the 2 lion-themed cakes I made for this little boy on his 2nd birthday. This homemade lion cake was ordered by his mom along with a set of 20 cute lion cupcakes for his birthday celebration at school. The cake was to be cut in school and the cupcakes (with cute edible lion cake toppers) were to be given out to each of his classmates.
I have a separate post on how to make the lion cupcakes. This post is more for the lion cake, which was decorated pretty much in the same theme as the cupcakes. In fact, the fondant lion cake topper on this cake is of the exact same design as the ones on the cupcakes except that it is slightly larger in size.
The lion cake topper design on this cake was based on my customer's selection from the internet and I have traced it to Yenni Ng of Cotton Candy Bakeshop (unable to provide a direct link as the link to the website is broken). So credit goes to Yenni Ng for the lion cake topper design.
Overall, this was a pretty simple lion cake to decorate. Other than the 3D fondant lion topper and the number topper, everything else was pretty easy to make.

🧾Supplies Required
- Cake – this was a 7 inches round cake, baked using my butter pound cake recipe.
- Buttercream – I used buttercream to fill the cake as well as to crumb coat it.
- Fondant – The entire cake was covered in fondant and the decoration was also made using fondant except for the lettering on the cake which were cut out from gum paste. I used Satin Ice fondant and gum paste .
- CMC powder – I added CMC powder into the fondant I used to make the lion topper as well as the number 2 topper. CMC helped both to hold their shape and stand firm on the cake.
- Black edible marker - I used this marker to draw the lion paws and its whiskers dots.
- Fondant shaping tools – these were used generally for the project.
- Round scalloped cutter set – I used this to form the lion’s mane.
- Needle scriber tool – this was used to make the wood grain patterns on the cake as well as to mark the lines on the lion’s mane.
- Alphabet cutter – I used FMM Tappit alphabet cutter set to cut out the letters on the cake.
- Flower plunger cutters – these were used to cut out the red and yellow flowers placed randomly on the cake.
- Floral wire – I used floral wire as the base for the number topper.
- Pizza cutting wheel – this was a general cutting tool used in decorating the cake. I also used this specifically to cut the tree leaves on the cake. My pizza cutter has 2 wheels, a plain one and a scalloped one. I used the scalloped blade to cut the leaves.
- Lollipop sticks
- Fondant glue & shortening – these were the glue agents for the project.
👩🍳How to Make
Step 1: Make the Fondant Lion Cake Topper
I started by making the lion topper first. In fact, I made this little guy together with the lion toppers I made for the cupcakes. I wanted the lion to be of similar design as the ones I made for the cupcakes so I made him in the exact same design but only in a larger version so that he would look more proportionate to the cake.
To make the lion, I used orange fondant and added some CMC powder to it. I started by shaping the body, followed by its legs before making the head and adding all the facial features. For the mane, I used one of my scalloped round cutters and cut out a round piece of chocolate fondant. I then used my scriber needle tool and drew lines on the fondant piece on both sides, starting from the center of the piece to its outer edges.
As for the paws and the whiskers, I used my edible food marker in black and simply drew the black paw design and whiskers dots. The lion’s eyes were made of fondant except for the tiny white dot on them which was basically a dot of white food color with a fine-tipped brush.
The lion was almost entirely shaped by hand except for the mane and ears. While I used a cutter to cut out the mane, I used my fondant shaping tools to form the ears.
And all the body parts were attached together to form the lion with fondant glue.
Once done, I left the topper aside to firm up and set completely.
Step 2: Make the Number "2" Topper
Next was the number ‘2’ topper. This was made using red fondant and I have also added CMC to the fondant so that it would dry hard and set firm. And I used floral wire as a support for the number.
To make the number topper, I drew the number on a piece of paper as a guide. And then I shaped my floral wire following the shape of the number.
Next, I rolled my fondant into a long thin roll and carefully inserted the wire into the roll. Inserting a shaped wire is a little tricky especially at the bottom part of the number and once the wire has been inserted, I had to spend some time smoothing out the fondant roll to make sure there were no creases and it was consistent all over.
And I made sure there was excess wire at the base of the number so that I could poke the number into the cake to keep it standing upright in a stable position.
Once the number was done, I let it set and firm up in a horizontally lying position until it was ready to be put on the cake.
Step 3: Prepare the Cake
As for the rest of the decoration, I made them all directly on the cake. Once the cake was baked and has completely cooled down, I leveled the layers and filled and crumb coated them with buttercream before covering it with a layer of light blue fondant.
Step 4: Attach the Alphabets on the Cake
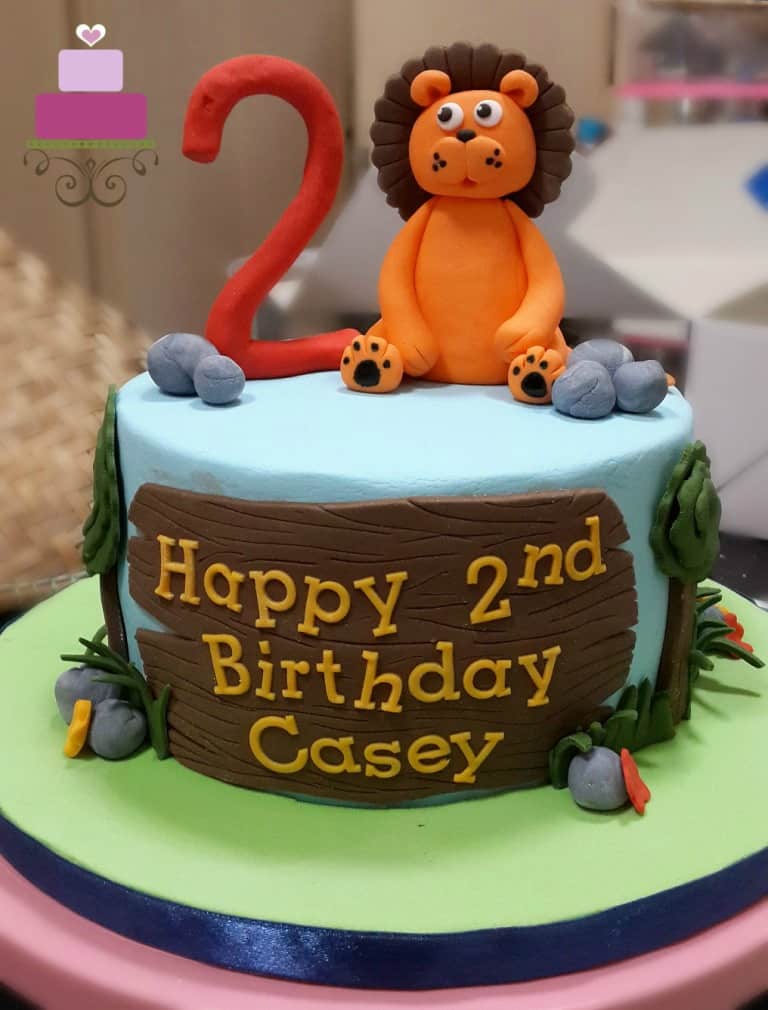
And then I made the birthday message on the cake. I wanted the birthday boy’s name to be put on a wooden plaque-like design and so made one with chocolate fondant. I cut out a rectangle piece of fondant and used my pizza cutting wheel to slightly round the sides and cut out random triangle cutouts at the sides to give the fondant piece a wooden plank look and feel. And then, using my needle scriber tool, I marked wood grain patterns on it.
Next, I cut out the letters using my FMM block letters Tappit cutter. I used yellow-tinted gum paste for the lettering. I attached the letters to the fondant wooden plank with shortening before attaching the plank to the side of the cake, also with shortening.
Step 5: Make the Trees on the Sides of the Cake
As for the 3 large trees on the sides of the cake, I used green and chocolate fondant. I cut the tree trunks in chocolate fondant and drew wood grain patterns on them with my needle scriber tool.
As for the leaves, I used the scalloped end of my pizza cutting wheel and cut out a long strip of green fondant. I then, twisted the strip in circular motion, forming the outer edges and gradually moving to the center of the circle. I used shortening to hold the strips in place and carefully lifted and attached them on the tree trunks on both sides.
Step 6: Attach the Green Fondant Grass
Using the same green fondant, I cut out grass patterns with my pizza cutting wheel and added them to the base of the cake on the opposite side of the wooden name plank. And then I added some rocks which were shaped in marbled grey fondant. I made these in random sizes and also placed them in random positions on the cake.
And finally, I added some tiny red and yellow flowers on the cake before adding on the lion topper and the number topper. Since the number topper was wired, I inserted the excess wire into a lollipop stick before inserting into the cake.
As for the lion topper, I applied some fondant glue on its base before placing it on the cake. That way, I could be rest assured that the lion would stay in place when transporting the cake.

And that’s that. My lion cake for 2-year-old Casey. I have also made another lion cake for Casey, and this time, it was for the celebration with his family. See how I decorated the other lion themed cake here.
❤️More Cake Designs You Will Love


Do you like this tutorial? Please leave a 5-star ⭐⭐⭐⭐⭐rating in the recipe card below and consider a review further down this page. I would love to hear from you. Thank you!
📖Recipe
Lion Cake
Equipment
- CMC Powder
- Black edible marker
- Fondant shaping tools
- Round scalloped cutter set
- Needle scriber tool
- Alphabet cutter
- Flower plunger cutters
- Floral wire
- Pizza cutting wheel
- Lollipop sticks
- Shortening
For best results, use the metrics measurements. US customary measurements have not been tested and are only meant for guide.
Ingredients
Cake
- 360 g self-raising flour
- 360 g granulated sugar
- 360 g butter at room temperature
- 6 eggs at room temperature
- 90 ml milk
- ¾ teaspoon baking powder
- ¼ teaspoon salt
- 1 teaspoon vanilla extract
Frosting
- Buttercream
- Fondant
- Gum Paste
Instructions
Baking the cakes
- Preheat oven to 170 °Celsius.
- Beat butter and sugar till soft and creamy for about 2 minutes. Add eggs, one at a time, beating well after each addition.
- In a separate bowl, sift flour, baking powder, and salt. Fold in the sifted ingredients into the creamed mixture alternately with milk, starting and ending with flour.
- Finally, add in vanilla extract and combine well. Pour batter into two 7-inches greased and floured cake pans and bake for 45 to 50 minutes until the top of the cakes spring back when lightly pressed. The cakes are done when a skewer inserted in the center of the cakes comes out without any wet batter.
- Remove cakes from oven and let them cool completely before icing and decorating.
Making the fondant lion cake topper
- To make the edible lion, use orange fondant and add some CMC powder to it. Start by shaping the body, followed by its legs before making the head and adding all the facial features. For the mane, use a scalloped round cutter and cut out a round piece of chocolate fondant. Then, use a scriber needle tool and draw lines on the fondant piece on both sides, starting from the center of the piece to its outer edges.
- As for the paws and the whiskers, use the edible food marker in black and simply draw the black paw design and whiskers dots. The lion’s eyes are made of fondant except for the tiny white dot on them which is basically a dot of white food color with a fine-tipped brush.
- In attaching the fondant lion toppers body parts together, use the fondant glue to secure them in place.
- Once done, leave the topper aside to firm up and set completely.
The number '2' cake topper
- Add some CMC powder to some red fondant and knead well. To make the number topper, draw the number on a piece of paper as a guide. And then shape a floral wire following the shape of the number.
- Next, roll the red fondant into a long thin roll and carefully insert the wire into the roll. Inserting a shaped wire is a little tricky especially at the bottom part of the number and once the wire has been inserted, you may have to spend some time smoothing out the fondant roll to make sure there are no creases and it has consistent thickness all over. Also, make sure that there is excess wire at the base of the number so that it the number topper can be poked into the cake while allowing it to remain in an upright standing position.
- Once the number topper is done, let it set and firm up in a horizontally lying position until it is ready to be put on the cake.
Preparing the cake
- As for the rest of the decoration, you can make them all directly on the cake. Once the cake is baked and has completely cooled down, level the tops. Fill and crumb coat them with buttercream before covering the entire cake with a layer of light blue fondant.
The alphabets on the cake
- Next is the birthday message on the cake. Cut out a rectangle piece of fondant and use a pizza cutting wheel to slightly round the sides. Cut out random triangle cutouts at the sides to give the fondant piece a wooden plank look and feel. And then, using the needle scriber tool, mark the wood grain patterns on it.
- Next, cut out the letters using the FMM block letters Tappit cutter. Use yellow-tinted gum paste for the lettering. Attach the letters to the fondant wooden plank with shortening before attaching the plank to the side of the cake, also with shortening.
The fondant trees on the side of the lion cake
- As for the 3 large trees on the sides of the cake, use green and chocolate fondant. Cut the tree trunks in chocolate fondant and draw wood grain patterns on them with the needle scriber tool.
- As for the leaves, use the scalloped end of a pizza cutting wheel and cut out a long strip of green fondant. Twist the strip in a circular motion, forming the outer edges and gradually moving to the center of the circle. Use shortening to hold the strips in place and carefully lift and attach them on the tree trunks on both sides of the lion cake.
The green fondant grass
- Using the same green fondant, cut out grass patterns with the pizza cutting wheel. Add the fondant grass to the base of the cake on the opposite side of the wooden name plank. And then shape some fondant rocks with marbled grey fondant. Make these in random sizes and place them in random positions on the cake. Secure these to the cake with shortening.
- And finally, add some tiny red and yellow flowers on the cake before adding on the lion topper and the number topper. Since the number topper is wired, insert the excess wire into a lollipop stick before inserting into the cake. As for the lion topper, apply some fondant glue on its base before placing it on the cake. That way, you can be rest assured that the cute lion cake topper would stay in place securely.
Leave a Reply