

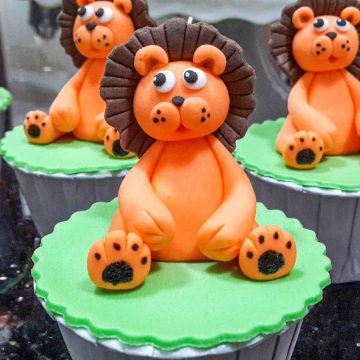
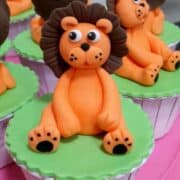
Looking for lion cupcakes for kids? Try these cute and adorable lion themed cupcakes with handmade fondant lion toppers.
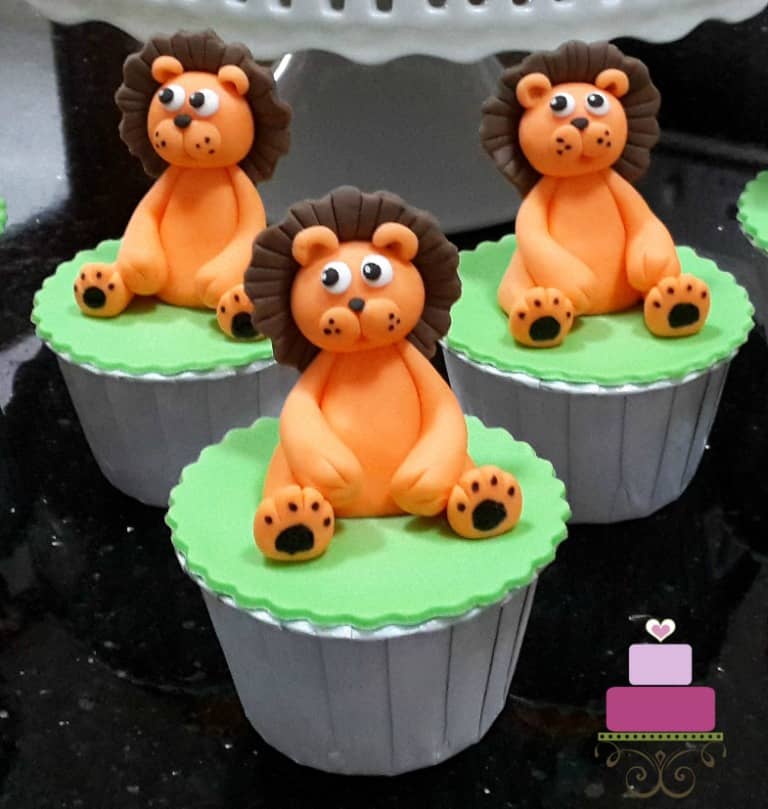
These cupcakes are a remake of the original lion topper design by Yenni Ng of Cotton Candy Bakeshop. The lion toppers on the cupcakes are made entirely in fondant and completely edible.
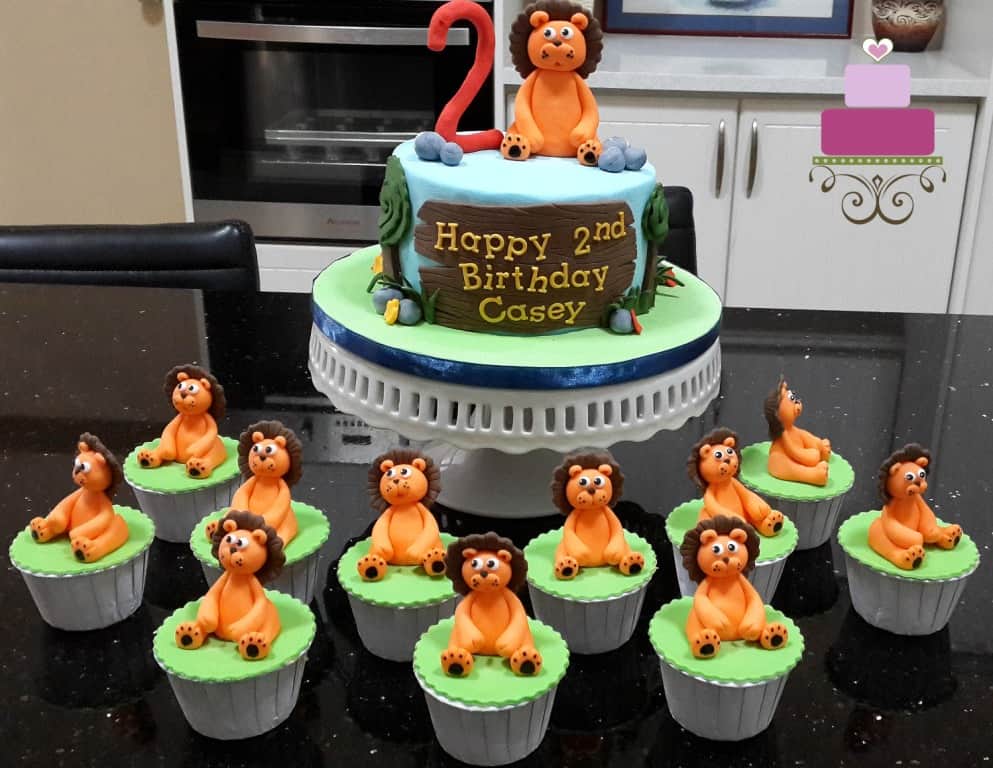
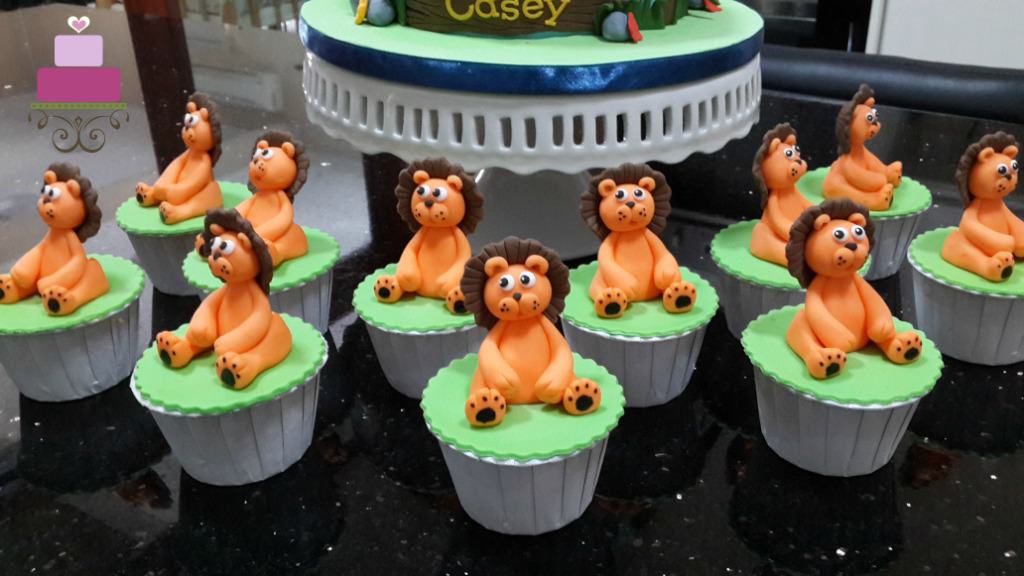
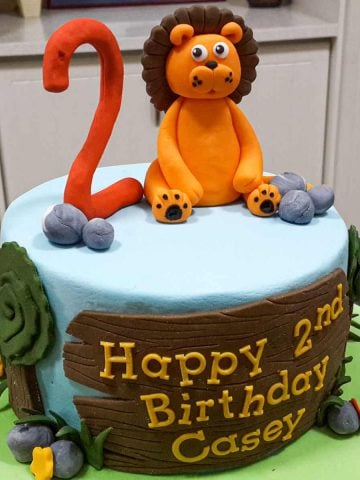
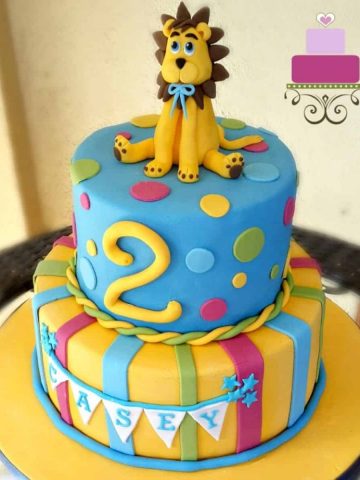
These cupcakes were made for a 2 year old boy's birthday. Lion was the theme for celebration. The cupcakes were ordered along with a small lion cake with a similar fondant lion topper on it. And if you like this lion cupcakes design, you might want to also check out this other lion cake with an even cute lion topper.
Note: This is an intermediate cake decorating tutorial and some basic knowledge about working with fondant is required.
Jump to:
❤️Why You Will Love This Tutorial
- You will get to learn how to make lion cupcakes, including the 3D lion topper.
- You get to showcase your decorating skills to others.
- It is a lot cheaper to make the cupcakes on your own than to custom order them.
- You can tweak the design to your liking.
📋Supplies Required
- Vanilla cupcakes
- Buttercream icing– To apply as a thin coat on the cupcakes before covering with fondant.
- Fondant – To make the lion toppers and cover the top of the cupcakes. For the lions, I used Satin Ice fondant in orange, chocolate, black and white. For the cupcake covering, I tinted white fondant in green.
- CMC powder – Add into the orange fondant when making the lion toppers. CMC helps the fondant to set firm and hold its shape better.
- Scalloped round cutter set – Use 2 different sizes, one for the lion's mane, and the other for the cupcake covering.
- Black edible food marker – For the lions’ paws and whiskers.
- Cake decorating brush – To dot the lions’ eyes in white (fine tipped)
- Food coloring – White food coloring for the tiny white dot in the lions’ eyes and green for the green fondant covering on the cupcakes.
- Fondant cutters and modelling tools – To shape the lion toppers (mostly for the paws and ears).
- Scriber needle modelling tool – For the lions’ mane, to mark the hairlines on the chocolate fondant that made up the mane.
- Fondant glue
👩🍳How To Make
Step 1: Make The Lion Cupcake Toppers
To make the lion toppers, start with the body. Add some CMC to the orange fondant and knead well. And then pinched out 11 pieces of fondant in the same size. Shape each to these pieces into pear shapes.
Next, pinch out 22 pieces of fondant for the hind legs. Roll each piece into a short sausage and then flatten one end. For the other end (the paws), flatten the rounded end and the use the sugar craft knife to make small slits for the paws.
Attach the legs to the lion's bodies with fondant glue.
For the front legs, again, pinch out 22 pieces of fondant. Form these into long sausages, with one end thin and the other end fat. Flatten the thin ends slightly and attach them to the bodies. For the paws, use the sugar craft knife to make a few small slits to denote the paws.
Note: The toppers can be made in advance so that the cupcakes can be assembled quickly before your party.
Step 2: Make The Fondant Mane
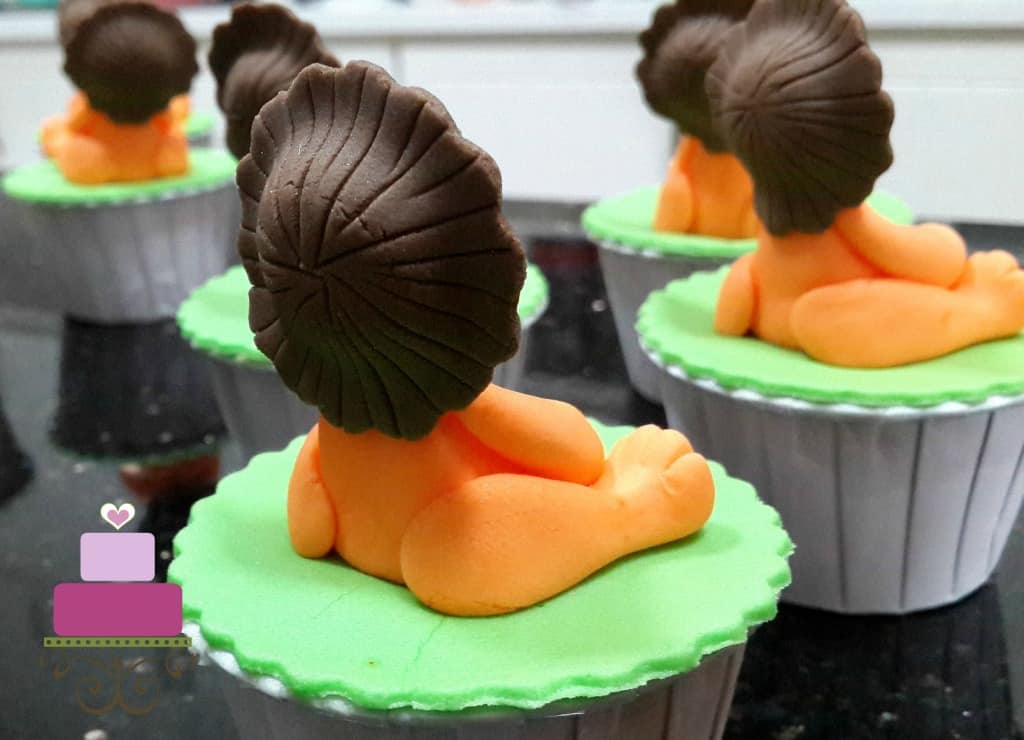
For the mane, use chocolate fondant. Roll it to about ⅛ inch thick and cut out 11 scalloped round pieces of fondant.
Use the scriber needle tool to mark the mane lines all around it, starting from the center of each round cut out to their outer edges. And then attach each of these to the back of the lion heads with fondant glue.
Step 3: Add The Facial Features
Start with the cheeks. Pinch to small orange pieces of fondant for each lion and form them into smooth round balls. Flatten these slightly and attach them to the face with some fondant glue.
Next, pinch a tiny piece of black fondant, form it into a smooth ball and attach it in between the earlier orange pieces. This makes the nose of the lion. Repeat for all the lions.
For the eyes, make them with white fondant. Roll the pieces into smooth balls and flatten them slightly before attaching the face. And then, pinch out tiny pieces of black fondant, form them into balls and attach to the white part of the eyes.
And finally, for the ears, form 2 small balls with orange fondant. Use the back of the brush to make a dent in the balls and then attach them on the head. Repeat for all the lions.
Step 4: Draw The Paws and Whiskers
Use black edible marker to draw the dots for the paws and the whiskers. And for the white dots in the eyes, use the fine tipped cake decorating brush, dip it into the white food coloring (do not dilute the paint) and dot the eyes.
Once the lions are all done, leave them aside to set completely.
Step 5: Assemble The Cupcakes
Once the cupcakes are baked and have cool down completely to room temperature, apply a thin layer of buttercream on top of each cupcake. If the cupcakes are domed, level the tops with a serrated knife before applying the buttercream.
Next, cut out round pieces of green fondant using the scalloped round cutter and attach them to the cupcakes.
To assemble the lion cupcakes, place one lion topper on each cupcake. Secure them in place with glue and let the glue set completely before moving the cupcakes.
💡Expert Tips
- The trick to ensure all the lion toppers are in the exact same size and shape is to work on them in batches (by body parts). For example, when making the lions' bodies, portion out 11 pieces of orange fondant in the exact same sizes. And then shape each one of them one by one and complete them in a batch before moving to other body parts. This way, you get to ensure all the pieces worked on are of the same size and shape.
- Sometimes, toothpicks are used to hold the fondant toppers on cupcakes, however, this is not advisable as there is a risk that people may bite into the toothpicks as they bite into the cupcakes and get injured.
- Humidity and fondant do not get along well. If you are living in a humid environment, there is a possibility for the fondant toppers to sag and become sticky. To avoid this and for best results, work in an air conditioned room.
❤️More Tutorials You Will Love

Do you like this tutorial? Please leave a 5-star ⭐⭐⭐⭐⭐rating in the recipe card below and consider a review further down this page. I would love to hear from you. Thank you!
📖Recipe
Lion Cupcakes
Equipment
- Cake decorating brush (fine tipped)
- Fondant cutters and modelling tools
- Scriber needle modelling tool
- Scalloped round cutter set
For best results, use the metrics measurements. US customary measurements have not been tested and are only meant for guide.
Ingredients
- 11 Cupcakes
- Buttercream
- Fondant Satin Ice fondant in orange, chocolate, black and white
- CMC powder
- Fondant glue
- Food coloring White and green
- Black edible food marker
Instructions
Making the lion cupcake toppers
- The toppers can be made in advance so that the cupcakes can be assembled quickly before your party.
- To make the lion toppers, start with the body. Add some CMC to the orange fondant and knead well. And then pinched out 11 pieces of fondant in the same size. Shape each to these pieces into pear shapes.
- Next, pinch out 22 pieces of fondant for the hind legs. Roll each piece into a short sausage and then flatten one end. For the other end (the paws), flatten the rounded end and the use the sugar craft knife to make small slits for the paws.
- Attach the legs to the lion's bodies with fondant glue.
- For the front legs, again, pinch out 22 pieces of fondant. Form these into long sausages, with one end thin and the other end fat. Flatten the thin ends slightly and attach them to the bodies. For the paws, use the sugar craft knife to make a few small slits to denote the paws.
Making the lions' mane
- For the mane, use chocolate fondant. Roll it to about ⅛ inch thick and cut out 11 scalloped round pieces of fondant.
- Use the scriber needle tool to mark the mane lines all around it, starting from the center of each round cut out to their outer edges. And then attach each of these to the back of the lion heads with fondant glue.
Adding the facial features
- Start with the cheeks. Pinch to small orange pieces of fondant for each lion and form them into smooth round balls. Flatten these slightly and attach them to the face with some fondant glue.
- Next, pinch a tiny piece of black fondant, form it into a smooth ball and attach it in between the earlier orange pieces. This makes the nose of the lion. Repeat for all the lions.
- For the eyes, make them with white fondant. Roll the pieces into smooth balls and flatten them slightly before attaching the face. And then, pinch out tiny pieces of black fondant, form them into balls and attach to the white part of the eyes.
- And finally, for the ears, form 2 small balls with orange fondant. Use the back of the brush to make a dent in the balls and then attach them on the head. Repeat for all the lions.
Drawing the paws and whiskers
- Use black edible marker to draw the dots for the paws and the whiskers. And for the white dots in the eyes, use the fine tipped cake decorating brush, dip it into the white food coloring (do not dilute the paint) and dot the eyes.
- Once the lions are all done, leave them aside to set completely.
Assembling the cupcakes
- Next are the cupcakes. Once the cupcakes are baked and have cool down completely to room temperature, apply a thin layer of buttercream on top of each cupcake. If the cupcakes are domed, level the tops with a serrated knife before applying the buttercream.
- Next, cut out round pieces of green fondant using the scalloped round cutter and attach them to the cupcakes.
- To assemble the lion cupcakes, place one lion topper on each cupcake. Secure them in place with glue and let the glue set completely before moving the cupcakes.
Notes
- The toppers can be made in advance so that the cupcakes can be assembled quickly before your party.
- The trick to ensure all the lion toppers are in the exact same size and shape is to work on them in batches (by body parts). For example, when making the lions' bodies, portion out 11 pieces of orange fondant in the exact same sizes. And then shape each one of them one by one and complete them in a batch before moving to other body parts. This way, you get to ensure all the pieces worked on are of the same size and shape.
- Sometimes, toothpicks are used to hold the fondant toppers on cupcakes, however, this is not advisable as there is a risk that people may bite into the toothpicks as they bite into the cupcakes and get injured.
- Humidity and fondant do not get along well. If you are living in a humid environment, there is a possibility for the fondant toppers to sag and become sticky. To avoid this and for best results, work in an air-conditioned room.
Leave a Reply