

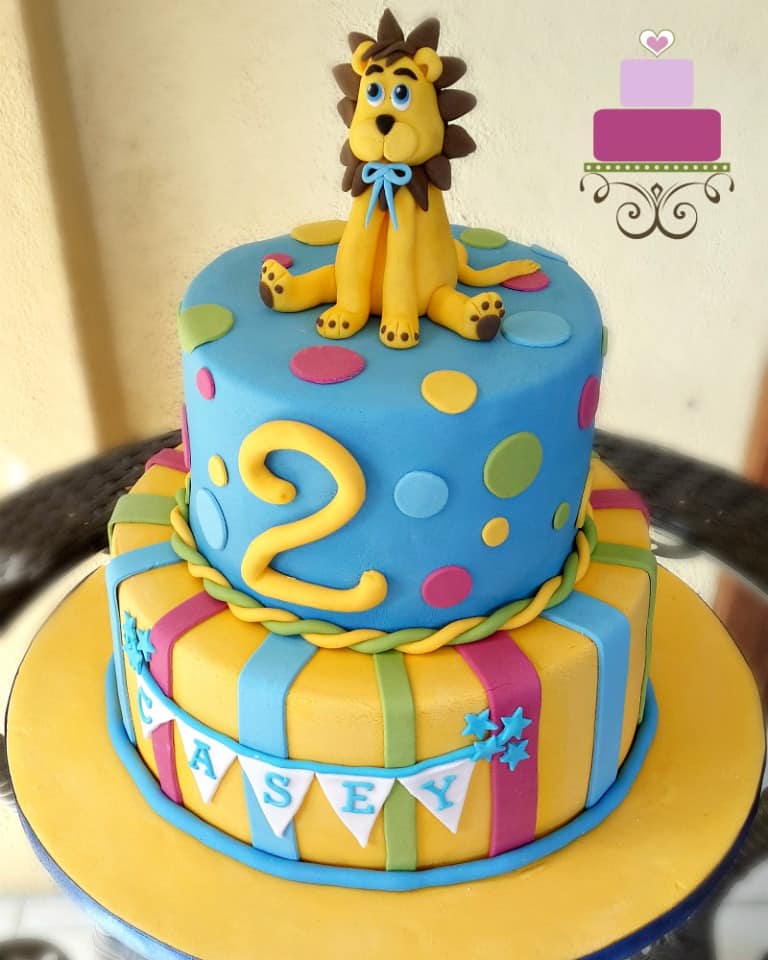
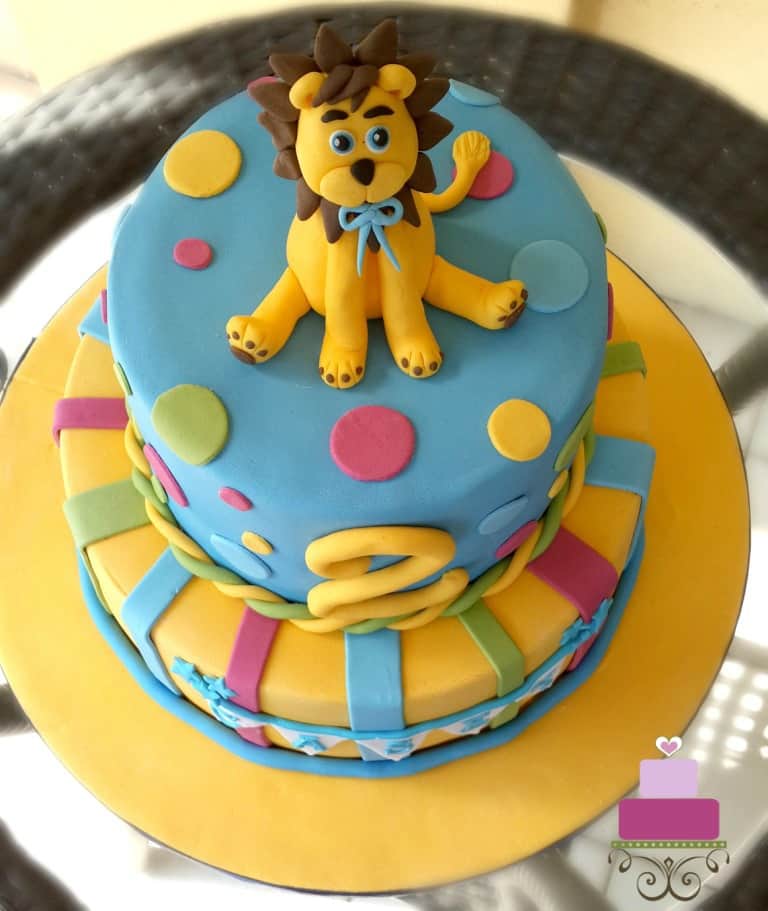
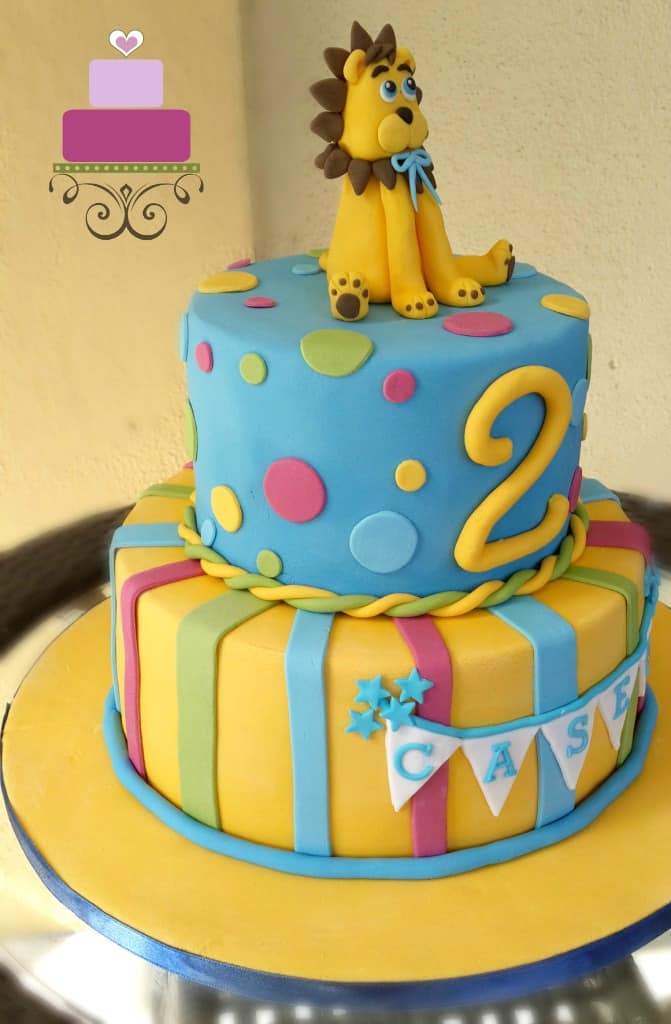
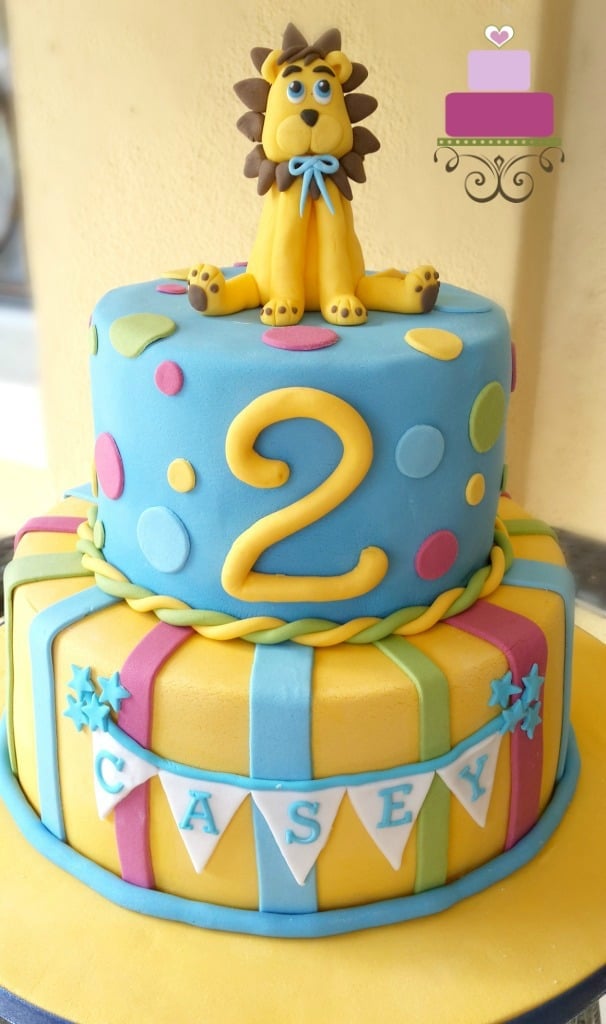
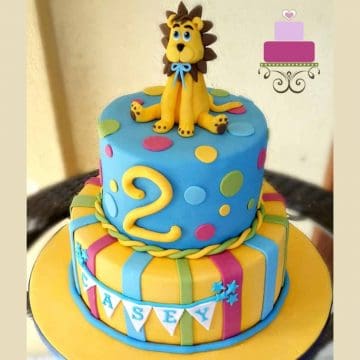
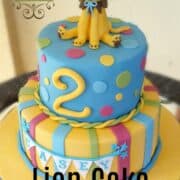
If you're looking for a show-stopping lion birthday cake idea, this 2 tier cake is sure to impress! With a handmade fondant lion topper and bright colored decorations, this cake is perfect for children.
This birthday cake is a remake of the original lion birthday cake design by tortenberlin.blogspot.com.
The cake is a 2 tier vanilla cake measuring 6 inches and 9 inches in diameter and is decorated entirely in fondant. The lion topper is handmade and is completely edible.
If you like this cute lion cake design, also check this other lion cake. And you should also check out this Lion King cake, lion cupcakes and jungle animals cake.
Note: This is an intermediate cake decorating tutorial and some basic knowledge about frosting a cake with buttercream and fondant is required.
Jump to:
❤️Why You Will Love This Tutorial
- It's fun and cheerful and is a perfect design for children cakes.
- The tutorial has a full list of all supplies required as well as step by step guide to decorate the cake.
- You get to hone your cake decorating skills and show it off to everyone.
- You get to make a professional looking cake with just a fraction of the cost of a custom cake.
- You get to make tweaks to the design as you wish.
📋Supplies Required
- Round butter pound cake – 2 layers of 6 inches round cakes and 2 layers of 9 inches rounds, each measuring approximately 2 inches high. Bake each layer in separate cake pans.
- Buttercream – To fill the cake as well as to crumb coat the cake tiers.
- Fondant – I used Satin Ice in white, Satin Ice chocolate and black.
- Food coloring - Wilton Golden Yellow , Wilton Royal Blue , Americolor Mint Green, Americolor Electric Purple and Wilton Royal Blue.
- Gum paste – I used Satin Ice gum paste in white for the lettering on the cake.
- CMC powder – Added to fondant to make the lion cake topper.
- Shortening and fondant glue – Used as 'glue' for this project.
- Fondant extruder – To make the cake borders as well as the bunting string on the cake.
- Star plunger cutter set – To make the stars that were attached at each end of the bunting string on the side of the bottom tier.
- Oval plunger cutter set – To make the the lion’s mane.
- Round cutter set and round plunger cutter set – To cut out the colorful circle polka dots on the first tier of the cake.
- Fondant modelling tools – To make the lion topper.
- Pizza cutting wheel – To cut the colorful strips on the bottom tier as well as for general cutting work for the cake.
👩🍳How to Make
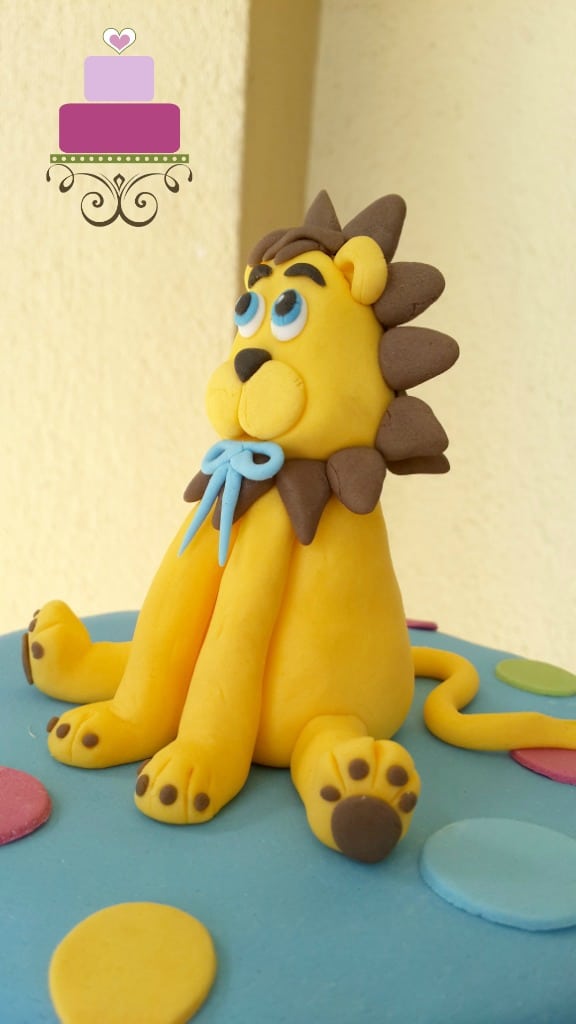
Step 1: Make the Lion Cake Topper
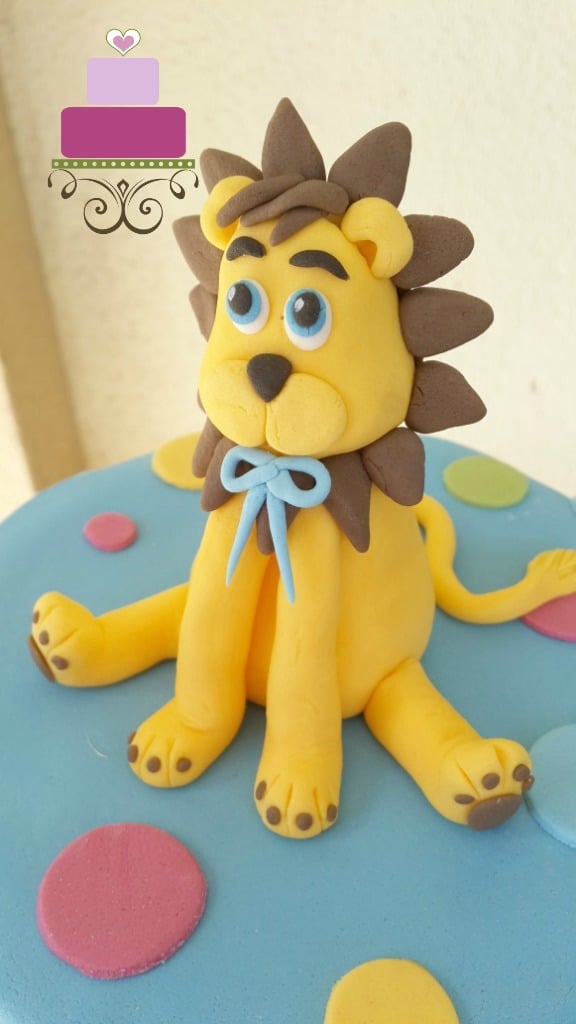
Make the lion topper a few days in advance to allow it to set and also to avoid last-minute rush in completing the cake.
To make the lion, tint some white fondant with Wilton Golden Yellow food color and knead some CMC into it for added stability.
For the mane, use chocolate fondant. Start by forming the body of the lion and attach all four legs to it. And then shape the lion's face. Add all the facial features first, including the ears before attaching it to the body with fondant glue.
And then add the mane to the lion's head. For the mane, cut out oval pieces of fondant using the oval plunger cutter and pinch the ends to make them slightly pointy. And then attach them all around the head with glue. Also add these to the back of the head.
Step 2: Prepare the Cake
As for the cakes, once baked, let them cool down completely on wire rack (cooling rack) to room temperature before decorating.
Level the tops of each cake layer. Stack both the 6 inch layers with some buttercream in between and crumb coat the stacked layers. And then cover the tier with blue fondant. Repeat the process for the 9 inch cake layers, but cover them in yellow.
Next, stack both cake tiers. To stack, poke in a few bubble tea straws on the bottom tier to help support and hold the weight of the top tier cake.
Once stacked, add the colorful wide and narrow strips alternately all around the bottom tier. Use 3 colors for the strips namely magenta, green and blue. Cut these with the pizza cutting wheel guided by a ruler and attach them to the cake with shortening at equal intervals.
Step 3: Make the Number '2' Design on the Cake
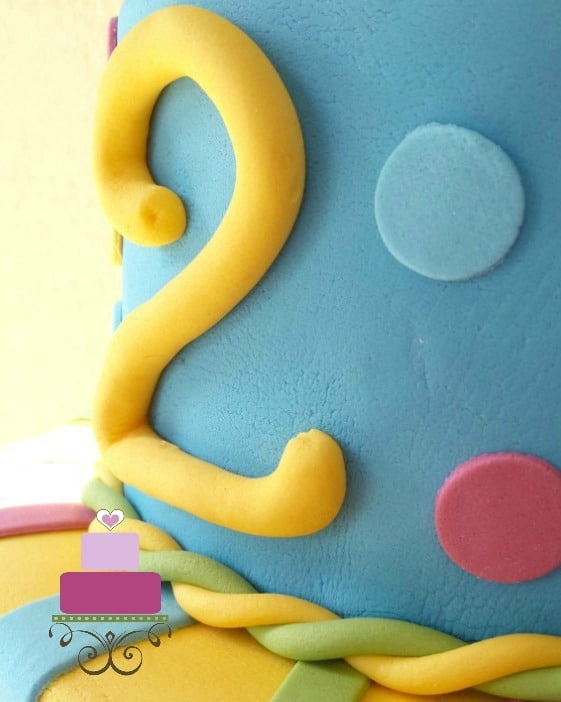
To make the large number ‘2’ on the front of the top tier cake, roll some blue fondant into a thick rope and from the number by hand.
You can use a paper template (hand drawn or printed) as a guide to form the number. Let the number firm up slightly before lifting and attaching to the front of the cake with glue.
Step 4: Add the Polka Dots
Using the same magenta, green and blue that was used for the strips on the bottom tier, make round cut outs in random sizes and attach them to the cake in random order. Also add yellow colored round cut outs for this tier. Attach these polka dots with shortening.
Step 5: Add the Birthday Boy's Name
Next to go on the cake was the birthday boy’s name. Roll some white fondant thin and use the triangle plunger cutter to cut the white buntings.
For the alphabets, tint some white gum paste blue and roll it as thin as possible. Use the FMM block letters cutter to cut out the alphabets. Attach these to the white buntings with shortening.
Next, use the extruder tool and pipe out a long strip of blue fondant. Attach this to the cake with some shortening.
And then attach the bunting to the string. Trim off any excess blue strip.
To cover the ends, roll and cut out some blue stars and attach them to the cake.
Step 6: Attach the Cake Border
For the top tier, use the extruder tool to pipe out yellow and green strips separately and then twist them together by hand to form the twisted rope. Place this twisted rope around the base of the top tier. Secure it in place with shortening.
For the bottom tier, use the extruder tool to pipe out a long strip of blue fondant and attach it as the border for the bottom tier.
And finally, add the lion topper to complete the lion birthday cake decoration.
💡Expert Tips
- CMC is added to fondant to help it set firm and that helps 3D figures to hold shape.
- When rolling the fondant, it helps to dust the work surface with powdered sugar (icing sugar) to avoid it from sticking.
- Make the lion topper a few days in advance so that you need not rush to complete the cake on time.
- When attaching intricate fondant or gum paste cut outs like alphabets, it is better to use shortening than fondant glue as shortening does not stick as hard as glue. You can still move the cut outs to adjust their position without any tears or distortion when using shortening, but not the glue.
❤️More Birthday Cakes You Will Love


Do you like this tutorial? Please leave a 5-star ⭐⭐⭐⭐⭐rating in the recipe card below and consider a review further down this page. I would love to hear from you. Thank you!
📖Recipe
Lion Birthday Cake
Equipment
- Fondant extruder tool
- Star plunger cutter set
- Oval plunger cutter set
- Round cutter set and round plunger cutter set
- Fondant modelling tools
- Pizza cutting wheel
For best results, use the metrics measurements. US customary measurements have not been tested and are only meant for guide.
Ingredients
- 2 six inches round cakes approximately 2 inches high
- 2 nine inches round cakes approximately 2 inches high
- Buttercream
- Fondant Satin Ice White, Chocolate and Black
- Food coloring Wilton Golden Yellow, Wilton Royal Blue , Americolor Mint Green, Americolor Electric Purple and Wilton Royal Blue.
- Gum paste Satin Ice gum paste in white
- CMC powder
- Shortening
- Fondant glue
Instructions
Making the lion cake topper
- Make the lion topper a few days in advance to allow it to set and also to avoid last-minute rush in completing the cake.
- To make the lion, tint some white fondant with Wilton Golden Yellow food color and knead some CMC into it for added stability.
- For the mane, use chocolate fondant. Start by forming the body of the lion and attach all four legs to it. And then shape the face. Add all the facial features first, including the ears before attaching it to the body with fondant glue.
- And then add the mane. For the mane, cut out oval pieces of fondant using the oval plunger cutter and pinch the ends to make them slightly pointy. And then attach them all around the head with fondant glue. Also add these to the back of the head.
Preparing the cakes
- As for the cakes, once baked, let them cool down completely to room temperature before decorating.
- Level the tops of each layer. Sandwich both the 6 inches layers with some buttercream in between and crumb coat the stacked layers. And then cover the tier with blue fondant. Repeat the process for the 9 inch cake layers, but cover them in yellow fondant.
- Next, stack both cake tiers. To stack, poke in a few bubble tea straws on the bottom tier to help support and hold the weight of the top tier cake.
- Once stacked, add the colorful wide and narrow strips alternately all around the bottom tier. Use 3 colors for the strips namely magenta, green and blue. Cut these with the pizza cutting wheel guided by a ruler and attach them to the cake with shortening at equal intervals.
Making the number '2' design on the cake
- To make the large number ‘2’ on the front of the top tier cake, roll some blue fondant into a thick rope and from the number by hand.
- You can use a paper template (hand drawn or printed) as a guide to form the number. Let the fondant number firm up slightly before lifting and attaching to the front of the cake with fondant glue.
Adding the polka dots
- Using the same magenta, green and blue fondant that was used for the strips on the bottom tier, make round cut outs in random sizes and attach them to the cake in random order. Also add yellow colored round cut outs for this tier. Attach these polka dots with shortening.
Adding the name
- Next to go on the cake was the birthday boy’s name. Roll some white fondant thin and use the triangle plunger cutter to cut the white buntings.
- For the alphabets, tint some white gum paste blue and roll it as thin as possible. Use the FMM block letters cutter to cut out the alphabets. Attach these to the white buntings with shortening.
- Next, use the extruder tool and pipe out a long strip of blue fondant. Attach this to the cake with some shortening.
- And then attach the bunting to the string. Trim off any excess blue fondant strip.
- To cover the ends, roll and cut out some blue stars and attach them to the cake.
Adding the cake border
- For the top tier, use the extruder tool to pipe out yellow and green strips separately and then twist them together by hand to form the twisted rope. Place this twisted rope around the base of the top tier. Secure it in place with shortening.
- For the bottom tier, use the extruder tool to pipe out a long strip of blue fondant and attach it as the border for the bottom tier.
- And finally, add the lion topper to complete the lion birthday cake decoration.
Notes
- CMC is added to fondant to help the fondant to set firm and that helps 3D figures to hold shape.
- Make the lion topper a few days in advance so that you need not rush to complete the cake on time.
- When attaching intricate fondant or gum paste cut outs like alphabets, it is better to use shortening than fondant glue as shortening does not stick as hard as fondant glue. You can still move the cut outs to adjust their position without any tears or distortion when using shortening, but not fondant.
Leave a Reply