

Here is a cute Penguin cake you can make for a triplets birthday. This 3 tier cake, decorated with 3 handmade fondant penguin toppers, a large number '8' topper and lot of fondant snowflakes on the sides makes a perfect cake for a triple birthday celebration.
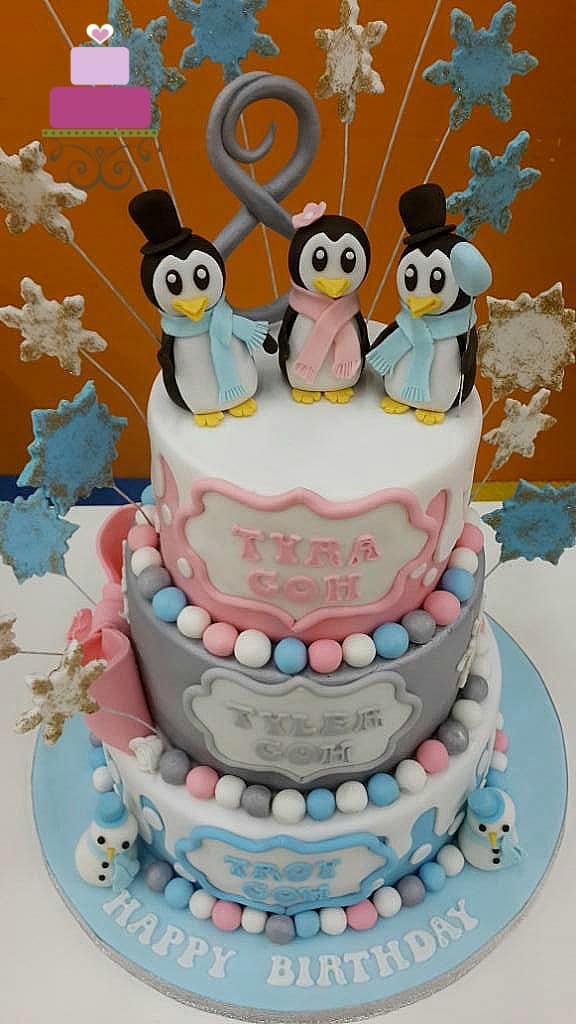
I made this penguin cake for a set of triplets – 2 boys and a girl - for their 8th birthday. This cake was designed based on an image from the Pink Cake Box provided by the mother. I modified the design to cater to my customer’s request to have the cake design modified for a set of triplets.
The original cake by Pink Cake Box had one large penguin topper and was a topsy turvy cake. Mine, however, was a normal 3 tier cake. Plus it had additional 2 penguins as toppers and also 2 snowmen at the base of the cake.
If you like this cake, you should also check out this lion birthday cake, lion cake and cupcakes, Hello Kitty cake, unicorn cake, Smurfs cake and castle birthday cake. They make great birthday cake designs for kids.
🧾Supplies Required
- Cake – this was a 3 tier cake measuring 6 inches, 8 inches and 10 inches in diameter. Each tier was approximately 4 inches high.
- Buttercream – I used buttercream to fill the tiers as well as to crumb coat them before covering with fondant.
- Fondant – I used Satin Ice for this project. You can also make your own fondant with this homemade fondant recipe or marshmallows fondant recipe.
- CMC powder – This powder was added in small quantities to fondant when making 3d figurines and shapes. CMC helps the fondant set harder hence making sure it does not lose shape.
- Edible glitter – I used this to decorate the snowflakes.
- Fondant glue.
- Wire – I used white 18 gauge floral wire for the snowflakes toppers.
- Alphabet cutter – I used Clikstix Groovy Alphabet Cutters for the triplet’s names as well as the ‘happy birthday’ wordings on the cake board.
- Fondant extruder tool – I used this to pipe out the border for the plaques that held the triplet’s names on the sides of the cake.
- Pizza cutter wheel – This was used throughout the cake decorating process.
- Sugar craft knife
- Oval plunger cutter – I used these to cut the black ovals of the penguins’ eyes.
- Round plunger cutters – I used this cutter to cut out the white polka dots on the blue and pink cake tiers.
- Flower plunger cutter – I used a medium-sized flower cutter for the tiny flower on one of the penguin toppers.
- Snowflakes cookie cutters – this was for the wired snowflakes as well as the snowflakes that were attached to the sides of the middle cake tier.
- Lollipop sticks – these were used to insert all the wired snowflakes so that there is no direct contact of the wires in the cake.
- Medium-sized round piping tip – This was used for the small white parts of the penguins’ eyes.
👩🍳How to Make
Step 1: Make the Penguin Toppers
I started by preparing the toppers first, i.e. the penguin toppers, the snowmen, the snowflakes, the ribbon bow and the number ‘8’ topper.
The penguins and snowmen were formed by hand and were not wired. To make the penguins, I used black fondant that has been added CMC. I formed the bodies and the heads separately and attached them together with glue.
And then I rolled some white fondant and cut out the white sections of the faces and bodies. The black of the eyes were cut out using my oval plunger cutter and the center whites were cut using one of my medium-sized round piping tips. I then added the beaks and feet in yellow and hands in black.
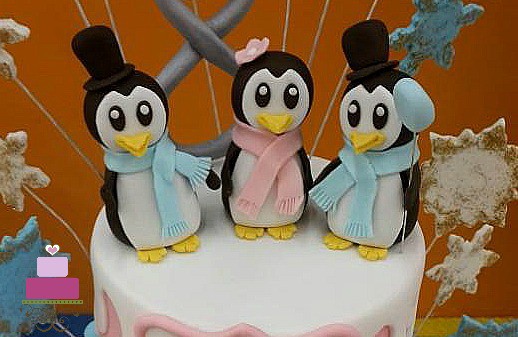
For the hats, I used black fondant, shaped the top of the hats and attached them to the round black cutouts. I let these set and harden before attaching them to the penguins with glue.
For the penguin scarfs, I cut out long strips of blue and pink and used my sugar craft knife to make short snips on both ends of the scarf.
For the penguin with the pink scarf, I put a small pink flower on the head, and one of the other penguins had a small balloon in one hand. The balloon was shaped in fondant and attached to a white floral wire.
The snowmen were also pretty straightforward. I shaped them in white fondant that has been added CMC. Both were also wearing scarves and hats like the penguins and had yellow nose and black eyes and buttons.
Step 2: Make the Fondant Snowflakes
As for the snowflakes, I cut these with my snowflakes cookie cutters. I attached a long wire to each snowflake. Before inserting the wires into the fondant snowflakes, I dipped the tips of the wire into glue to make sure they are totally secured to the fondant.
And I let these set and harden in a horizontal position until the rest of the cake was ready. I also added some glitter to the snowflakes and these were attached using glue.
See how I used the same snowflakes cutters to make pretty snowflake cookies for Christmas.
Step 3: Make the Large Pink Fondant Bow
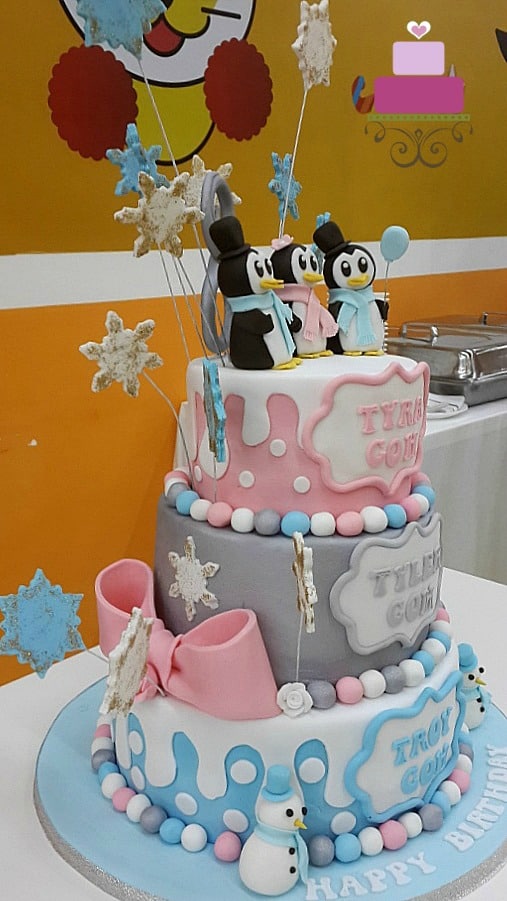
The large pink bow on the side of the second tier was also made in advance. And similar to the rest of the 3d decorations above, I added CMC to the pink fondant that was used to make the bow. I prepared the loops of the bow separately and let them set and harden before assembling them into a bow on the side of the penguin cake.
You can refer to the tutorial I have here on how to make a loop bow. The steps are similar except for the size of the loops which need to be cut in a larger size.

Step 4: Make the Number '8' Topper
Next was the number ‘8’ topper. I rolled a long piece of grey fondant and guided it into a number ‘8’.
I inserted 2 pieces of curved wire (that has been brushed lightly with glue) to the bottom of the number and twisted the bottom ends together which I then used to poke the number into the penguin cake.
Step 5: Bake and Cover the Cake with Fondant
As for the cake itself, once baked and cooled, I leveled and filled each tier with buttercream. I used the same buttercream to crumb coat the tiers as well.
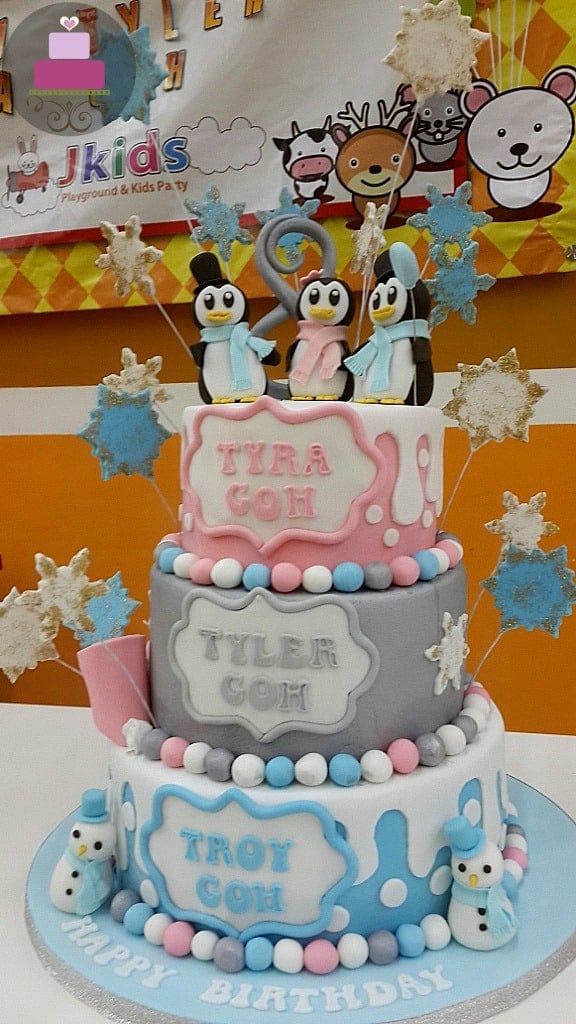
And then I covered the tiers in fondant – blue for the bottom tier, grey for the middle tier and pink for the top tier. For the blue and pink tiers, I added a layer of white that looked like melted dripping snow. And then I stacked all the 3 tiers together.
Step 6: Add Names on The Cake
Next, I added the names of the triplets on the cake. I used my FMM letter cutter and cut out the names in pink, grey and blue. I attached the names onto white plaques that have been cut using a plaque cutter.
And then I attached the plaques onto the sides of the cake and added a border around them in the same color as the color of the letters on them. These were attached with shortening.
Step 7: Attach the White Polka Dots
After that, I added the white polka dots (cut using my round plunger cutter) to the pink and blue tiers. For the grey tier, I had white snowflakes attached to it.
Step 8: Attach the Bow to the Cake
Following that, I assembled the ribbon bow on the side of the second tier. Since the bow was large, it was a bit tricky to get it to stay in place while the glue that was holding it dried. I used a satin ribbon tied around the tier to hold the ribbon in place.
Step 9: Make the Cake Border
Next to go on the cake were the large fondant balls border. I shaped these by hand. And then I attached them to the side of the cake with glue in random order.
Finally, I attached the penguins, snowmen, snowflakes, and the number 8 topper on the cake before adding the ‘Happy Birthday’ lettering on the cake board.
And that was how I decorated this triplet penguins birthday cake.
Happy Decorating 🙂


Leave a Reply