

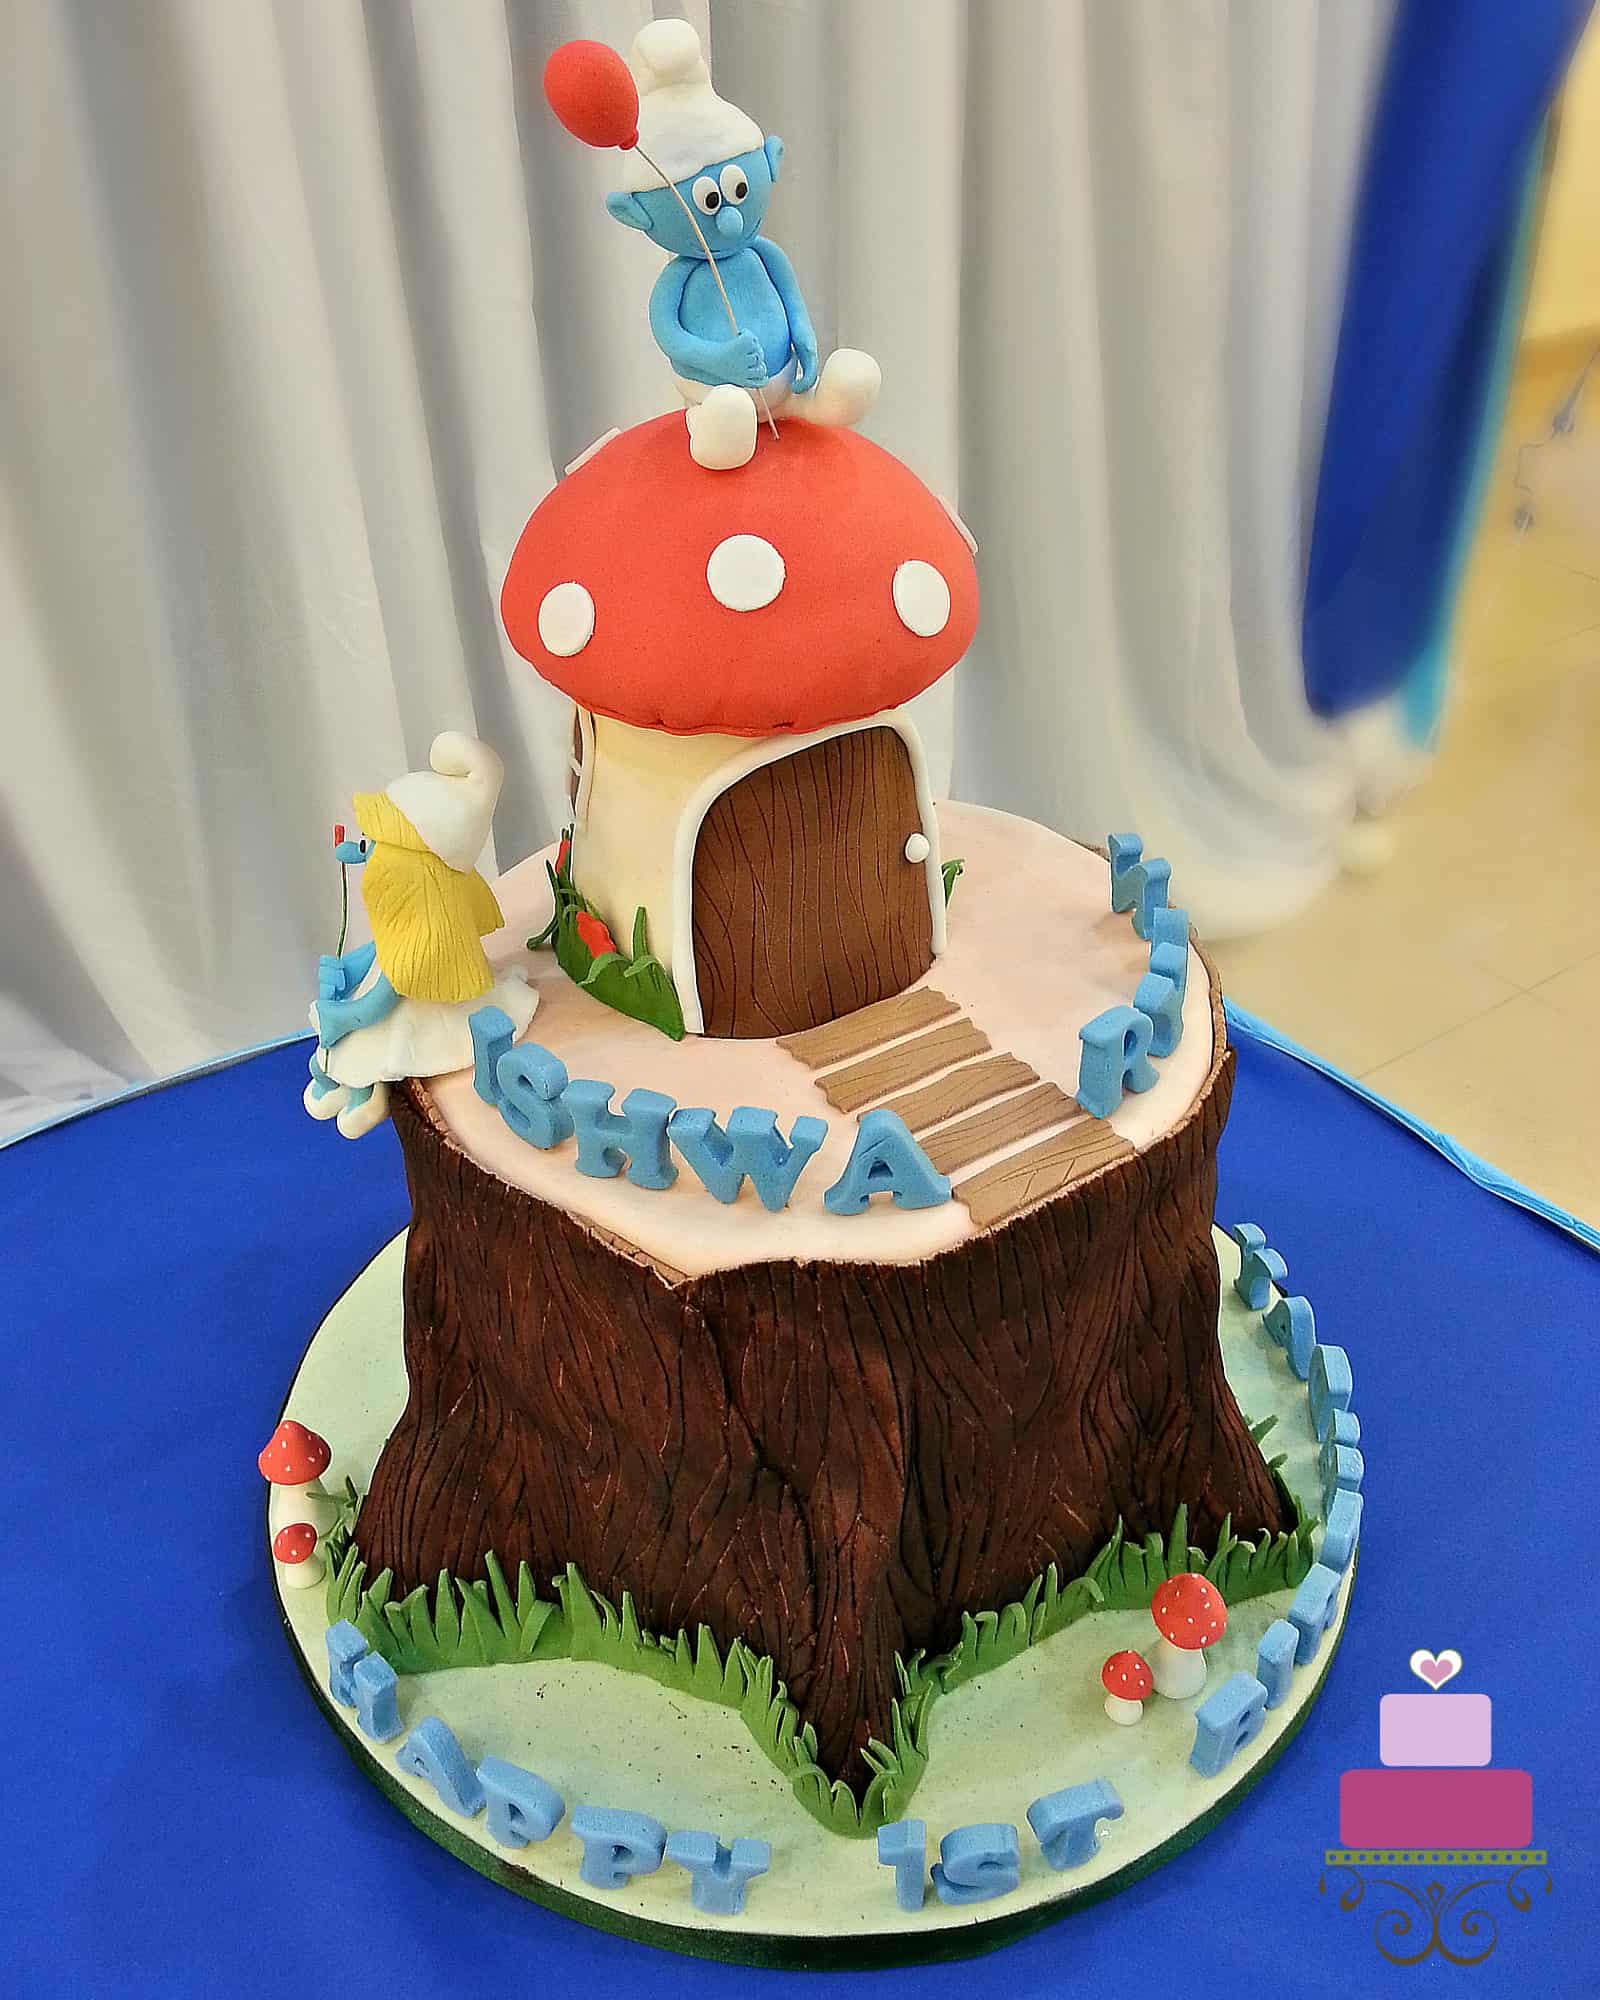
This Smurfs cake makes a fun and whimsical cake idea. With handmade 3D fondant Smurf and Smurfette cake toppers on a nature themed 3D cake in the shape of a tree log and mushroom, this cake design is absolutely charming and is sure to delight both children and adults alike!
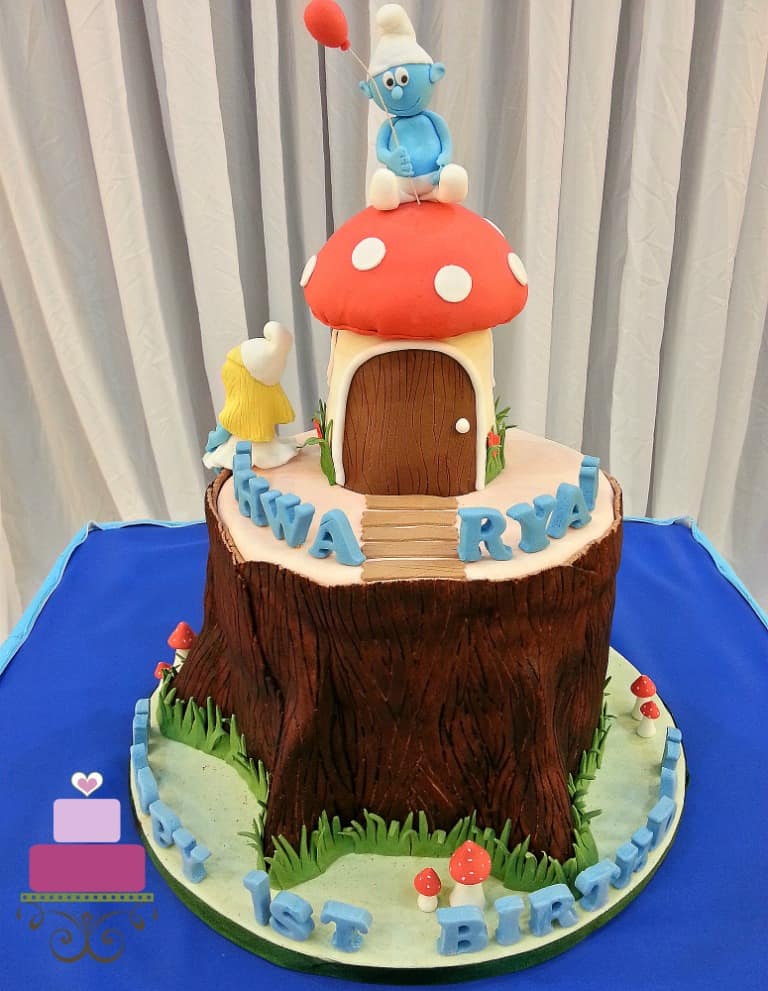
The Smurfs figurines are made entirely of fondant and totally edible. The mushroom is all cake that is covered in fondant. The tree trunk is also all cake, measuring 9 inches in diameter and approximately 8 inches high. The 3D fondant letters on the cake are made entirely in fondant and so are the other decorations on the cake.
Note: This is an intermediate cake decorating tutorial and some basic knowledge about frosting a cake with buttercream and fondant is required.
Jump to:
❤️Why You Will Love This Tutorial
- It has the list of all supplies and provides you with step by step tutorial on how to make and decorate the Smurfs cake.
- It is a lot cheaper to make the cake yourself than to custom order it from a bakery.
- You can customize the cake design to fit your specific needs and preferences, making it exactly the way you want.
- You can choose high-quality ingredients and ensure that the cake is free from any preservatives or additives.
- It can be a great way to bond and spend quality time with your kid together, creating memories that will last a lifetime.
- It can give you a sense of pride and satisfaction that store-bought cakes simply can't match.
📋Supplies Required
- Butter pound cake – 4 layers of 9 inch round cakes, 2 layers of 4 inch round cakes and 1 bowl shaped cake baked in an oven safe bowl measuring at least 5 inches in diameter. (Please refer the recipe card below for list of ingredients and exact measurements). If you do not have 4 inch round tins, you can bake the cake in 6 inches round tins and trim the sides to make the cake smaller. Please refer to the butter pound cake recipe page for recipe measurements for 6 inches round cake.
- Buttercream – I used buttercream to fill the cake as well as to crumb coat the cake and cupcakes. (Please refer to the recipe card at the bottom of the page for the list of ingredients and exact measurements)
- Fondant – The entire cake is covered and decorated in fondant. I used Satin Ice . You can make your own fondant if you wish.
- Food colors – a combination of AmeriColor and Wilton food colors.
- CMC powder – Add to fondant when making 3D deco on the cake such as the lettering, Smurf figures and the balloon. CMC helps fondant to dry firmer and is particularly helpful when making upright standing pieces.
- Fondant glue & shortening – These were the glue agents in this project.
- Alphabet cutters - To cut out the 3d alphabets on the cake.
- Cake decorating brush – Use a food-grade, fine-tipped brush to dot the small fondant mushrooms with white food coloring and a normal broad tipped brush to paint the tree trunk.
- Sugar craft knife – To cut fondant and other deco on the cake.
- Needle scriber tool – To mark wood grain patterns on fondant.
- Extruder tool – To make the door and window frames for the mushroom house on the cake.
- Round plunger cutter – To cut out white polka dots for the mushroom cake top.
- Flower plunger cutter – For the red flowers on the grass at the base of the mushroom cake as well as the flower held in hand by Smurfette.
- Fondant modeling tool set – To make the Smurf and Smurfette figurine on the cake.
- Pizza cutting wheel - To cut out grass in green fondant.
- Floral wire – For the balloon string.
- 9 inch round cake tins
- 4 inch round cake tins
- Bowl shaped cake tin or an oven proof bowl measuring 5 inches in diameter (measured at the top)
👩🍳How to Make
Step 1: Bake the Tree Log Cake
Preheat oven to 170 deg Celsius. Grease and flour two 9-inch round cake tins. Set aside.
Cream butter and sugar until light and fluffy for approximately 2 minutes. Scrape the sides and bottom of the bowl half way through.
Add the eggs, 2 at a time, beating well after each addition.
In a separate bowl, sift the flour, baking powder and salt. Fold this flour mixture into the creamed wet ingredients alternately with milk. Start and end with the dry ingredients. You can do it in 3 batches for the dry ingredients and 2 batches for the milk.
Finally, fold in the vanilla extract.
Divide batter into the 2 prepared cake tins and bake for 45 to 50 minutes, until a skewer or cake tester inserted in the center of the cakes come out without any wet batter.
Remove cakes from oven and let them rest in the cake tins for a few minutes before loosening the sides with a jam knife and turning them over onto to wire racks. Turn the cakes over to face upwards and let them cool completely to room temperature before decorating.
Step 2: Bake the Mushroom Shaped Cake
Follow the same steps above, using the ingredients listed under mushroom cake. Divide the cake batter into 2 well greased and floured 4 inches round cake tins and the bowl shaped tin or bowl.
Bake the cakes for about 25 to 30 minutes or until a skewer inserted in the centers of the cakes come out without any wet cake batter.
Step 3: Make the Buttercream
Measure butter into a large bowl. Whip it on high speed for about 1 minutes until it turns creamy.
Sift in the powdered sugar (icing sugar). Mix into the butter with a spoon. This step will avoid the sugar from flying when you turn on your mixer.
Once the sugar is fairly incorporated into the butter, cream it on medium high speed until the mixture turns light and fluffy. Add the vanilla extract. Continue beating until the extract is well combined.
If the buttercream appears too stiff, add some milk of cream. Start with one teaspoon and increase in very small quantities until your buttercream is of a spreadable consistency.
Step 4: Make the Smurf Cake Toppers
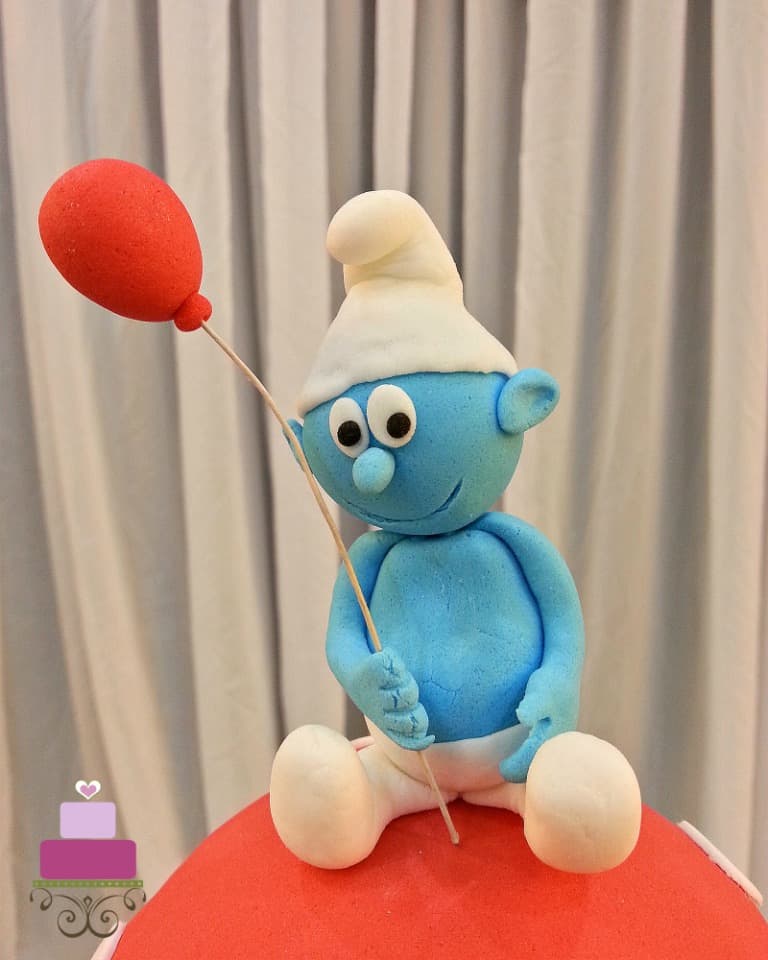
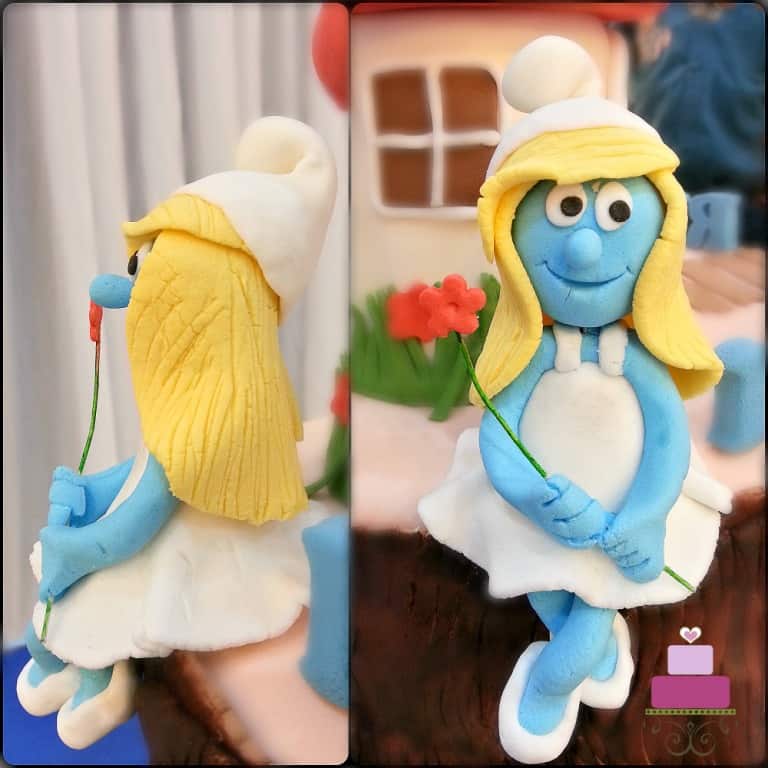
Tint some white fondant blue. Add some (about a quarter of a teaspoon) CMC powder to the fondant so that the figurines would hold their shapes firmly and dry faster. For the hats, dress, and stockings, use white and for Smurfette’s hair, use Satin Ice yellow.
To make the hair, roll some yellow fondant thin, use a needle tool to draw lines on it, and then place the piece on the head, arranging it in such a way that it looks like the hair.
The balloon in the Smurf’s hand is made in red. Add a pinch of CMC to the fondant first before shaping it.
Cut floral wire to about 15cm long. Dip one end into fondant glue and poke it into the bottom of the balloon. Set it aside to dry.
Step 5: Make the Tree Trunk Cake
Once the 9 inch round cake layers have all cooled down, level the cake layers (with a serrated knife or a cake leveler (if the tops are not flat). Stack each layer on top of one another with a layer of buttercream in between each layer.
Crumb coat the entire tree trunk. Next, add lumps of fondant randomly around the cake to make the roots. Shape these lumps such that they look like the tree roots. Since my cake board was not too big, I made them fairly short.
And then cover the top of the cake in light brown fondant. Cover just the top and let it fall to the sides for about 1 inch.
For the sides, tint some white fondant in brown and wrap it around the cake. For the top edges, trim off carefully with a knife, leaving some parts slightly higher than the rest for a natural look.
Next, use the needle tool to draw wood grain pattern all around the tree trunk. To complete the tree trunk, paint the sides with brown food color (diluted lightly with water) using a food grade brush.
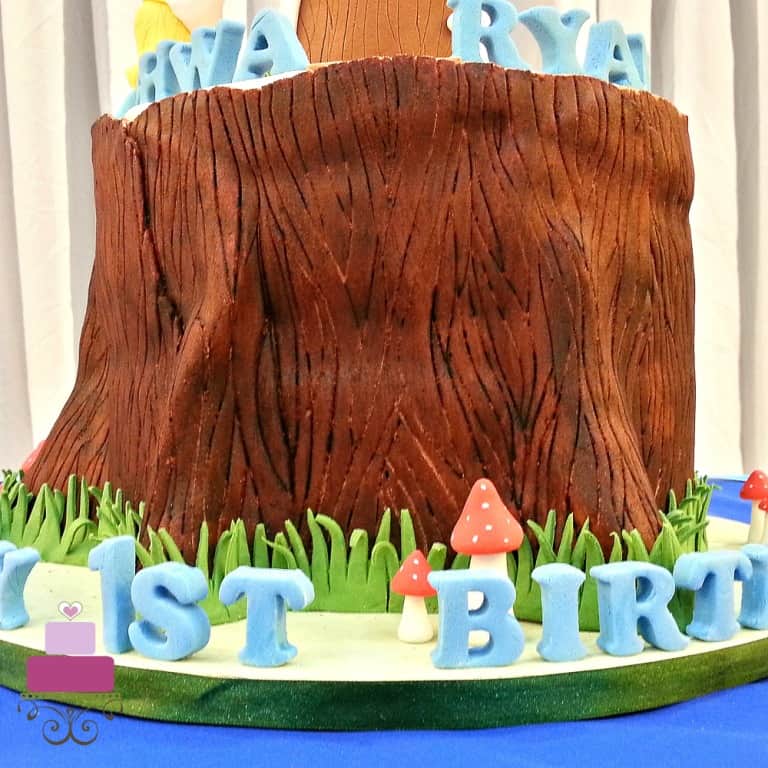
Step 6: Make the Grass Border
Next, is the green grass all around the tree. For this, roll out some green strips (about 1 and a half inches wide and used the pizza cutting wheel to cut out random triangle patterns on one edge of the strip.
Attach the grass all around the sides of the tree base with shortening. In doing this, make sure the top of the grass is not entirely attached to the cake. Bend some as natural long grass would bend.
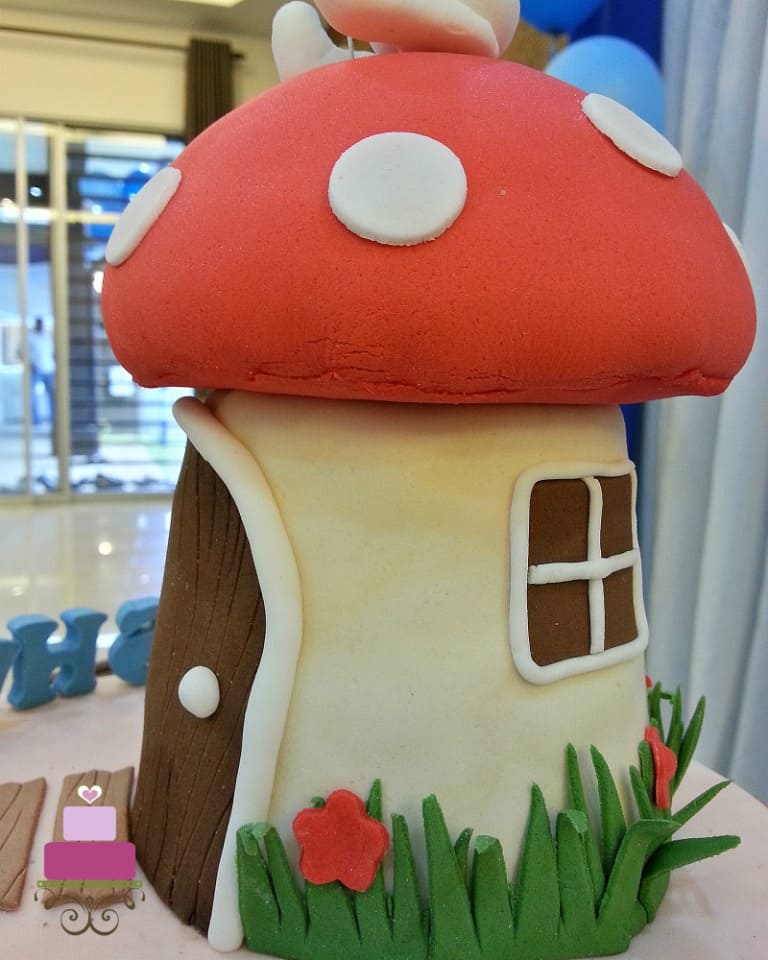
Step 7: Make the Mushroom Cake
For the mushroom stalk, stack the 4 inches round cakes together with buttercream and carve the tops so that the diameter is slightly smaller at the top than the bottom. Crumb coat the whole cake and cover the sides in ivory. You need not cover the top as it will be covered by the mushroom top.
Decorate the front of the mushroom with a large door. Cut it out in brown. Use the needle tool to draw the wood grain pattern and attach the door to the cake with shortening.
For the door frame, use the extruder tool fitted with a circular disc to pipe out a long strip of ivory and attach it as the door frame with the help of shortening.

Make a window on the other side of the mushroom in a similar manner.
For the mushroom top, cover the bowl shaped cake in red. Tuck about 2 centimeters of the fondant underneath the cake. Once the red fondant is on, turn the cake upside down. Roll another piece of round fondant piece and attach it to the bottom of the mushroom top.
Step 8: Assemble the Cakes
To assemble the cakes, lifted the mushroom stalk cake and placed it on the tree cake. Poke a dowel rod right in the center of the stalk all the way down into the tree bark.
And in doing this, make sure there is extra dowel rod above the stalk to hold the mushroom top. And then carefully lift the mushroom top and place it on the stalk. The dowel rod will help to hold it in place on the cake.
Next, add white polka dots on the cake. Cut these using the round cutter and attach to the cake with shortening.
For the base of the mushroom stalk, add grass, similar to the tree. And I add some flowers around it in random order.
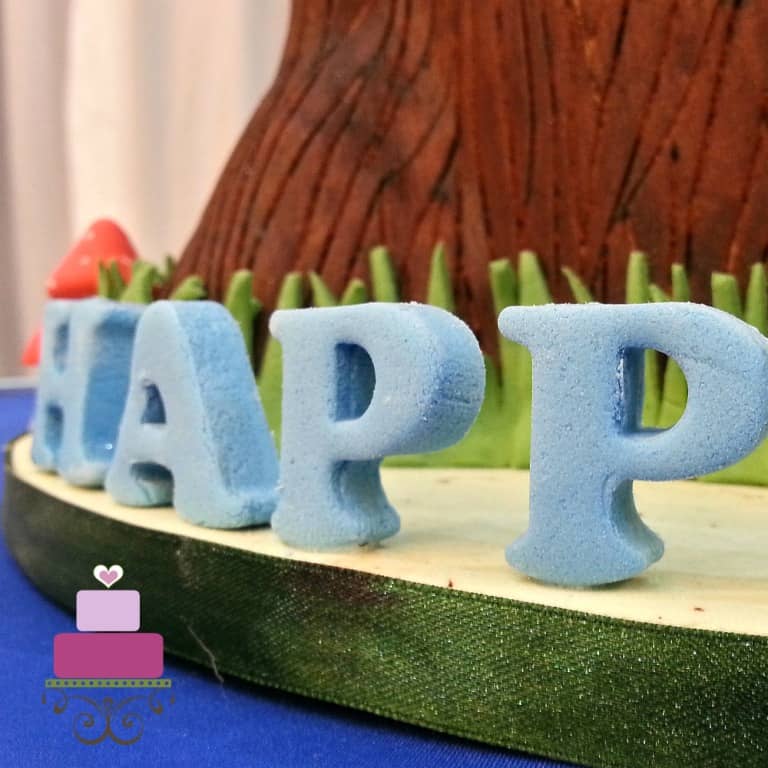
Step 9: Add the 3D Alphabets
After the mushroom and the tree trunk, make the lettering. Use blue fondant and added some CMC to it.
Let the cut alphabets set and harden in a horizontal position until they were firm enough to stand upright. And then, attach these letters onto the cake and the cake board with the edible glue.
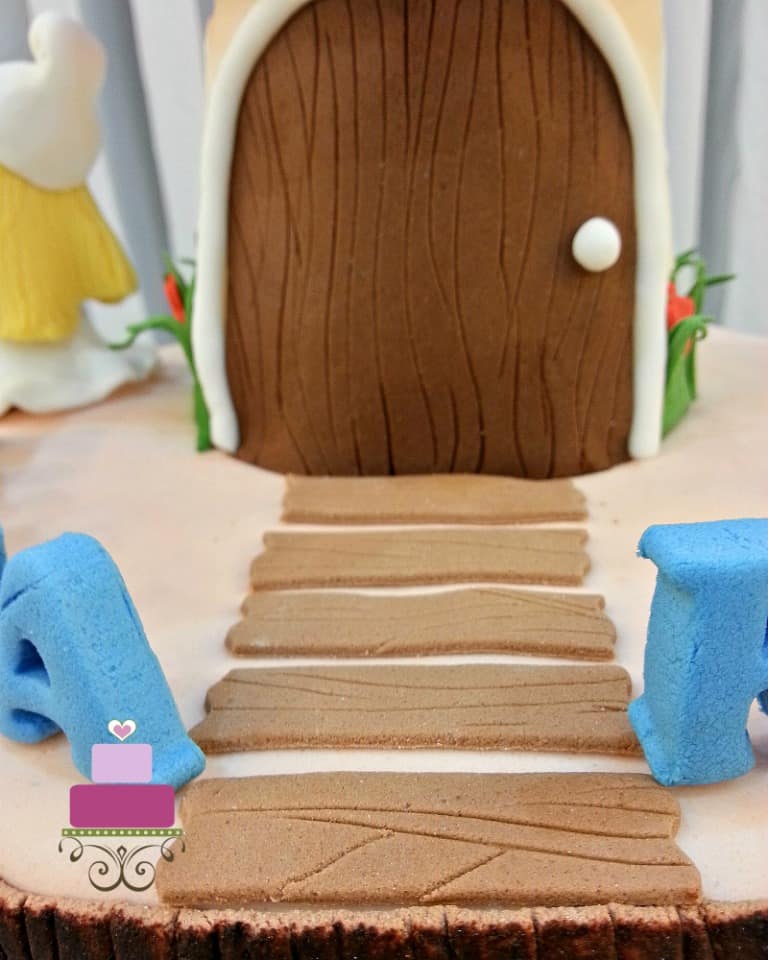
Step 10: Make the Walkway
For the walkway, use light brown fondant and cut out rectangle strips. Arrange these on the cake towards the mushroom door. Attach them to the cake with shortening.
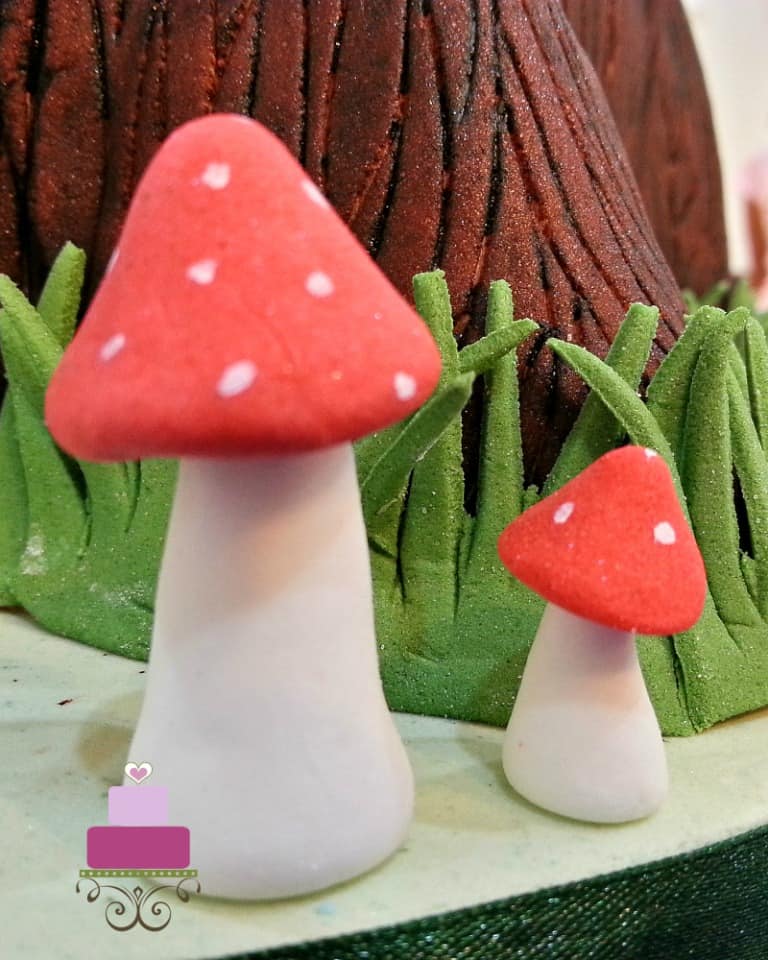
Next to go on the cake are the tiny 3D mushrooms on the cake board. Form these by hand. Add CMC to the fondant so that the mushrooms could stand upright and stable on the cake board.
For the stalks, use white fondant and for the tops, use red. The white dots, mark them using white food coloring and a fine-tipped cake decorating brush. And attach these mushrooms to the cake board with glue.
And finally, to complete the assemble, place the Smurfs figurines on the cake with the Smurfette in a sitting position on the tree trunk while the Smurf on the mushroom top.
To ensure the Smurf remained stable on the cake, attach him to the cake with the help of a thin wooden pick.
And that completes the Smurfs cake.
💡Expert Tips
- If making the fondant Smurf cake toppers is too difficult for you, an easier option would be to you toy toppers.
- If you do not need so much cake, you can replace half of the tree cake with a 9 inches round styrofoam dummy. Wrap the dummy with a plastic wrap, place it on the cake board. Add a cake board on top and place the real cake layers ( 2 layers in this case) on the cake board. Crumb coat the cake (including the dummy) and cover with fondant in the same way as outlined above.
- You can change the cake flavor to any that you like. You can also use any cake recipe that you like, however, since you will be stacking 4 layers of cake, it has to be a sturdy cake and not too soft like a sponge cake. Other cake flavors you can choose from my blog include chocolate cake, orange cake, marble cake and coffee cake.
- It is advisable to not stack more than 4 layers of cake for the tree trunk as the top layers will compress the bottom layer, leaving you with uneven cake layers. If you wish to make taller cakes, add cake boards in between and support the cake tiers with dowel rods.
❤️More Tutorials You Will Love


Do you like this tutorial? Please leave a 5-star ⭐⭐⭐⭐⭐rating in the recipe card below and consider a review further down this page. I would love to hear from you. Thank you!
📖Recipe
Smurfs Cake
Equipment
- Alphabet cutters
- Cake decorating brush (fine-tipped and a broad tipped)
- Sugar craft knife
- Needle scriber tool
- Extruder tool
- Round plunger cutter
- Flower plunger cutter
- Fondant modeling tool set
- Pizza cutting wheel
- Floral wire
- 9 inch round cake tins
- 4 inch round cake tins
- Bowl shaped cake tin or an oven proof bowl measuring 5 inches in diameter (measured at the top)
For best results, use the metrics measurements. US customary measurements have not been tested and are only meant for guide.
Ingredients
9 Inch round cakes
- 1100 g butter (at room temperature)
- 1100 g granulated sugar
- 1100 g self-raising flour
- 18 eggs (at room temperature)
- 270 ml milk
- 1 teaspoon salt
- 2 ¼ teaspoon baking powder
- 3 teaspoon vanilla extract
4 inch round cakes & bowl shaped cake
- 360 g self-raising flour
- 360 g granulated sugar
- 360 g butter (at room temperature)
- 6 eggs (at room temperature)
- 90 ml milk
- ¾ teaspoon baking powder
- ¼ teaspoon salt
- 1 teaspoon vanilla extract
Buttercream
- 400 g butter
- 800 g powdered sugar (icing sugar)
- 1 teaspoon vanilla extract
- 4 tablespoon milk or cream (optional)
Decoration
- Fondant
- Food coloring
- CMC powder
- Fondant glue
- Shortening
Instructions
Baking the tree log cake
- Preheat oven to 170°Celsius. Grease and flour four 9-inch round cake tins. Set aside. If you do not have 4 tins, bake the cake in 2 batches.
- Cream butter and sugar until light and fluffy for approximately 2 minutes. Scrape the sides and bottom of the bowl half way through.
- Add the eggs, 2 at a time, beating well after each addition.
- In a separate bowl, sift the flour, baking powder and salt. Fold this flour mixture into the creamed wet ingredients alternately with milk. Start and end with the dry ingredients. You can do it in 3 batches for the dry ingredients and 2 batches for the milk.
- Finally, fold in the vanilla extract.
- Divide batter into the prepared cake tins and bake for 45 to 50 minutes, until a skewer or cake tester inserted in the center of the cakes come out without any wet batter.
- Remove cakes from oven and let them rest in the cake tins for a few minutes before loosening the sides with a jam knife and turning them over onto to wire racks. Turn the cakes over to face upwards and let them cool completely to room temperature before decorating.
Baking the mushroom shaped cake
- Follow the same steps as the tree log cake above but using the ingredients listed for the mushroom cake. Divide the cake batter into 2 well greased and floured 4 inches round cake tins and the bowl shaped tin or bowl.
- Bake the cakes for about 25 to 30 minutes or until a skewer inserted in the centers of the cakes come out without any wet cake batter. The bowl shaped cake may require slightly longer baking time.
Making the buttercream
- Measure butter into a large bowl.Whip it on high speed for about 1 minutes until it turns creamy.Sift in the powdered sugar (icing sugar).
- Mix into the butter with a spoon. This step will avoid the sugar from flying when you turn on your mixer.Once the sugar is fairly incorporated into the butter, cream it on medium high speed until the mixture turns light and fluffy.
- Add the vanilla extract. Continue beating until the extract is well combined.
- If the buttercream appears too stiff, add some milk of cream. Start with one teaspoon and increase in very small quantities until your buttercream is of a spreadable consistency.
Making the Smurf cake toppers
- Tint some white fondant blue. Add some (about ¼ teaspoon) CMC powder to the fondant so that the figurines would hold their shapes firmly and dry faster.
- For the hats, dress, and stockings, use white and for Smurfette’s hair, use Satin Ice yellow. To make the hair, roll some yellow fondant thin, use a needle tool to draw lines on it, and then place the piece on the head, arranging it in such a way that it looks like the hair.
- The balloon in the Smurf’s hand is made in red. Add a pinch of CMC to the fondant first before shaping it.
- Cut floral wire to about 15cm long. Dip one end into fondant glue and poke it into the bottom of the balloon. Set it aside to dry.
Decorating the tree log cake
- Once the 9 inch round cake layers have all cooled down, level them (with a serrated knife or a cake leveler (if the tops are not flat). Stack each layer on top of one another with a layer of buttercream in between each layer.
- Crumb coat the entire tree trunk with buttercream. Next, add lumps of fondant randomly around the cake to make the roots. Shape these lumps such that they look like the tree roots.
- And then cover the top of the cake in light brown fondant. Cover just the top and let the excess fall to the sides for about 1 inch long.
- For the sides, tint some white fondant in brown and wrap it around the cake. For the top edges, trim off carefully with a knife, leaving some parts slightly higher than the rest for a natural look.
- Next, use the needle tool to draw wood grain pattern all around the tree trunk. Do it while the fondant still has not dried. To complete the tree trunk, paint the sides with brown food color (diluted lightly with water) using a food grade brush.
Making the grass border
- Next, is the green grass all around the tree. For this, roll out some green strips (about 1 and a ½ inches wide and used the pizza cutting wheel to cut out random triangle patterns on one edge of the strip.
- Attach the grass all around the sides of the tree base with shortening. In doing this, make sure the top of the grass is not entirely attached to the cake. Bend some as natural long grass would bend.
Decorating the mushroom cake
- For the mushroom stalk, stack the 4 inches round cakes together with buttercream and carve the tops so that the diameter is slightly smaller at the top than the bottom.
- Crumb coat the whole cake and cover the sides in ivory. You need not cover the top as it will be covered by the mushroom top.
- Decorate the front of the mushroom with a large door. Cut it out in brown. Use the needle tool to draw the wood grain pattern and attach the door to the cake with shortening.
- For the door frame, use the extruder tool fitted with a circular disc to pipe out a long strip of ivory and attach it as the door frame with the help of shortening.
- Make a window on the other side of the mushroom in a similar manner.
- For the mushroom top, cover the bowl shaped cake in red. Tuck about 2 centimeters of the fondant underneath the cake. Once the red fondant is on, turn the cake upside down. Roll another piece of round fondant piece and attach it to the bottom of the mushroom top.
Assembling the cakes
- To assemble the cakes, lifted the mushroom stalk cake and placed it on the tree cake. Poke a dowel rod right in the center of the stalk all the way down into the tree bark. And in doing this, make sure there is extra dowel rod above the stalk to hold the mushroom top.
- And then carefully lift the mushroom top and place it on the stalk. The dowel rod will help to hold it in place on the cake.
- Next, add white polka dots on the cake. Cut these using the round cutter and attach to the cake with shortening.
- For the base of the mushroom stalk, add grass, similar to the tree. And I add some flowers around it in random order.
Adding the 3D alphabets
- After the mushroom and the tree trunk, make the lettering. Use blue fondant and added some CMC to it. Let the cut alphabets set and harden in a horizontal position until they were firm enough to stand upright.
- And then, attach these letters onto the cake and the cake board with the edible glue.
Making the walkway and completing the decoration
- For the walkway, use light brown fondant and cut out rectangle strips. Arrange these on the cake towards the mushroom door. Attach them to the cake with shortening.
- Next to go on the cake are the tiny 3D mushrooms on the cake board. Form these by hand. Add CMC to the fondant so that the mushrooms could stand upright and stable on the cake board.
- For the stalks, use white fondant and for the tops, use red. The white dots, mark them using white food coloring and a fine-tipped cake decorating brush.
- And attach these mushrooms to the cake board with glue.
- And finally, to complete the assemble, place the Smurfs figurines on the cake with the Smurfette in a sitting position on the tree trunk while the Smurf on the mushroom top.
- To ensure the Smurf remained stable on the cake, attach him to the cake with the help of a thin wooden pick. And that completes the Smurfs cake.
Notes
- If you do not have 4 inch round tins, you can bake the cake in 6 inches tins and trim the sides to make the cake smaller. Please refer to the butter pound cake recipe page for recipe measurements for 6 inches round cakes.
- The amount of buttercream provided in the recipe is only a guidance. You may need to add more depending on how much you use to sandwich your cake layers.
- If making the fondant Smurf cake toppers is too difficult for you, an easier option would be to you toy toppers.
- If you do not need so much cake, you can replace half of the tree cake with a 9 inches round styrofoam dummy. Wrap the dummy with a plastic wrap, place it on the cake board. Add a cake board on top and place the real cake layers ( 2 layers in this case) on the cake board. Crumb coat the cake (including the dummy) and cover with fondant in the same way as outlined above.
- It is advisable to not stack more than 4 layers of cake for the tree trunk as the top layers will compress the bottom layer, leaving you with uneven cake layers. If you wish to make taller cakes, add cake boards in between and support the cake tiers with dowel rods.
Leave a Reply