

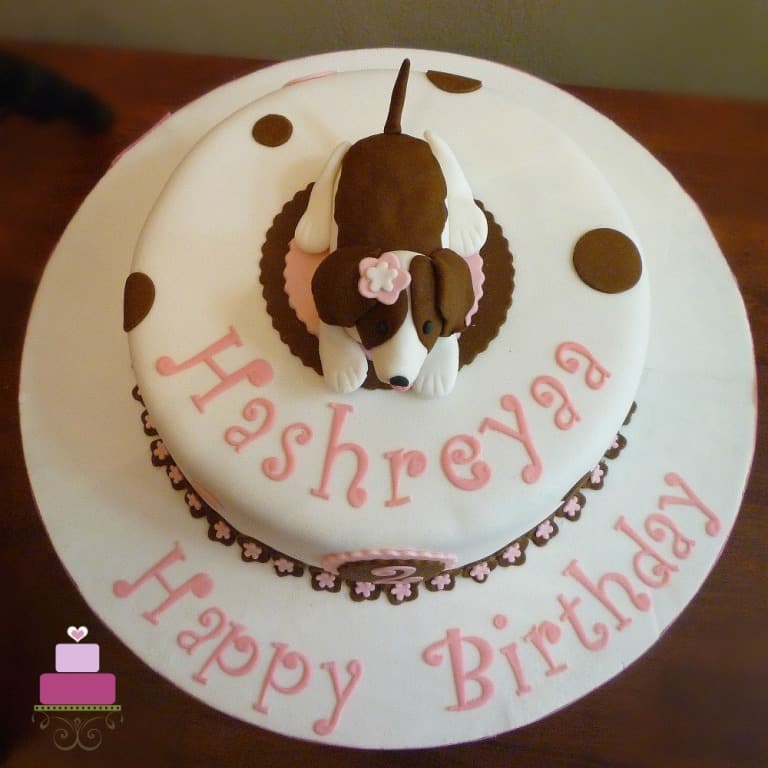
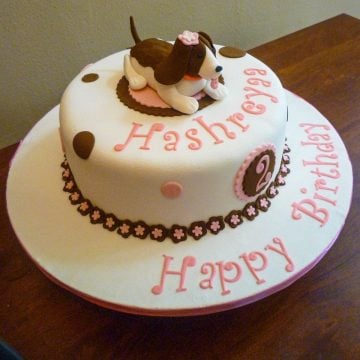
This simple dog cake design is just what you need to add a touch of fun and creativity to your little one's upcoming birthday celebration. It is a simple homemade birthday cake decorated with a charming 3D dog topper that looks almost too cute to eat!
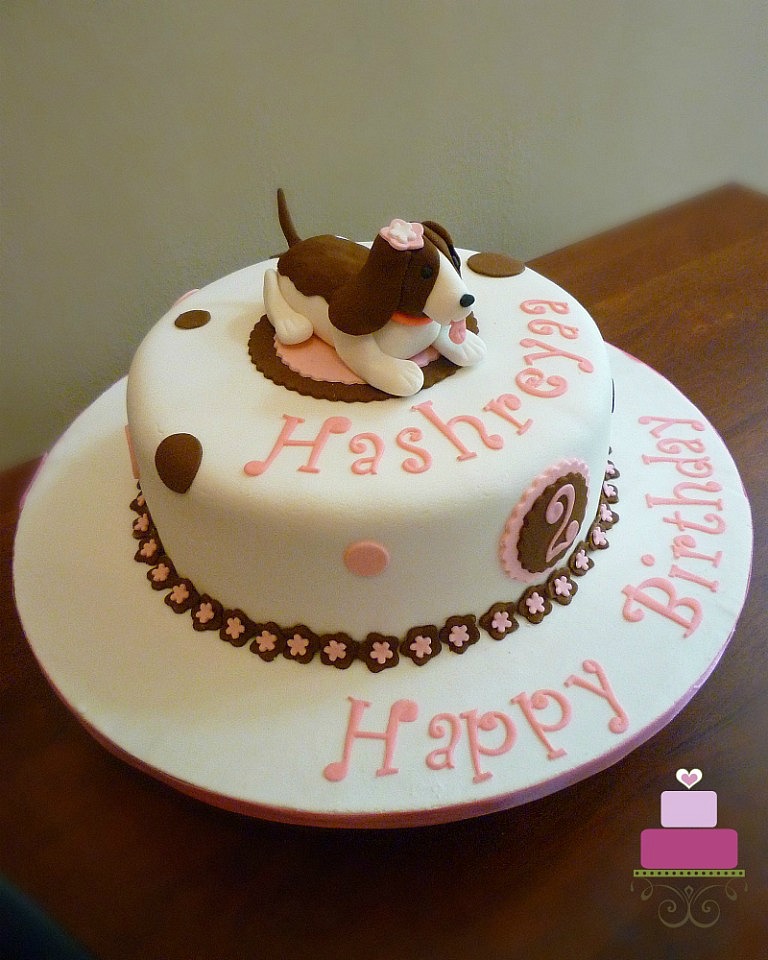
This is a single tier cake measuring 9 inches in diameter and approximately 4 inches high. The cake is covered with fondant and the 3D cake topper is also made of fondant.
Note: This is an intermediate cake decorating tutorial and some basic knowledge about frosting a cake with buttercream and fondant is required.
Jump to:
❤️Why You Will Love This Tutorial
- A simple cake design and fairly easy to make for dog lovers and those with children who share the same passion.
- Cost effective way to celebrate your child's birthday at only a fraction of the cost of a custom ordered cake.
- A great way to add a personal touch to your child's birthday with a cake that is designed with much love.
- Can be a fun bonding activity for parents and kids to enjoy together in the kitchen.
📋Supplies Required
- Butter pound cake - 2 layers of 9 inches round cakes. (Please refer the recipe card below for list of ingredients and exact measurements).
- Buttercream – To fill the cake as well as to crumb coat it. (Please refer the recipe card below for list of ingredients and exact measurements).
- Fondant - To cover and decorate the dog cake as well as to make the 3d dog cake topper.
- Gum paste - For the lettering on the cake.
- Wilton pink gel food color
- Flower plunger cutters – To make the tiny 5-petal flowers placed on the border of the cake as well as the dog’s head.
- Round plunger cutter set – To cut out the brown circles on the cake.
- Fondant shaping tools – For shaping the dog topper.
- TAPPIT Funky Alphabet Cutters
- Round scalloped cutter set - To cut out the brown and pink scalloped round cutouts on which the dog topper is placed on the cake as well as where the number ‘2’ cut out is placed on the side of the cake.
- Sugar craft knife
- Fondant glue and shortening
- 9 inches round cake tins
👩🍳How to Make
Step 1: Bake the Cake
Preheat oven to 170°Celsius. Grease and flour two 9-inch round cake tins.
In a medium sized bowl, cream butter and sugar until light and fluffy for approximately 2 minutes. Scrape the sides and bottom of the bowl half way through. Add the eggs, 1 at a time and each time, beat until the all the traces of the egg are no longer visible.
Sift the flour, baking powder and salt in a separate large bowl. Fold these sifted dry ingredients into the creamed mixture alternately with milk. Start and end with the flour mixture, in 3 batches.
Finally, fold in the vanilla extract. Mix well.
Divide batter into the two cake tins and level the tops. Bake the cakes for 45 to 50 minutes, until a skewer or cake tester inserted in the center of the cakes come out without any wet batter.
Once baked, remove cakes from oven. Let them cool in the tins for about 2 minutes, and then loosen the sides with a butter knife and turn the cakes over onto wire racks. Turn them over again to face upwards and let the cakes cool completely to room temperature before frosting and decorating.
Step 2: Make the Buttercream
Add butter into a medium sized bowl and beat for approximately 1 minute.
Sift in the icing sugar and mix it into the creamed butter with a spoon before using the cake mixer. This will avoid the sugar from flying as you turn on your cake mixer.
Cream both the butter and sugar until fluffy. Add the vanilla extract and cream again until well combined. If the buttercream appears too stiff, add some milk. Beat until the mixture is all smooth and creamy.
Step 3: Make the Fondant Dog Topper
To make the dog, start with its body. Roll some white fondant into a thick short sausage and then make one end of it slightly pointed upwards. That end is to be the dog’s neck. Leave the other end of the sausage rounded.
Next is the head. In making the head, make sure the size is proportionate to the body. Start by rolling some white fondant into a smooth round ball. And then roll the front portion to be slightly pointed. This is to form the nose and mouth portions of the dog.
Next, roll some brown fondant thin and wrap it around the dog’s head from the bottom, ending right after its ears on the head. Using the same colored fondant, I add a large brown spot on the dog’s body. And using the same brown, form the ears.
After that, use the fondant tools to cut a small slit for its mouth and to insert the dog's tongue.
To make the tongue, pinch a small piece of pink fondant, press it thin into a longish rounded shape and use the sugarcraft knife to mark a line in the center. Brush some fondant glue to the dog's mouth and carefully push one end of the tongue into the dog's mouth. And then curl the portion that was jotting out to give it a more natural tongue look.
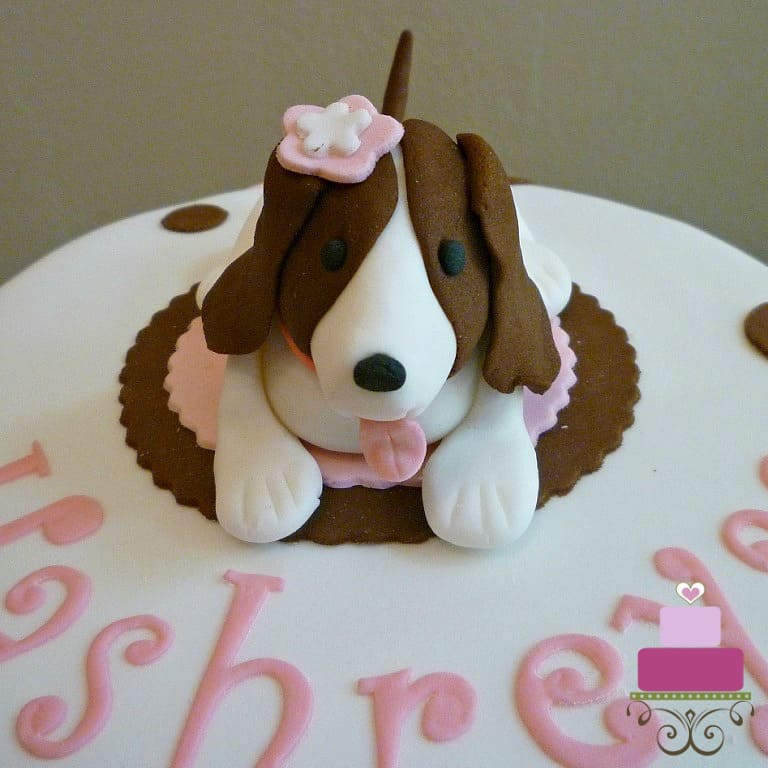
Next, add the nose and the eyes (form these with black fondant and attach to the face with fondant glue).
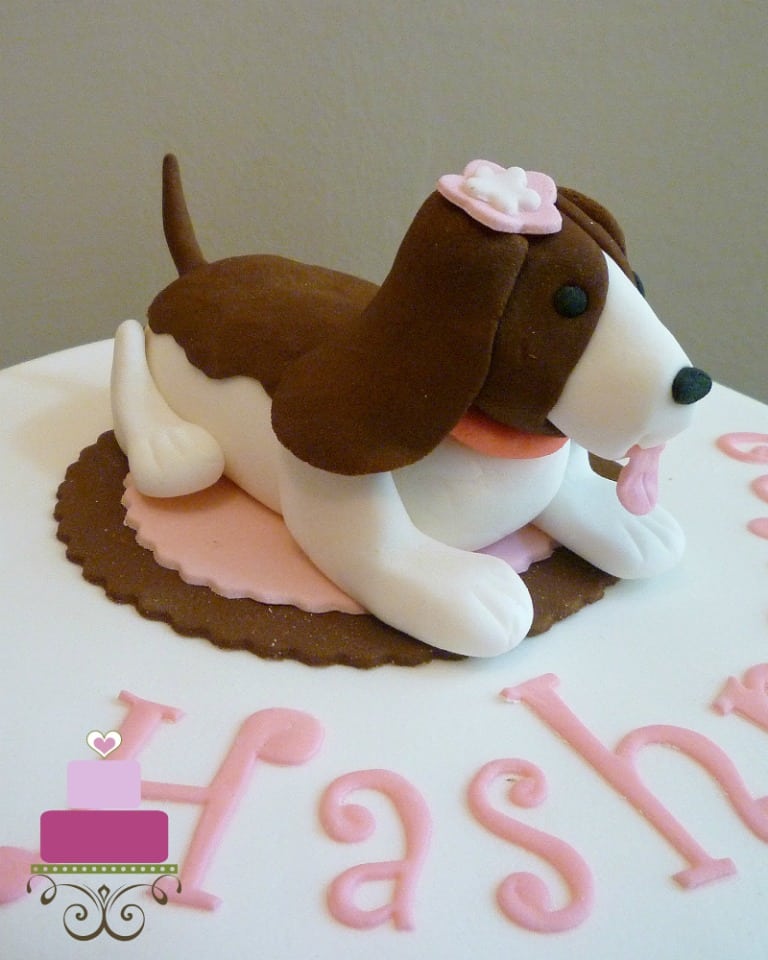
Once the face is done, add the legs. To make these, pinch 4 equal-sized white fondant pieces for the 4 legs. Roll each of them into medium-sized sausages, flatten the ends (one side vertically and the other side horizontally), and attached them to the dog's body. Refer to the image above for the positioning of the legs.
Once all the four legs are on, use the sugar craft knife to mark the paws on each of the dog’s legs and then form and add the dog's tail. To make the tail, roll a piece of brown fondant into a pointy rope and attach it to the back of the dog.
And finally, add a tiny pink flower on the dog’s head. Cut the flower using the flower plunger cutter. And that completes the dog cake topper. Set it aside to firm up and set.
Step 4: Cover the Cake with Fondant
Once the cakes have cooled down completely, level the tops and stack them with buttercream in between. And them crumb coated the cake, also with buttercream.
Next, cover the cake with white fondant. And then place it on a white fondant covered cake board.
Using the same flower plunger cutter used to cut the flower on the dog’s head, cut out lots of tiny brown flowers and attach these (with fondant glue) all around the base of the cake as its border. In the center of each of these flowers, attach a smaller pink flower, also with fondant glue.
Step 5: Add the Brown Fondant Mat
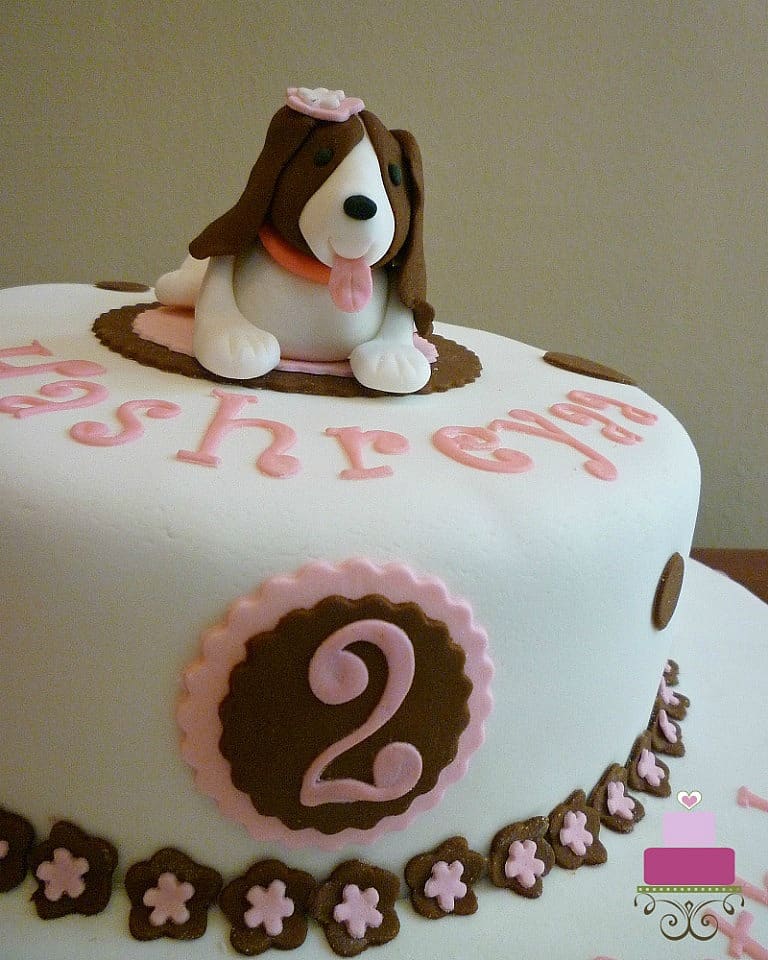
Cut out a round piece in brown using the scalloped round cutter and attach it to the center of the cake. On it, add a smaller cut out in pink. And then place the dog on these cutouts and secured it to the cake with glue.
Make another set of similar cutouts in brown and pink and place them on the front side of the cake.
Step 6: Attach the Cake Lettering
Next, add wordings on the cake. Cut these with the TAPPIT letter cutters in Funky font in pink-tinted gum paste. The letters are best cut using gum paste as gum paste can be rolled paper thin (almost transparent) without tearing. For the Tappit letter cutters to work well, the gum paste must be rolled very thin. It also helps to let the rolled gum paste to dry slightly, for a minute or two before cutting.
Once the letters are all cut, add the birthday child's name on the cake and the birthday wishes on the board. And add the age number on the round cutouts on the side of the cake. Attach all these with shortening.
Step 7: Add the Polka Dots
The last step in making this dog cake design is to add the brown and pink dots on the cake. Cut the dots with the round plunger cutters in various sizes and place them randomly on the cake to complete the cake decoration.
💡Expert Tips
- If making the fondant dog topper is too advanced for you, replace it with a toy topper instead.
- The fondant dog topper can be made in advance so that assembling the cake on the party day can be quick.
- You can use any other cake recipe you like provided the cake is sturdy enough to hold the weight of the fondant covering on it. Check out my cake recipes here and in particular this chocolate, orange, marble or coffee flavored pound cakes.
- When making buttercream, make sure to sift the icing sugar to break any lumps. Also, to avoid the sugar from flying as you turn on your cake mixer, it helps to stir it into the butter with a spoon first before using the machine.
- If you are living in a humid country, working with fondant can be tricky especially if you are using store bought fondant. Fondant tends to become saggy and sticky with humidity, so it is best to work in an air conditioned room.
- When using letter cutters like the Tappit letter cutters, use gum paste instead of fondant as you need the paste to be rolled super thin for best results, and you can only do that with gum paste.
- When applying fondant glue, use a brush and use it lightly so that it dries quickly and holds your pieces in place.
❤️More Tutorials You Will Love
Do you like this tutorial? Please leave a 5-star ⭐⭐⭐⭐⭐rating in the recipe card below and consider a review further down this page. I would love to hear from you. Thank you!
📖Recipe
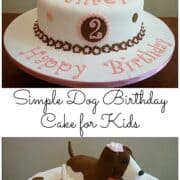
Simple Dog Cake Design
Equipment
- Flower plunger cutters
- Round plunger cutter set
- Fondant shaping tools
- TAPPIT Funky Alphabet Cutters
- Round scalloped cutter set
- Sugar craft knife
- Fondant glue and shortening
- 9 inches round cake tins
For best results, use the metrics measurements. US customary measurements have not been tested and are only meant for guide.
Ingredients
9 Inch round cakes
- 540 g butter at room temperature
- 540 g granulated sugar
- 540 g self-raising flour
- 9 eggs at room temperature
- 135 ml milk
- ½ teaspoon salt
- 1 ⅛ teaspoon baking powder
- 1 ½ teaspoon vanilla extract
Buttercream
- 200 g butter
- 400 g powdered sugar icing sugar
- ½ teaspoon vanilla extract
- 2 tablespoon milk or cream optional
Decoration
- Fondant
- Gum paste
- Wilton pink gel food color
Instructions
Baking the cakes
- Preheat oven to 170°Celsius. Grease and flour two 9-inch round cake tins.
- In a medium sized bowl, cream butter and sugar until light and fluffy for approximately 2 minutes. Scrape the sides and bottom of the bowl half way through.
- Add the eggs, 1 at a time and each time, beat until the all the traces of the egg are no longer visible.
- Sift the flour, baking powder and salt in a separate large bowl. Fold these sifted dry ingredients into the creamed mixture alternately with milk. Start and end with the flour mixture, in 3 batches.
- Finally, fold in the vanilla extract. Mix well.
- Divide batter into the two cake tins and level the tops. Bake the cakes for 45 to 50 minutes, until a skewer or cake tester inserted in the center of the cakes come out without any wet batter.
- Once baked, remove cakes from oven. Let them cool in the tins for about 2 minutes, and then loosen the sides with a butter knife and turn the cakes over onto wire racks. Turn them over again to face upwards and let the cakes cool completely to room temperature before frosting and decorating.
Making the buttercream
- Add butter into a medium sized bowl and beat for approximately 1 minute.
- Sift in the icing sugar and mix it into the creamed butter with a spoon before using the cake mixer. This will avoid the sugar from flying as you turn on your cake mixer.
- Cream both the butter and sugar until fluffy. Add the vanilla extract and cream again until well combined. If the buttercream appears too stiff, add some milk. Beat until the mixture is all smooth and creamy.
Making the fondant dog topper
- To make the dog, start with its body. Roll some white fondant into a thick short sausage and then make one end of it slightly pointed upwards. That end is to be the dog’s neck. Leave the other end of the sausage rounded.
- Next is the head. In making the head, make sure the size is proportionate to the body. Start by rolling some white fondant into a smooth round ball. And then roll the front portion to be slightly pointed. This is to form the nose and mouth portions of the dog.
- Next, roll some brown fondant thin and wrap it around the dog’s head from the bottom, ending right after its ears on the head. Using the same colored fondant, I add a large brown spot on the dog’s body. And using the same brown, form the ears.
- After that, use the fondant tools to cut a small slit for its mouth and to insert the dog's tongue.
- To make the tongue, pinch a small piece of pink fondant, press it thin into a longish rounded shape and use the sugar craft knife to mark a line in the center. Brush some fondant glue to the dog's mouth and carefully push one end of the tongue into the dog's mouth. And then curl the portion that was jotting out to give it a more natural tongue look.
- Next, add the nose and the eyes (form these with black fondant and attach to the face with fondant glue).
- Once the face is done, add the legs. To make these, pinch 4 equal-sized white fondant pieces for the 4 legs. Roll each of them into medium-sized sausages, flatten the ends (one side vertically and the other side horizontally), and attached them to the dog's body. Refer to the image in the blog post above for the positioning of the legs.
- Once all the four legs are on, use the sugar craft knife to mark the paws on each of the dog’s legs and then form and add the dog's tail. To make the tail, roll a piece of brown fondant into a pointy rope and attach it to the back of the dog.
- And finally, add a tiny pink flower on the dog’s head. Cut the flower using the flower plunger cutter. And that completes the dog cake topper. Set it aside to firm up and set.
Covering the cake with fondant
- Once the cakes have cooled down completely, level the tops and stack them with buttercream in between. And them crumb coated the cake, also with buttercream.
- Next, cover the cake with white fondant. And then place it on a white fondant covered cake board.
- Using the same flower plunger cutter used to cut the flower on the dog’s head, cut out lots of tiny brown flowers and attach these (with fondant glue) all around the base of the cake as its border. In the center of each of these flowers, attach a smaller pink flower, also with fondant glue.
Making the brown fondant mat on the birthday cake
- Cut out a round piece in brown using the scalloped round cutter and attach it to the center of the cake. On it, add a smaller cut out in pink. And then place the dog on these cutouts and secured it to the cake with glue.
- Make another set of similar cutouts in brown and pink and place them on the front side of the cake.
Lettering on the cake
- Next, add wordings on the cake. Cut these with the TAPPIT letter cutters in Funky font in pink-tinted gum paste. The letters are best cut using gum paste as gum paste can be rolled paper thin (almost transparent) without tearing. For the Tappit letter cutters to work well, the gum paste must be rolled very thin. It also helps to let the rolled gum paste to dry slightly, for a minute or two before cutting.
- Once the letters are all cut, add the birthday child's name on the cake and the birthday wishes on the board. And add the age number on the round cutouts on the side of the cake. Attach all these with shortening.
Adding the polka dots
- The last step in making this dog cake design is to add the brown and pink dots on the cake. Cut the dots with the round plunger cutters in various sizes and place them randomly on the cake to complete the cake decoration.
Notes
- The fondant dog topper can be made in advance so that assembling the cake on the party day can be quick.
- If making the fondant dog topper is too advanced for you, replace it with a toy topper instead.
- You can use any other cake recipe you like provided the cake is sturdy enough to hold the weight of the fondant covering on it.
- The amount of buttercream provided in the recipe is only a guidance. You may need to add more depending on how much you use to sandwich your cake layers.
- If you are living in a humid country, working with fondant can be tricky especially if you are using store bought fondant. Fondant tends to become saggy and sticky with humidity, so it is best to work in an air conditioned room.
- When using letter cutters like the Tappit letter cutters, use gum paste instead of fondant as you need the paste to be rolled super thin for best results, and you can only do that with gum paste.
- When applying fondant glue, use a brush and use it lightly so that it dries quickly and holds your pieces in place.
Leave a Reply