

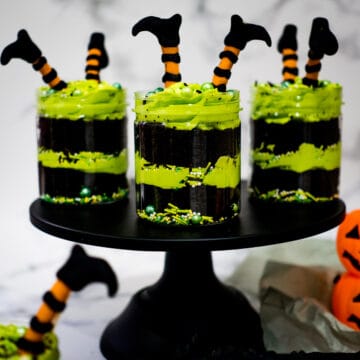
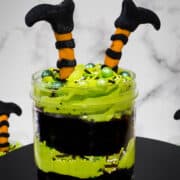
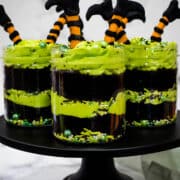
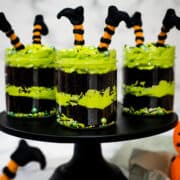
Get ready for some Halloween fun with these cute witches' brew Halloween cake jars! With delicious layers of rich chocolate cake sandwiched with vibrant green buttercream and topped with cute little witches' legs made in fondant, these cake jars will definitely amaze your guests!
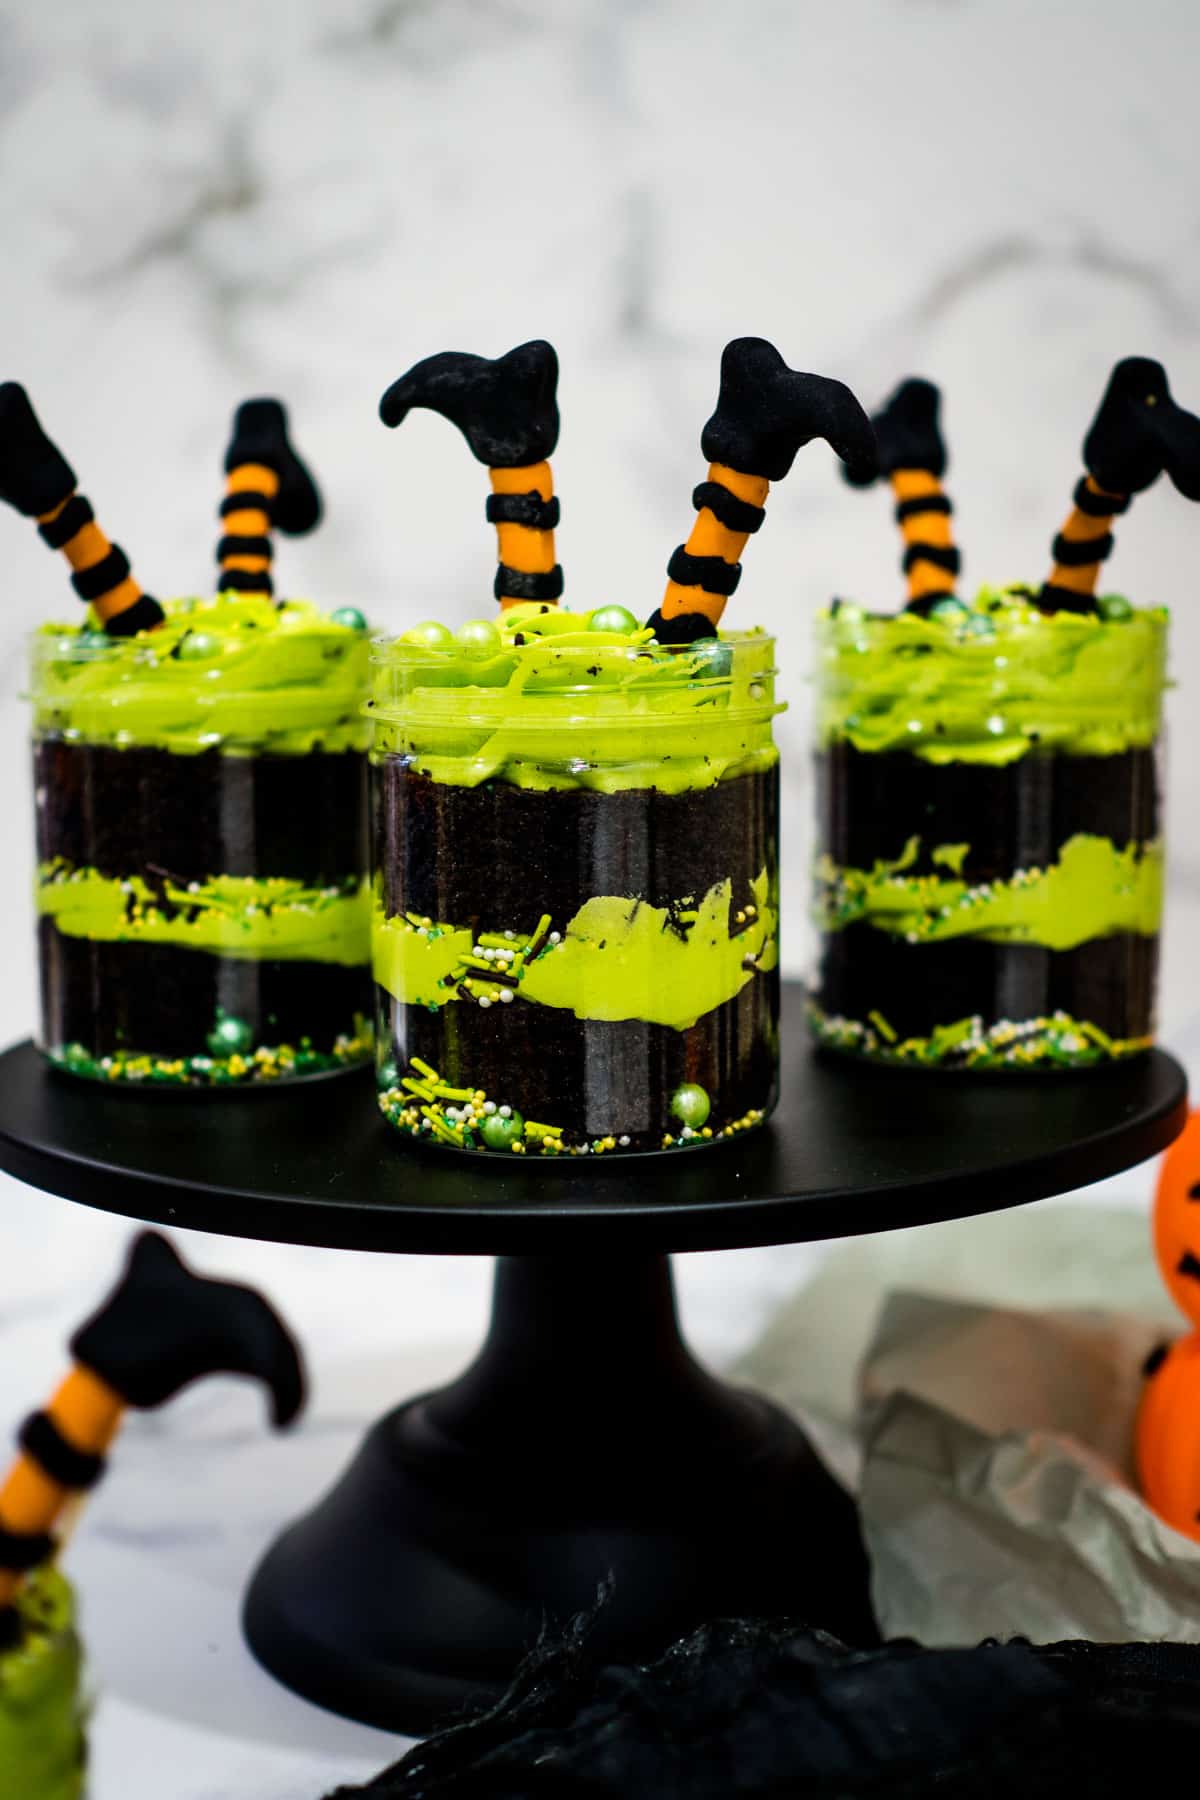
The recipe and tutorial below makes 9 cake jars. Each cake jar is three inches in diameter and three and half inches high.
The cake is baked in a 9 inch square tin using my chocolate pound cake recipe and is layered into half before being cut into small 3-inch circles to fit the 9 jars. Each jar consists of 2 layers of cake with a generous layer of buttercream in between and on top.
Note: These cake jars are fairly easy to assemble. Some basic fondant shaping skills is expected to make the fondant witch legs.
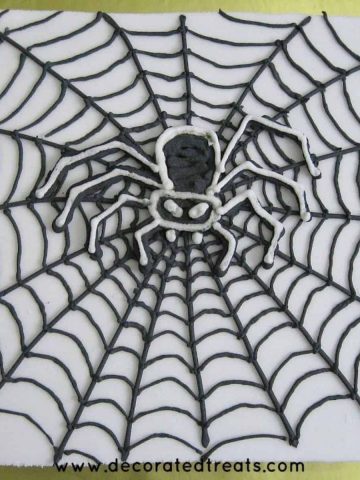
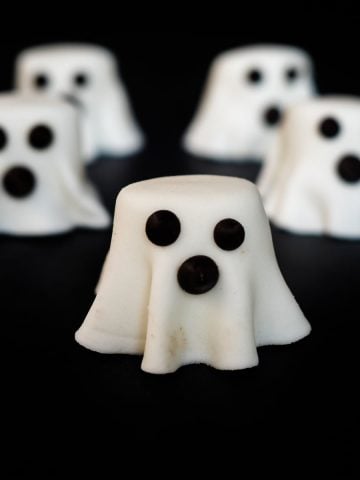
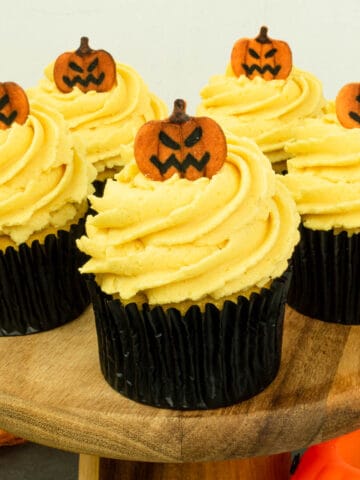
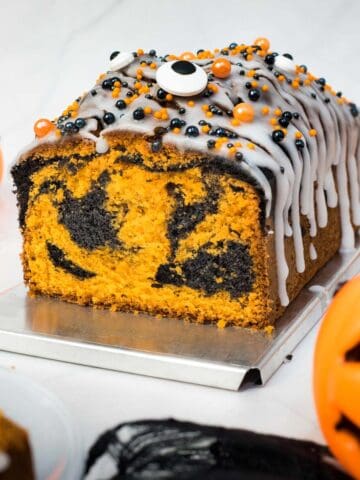
Like these tutorial? You should also check out my easy to make Halloween marble cake, creepy Halloween spider cupcakes, Jack O Lantern Halloween pumpkin cupcakes and no-bake Halloween marshmallow ghosts recipe and tutorial.
Jump to:
❤️Why You Will Love This Tutorial
- These cake jars are eye-catching, making them stand out on a dessert table. They can double as decorative elements for Halloween-themed parties or table settings.
- The green and black color scheme matches the Halloween theme perfectly.
- The combination of rich and moist chocolate cake, creamy buttercream and crunchy sprinkles offer a perfect blend of flavors and a pleasing contrast in textures.
- Cake jars are easy to transport, making them a convenient option for parties or gatherings.
- Each jar is an individual serving, making it easy for guests to enjoy without the need for cutting or serving.
📋Supplies Required
For the Cake:
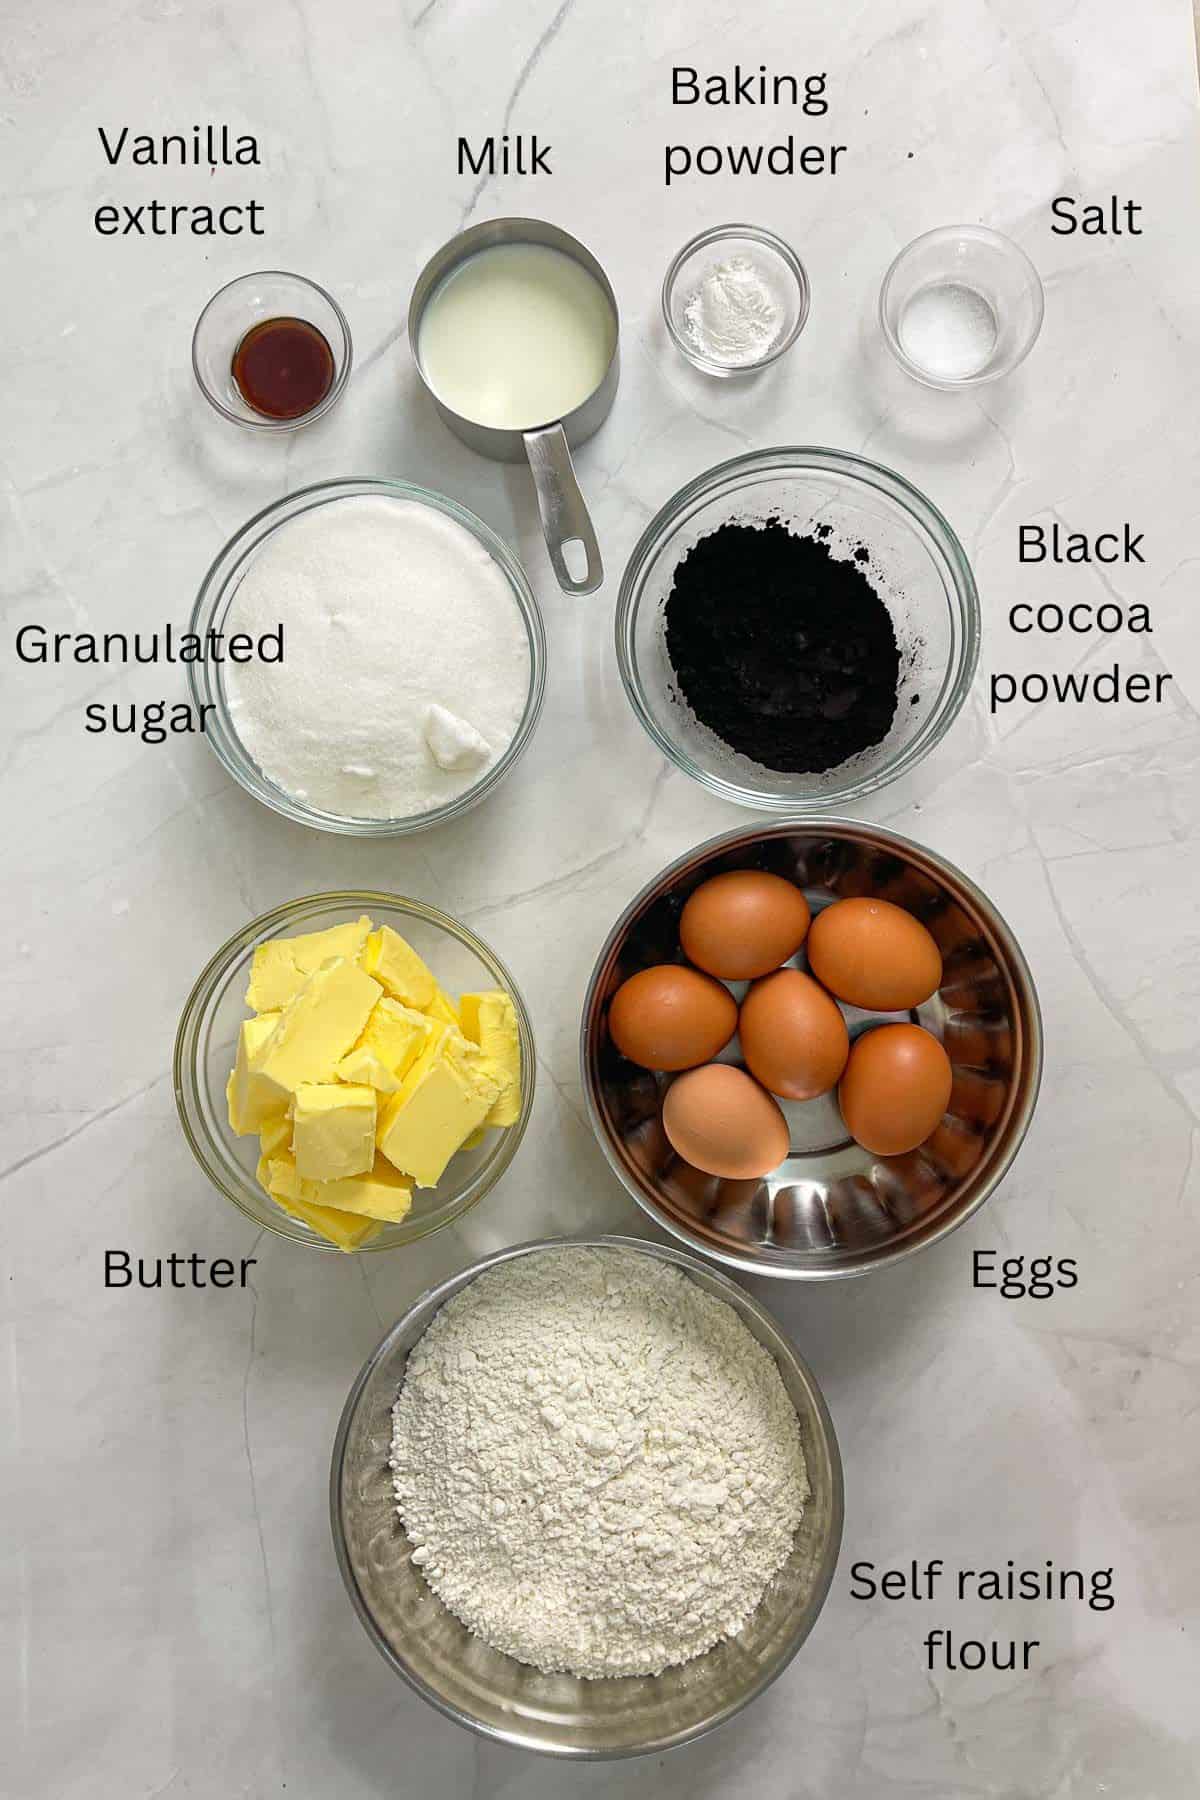
- Self raising flour + baking powder + salt - sift these together to mix them well and to break any lumps in the flour. Use fine salt.
- Unsweetened black cocoa powder - make sure to sift the cocoa powder before using as it tends to be lumpy and can remain lumpy in your cake batter.
- Granulated sugar (caster sugar) - fine sugar works best for this cake. Coarse white sugar will leave unsightly specks of sugar on the surface of the cake after baking.
- Butter - I use salted butter. If you are using unsalted butter, increase the amount of salt in the recipe by one eighth of a teaspoon.
- Eggs - use large eggs.
- Whole milk - Contributes to the moist texture of the cake. Use room temperature milk.
- Vanilla extract - adds a lovely aroma and flavor to the chocolate pound cake.
For the Buttercream & Decoration:
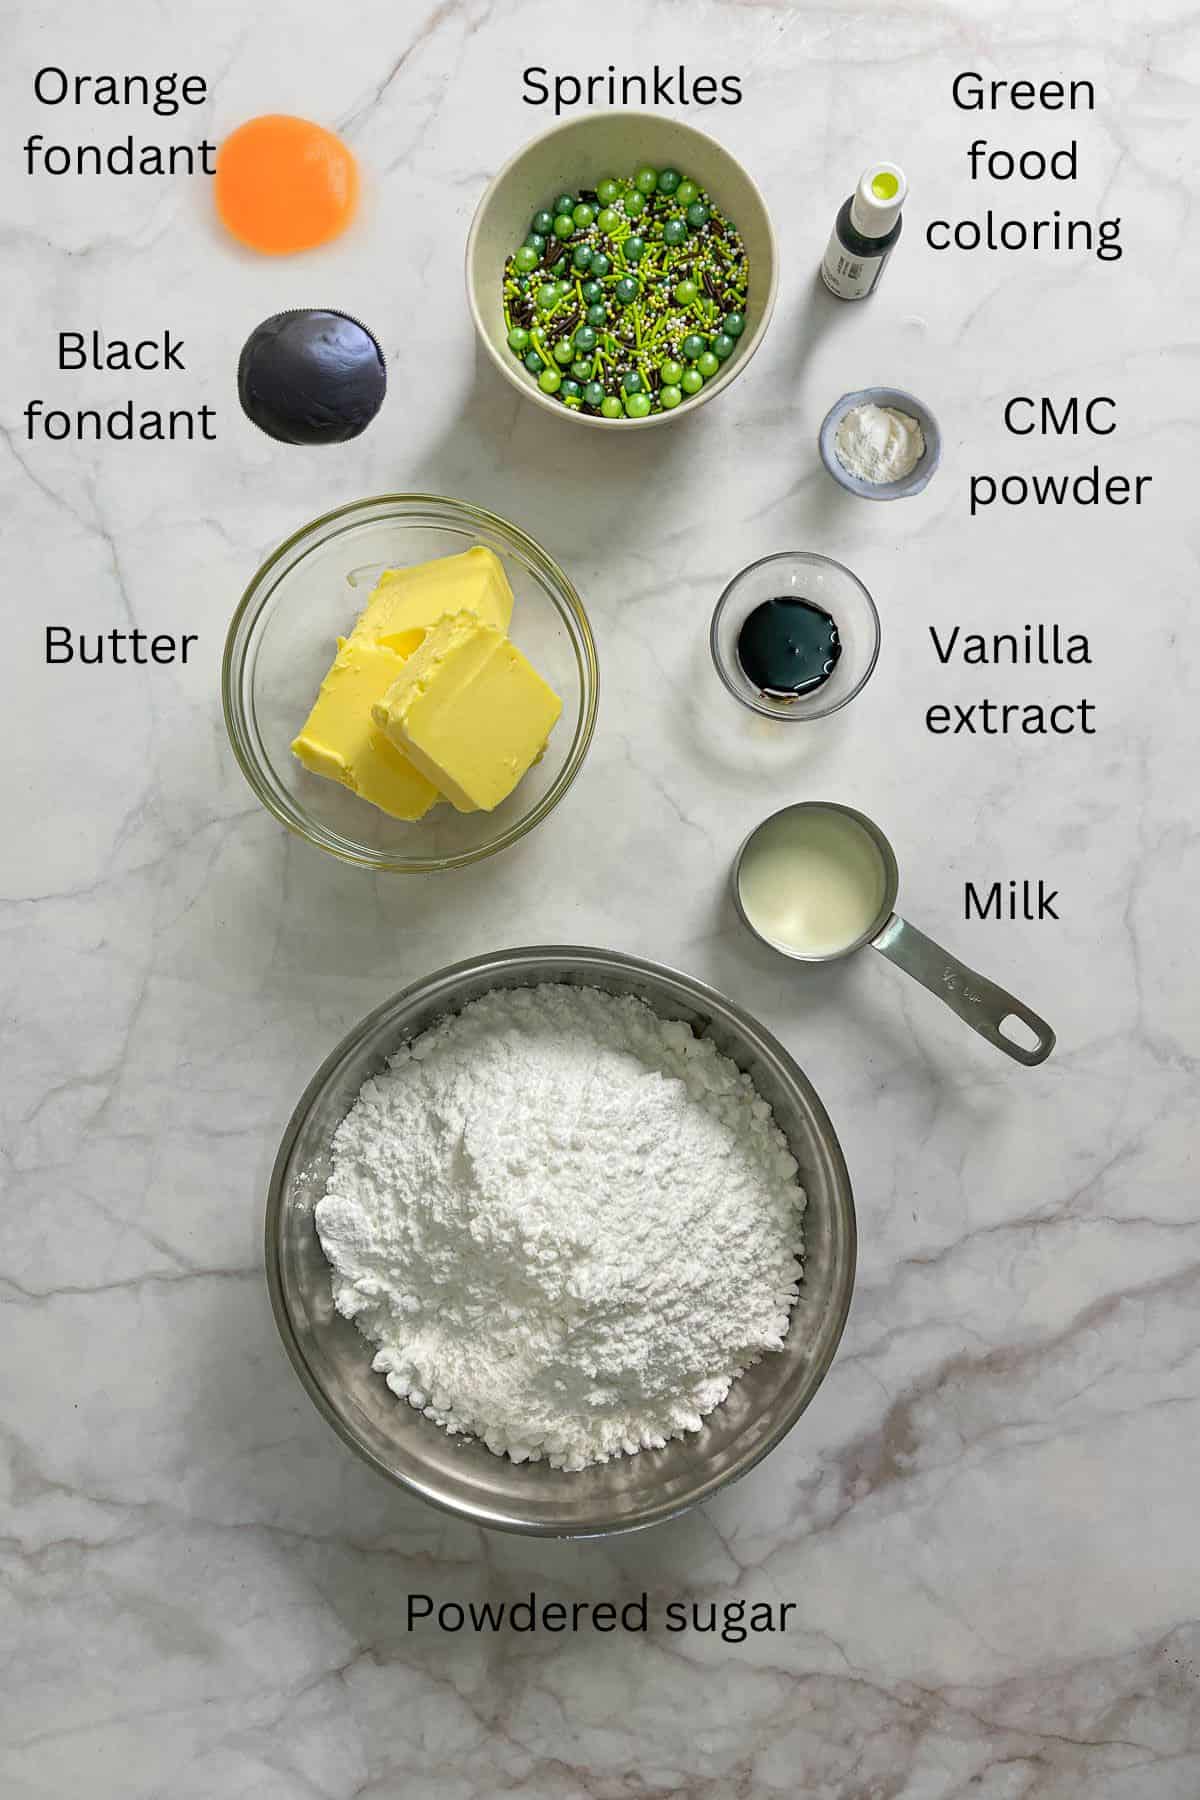
- Butter - I use salted butter. If you are using unsalted butter, add a pinch of salt to the butter when creaming.
- Powdered sugar (icing sugar) - this sugar tend to be lumpy and must be sifted before using.
- Vanilla extract - adds flavor to the buttercream
- Milk or cream (optional) - this is only required if your buttercream is too stiff.
- Food coloring – I used Americolor Electric green for the buttercream.
- Fondant – This is to make the witches' legs. I used Satin Ice in orange and black . You can make your own fondant if you wish and tint it with orange and black gel food coloring.
- CMC powder (or tylose powder) – to be kneaded into fondant when making the witches' legs. CMC helps fondant to dry firmer and is particularly helpful when making upright standing fondant pieces.
- Sprinkles - A mix of green, blue and chocolate to match the green buttercream and the witches' brew Halloween theme.
*Refer to the recipe card below for full list of ingredients and exact quantities. For best results, use a digital kitchen scale where applicable*
Tools and Other Supplies:
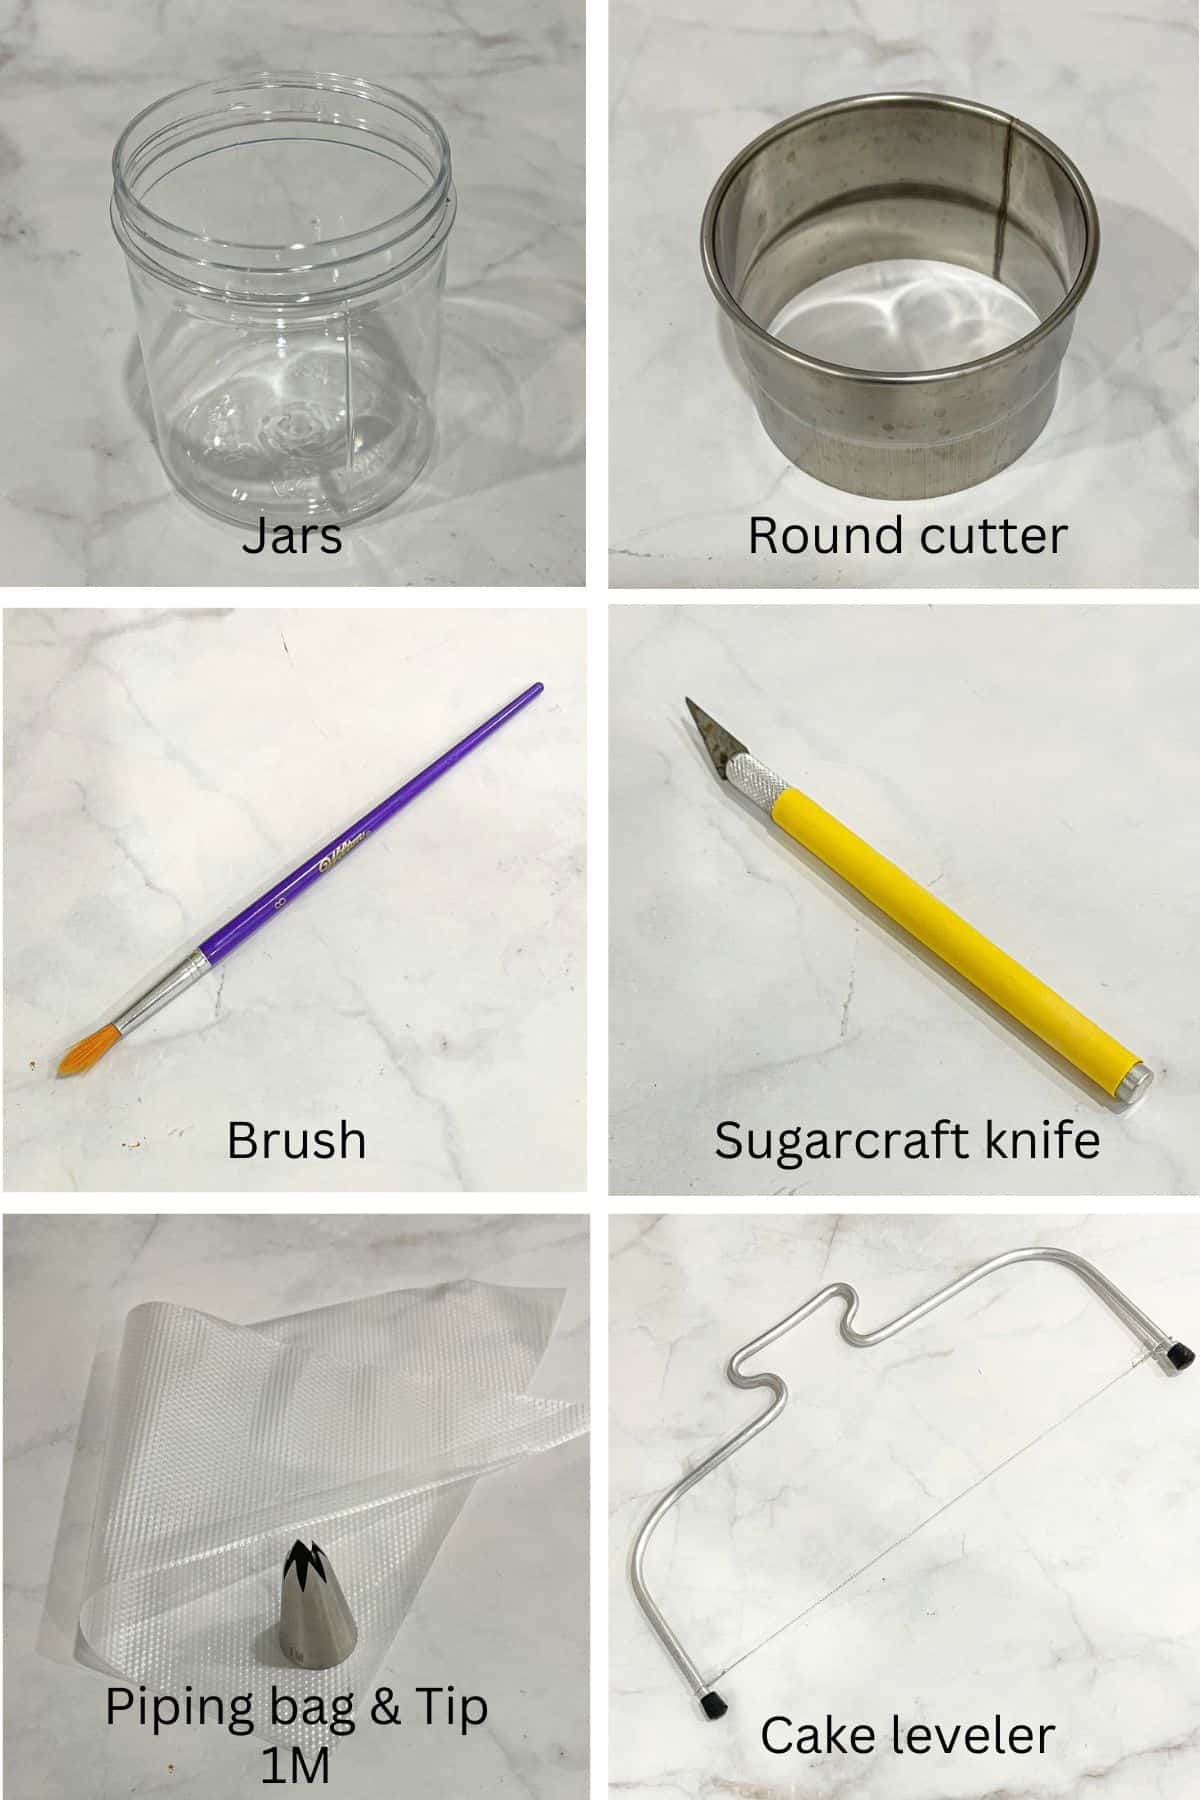
- Plastic or glass jars to assemble the cakes. Mine measured 3 inches in diameter and 3 ½ inches high.
- Round cutter (3 inches in diameter) - to cut the cake into circles. You can use a cookie cutter or any other tool, including the jars to cut the cakes. For easy handling, the cake circles should be 2mm or 3mm smaller than the diameter of the jar.
- Cake decorating brush – Use a food-grade, fine-tipped brush to dampen the witches boots in black fondant and to attach the black stripes to make the legs.
- Sugar craft knife and fondant modelling tools – To cut and shape the fondant.
- Disposable piping bags and star tip 1M - to pipe the buttercream.
- Cake leveler - to level and layer the cake before cutting into circles.
👩🍳How to Make
Step 1: Make the Witches' Black and Orange Fondant Legs
You will need a total of 18 legs (9 pairs for the 9 cake jars). These are best made at least one day ahead to give them sufficient time to set and harden, to avoid them from bending after attaching to the cakes in the jars.
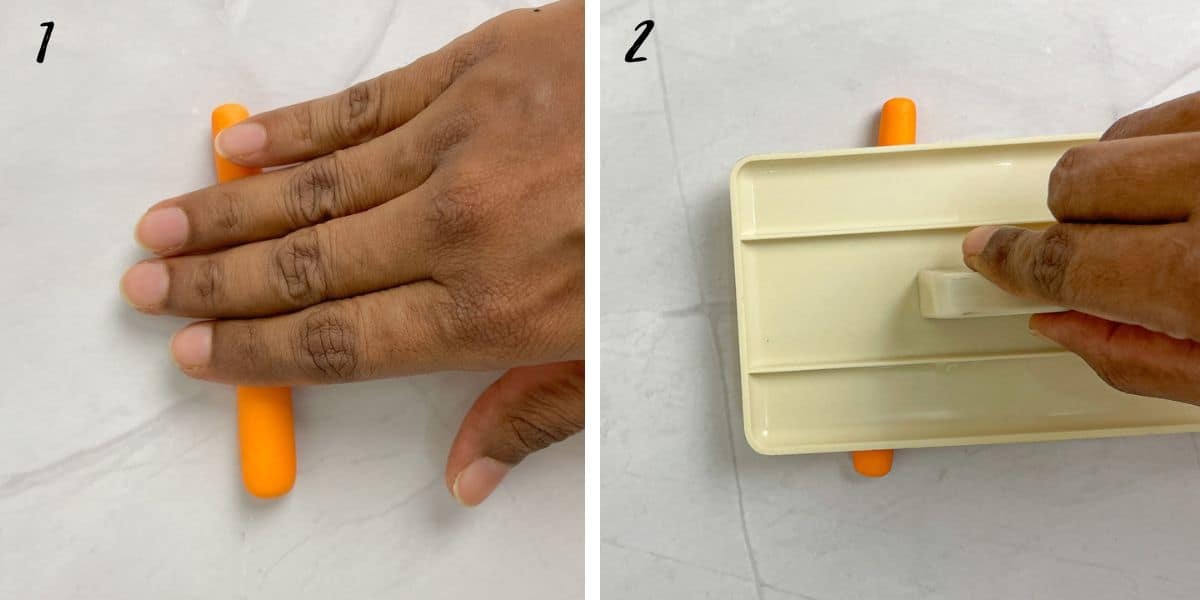
Knead some CMC into orange fondant. Knead until it becomes soft and pliable. Roll the fondant into a long strip (approximately 5mm in diameter) (image 1). This is to make the witches' long orange legs.
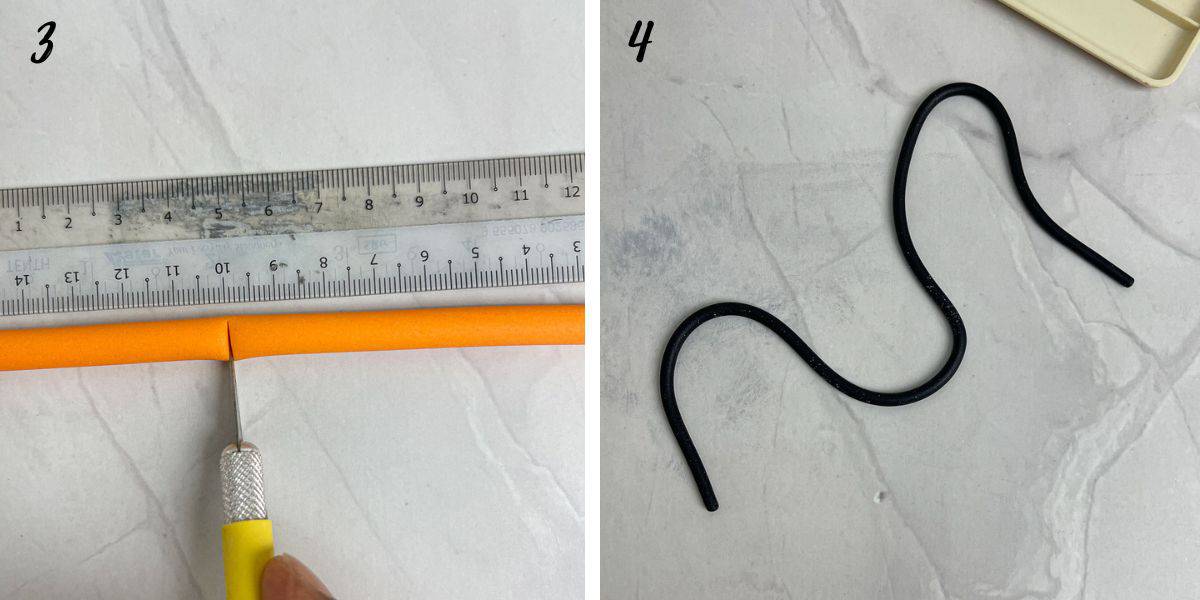
Note: Instead of rolling with your hands, you can use a fondant smoother. It helps create smooth strips without any finger marks or dents (image 2).
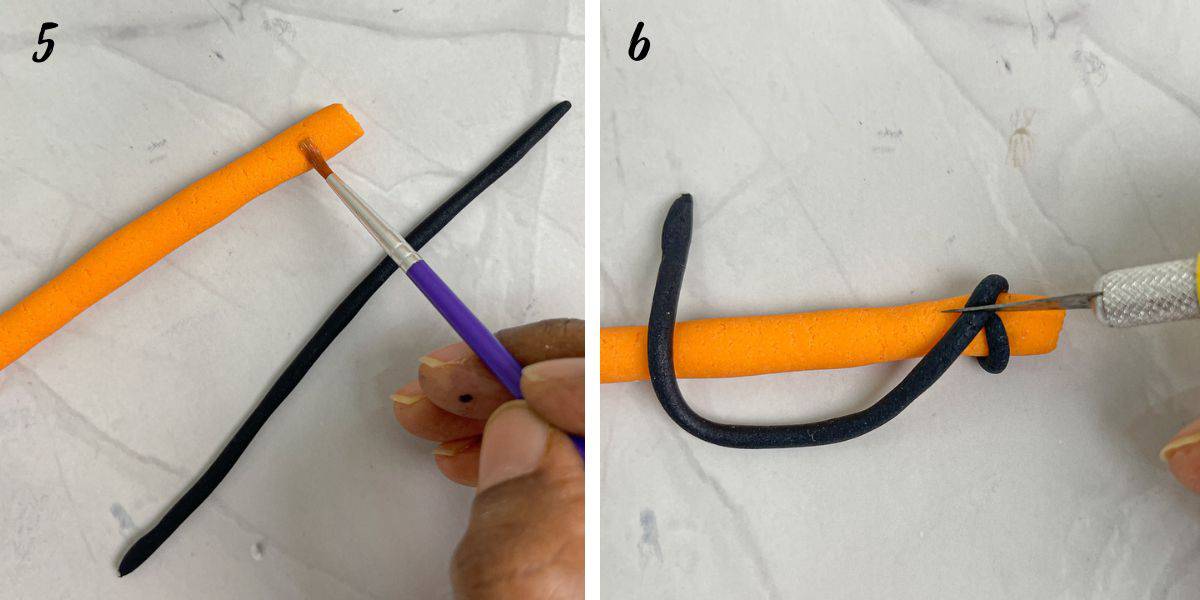
Cut the strip into 10 cm lengths (image 3). Repeat the process until you have 18 of these. Keep the strips covered in a container to prevent them from becoming dry as you work on them.
Note: When working with fondant in humid environment, it has a tendency to become sticky and saggy and will not firm up even after leaving it to set overnight. Adding CMC powder helps. Working in an airconditioned room also helps to set them firm.
Variation: Another option to deal with humidity is to insert lollipop sticks into the legs. To do this, roll the orange fondant into a long rope and then flatten it lightly (make sure the width is sufficient to wrap around a lollipop stick. Dampen the stick (with a damp brush) and wrap it with the flattened fondant. Roll lightly to smooth the joints.
Next step is to add the black fondant stripes to the orange legs. It is not necessary to add any CMC to the fondant. Roll it into a long thin strip (with an approximate diameter of 2mm to 3mm) (image 4).
Note: For easy handling, make the strips in lengths of 25cm to 30cm and repeat as you finish using them up.
Dampen the cake decorating brush and brush it on the orange fondant leg where you wish to place the stripes. Start from one end, leaving about 1 cm space (image 5).
Attach the black strip to the dampened area and carefully cut off the excess (image 6).
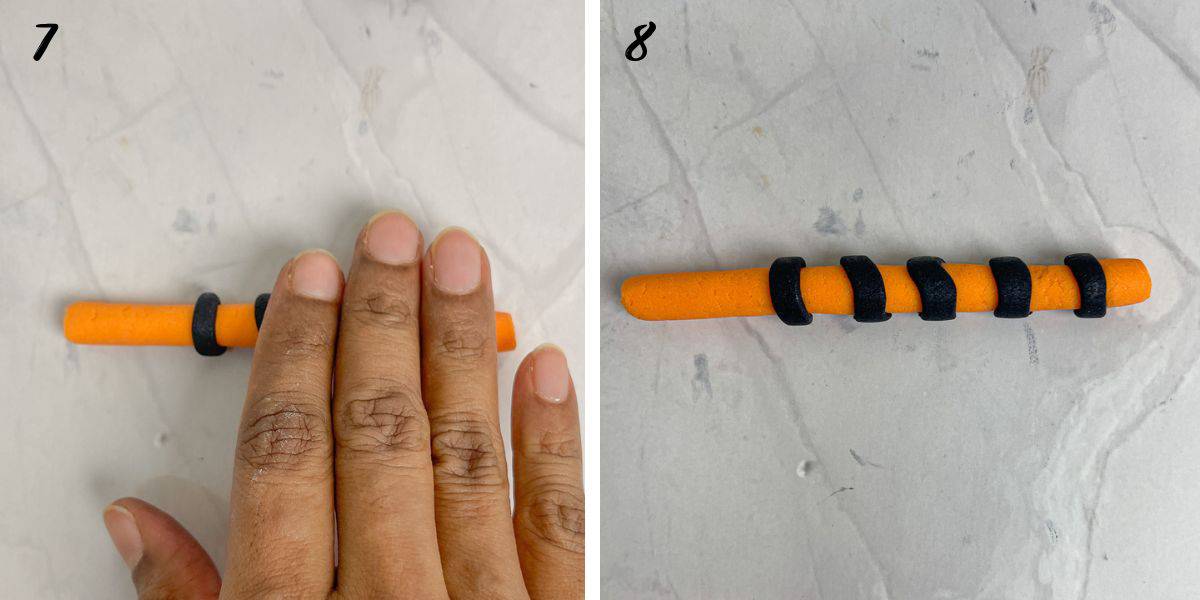
Use your fingers to smoothen and adjust as necessary. Repeat the process until you have 5 black stripes on each leg for all the 18 legs. Keep the legs covered while you are working on the others (images 7 & 8).
Note: The traces of water from the damp brush act as a glue for the fondant. However, applying too much water will cause your fondant to turn soggy and the color to bleed. When using the brush, dip it in water and then wipe it lightly in a kitchen towel before applying to fondant.
Variation: Instead of adding fondant stripes, you can also use a black food marker to draw the black lines on the legs. Let the orange fondant dry first before drawing the lines.
Step 2: Make the Black Fondant Shoes
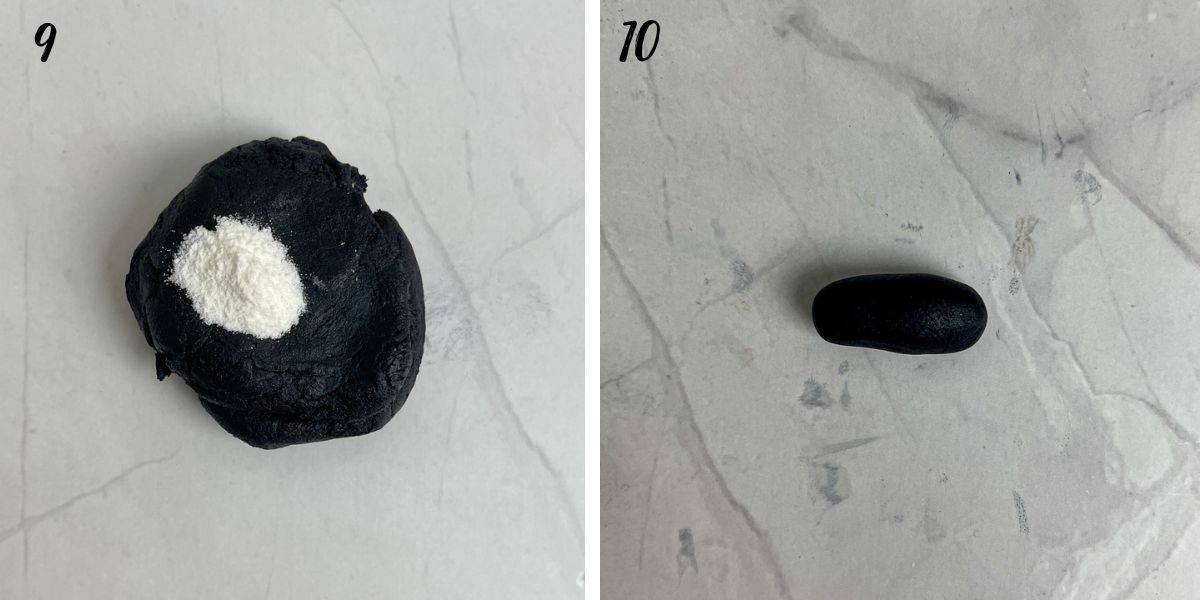
Knead some CMC into black fondant (image 9). Knead until soft and pliable and make 18 balls (approximately 2 cm in diameter).
Note: Keep the balls covered in a container as you work on them one by one. If you find them a little dry, knead again until they become smooth.
Roll the fondant ball into a short sausage (image 10).
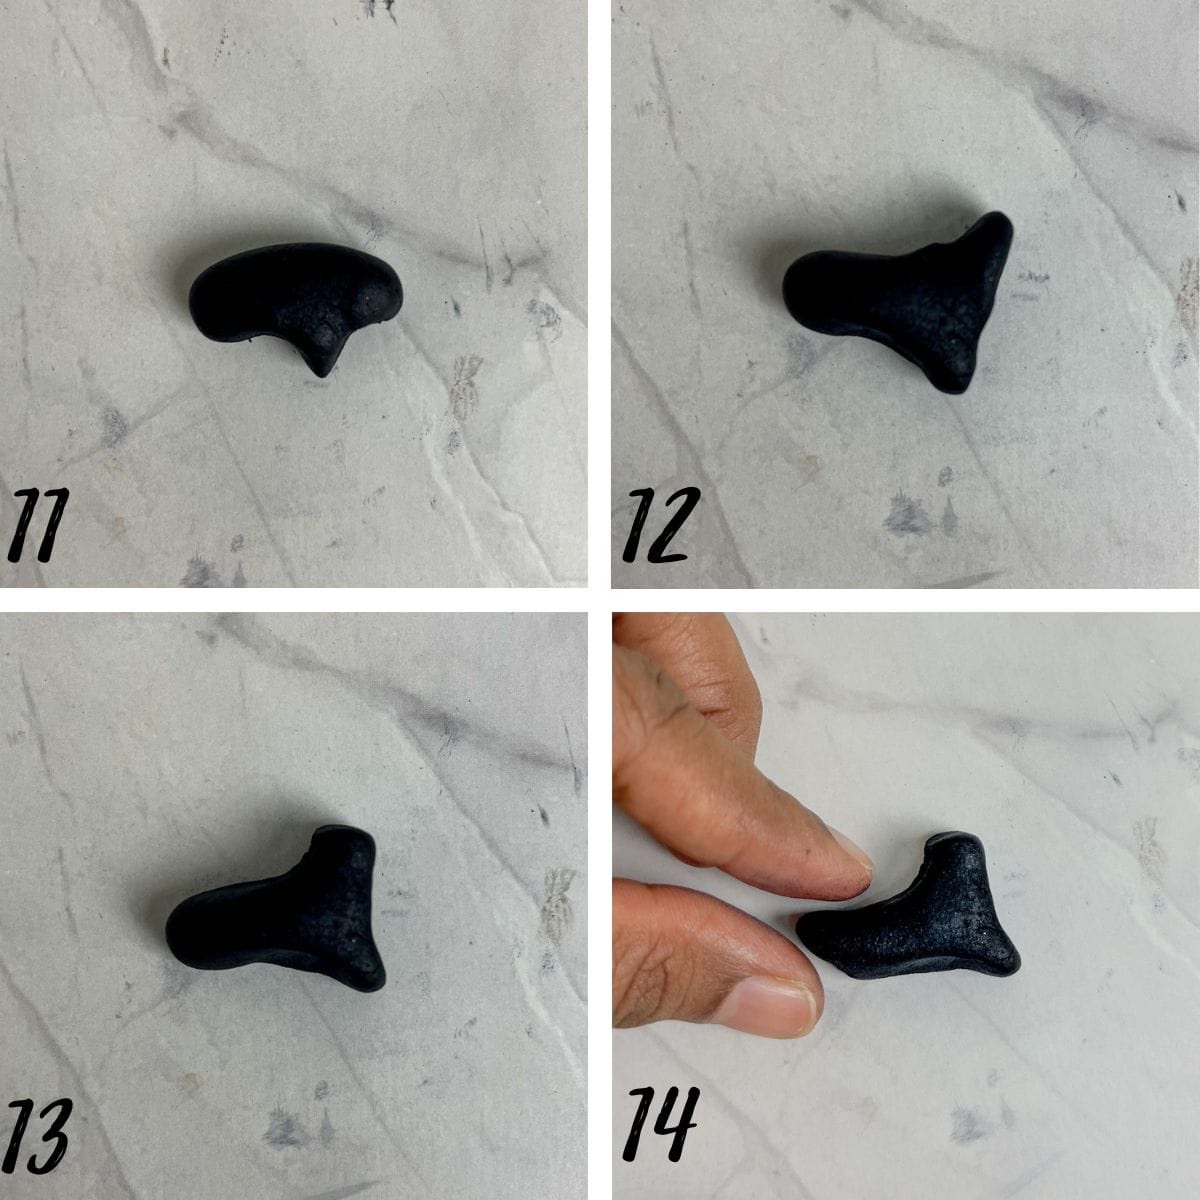
Pinch the bottom of the sausage to make it pointy (image 11). This will form the heel of the shoe.
Next, push the right-end of the sausage upwards (image 12).
Press it down slightly to make it thicker and fatter (image 13). This will be the top part the shoes.
Next, pinch the left-end of the sausage flat and curl it up slightly (image 14). This will make the pointy end of the witch shoes. If the shoe appears to thick, press it down lightly.
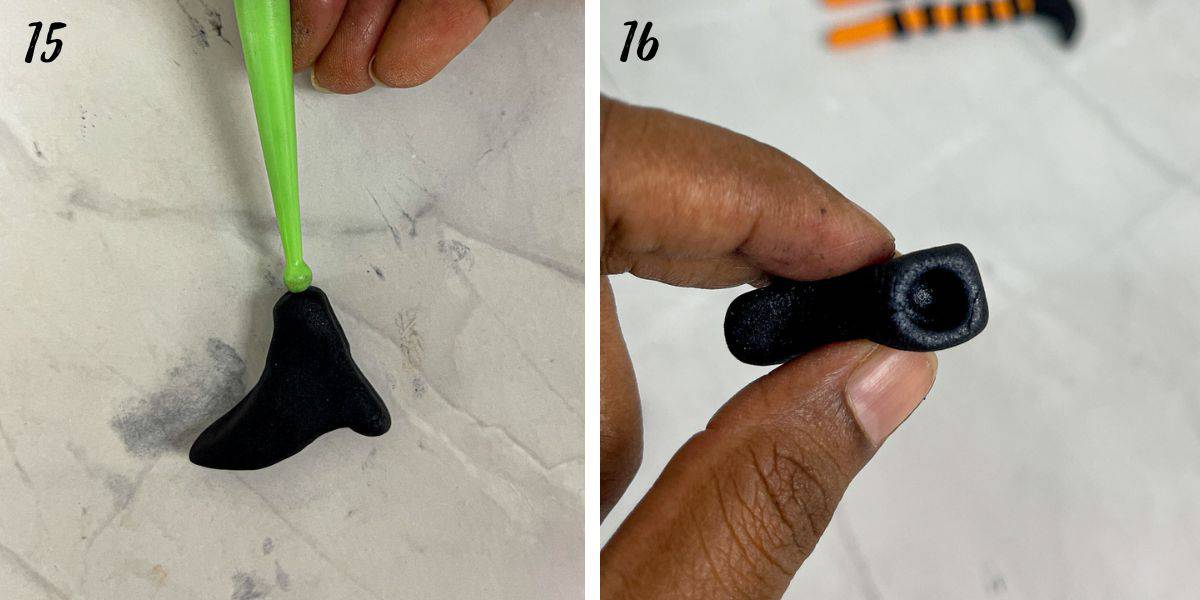
To make the opening for the shoe, use a small ball tool or any rounded object to make a round dent as shown in images 15 and 16.
(Note: the first shoe will take a slightly longer time to make, but once you get used to the steps, you will be able to make them at a much quicker rate.)
Step 3: Attach the Shoes to the Legs
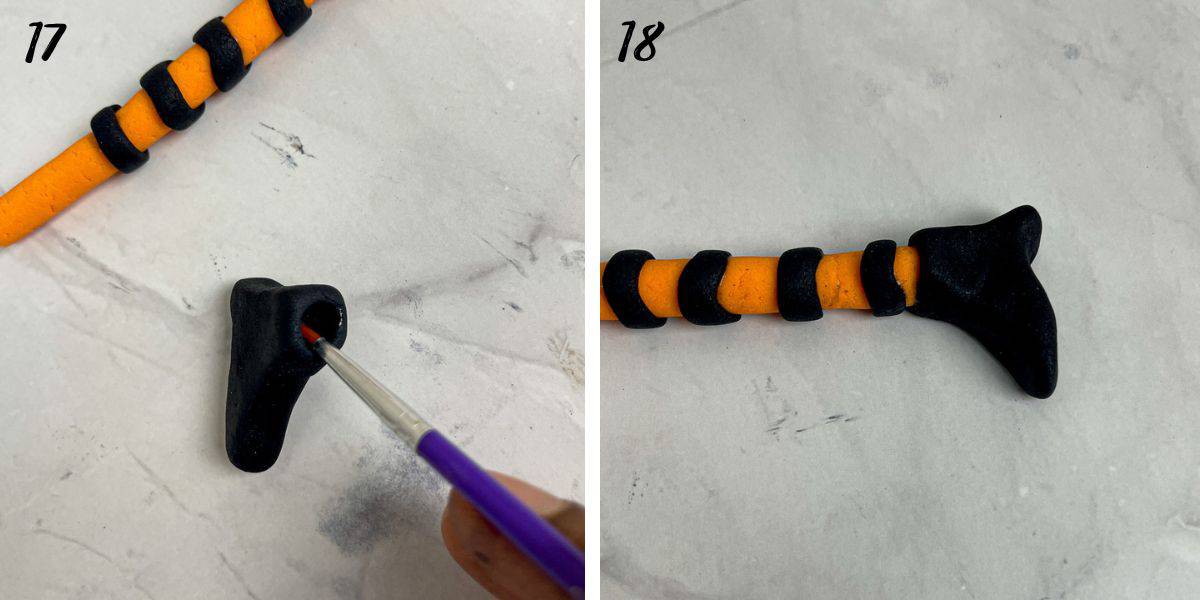
To attach the shoes to the legs, use a damp brush to lightly moisten the insides of the rounded hole in the shoes (image 17).
Gently attach it to the leg and press it lightly with your fingers to secure it well (image 18).
Set the leg (with the shoe attached) on a flat surface to allow the shoe to set in position securely. Repeat the above steps until all the shoes are completed and attached to the legs. Let the legs rest overnight until they are dry and firm.
Step 4: Bake the Cake
Preheat oven to 170 degrees Celsius. Grease and flour one 9-inch square cake tin. Set aside.
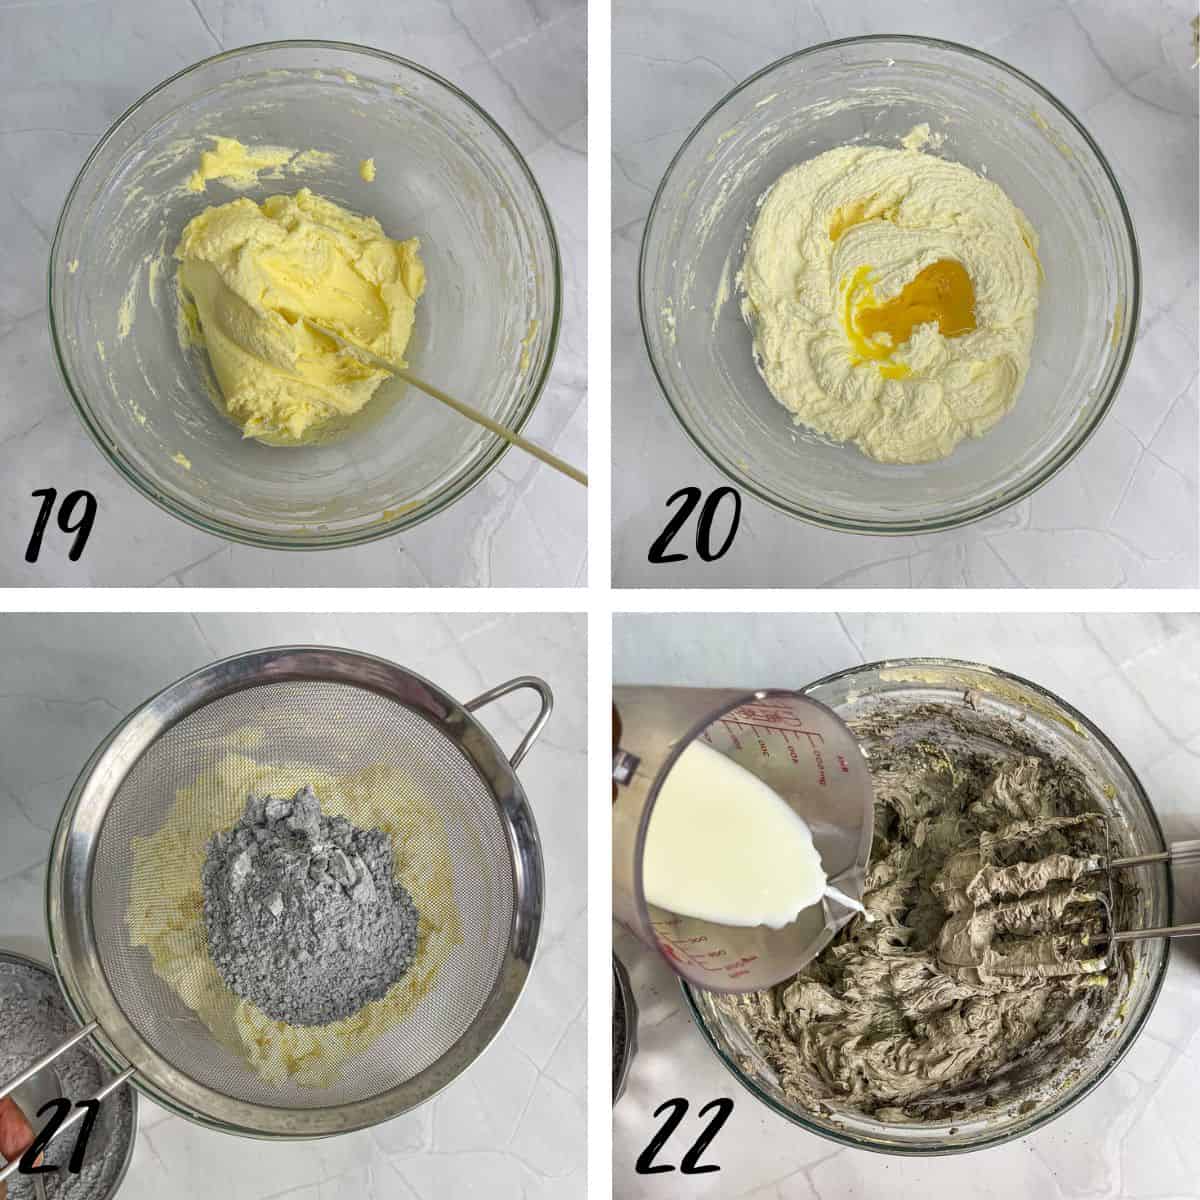
Cream butter and sugar until light and fluffy (on medium speed) for approximately 2 minutes. Scrape the sides and bottom of the bowl half way through. (image 19).
Add the eggs, two at a time, beating well after each addition (image 20).
In a separate bowl, measure the flour, baking powder, cocoa powder and salt. Mix with a hand whisk until well combined. Sift the flour mixture into the creamed ingredients (image 21) in 3 batches. Alternate each batch with milk (image 22). and fold well. Finally, fold in the vanilla extract.
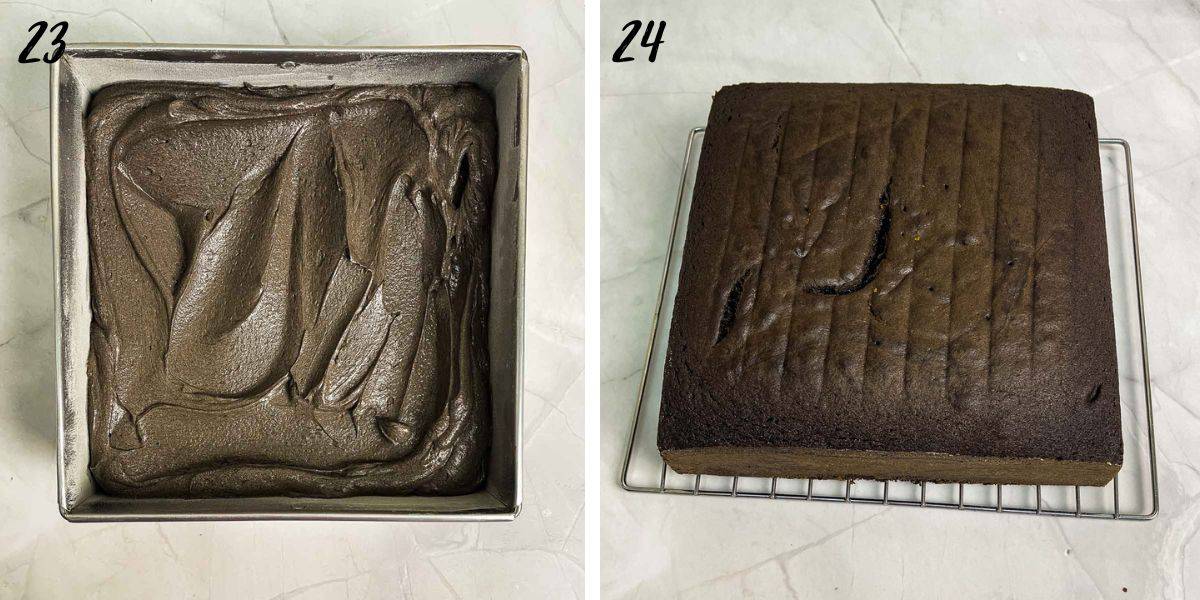
Transfer the cake batter into the prepared cake tin (image 23) and bake for 45 to 50 minutes. Test the cake at least 5 to 10 minutes before the baking time is up by inserting a skewer or cake tester in the center of the cake. The cake is baked if the skewer comes out without any wet batter and the top of the cake springs back when pressed lightly.
Remove the cake from oven and let it rest in the tin for 2 to 3 minutes. Loosen the sides with a butter knife and turn it onto a wire rack. Use another wire rack to turn it again to face upwards (image 24). Let the cake cool completely before frosting.
Step 5: Make the Buttercream
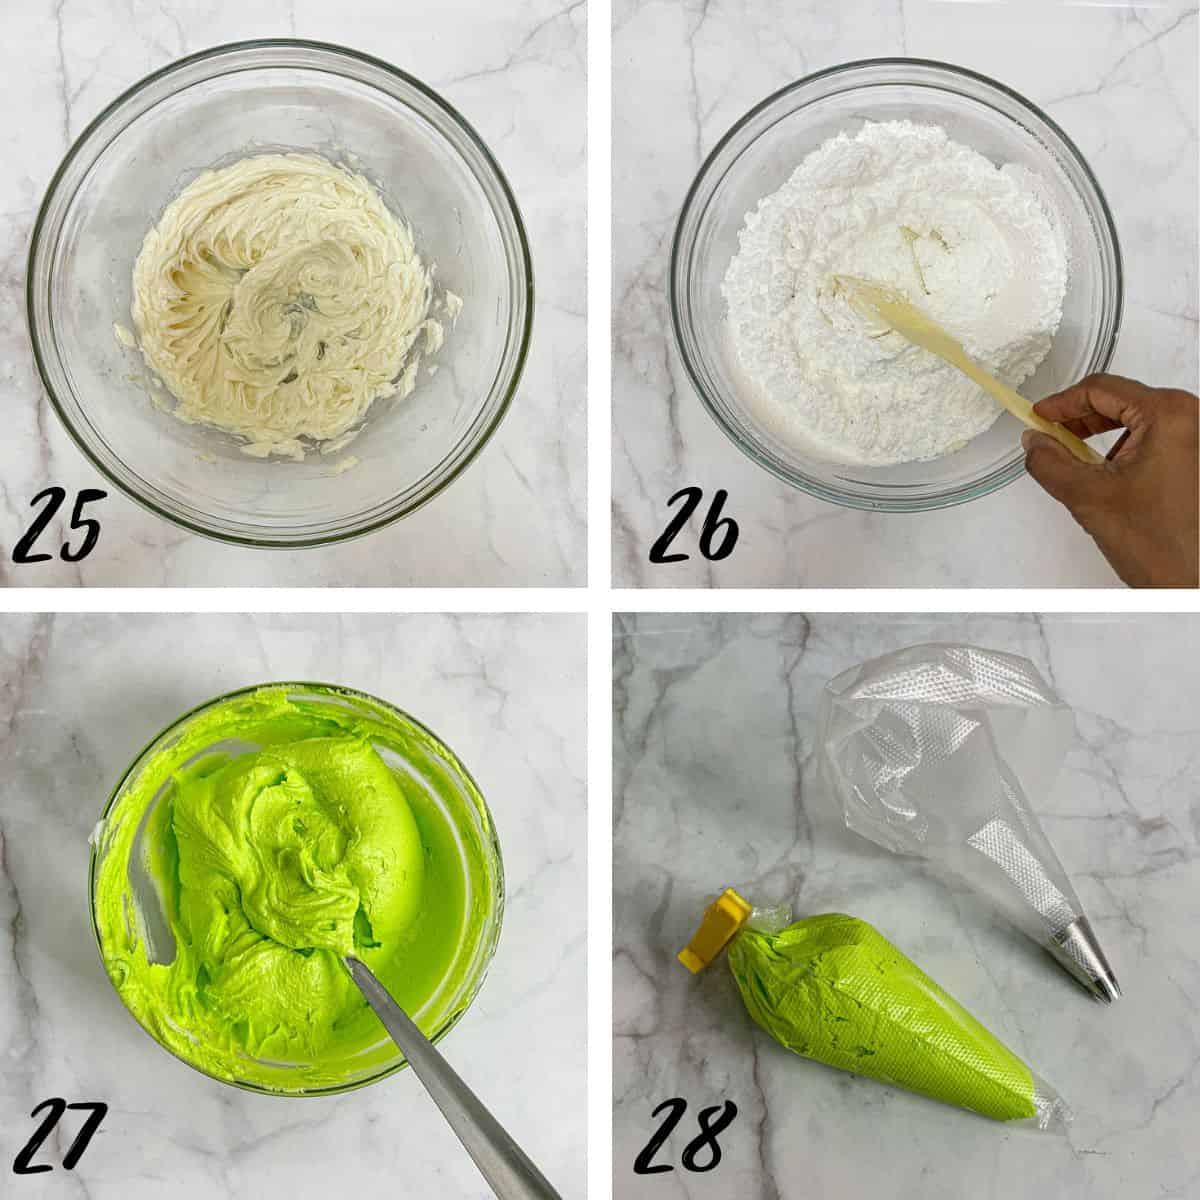
To make the buttercream, place the butter into a large bowl. Cream it until it is soft, smooth and creamy (image 25).
Add in the sifted powdered sugar. Mix with a spatula to moisten it (image 26) before using the electric mixer to whip the buttercream. This will help prevent the sugar from flying all over when you turn on the mixer.
Add vanilla extract and beat again until it is well combined and the buttercream is all smooth.
Add a few drops of food coloring and mix thoroughly (image 27). Transfer the buttercream into a piping bag fitted with large star tip (tip 1M) (image 28).
Note: Start with a little food coloring and mix well before adding more until you reach the desired color for the buttercream. Gel food colors are very concentrated and only require a small amount of to be used.
Step 6: Assemble the Cake Jars
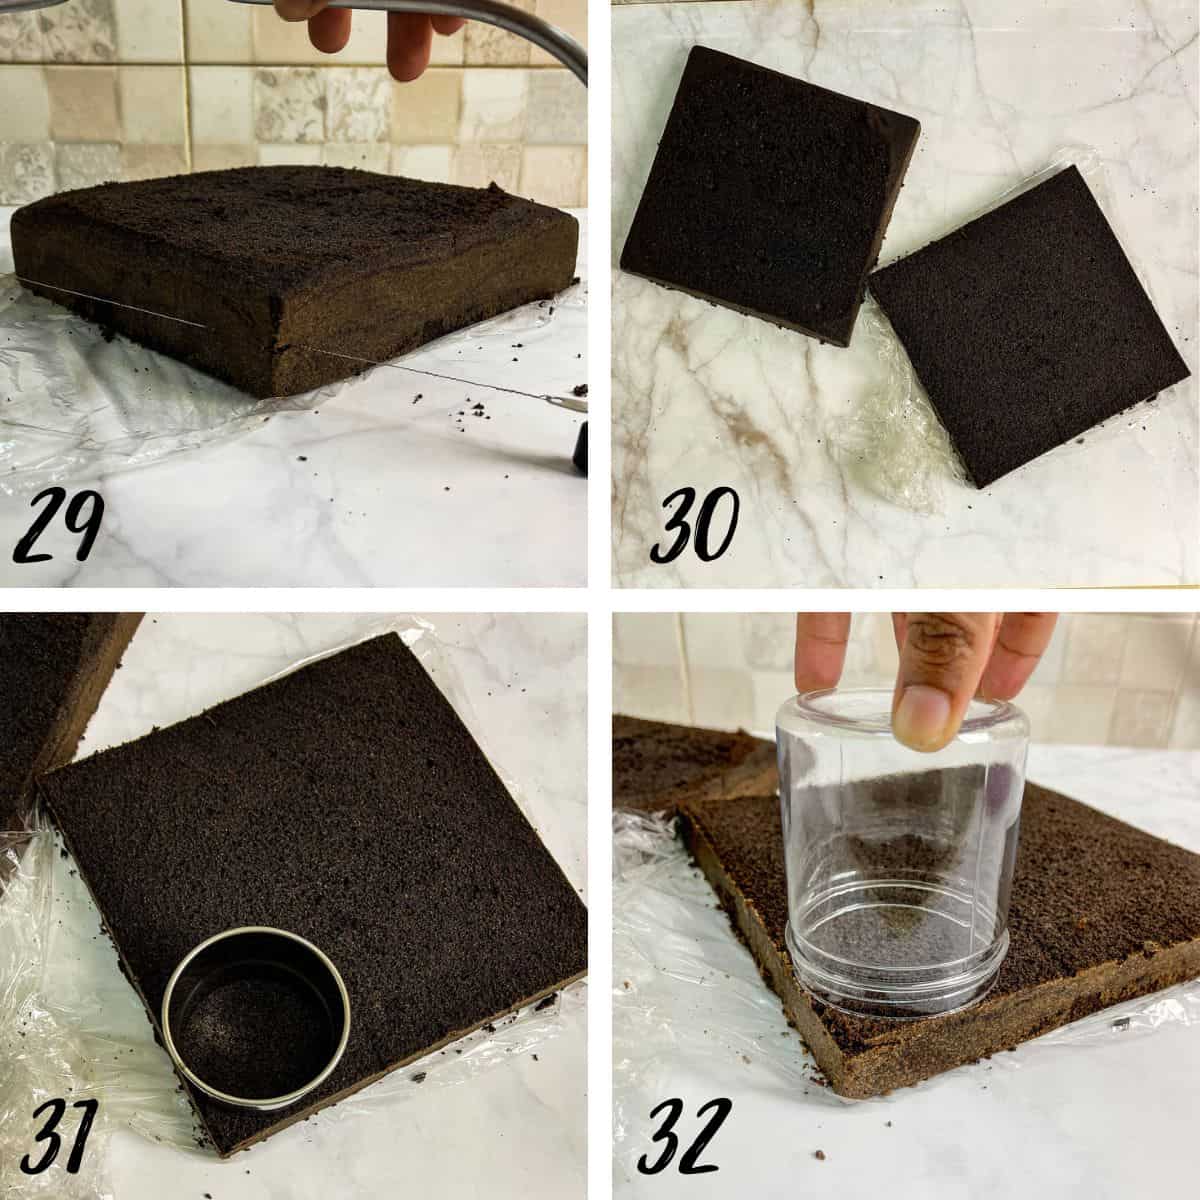
Level the top of the cake (if not level) and then slice it into half horizontally (images 29 & 30). You can do this with a cake leveler or serrated knife. For other methods, check out my post on how to level and layer cakes.
Use the round cutter (image 31) (or one of the cake jars (image 32)) to cut out 9 circles from each cake layer.
Note: Plan how you will cut the circles before cutting them to ensure you have enough space for 9 on each cake layer.
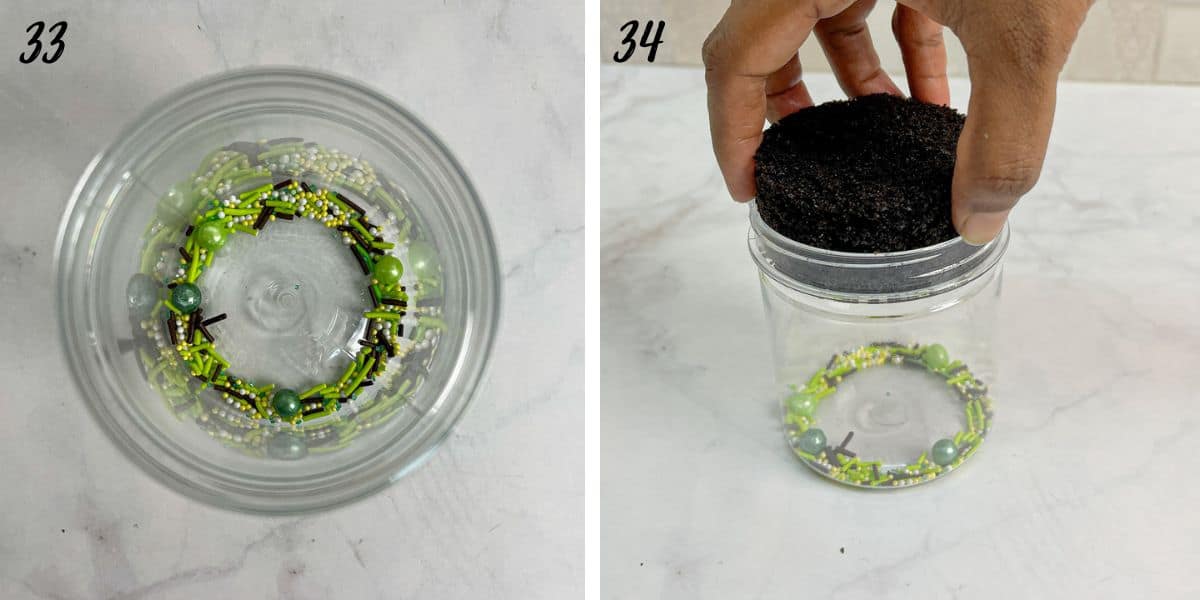
To assemble the Halloween cake jars, drop a spoonful of sprinkles to the bottom of the jar. Push them to the sides so that they are visible from the outside (image 33).
Note: Adding the sprinkles to the bottom of the jar is optional. I did it because my jars were not flat at the bottom (they were slightly higher in the center) and the sprinkles were a nice way to fill the gap on the sides.
Next, gently push in the first cake layer into each jar (image 34).
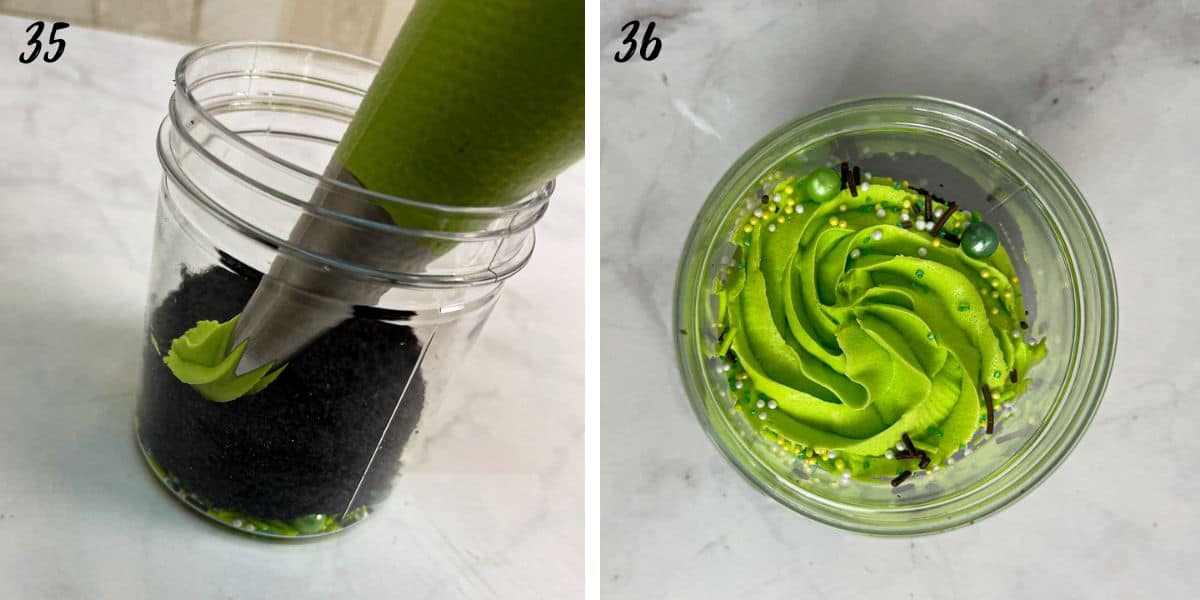
And then pipe the first layer of buttercream into each jar, starting from the sides towards the center. Add more sprinkles, but only on the sides such that they are visible from the outside (images 35 & 36).
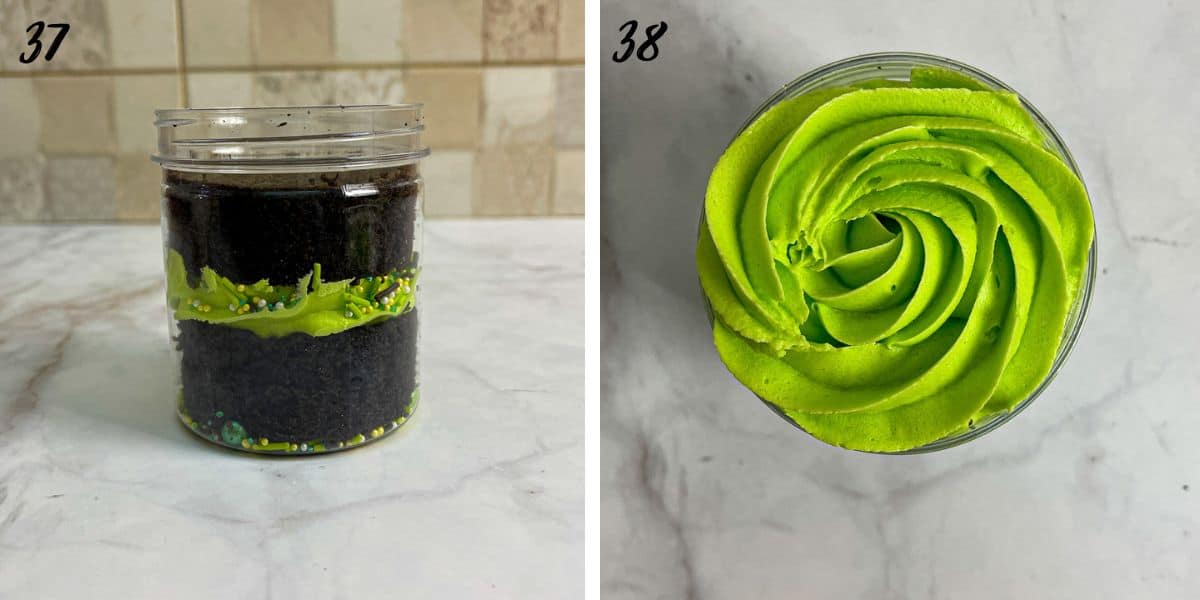
Top these with another layer of the chocolate cake, followed by a final layer of buttercream. Pipe the buttercream into a large swirl (images 37 & 38).
Top the cake jars with sprinkles, this time all over the top instead of just the sides.
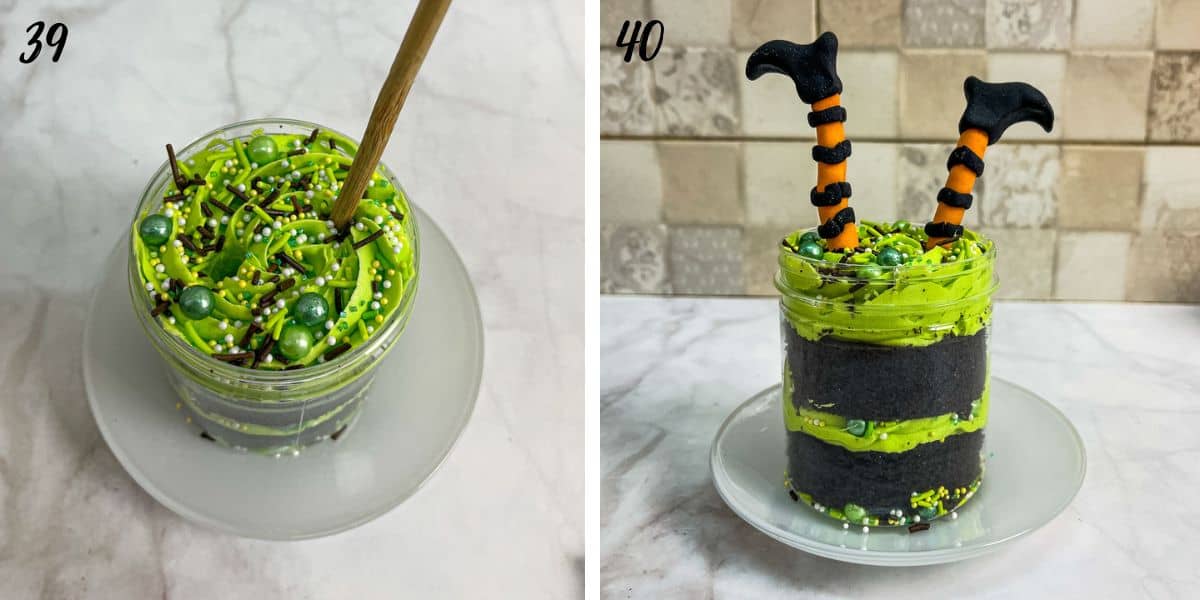
Finally, use a long wooden skewer to make 2 holes in the cake jar (image 39). Poke the witch legs into the holes to complete the witches' brew Halloween cake jars (image 40).
Note: If you find the fondant not set properly, you can try to poke uncooked spaghetti into each leg. It is not advisable to use thin wooden skewers, wires or toothpicks as they can cause poking hazard if accidentally bitten into.

💭FAQs
These Halloween cake jars can last at room temperature for a good 2 to 3 days after assembling. Do note however, that the sprinkles might start to bleed depending on the type of sprinkles you use.
For best results, they are best assembled on the day they are intended to be served. Left overs can be kept at room temperature for 2 to 3 days and refrigerated for up to one week.
Yes you can. So long as the jars are of the same diameter (width) from top to bottom, you can use any type of jars, including mason jars.
To be able to do this, you will have to make sure the jars you use are oven safe and meant to withstand high temperatures.
❤️More Tutorials You Will Love
Do you like this recipe? Please leave a 5-star ⭐⭐⭐⭐⭐rating in the recipe card below and consider a review further down this page. I would love to hear from you. Thank you!
📖Recipe
Witches Brew Halloween Cake Jars
Equipment
- Plastic or glass jars ( 3 inches in diameter and 3½ inches high)
- Round cutter (3 inches in diameter)
- Cake decorating brush
- Sugar craft knife
- Fondant modelling tools (ball tool)
- Disposable piping bags
- Piping star tip 1M
- Cake leveler
For best results, use the metrics measurements. US customary measurements have not been tested and are only meant for guide.
Ingredients
Cake
- 330 g self raising flour
- 360 g granulated sugar
- 360 g butter
- 6 eggs
- 30 g unsweetened black cocoa powder
- 1½ teaspoon baking powder
- ½ teaspoon salt
- 90 ml milk
- 2 teaspoon vanilla extract
Buttercream frosting and Decoration
- 400 g butter (salted)
- 800 g powdered sugar (icing sugar)
- 1¼ teaspoon vanilla extract
- 2 tablespoon milk or cream (optional- if the buttercream is too stiff)
- Electric green food coloring ( a few drops)
- 250 g Orange fondant
- 200 g Black fondant
- 1 tablespoon CMC powder
- Sprinkles
Instructions
The Witches' Black and Orange Fondant Legs
- Knead half a tablespoon of CMC into orange fondant. Knead until it becomes soft and pliable. Roll the fondant into a long strip (approximately 5mm in diameter) to make the witches' long orange legs. (See note 2)
- Cut the strip into 10 cm lengths. Repeat the process until you have 18 of these. Keep the strips covered in a container to prevent them from becoming dry as you work on them. (See note 3)
- Next, roll the black fondant into a long thin strip (with an approximate diameter of 2mm to 3mm). This will form the black stripes on the orange legs. It is not necessary to add any CMC to the fondant. For easy handling, make the strips in lengths of 25cm to 30cm and roll more as you finish using them up.
- Dampen the cake decorating brush (see Note 4) and brush it on the orange fondant legs where you wish to place the stripes. Start from one end, leaving about 1 cm space.
- Attach the black strip to the dampened area and carefully cut off the excess.
- Use your fingers to smoothen and adjust as necessary. Repeat the process until you have 5 black stripes on each leg for all the 18 legs. Keep the legs covered while you are working on the others.
The Black Fondant Shoes
- Knead the remaining half tablespoon of CMC into the remaining black fondant. Knead until soft and pliable and make 18 balls (approximately 2 cm in diameter) (See note 5).
- Roll each fondant ball into a short sausage. Do this one at a time, keeping the rest covered in a container.
- Pinch the bottom of the sausage to make it pointy. This will form the heel of the shoe.
- Next, push the right-end of the sausage upwards. Press it down slightly to make it thicker and fatter. This will be the top part the shoe.
- Next, pinch the left-end of the sausage flat and curl it up slightly. This will make the pointy end of the witch shoes. If the shoe appears to fat, press it down lightly.
- To make the opening for the shoe, use a small ball tool or any rounded object to make a round dent large enough to insert orange fondant leg. (See note 6).
Attaching the Shoes to the Legs
- To attach the shoes to the legs, use a damp brush to lightly moisten the insides of the rounded hole in the shoes. Gently attach it to the leg and press it lightly with your fingers to secure it well.
- Set the leg (with the shoe attached) on a flat surface to allow the shoe to secure firmly. Repeat the above steps until all the shoes are completed and attached to the legs. Let the legs rest overnight until they are dry and firm.
The Cake
- Preheat oven to 170℃. Grease and flour one 9-inch square cake tin. Set aside.
- Cream butter and sugar until light and fluffy (on medium speed) for approximately 2 minutes. Scrape the sides and bottom of the bowl half way through.
- Add the eggs, two at a time, beating well after each addition.
- In a separate bowl, measure the flour, baking powder, cocoa powder and salt. Mix with a hand whisk until well combined. Sift the flour mixture into the creamed ingredients in 3 batches. Alternate each batch with milk and fold well. Finally, fold in the vanilla extract.
- Transfer the cake batter into the prepared cake tin and bake for 45 to 50 minutes. Test the cake at least 5 to 10 minutes before the baking time is up by inserting a skewer or cake tester in the center of the cake. The cake is baked if the skewer comes out without any wet batter and the top of the cake springs back when pressed lightly.
- Remove the cake from oven and let it rest in the tin for 2 to 3 minutes. Loosen the sides with a butter knife and turn it onto a wire rack. Use another wire rack to turn it again to face upwards. Let the cake cool completely before frosting.
Buttercream Frosting
- Place the butter into a large bowl. Cream until it is soft, smooth and creamy.
- Add in the sifted powdered sugar. Mix with a spatula to moisten it before using the electric mixer to whip the buttercream. This will help prevent the sugar from flying all over when you turn on the mixer.
- Add vanilla extract and beat again until it is well combined and the buttercream is all smooth. Add the milk if the buttercream is too stiff at this stage.
- Add a few drops of green food coloring and mix thoroughly (see Note 7). Transfer the buttercream into a piping bag fitted with large star tip (tip 1M).
Assembling the Halloween Cake Jars
- Level the top of the cake (if not level) and then slice it into half horizontally.
- Use the round cutter (or one of the cake jars) to cut out 9 circles from each cake layer (see Note 8).
- To assemble the Halloween cake jars, drop a spoonful of sprinkles to the bottom of the jar (see Note 9). Push them to the sides so that they are visible from the outside.
- Next, gently push in the first cake layer into each jar.
- And then pipe the first layer of buttercream into each jar, starting from the sides towards the center. Add more sprinkles, but only on the sides such that they are visible from the outside.
- Top with another layer of the chocolate cake, followed by a final layer of buttercream. Pipe the buttercream into a large swirl.
- Top the cake jars with more sprinkles, this time all over the top instead of just the sides.
- Finally, use a long wooden skewer to make 2 holes in the cake jar. Poke the witch legs into the holes to complete the witches' brew Halloween cake jars.
Notes
- You will need a total of 18 fondant legs (9 pairs for the 9 cake jars). These are best made at least one day ahead to give them sufficient time to set and harden, to avoid them from bending after attaching to the cakes in the jars.
- Instead of rolling with your hands, you can use a fondant smoother. It helps create smooth strips without any finger marks or dents (image 2).
- When working with fondant in humid environment, fondant has a tendency to become sticky and saggy and will not firm up even after leaving it to set overnight. Adding CMC powder helps. Working in an airconditioned room also helps to set them firm. Another option to deal with humidity is to insert lollipop sticks into the legs. To do this, roll the orange fondant into a long rope and then flatten it lightly (make sure the width is sufficient to wrap around a lollipop stick. Dampen the stick (with a damp brush) and wrap it with the flattened fondant.
- The traces of water from the damp brush act as a glue for the fondant. However, applying too much water will cause your fondant to turn soggy and the color to bleed. When using the brush, dip it in water and then wipe it lightly in a kitchen towel before applying to fondant.
- Keep the balls covered in a container as you work on them one by one. If you find them a little dry, knead again until they become smooth.
- The first shoe will take a slightly longer time to make, but once you get used to the steps, you can make them at a much quicker rate.
- Start with a little food coloring and mix well before adding more until you reach the desired color for the buttercream. Gel food colors are very concentrated and only require a small amount to be used.
- Plan how you will cut the circles before cutting them to ensure you have enough space for 9 on each cake layer.
- Adding the sprinkles to the bottom of the jar is optional. I did it because my jars were not flat at the bottom (they were slightly higher in the center) and the sprinkles were a nice way to fill the gap on the sides.

Leave a Reply