

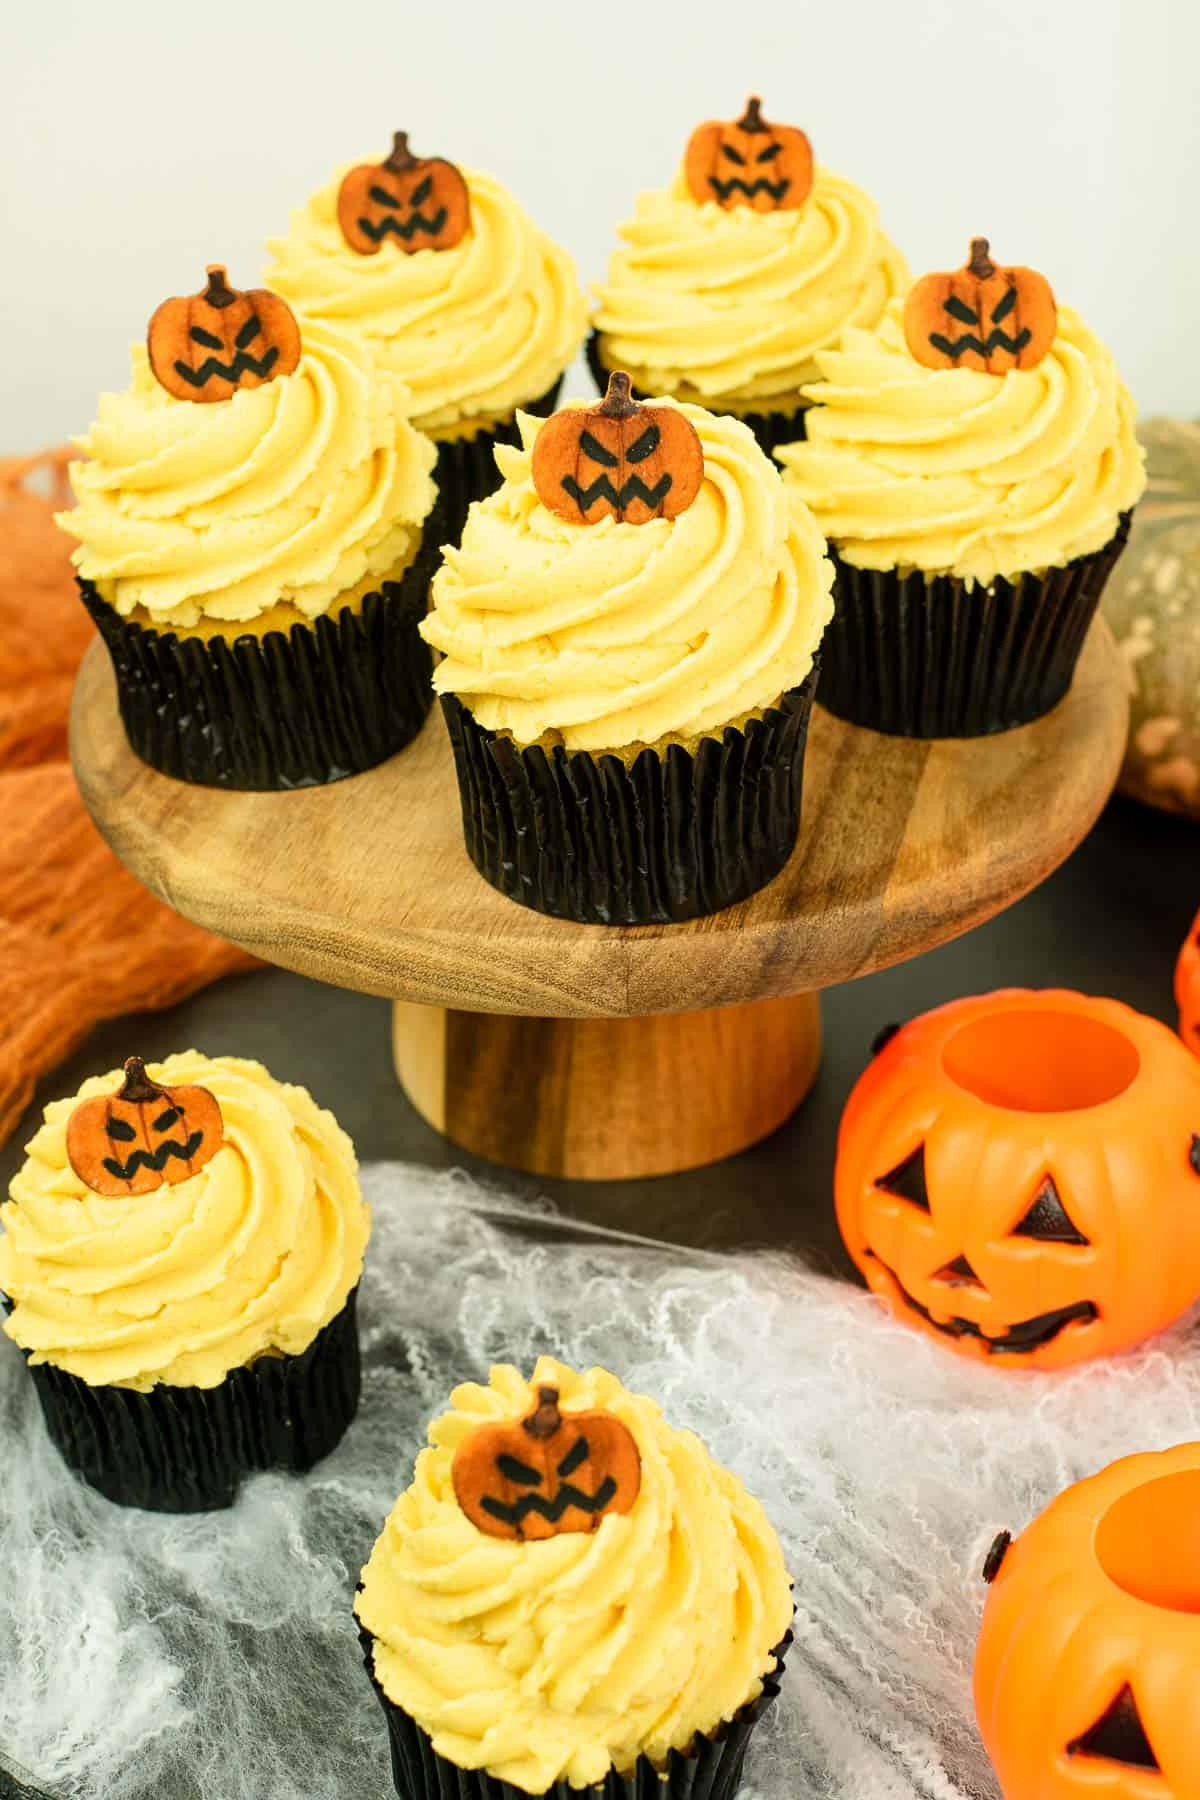
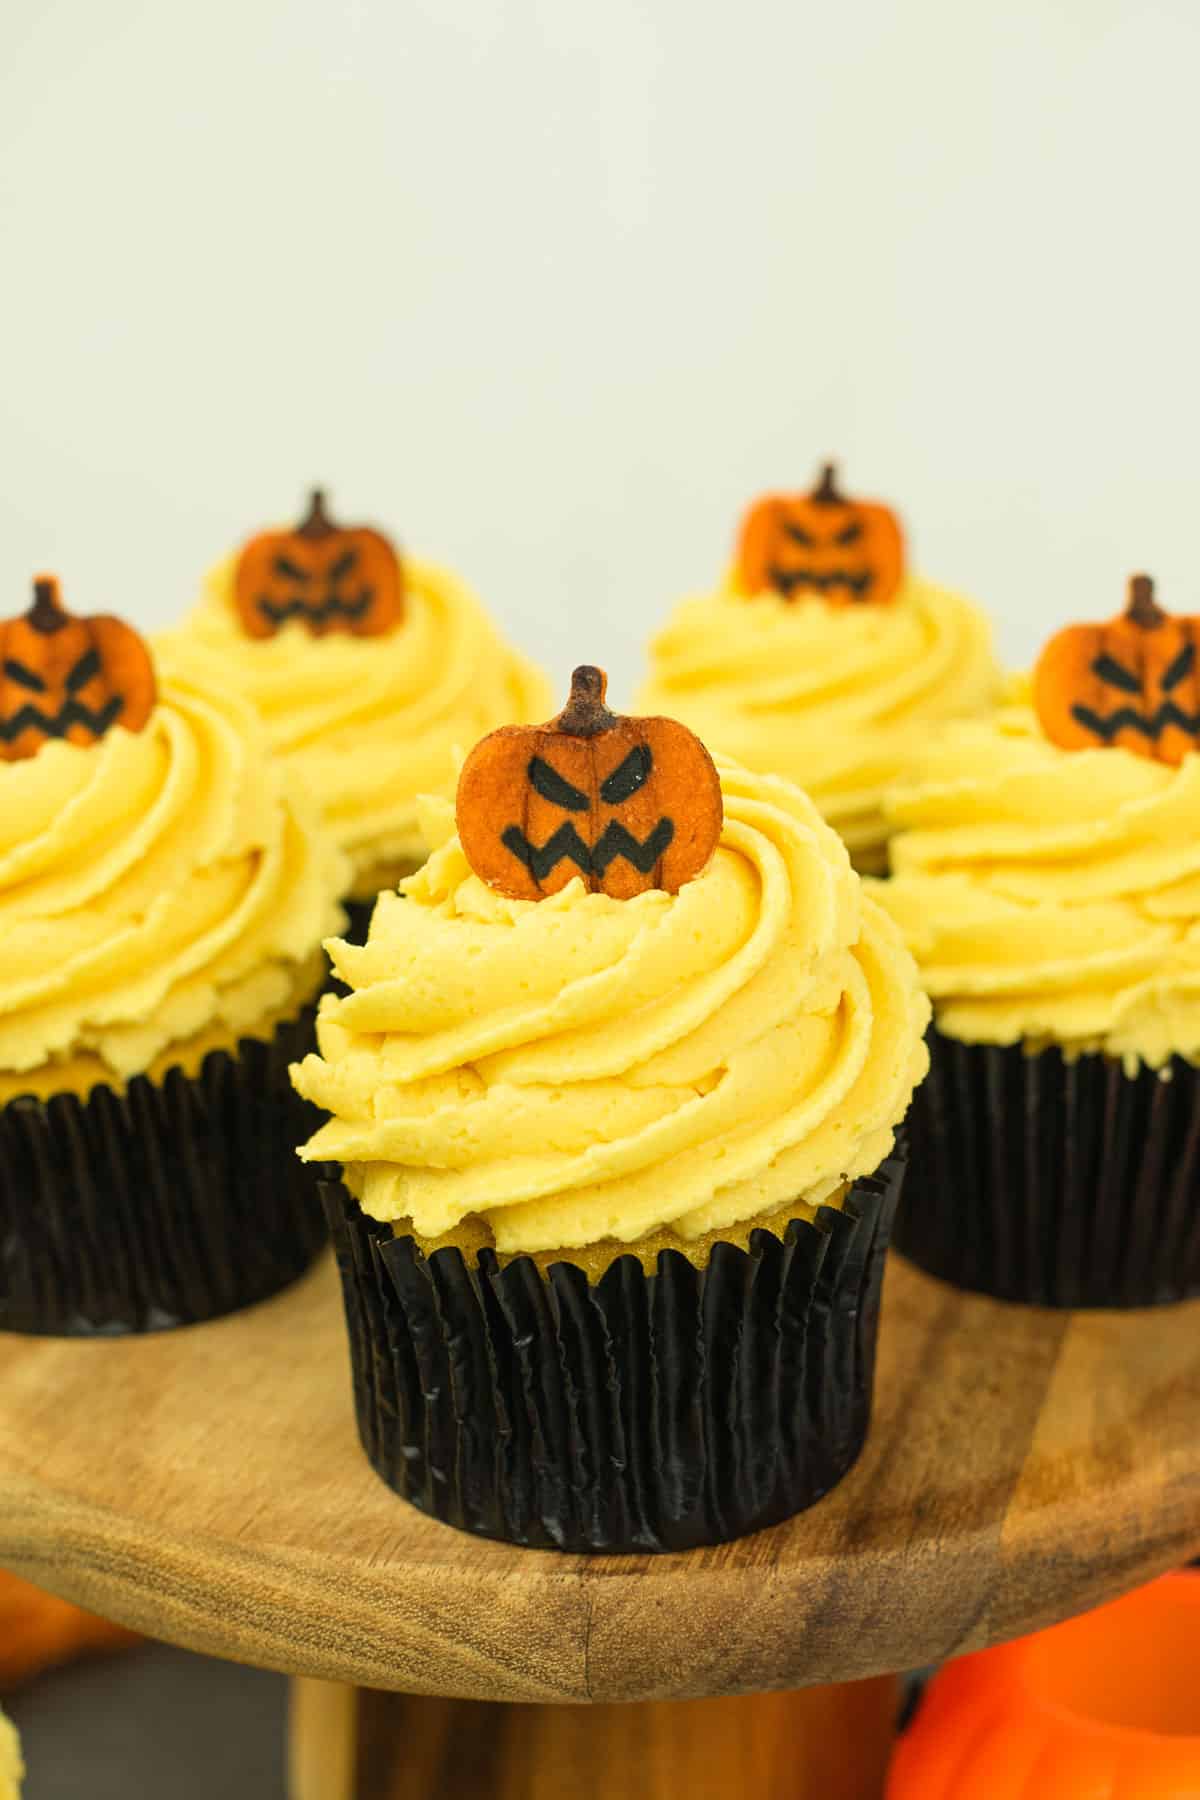
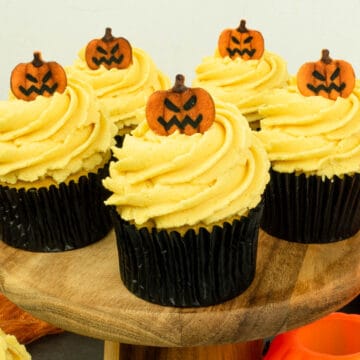
Get ready to celebrate Halloween with these easy Jack-O-Lantern Halloween pumpkin cupcakes. Infused with the fall flavors of pumpkin and caramel and topped with a smooth pumpkin buttercream, these cute treats are decorated with easy handmade fondant Halloween pumpkin toppers for a truly fun Halloween spirit.
This pumpkin cupcake recipe is adopted from my super moist vanilla cupcakes and salted caramel pumpkin cupcakes. If you're into pumpkin recipes, you've got to try my other pumpkin goodies, like this cozy pumpkin spice pound cake and the yummy chocolate pumpkin cupcakes. And don't miss out on some pumpkin Halloween magic too with these spooky spider cupcakes and the Halloween marble cake.
Jump to:
❤️Why You Will Love This Recipe
- This easy pumpkin cupcakes are soft and fluffy, with a moist texture that stays moist for a good 4 to 5 days.
- The cupcakes are delicious with the combination of pumpkin, warming spices and caramel flavors.
- The fondant Jack-O-Lantern pumpkin toppers are cute and easy to make.
- These will make fun treats for Halloween parties.
📋Ingredients
For the Cupcakes:

- Self-raising flour + baking powder + salt - Mix and sift these together with pumpkin pie spice powder. Sifting helps aerate the flour for well risen cupcakes. It also helps the dry ingredients to combine well, reducing the need to over mix the batter.
- Granulated sugar (caster sugar) - this fine sugar is recommended over coarse white sugar as coarse sugar does not dissolve well in cakes and cupcakes and has a tendency to leave the top of your cupcakes with sugar specks. If you wish to use coarse sugar, process it first to make it finer before using.
- Butter - This recipe uses salted butter, and if you wish to use unsalted butter, add an extra pinch of salt to the recipe.
- Eggs - Use large eggs at room temperature for optimal results.
- Milk – contributes to the moist texture of the cupcakes. Use whole milk and make sure it is at room temperature.
- Pumpkin puree and pumpkin spice powder - Choose either canned pumpkin puree or homemade pumpkin puree. If using homemade puree, make sure the texture that is neither too runny nor too thick. Avoid using pumpkin pie filling as it is already sweetened and will not be suitable for this recipe.
- Vanilla extract - Adds to the flavor of the cupcakes.
For the Salted Caramel:
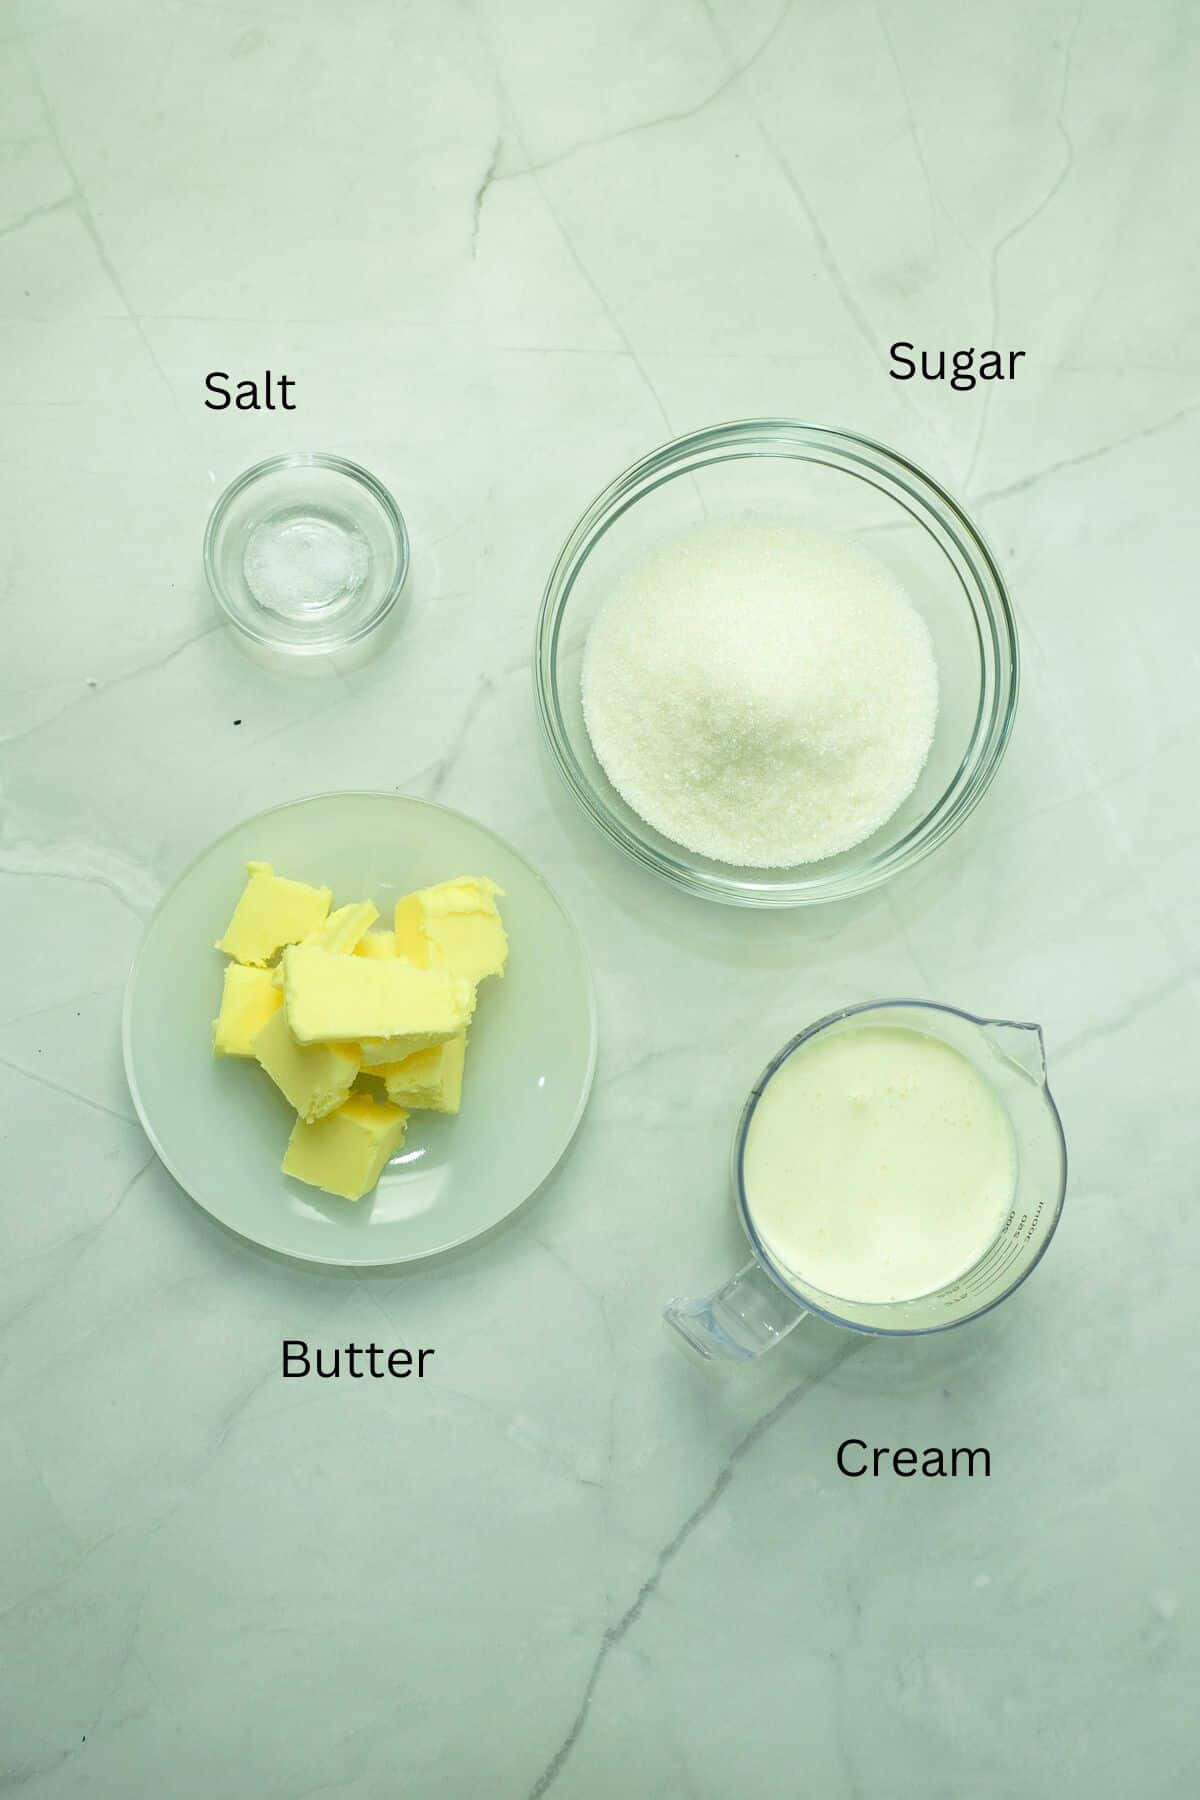
- White sugar - Both coarse and granulated sugar can be used, however coarse sugar will take longer to melt.
- Butter - Use salted butter for a rich, buttery taste. If using unsalted butter, increase the amount of salt flakes mentioned in the recipe slightly. Do not skip the salt, as it plays a key role in enhancing the caramel flavor.
- Heavy cream - Use cream with at least 35% fat content for the best results. Both cooking cream and whipping cream are suitable options for this recipe.
- Salt flakes - Helps in balancing the sweetness of the caramel sauce and intensifying its overall flavor.
For the Pumpkin Buttercream:
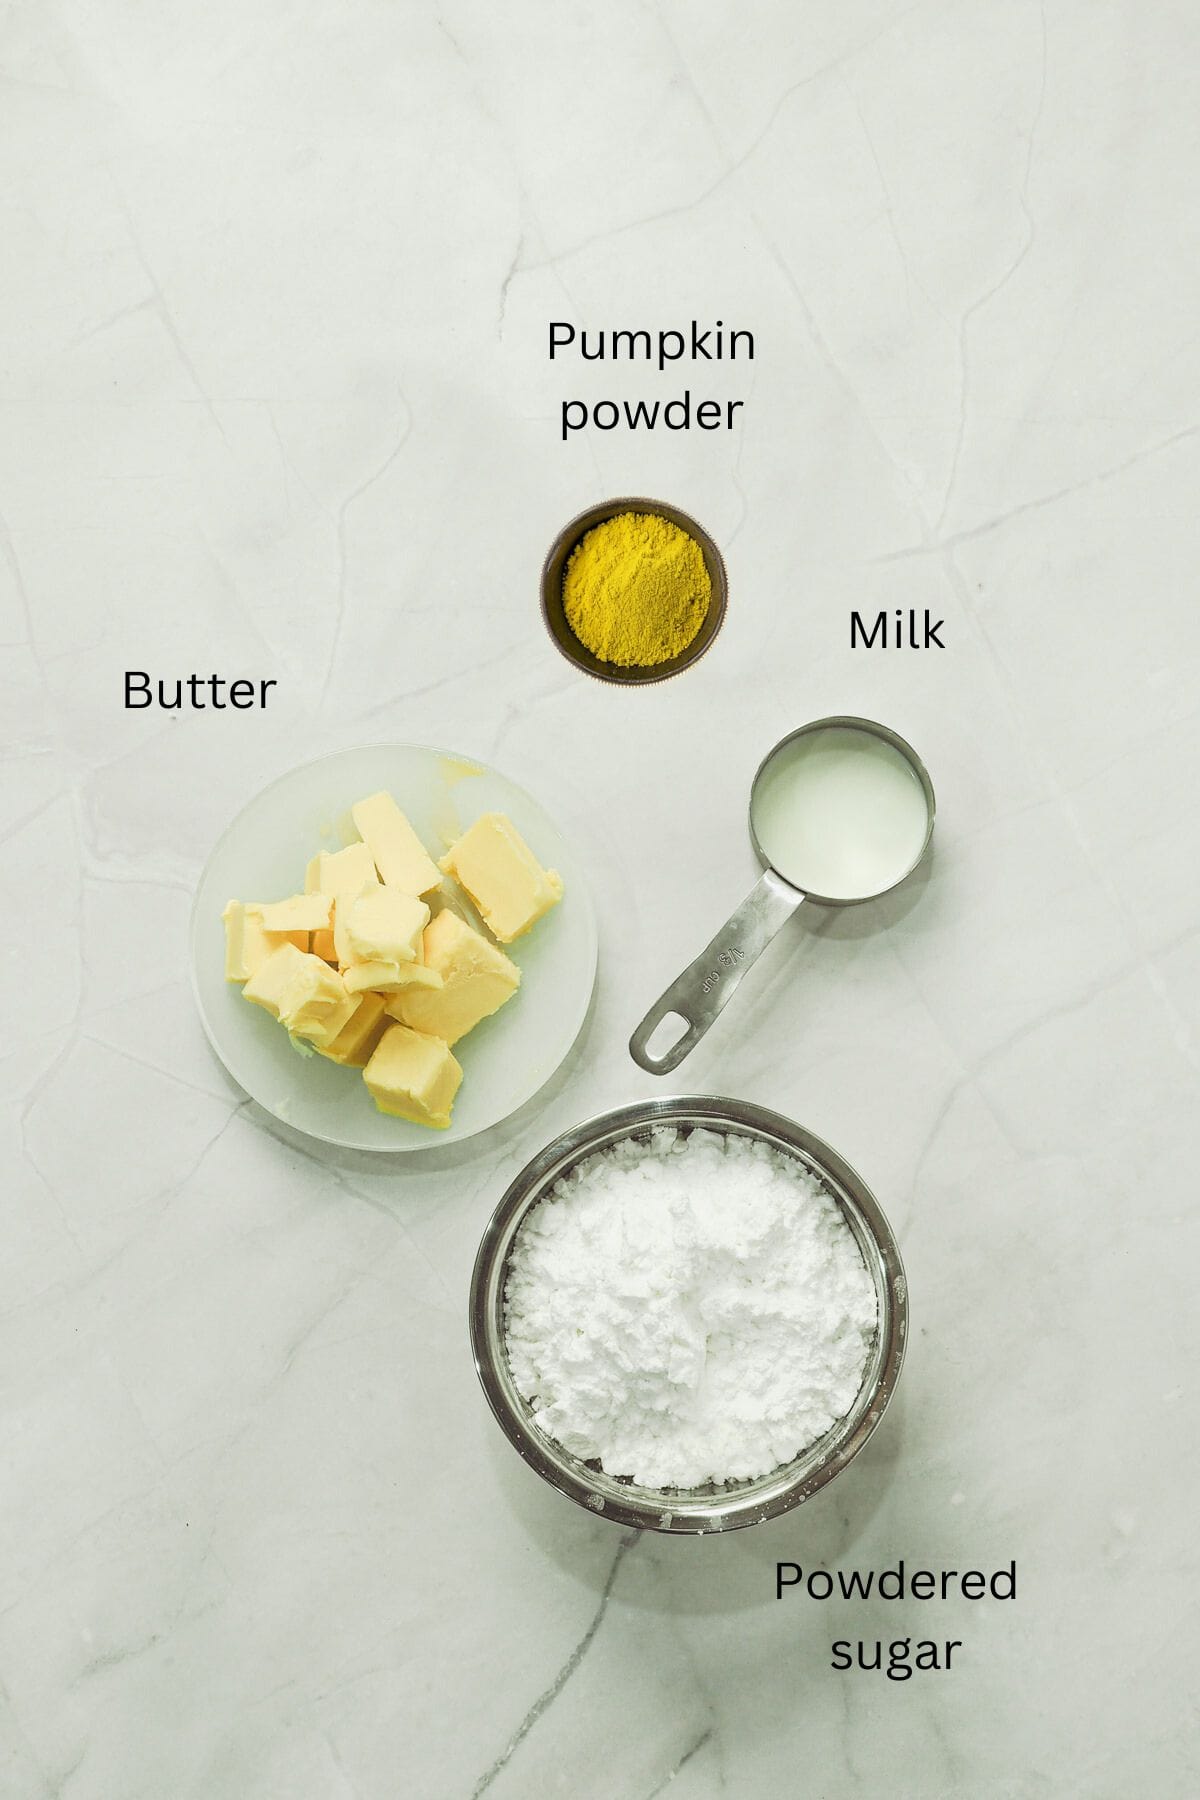
- Powdered sugar (icing sugar) – sift first before using as this tends to be lumpy.
- Butter – this recipe uses salted butter, but if you wish to use unsalted butter, add about ⅛th teaspoon of salt to the buttercream. The salt really enhances the taste of the buttercream.
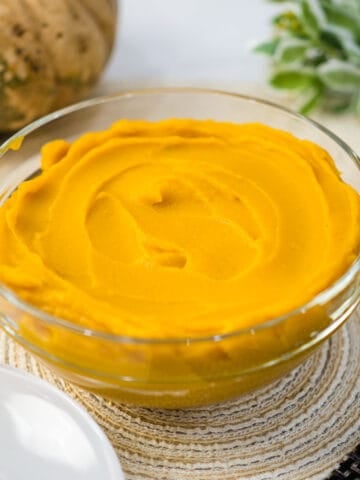
- Pumpkin powder – contributes to the taste and color of the pumpkin buttercream. This can be purchased from your local stores or online stores. Using powder in the buttercream helps maintain its texture from becoming too runny, unlike using pumpkin puree.
- Milk – this is optional and you only need to use it (in small quantities) if the buttercream is too stiff. When adding the the buttercream, do it in small increments of half or one tablespoon at a time to avoid the buttercream from becoming too soft.
- Vanilla extract – adds a lovely aroma to the buttercream.
For the Decoration:
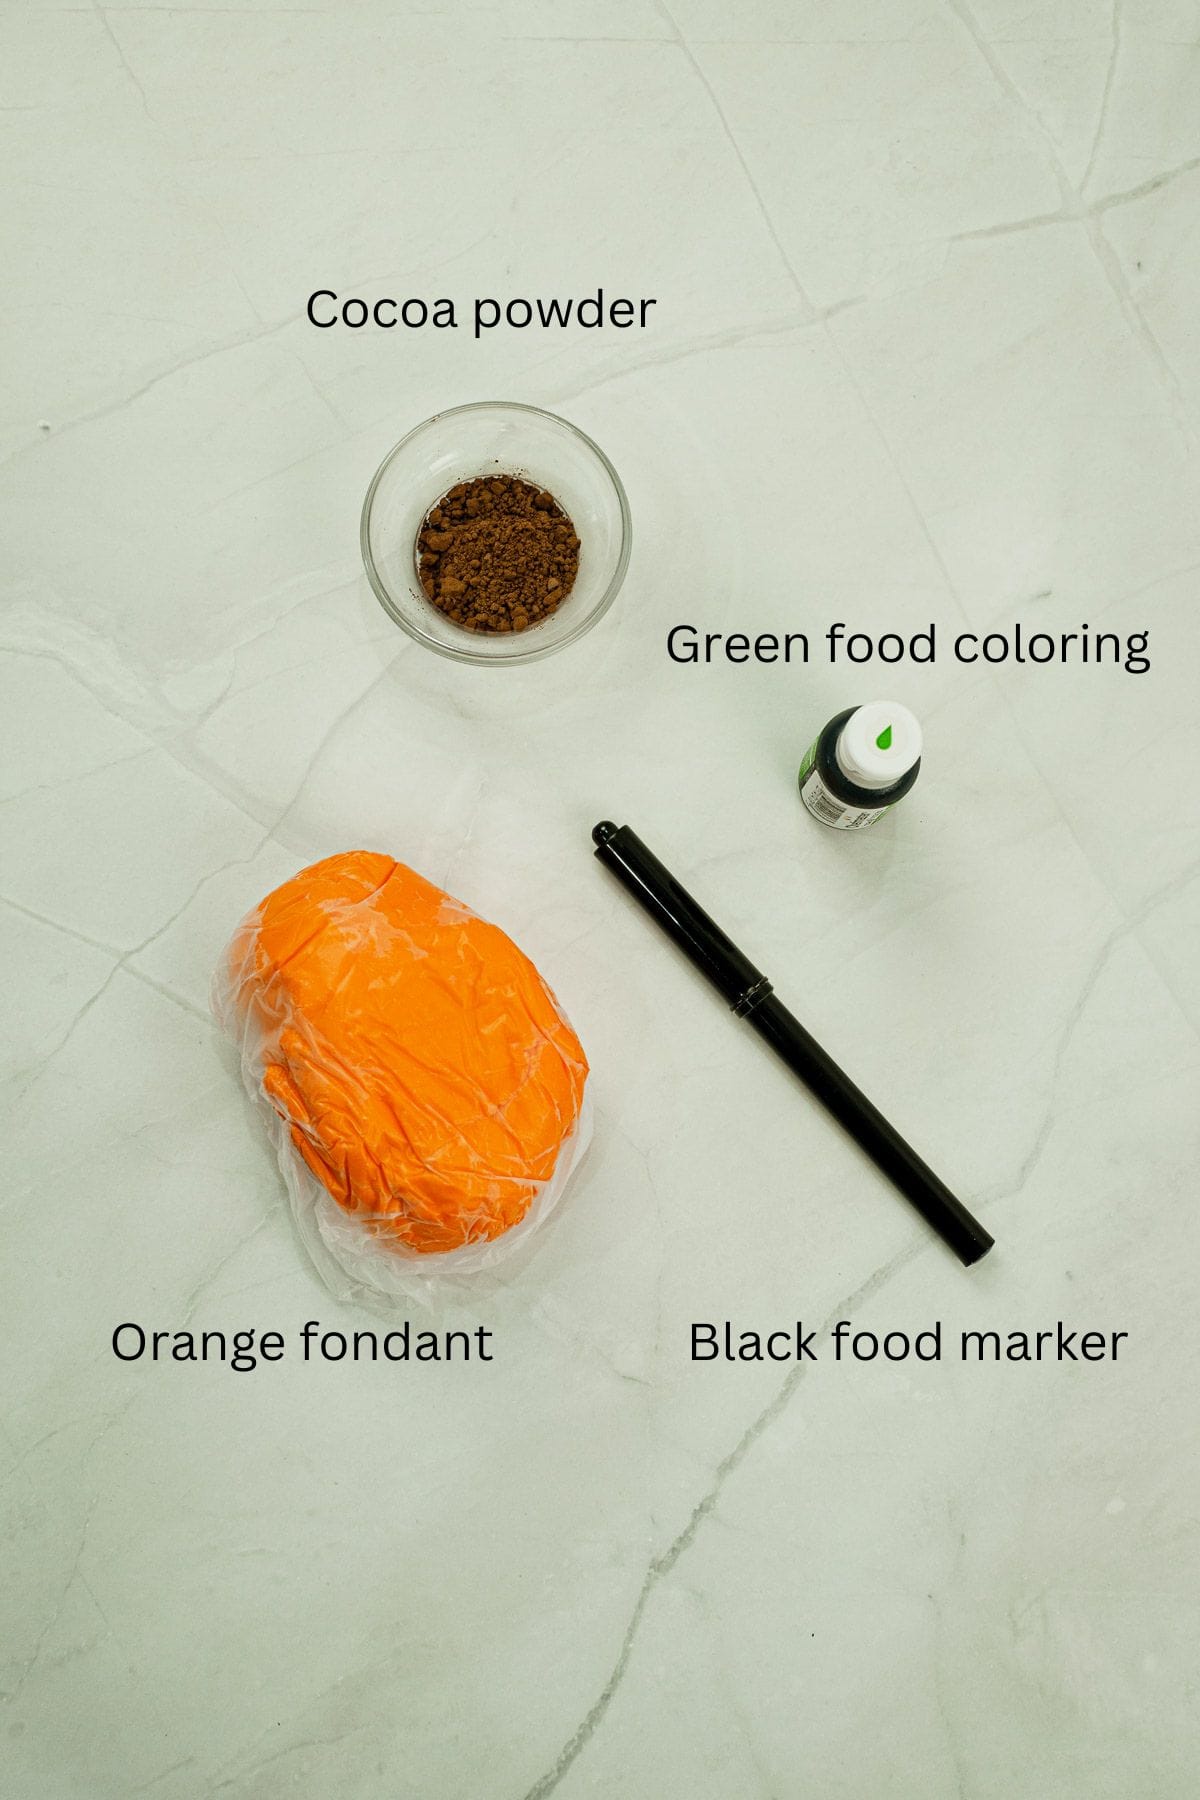
- Orange fondant – you can buy this readymade in orange color, or tint white fondant with orange food coloring. If using food coloring, use gel based colors to maintain the texture of the fondant. You can also make your own fondant if you like.
- Black edible food marker – this is food safe marker and can be purchased from local or online shops.
- Cocoa powder – this is used in very small quantities, to dust the fondant pumpkin cut outs.
- Green food coloring – to color the fondant pumpkin stalks.
*Refer to the recipe card below for full list of ingredients and exact quantities. For best results, use a digital kitchen scale where applicable*
🧾Substitution and Variations
- You have the option to substitute self-raising flour with all-purpose flour. For 200g of all-purpose flour and add one teaspoon, along with an extra one-third teaspoon of baking powder. Combine and sift the mixture at least three times before using. Do note that this additional baking powder is on top of what the recipe already calls for.
- Granulated white sugar in the cupcakes can be replaced with brown sugar. Both dark and light brown sugar will work for this recipe. Do note however, that the color of the cupcakes will be brownish instead of yellow.
- If you do not have edible food markers, you can also use black gel food coloring and a fine brush to paint the facial features on the fondant pumpkins.
This recipe has not been tested with other substitutions or variations. If you do try, please let me know in the comments section below!
👩🏻🍳How to make
Make the fondant pumpkin cupcake toppers
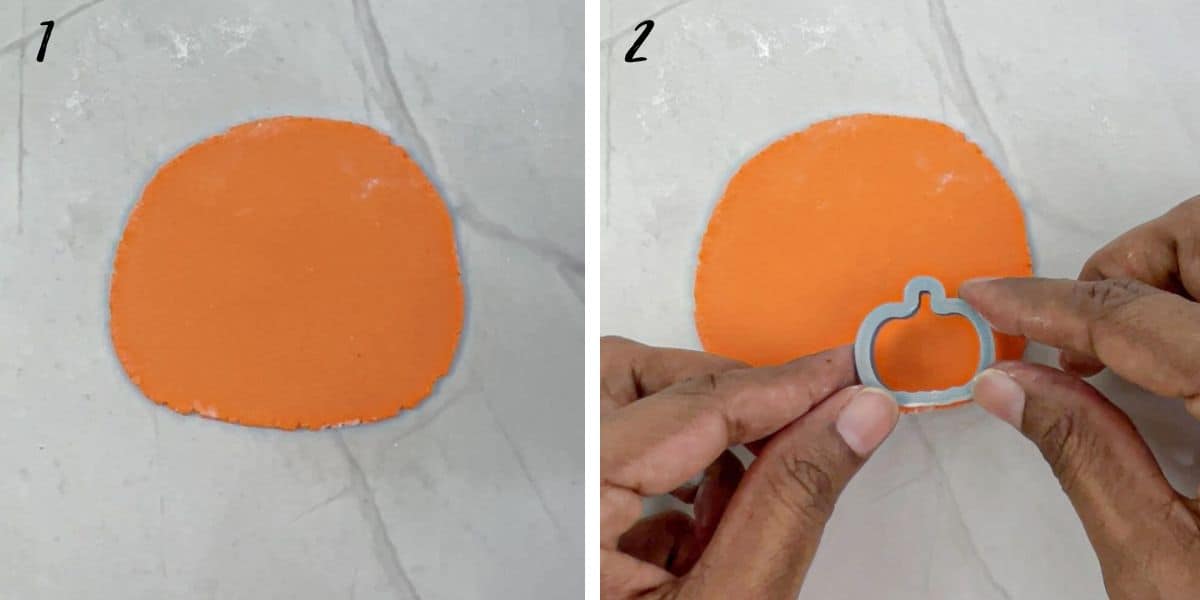
Step 1: Knead the orange fondant until smooth and pliable. Dust your workspace with some cornstarch (here’s how to make your own dusting bag for fondant work) and roll the fondant thin to about ⅛ of an inch (image 1).
Note: If tinting white fondant, wearing gloves when mixing the food coloring will keep your hands clean from the color marks.
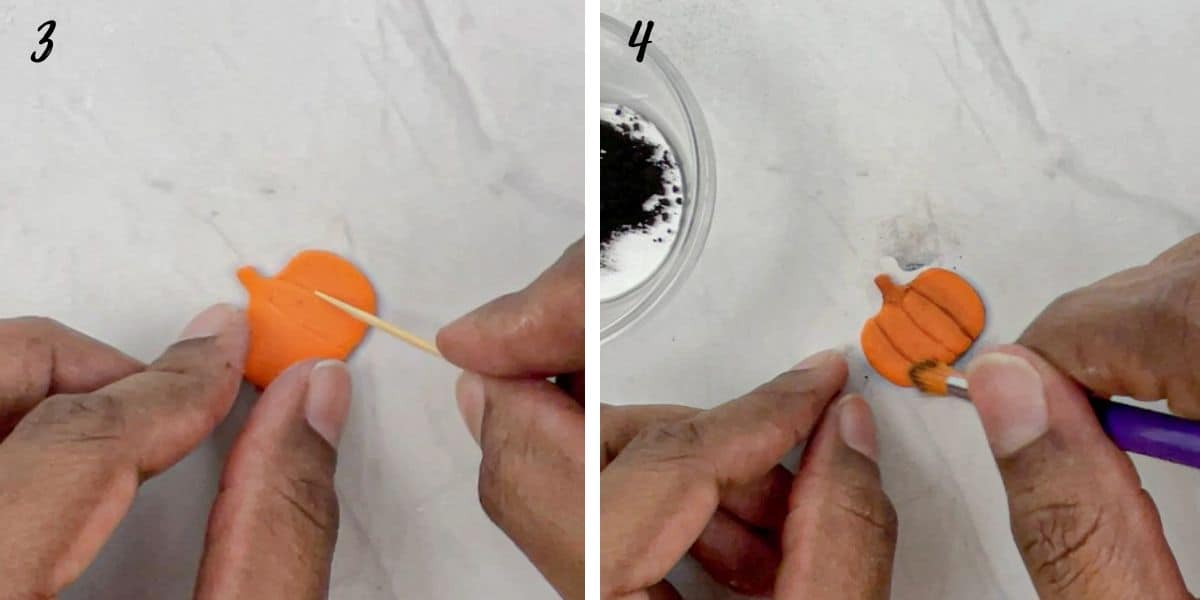
Step 2: Cut out the pumpkin shapes using a pumpkin shaped cutter. Mine measured 2.5m in height and length (image 2).
Note: Cut all the pumpkin toppers at once and include a few extras for contingency. Keep them covered in a covered container as you work on them to prevent the fondant from becoming dry.
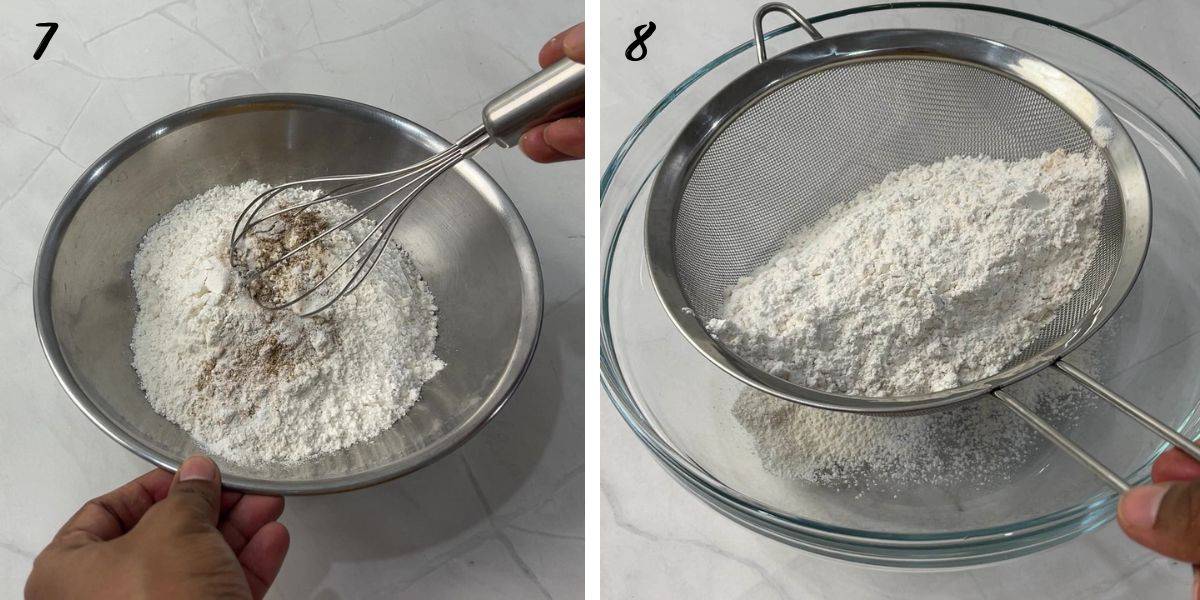
Step 3: Next, use a toothpick and draw out lines on the pumpkin (image 3).
Step 4: Dip your brush lightly in cocoa powder and dust the pumpkins to add some depth along the lines and the sides (image 4). Make sure the brush is completely dry.

Step 5: Use the black food marker to draw the eyes and the mouth for the pumpkin toppers (image 5).
Step 6: And then paint the stalk with some green food coloring. Lightly moisten your brush when painting (but not too much) so that the color shows well on the pumpkins (image 6). Set them aside for the paint to dry and until they are ready to be assembled on the cupcakes.
Bake the cupcakes
Step 7: Preheat oven to 175 degrees Celsius. Line your cupcake tin with cupcake liners.
Step 8: Combine the flour, baking powder, salt, and spices in a medium bowl and sift them together (images 7 & 8).
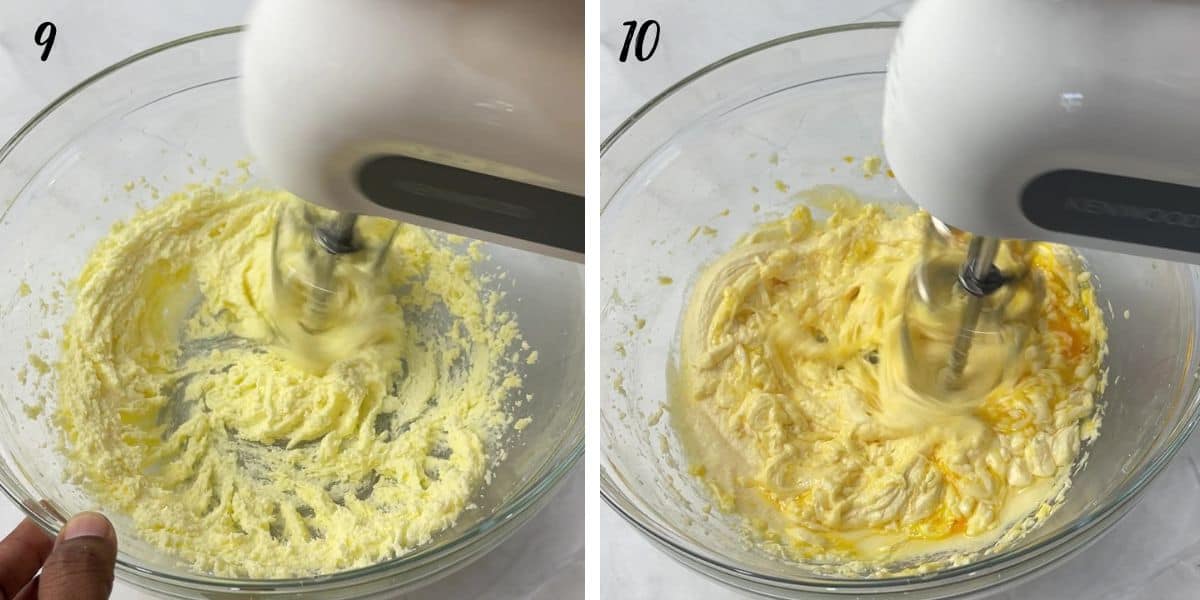
Step 9: In s a separate bowl, combine butter and sugar. Cream both with an electric mixer until light and fluffy (on medium speed). Remember to scrape the bowl's bottom and sides halfway through to ensure all the ingredients are thoroughly mixed (image 9).
Note: Make sure to cream for at least 2 minutes for this recipe.
Step 10: Add the eggs one at a time, and beat until no traces of the egg are visible before adding the next one (image 10).
Note: Crack the eggs in a separate cup or bowl to prevent any accidental shell pieces from ending up in the batter.
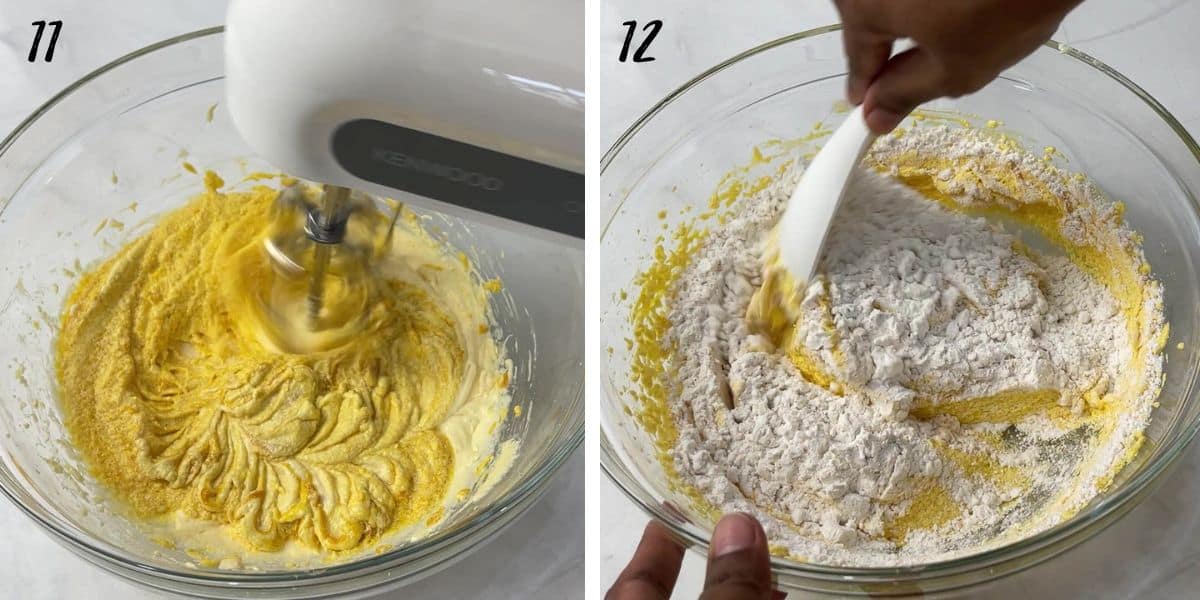
Step 11: Incorporate the pumpkin puree (image 11) into the batter and beat until well combined. Scrape the bowl.
Note: It's normal for the batter to appear curdled at this stage.
Step 12: Gently fold half of the dry ingredients (sifted flour mixture) into the creamed wet ingredients (image 12).
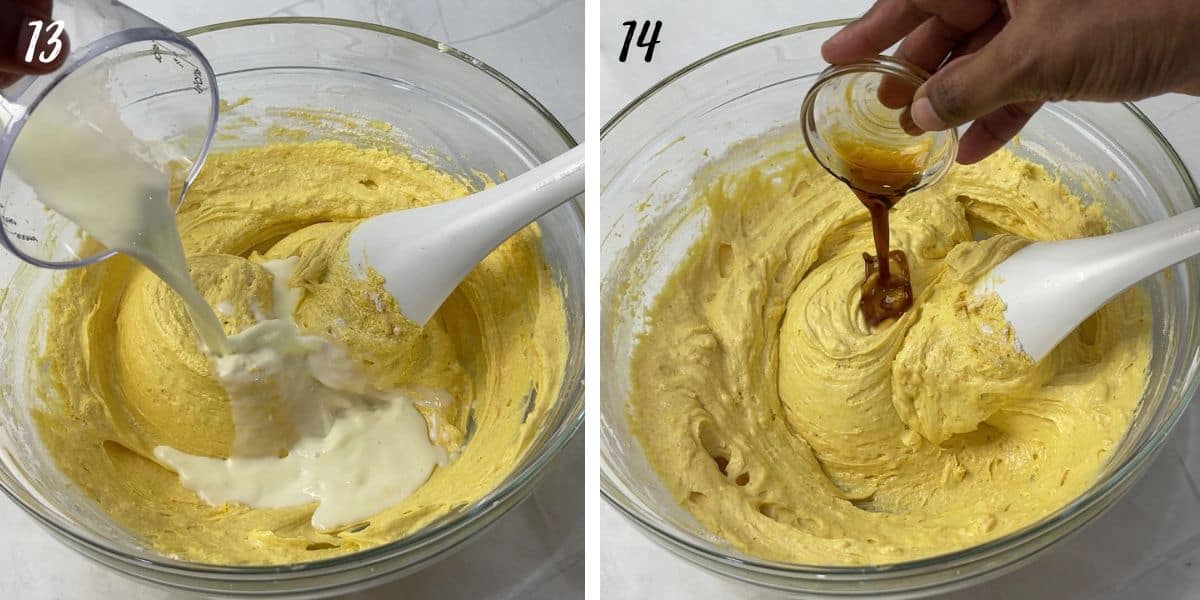
Fold in the milk followed by the remaining flour ( images 13).
Add the vanilla extract and mix well (image 14).
Note: Avoid overmixing the batter. If using a cake mixer, maintain a very low speed and mix only until the ingredients are well combined. Don't forget to scrape the bowl.
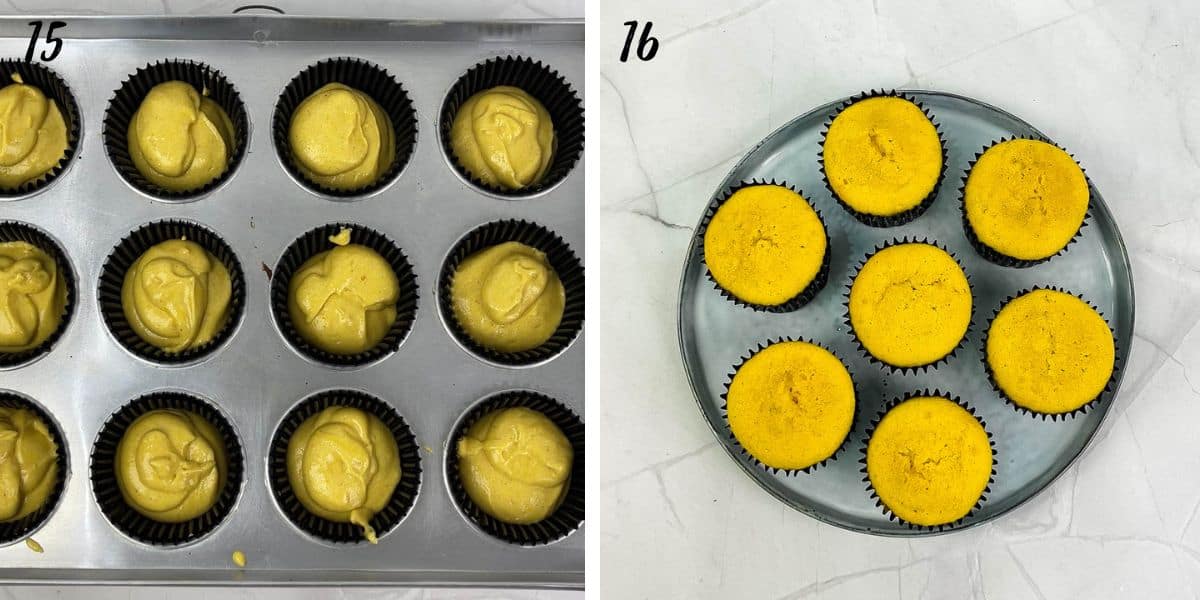
Step 13: Fill each prepared cupcake liner with the pumpkin cupcake batter, filling them about three-quarters full (image 15). Bake for 15 - 20 minutes or until a toothpick inserted into the center comes out clean. Once baked, take the cupcakes out of the tin and let them cool completely on a wire rack before frosting (image 16).
Note: Using a spring-loaded ice cream scoop or cookie scoop is an efficient and tidy way to fill the liners with consistently sized batter.
Prepare the salted caramel sauce
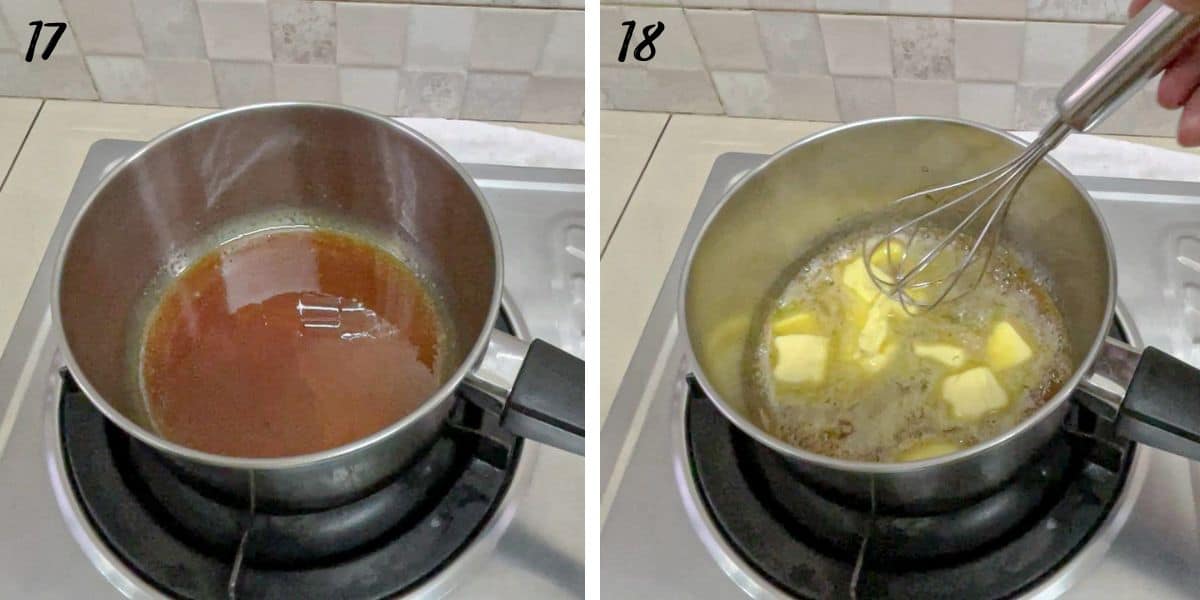
Step 14: Measure the sugar into a medium saucepan. Set the heat to low and allow the sugar to melt. Stir to help the sugar melt consistently (image 17).
Note: As the sugar transitions to an amber hue, it has a tendency to burn quickly. Adjust the heat as needed to maintain control. Turn it off occasionally to better control the heat until all the sugar is melted.
Step 15: Once the sugar has fully melted, add the butter. Use a whisk to mix until the butter is thoroughly melted (image 18).
Note: The caramel may bubble vigorously upon adding the butter, which is completely normal. Maintain a low heat.
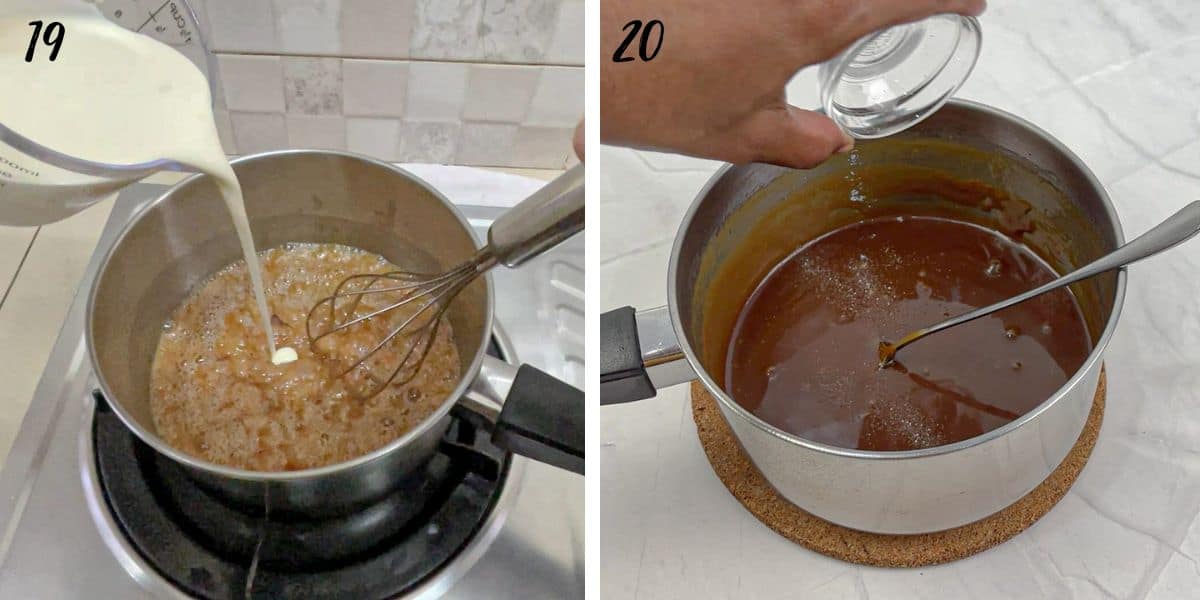
Step 16: Gradually pour the cream in a thin, steady stream. Whisk continuously until the cream is fully incorporated (image 19).
Note: The mixture will bubble once more during the addition of the cream.
Step 17: Continue cooking over low heat until the sauce achieves a slightly thicker consistency. The sauce will further thicken as it cools. Sprinkle the salt and mix it well into the sauce (image 20).
Step 18: Allow the caramel sauce to cool completely to room temperature before using.
Note: You can use a candy thermometer to assist in monitoring the caramel. Cook until it reaches 105°C (or 220°F). At this temperature, the caramel will be of a drizzling consistency. Cook the caramel further if you wish for a thicker consistency.
Make the buttercream
Step 19: Place the butter in a large bowl and beat it until it becomes smooth and creamy.
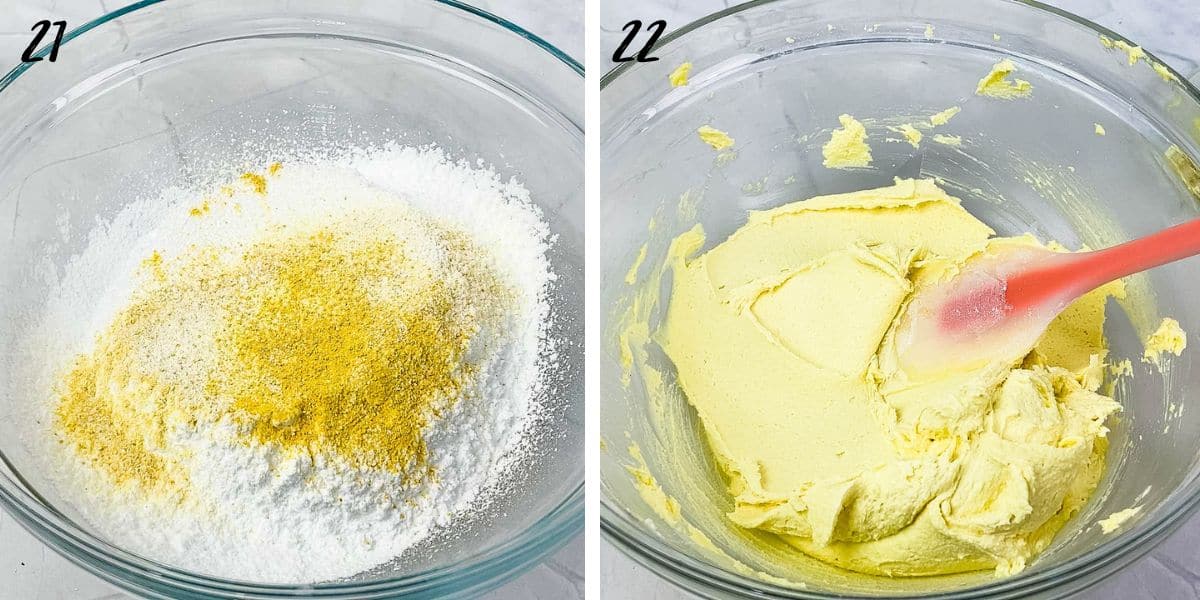
Step 20: Sift the powdered sugar into the bowl, followed by the pumpkin powder. (image 21).
Note: Before using the mixer, lightly mix the ingredients with a spatula. This will moisten the sugar and prevent it from flying as you switch on the electric mixer.
Step 21: Begin mixing at a low speed, gradually increasing to medium speed until the sugar, pumpkin powder and butter are thoroughly combined, and turn smooth and creamy.
Make sure to scrape the sides of the bowl to incorporate any remaining butter or sugar that might be left unmixed.
Step 22: Add the vanilla extract and continue to beat until it's well combined. At this stage, if the buttercream appears too stiff, add the milk. Do it in small increments of half a tablespoon and beat well before adding more (see image 22).
Note: The buttercream should be sufficiently stiff for piping. Avoid adding too much milk.
Assemble the cupcakes
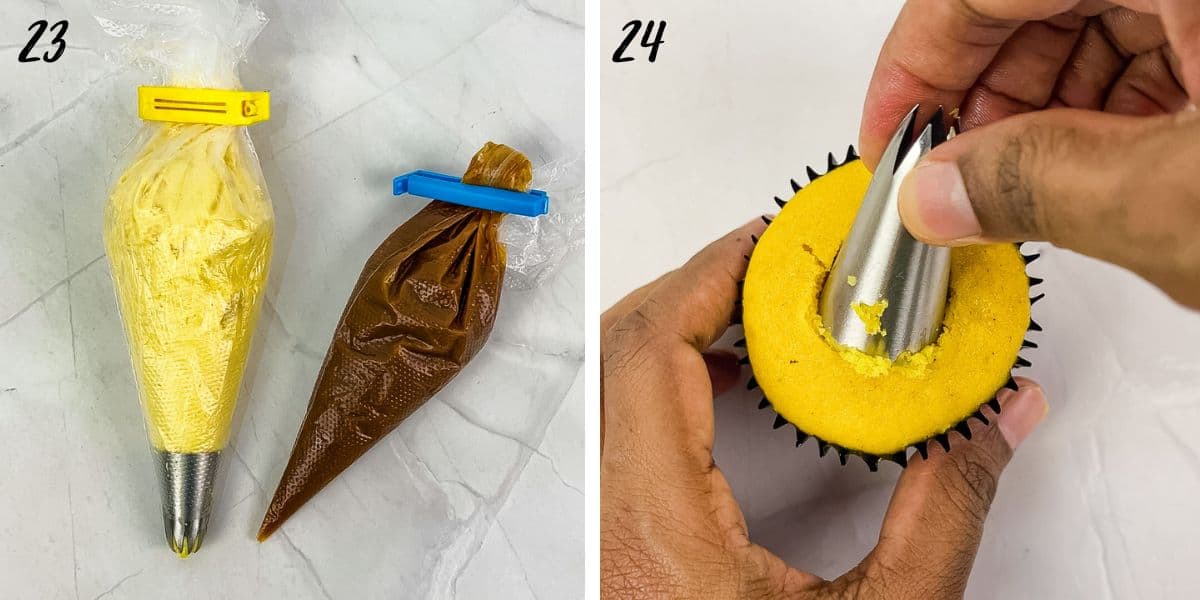
Step 23: Transfer the caramel sauce and buttercream into piping bags. Use star tip #1M for the buttercream (image 23).
Note: If the buttercream is too much for a single piping bag, divide it into two.
Step 24: Core the cupcakes with a cupcake corer or the back of a large piping tip (image 24) . Set the cored pieces aside as you will need them to cover the holes later.
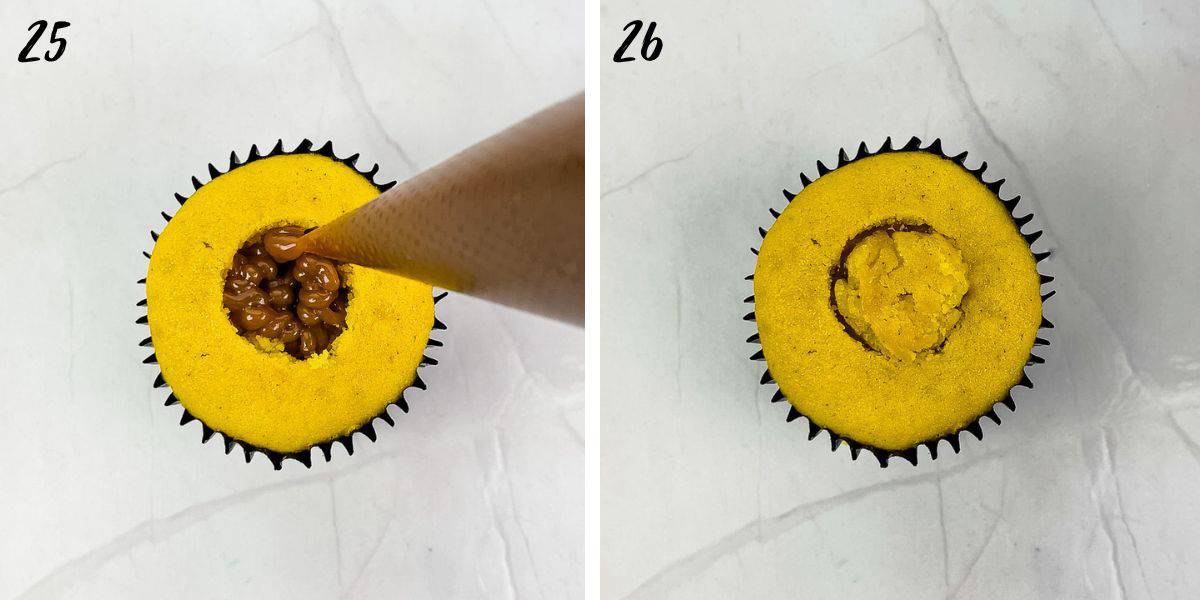
Step 25: Snip the caramel piping bag and pipe the sauce into the holes (image 25).
Note: Use a piping bag for a tidier filling of the cupcakes with caramel sauce.
Step 26: Cover the holes with the cored pieces earlier (you only need the top layer and not the whole cored piece of the cupcake)(image 26).
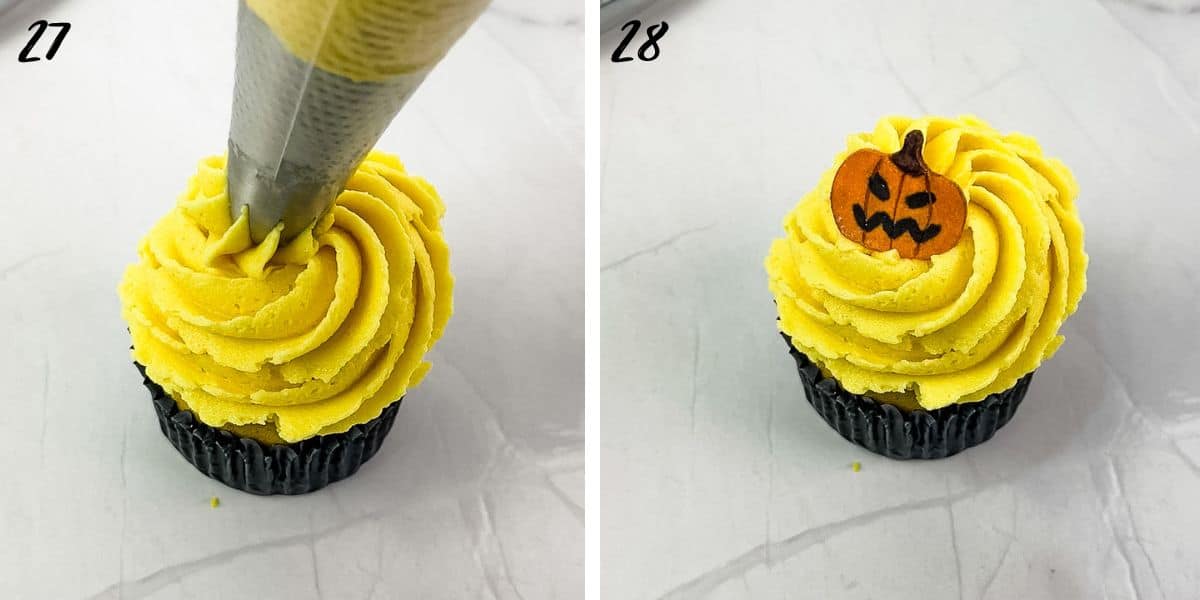
Step 27: Pipe pumpkin buttercream swirls on each cupcake (image 27).
Step 28: Add a pumpkin topper on top of the cupcakes. Press these toppers in lightly into the buttercream to hold them in place (image 26).

💡Expert tips
- Ensure all ingredients are at room temperature for a smoother batter and frosting.
- Overbaking can lead to dry cupcakes. Test for doneness a few minutes before the recommended baking time is up by inserting a toothpick into the center. If it comes out clean without any wet batter, they're ready.
- These cupcakes are baked in liners measuring approximately 5cm in diameter at the base and 3.5cm in height at the sides, yielding around 14 cupcakes. Adjust the baking time accordingly if using larger or smaller liners.
- To keep the cupcakes moist, cover them with a kitchen towel when cooling and store in an airtight container once they've reached room temperature.
- When making the caramel sauce, sugar has a tendency to burn very quickly as it caramelizes. This is particularly so when making in small batches. To better control the process, this recipe makes a slightly larger batch of sauce (sufficient for 2 batches of the cupcakes recipe) than is required. You can use it for other treats like this salted caramel cheesecakes, Snicker cheesecake, chocolate pumpkin cupcakes, or salted caramel pumpkin cupcakes. You can even store it in the refrigerator for later use or use it as a sweetener for teas and lattes.
- Use a light-colored saucepan when making the caramel to ensure a clear view of the sugar's color as it caramelizes.
💭FAQs
Yes you can. You can use cream cheese frosting or chocolate ganache to frost these cupcakes.
The pumpkin buttercream is of a yellow shade from the natural color of the pumpkin powder used in the recipe. If you wish to make orange frosting, you can add a few drops of orange food coloring to it. Mix well.
Without the caramel filling and buttercream frosting, the cupcakes can remain fresh at room temperature for approximately 4 to 5 days. Once filled and frosted, store them in a covered container in the refrigerator, especially if not consumed on the same day. Refrigeration can extend their shelf life to around 4 to 5 days. Let the cupcakes to return to room temperature before serving.
Only add the fondant toppers right before serving. Fondant has a tendency to turn soggy due to condensation from refrigeration, hence it is not recommended for the toppers to be refrigerated.
❤️More Recipes You Will Love

Do you like this recipe? Please leave a 5-star ⭐⭐⭐⭐⭐rating in the recipe card below and consider a review further down this page. I would love to hear from you. Thank you!
📖Recipe
Jack-O-Lantern Halloween Pumpkin Cupcakes (How to Make)
Equipment
- Black edible marker (food grade)
- Cake decorating brush
- Pumpkin cutter (2.5 cm in length and width)
- Piping tip #1M
- Disposable piping bags
For best results, use the metrics measurements. US customary measurements have not been tested and are only meant for guide.
Ingredients
Cupcakes
- 200 g self raising flour
- 100 g butter (salted)
- 200 g granulated sugar
- 2 eggs
- 200 g pumpkin puree
- 100 ml milk
- ½ teaspoon baking powder
- ¼ teaspoon salt
- 1 teaspoon pumpkin pie spice powder
- 1 teaspoon vanilla extract
Salted Caramel Sauce
- 160 g white sugar
- 200 ml heavy cream
- 80 g butter (salted)
- ¼ teaspoon sea salt flakes
Pumpkin Buttercream
- 450 g powdered sugar
- 225 g butter (salted)
- 1 tablespoon pumpkin powder
- 2 tablespoon milk optional
Decoration:
- 60 g orange fondant
- 1 teaspoon cocoa powder
Instructions
Make the fondant pumpkin toppers
- Knead the orange fondant until smooth and pliable. Dust your workspace with some cornstarch and roll the fondant thin to about ⅛th of an inch (see Note 1).
- Cut out the pumpkin shapes using a pumpkin shaped cutter. Cut all the pumpkin toppers at once and include a few extras for contingency. Keep them covered in a covered container as you work on them to prevent the fondant from becoming dry.
- Next, use a toothpick and draw out lines on the pumpkin.
- Dip a dry brush lightly in cocoa powder and dust the pumpkins to add some depth along the lines and the sides.
- Use a black food marker to draw the eyes and the mouth for the pumpkin toppers.
- Paint the stalk with some green food coloring. Lightly moisten your brush when painting (but not too much) so that the color shows well on the pumpkins. Set them aside for the paint to dry and until they are ready to be assembled on the cupcakes.
Bake the cupcakes
- Preheat oven to 175℃. Line your cupcake tin with cupcake liners.
- Combine flour, baking powder, salt, and spices in a medium bowl and sift together.
- In a separate bowl, combine butter and sugar. Cream both until light and fluffy (for 2 minutes on medium speed). Scrape the sides and bottom of the bowl halfway through to ensure all the ingredients are thoroughly mixed.
- Add the eggs one at a time, and each time, beat until no traces of the egg are visible before adding the next one (see Note 2).
- Incorporate the pumpkin puree into the batter and beat until well combined. Scrape the bowl. The batter may appear curdled at this stage.
- Gently fold the dry ingredients (sifted flour mixture) into the creamed wet ingredients in two batches, alternating with the milk (see Note 3).
- Scoop the batter into prepared cupcake liners until about three-quarters full (see Note 4). Bake for 15 - 20 minutes or until a toothpick inserted into the center comes out clean. Once baked, let them cool completely on a wire rack before frosting.
Prepare the salted caramel sauce
- Measure sugar into a medium saucepan. Set the heat to low and stir occasionally to help the sugar melt consistently (see Note 5).
- Once the sugar has fully melted, add the butter. Use a whisk to mix until the butter is thoroughly melted (see Note 6).
- Gradually pour the cream in a thin, steady stream. Whisk continuously until the cream is fully incorporated.
- Continue cooking over low heat until the sauce achieves a slightly thicker consistency. The sauce will further thicken as it cools (see Note 7). Sprinkle the salt and mix it well into the sauce.
- Allow the caramel sauce to cool completely to room temperature before using.
Make the buttercream
- Place butter in a large bowl and beat until it becomes smooth and creamy.
- Sift the powdered sugar into the bowl, followed by the pumpkin powder. Mix lightly with a spatula before creaming the ingredients with a mixer (see Note 8). Start with low speed and gradually increase to medium speed until the sugar, pumpkin powder and butter are thoroughly combined, and turn smooth and creamy.
- Add vanilla extract and continue to beat until it's well combined. If the buttercream appears too stiff, add the milk. Do it in small increments of half a tablespoon and beat well before adding more.
Assemble the cupcakes
- Transfer caramel sauce and buttercream into piping bags. Use star tip #1M for the buttercream.
- Core the cupcakes with a cupcake corer or the back of a large piping tip. Set the cored pieces aside as you will need them to cover the holes later.
- Fill the cored holes with caramel sauce (see Note 9).
- Cover the holes with the cored pieces earlier (only the top layer and not the whole cored piece of the cupcake).
- Pipe pumpkin buttercream swirls on each cupcake.
- Top with the fondant pumpkins. Press the toppers in lightly into the buttercream to hold them in place.
Notes
- If tinting white fondant, wearing gloves when mixing the food coloring will keep your hands clean from the color marks.
- Crack the eggs in a separate cup or bowl to prevent any accidental shell pieces from ending up in the batter.
- Avoid overmixing the batter. If using a cake mixer, maintain a very low speed and mix only until the ingredients are well combined. Don't forget to scrape the bowl.
- Using a spring-loaded ice cream scoop or cookie scoop is an efficient and tidy way to fill the liners with consistently sized batter.
- As the sugar transitions to an amber hue, it has a tendency to burn quickly. Adjust the heat as needed to maintain control. Turn it off occasionally to better control the heat until all the sugar is melted.
- The caramel may bubble vigorously upon adding the butter, which is completely normal. Maintain a low heat.
- Use a candy thermometer to assist in monitoring the caramel. Cook until it reaches 105°C (or 220°F). At this temperature, the caramel will be of a drizzling consistency. Cook the caramel further if you wish for a thicker consistency.
- Before using the mixer, lightly mix the ingredients with a spatula. This will moisten the sugar and prevent it from flying as you switch on the electric mixer.
- Use a piping bag for a tidier filling of the cupcakes with caramel sauce.
- Overbaking can result in dry cupcakes. Test a few minutes before the recommended baking time is up by inserting a toothpick into the center. If it comes out clean without any wet batter, they're ready.
- These cupcakes are baked in liners measuring approximately 5cm in diameter at the base and 3.5cm in height at the sides, yielding around 14 cupcakes. Adjust the baking time accordingly if using larger or smaller liners.
- Keep the cupcakes covered with a kitchen towel when cooling to keep them moist. Store in an airtight container.
- When making the caramel sauce, sugar has a tendency to burn very quickly as it caramelizes. This is particularly so when making in small batches. To better control the process, this recipe makes a slightly larger batch of sauce (sufficient for 2 batches of the cupcakes recipe) than is required. Use a light-colored saucepan when making the caramel to ensure a clear view of the sugar's color as it caramelizes.
Leave a Reply