

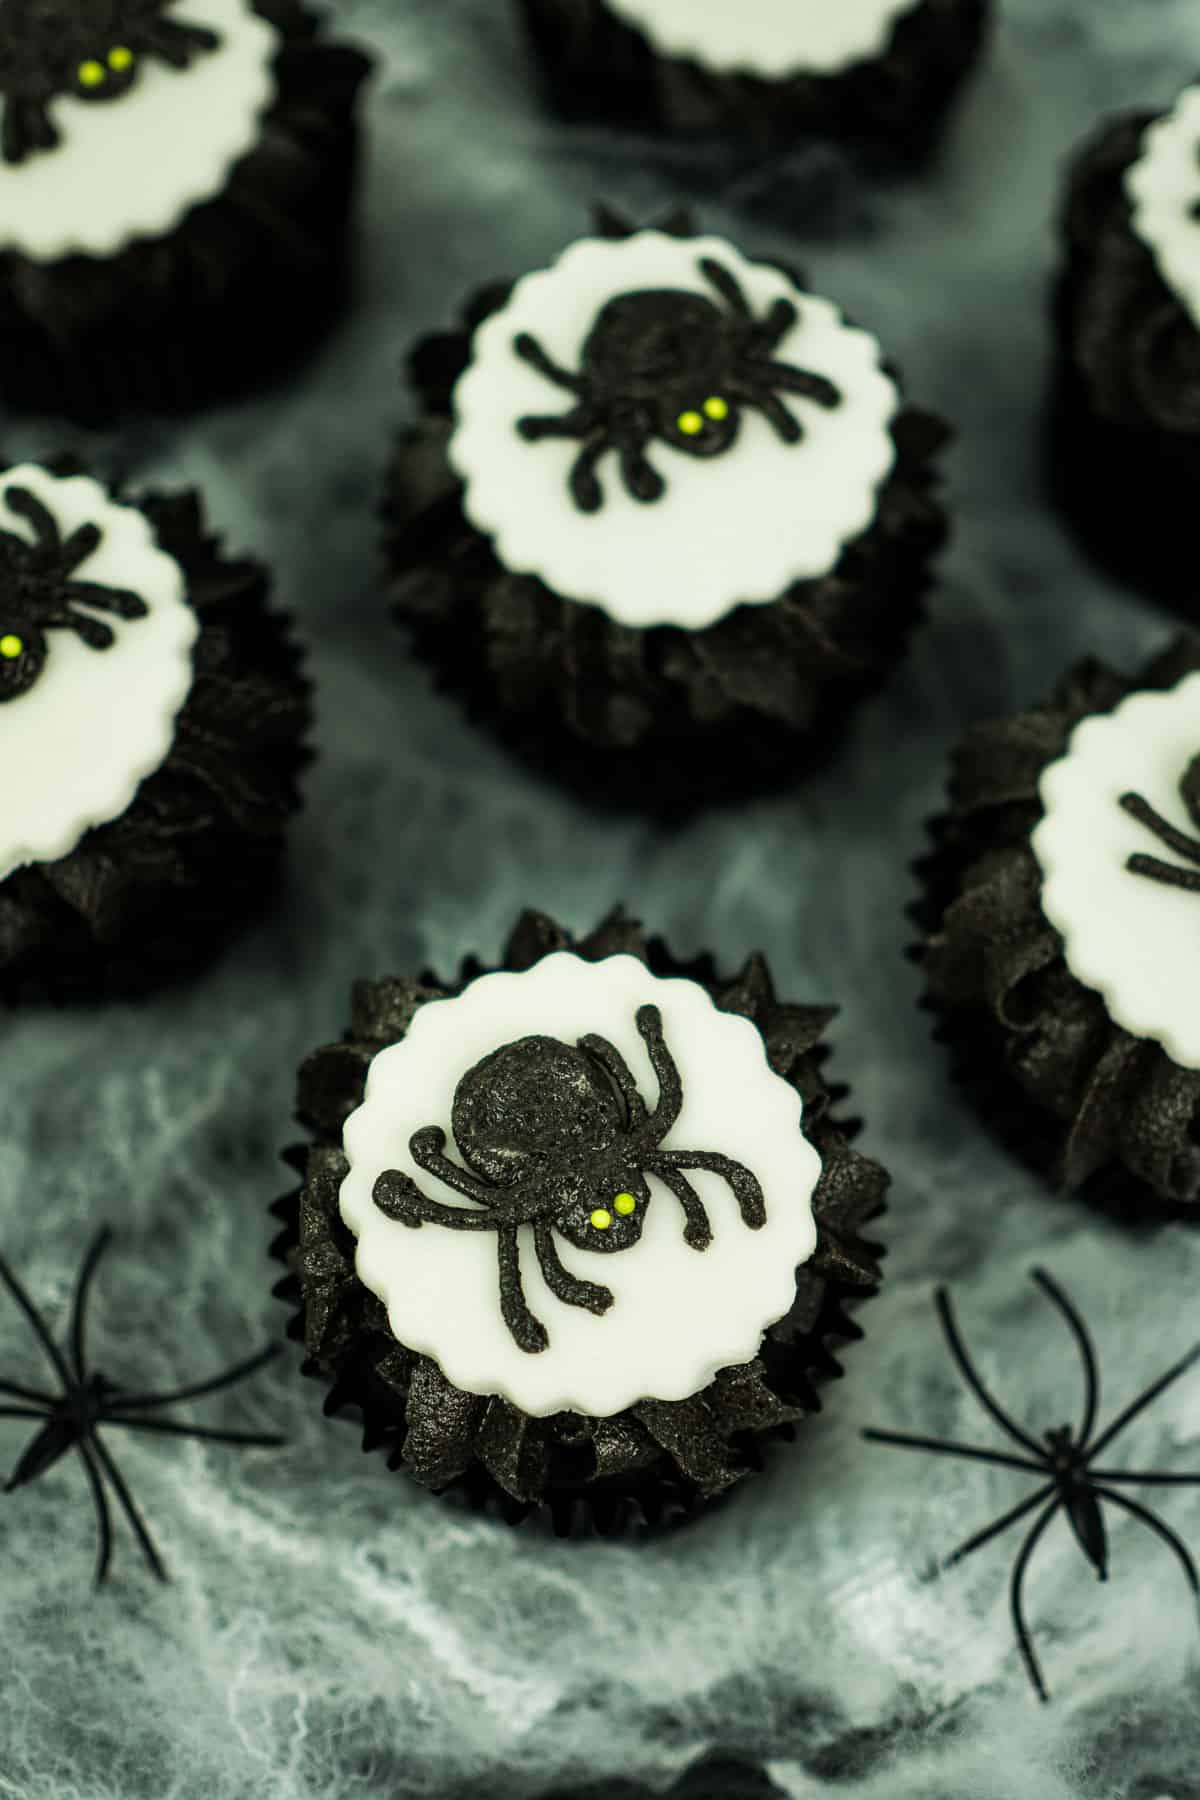
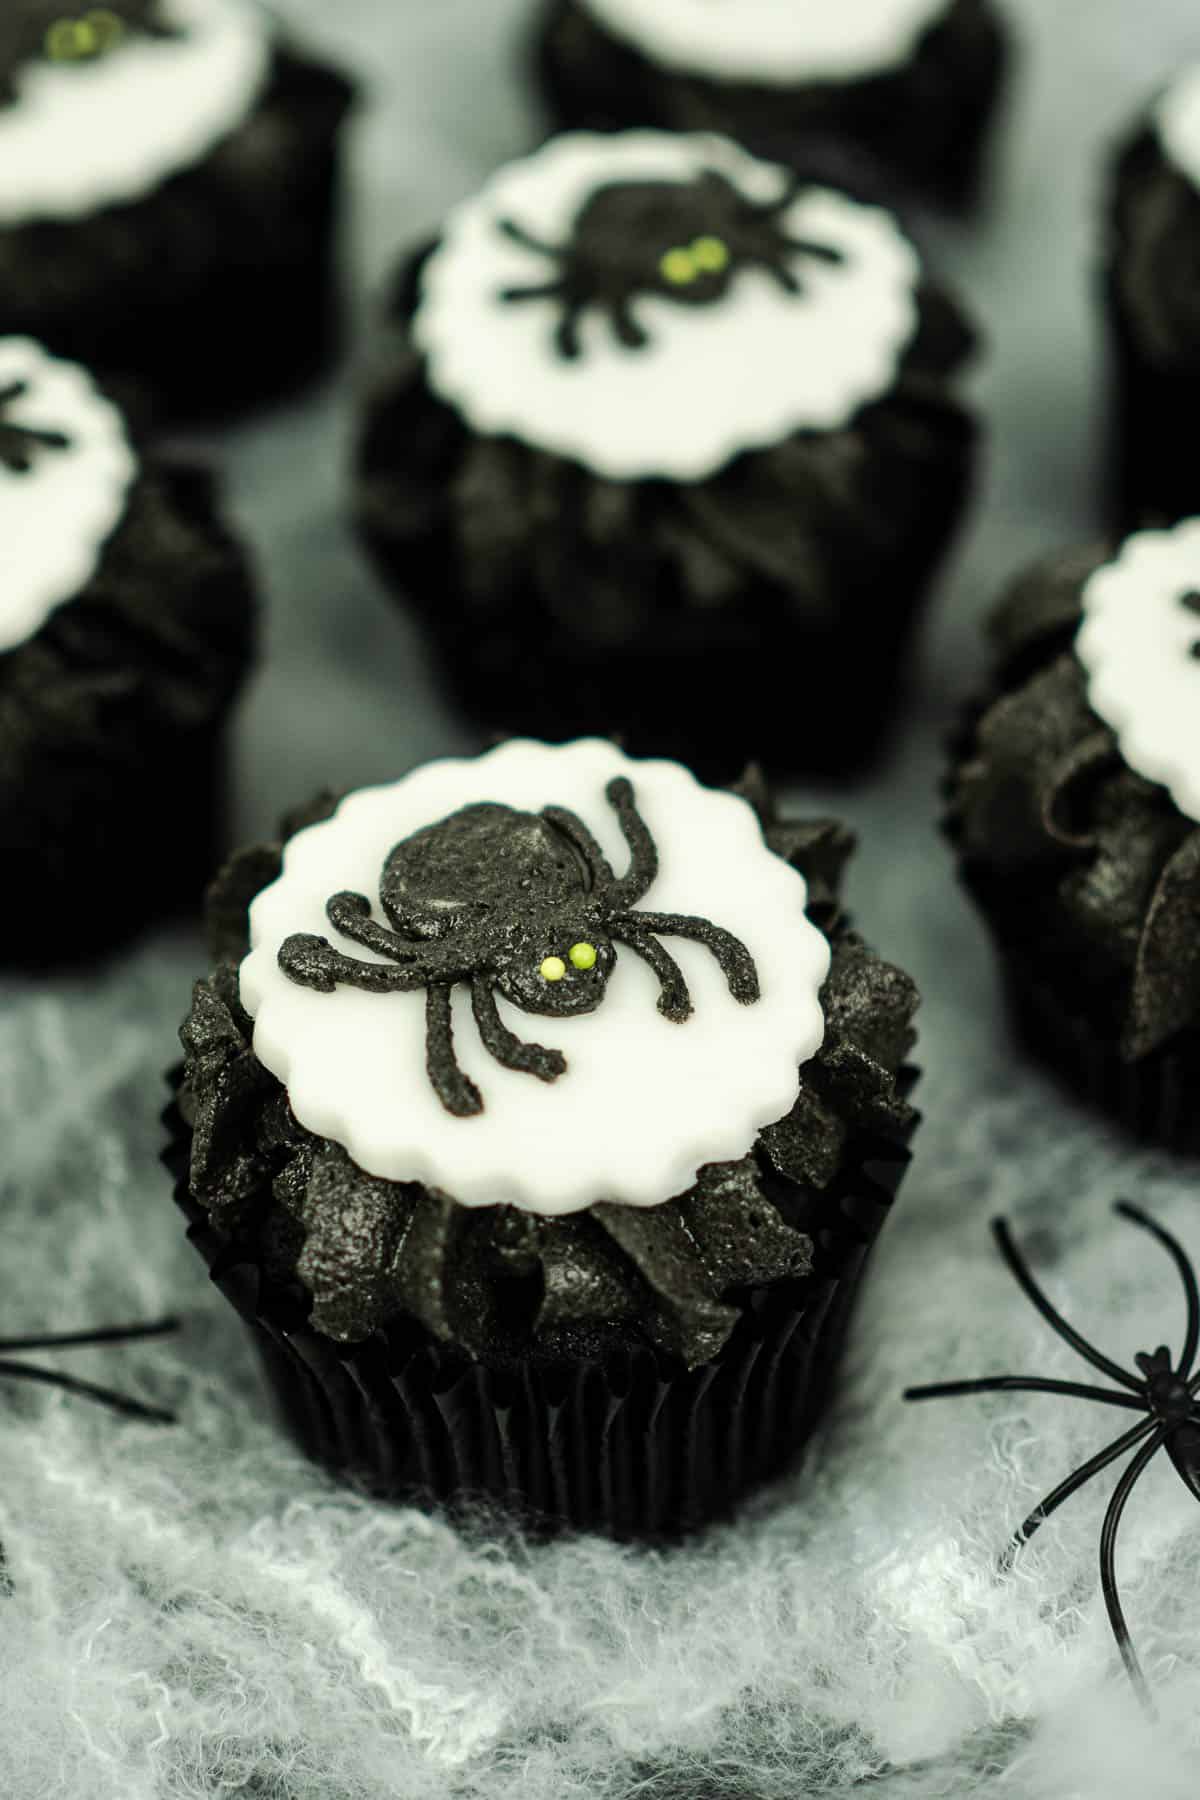
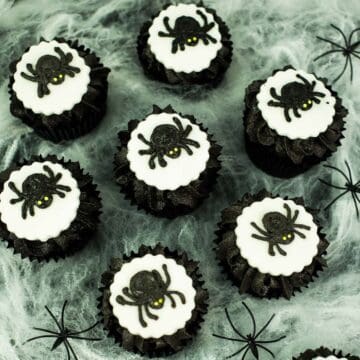
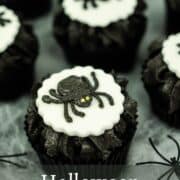
These creepy Halloween spider cupcakes recipe makes rich, black chocolate cupcakes with the in-season flavor of pumpkin and warm pumpkin pie spices. Topped with velvety black buttercream and decorated with creepy black spiders piped in buttercream, these soft and fluffy cupcakes are easy to decorate and make perfect Halloween treats.
This simple chocolate pumpkin cupcakes recipe is adapted from my incredibly moist vanilla cupcakes recipe, and chocolate pumpkin cupcakes recipe to create deliciously moist chocolate cupcakes with a delightful pumpkin and pumpkin pie spice flavors.
Unlike most spider themed cupcakes on the internet which are decorated with Oreo cookies (or other chocolate sandwich cookies), and candy eyes or candy eyeballs, the spooky spider cupcakes design I have here is a unique but equally simple to decorate.
If you're craving more pumpkin delights, be sure to explore my collection of pumpkin desserts, such as this autumn-inspired pumpkin spice pound cake and salted caramel pumpkin cupcakes. Also, discover creative ways to incorporate pumpkins into your Halloween party with treats like my Halloween marble cake and these the Jack O Lantern Halloween pumpkin cupcakes.
Jump to:
❤️Why You Will Love This Recipe
- The easy spider cupcakes recipe makes deliciously soft and fluffy cupcakes and stay moist for a good 4 to 5 days.
- The black color of the cupcakes is all naturally derived from black cocoa powder.
- The black buttercream starts with a chocolate buttercream base made using black cocoa powder, hence minimal food coloring used.
- This is an easy cupcake decorating idea. No special cutters are required for the spiders, they can be piped free hand.
- The pumpkin and pumpkin pie spice flavors of the cupcakes are great for the Fall season.
📋Ingredients
For the Cupcakes:
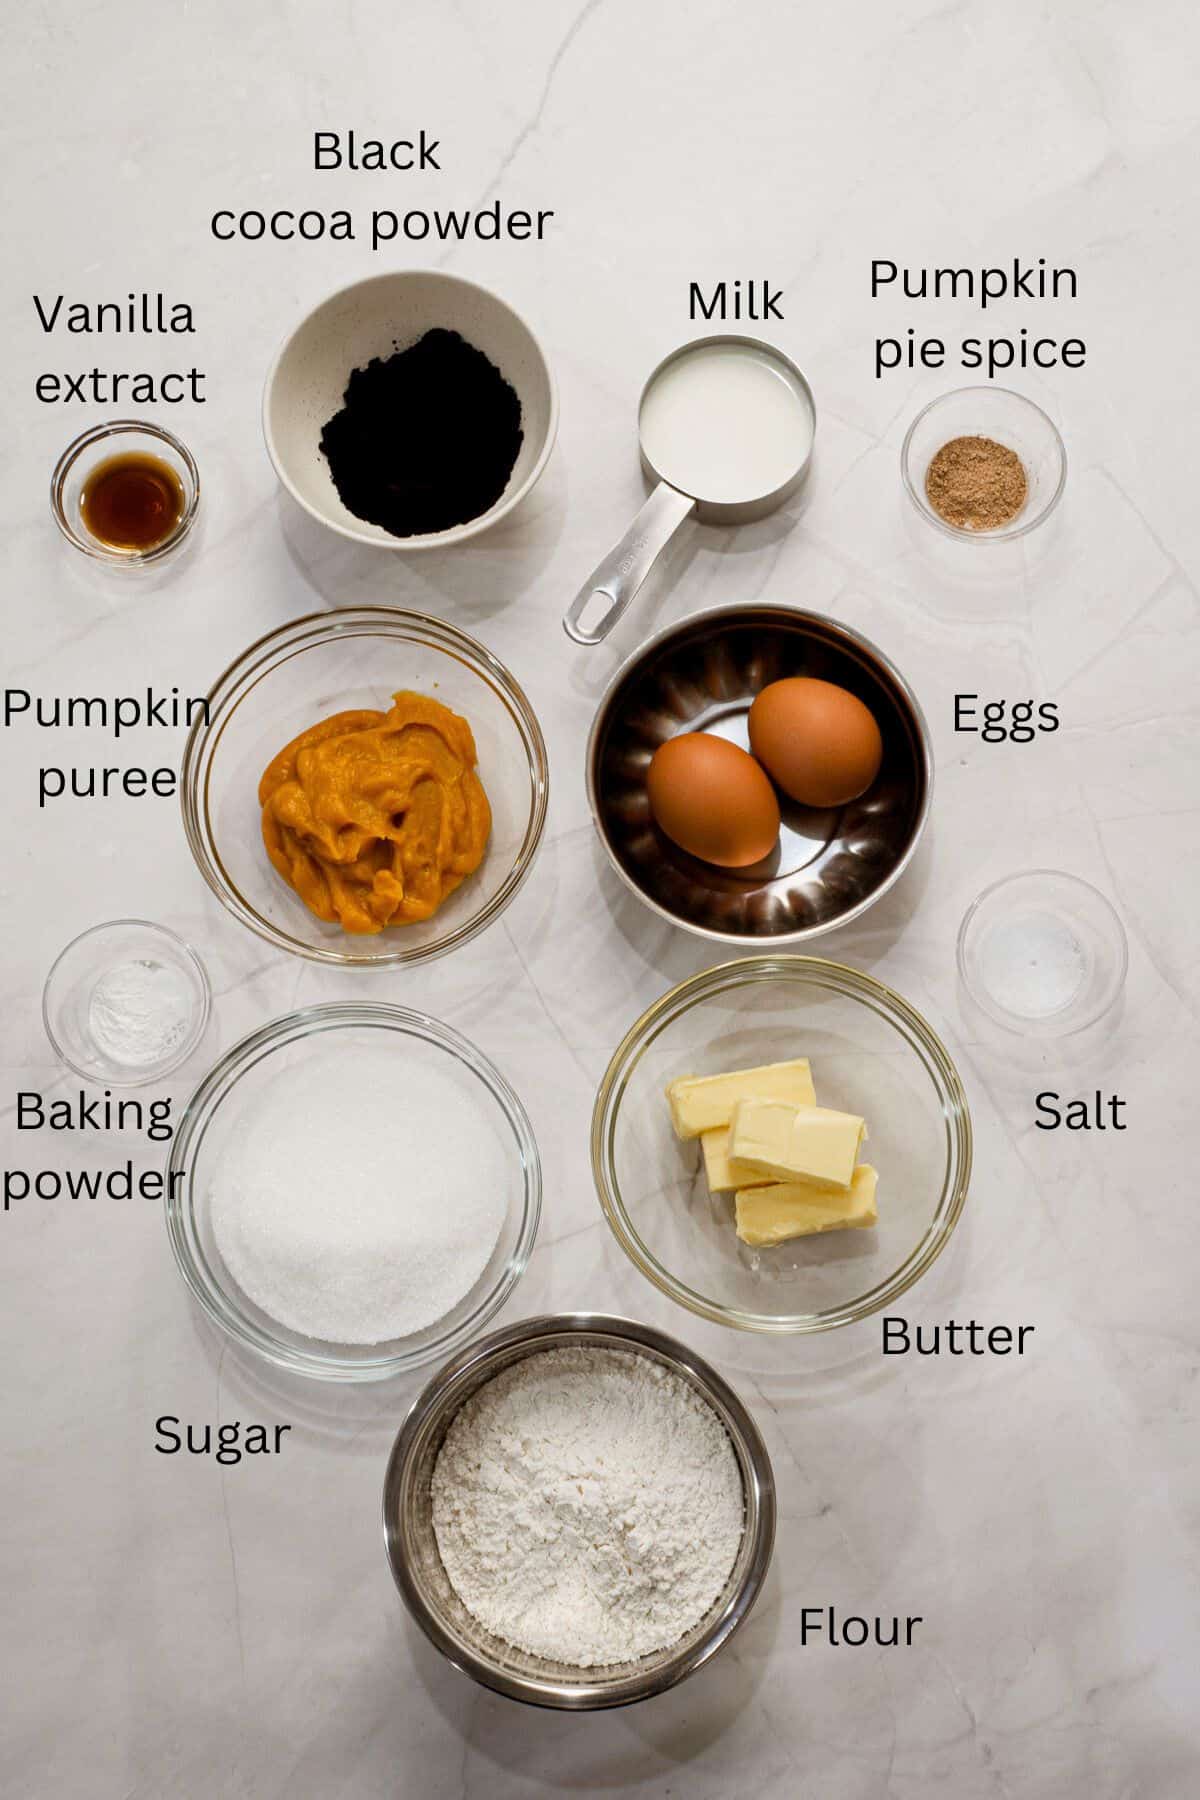
- Self-raising flour + baking powder + salt - combine these dry ingredients and sift them along with the pumpkin pie spices and cocoa powder. Sifting aerates the flour, ensuring well-risen cupcakes, and helps the ingredients to combine well. Fine salt is recommended for optimal flavor enhancement.
- Black cocoa powder - contributes to the rich chocolate flavor and black color of the cupcakes. Sift the cocoa powder to prevent any lumps in the batter.
- Granulated sugar (caster sugar) - avoid coarse sugar, which may leave unwanted specks on the cupcakes after baking. If granulated sugar is unavailable, briefly process coarse sugar to achieve a finer texture before using.
- Butter - I prefer using salted butter. If you choose unsalted butter, add a small extra pinch of salt to the recipe.
- Eggs - opt for large-sized eggs at room temperature for optimal baking results.
- Milk - contributes to the moisture in the cupcake batter, and gives them a moist and tender crumb.
- Pumpkin puree – both canned puree or homemade pumpkin puree can be used. If using homemade puree, make sure the texture is neither too thick nor too runny. It should be similar to canned pumpkin. Do not use pumpkin pie filling, as it is not suitable for this recipe.
- Pumpkin pie spice – this is a combination of cinnamon, cloves, ginger, allspice and nutmeg. This spice can be purchased in mixed form from local or online stores.
- Vanilla extract - adds a lovely aroma to the cupcakes.
For the Black Buttercream Frosting:
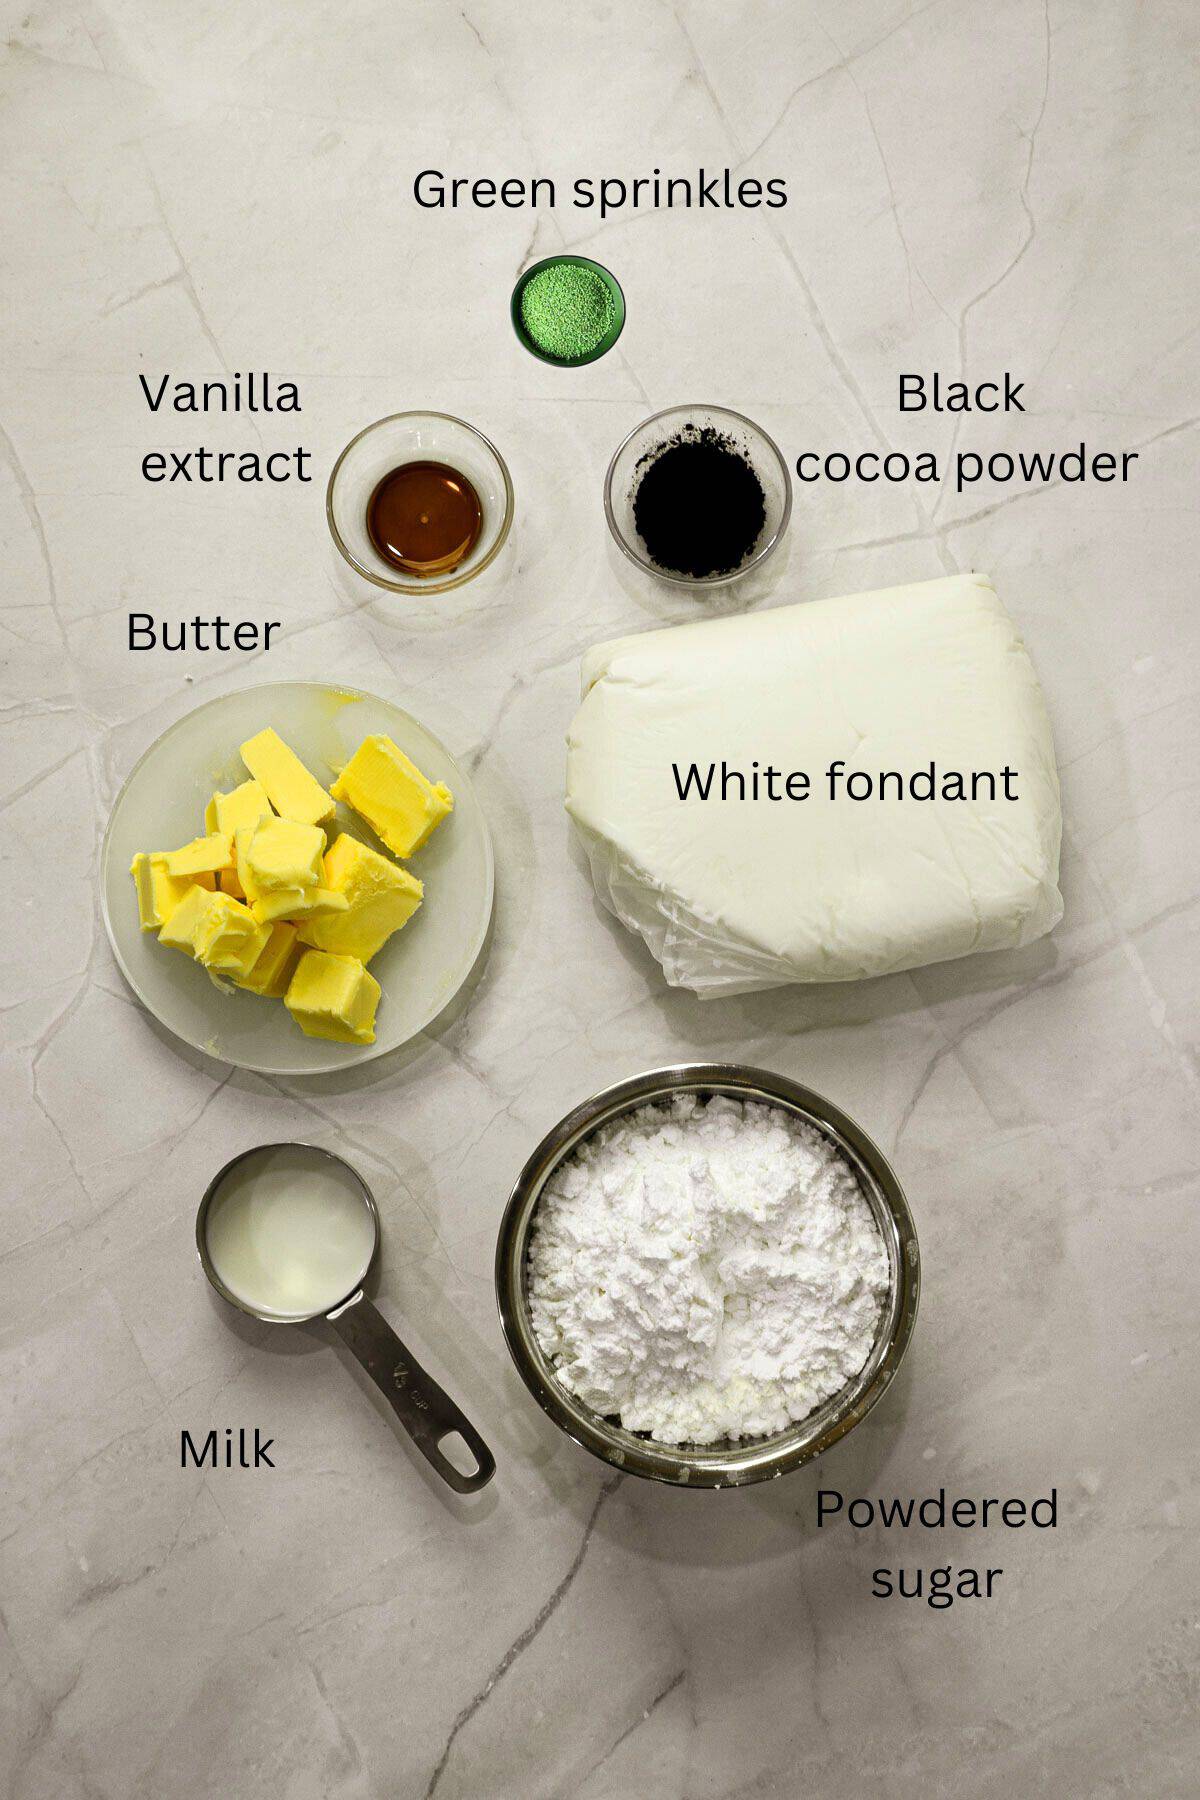
- Butter - ensure the butter is softened at room temperature but firm. If it is too soft to the point it is not able to hold its shape, place it back in fridge to firm up. This recipe uses salted butter. If you use unsalted butter, add ⅛ teaspoon of salt when creaming the butter and sugar. Salt enhances the taste of the buttercream.
- Powdered sugar - sift the powdered sugar before mixing with butter to avoid any lumps in the frosting.
- Milk - this is optional and only required if the buttercream is too stiff. Add in small increments of one or half tablespoon each time to prevent the buttercream from becoming too runny.
- Black cocoa powder - provides the black base color for the buttercream. Sift the cocoa powder before using to prevent any clumps in the frosting.
- Black food coloring – this is optional, and only required in small quantity if used.
For the Decoration:
- White fondant – both store bought fondant or homemade fondant will work.
- Green sprinkles – these are for the eyes of the spiders.
*Refer to the recipe card below for full list of ingredients and exact quantities. For best results, use a digital kitchen scale where applicable*
🧾Substitution and Variations
- Self-raising flour can be substituted with all-purpose flour and baking powder. Use 180g of all-purpose flour and add one teaspoon, plus an additional one third teaspoon of baking powder to it (in addition to the amount mentioned in the recipe). Mix thoroughly and sift at least three times before using.
- Black cocoa powder can be substituted with normal chocolate cocoa powder however, the cupcakes will dark chocolate and not be as black. To make them black, add a few drops of food coloring to the cupcake batter. For the buttercream, you can use normal cocoa powder but may need to increase the amount of food coloring added for a truly black buttercream.
- White sugar for the cupcakes can be replaced with brown sugar. Use exact same quantity.
- If you don't have powdered sugar, you can grind regular sugar until it's fine and then sift it to make the buttercream.
This recipe has not been tested with other substitutions or variations. If you do try, please let me know in the comments section below!
👩🏻🍳How to make
Bake the cupcakes
Step 1: Pre heat oven to 175°C and prepare a cupcake pan with cupcake liners.
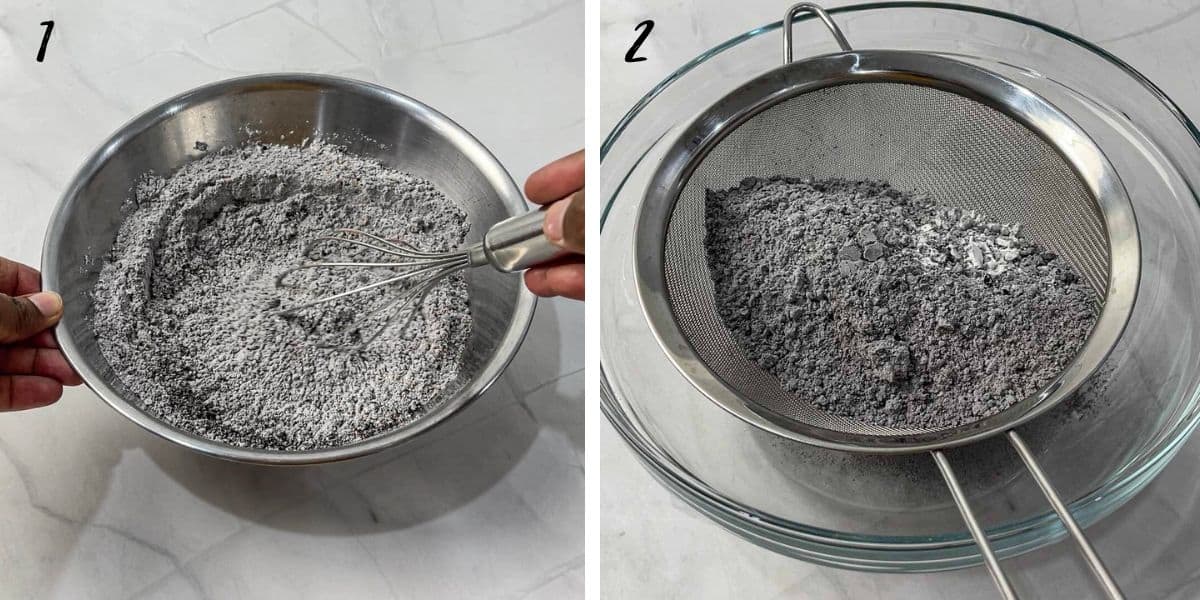
Step 2: Whisk together self-raising flour, cocoa powder, pumpkin spice powder, baking powder, and salt in a medium bowl (image 1). Sift the mixture and set it aside (image 2).

Step 3: In a separate bowl, combine sugar and butter, and cream until they turn light and fluffy (about 2 minutes on medium speed) (image 3). Remember to scrape the sides and bottom of the bowl halfway through.
Step 4: Beat in the eggs, one at a time (image 4), ensuring that each egg is well incorporated before adding another one. Scrape the bowl's sides and bottom halfway through to ensure thorough mixing.
Note: Scraping the bowl guarantees that all the ingredients are properly blended, leaving no unmixed portions.
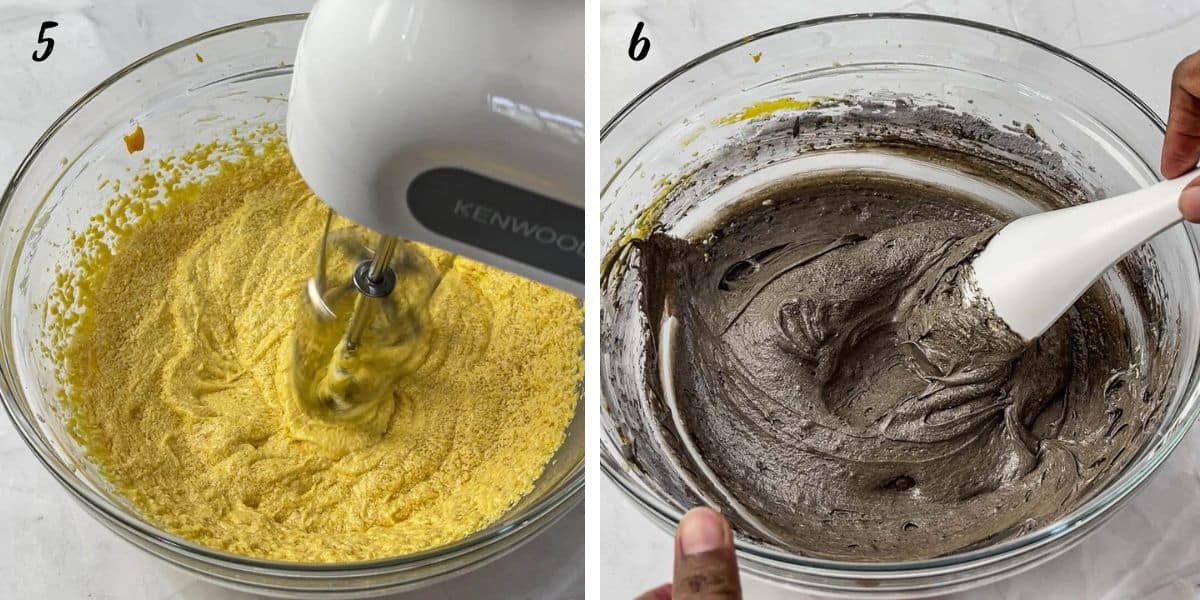
Step 5: Add the pumpkin puree and beat until well combined (image 5). Don't worry if the mixture appears curdled after adding the pumpkin puree.
Step 6: Gradually fold half of the flour mixture (dry ingredients) into the wet ingredients(image 6).
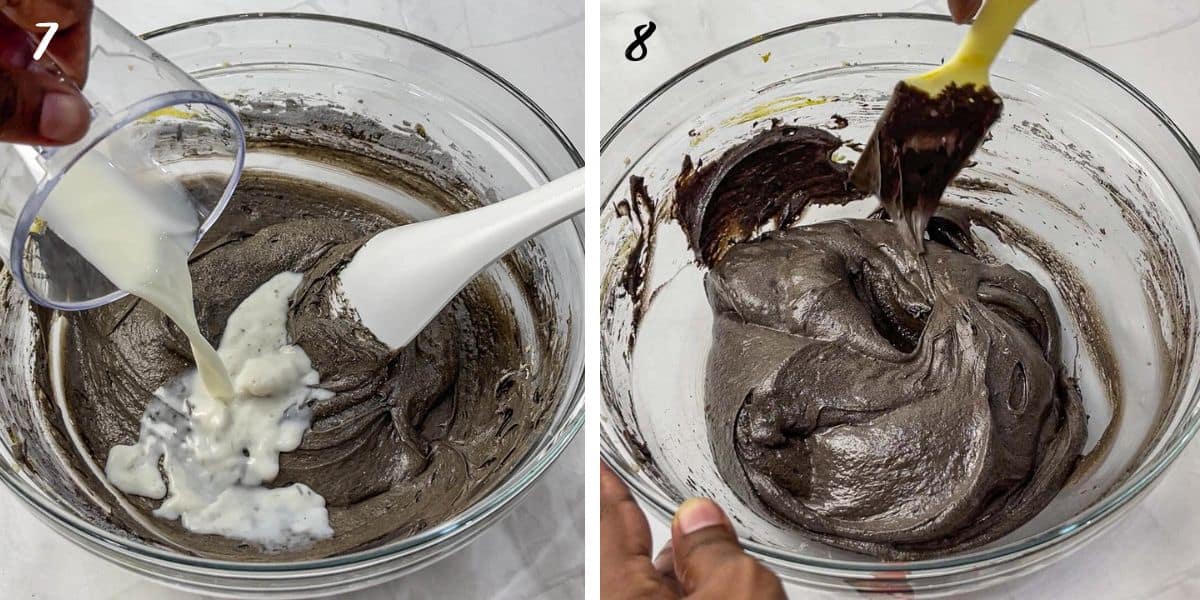
Step 7: Incorporate the milk (image 7) and fold again, followed by the remaining flour mixture. Scrape the sides and bottom of the bowl to ensure all the ingredients are well mixed (image 8).
Step 8: Add the vanilla extract and mix until combined.
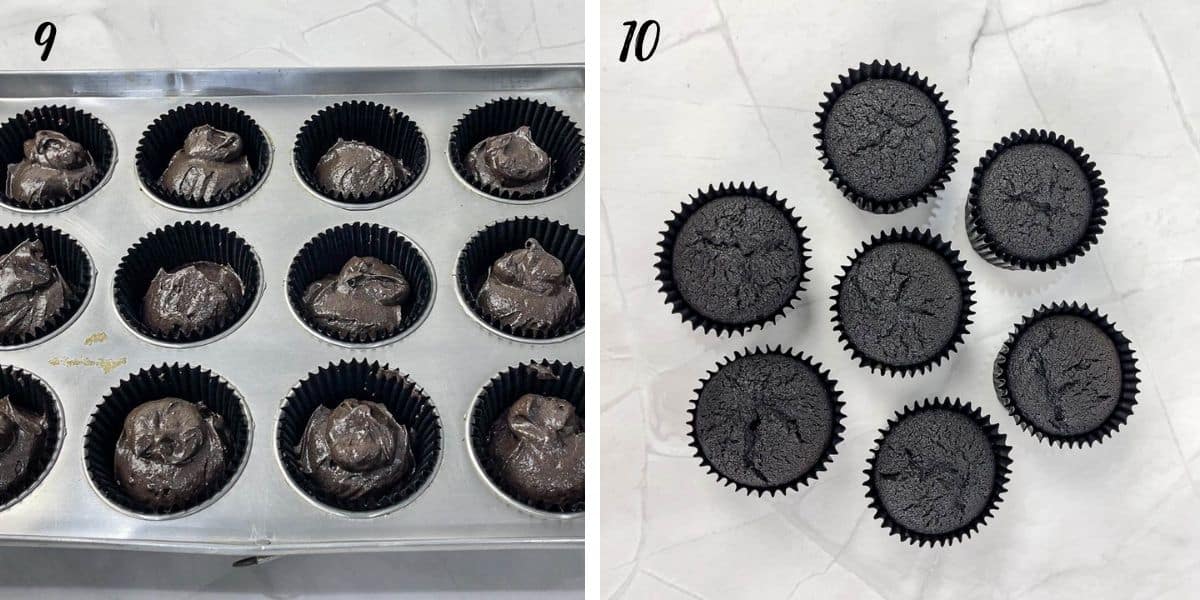
Step 9: Scoop the cupcake batter and fill each liner about three quarters full (image 9). Using a cookie scoop or an ice cream scoop with a spring release can help maintain consistent cupcake sizes.
Step 10: Bake for 15 - 18 minutes or until a toothpick inserted into the center comes out clean without any wet batter. Alternatively, check if the cupcakes spring back when lightly pressed on the top.
Step 11: Remove the cupcakes from the oven and let them rest in the tin for 1 to 2 minutes before transferring them to a cooling rack to cool to room temperature before decorating (image 10).
Note: Cover the cupcakes with a kitchen towel while cooling to prevent them from losing their moisture.
Make the black buttercream frosting
Step 12: Add butter into a large bowl. Beat until smooth and creamy.
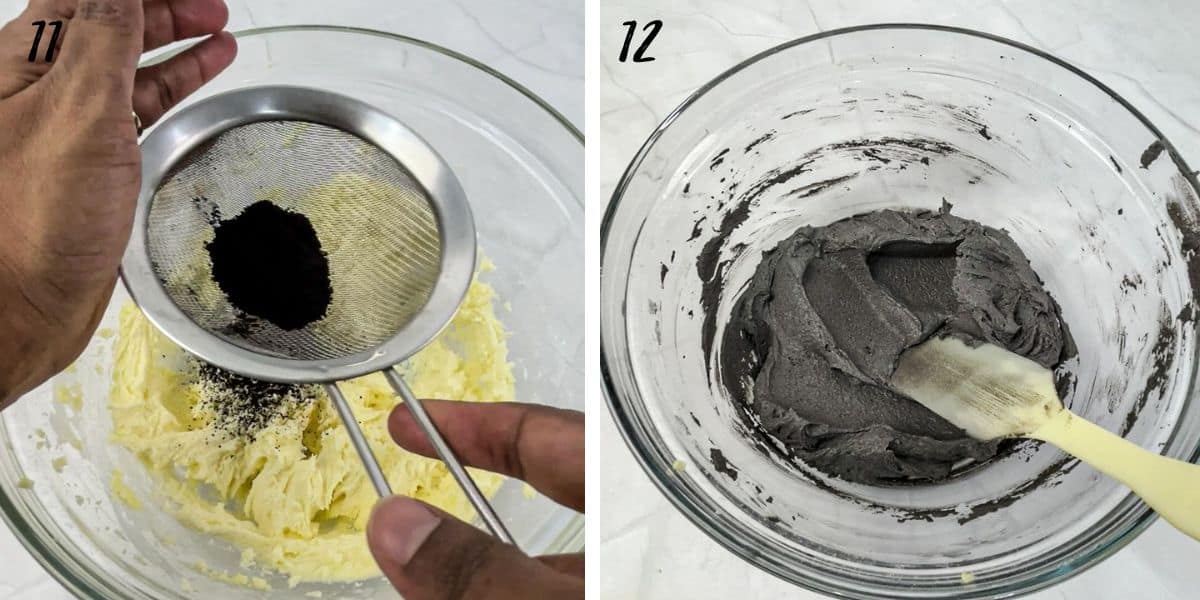
Step 13: Sift in the powdered sugar followed by the black cocoa powder (image 11).
Note: Mix with spatula first before using the mixer. This is help moisten the sugar and prevent it from flying all over as you turn on your electric mixer.
Step 14: Continue mixing with the mixer on low speed and then increase to medium speed until the sugar, cocoa powder and butter are well incorporated and the frosting is smooth and creamy.
Scrape the sides of the bowl and the beaters to make sure there is no butter or sugar or cocoa powder left unmixed at the bottom and sides of the bowl as well as the beaters.
Step 15: Add the vanilla extract and beat again until well combined. At this stage, the buttercream may not appear completely black. It is best to set it aside for approximately 10 to 20 minutes as the black color from the cocoa powder will intensify slowly (image 12).
Note: If the color is not sufficiently black, add a few drops of black food coloring or a combination of red, green and brown food colors after allowing the buttercream to rest. Mix well and let the frosting rest again for another 10 to 15 minutes to allow the colors to intensify.
Step 16: Transfer the buttercream into a piping bag. Fit another 2 empty piping bags with a star tip (tip #1M) and a small round tip (tip #3) each.
Note: If the buttercream is too much to be filled into a single piping bag, fill it into two. Once you have finished using the first one, simple remove it form the piping bags that has the tips attached and replace with the new bag.
Decorate the cupcakes
Step 17: Insert the black chocolate frosting bag into the star-tipped piping bag.
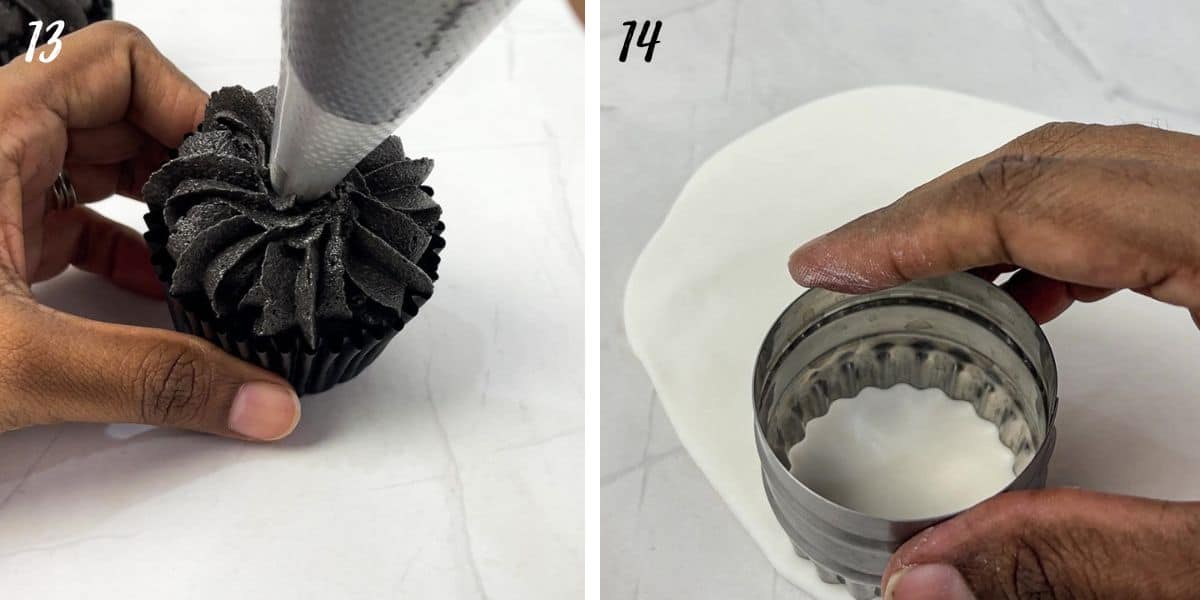
Step 18: Pipe a row of reverse stars on top of each cupcake (image 13). Complete the piping for all the cupcakes.
Step 19: Next, pinch some white fondant and roll it thin to about ⅛ of an inch. Cut out small circles with a 2-inches diameter round cutter (image 14). Cut out sufficient circles to cover all the cupcakes.
Note: Knead the fondant until smooth and pliable before rolling. Dust your workspace with some cornstarch before rolling the fondant to prevent it from sticking (here is how you can make your own dusting pouch).
Step 20: Place the cut outs onto each frosted cupcake. Position them right in the center of each cupcake.
Transfer the black buttercream bag from the star tipped bag into the round tipped bag to pipe the spooky spiders.
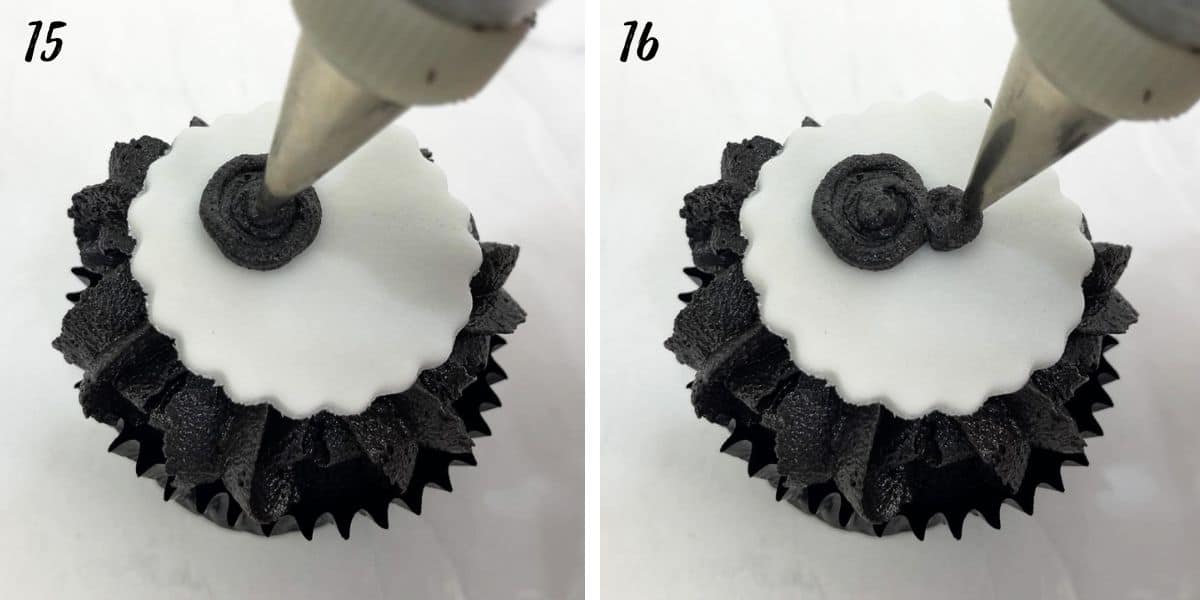
Step 21: Start with the spider bodies. Pipe a circle and fill it with buttercream (image 15).
Pipe a smaller circle in front of it and fill it with buttercream too. This will form the head of the buttercream spider (image 16).
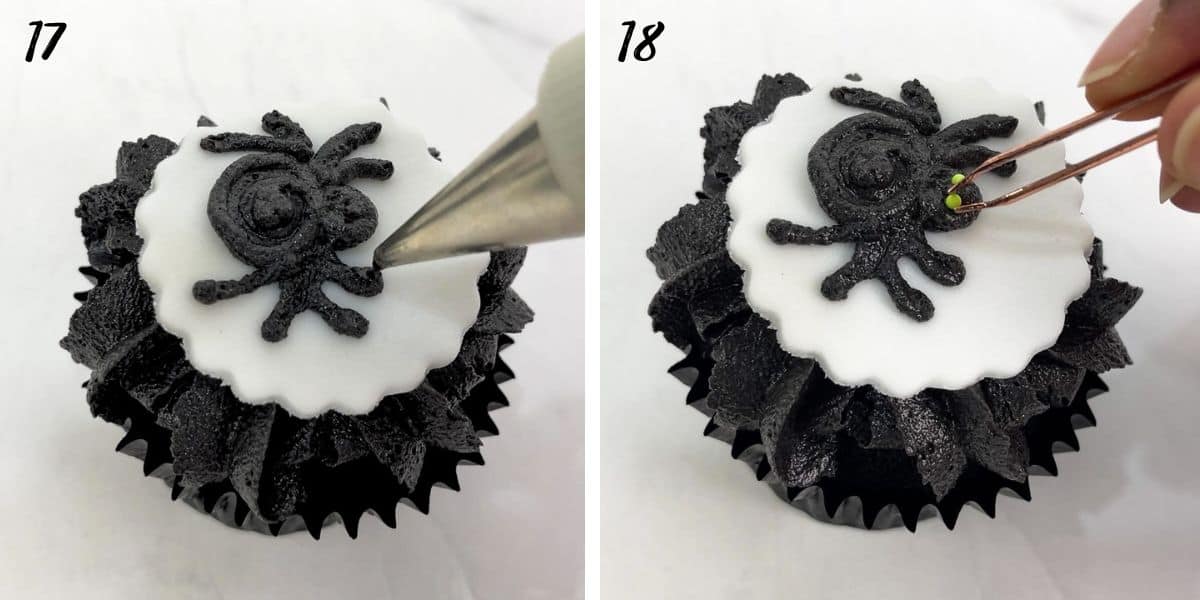
Step 22: Next, pipe 4 spider legs on each side of the spider (image 17).
Step 23: And finally, use a tweezer to place 2 tiny green sprinkles for the eyes of the little spiders (image 18).
💡Expert tips
- Make sure the black cocoa powder is thoroughly mixed into the cupcake batter to achieve a deep, rich black color.
- Always allow some time for the color of the cocoa powder and food color to intensify in the frosting before adding more.
- Gel based food colors are prefer as they are concentrated and you only need to use small amounts, which in turn will not alter the consistency of the frosting, unlike liquid food coloring which has a tendency to impact the texture of the buttercream if used much.
- Fondant might turn soggy in humid environment. Keep the cupcakes in an airconditioned room, but not the fridge as the fondant will condensate.

💭FAQs
Stick to pumpkin puree for this recipe, as pumpkin pie filling contains additional sweeteners and spices that can alter the texture and flavor of the cupcakes.
Yes, you can experiment with other frostings, such as cream cheese frosting or chocolate ganache, for a different flavor profile. Adjust the decorations accordingly for a spookier effect.
The cupcakes can last at room temperature for a good 4 to 5 days (provided they are handled without any moisture). However, it is advisable to place the fondant pieces and pipe the spiders right before serving as there is a tendency for the black color from the spiders to smear into the white fondant if left too long.
It is also not advisable to store the decorated cupcakes in the fridge as the condensation on the fondant will turn it soggy once removed from the fridge.
❤️More Recipes You Will Love

Do you like this recipe? Please leave a 5-star ⭐⭐⭐⭐⭐rating in the recipe card below and consider a review further down this page. I would love to hear from you. Thank you!
📖Recipe
Creepy Halloween Spider Cupcakes
Equipment
- Star tip #1M (Wilton)
- Round tip #2 (Wilton)
- Disposable piping bags
- Round scalloped cutter (2 inches in diameter)
- Small rolling pin
For best results, use the metrics measurements. US customary measurements have not been tested and are only meant for guide.
Ingredients
Chocolate Cupcakes
- 180 g self raising flour
- 20 g cocoa powder
- 100 g butter salted
- 200 g granulated sugar
- 2 eggs
- 200 g pumpkin puree
- 100 ml milk
- ½ teaspoon baking powder
- ¼ teaspoon salt
- ½ teaspoon pumpkin pie spice
- 1 teaspoon vanilla extract
Buttercream
- 450 g powdered sugar
- 225 g butter salted
- 2 tablespoon black cocoa powder
- 2 tablespoon milk
- 1 teaspoon vanilla extract
- Black food coloring
Decoration:
- 175 g white fondant
- Tiny green sprinkles (for the spiders' eyes)
Instructions
Bake the cupcakes
- Preheat oven to 175°C and prepare a cupcake pan with muffin liners (or cupcake liners).
- Whisk together self-raising flour, cocoa powder, pumpkin spice powder, baking powder and salt in a mixing bowl. Sift the mixture and set it aside.
- In another bowl, combine sugar and butter. Cream until light and fluffy (about 2 minutes on medium speed). Scrape the sides and bottom of the bowl halfway through.
- Beat in the eggs, one at a time until well incorporated. Scrape the bowl's sides and bottom halfway through to ensure thorough mixing (see Note 1).
- Add the pumpkin puree and beat until well combined. The mixture will curdle and that is fine.
- Gradually fold half of the flour mixture (dry ingredients) into the creamed wet ingredients. Do not overmix.
- Add the milk and fold again, followed by the remaining flour mixture. Scrape the sides and bottom of the bowl.
- Add the vanilla extract and mix well.
- Scoop the batter into the prepared cupcake liners (see Note 2). Fill each liner about three quarters full.
- Bake the cupcakes for 15 - 18 minutes or until a toothpick inserted into the center of the cupcakes comes out clean without any wet batter (see note 3).
- Remove the cupcakes from oven and let them rest in the tin for 1 to 2 minutes before transferring them to a cooling rack to cool completely to room temperature before decorating. Keep the cupcakes covered in a kitchen towel (see Note 4).
Make the black buttercream frosting
- Add butter into a large mixing bowl. Beat it until smooth and creamy.
- Sift in the powdered sugar followed by the black cocoa powder.
- Mix lightly with a spatula (see Note 5) before using the mixer. User the mixer on medium speed until the sugar, cocoa powder and butter are well incorporated and the frosting is smooth and creamy.
- Scrape the sides of the bowl and the beaters to make sure there is no butter or sugar or cocoa powder left unmixed at the bottom and sides of the bowl as well as the beaters.
- Add the vanilla extract and beat again until well combined. At this stage, the buttercream might not appear black (will be a grey tone). Set it aside for approximately 10 to 20 minutes for the black color from the cocoa powder to intensify.
- If the color is not sufficiently black after resting, add a few drops of black food coloring or a combination of red, green and brown food colors (see Note 6) to give the buttercream a black shade. Mix well and let the frosting rest again for another 10 to 15 minutes to allow the colors to intensify.
- Transfer the buttercream into a piping bag. Fit another 2 piping bags with a star tip (tip #1M) and a small round tip (tip #3) each (see Note 7).
Decorate the cupcakes
- Insert the buttercream icing bag into the star-tipped piping bag.
- Pipe a row of reverse stars on top of each cupcake in a circle pattern. Complete the piping for all the cupcakes.
- Next, pinch some white fondant and roll it thin to about ⅛ of an inch. Cut out small circles with a 2-inches diameter round cutter. Cut out sufficient circles to cover all the cupcakes (see Notes 8 & 9).
- Place each cut out onto the buttercream frosted cupcakes. Position them right in the center of each cupcake.
- Transfer the black buttercream bag from the star tipped bag into the round tipped bag to pipe the spiders.
- Start with the spider’s body. Pipe a small circle and fill it with buttercream.
- Pipe a smaller circle in front of it and fill it with buttercream to make the spider’s head.
- Next, pipe 4 legs on each side of the spider.
- Finally, use a tweezer and attach 2 tiny green sprinkles for the eyes.
Notes
- Scraping the bowl guarantees that all the ingredients are properly blended, leaving no unmixed portions.
- Using a cookie scoop or an ice cream scoop with a spring release can help maintain consistent cupcake sizes.
- These cupcakes are baked in cupcake liners measuring approximately 5 cm in diameter (at the bottom) and 3.5cm high (at the sides). If you use large or smaller liners, adjust the baking time accordingly.
- To keep the cupcakes moist, cover the cupcakes with a kitchen towel during cooling to prevent them from drying out.
- Mixing with spatula first before using the mixer will moisten the sugar and prevent it from flying all over as you turn on your mixer.
- Gel based food colors are prefer as they are concentrated and you only need to use small amounts, which in turn will not alter the consistency of the frosting, unlike liquid food coloring which has a tendency to impact the texture of the buttercream if used much. Also, a combination of red, green and brown is alternative option to using black food coloring. It will produce similar results as using black coloring.
- If the buttercream is too much to be filled into a single piping bag, fill it into two. Once you have finished using the first one, simple remove it from the piping bag that has one of the tips attached and replace with the new icing bag.
- Knead the fondant well to make it smooth and pliable before rolling. Also, dust your workspace with some icing sugar or cornstarch to prevent the fondant from sticking.
- The size of the cutter can vary, depending on the size of your cupcakes.
- Fondant might turn soggy in humid environment. Keep the cupcakes in an airconditioned room, but not the fridge as the fondant will condensate.
Leave a Reply