

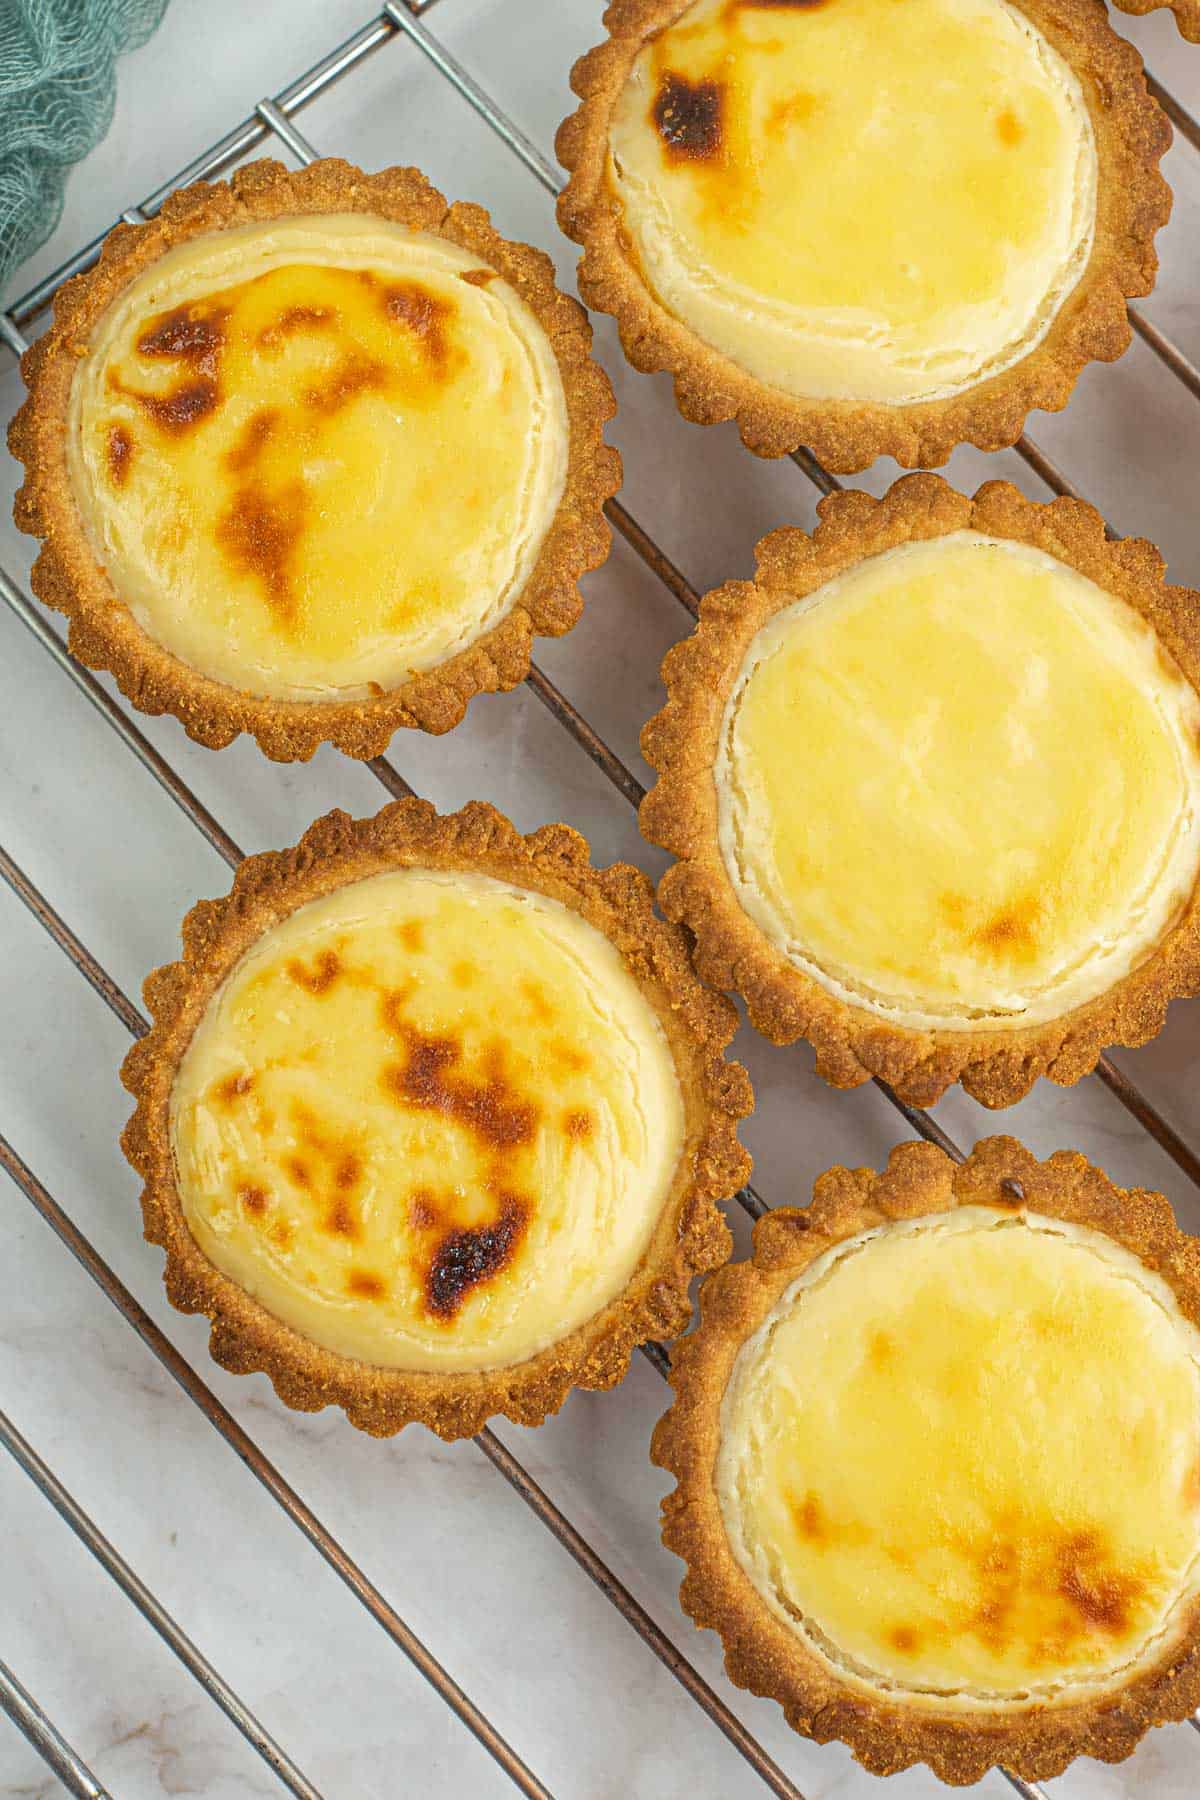
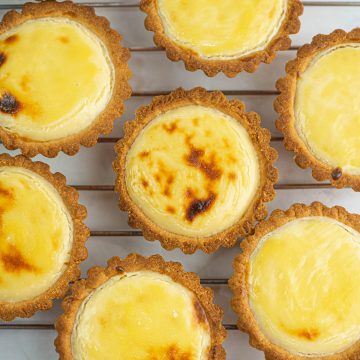
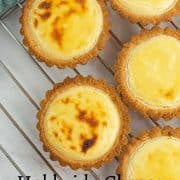
This Hokkaido cheese tarts recipe makes truly delicious and creamy cheese tarts. Baked into small, hand-held crisp and buttery tart shells with a perfect balance of sweet, slightly tangy and savory creamy cheese filling, these cheese tarts make perfect treats for parties and are great as desserts too.
Jump to:
❤️Why you will love this recipe
- This is an easy recipe, with detailed step by step instructions for making homemade Hokkaido cheese tarts.
- The tarts are easy to make and turn out perfect every single time.
- The recipe makes absolutely delicious tarts with creamy cheese filling and buttery tart shells.
- The aroma of the tarts as you bake them is so divine and inviting.
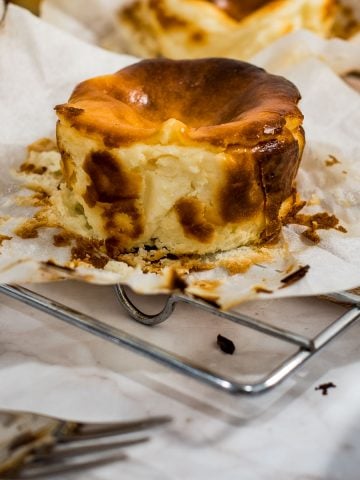
Like this recipe? Here are more recipes you can check out:
📋Ingredients
Crust
- All purpose flour + salt - best sifted. Use fine salt as it dissolves more easily.
- Butter - should be cold and firm but soft enough to cut into small cubes. Cut into small pieces for easy mixing. I use salted butter. If using unsalted butter, add an extra small pinch of salt to the recipe.
- Powdered sugar (icing sugar) - sift first before using to break any lumps.
- Egg - use large egg.
- Vanilla extract - adds a lovely aroma and flavor to the crust.
Filling
- Cream cheese - makes up the largest type of cheese used in the filling. Use the block cream cheese and not the spreadable one.
- Mascarpone cheese - adds to the creaminess of the filling.
- Parmesan cheese - contributes to the slightly savory taste in the tart filling.
- Granulated sugar - sweetens the cheese filling
- Egg yolk - contributes to the custard texture of the filling.
- Corn starch - helps to thicken the creamy cheese filling.
- Heavy cream - use cream with at least 35% fat content.
- Fresh milk - use whole milk as it contributes to the creamy filling.
- Butter - I use salted butter. Unsalted butter will also work fine for the recipe.
Egg Wash
- Egg yolk - to brush on top of the tarts.
*Refer to the recipe card below for full list of ingredients and exact quantities. For best results, use a digital kitchen scale where applicable*
🧾Substitution and Variations
- The distinct feature of these Hokkaido cheese tarts is the sweet, tangy and savory taste of the cheese filling. This is achieved by using a combination of cheese in making the filling. The largest portion is made up of cream cheese and you can intensify the cheese taste by adding some parmesan cheese. I have also added some mascarpone cheese to the filling. You can make these Hokkaido baked cheese tarts with just the cream cheese if you like.
- Vanilla flavoring in the pastry and filling can be omitted. Alternatively, it can be replaced with other flavoring like lemon. Just add some grated lemon zest (about 1 teaspoon) into the pastry along with the powdered sugar and/or add about 1 teaspoon of lemon juice into the cheese custard in place of the vanilla extract.
- I have used individual metal fluted tart molds to make these Hokkaido cheese tarts. Here are other types of tart pans and molds you can use if you do not have the ones like I do:
- Smooth edged mini tart molds made of metal
- Mini silicone tart molds
- Mini muffin pan
- Mini disposable individual tart tin or molds (usually made of aluminum foil or paper).
This recipe has not been tested with other substitutions or variations. If you do try, please let me know in the comments section below!
👩🍳How to Make
Mixing the dough
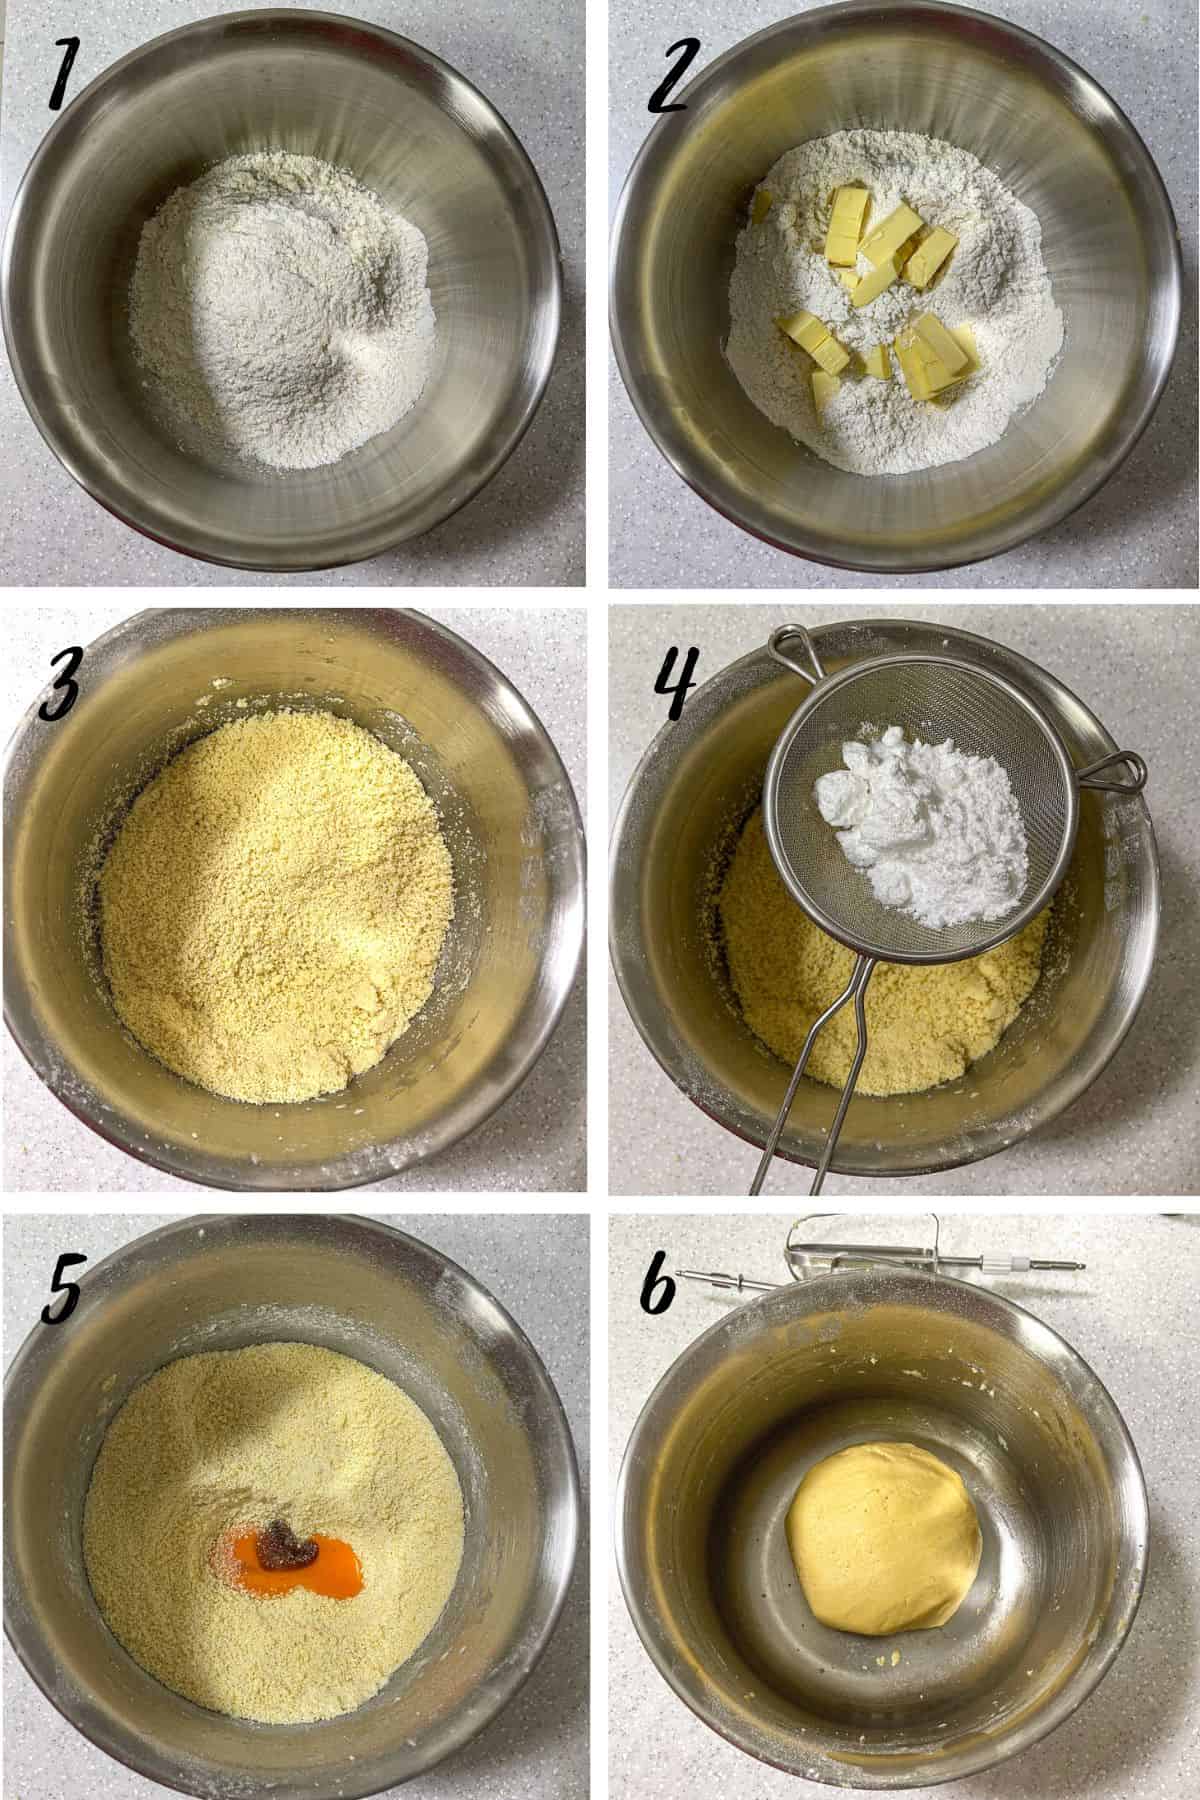
- Start by measuring the flour into a large bowl.
- Cut cold butter into small pieces and add to the flour.
- Mix both with your finger tips or a hand mixer or food processor until the butter and flour mixture resembles bread crumbs. Make sure there are no solid bits of butter left unmixed.
- Next, add the powdered sugar and salt and combine well. At this stage, the mixture would still look like breadcrumbs.
- Next, add the egg and vanilla extract. Mix the ingredients until a dough is formed. Do not overmix it, suffice if all the ingredients come together into a smooth ball.
- Set it aside for about 10 minutes to rest. Once rested, knead lightly and divide the dough into 15 to 16 portions depending on the size of your molds. My molds measured 7cm in diameter at the top and 5cm at the bottom, with a height of 2cm.
Shaping the pastry
There are a few ways in which you can shape the dough into the tart molds. Here are all the methods you can use:
First Method
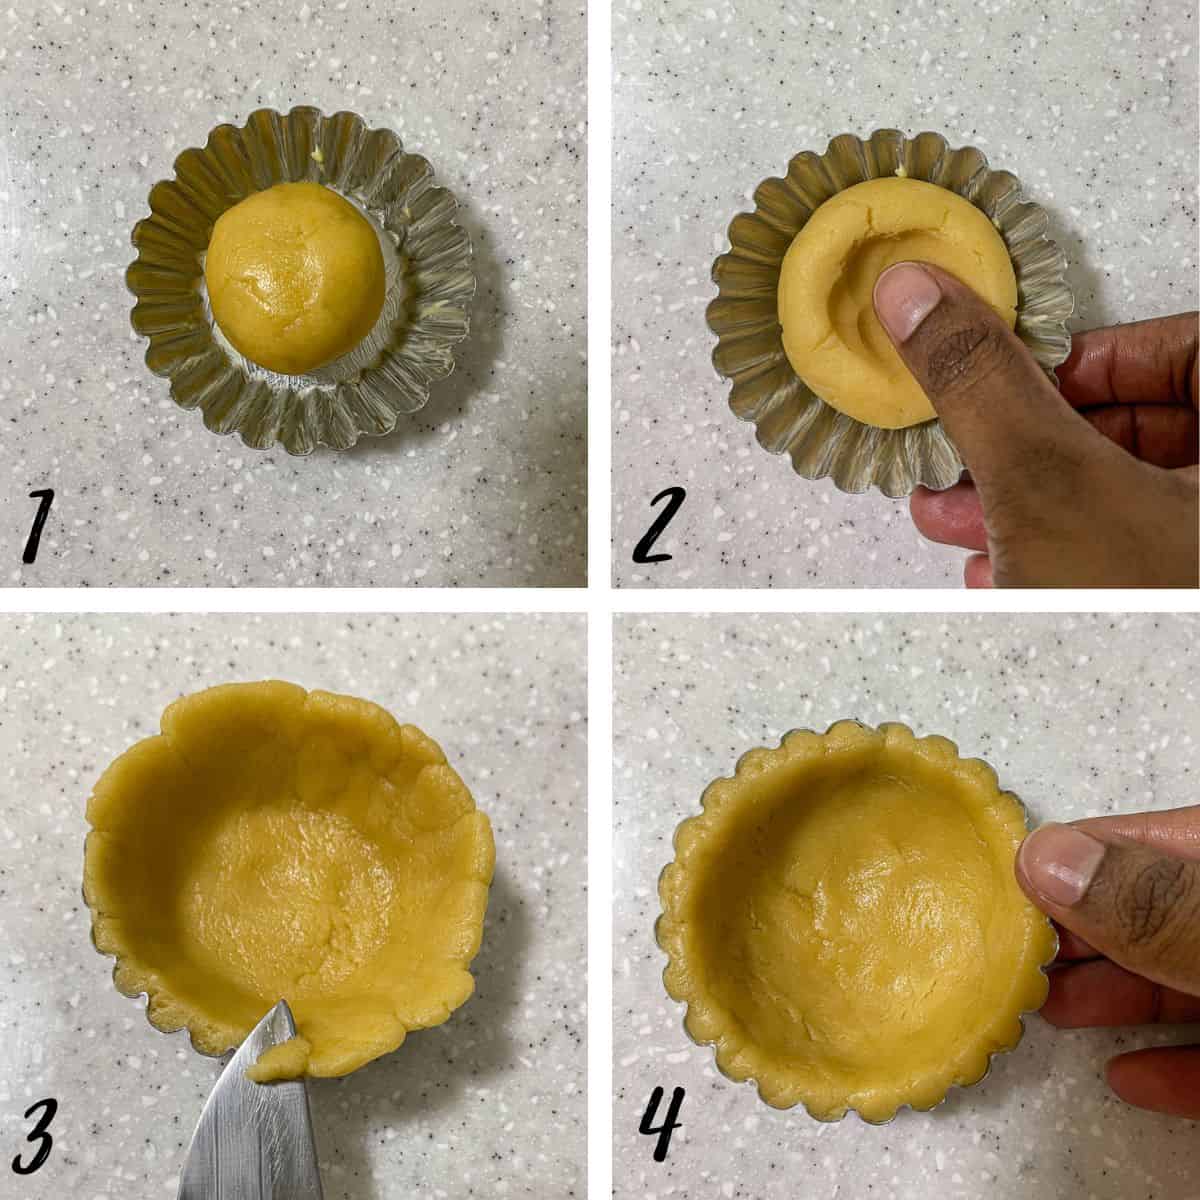
- Form the dough into round balls. Place each ball into a well greased mold and press it with your fingers to cover the insides of the mold.
- In doing this, take note to make sure the thickness of the pastry dough is consistent.
- Trim off any excess dough on the sides with a small sharp knife.
- Or you can simply press the excess down with your fingers for a flat edge.
Second Method
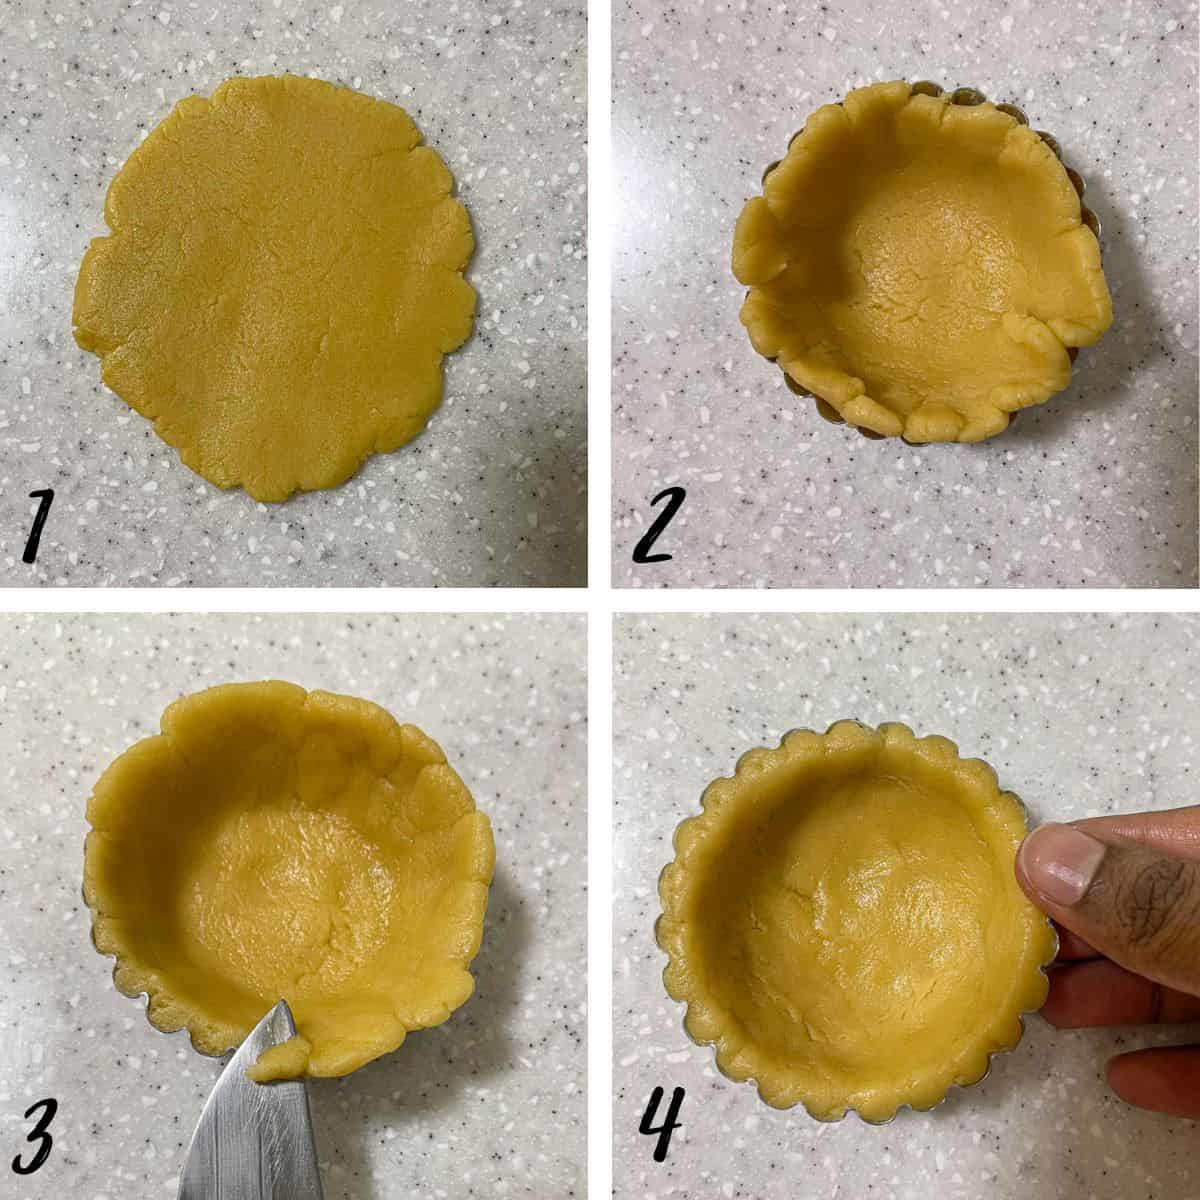
- Form the dough into round balls. Use a rolling pin to roll the dough into a small disc.
- Lift the dough and carefully place it into the pastry mold and press it down gently to follow the shape of the mold.
- Trim of any excess with a sharp knife or simply press it down with your fingers to form flat edges.
- For this method, when rolling the dough, do not roll it too big or too thin, or you will end up with shells that are too thin and a lot of excess dough being cut out.
Third Method
- Form the dough into round balls.
- Flatten it with your fingers to form a small round disc.
- Place the disc into the tart mold and press it down gently to follow the shape of the mold. In doing this, pay attention to the thickness of the pastry as you would want to ensure it is consistent for a uniform baking.
- Similar to the above 2 steps, you can trim off the excess at the edges or simply press it down with your fingers to flatten it.
Baking the tart pastry
Before assembling the Hokkaido cheese tarts, the tart crust need to be blind baked first. This will ensure they bake into a lovely crisp and crumbly texture before the creamy cheese mixture is added.
- To blind bake the shells, use a fork to poke them in the center. This will avoid the centers from puffing up as they bake. Puffed pastry shells will leave lesser room for the cheese hence you need to do this step to ensure the shells do not puff up during baking.
- Place the shells in a preheated oven and bake until they turn golden brown. Do take note to not over bake these as you would be returning these Hokkaido cheese tart shells back into the oven after assembling the cream.
Once baked, remove the baked pastry shell from oven, let them cool slightly before removing the casings and cooling them completely to room temperature on wire rack. Let the shells cool completely before using. You can even bake these shells a few days in advance. Store them in an airtight container until ready to use.
Making the cheese custard
An important point to note when making the cheese custard for these Hokkaido cheese tarts is its consistency. If you like soft and flowy cheese filling, you should not cook it for too long. But if you prefer a more firm and solid filling, you will have to increase the cooking time.
- Start by measuring the milk and cream.
- Next, measure the sugar into a separate small bowl. Add the cornstarch and mix well to combine.
- Add 1 tablespoon of the milk-cream mixture into the sugar. Mix to form a paste.
- Add the egg yolk to the mixture and mix well. Set aside.
- Separately, place cream cheese, parmesan cheese and mascarpone cheese into a small saucepan. Also add the butter and the remaining milk and cream mixture.
- Place the saucepan on medium low heat and cook until the cheeses melt completely and the mixture is smooth. Stir constantly to avoid the mixture from burning and adjust the heat to low if necessary. Turn off the heat and add the vanilla extract.
- Also add the sugar and egg mixture. Stir quickly to avoid the egg from curdling.
- Turn on the heat again to a low flame. Continue cooking until it thickens. The filling does not thicken much after cooling so you can assess the thickness at this point. Once you achieve the desired level of thickness for your filling, remove it from heat.
- Strain the custard to remove any fine lumps. If it is thick, use a spoon to push it through the sieve gently.
- Transfer the filling into a separate container and cover the top with a plastic wrap. Make sure the plastic wrap is touching the surface of the filling to avoid skin from forming on the surface. Let the filling cool completely before using.
Assembling the cheese tarts
Assembling these Hokkaido cheese tarts is easy.
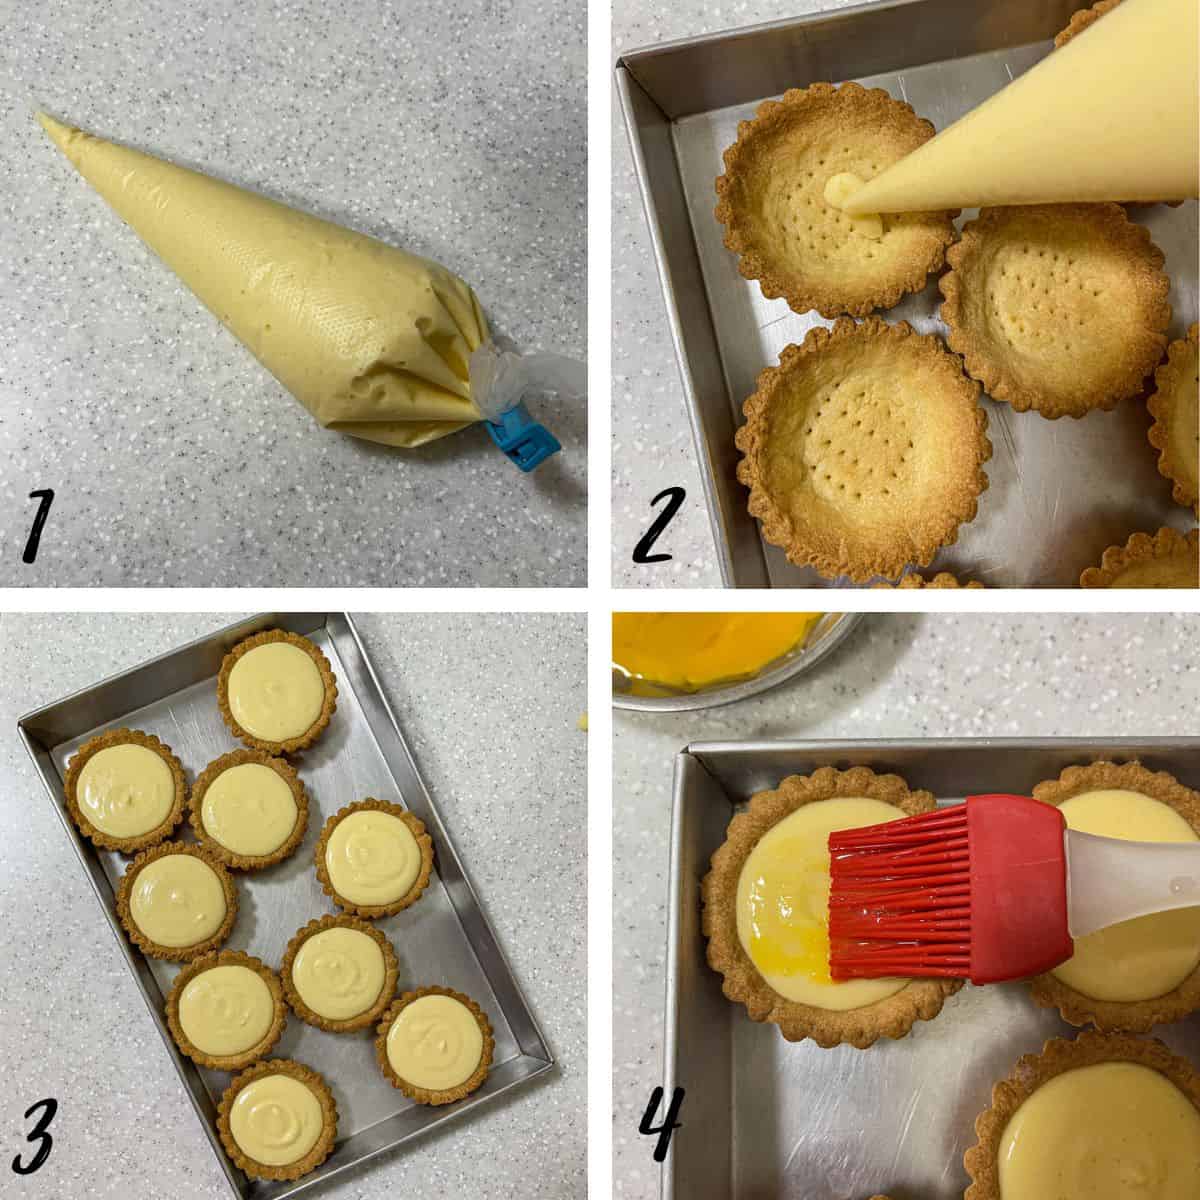
- For easy handling, transfer the cooked cheese mixture into a piping bag. Snip the tip.
- Pipe it into the baked tart shell until it is of the same level as the sides of the shells. Do this for all the tarts.
- If your filling is thick, you might want to lightly tap the tray of the tarts on your kitchen counter to level the custard for an even layer.
- Place the Hokkaido cheese tarts into the freezer for about 5 minutes. This step is to firm up the filling so that it is easier to apply the egg wash on top. In the meantime, preheat the oven. Remove from the Hokkaido cheese tarts from the freezer. Brush the top of the tarts with egg yolk using a pastry brush.
Bake the cheese tarts in the oven for 5 to 10 minutes until the egg wash is cooked. To achieve the slightly charred tops, place the tarts in the top section of your oven and adjust the setting to a grill mode. Pay close attention to the tarts at this stage as there is a tendency for the tart shells to burn. An easier option would be to use a blow torch to char the egg yolk.
Remove the Hokkaido tarts from the oven and let them cool before serving.
🍽️Serving & storage
- If you like the tarts warm, serve while they are warm.
- Keep the leftovers refrigerated in an airtight container for up to 4 days. The tarts are great when served chilled too.
💡Expert Tips
- The Hokkaido cheese tart dough is mixed using the rub-in method, whereby the butter is cut into or rubbed into the flour to form breadcrumbs-like texture before being mixed into a dough with the egg. To achieve the breadcrumb-like texture, the butter must be cold and solid (not room temperature).
- This rubbing in process helps to coat the flour particles with butter, preventing gluten development. And this in turn helps with the lovely crisp texture of the crust. For best results, the butter must be cold.
- For a smooth and creamy filling, make sure the cheeses melt completely when making the filling.
- It also helps to run through the cooked filling in a sieve to remove any lumps.
💭FAQs
Hokkaido cheese tarts are also popularly known as Japanese cheese tarts. As the name suggests, they originate from Japan and have since gained much popularity in places like Hong Kong and other parts of Asia as well as the United States.
The traditional recipe is made using a combination of high-quality cheeses that give the tarts a distinct aroma and a creamy custard that melts in your mouth. The crust is made with a sweet buttery pastry that provides a nice contrast to the creamy filling.
The cheese custard is made with a blend of cream cheese, mascarpone cheese, and sometimes other types of cheese. It is typically mixed with sugar and eggs to create a smooth and creamy texture. Some variations may also include vanilla or other flavorings to enhance the taste.
Hokkaido cheese tarts are typically baked until the filling is just set and the crust is golden brown. They are best served warm, straight out of the oven and are equally delicious when served chilled.
The Hokkaido cheese tarts recipe on this page is very similar to the traditional Hokkaido version, and I have chosen to flavor mine with vanilla for a truly aromatic and creamy tarts. These goodies are only lightly sweetened, and you get to taste the rich combination of cream cheese, mascarpone and parmesan in every bite!
Charring is not necessary. The purpose of baking the tarts after adding the filling is to cook the egg wash.
The egg wash can be cooked in the oven without the grill function or using a blow torch.
Simply place the tarts in the middle rack in your oven and let the tarts cook for 5 to 10 minutes. Remove from oven, cool them slightly and serve, or chill first and then serve them.
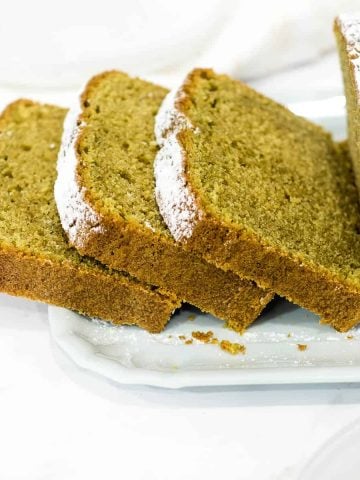
❤️More Recipes You Will Love
Do you like this recipe? Please leave a 5-star ⭐⭐⭐⭐⭐rating in the recipe card below and consider a review further down this page. I would love to hear from you. Thank you!
📖Recipe
Hokkaido Cheese Tarts (the BEST Baked Japanese Tart Recipe)
For best results, use the metrics measurements. US customary measurements have not been tested and are only meant for guide.
Ingredients
Pastry Shells
- 250 g all purpose flour
- 125 g butter
- 60 g powdered sugar
- 1 egg
- ⅛ teaspoon salt
- ½ teaspoon vanilla extract
Cheese Filling
- 200 g cream cheese
- 50 g mascarpone cheese
- 50 g parmesan cheese
- 60 g granulated sugar
- 1 tablespoon corn starch
- 50 ml cream
- 50 ml milk
- 30 g butter
- 1 egg yolk
- 1 teaspoon vanilla extract
Egg Wash
- 1 egg yolk
Instructions
Pasty Shells
- Measure the flour into a medium bowl.
- Cut cold butter into small pieces and add to the flour.
- Mix both with your fingertips or a cake mixer or a food processor until the mixture resembles fine breadcrumbs. Make sure there are no solid bits of butter left unmixed.
- Add the powdered sugar and salt and combined well. At this stage, the mixture would still look like breadcrumbs.
- Next, add the egg and vanilla extract. Mix the ingredients until a dough is formed. Do not overmix, suffice if all the ingredients come together into a smooth ball.
- Set it aside for about 10 minutes to rest. Once rested, knead lightly and divide the dough into 15 to 16 portions.
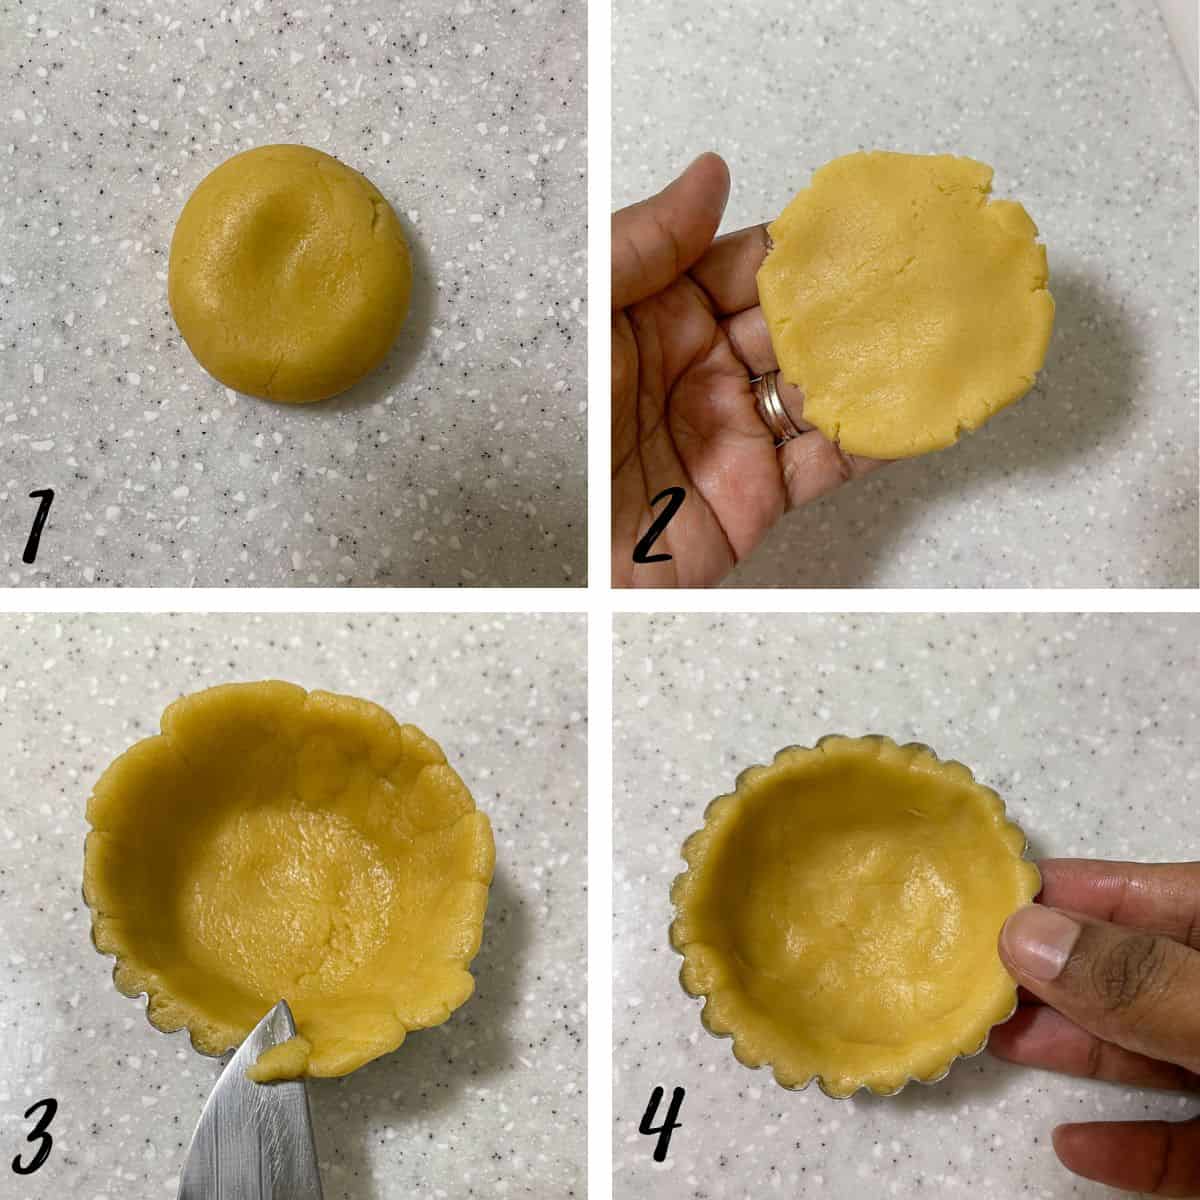
- Form each portion into round balls.
- Flatten each ball with your fingers to form a round disc.
- Place the disc into the tart mold and press it down gently to follow the shape of the mold. In doing this, pay attention to the thickness of the pastry to ensure it is consistent for an even baking.
- Trim off the excess at the edges with a sharp knife or press it down with your fingers to flatten it.
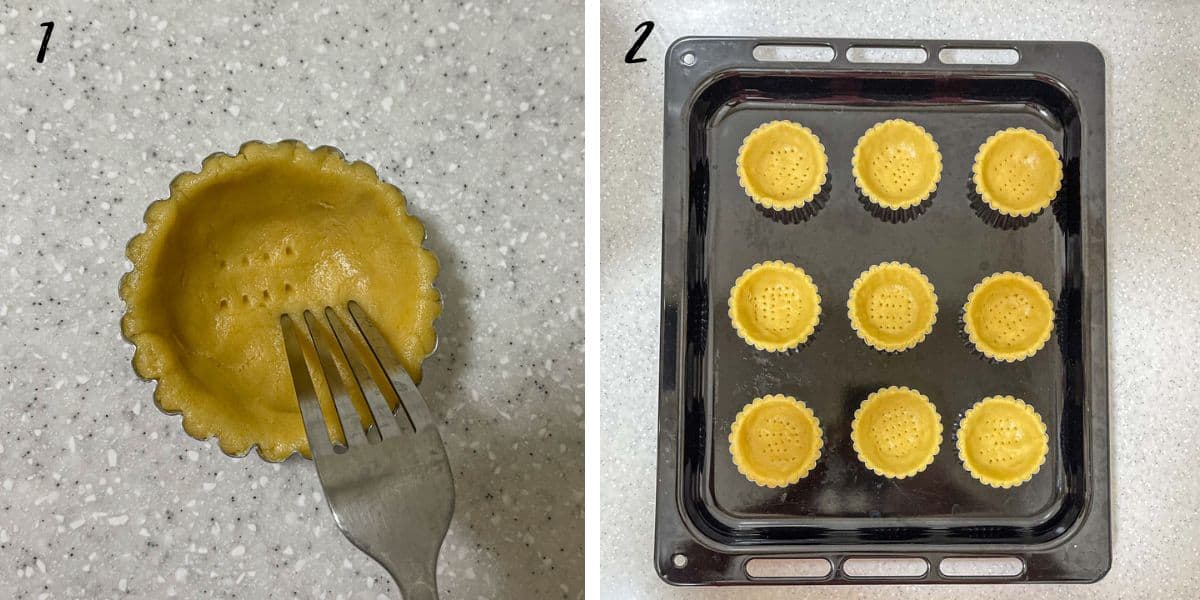
- Use a fork to poke in the center. This will avoid the centers from puffing up as they bake.
- Place the shells in a pre heated oven and bake for 15 minutes at 175 degrees Celsius until they turn golden brown. Do not over bake.
- Remove the pastry from oven and let them cool slightly before removing the casings. Let the shells cool completely before using. The shells can be baked a few days in advance and stored in an airtight container until ready to use.
Making the cheese custard
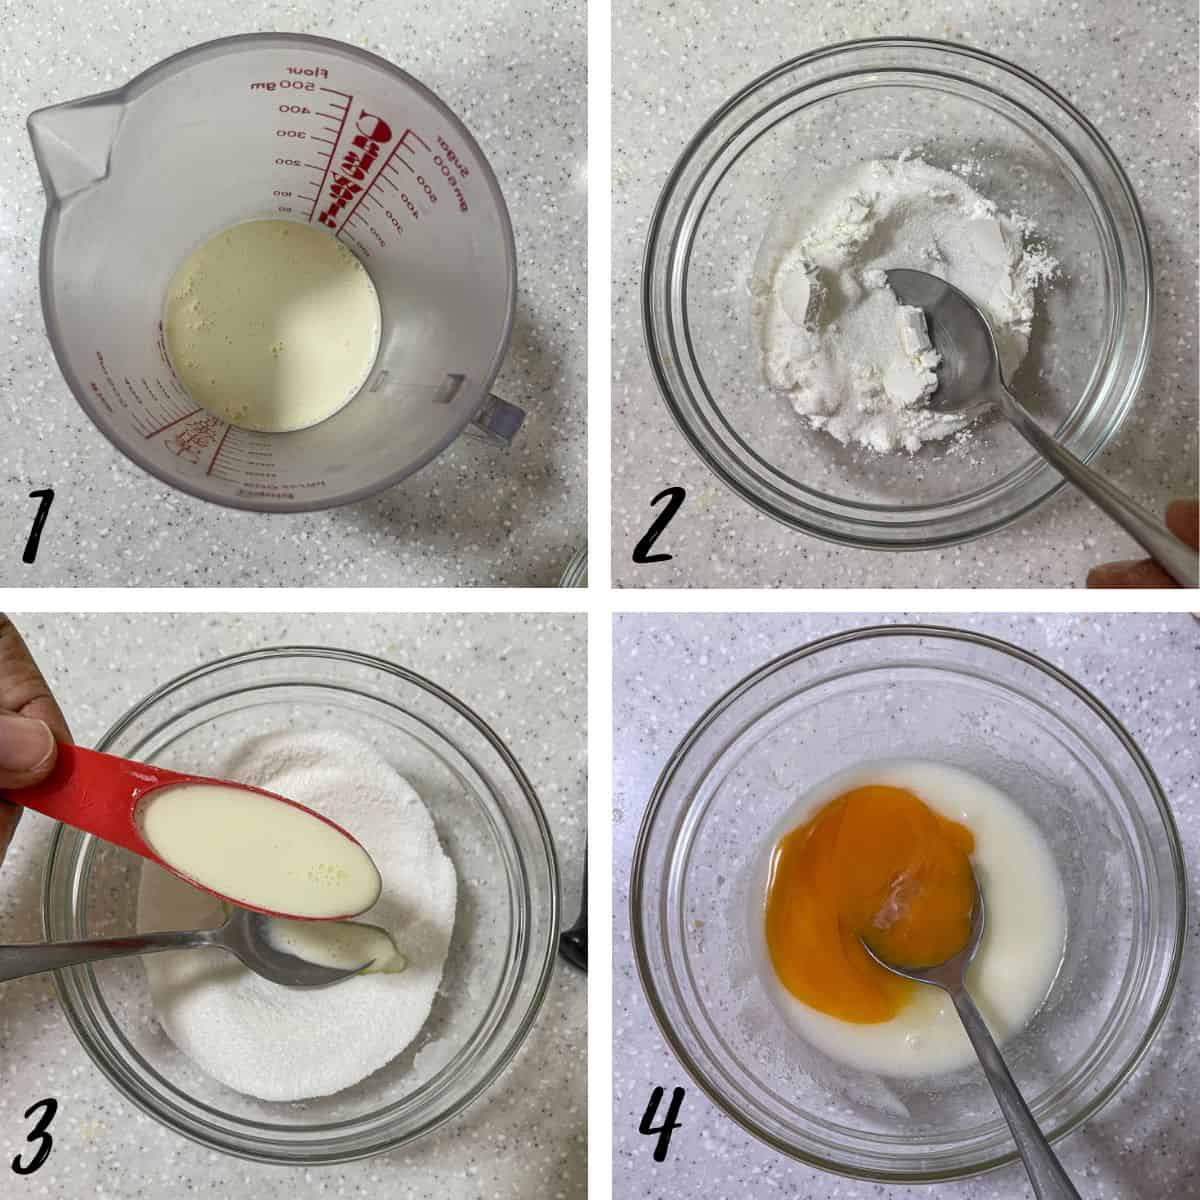
- Measure milk and cream into a cup.
- Separately, measure sugar into a small bowl. Add the corn starch and mix well to combine.
- Add 1 tablespoon of the milk-cream mixture into the sugar. Mix to form a paste.
- Add the egg yolk to the mixture and mix well. Set aside.
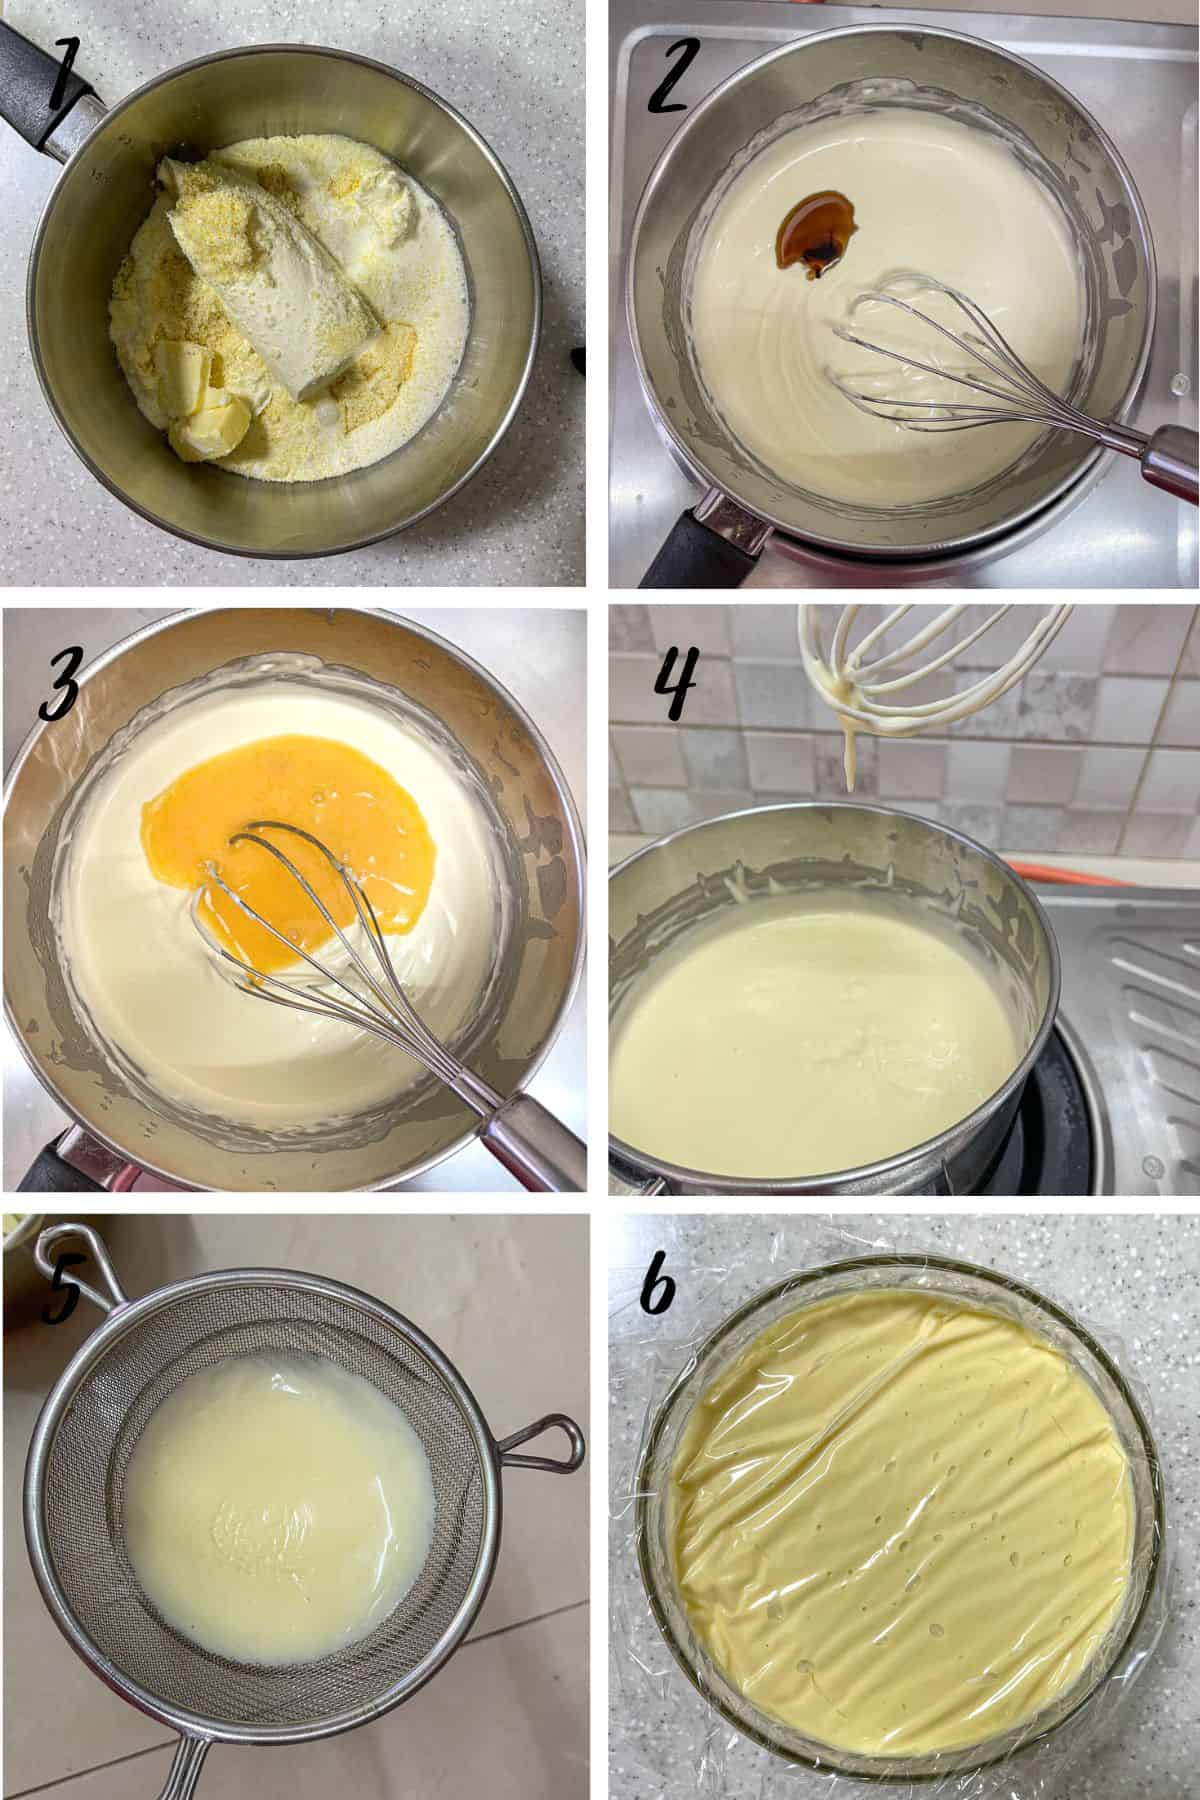
- In a separate saucepan, measure all the cheeses - cream cheese, parmesan cheese and mascarpone cheese.
- Add the butter and the remaining milk mixture.
- Place the saucepan on medium low heat and cook the mixture until the cheeses melt completely and the mixture is all smooth. Stir constantly to avoid the mixture from burning and adjust the heat to low if necessary.
- Turn off the heat and add the sugar-egg mixture. Stir quickly to avoid the egg from curdling.
- Turn on the heat again to a low flame. Continue cooking the cheese custard until it thickens. The filling does not thicken further after cooling so you can assess the thickness you wish for your tarts at this point.
- Remove from heat. Strain the custard with a fine mesh sieve to remove any lumps. Use a spoon to gently push the custard through if it is thick.
- Transfer the filling into a separate container and cover the top with a plastic wrap. Make sure the plastic wrap is touching the surface of the filling to avoid skin forming on the surface as it cools down.
- Let the filling cool completely before using. If not using on the same day, refrigerate it.
Assembling the cheese tarts
- Transfer the cooked cheese mixture into a piping bag. Snip the tip.
- Pipe it into the tart shells until it is of the same level as the sides of the shells. Do this for all the tarts.
- If the filling is thick, tap the tray of tarts lightly on your kitchen counter to level it.
- Place the Hokkaido cheese tarts into the freezer for about 5 minutes. This step is to firm up the filling so that it is easier to apply the egg wash on top. In the meantime, preheat the oven to 180 degrees Celsius.
- Remove from the cheese tarts from the freezer. Brush the top with egg yolk.
- Bake the tarts in the oven for 5 minutes until the egg wash is cooked. To achieve the slightly charred tops, place the tarts in the top section of your oven and adjust the setting to a grill mode. Pay close attention to the tart at this stage as there is a tendency for the tart shells to burn. An easy option would be to use a blow torch to char the egg yolk.
- Remove the Hokkaido tarts from the oven and let them cool before serving. If you like them warm, serve while they are warm. The tarts are also great when served chilled.
Notes
- The Hokkaido cheese tart dough is mixed using the rub-in method, whereby the butter is cut into or rubbed into the flour to form breadcrumbs-like texture before being mixed into a dough with the egg. To achieve the breadcrumb-like texture, the butter must be cold and solid (not room temperature).
- This rubbing in process helps to coat the flour particles with butter, preventing gluten development. And this in turn helps with the lovely crisp texture of the crust. For best results, the butter must be cold.
- For a smooth and creamy filling, make sure the cheeses melt completely when making the filling.
- It also helps to run through the cooked filling in a sieve to remove any lumps.

Leave a Reply