

If you like jelly or agar agar dessert, you must try this konnyaku jelly recipe. It's very easy (only 3 ingredients required), quick to make and is absolutely delicious! The best part is, you can flavor it into any flavor you like and can even add fresh fruits and other ingredients for a fancier version.
This is a basic konnyaku jelly recipe and I kept it as simple as possible by not adding any extra flavoring to the jelly. Instead, I used fresh mangoes and oranges. You can use this basic recipe and customize it to make a variety of delicious jellies, and I have shared the tips on how you to adjust the recipe for flavor customization in the notes section below.
If you like jellies, you should also check out this basic agar agar jelly recipe, nata de coco jelly with pineapple, coffee jelly, mango jelly, fruit jelly cups and fruit jelly cake.
Jump to:
❤️Why You Will Love This Recipe
- It is very quick and easy.
- You only need 3 basic ingredients to make this jelly.
- It is delicious and makes a refreshing dessert.
- You can make it in any flavor you like.
What is Konnyaku Jelly?
Konnyaku jelly (also known as konjac jelly and sometimes referred to as candy) is almost similar to agar agar jelly or even gelatin. It often comes in powder form and is derived from a plant called konjac hence the name konjac jelly as it is sometimes referred to. Another name for konjac plant is Devil's Tongue yam. Given that the jelly is plant based, it is an excellent option for vegetarians and vegans.
Konnyaku is said to have originated in China but is also widely used in Japan, so much so that the konnyaku jelly is also often referred to as Japan konnyaku jelly or Japanese konnyaku jelly. It is also well known as a Japanese dish.
Where to Buy the Jelly Powder
You can find konnyaku jelly sold in powder form in Asian or Japanese supermarkets. It is white in color and has a light texture.
Most often, konnyaku powder or konjac powder is sold in single use quantities of 10 grams and it is advisable to buy such packets as you only need about 10g of the jelly powder to make about 1liter of jelly. Jelly powder that is pre packed in small quantities will save you the trouble of having to measure it in small quantities accurately (unless if you have a digital scale).
Konnyaku Vs Agar Agar vs Gelatin
Origin - Both konnyaku and agar agar are derived from plants, the former from a plant called Konjac or Devil's Tongue yam and the latter from seaweed. Gelatin, on the other hand is derived from animals, most often from cows.
Form - Konnyaku is often sold in fine powder form. Agar agar is sold in both powder form as well as thin long strips or flakes. In powder form, konnyaku powder is white, while agar agar is yellowish. Agar agar strips are colorless. Gelatin is also sold in powder form, but it is coarser (almost like granulated sugar) and is beige in color.
Taste - On their own, all three are quite tasteless.
Cooking method - Konnyaku jelly powder and agar agar powder are cooked in a similar way. They are mixed with sugar and added to water and cooked before being poured into molds. Agar agar strips are often soaked first before being cooked in water until they dissolve. Sugar and other flavoring as added after that. Gelatin is often soaked in water until it blooms before being added into hot water and double boiled until it dissolves. It is also sweetened with sugar and can be poured into molds.
Texture - Konnyaku jelly and agar agar are both firmer than gelatin and of the two, konnyaku has a chewier texture which is a great jelly texture. Gelatin has a wobbly texture and is often poured into mini molds and served with the molds.
📋Ingredients
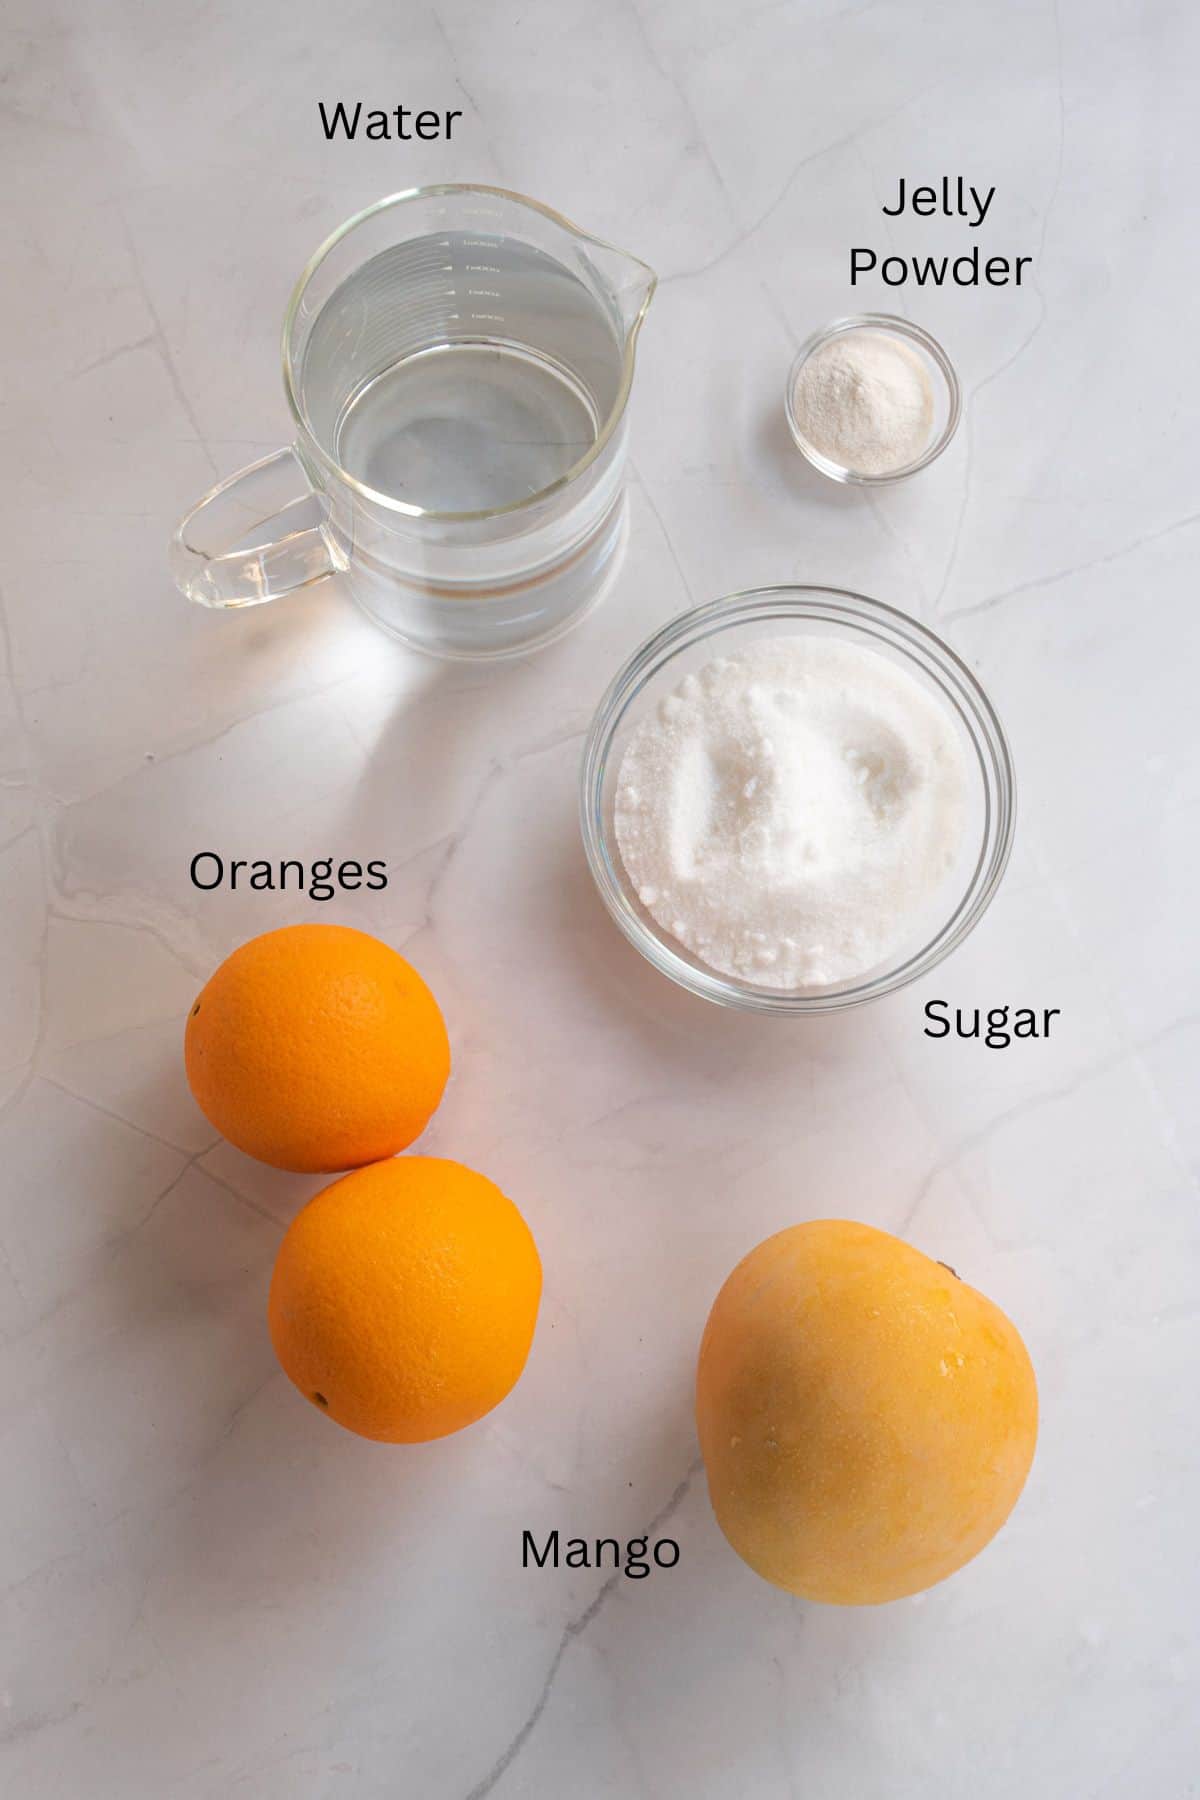
- Konnyaku jelly powder - this often sold in small packets and sometimes in larger packets. It is white in color and looks almost like agar agar powder. For ease of use and measuring, buy the jelly in small packets of 10g or 20g
- White sugar (coarse or granulated) - white sugar works best as it maintains the clear color of the jelly.
- Water - to cook the jelly. Use filtered water.
- Mangoes and oranges (optional) - use ripe fruits for best results. You can also use other fruits of your choice.
*Refer to the recipe card below for full list of ingredients and exact quantities. For best results, use a digital kitchen scale where applicable*
🧾Substitution and Variation
- For this basic recipe, the best substitute for konnyaku powder would be agar agar jelly powder. Use it in the exact same quantity or follow my basic agar agar recipe here to make the jelly.
- Other flavor options:
- Konnyaku jelly is great when paired with fruits. I have used mangoes and oranges in my recipe, but you can easily substitute these with other fruits like longan, peach, strawberry, lychee, passion fruits and other fruits of your choice. Remember to de-seed your fruits before adding them to the jelly.
- You can also add some chia seeds into the jelly for a healthier or diet food option.
- Alternatively, you can add fruit juice into the jelly. To do this, replace the liquid in the recipe with fruit juice to make the jelly.
- And instead of making the plain base, you can make a green tea jelly base by substituting some of the liquid in the recipe card below with freshly brewed green tea.
- Alternatively you can also use coconut milk to make the jelly base. You can follow my coconut jelly recipe here and substitute the agar agar powder with konnyaku jelly powder.
- Other flavors that work well with this jelly are Osmanthus, Ribena, yuzu and coconut water. In fact, with coconut water, you can make the jelly with no sugar or sweetener added (literally a 2 ingredient jelly). Replace water with the additional liquid added into the jelly.
- Serving options:
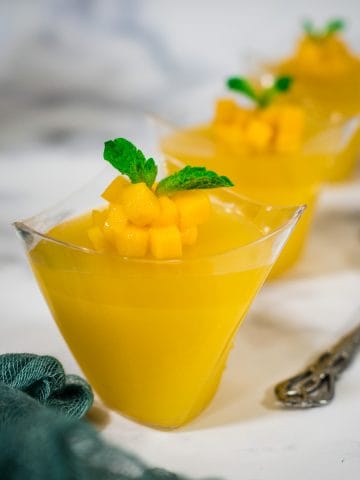
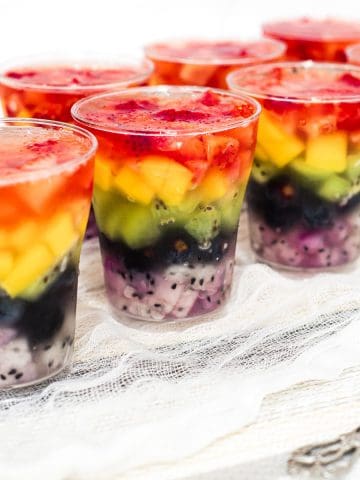
- Konnyaku jelly can be poured into smaller, individual serving sized or snack size molds like the ones I have used in this recipe. Simply unmold the jellies before serving. It can also be poured into small cups of individual serving sizes and served without unmolding like my mango jelly recipe here. These would be great for parties.
- Another option is to pour the jelly into a large mold as a konnyaku jelly cake and cut it into smaller pieces for serving. You can see how I used a bundt cake mold to make my lychee jelly and nata de coco jelly.
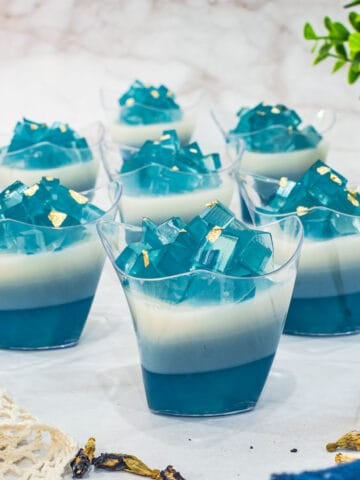
- You can create pretty designs with your jellies by dividing the solution and coloring them. Pour them into layers to make pretty layered jelly dessert like this coconut jelly and pandan jelly.
This recipe has not been tested with other substitutions or variations. If you do try, please let me know in the comments section below!
👩🍳How to Make
Step 1: Prepare the jelly mold. This is a very important step in making jellies. Jellies set very quickly as they cool down and you cannot afford to waste time in preparing the molds after cooking the jelly as you risk your jelly starting to set if the molds are not ready in time.
Step 2: Cut the mangoes and oranges. Mangoes and oranges in this basic jelly recipe are optional, but if you plan on using them, it is best that you prepare them before you start cooking the jelly.

Peel the mango. Hold the peeled fruit on a cutting board with stem end of the fruit and its opposite end in a horizontal position. Place your knife about 1cm away from the center of the fruit and slice it all the way down. Repeat for the other side of the fruit so that you get 2 large pieces of the fruit (image 1).
Place the first part on a cutting board and slice it thin (image 2).
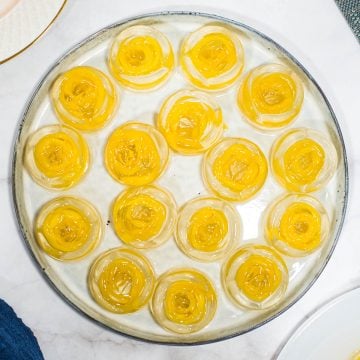
Roll each slice of the mango flesh to form a rose. Add more mango strips if you want the mango rose to be larger.
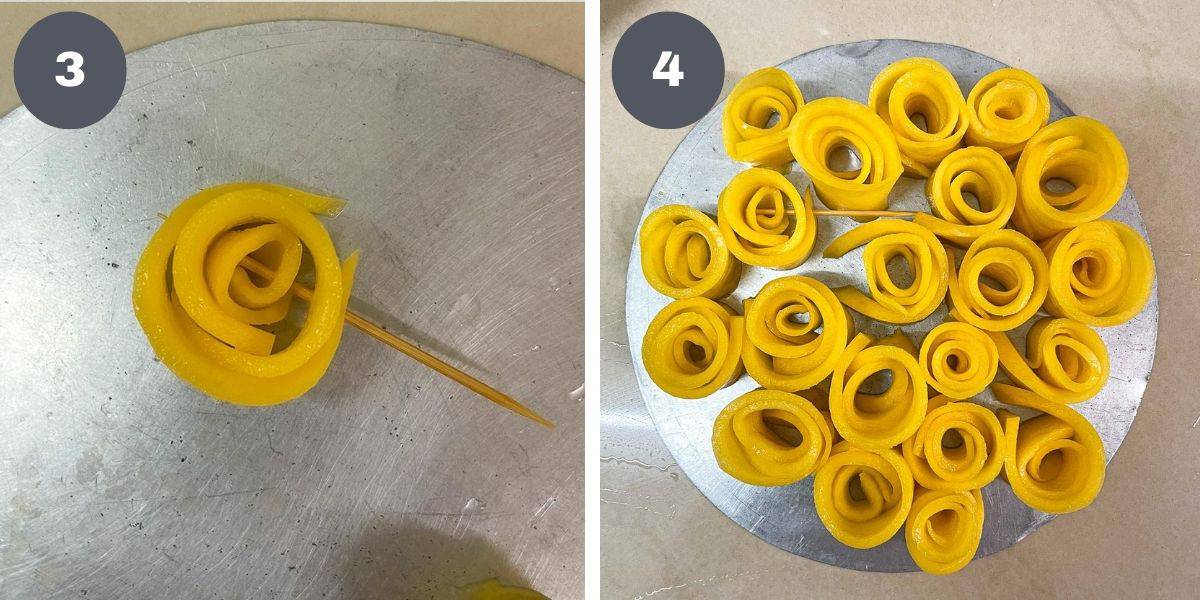
You might want to check to make sure the mango roll fits your jelly mold. If you find it hard to keep the pieces rolled, use a tooth pick to hold them in place. Place the rolled mango flowers onto a freezer safe tray (image 3).
Repeat and make as many flowers as you need (plus some extras for contingency). Place the tray of rolled mango strips in the freezer for about 30 to 60 minutes, until your jelly solution is ready. Keeping them in the freezer makes it a lot easier to handle the mangoes and they don't unroll easily as opposed to when you do not freeze them (image 4).
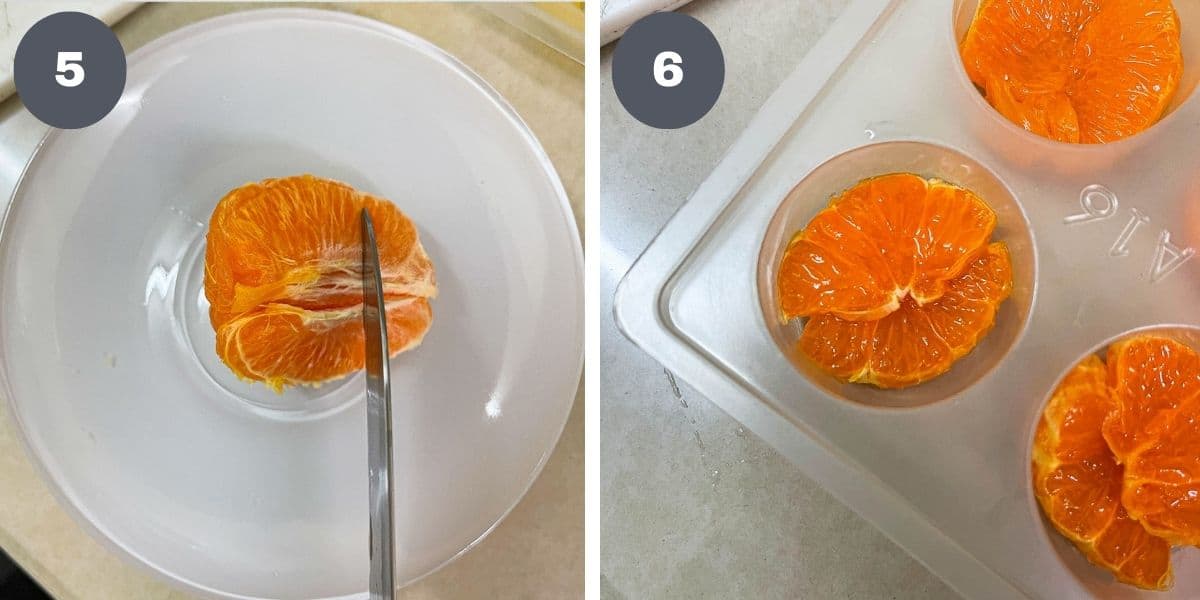
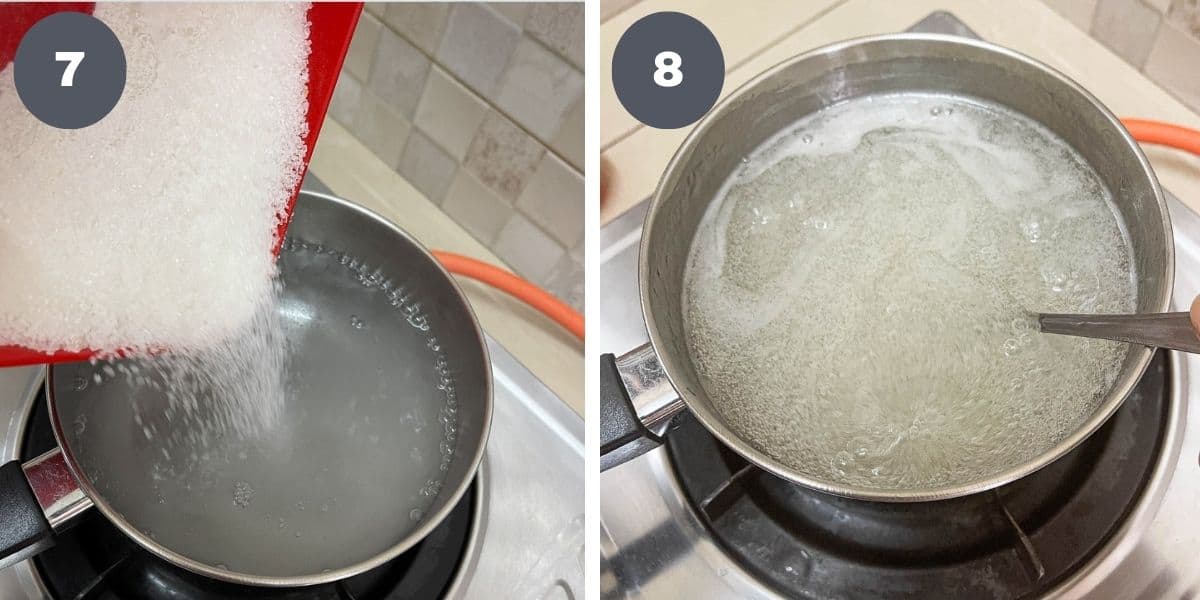
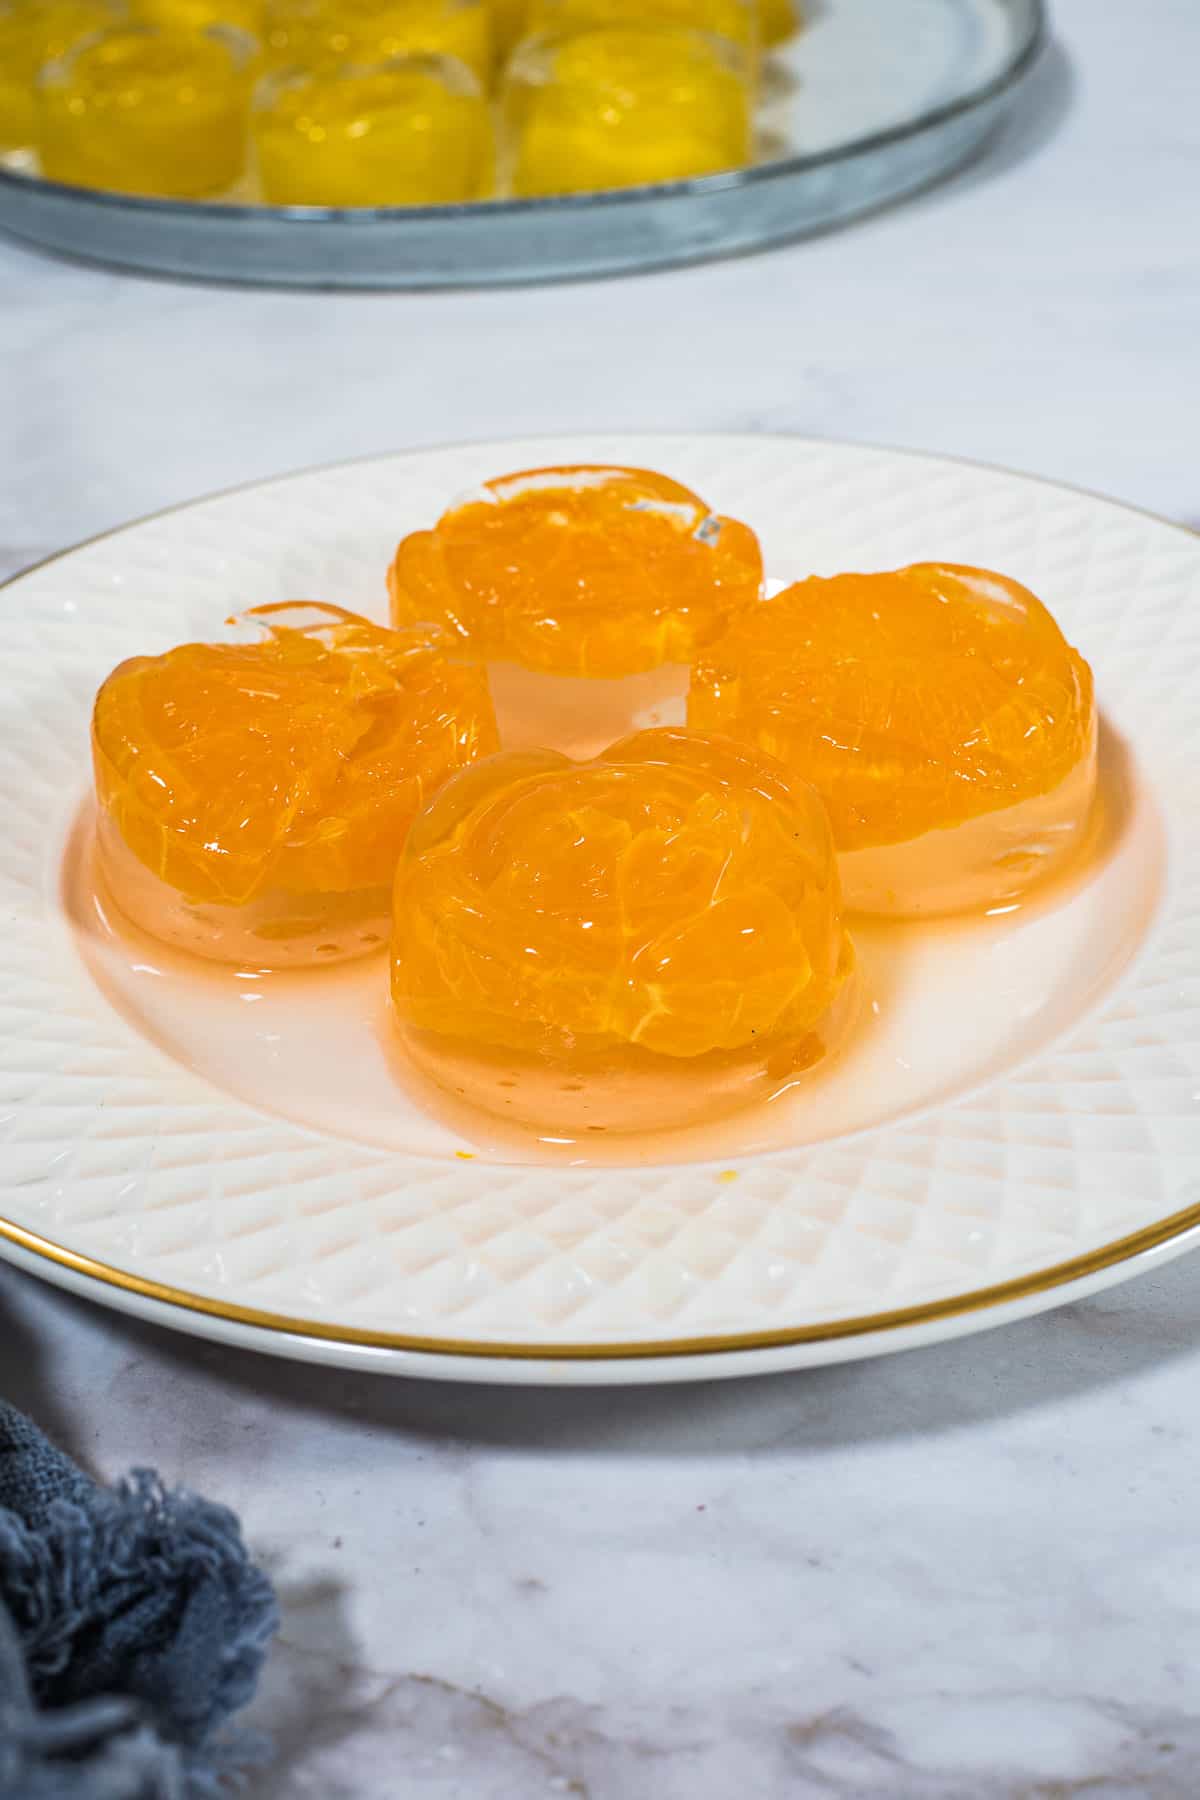
For the oranges, peel off the outer skin and divide each fruit into 3 to 5 segments. Slice each segment thin (image 5).
Place 2 of the sliced segments into each mold. You can add more or less as you like. Leave the fruits aside until the jelly is ready for pouring (image 6).
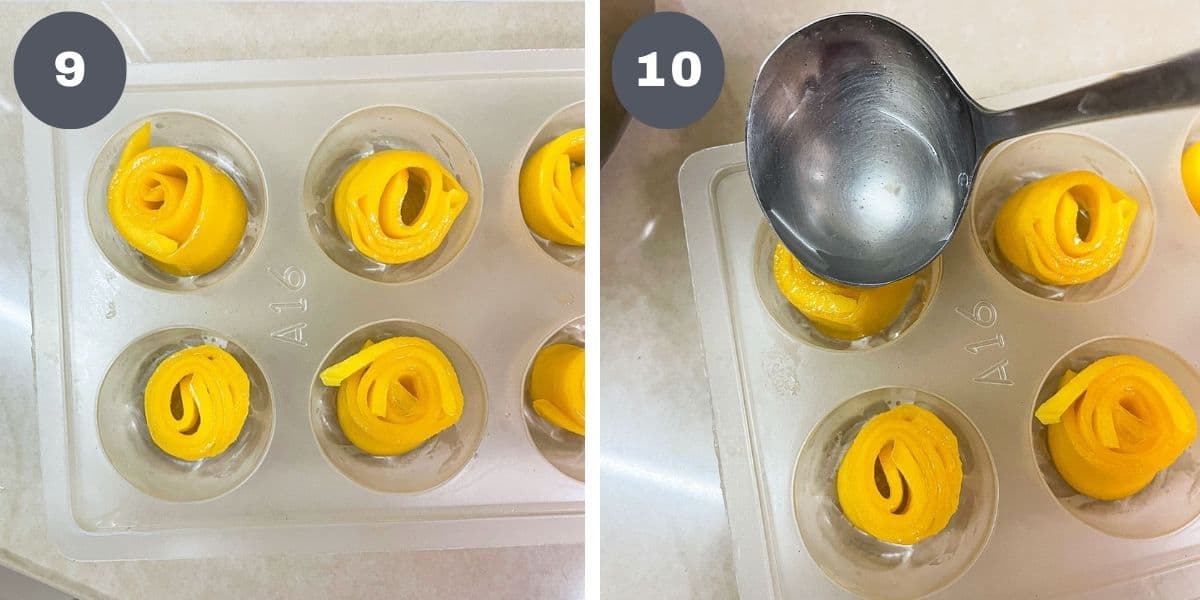
Step 3: Cook the jelly. Mix the jelly powder with the sugar. Set aside.
Note: Mixing sugar with the powder help avoid the jelly powder from clumping when added to water.
Measure the water into a pot. Turn on the heat. Once slightly heated up (make sure the water is not boiling hot, a warm temperature is sufficient), slowly add the jelly-sugar mixture. Stir quickly to avoid clumping (image 7).
Cook the jelly on low heat until it reaches a rolling boil (image 8). Stir constantly. You can check if the jelly is cooked by scooping some into a spoon. Wait until the bubbles subside and if the solution appears clear, the jelly is cooked. If it appears cloudy, you will need to cook it longer.
Note: As a guide, follow the instructions at the back of your jelly packet for an indication of the cooking time. If there are none, cook for about 5 to 8 minutes on low heat.
Once cooked, turn off the heat.
Note: At this stage the jelly is ready and if you are not using any fruits, you can pour it into molds. Allow the jelly to cool down to a warm temperature before placing it in the refrigerator until the jelly sets completely. Larger ones will take longer to set, vice versa. To test, shake the mold gently after about an hour. If it is wobbly, set for a while longer. If it does not move, press the jelly gently with your finger. The jelly is ready if it is firm to the touch.
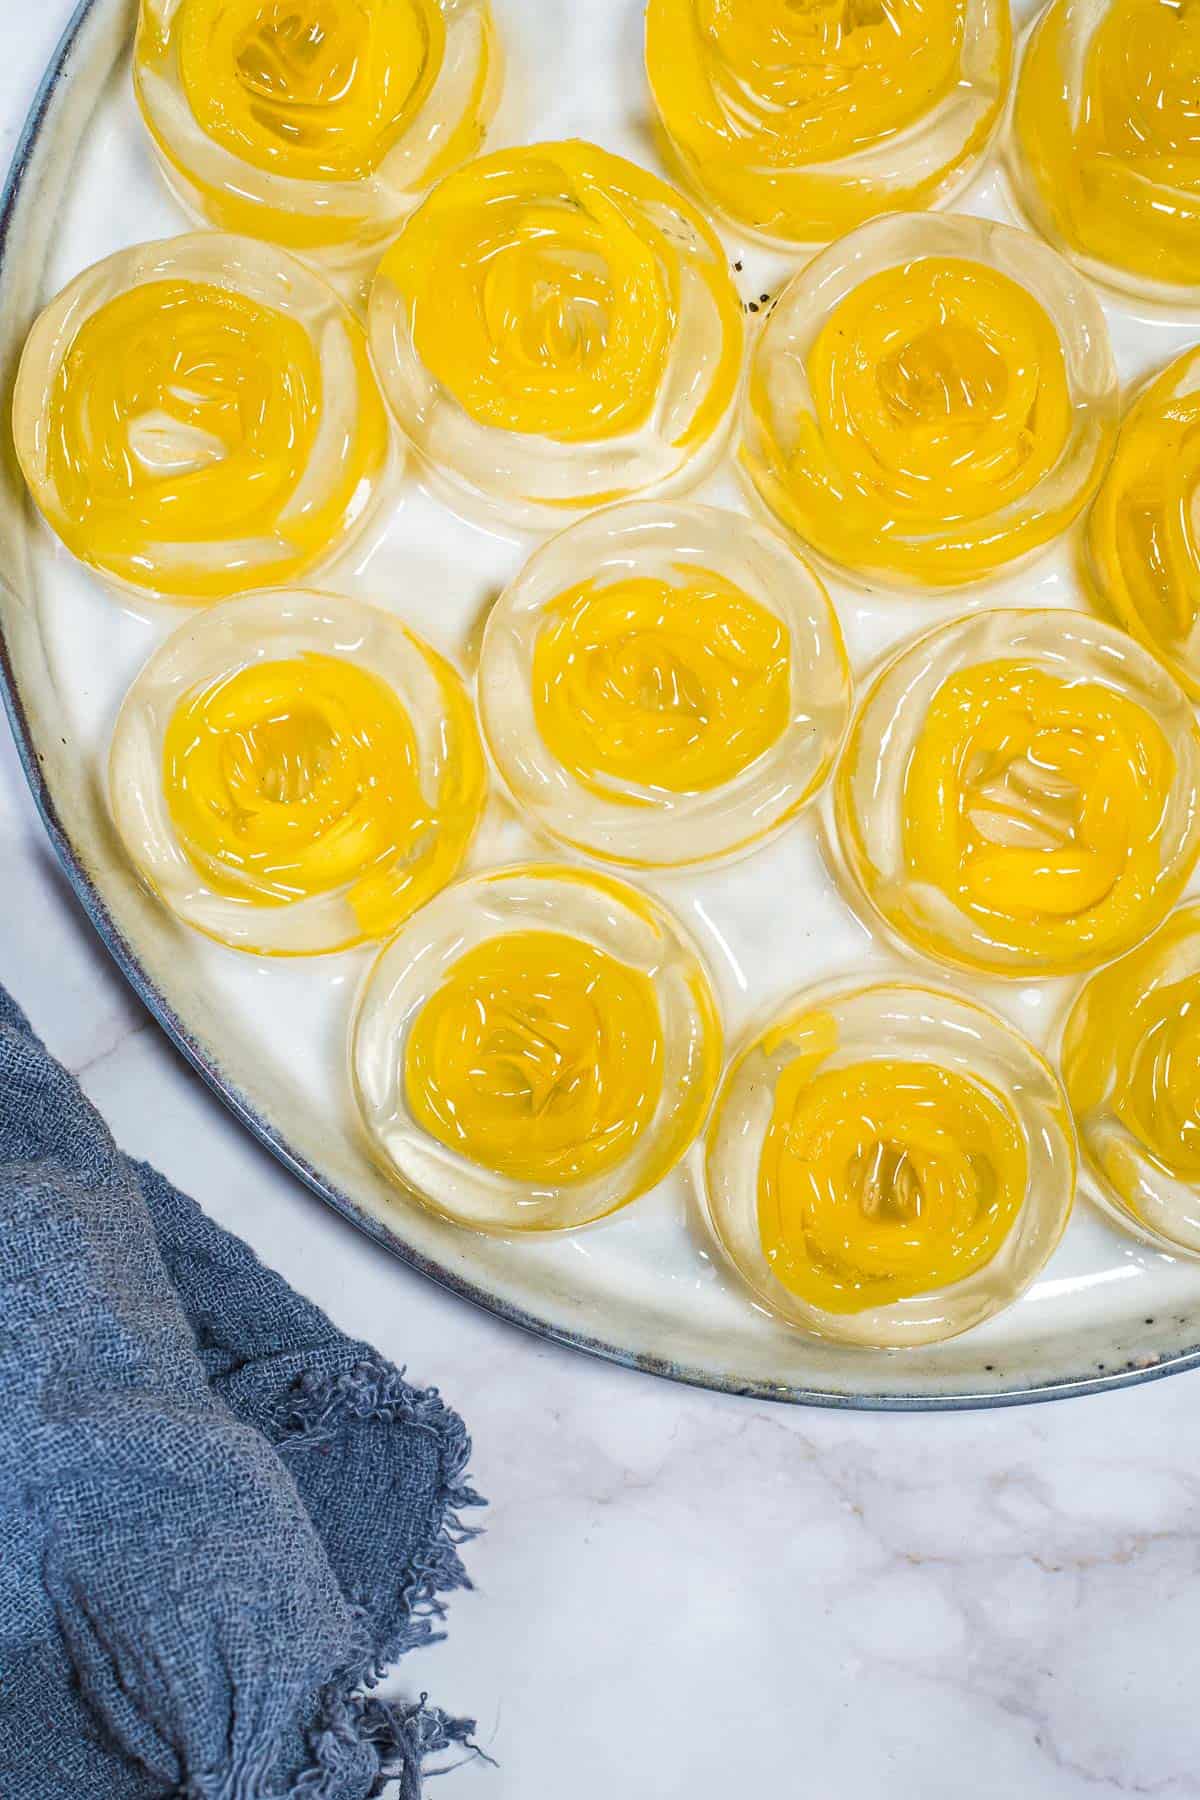
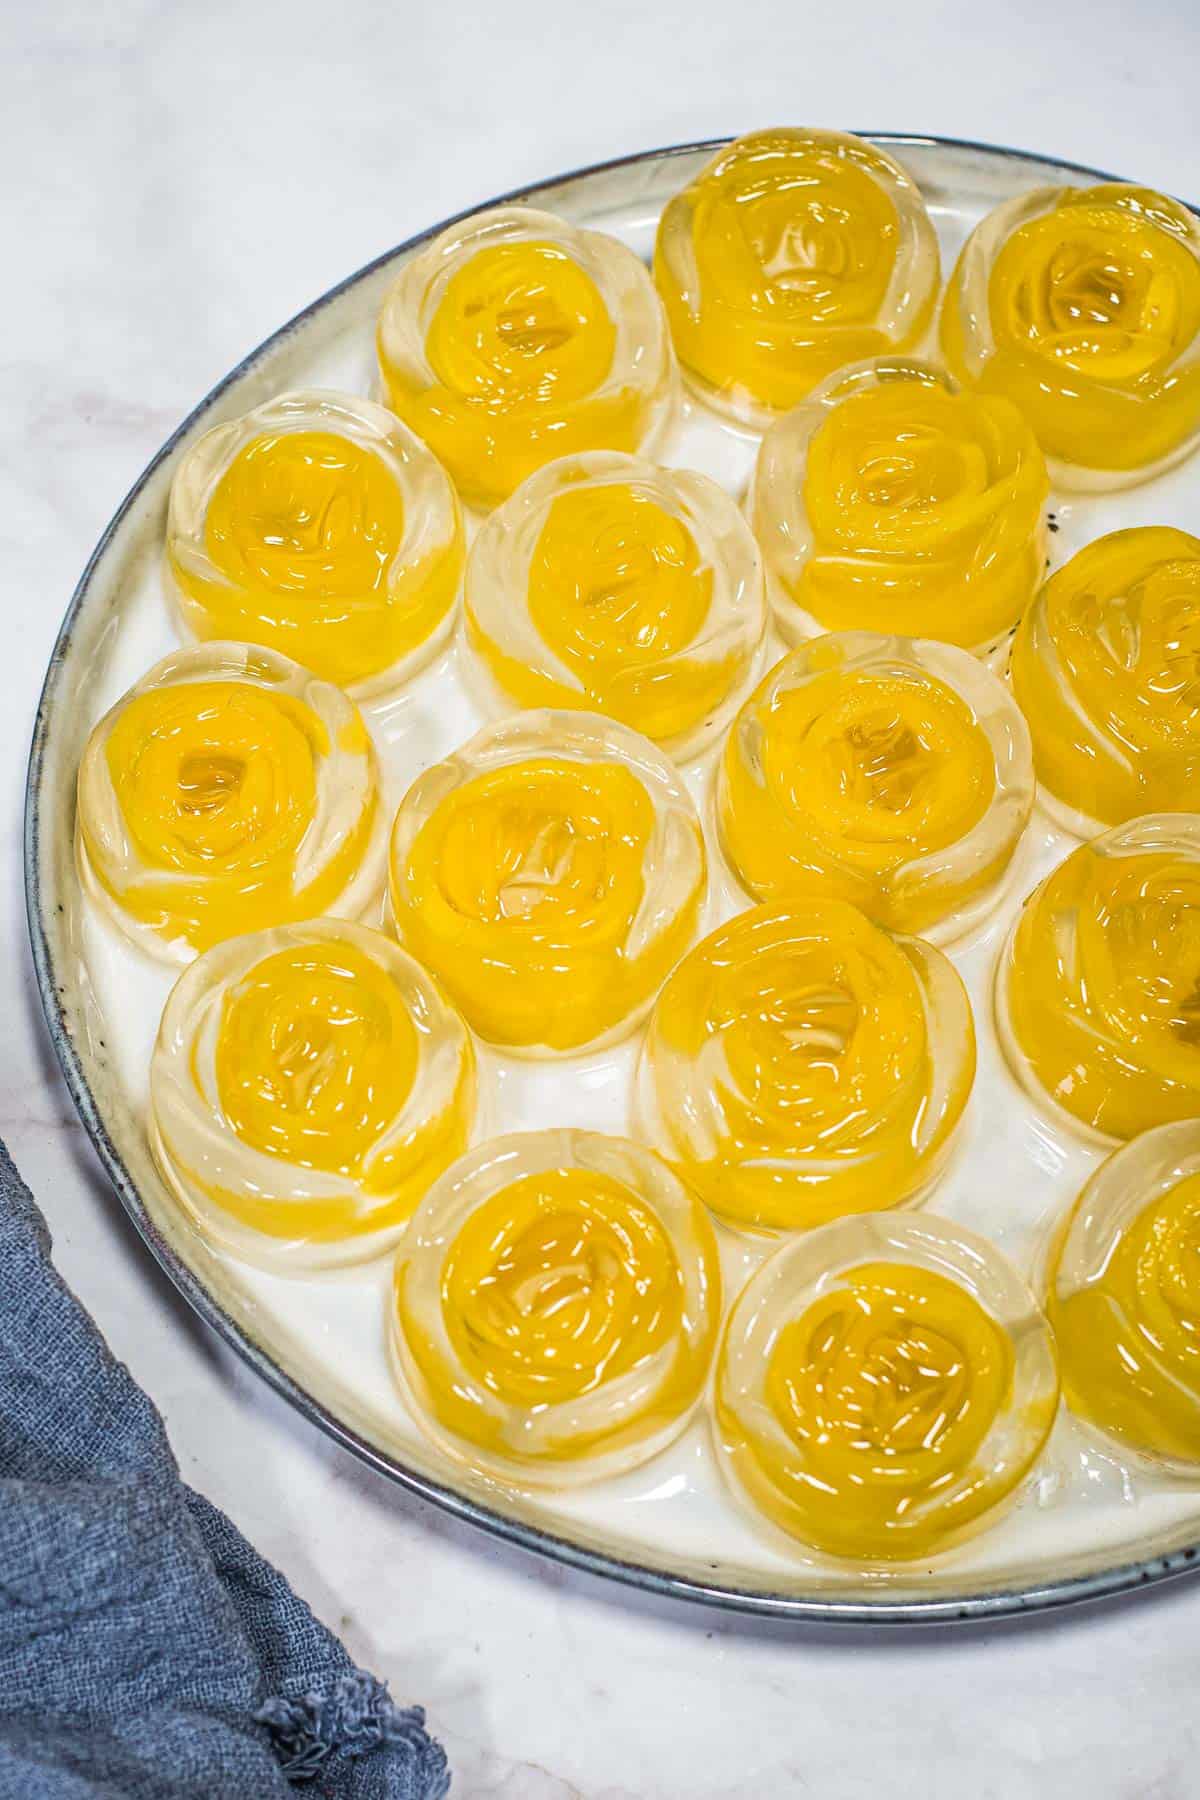
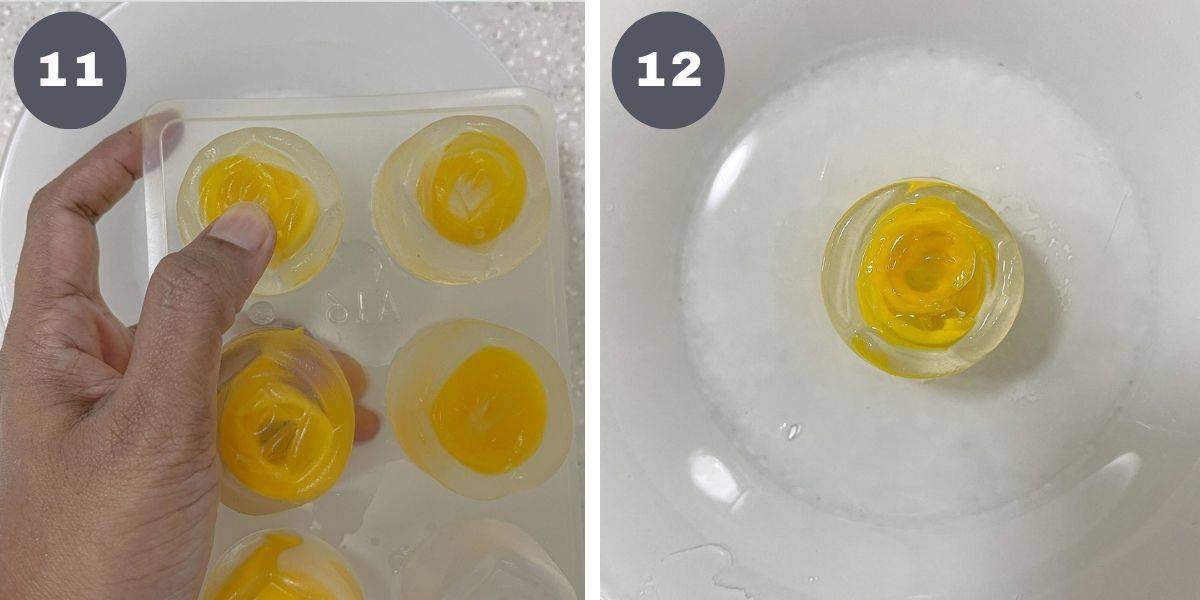
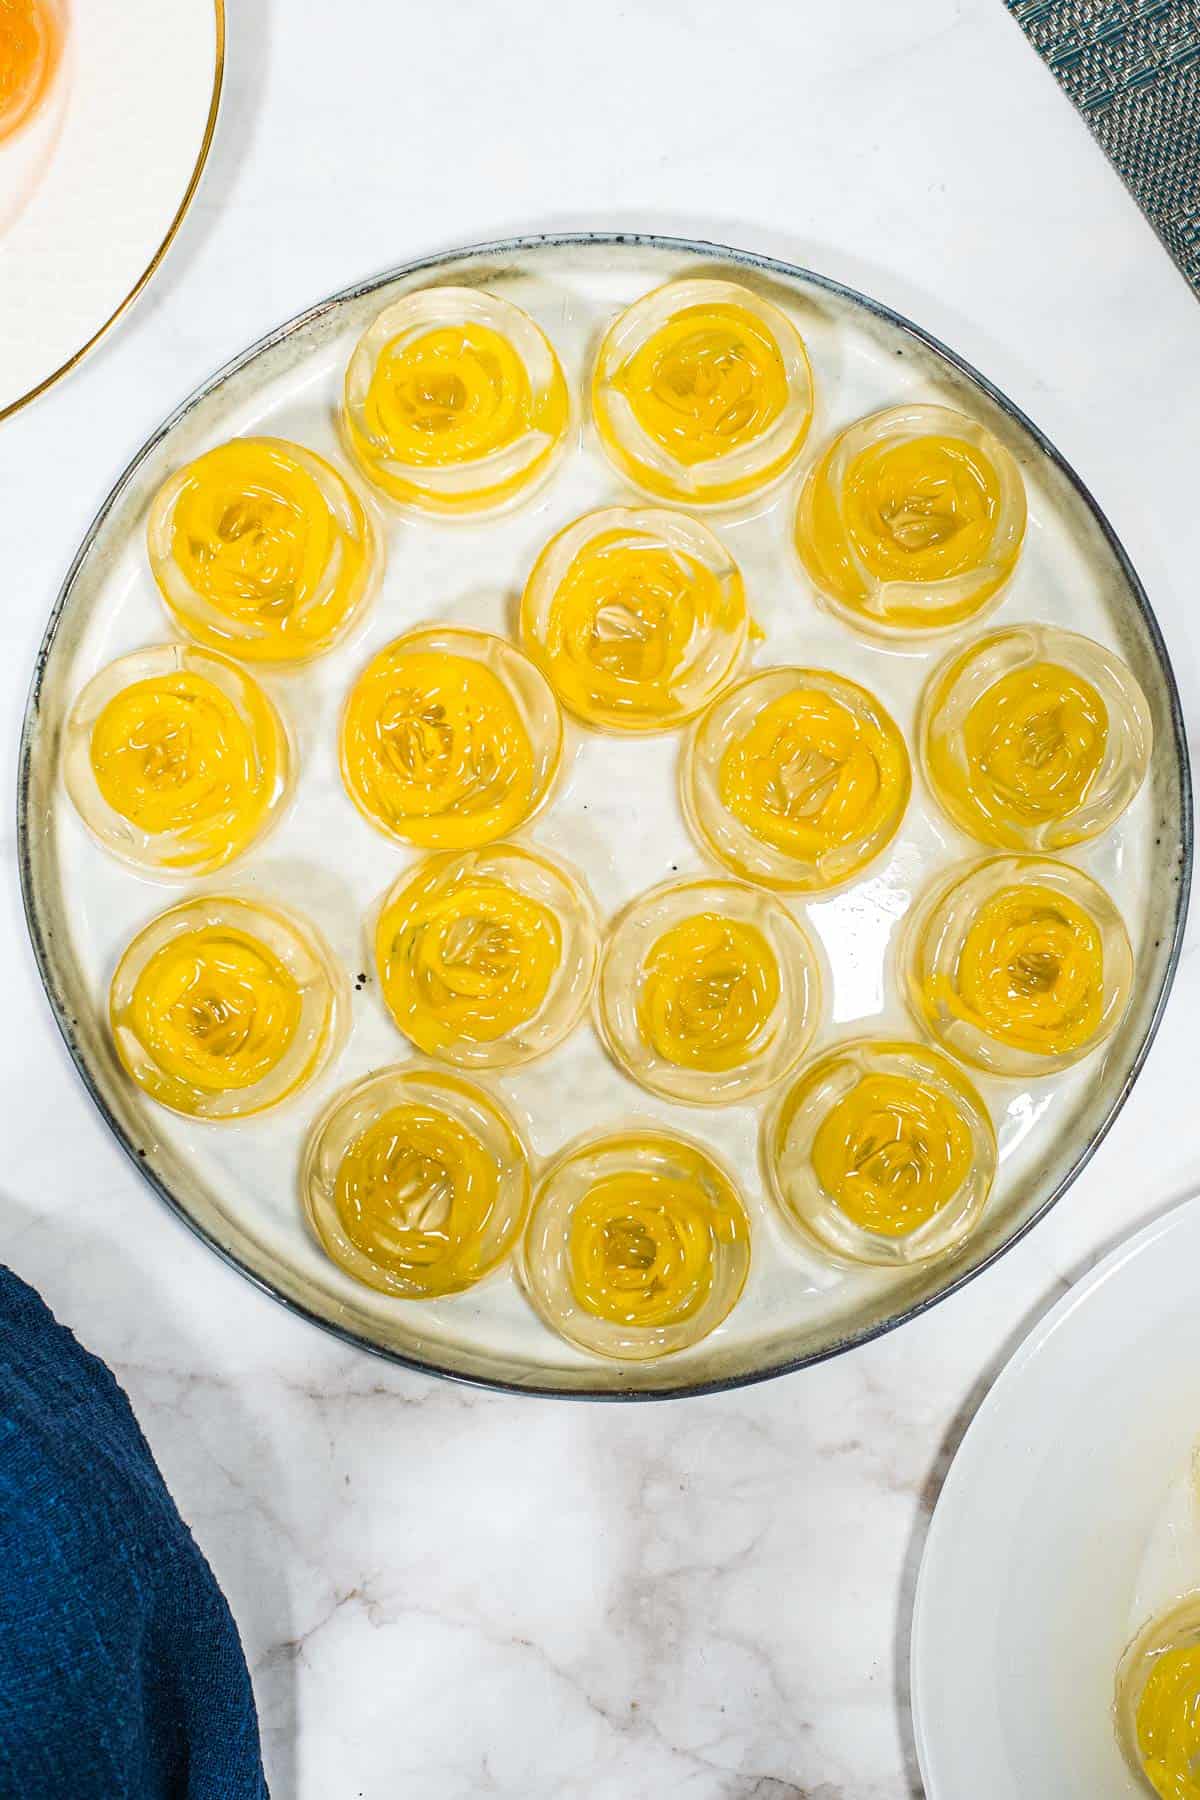
Step 4: Pour the jelly into molds. For the mango jelly, as the jelly is almost cooked, remove the fruit rolls from the freezer. Remove any toothpicks (if you have used them), and arrange the rolls into the mold (image 9).
Pour the cooked jelly into the fruit filled molds (oranges and mangoes) (image 10). Let the jelly cool slightly before placing the molds in the refrigerator to set completely.
Step 5: Unmold the jelly. You can unmold the jellies right before serving. To unmold, turn the mold over and gently press the top or tap them on a wide plate to release. If they are stuck, gently loosen the sides by pushing the sides away with your fingers before turning the mold over and tapping them out (image 11).
Keep the konnyaku jelly refrigerated until ready to be served. The jelly can be served at room temperature but best when served chill (image 12).
💡Expert Tips
- Given the chewy and slippery nature of this jelly, it is quite susceptible to choking. Therefore, serve it with caution for children and the aged. It is advisable to cut the jelly into small pieces before serving to avoid this risk.
- Make sure the jelly is completely set before unmolding. To test, try shaking the mold, if it is wobbly, it needs more time to set. To expedite the process, refrigerate the jelly.
💭FAQs
The best answer for this question is to follow the instructions in the packet. If there are no instructions given, you can use the measurement provided in this recipe. Typically, for every 10g of jelly powder, use between 950ml to 1 liter of liquid.
The key tip when adding liquid ingredients to konnyaku jelly is to make sure the ratio of liquid to the jelly powder is maintained. For example, if you wish to add fruit juice to make the jelly, measure the fruit juice and then top it up with water until the liquid measurement reaches the point indicated in the recipe.
When it comes to adding solid ingredients like fruits into the jelly, all you need to take note off is, if too much fruits are added such that the proportion of the fruits is too much for the jelly to hold them, your jelly will not be able to hold them well in place after setting and when you unmold your jelly, it will fall apart.
Too much water used in making the jelly will cause it to not set well and be watery. Too little water will make your jelly hard.
If you have used the correct liquid measurement, the jelly should set well and not be watery. Always follow the liquid measurement provided on your jelly powder packet.
Generally, the higher the ratio of jelly powder to the liquid, the chewier it will be.
However, this is not necessarily how everyone would like the jelly. The chewy texture is definitely a distinct feature if this konnyaku jelly, and for best results, the ratio of the jelly powder to liquid be kept at an optimum level, as indicated in the recipe.
This jelly should be kept refrigerated at all times. That way, it it can last for up to 1 week. Keep it covered to avoid it from drying out in the fridge.
If you use fruits in making your jelly, you will notice that the jelly tends to release some liquid as time passes. This is normal and does not mean the jelly has gone bad.
❤️More Recipes You Will Love
Do you like this recipe? Please leave a 5-star ⭐⭐⭐⭐⭐rating in the recipe card below and consider a review further down this page. I would love to hear from you. Thank you!
📖Recipe
Konnyaku Jelly
For best results, use the metrics measurements. US customary measurements have not been tested and are only meant for guide.
Ingredients
- 950 ml water
- 250 g white sugar
- 10 g konnyaku jelly powder
Optional
- Mangoes
- Oranges
Instructions
- Prepare the molds. Wash and pat them dry and set aside.
- Prepare the fruits if using. For the mangoes, peel the skin, and cut the flesh on both sides of the seed. Slice each side into thin stripes. Roll the strips to form roses and place them on a freezer safe tray. Use toothpicks to hold the rolls intact in necessary. Once the rolls are completed, place them in the freezer to set for about 30 to 60 minutes. Freezing makes it is easier to handle the rolled mango strips.
- For the oranges, peel the skin and divide each fruit into 3 to 5 segments. Slice each segment thin and place the slices into the prepared jelly molds. Set aside.
- Combine the konnyaku jelly powder and sugar in a small bowl. Mix until both are well combined (see Note 1). Set aside.
- Add water into a medium sized pot. Turn on the heat to low. Once the water is warmed up (should not be boiling), add the sugar-jelly powder mixture into the pot. Stir constantly as you add the mixture into the water to avoid clumping.
- Cook the solution on low heat (stirring constantly) until the sugar and jelly are all dissolved. This should take approximately 5 to 8 minutes over medium low heat.
- You can check if the jelly is cooked by scooping some of the jelly solution into a spoon. Wait until the bubbles subside and if the solution appears clear, the jelly is cooked. If it appears cloudy, you will need to cook it longer. There will be tiny bubbles in the jelly solution as you scoop it out in a spoon, so hold it for about 20 seconds to allow the bubbles to subside. The bubbles can make your jelly look cloudy (see Note 2).
- Turn off the heat (see Note 3).
- Towards the last 2 to 3 minutes of the cooking time of the jelly, remove the mangoes from the freezer. Remove the toothpicks if you have used them, and start to arrange the fruits into the jelly molds.
- Once the jelly solution is cooked, spoon it into the molds. You will need to work fairly quickly as the jelly tends to set as it cools down.
- Let the jellies rest at room temperature for a few minutes before transferring them to the refrigerator to set completely (for about 2 hours) before serving (see Note 4).
- To unmold, turn the mold over and gently press the top or tap them on a wide plate to release. If they are stuck, gently loosen the sides by pushing the sides away with your fingers before turning the mold over and tapping them out.
- Keep the konnyaku jelly refrigerated until ready to be served.
Notes
- Mixing help avoid the jelly powder from clumping when added to water.
- As a guide, follow the instructions at the back of your jelly packet for an indication of the cooking time. If there are none, cook for about 5 to 8 minutes on low heat.
- At this stage the jelly is ready and if you are not using any fruits, you can pour it into molds. Allow the jelly to cool down to a warm temperature before placing it in the refrigerator until the jelly sets completely. Larger ones will take longer to set, vice versa. To test, shake the mold gently after about an hour. If it is wobbly, set for a while longer. If it does not move, press the jelly gently with your finger. The jelly is ready if it is firm to the touch.
- Make sure the jelly is completely set before unmolding. To test, try shaking the mold, if it is wobbly, it needs more time to set. To expedite the process, refrigerate the jelly.

Bernice
Thank you for this exciting and informative post. I love learning about food. I had heard of konjac being used, primarily for noodles but I didn't know it can be used like agar agar. Thank you for letting me know about another veggie based alternative to gelatin.
Lindsay
Tried these and they turned out perfectly. Super refreshing after heavier meals especially!
Nora
The dessert looks so amazing! Will try it right away! Thanks!
Nancy
These looks so pretty
Rachael
Beautiful and fun dessert to make with excess fruit. Thank you for the detailed recipe!!