• Skip to primary navigation
  • Skip to main content
  • Skip to primary sidebar

Decorated Treats

  • Home
  • Recipes
    • Cake Recipes
    • Cookies Recipes
    • Brownies & Bars
    • Bread & Dough Treats Recipes
    • Sweets & Candies
    • Jellies & Cold Dessert
    • Frostings, Fillings & Sauces
  • Designs & Tutorials
  • Tips & Techniques
    • Preparing Cakes for Decoration
    • Fondant Decorating
    • Piping Techniques for Cake Decorating
    • Gum Paste Flowers - How to Make
    • Decorating with Chocolate
    • Other Techniques
  • Submit Your Cake Photos
menu icon
go to homepage
  • Categories
  • Recipes
  • Tutorials
  • Techniques
  • Your Cakes
  • Contact Me
    • Facebook
    • Instagram
    • Pinterest
    • YouTube
  • subscribe
    search icon
    Homepage link
    • Categories
    • Recipes
    • Tutorials
    • Techniques
    • Your Cakes
    • Contact Me
    • Facebook
    • Instagram
    • Pinterest
    • YouTube
  • ×

    Home » Birthday Cakes

    Pink 21st Birthday Cake - A Decorating Tutorial

    Published: Sep 26, 2020 · Modified: Aug 5, 2022 by Priya Maha

    Poster for a pink 21st birthday cake

    Here is a pink 21st birthday cake 
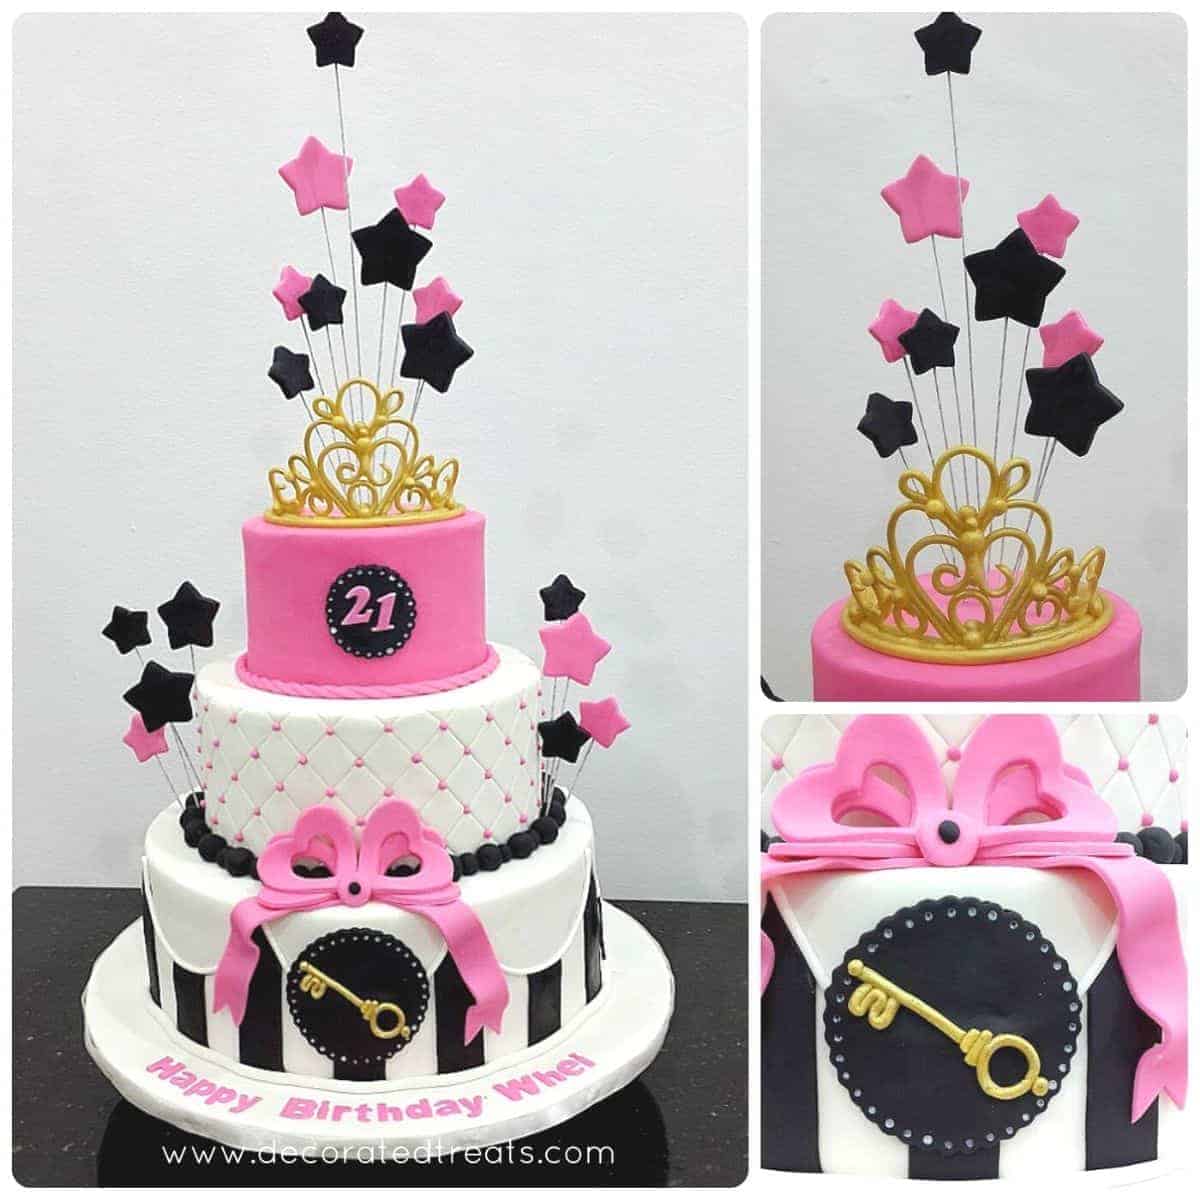
I made for a customer who wanted to present this gorgeous cake for his girlfriend’s 21st birthday. I did not design this cake. It was recreated based on an image from my customer. I modified it slightly with some tweaking to the design.

    Poster for a pink 21st birthday cake

    A pretty 21st birthday cake in pink, white, black and gold

    Nevertheless, I was totally pleased with the way this 21st birthday cake turned out. The first 2 tiers were dummy and only the bottom one was a real cake. Everything on the cake was edible except for the wired stars. And that is because they were wired hence not safe for consumption.


    How to Decorate the Pink 21st Birthday Cake:

    Main supplies for the 21st birthday cake:

    Raw Materials

    • Cake – Only the bottom tier was cake, measuring 12 inches in diameter. My customer chose coffee-flavored butter cake and so I baked it using my coffee cake recipe.
    • Styrofoam dummy – Both the top and second layers of the cake were Styrofoam dummies. 
    • Buttercream – I used buttercream to fill the real cake layers as well as to crumb coat the cake.
    • Fondant – this was used to cover the whole cake. I used Satin Ice in pink, white, and black. I also used fondant for the stars, the ribbon, and the tiara, however, for these items, I added a bit of CMC so that they set hard and firm.

    Tools

    • Extruder tool – This tool helped me in producing even-sized roll for the tiara, the pink rope border, the white plain border as well as the key.
    • Gold dust & lemon extract – I mixed these two to make gold paint and used it for the key and tiara.
    • Star cutters – I cut the bursting stars on the cake with these cutters. Each one was attached individually to white floral wires. I also used tiny stars for the back of the cake. These were cut out using star-shaped plunger cutters.
    • Heart shaped cutters –  I used 2 different sizes to make the pink bow on the cake.
    • Round scalloped cutters – These were used to cut out the black circles on the sides of the 1st and 3rd tiers where I attached the number ‘21’ and the gold key respectively.
    • Floral wires – the wires held the bursting stars on the cake. I used gauge 18 so that they could hold the weight of the stars and not bend away.
    • Alphabet cutters - I used Clikstix cutters for the name on the cake board as well as the number ‘21’.
    • Diamond embossing mat– I used this mat to imprint the diamond patterns on the sides of the second tier.
    • Fondant glue & shortening

    Decorating and assembling the pink 21st birthday cake:

    Decorating the dummy layers

    • Since the first and second tiers of the 21st birthday cake were dummies, I could decorate them ahead of time. I covered the top dummy with pink. The second one was covered in white. There was no need for a crumb coat when covering dummies. All I had to do was brush them with water and cover them with fondant.
    • I used my diamond embossing mat to imprint diamond shapes all around the tier and attached tiny pink balls (hand-shaped) at equal intervals.  At the back of the cake where the imprint didn’t quite align, I used little pink stars to hide it.
    The back of a 3 tier pink, white and black 21st birthday cake

    The back of the pink 21st birthday cake

    The stars and the tiara

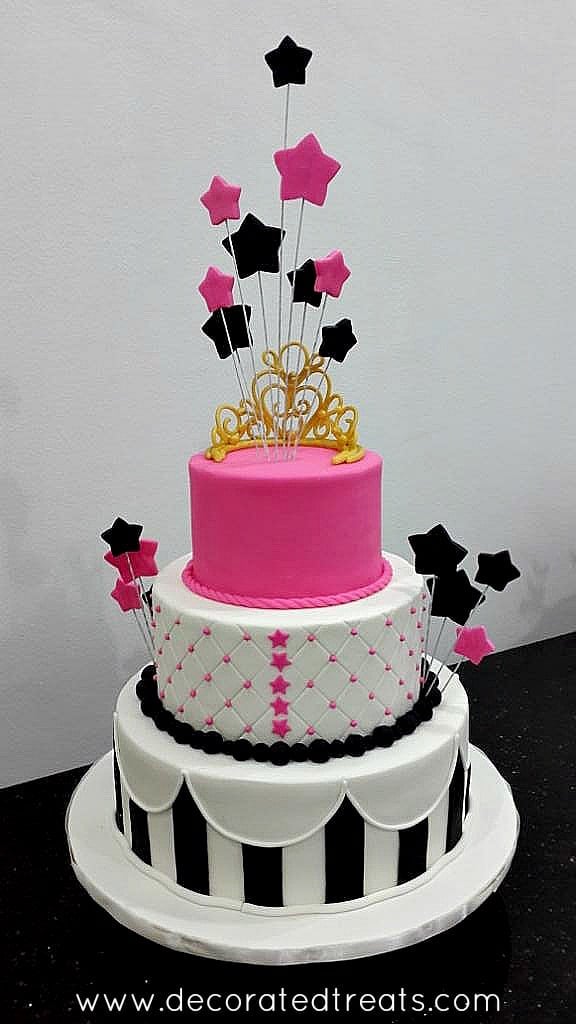
    • I also made the stars and the tiara for the 21st birthday cake ahead of time. This was so that they could have enough time to dry and set hard. For the stars, I used 2 different sized cutters. I cut them in pink and black (that has been mixed with CMC). I attached one wire into each star and let them set completely, lying flat.
    • As for the tiara, I used my extruder tool to pipe out a long thin roll of fondant. I used a template for the tiara, drew it on a piece of paper, and glued the paper template to the sides of a 5-inch round cake dummy. And then, I guided the piped strip to follow the design on my template. I used fondant glue to attach all the pieces of the tiara together.
    • Once done, I left the tiara to set completely (I left mine overnight). And then I slowly removed it from the template, placed it on a cake board before painting it with gold edible paint (gold dust mixed with lemon extract).
    Gold tiara on a pink cake

    The number 21 on the pink 21st birthday cake

    The gold key

    I made the gold key for the 21st birthday cake in the same way as the tiara. 

    Assembling the pink 21st birthday cake

    • Once the cake was baked, I leveled the layers. And then I sandwiched them and crumb coated the cake with buttercream. And then I covered it with white fondant. Next, I measured the circumference of the cake and drew out a scalloped template. I placed the template on the sides of the cake and marked the scallops using my needle tool.
    • And then I cut out black strips and attached them to the cake with some shortening.
    • Once the strips were done, I piped out a long thin fondant roll using my extruder tool and attached it to the cake, following the scallops’ markings I made earlier. To attach the roll, I used shortening.
    • As for the round black plaque on the first and third tiers, I used my round scalloped cutter and poked tiny holes all around them. I then used my fine-tipped brush to paint dots of white on the holes. For this purpose, I used Americolor liquid food color.

    The bow

    • Next to go on this pink 21st birthday cake was the bow. I used heart-shaped cutters for the loops and attached them to the cake with shortening.
    • Finally, before placing the stars and the tiara on the cake, I added the border and the wordings on the cake.
    A 3 tier cake for 21st birthday decorated in pink, white and black stars, a gold tiara and a 2D key on the third tier

    A pink 21st birthday cake

    And that my pretty pink 21st birthday cake.

    Hope you find this sharing helpful. If you have any comments or questions, pls leave them below, I will get back to you as soon as I can.

    Thank you for reading 🙂

    More Birthday Cakes

    • A round rosette cake in white, pink, burgundy and green.
      How to Make a Rosette Cake - Buttercream Cake Recipe
    • A round black cake with Star Wars themed cake.
      Star Wars Birthday Cake - How to Make
    • A round double barrel cake decorated with Simba cake topper, Lion King edible image and green fondant palm leaves
      Lion King Cake with Simba Cake Topper - How to Make
    • A black and white 2 tier cake with guitar topper and black music note topper
      Guitar Cake Design - How to Make

    Reader Interactions

    Comments

    1. Zainab

      December 05, 2020 at 5:47 pm

      Hi...this was very helpful for me.can I know what is the height of this cake if possible...I really need to know it.

      Reply
      • Priya

        December 05, 2020 at 10:33 pm

        Hi Zainab,

        I am afraid I did not measure the height of the cake, but I do know that each of the cake tiers was about 4 inches high. So that makes the 3 tiers of the cake 12 inches (without the tiara and the wired star toppers). I estimate the star toppers to easily measure about 10 inches. So, the full height of the cake is approximately 21 inches. Hope this helps.

        Reply
    2. Teuiarii Terri Tata

      December 14, 2020 at 2:15 pm

      Hi, I just open your website and saw this 3tier 21st birthday cake...I am interested in ordering one for my daughter for her 21st birthday on the 6th February 2021. Her colour is pink, purple and black.

      Please let me know how much it's cost, also can we eat the 2nd and the third tier of the cake. Just wondering if we can!!!

      Reply
    3. Teuiarii Terri Tata

      December 14, 2020 at 2:17 pm

      Please let me know how much it costs...

      Reply
      • Priya

        December 15, 2020 at 1:43 pm

        Hi there,

        This is a cake decorating tutorial page, I am afraid I do not take orders for cakes. Sorry to disappoint you.

        Reply

    Leave a Reply Cancel reply

    Your email address will not be published. Required fields are marked *

    Recipe Rating


    This site uses Akismet to reduce spam. Learn how your comment data is processed.

    Primary Sidebar

    Hi there!

    I'm Priya, and I'm so excited that you dropped by :) Welcome to DECORATED TREATS, a place where I share all my cake decorating ideas & true and tried recipes for all things sweet.

    More about me →


    Currently trending

    • Mascarpone whipped cream frosting piped into a glass and decorated with strawberry slices.
      Mascarpone Whipped Cream Frosting Recipe
    • A stack of 4 ube brownies.
      Ube Brownies (Fudgy Purple Yam Brownies)
    • A few green cupcakes on a grey plate.
      Pandan Cupcakes with Pandan Buttercream
    • A bowl of mascarpone cheese against marble background.
      Can You Freeze Mascarpone Cheese (How To & Tips)

    As featured on:

    Footer

    ^ back to top

    SUBSCRIBE TO DECORATED TREATS

    Sign up for latest recipes and tutorials!


    Thank you for joining!

    Keep watch for my latest updates in your email.

    .

    About

    • Privacy Policy & Disclaimer
    • Conversion Chart

    Resources

    • Submit your Cakes
    • Testimonials

    Decorated Treats is a participant in the Amazon Services LLC Associates Program, an affiliate advertising program designed to provide a means for sites to earn advertising fees by advertising and linking to Amazon.com. Decorated Treats also contains other affiliate links, which if you purchase from may earn me a small commission. The full disclosure policy can be found here.

    Copyright © 2022 Decorated Treats