

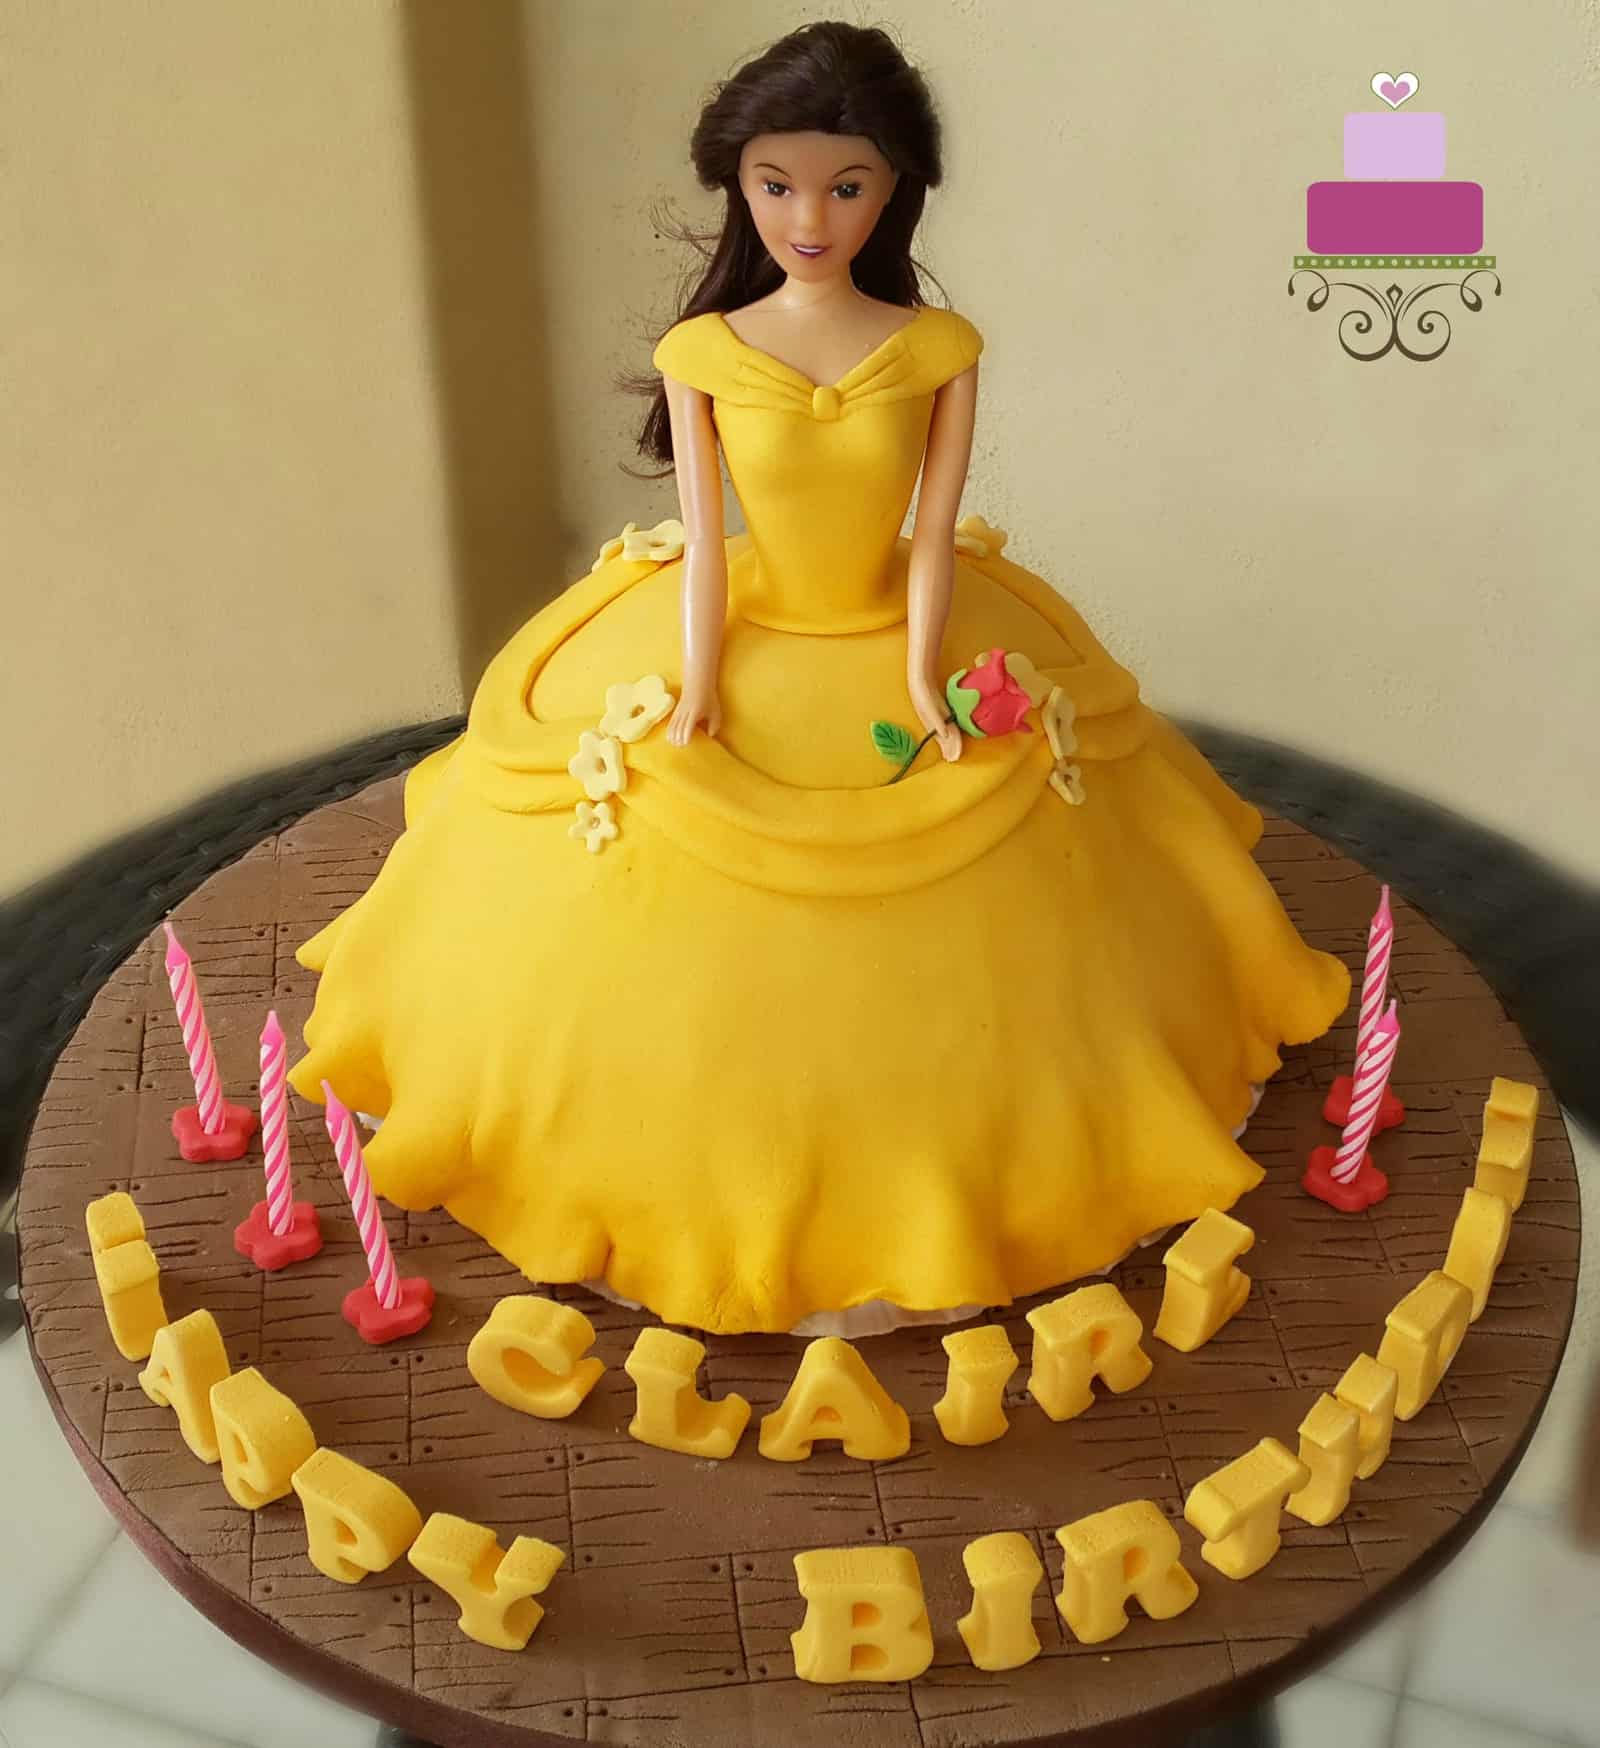
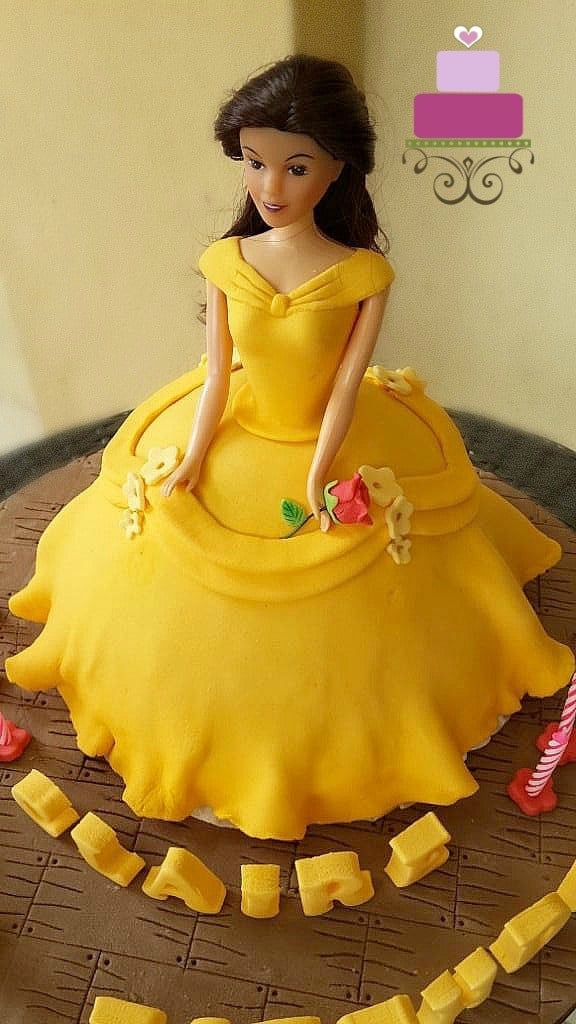
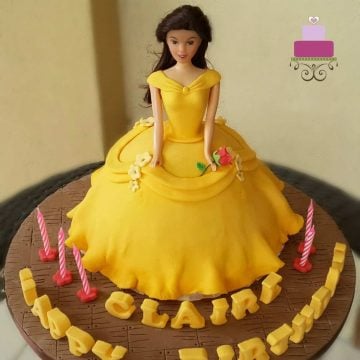
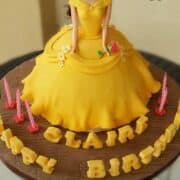
I made this Princess Belle cake (a Beauty and the Beast themed cake) for a 5-year-old girl’s birthday. It is a doll cake with the skirt made up of cake. This is an easy cake to make and perfect for a Princess themed party or birthday celebration.
The girl’s mother wanted me to use a real Disney Belle doll for this princess cake. In fact, she was supposed to provide one to me so that I could use it for the princess cake.
Unfortunately, she could not get one for me on time. So we had to resort to a plain doll pick I had in stock with me. Luckily the doll pick I had had brown hair. At least that matched Belle’s hair since the facial features didn’t quite match Belle’s.
If you like doll cakes, you should also check out this doll cake. And for more princess cakes, check out this Disney Princesses castle cake, Little Mermaid birthday cake and Ariel the Little Mermaid cake.
🧾Supplies Required
- Cake – this was a bowl-shaped cake that I baked in a stainless steel bowl I had at home. I used my butter pound cake recipe and used this method to decide on the amount of batter to prepare for the cake.
- Buttercream – Since the cake was baked in a bowl, I did not layer and fill it with any icing. Buttercream was used only to crumb coat the cake before covering it with fondant.
- Fondant – I used Satin Ice for this project. For the yellow, I tinted white fondant with Wilton Golden Yellow food color. For the brown, I tinted white fondant with Wilton Brown food color. The red and green for the red rose and leaf in Belle’s hand was white fondant tinted in Wilton Red and Wilton Leaf Green .
- Doll pick – I purchased this from a local cake decorating supply shop.
- Alphabet cutter – These were also purchased from a local cake decorating supply shop. I used these for the lettering on the cake.
- Flower plunger cutter - I used this cutter to cut out the pale yellow flowers on Belle’s gown as well as the red flowers on the cake board and held the candles.
- Needle tool
- Sugarcraft knife
- Ruler
- Pizza cutting wheel
- Floral wire – I used just a tiny bit of wire on this cake and that was for the rose stalk in Belle’s hand.
- Shortening – Shortening was used an a glue for this project along with fondant glue.
- Fondant glue
👩🍳How to Make
Step 1: Prepare the Cake
The decorating process was pretty straightforward. Since I baked the cake in a bowl shaped pan, no carving was required.
I started by crumb coating the cake and then covered it with a layer on white fondant. And then I rolled yellow fondant (tinted with Wilton Golden Yellow color) and covered on the white fondant. I made it a point to not press down the yellow fondant at the bottom edges of the cake. In fact, I left it frilly to give it a natural shape of a ball gown. And if you notice, the white fondant underneath could be seen and that was also on purpose.
Step 2: Make Belle's Dress with Fondant
Next, I inserted the doll pick in the center of the cake and used the same yellow to cover the bodice. And using the same color, I cut long strips of fondant, folded it along its long edge and cut it into short strips of about 7 to 8 cm lengths.
I arranged these strips in 2 curved layers all around the dress about one third below the waist. And to hide the joints of the strips, I added tiny 5 petal flowers that were cut in 3 different sizes in descending order.
Step 3: Make the Red Rose on Belle's Hand
As for the red rose on Belle’s hand, I made this by hand and attached it to a short piece of floral wire. I also added a green leaf which I formed by hand (the veins marked by my needle tool).
As for Belle’s hair, I could not do it up to match Belle’s hair do, so I tied it half instead.

Step 4: Decorate the Cake Board
And the princess was placed on a decorated cake board. I covered the cake board in brown fondant and using my ruler as a guide, I marked long horizontal lines, each about 2.5 cm apart. And then I marked vertical lines in alternate order along each row.
And using my needle tool, I further marked short wood grain marks on the edges and marked tiny holes using a toothpick at the corner of each of the rectangle sections. Overall, the idea was to create wooden plank floor effect.
And then I placed the decorated Belle cake on the cake board, giving enough space to arrange the 3D lettering on the front.
Step 5: Attach the 3D Alphabets
I cut the 3D letters using my block letters cutters in the same yellow fondant I used for Belle’s dress except that I added some CMC powder to it before cutting the letters out. This is to make sure the letters set hard and could hold their shape when placed upright on the Belle cake board. I left them to harden for a few hours before attaching them to the cake board with glue.
And finally, so that there is place to put the candles on the cake, I attached 5 red flowers that I cut using my flower plunger cutter to the Belle cake board. And I poked the candles into the flowers before the fondant dried so that the candles would stand in place.
❤️More Cake Designs You Will Love


Do you like this tutorial? Please leave a 5-star ⭐⭐⭐⭐⭐rating in the recipe card below and consider a review further down this page. I would love to hear from you. Thank you!
📖Recipe
Belle Cake (Beauty and The Beast Princess Cake)
Equipment
- Doll pick (or Belle doll)
- Alphabet cutter
- Flower plunger cutter
- Needle tool
- Sugarcraft knife
- Ruler
- Pizza cutting wheel
- Floral wire
- Shortening
For best results, use the metrics measurements. US customary measurements have not been tested and are only meant for guide.
Ingredients
Cake
- 420 g self-raising flour
- 420 g granulated sugar
- 420 g butter
- 7 eggs
- 105 ml milk
- 1 teaspoon baking powder
- ⅔ teaspoon salt
- 1 teaspoon vanilla extract
Frosting and Decoration
- Buttercream
- Fondant
- Food coloring - Wilton Golden Yellow Wilton Brown, Wilton Red, Wilton Leaf Green
Instructions
Baking the cake
- Preheat oven to 170 °Celsius.
- Grease and flour a bowl shaped cake tin (doll cake mold). Set aside.
- In a medium sized bowl, beat butter and sugar till soft and creamy for about 2 minutes. Add eggs, one at a time, beating well after each addition.
- In a separate bowl, sift flour, baking powder, and salt. Fold in the sifted ingredients into the creamed mixture alternately with milk, starting and ending with flour.
- Finally, add in vanilla extract and combine well. Pour batter into the well greased and floured doll cake mold and bake for 55 to 60 minutes until the top of the cake springs back when lightly pressed. The cake is done when a skewer inserted in the center of the cake comes out without any wet batter.
- Remove the cake from oven and let it cool completely before icing and decorating.
Preparing the cake
- Place the cake on a cake board with a slightly smaller diameter than the cake. Crumb coat the cake with a thin layer of buttercream. And then cover it with a layer of rolled white fondant.
- Next, add some yellow food color to white fondant. Roll it thin and cover it on the white fondant. Do not press down the yellow fondant at the bottom edges of the cake. In fact, leave it frilly to give it a natural shape of a ball gown. Trim the excess with a pizza cutting wheel and re-adjust the frills. The white fondant underneath should be seen and that is on purpose.
Decorating Belle's gown
- Next, insert the Belle figurine pick in the center of the cake.
- Roll some yellow fondant and cover the bodice. Again, using the same color, cut a long strip of fondant, fold it along its long edge and cut it into short strips of about 7 to 8 cm lengths. Arrange these strips in 2 curved layers all around the dress about one third below Belle's waist. And to hide the joints of the strips, attach tiny 5-petal flowers that were cut in 3 different sizes in descending order on the folds. You can use shortening or fondant glue to attach the flowers.
The red rose
- To make the red rose, pinch tiny piece of red fondant and press them into flat circles (about 1 cm in diameter). Arrange the petals to form a tiny rose. Attach the petals together with fondant glue. Poke a tiny floral wire to the bottom of the rose.
- For the leave, pinch some green fondant, and press and shape it by hand into a tear drop shape. Mark the veins on the leaf with the needle scribber tool. Attach the leaf to the rose with fondant glue.
Decorating the Belle cake board
- Get a cake board that is large enough to hold the cake and the 3D lettering. Cover it with foil. Brush the top with shortening.
- Roll some brown fondant thin and place it onto the cake board. Smooth the top and cut of the excess.
- Using a ruler as a guide, mark long horizontal lines, each about 2.5 cm wide with the needle tool. And then mark vertical lines in alternate order along each row.
- And using the needle tool, further mark short wood grain marks on the edges of each rectangle section and mark tiny holes using a toothpick at the corner of each of the rectangle sections. Overall, the idea was to create wooden plank floor effect.
- And then carefully lift the Belle cake (along with the cake board underneath) and place it on the decorated cake board giving enough space to arrange the 3D lettering on the front.
The 3D fondant lettering for the name
- Add some CMC powder in the yellow fondant. Cut out the 3D letters using block letter cutters. Leave the letters to harden for a few hours before attaching them to the cake board with fondant glue.
- And finally, roll some red fondant and cut out 5 red flowers with the flower plunger cutter. Make sure the flowers are slightly thick to be able to hold the candles. Attach the flowers onto the cake board (with fondant glue) and poke the candles into the flowers before the fondant dries so that the candles would stand in place.
Notes
- The amount of cake batter you need for your cake will depend on the size of your cake mold. The recipe measurement provided above is only as a guide based on the cake pan I used to make my doll cake.
Leave a Reply