

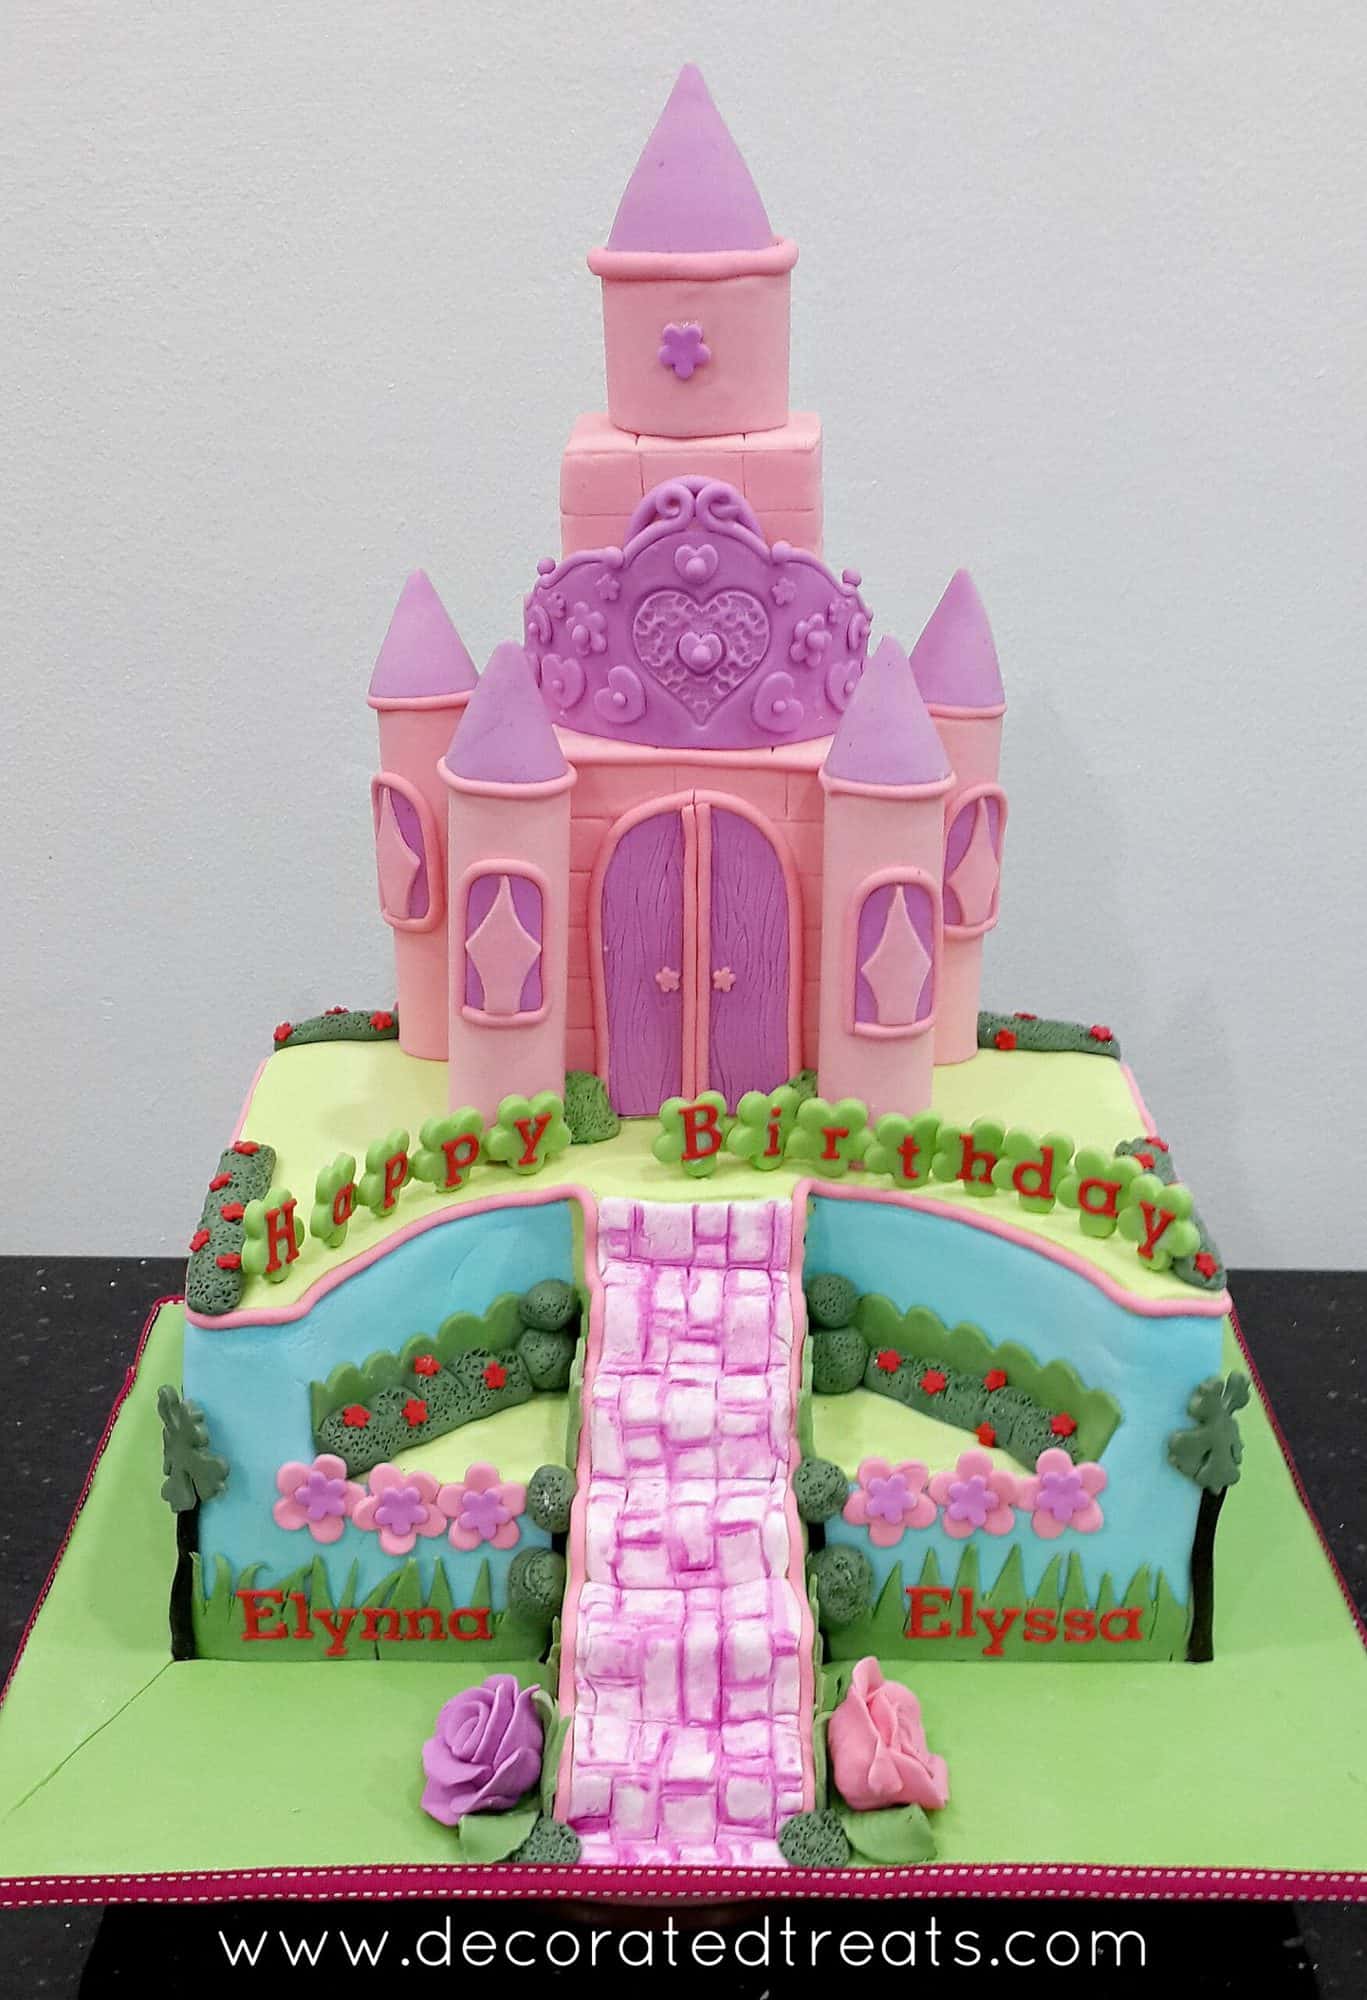
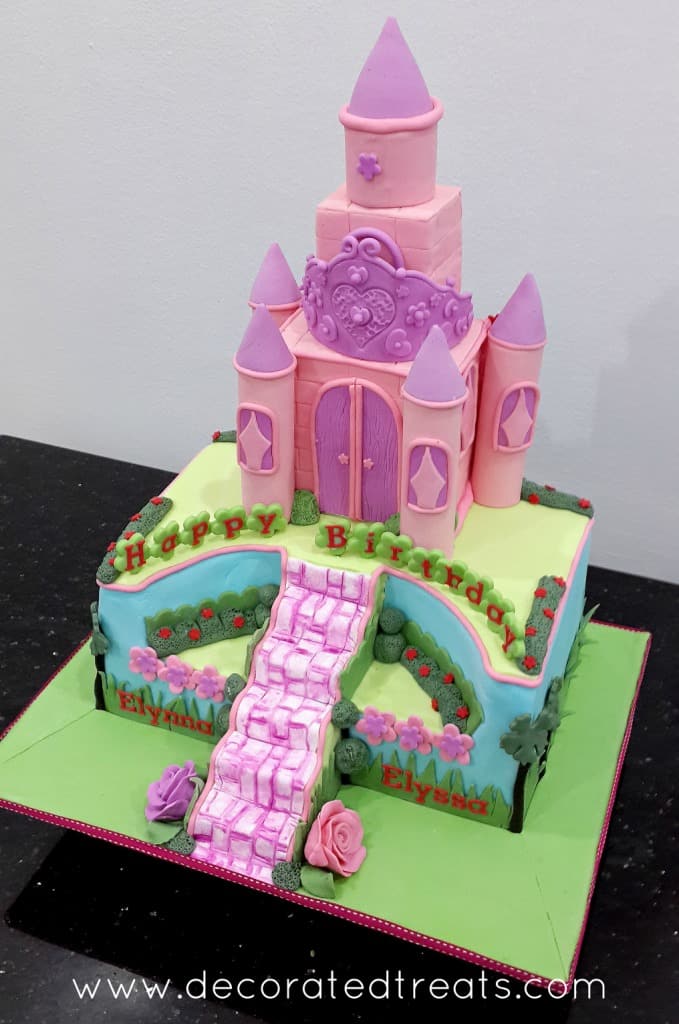
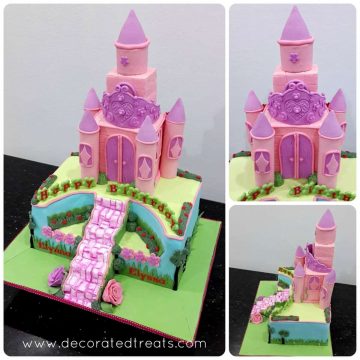
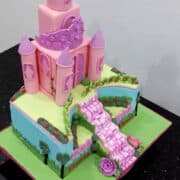
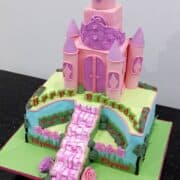
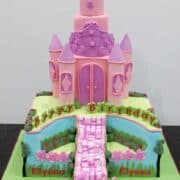
This 3D princess castle cake makes a perfect birthday cake for girls. With completely edible decorations, the cake features a pink and purple castle with a purple tiara set in a lovely garden. Learn how to make this cake with this easy tutorial.

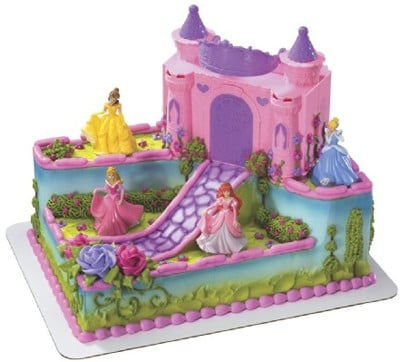
The cake was designed for a pair of twins and the design itself was adapted from an online store selling castle cake toppers as follows. I recreated this cake based on this cake and castle cake topper:
Note: This is an intermediate cake decorating tutorial and some basic knowledge of working with fondant and carving cakes is required.
Jump to:
❤️Why You Will Love This Tutorial
- You get to learn how to make a castle cake that is completely edible.
- You get to learn how to create an edible garden cake with fondant.
- You can make your own castle cake at a fraction of the cost for cakes sold at bakeries.
- You can customize the design to suit your liking.
If you are into castle cakes, you will also like these 2 other castle cake designs I have - a pink 3D castle cake with candies and marshmallows and a 2 tier buttercream castle cake with Disney princess cake toppers.
And you might also want to check out my Belle cake, Ariel the Little Mermaid cake and Little Mermaid birthday cake for more princess themed cakes.
📋Supplies Required
- Marble pound cake – Two layers of 10 inch by 6 inch rectangle cakes and two layers of 8 inch square cakes.
- Buttercream – To fill the cake layers and to crumb coat the cake before covering with fondant.
- Fondant
– I used store-bought one for this project. You can also make your own fondant from scratch with my easy homemade fondant recipe or a quicker version with my marshmallow fondant recipe.
- Gum paste
- Cardboard – To help form the castle towers.
- Cutters – These are 5 petal flower cutters
- Woodgrain impression mats
- Star piping tips
- Extruder tool
- Tappit alphabet cutter – To cut the birthday girls’ names and the 'happy birthday' wording.
- Shortening and fondant glue – these are used to stick fondant decorations on the cake. Fondant glue is used for heavier items and shortening for lighter ones.
- Food coloring - to tint the fondant and gum paste.
- Hot glue and ribbon - To decorate the sides of the cake board.
- Needle scriber tool - to mark the bricks line on the steps.
- Pizza cutting wheel and sugar craft knife - as general fondant cutting tools.
👩🍳How to Make
Step 1: Bake the Cakes and Mix the Buttercream
Bake 2 layers of 10 inches by 6 inches rectangle cakes. Each layer should be approximately 2 inches high. These will form the bottom tier or base cake (i.e., the garden and the stairs).
Also bake 2 layers of 8 inch square cakes. These will make the castle cake.
Cool all the cake layers completely before carving and decorating.
Make the buttercream for the filling and crumb coat.
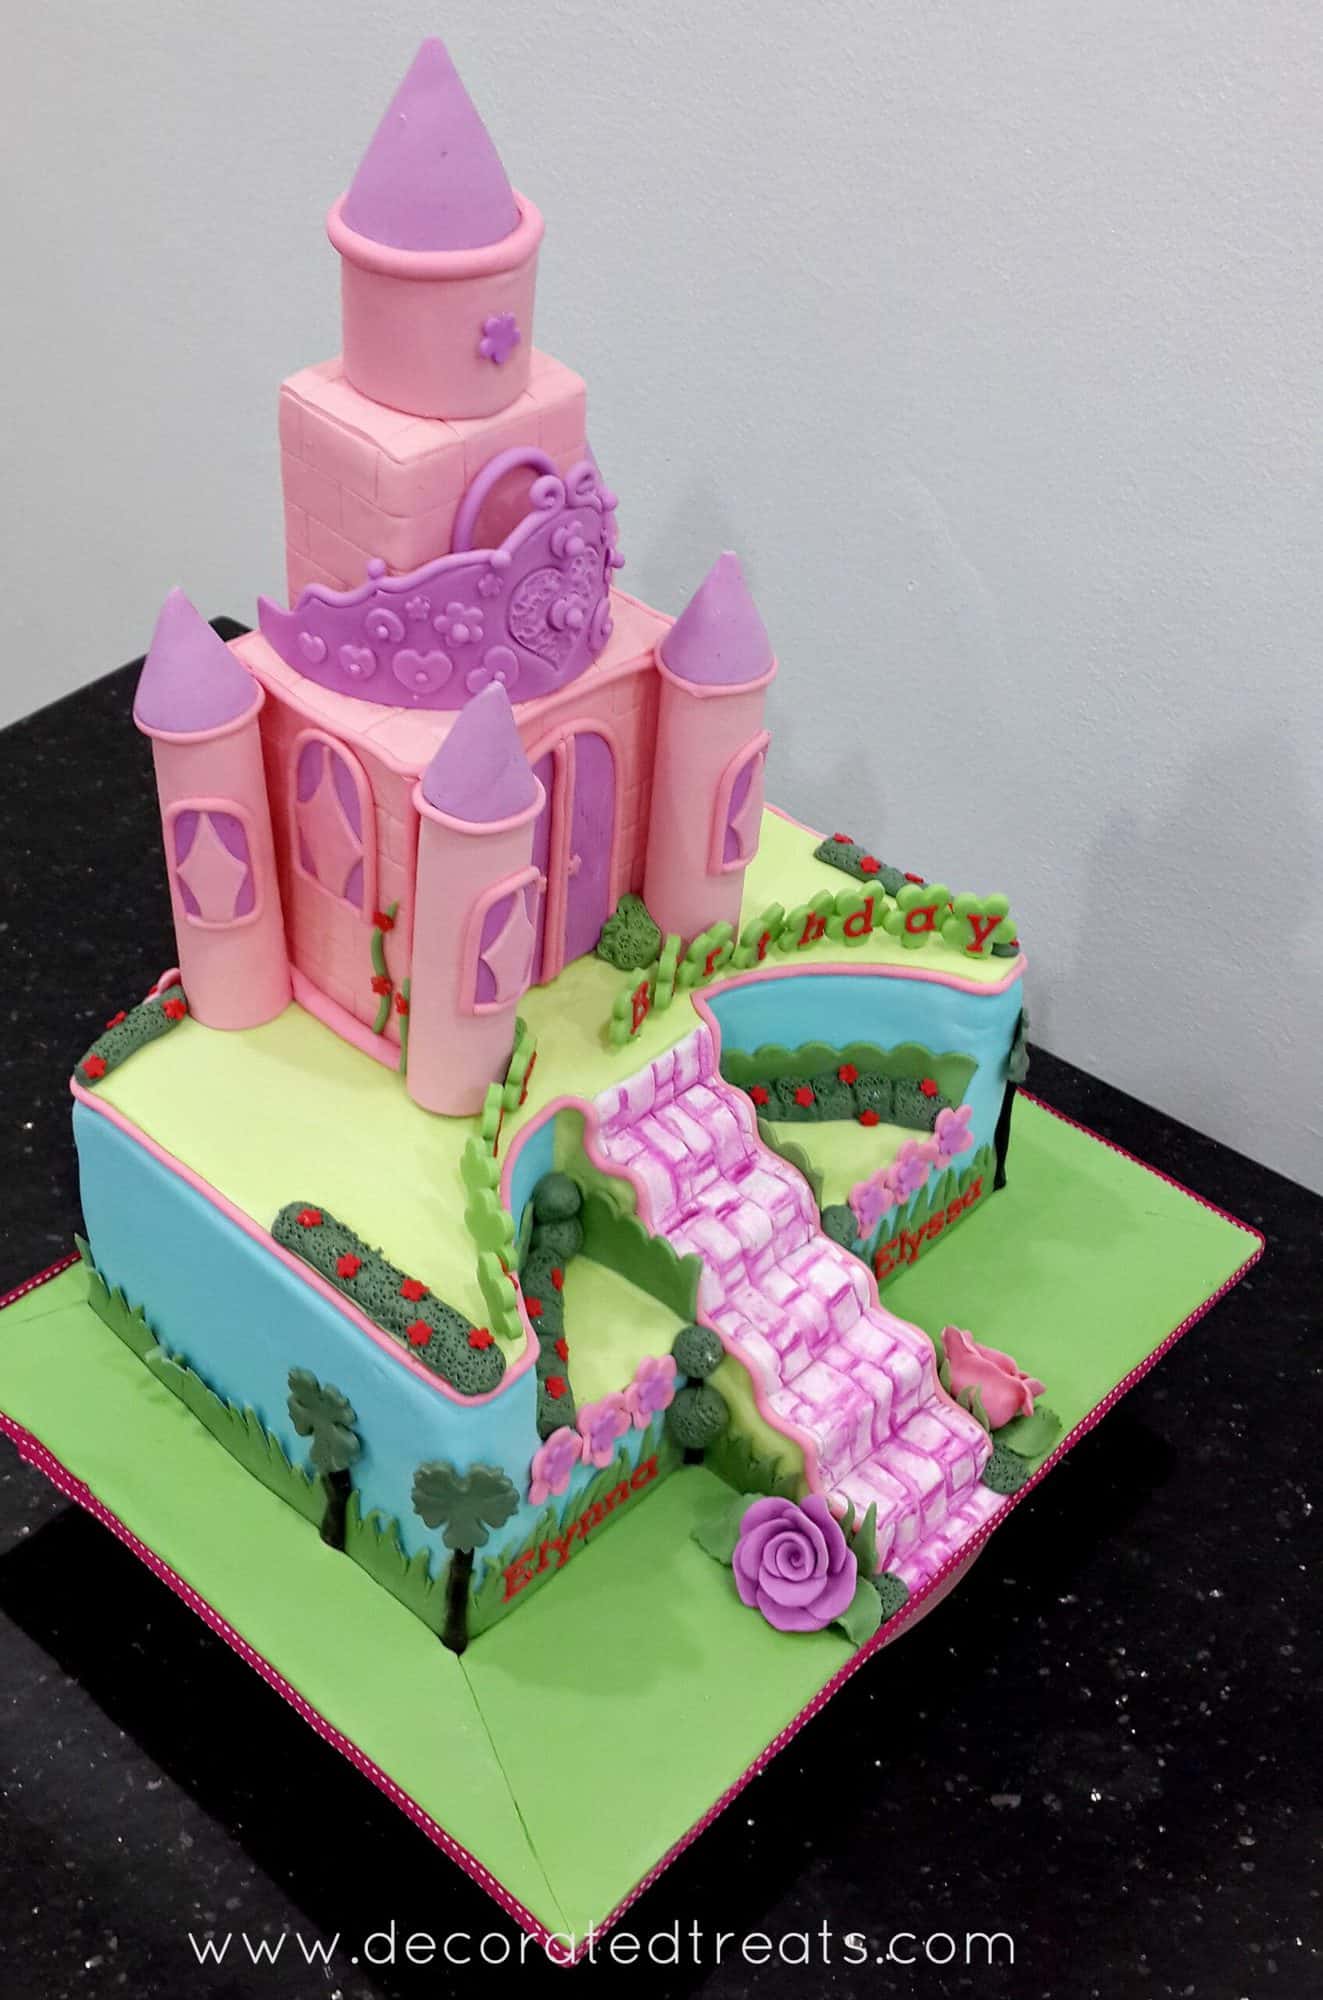
Step 2: Carve and Decorate the Garden Cake
Once completely cooled down, level all 4 cake layers. Sandwich both the rectangle layers with buttercream.
Carve the top layer of the cake to make a stairway in the center and curves on both sides of the stairs. Mix the carved out cake pieces with buttercream to make a thick cake paste (like making cake pops). Use this to shape the remaining 3 steps at the bottom of the stairway.
Crumb coat the whole cake. Cover the sides with blue fondant, the top with green and the stairs in white.
To make the grass on the bottom tier, roll and cut green fondant into long strips and use a pizza cutter to cut out triangles on one sides of the strip to create the grass effect. Attach to the cake with shortening. The grass on the curved walls of the garden is cut using cutters.
Next, add the dark green shrubs on the top of the cake and sides of the stairs. Roll dark green fondant into sausages and attach to the cake with glue. Poke the top in random order with a star piping tip to create the leaves effect. Add red fondant flowers (cut using the smallest of the flower plunger cutter).
To make the trees, use brown fondant for the trunk (roll by hand) and use a medium flower cutter to make the leaves for the trees. Attach to the cake with shortening.
For the green 3D flowers with the “happy birthday’ wording, cut them using the flower plunger cutter and attach to a toothpick. Use thick fondant so that you can poke the toothpicks into the fondant. Cut all the red letters in red tinted gum paste using Tappit letter cutters. Attach to the green flowers with shortening. Let the flowers set before attaching to the cake.
Cut the purple and pink flowers using flower plunger cutter as well. Attach to the front of the cake with shortening.
The two roses at each side of the steps are formed by hand. See my tutorial on how to make gum paste roses.
To create the bricks design on the stairs, draw the lines with a needle tool. Hand paint the lines with purple food coloring (diluted with water).
Brush the cake board with shortening and cover it with green fondant. Cut the fondant into 4 separate rectangles and attach to the cake board.
Step 3: Carve the Castle Cake
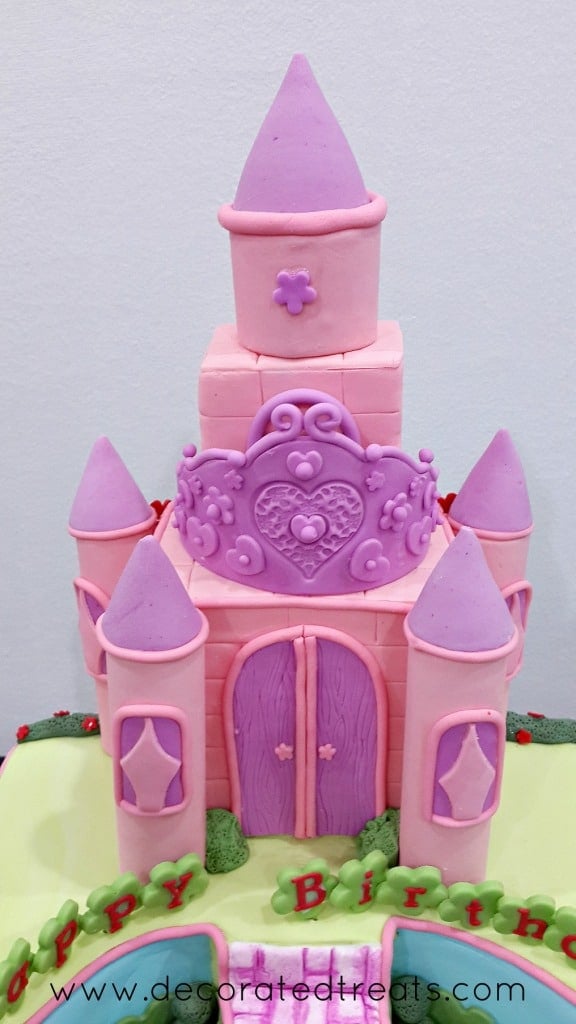
Sandwich the square cake layers. Cut out two 2 square pieces - one measuring 5 inch square and the other measuring 3 inch square. These will form the top and bottom tier of the castle.
Crumb coat both tiers with buttercream and cover with pink fondant. Use a needle tool or a toothpick to draw the brick lines on both tiers.
Add pink border all around the edges of the bottom tier. Use an extruder tool to pipe out the fondant strip for the border. Attach the strip with fondant glue.
Note: The border can also be rolled by hand, though it will be slightly more time consuming.
Add the door and windows on the sides. These are rolled and cut by hand and attached with shortening.
Step 4: Make the Castle Towers
Make 4 cardboard rolls in the size of the towers (approximately 1 inch to 1.5 inches in diameter and 6 to 7 inches high).
Note: The actual height of the towers is 4 inches but the cardboard roll should be slightly longer so that it is easier to handle the fondant wrapped around it in the next steps.
Add CMC to some pink fondant, roll it thin and cut it into 4 rectangle pieces measuring approximately 4 inches high and 6 inches wide.
Wrap each piece around the cardboard rolls, trim any excess and secure the joints with fondant glue. Set these aside for the glue to set and then gently remove the cardboard rolls.
Repeat the process for single tower for the top of the castle.
Add windows to each tower.
To make the pointy roofs, cut out circles in CMC-added purple fondant. Cut each circle into half and join the straight end of the semi circles to form a cone. Glue the joints with fondant glue. Set aside to dry.
Step 5: Make the Tiara
Draw the tiara template on a piece of paper, making sure the size fits the castle cake. Cut out CMC added purple fondant using the template.
Note: You can draw the template free hand or find a suitable image from the internet. Resize it accordingly to fit the size of the castle cake. See here for guide on how to resize images for cake decorating.
Decorate the tiara with an embossed heart design in the center. Add small flower and heart fondant cut outs on the sides.
Shape the tiara by wrapping it around any cylindrical items like a cookie jar or glass bottle. Choose an item with a diameter that fits the top of the castle cake ( it should fit within the bottom castle tier and able to fit the top castle tier within its diameter).
Let the tiara set completely before removing from the jar or bottle. Use the extruder tool to pipe out a long strip of fondant roll and attach it to the top rims of the princess tiara with fondant glue.
Step 6: Assemble the Castle Cake
Poke four bubble tea straws into the garden cake where you wish to position the castle. These should be within the size of the castle cake and should not be visible once you place the castle on them.
Lift and carefully place the base tier of the castle cake (the castle cake should be with a cake board or card board underneath in the exact size of the cake) onto the garden cake. The weight of the cake will be supported by the bubble tea straws underneath.
Note: If you are going to transport the cake elsewhere, you will need to poke a dowel rod through both the castle cake tiers all the way to the bottom of the garden tier to prevent the tiers from sliding off.
Add the second tier of the castle cake. Next add all the towers. Secure them in place with fondant glue.
Finally, place the princess tiara on the cake. Hold it in place with fondant glue to complete the princess castle cake design.
❤️More Cake Designs You Will Love
Do you like this tutorial? Please leave a 5-star ⭐⭐⭐⭐⭐rating in the recipe card below and consider a review further down this page. I would love to hear from you. Thank you!
📖Recipe
Princess Castle Cake
Equipment
- Cardboard
- 5-petal flower plunger cutters
- Heart plunger cutters
- Woodgrain impression mat
- Star piping tip
- Extruder tool
- Tappit alphabet letter cutter
- Hot glue and ribbon
- Needle scriber tool
- Pizza cutting wheel and sugar craft knife
For best results, use the metrics measurements. US customary measurements have not been tested and are only meant for guide.
Ingredients
- 2 rectangle cakes measuring 6 inches by 10 inches
- 2 square cakes measuring 8 inches by 8 inches
- Buttercream
- Fondant
- Gum paste
- Shortening
- Fondant glue
- Food coloring
Instructions
Bake the cakes and make buttercream
- Bake 2 layers of 10 inch by 6 inch rectangle cakes and 2 layers of 8 inch square cakes. Each layer should be approximately 2 inches high. Cool all the cake layers completely before carving and decorating.
- Make the buttercream for the filling and crumb coat.
- Once completely cooled down, level all 4 layers.
Decorate the garden cake
- Sandwich the rectangle cake layers with buttercream. Carve the top layer of the stacked cakes to make a stairway in the center and curves on both sides of the stairs.
- Mix the carved out cake pieces with buttercream to make a thick cake paste (like making cake pops). Use this to shape the remaining 3 steps at the bottom of the stairway.
- Crumb coat the whole cake. Cover the sides with blue fondant, the top with green and the stairs in white.
- To make the grass on the bottom tier, roll and cut green fondant into long strips and use a pizza cutter to cut out triangles on one sides of the strip to create the grass effect. Attach to the cake with shortening. Cut the grass on the curved walls of the garden with scalloped rectangle cutters (see Note 1).
- Next, add the dark green shrubs on the top of the cake and sides of the stairs. Roll dark green fondant into sausages and attach to the cake with glue. Poke the top in random order with a star piping tip to create the leaves effect. Add red fondant flowers (cut using the smallest of the flower plunger cutter).
- To make the trees, roll brown fondant to form the trunk and use a medium flower cutter to make the leaves for the trees. Attach to the cake with shortening.
- For the green 3D flowers with the “happy birthday’ wording, cut them using the flower plunger cutter and attach to a toothpick. Use thick fondant so that you can poke the toothpicks into the fondant. Cut all the red letters in red tinted gum paste using Tappit letter cutters. Attach to the green flowers with shortening. Let the flowers set before attaching to the cake.
- Cut the purple and pink flowers using flower plunger cutter as well. Attach to the front of the cake with shortening.
- The two roses at each side of the steps are formed by hand. See my tutorial on how to make gum paste roses. Alternatively, you can use ready made sugar roses.
- To create the bricks design on the stairs, draw the lines with a needle tool. Hand paint the lines with purple food coloring (diluted with water).
- Brush the cake board with shortening and cover it with green fondant. Cut the fondant into 4 separate rectangles and attach to the cake board.
Carve the castle cake
- Sandwich the square cake layers with buttercream. Cut out two 2 square pieces - one measuring 5 inches square and the other measuring 3 inches square for the top and bottom tiers of the castle.
- Crumb coat both tiers separately with buttercream and cover with pink fondant. Use a needle tool or a toothpick to draw the brick lines on both tiers.
- Add pink border all around the edges of the bottom tier. Use an extruder tool to pipe out the fondant strip for the border. Attach the strip with fondant glue (see Note 2).
- Add the door and windows on the sides. Roll and cut by hand and attach with shortening.
Make the castle towers
- Make 4 cardboard rolls in the size of the towers (approximately 1 inch to 1.5 inches in diameter and 6 to 7 inches high (see Note 3)).
- Add CMC to some pink fondant, roll it thin and cut it into 4 rectangle pieces measuring approximately 4 inches high and 6 inches wide.
- Wrap each piece around the cardboard rolls, trim any excess and secure the joints with fondant glue. Set these aside for the glue to set and then gently remove the cardboard rolls.
- Repeat the process for single tower for the top of the castle.
- Add windows to each tower.
- To make the pointy roofs, cut out circles in CMC-added purple fondant. Cut each circle into half and join the straight end of the semi circles to form a cone. Glue the joints with fondant glue. Set aside to dry.
Make the tiara
- Draw the tiara template on a piece of paper, making sure the size fits the castle cake (see Note 4). Cut out CMC added purple fondant using the template.
- Decorate the tiara with an embossed heart design in the center. Add small flower and heart fondant cut outs on the sides.
- Shape the tiara by wrapping it around any cylindrical items like a cookie jar or glass bottle. Choose an item with a diameter that fits the top of the castle cake ( it should fit within the bottom castle tier and able to fit the top castle tier within its diameter).
- Let the tiara set completely before removing from the jar or bottle. Use the extruder tool to pipe out a long strip of fondant roll and attach it to the top rims of the princess tiara with fondant glue.
Assemble the princess castle cake
- Poke four bubble tea straws into the garden cake where you wish to position the castle. These should be within the size of the castle cake and should not be visible once you place the castle on them.
- Lift and carefully place the base tier of the castle cake (the castle cake should be with a cake board or card board underneath in the exact size of the cake) onto the garden cake. The weight of the cake will be supported by the bubble tea straws underneath (see Note 5).
- Add the second tier of the castle cake. Next add all the towers. Secure them in place with fondant glue.
- Finally, place the princess tiara on the cake. Hold it in place with fondant glue to complete the cake.
Notes
- If you do not have the scalloped cutter, you can replace it with fondant grass like the bottom layer of the cake.
- The border can also be rolled by hand, though it will be slightly more time consuming.
- The actual height of the towers is 4 inches but the cardboard roll should be slightly longer so that it is easier to handle the fondant wrapped around it in the next steps.
- You can draw the template free hand or find a suitable image from the internet. Resize it accordingly to fit the size of the castle cake. See here for guide on how to resize images for cake decorating.
- If you are going to transport the cake elsewhere, you will need to poke a dowel rod through both the castle cake tiers all the way to the bottom of the garden tier to prevent the tiers from sliding off.

Leave a Reply