

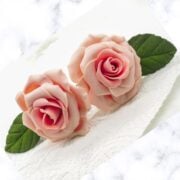
Want to learn how to make gum paste rose? Here is my step by step tutorial for making basic gum paste roses with calyx and leaves. These two toned full bloom roses are wired and make perfect decoration for wedding cakes and floral themed cakes.

You can use my technique here to not only create a full bloom rose but also to make half bloomed ones as well as the buds. The tutorial presented on this page is for a full bloom rose. However, I do mention along the way, the steps you need to take to create half bloom roses and the rosebuds.
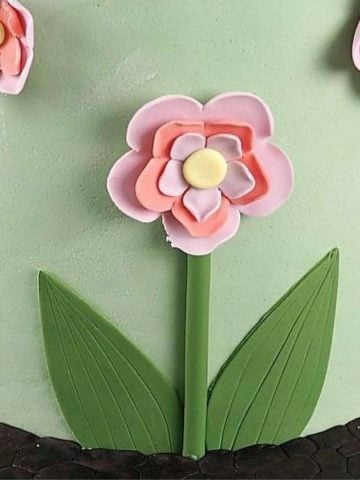
See how I have used these roses to make an elegant 5 tier wedding cake in autumn colors and a birthday cake. And for more gum paste flowers, check out my tutorial on how to make gum paste plumeria, gum paste hydrangea, gum paste hibiscus and gum paste poppies. And for a comprehensive guide on how to use flowers on cakes, check out my guide on decorating cakes with fresh and gum paste flowers.
❤️Why you will love this tutorial
- You get to learn how to make wired roses, including the leaves.
- Making our own gum paste roses is much cheaper than buying them from elsewhere.
- You get to customize the colors and sizes to your liking.
- You can make these flowers in advance in white gum paste and dust them with the color of choice when you need to use them. Follow my tutorial on how to color gum paste flowers.
🧾Supplies
- Gum paste - I used Satin Ice gum paste in white and tinted it pink for the roses and green for the leaves and calyx.
- Food color - I used Wilton pink gel food color for the rose and Wilton moss green for the leaves and calyx.
- Petal dust - I used only 2 colors for this project and those were rose leaf petal dust and violet petal dust. Both were used for the leaves and calyx.
- Floral wire - I used green 18 gauge wire floral wire for the rose and 24 gauge wire for the leaves. It is important to make sure not to use wire with a thin gauge for the roses as it will not be able to support the weight of the rose as you add on the petals to make a full bloom flower. Since the rose leaves are not too heavy, attaching them to gauge 24 wire is good enough.
- Rose petal cutters - I used FMM rose petal cutters that come in a set of 5. For this tutorial, I used the largest cutters.
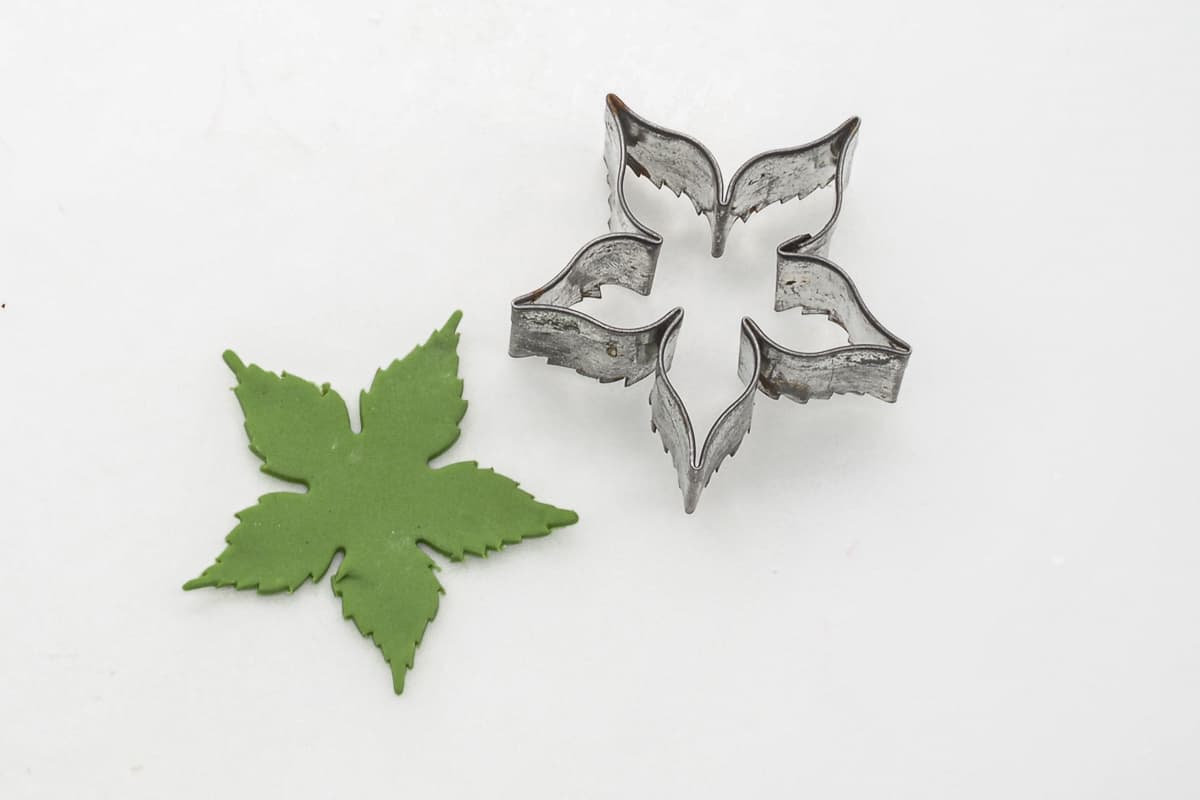
- Rose leaf cutter
- Rose calyx
- Fondant ball tool & fondant shaping foam - these tools were used to thin and shape the rose petals as well as the calyx.
- Rolling pin
- Thin sponge - I purchased this from a local craft shop. It is basically a thin piece of sponge measuring about 3 mm in thickness. I used this sponge to help hold my rose petals in place as the gum paste sets.
- Cake decorating brushes - I used these to apply glue onto petals as well as to dust the leaves and rose calyx.
- Large flower formers
- Gum paste leaf veiner for the rose leaves.
- Long nose pliers to shape the floral wire ends.
- Fondant glue - This is to stick the petals together as well as to secure the floral wires used onto gum paste.
✂️How to make
Step 1: Tint the gum paste
The first step is to tint your gum paste. The gum paste rose in this tutorial is in 2 different shades of pink. The petals on the inner side of the rose are of a darker shade of pink. While the outer ones are of a lighter shade.
Start with the darker shade of pink. As you move towards making outer petals of the flower, add white gum paste to the remaining pink paste to make it lighter. As for the leaves and calyx, tint the gum paste in green.
Step 2: Prepare the floral wires
Use 18 gauge floral wire for the flower stems. Depending on how long you want the stems for each flower to be, cut the 18 gauge floral wire. You can cut it into 2 or 3 sections.
Form a tiny loop on one end with your pliers.
Step 3: Make the rose bud
Once the wires are ready, you can start with the flowers. Take a small ball of pink gum paste. Form it into a cone and insert the looped end of your wire into it. Before inserting the wire, dip it into fondant glue. This is so that the wire is secured firmly to the gum paste cone.
Pinch the bottom neatly.
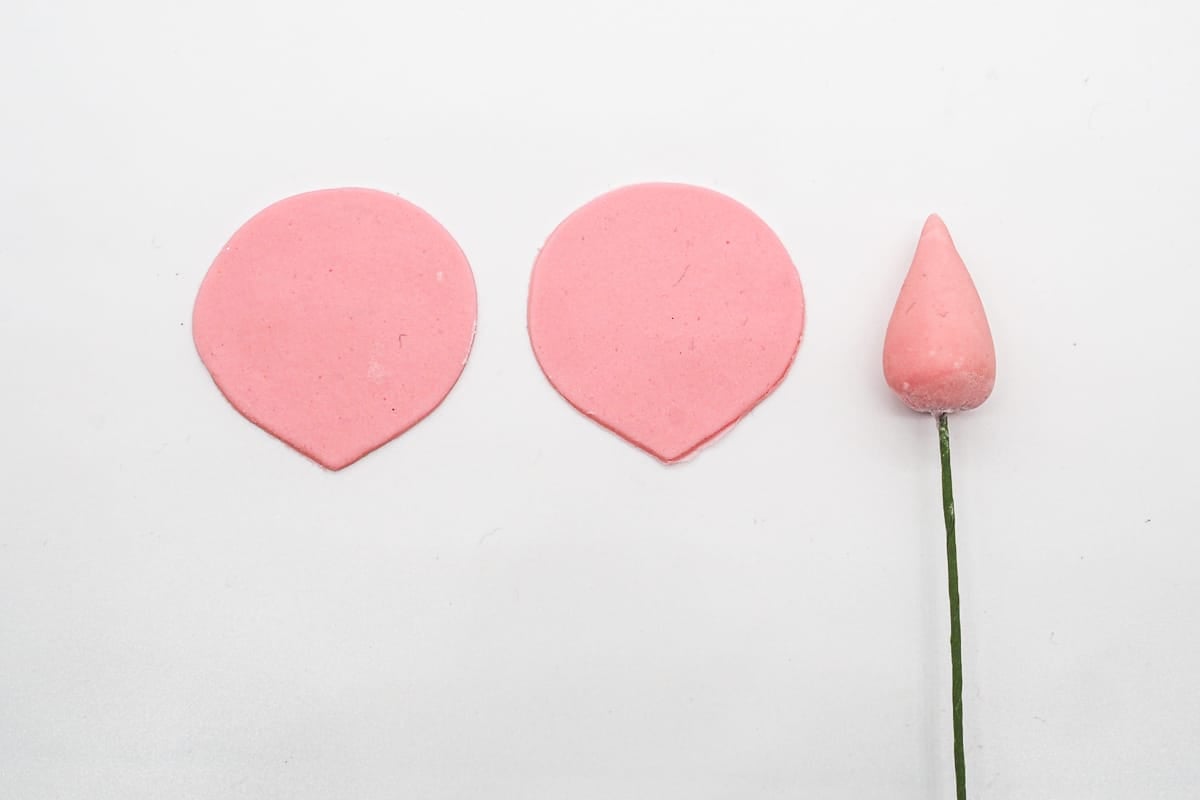
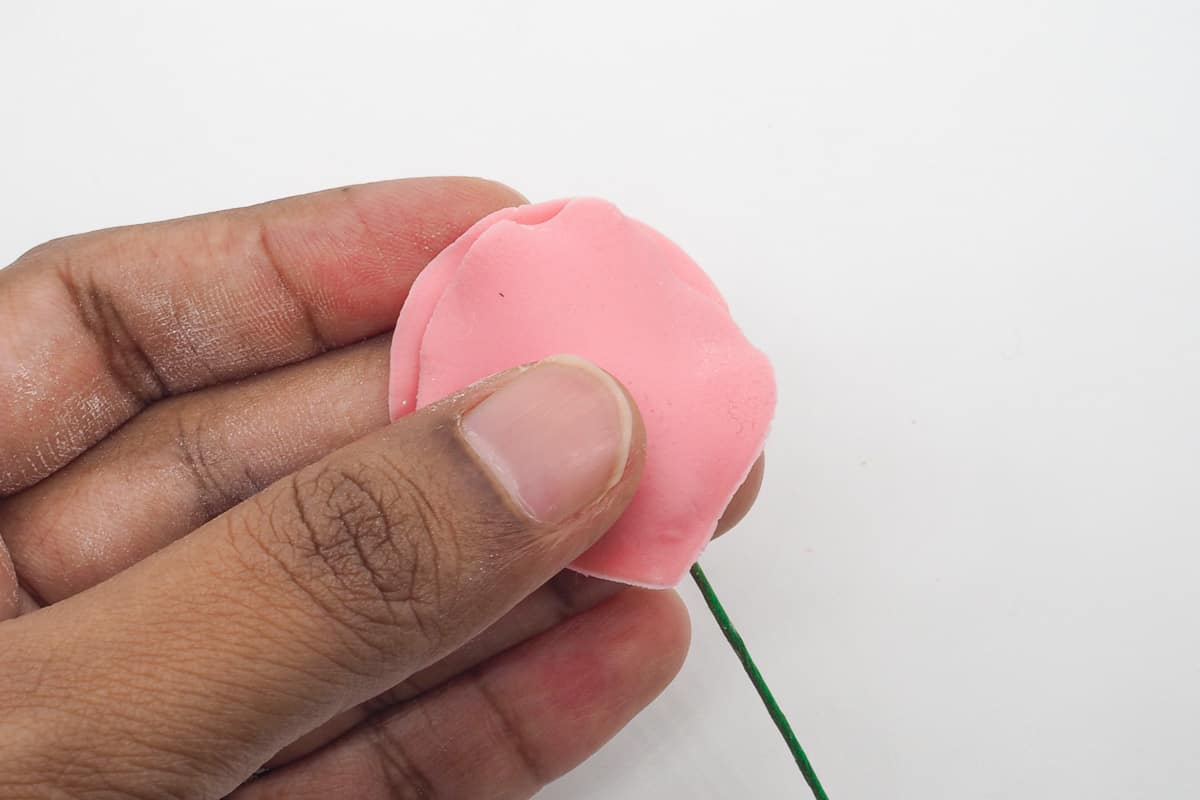
Next is the petals. The first row of petals is essentially just 1 petal wrapped completely around the cone. Roll your gum paste as thin as possible and cut out one petal.
I used the largest cutter in the FMM rose petal cutters set. If you don't have the FMM cutters, you can use any other rose petal cutter you have in hand.
Use your ball tool to thin the edges of the petal.
And then, apply glue all around the edges of the petal and slowly wrap it around your cone base.

The pointed end of the petal should be facing down and the curved end should be facing to the top. In wrapping the rose petal, make sure you get a neat, tightly wrapped pointed tip. See below:
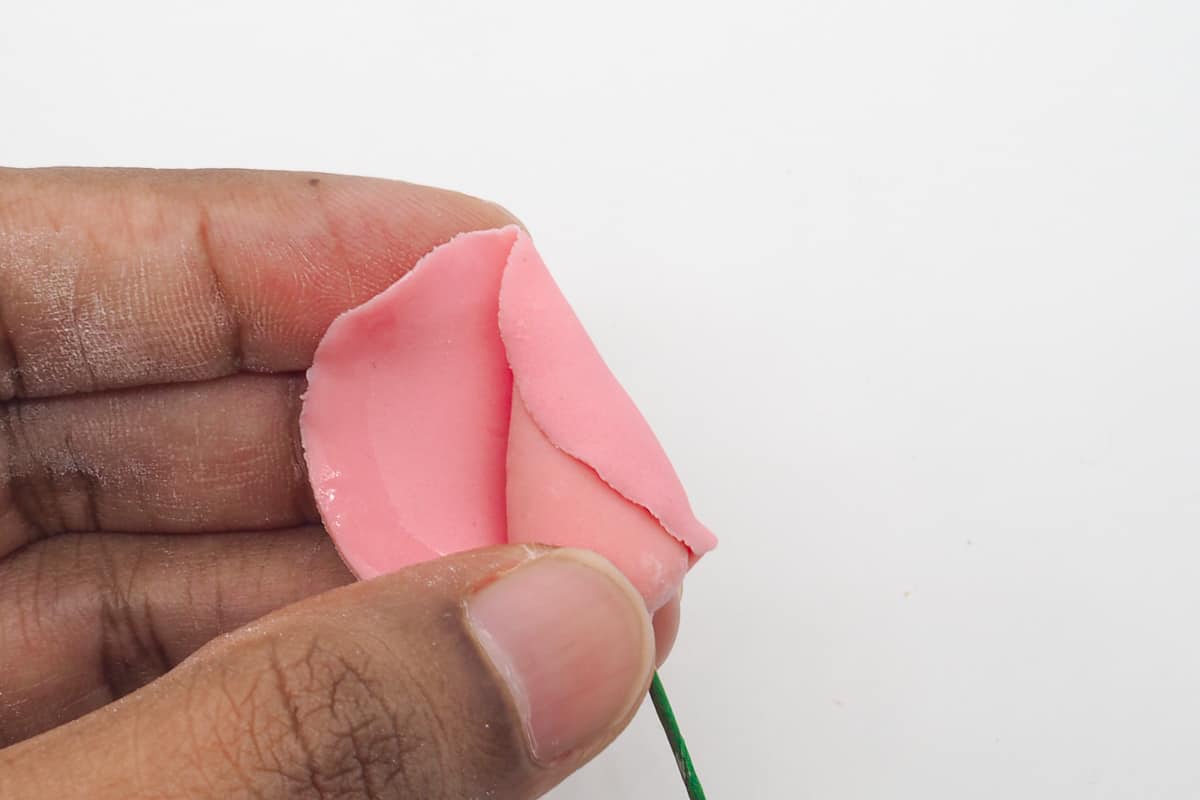
The next layer of the gum paste rose petals consists of 2 petals. These are supposed to be tightly wrapped around the cone as well. But no as tightly as the first one, especially at the top.
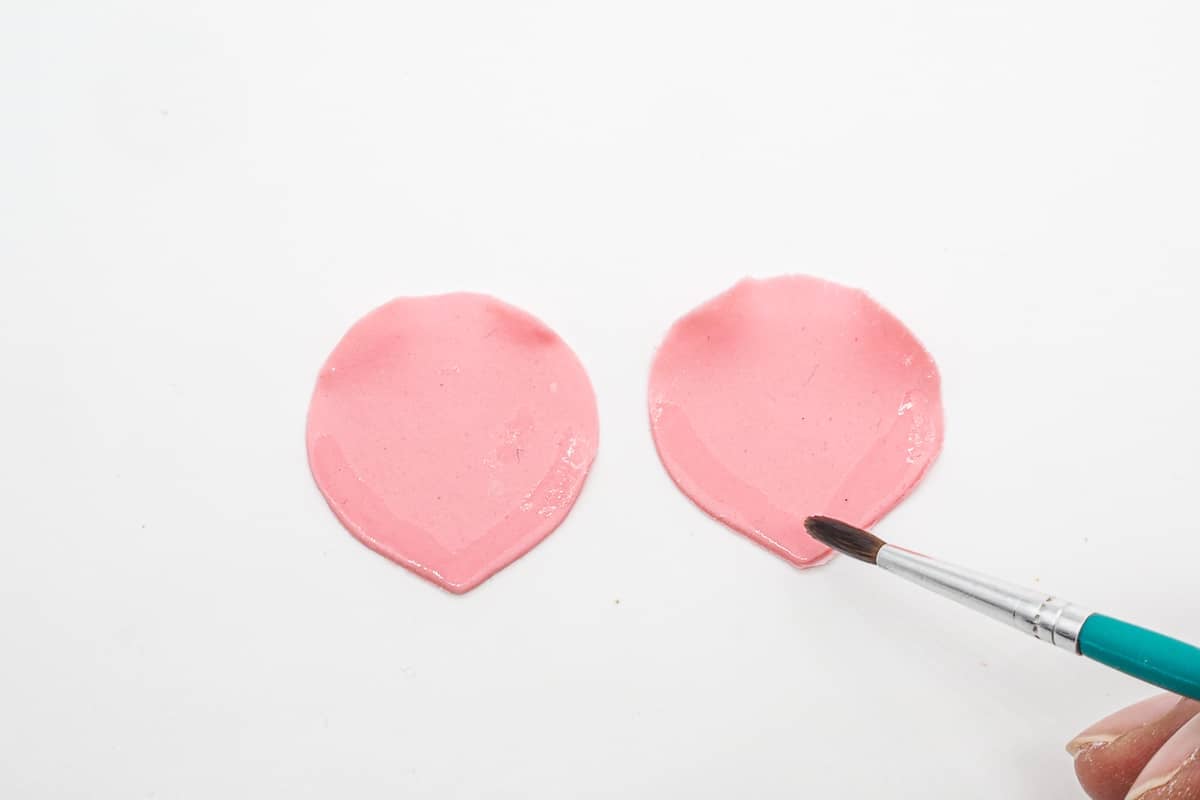
To do this, cut out 2 petals from your gum paste. Thin the edges as you did in the first step above. And then apply glue on the edges, but this time, limit to just the edges on the lower half of each petal.
Next, place the bud on the first petal as shown below. And then place the second petal on the opposite side of the first petal. Wrap the right side of the top petal in, followed by the same side of the bottom petal as shown below:
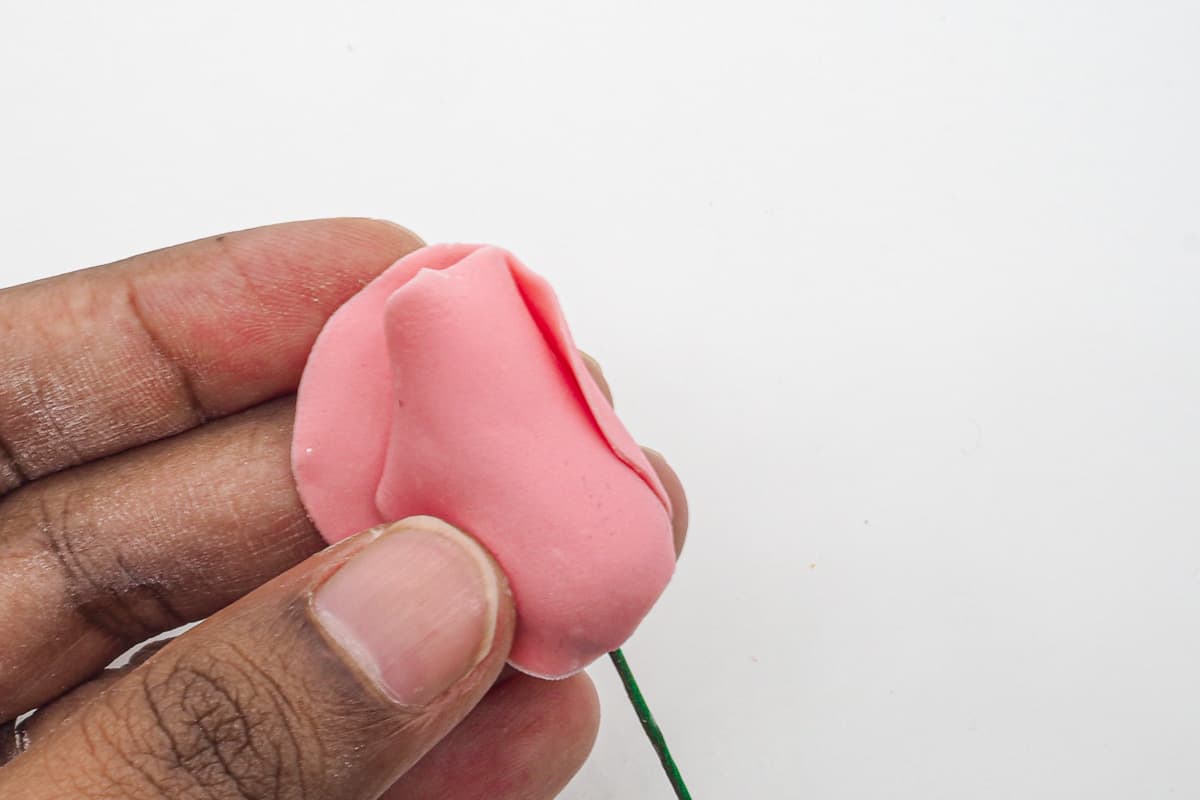
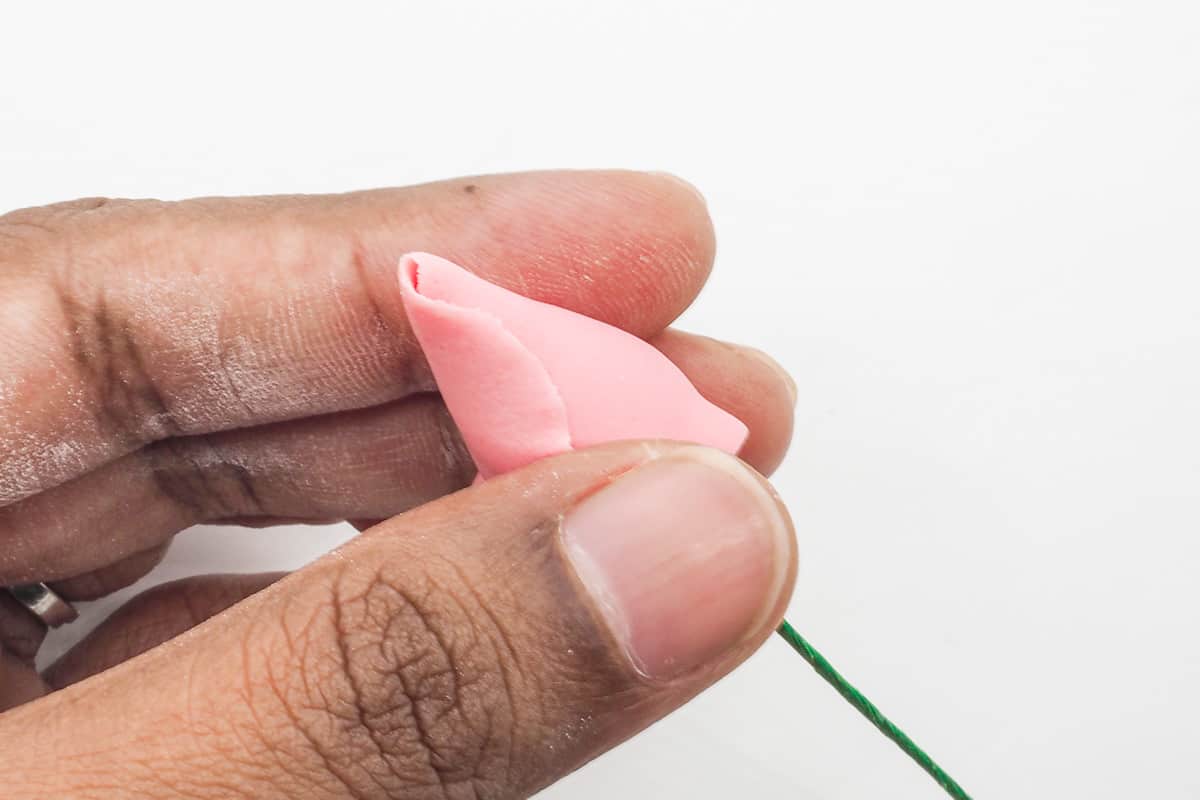
Next, wrap the other side of the bottom petal in, and finally wrap the top petal around the bud:
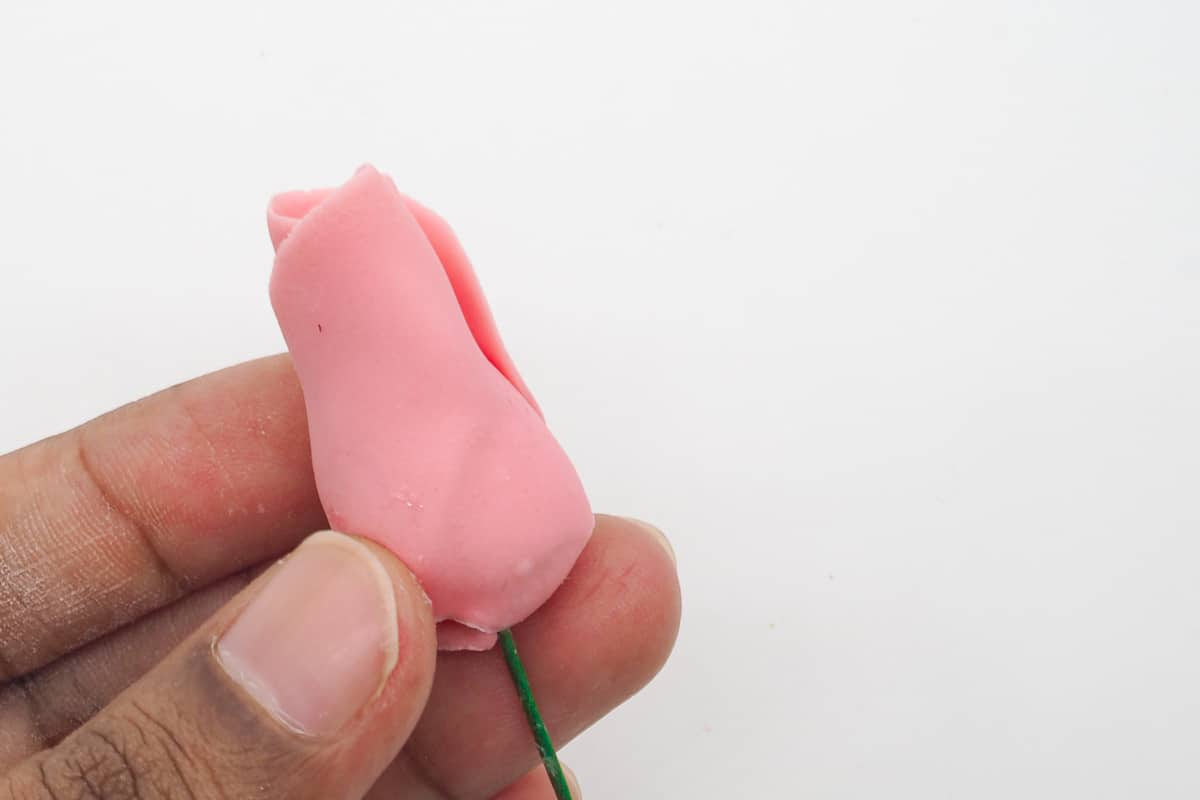
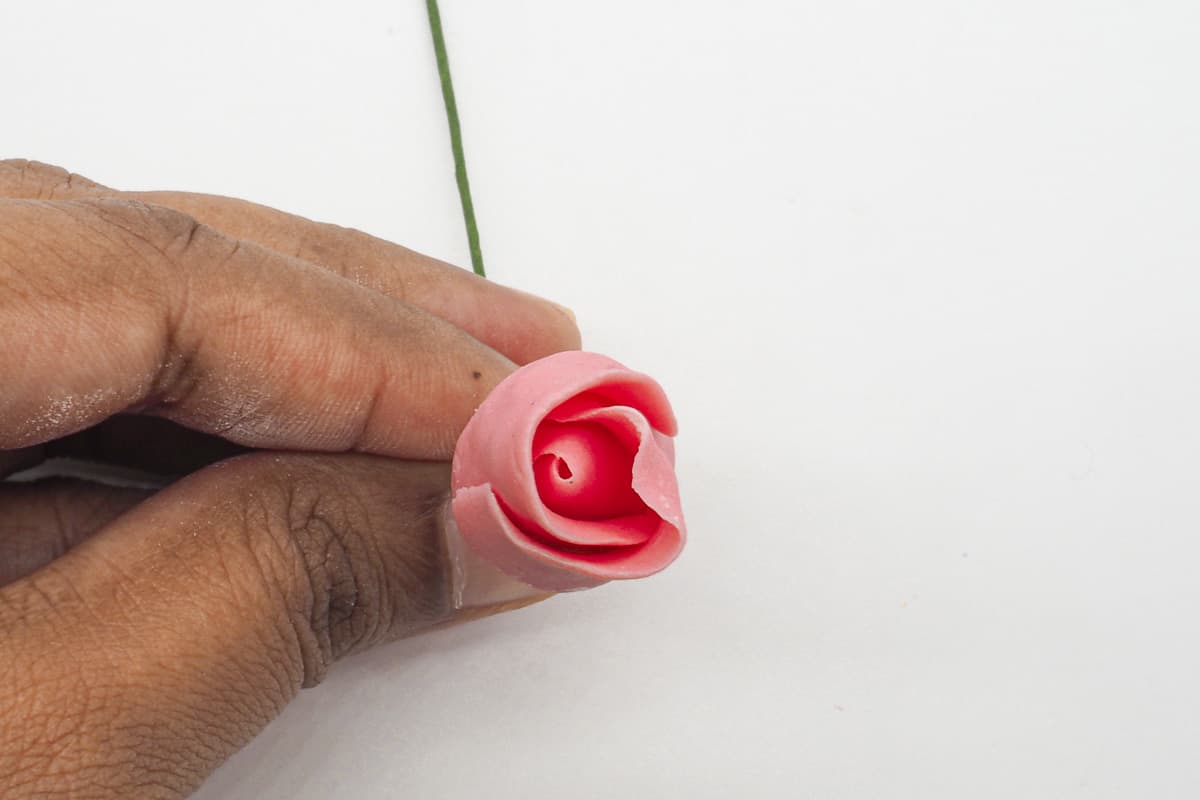
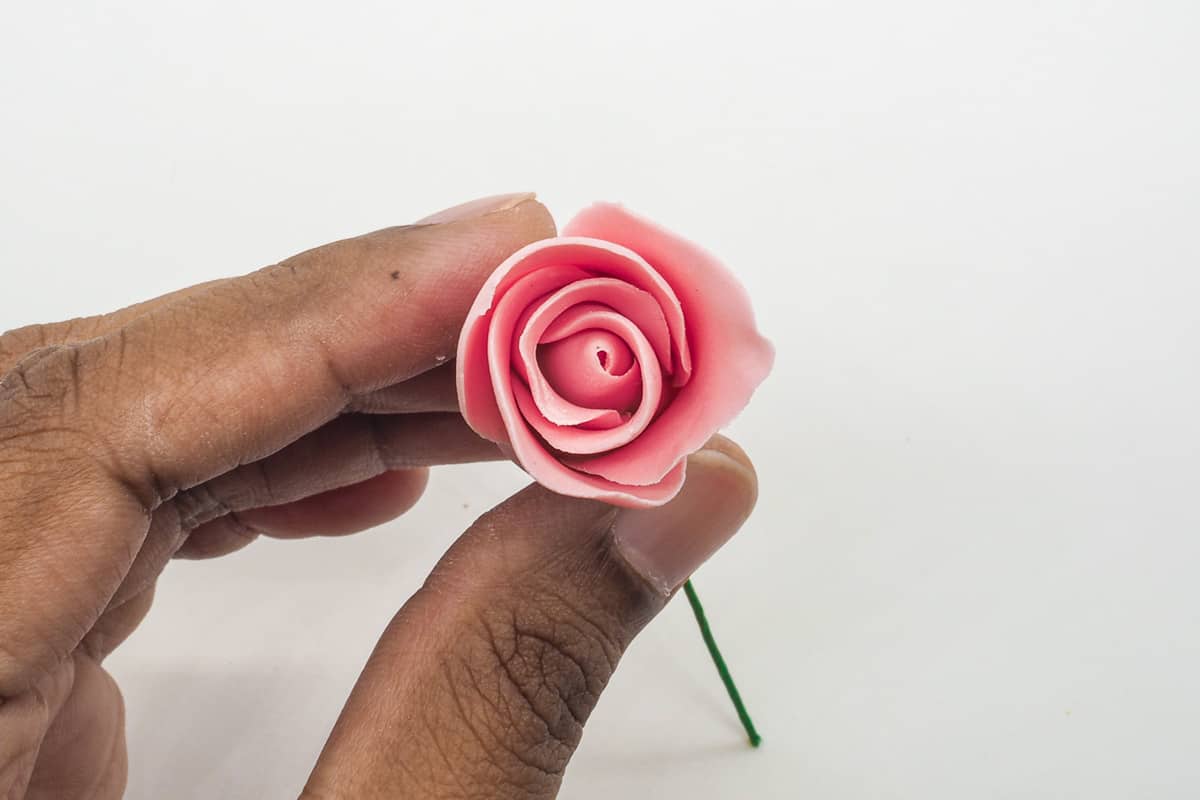
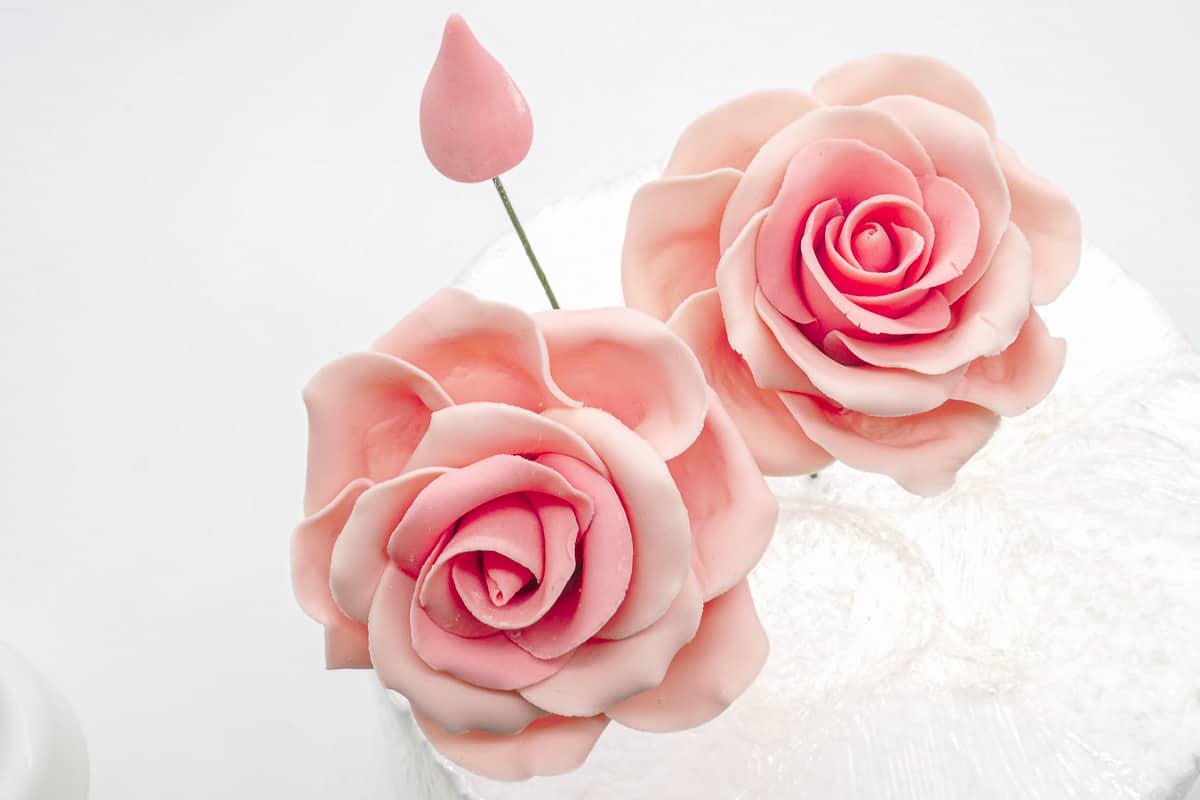
This is how the bud should look like from the top. This is the rosebud stage. If you intend to use rosebuds on your cake, you can stop adding petals and proceed to attach the calyx for the rose buds (see step 6 below).
Step 4: Add more petals to make half bloom rose
To proceed to a half bloom rose, you just need to add another layer of petals around the second layer above. For this third layer, the process is the same as the second layer, but this time, use 3 petals.
Again, cut out 3 petals, thin the edges with your ball tool and apply glue to the lower edges. And similar to the second layer of petals, start by placing the bud on one petal followed by the second petal, slightly overlapping underneath the first one.
And then wrap the second petal in. After that, add the third petal, slightly overlapping the second petal and wrap in both its sides as shown.
And finish off the third layer of petals by wrapping the left side of the first petal in around the third petal.

This is the top view after the third layer of petals.
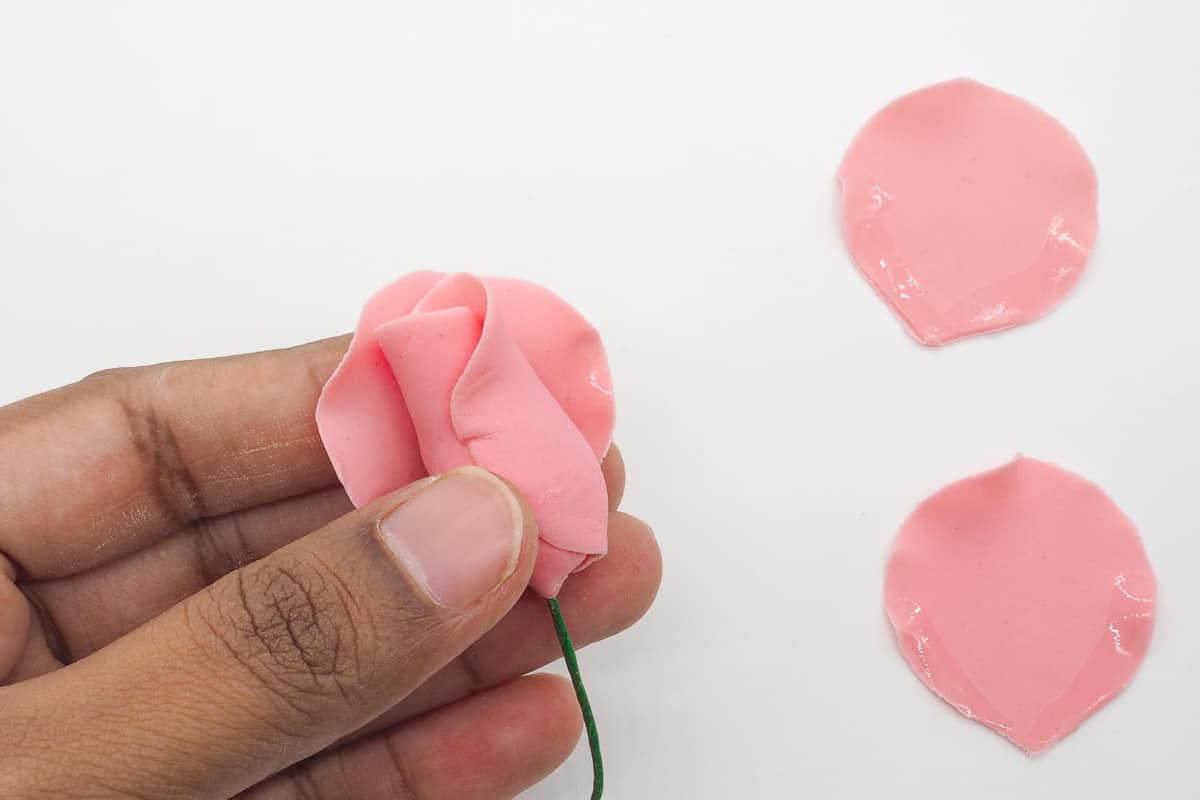
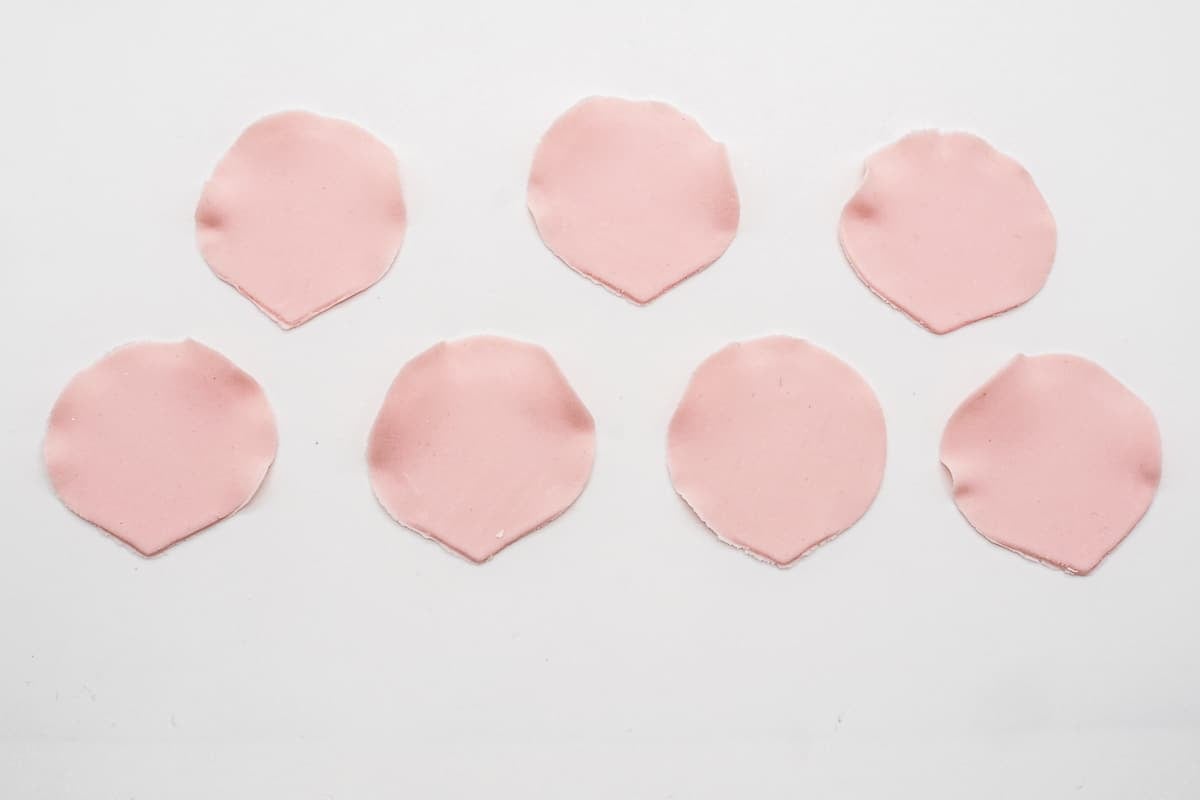
The process of adding on the next layer of petals is very similar to the third layer above. This time, however, instead of 3 petals, use 5 petals.
Lighten the color of your gum paste to a lighter shade of pink by adding some white gum paste to it.
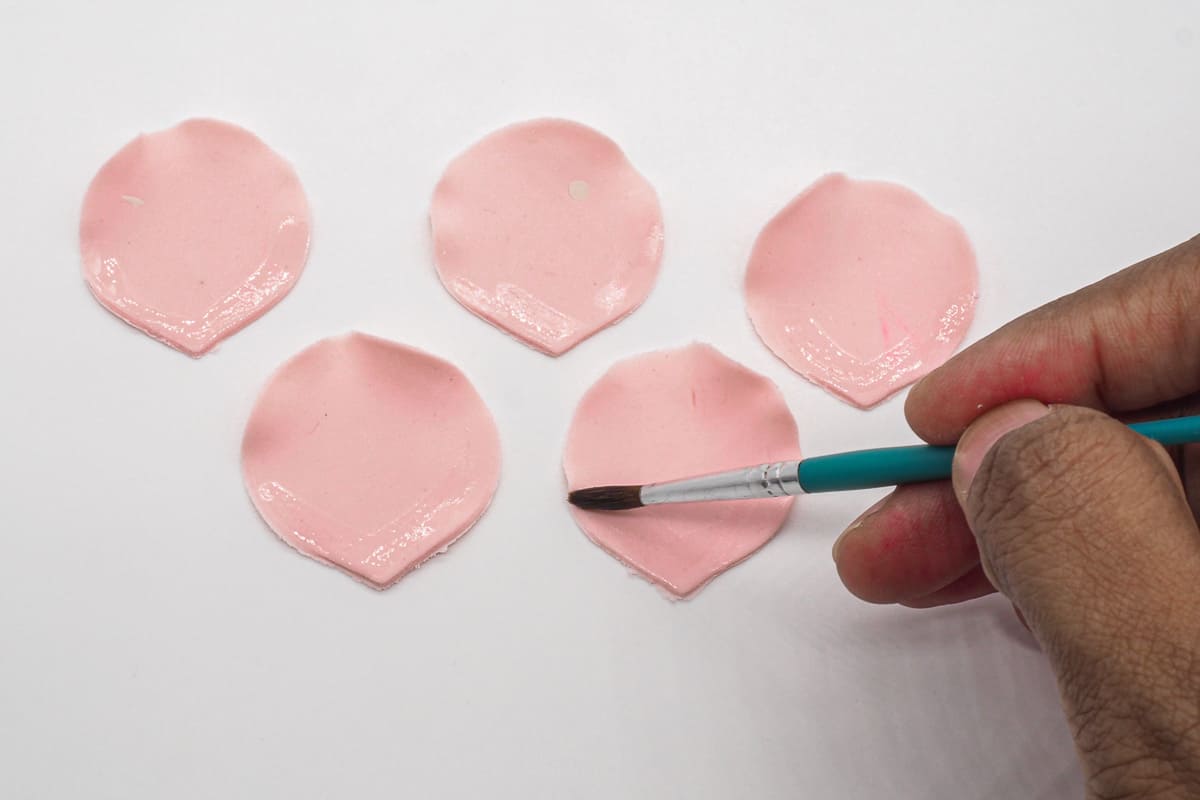
Once all the 5 petals are wrapped, curl the outer edges of each petal. You can use a toothpick for this process, but I just did it with my fingers.
And then loosen the petals slightly with the back of your brush or the thinner end of your ball tool. At this stage, the petals should not be too tightly wrapped around the center of the flower.
And this is how the flower should look from the top. At this point, the gum paste rose in at a half bloom stage. So if you want a half bloomed rose on your cake, you can stop the process of adding more petals and proceed with the calyx in step 6 below.
Before adding more petals, set the flower aside to allow the petals to set. It will be easier to add more petals that way.
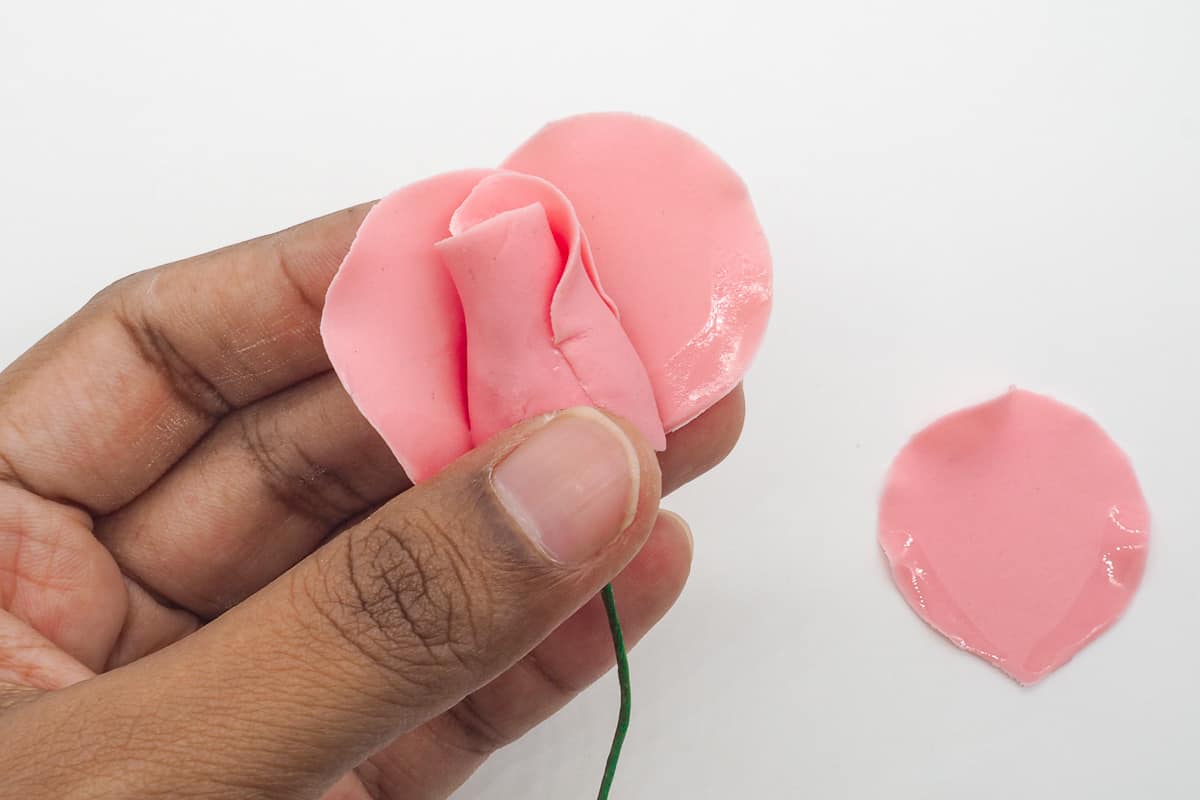
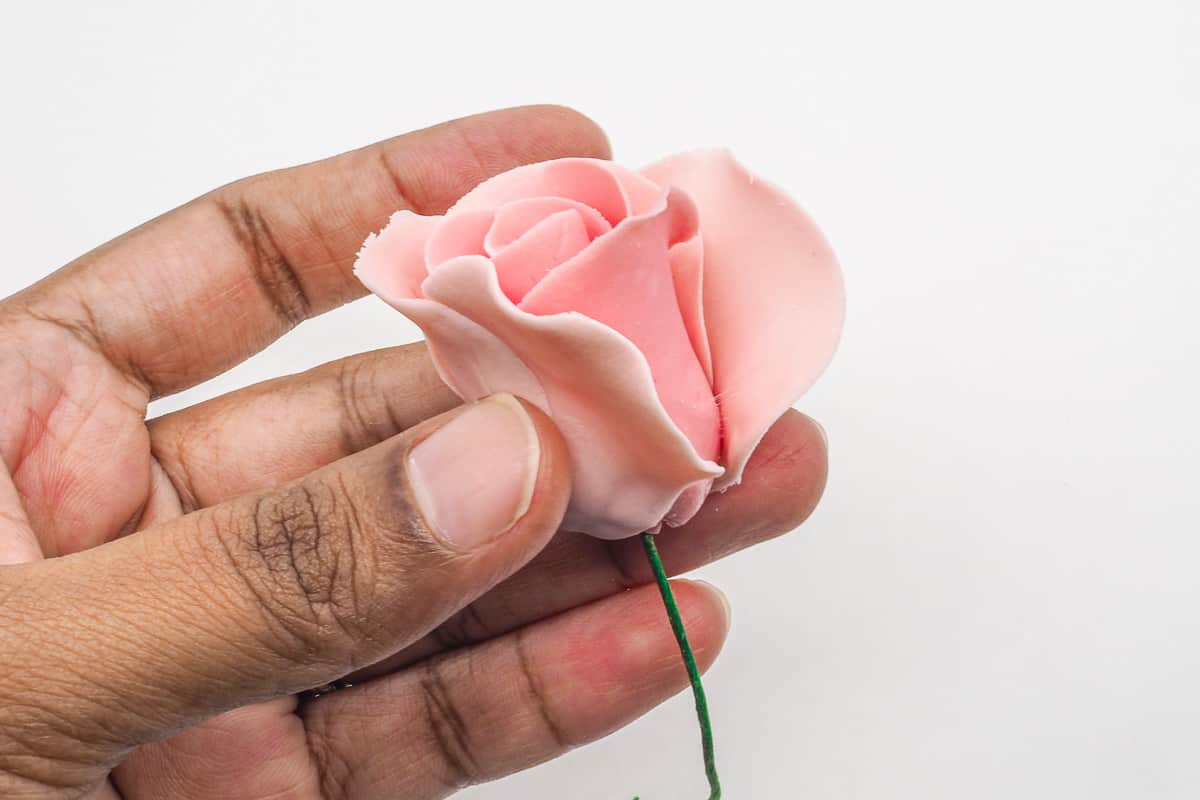
Step 5: Add more petals for a full bloom rose
To continue making a full bloom rose, you need to continue adding another layer of petals. For this final layer, use 7 petals (in the same light pink shade used for the layer before this). Add them to the flower in the exact same way as the previous 2 layers.
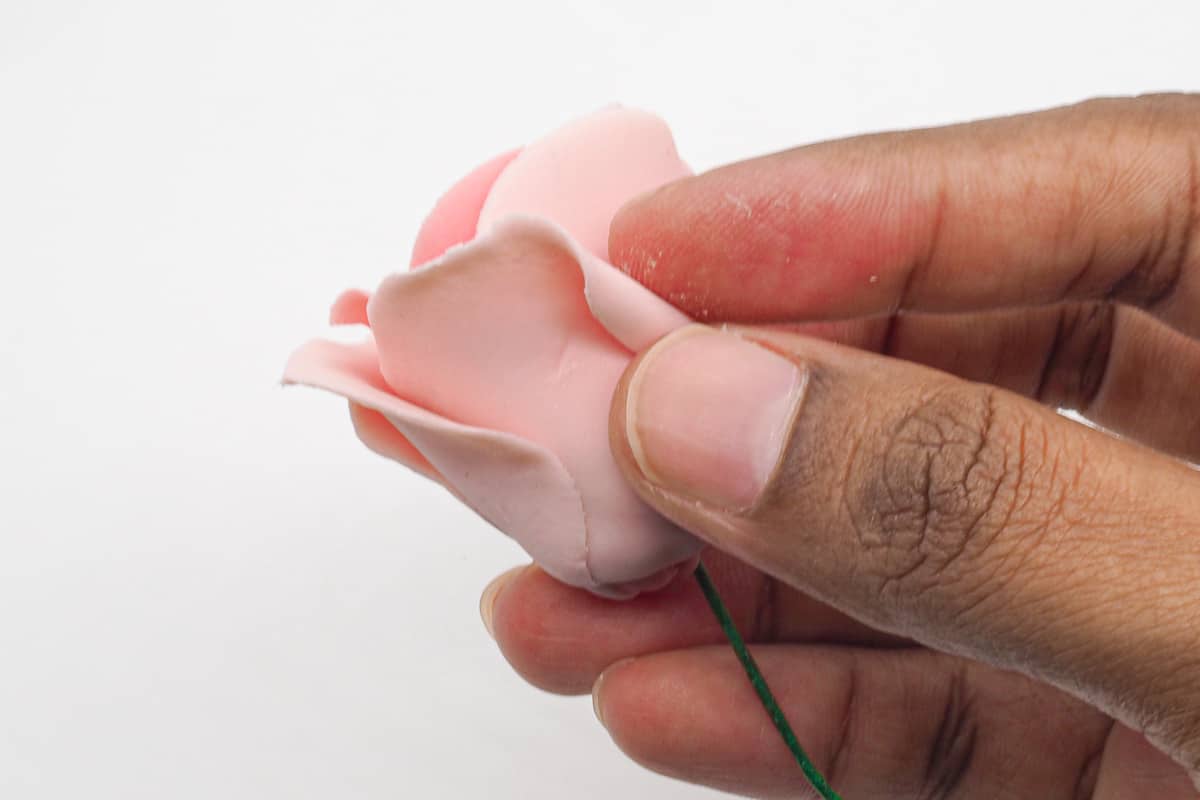
And then to add a bit of natural gap between the petal layers, insert tiny pieces of sponge or soft tissues in between the last 2 layers of the petals to hold the petals in place while the gum paste dries.
I used petal former to dry my rose. And I used the same sponge pieces to help hold the gum paste rose petals in shape while the gum paste dries.
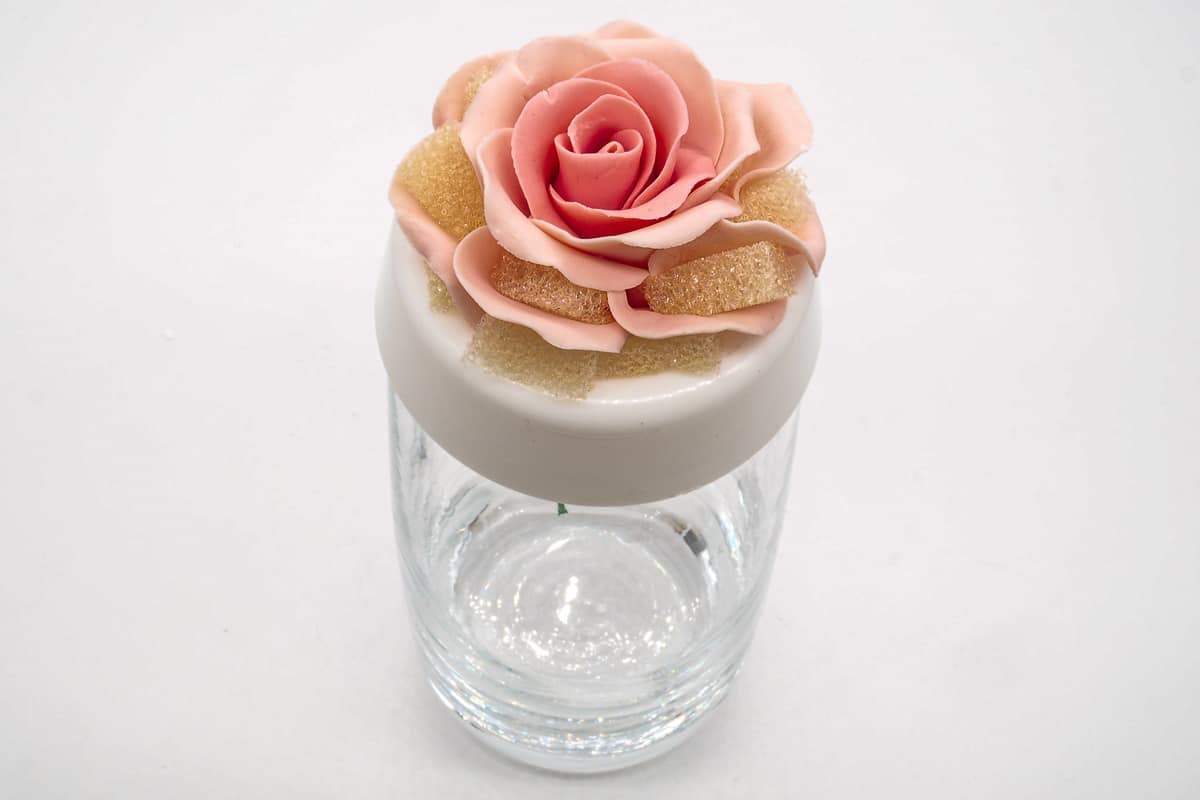
At this stage, again, let the petals set overnight. Since the flower is wired, you can place the former on an empty glass. If the stem wire is too long, simply bend it at the bottom to fit into the glass. This is so that the flower former could rest stable on the glass.
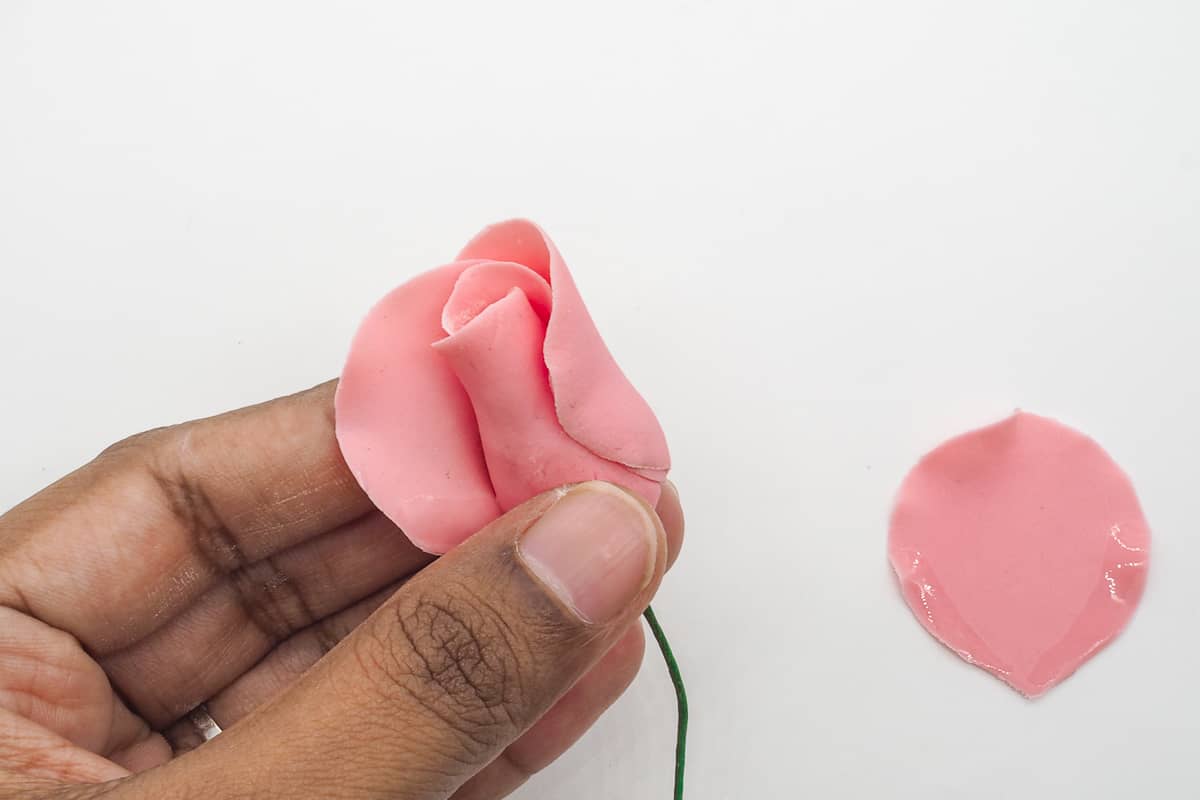
Once the gum paste has set, you can remove your sponge or tissue pieces. I normally use tweezers for this process.
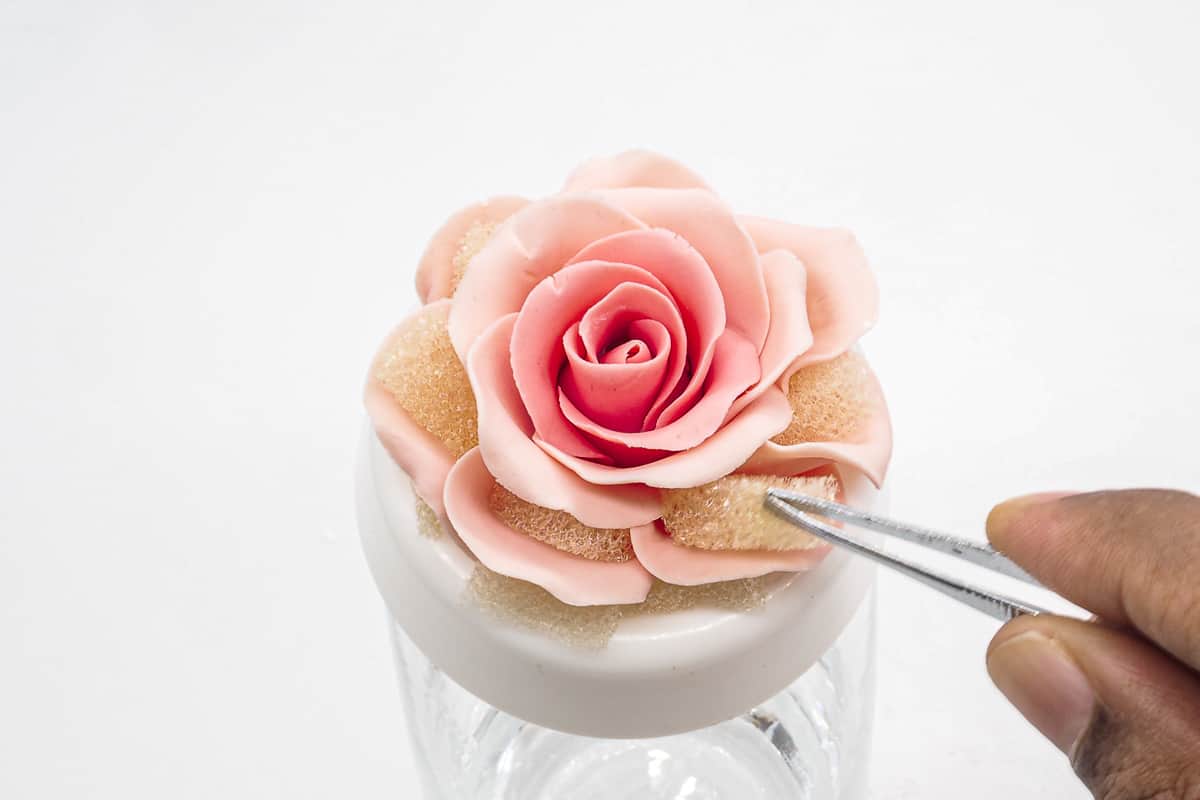
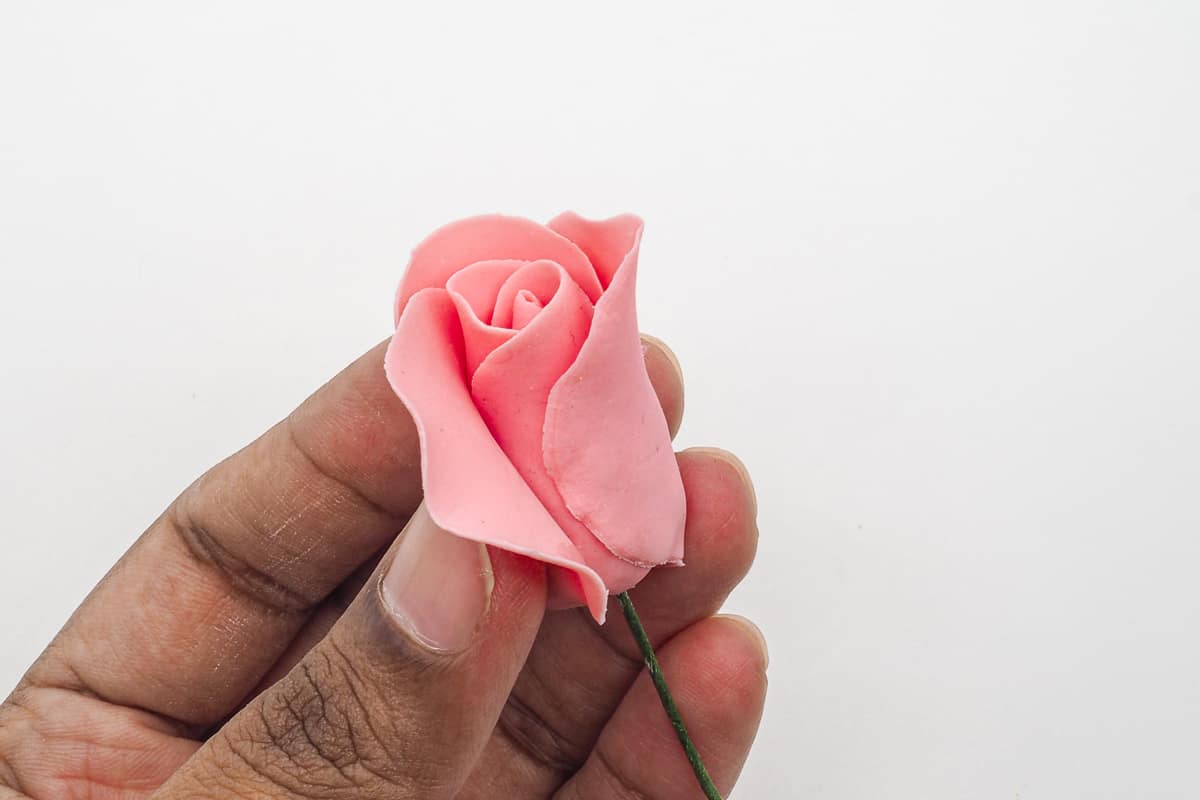
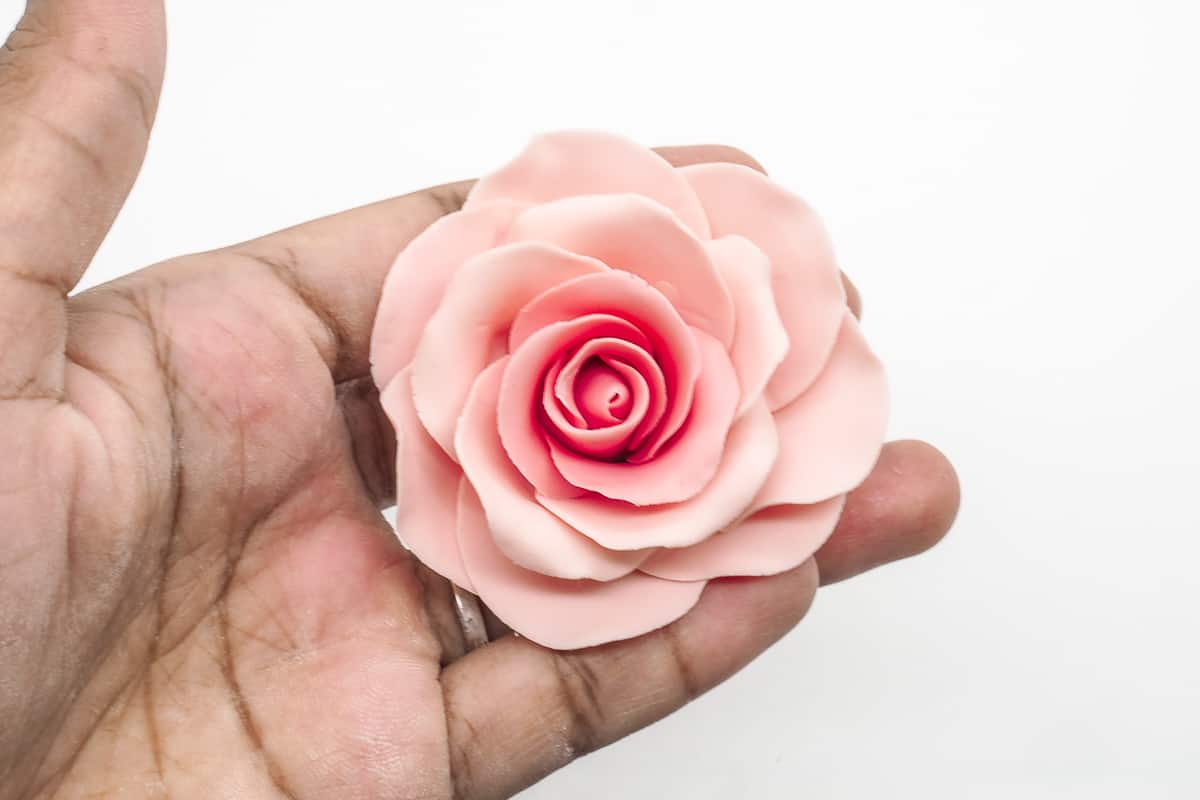
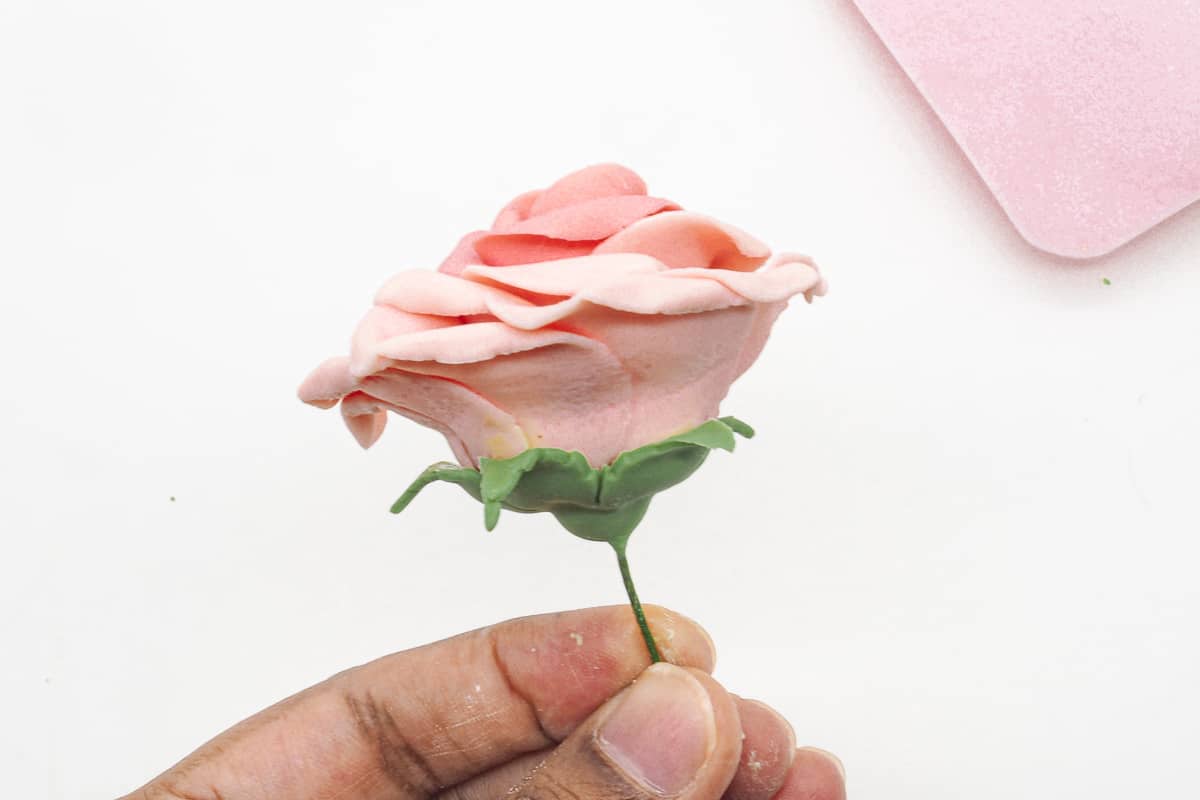
And this is how the flowers look after the sponge pieces are removed and the petals have dried. Your gum paste rose is literally complete at this stage. The next stages are adding calyx and making rose leaves.
Step 6: Add the calyx
The next step in making the gum paste rose is adding its calyx. You can choose not to add the calyx if your gum paste flowers are arranged in a tightly arranged bouquet on your cake as the back of the rose will not be visible in such arrangements.
But if you are using either a single rose or just a few on your cake, adding calyx will not only cover the back of the roses to make it look neat, it will also help make your rose look more realistic.
Adding the calyx is a pretty simple process. All you need is a calyx cutter and petal dusts.
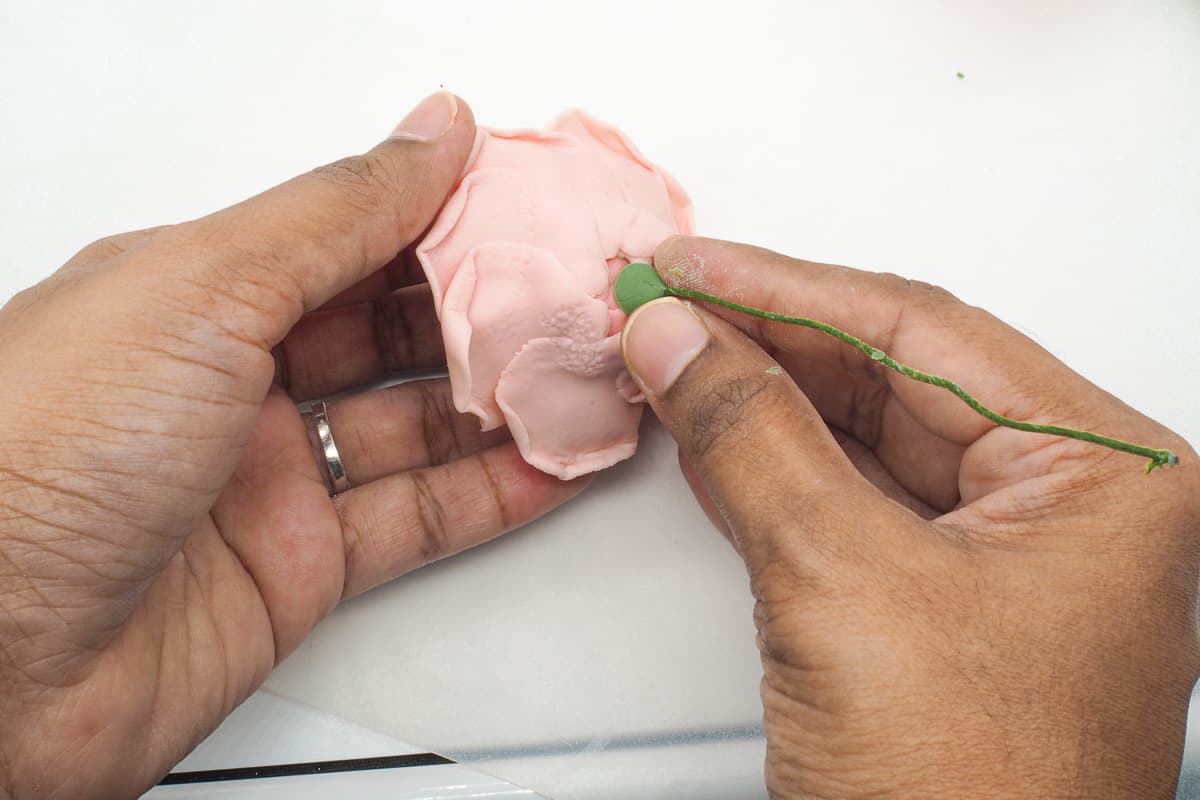
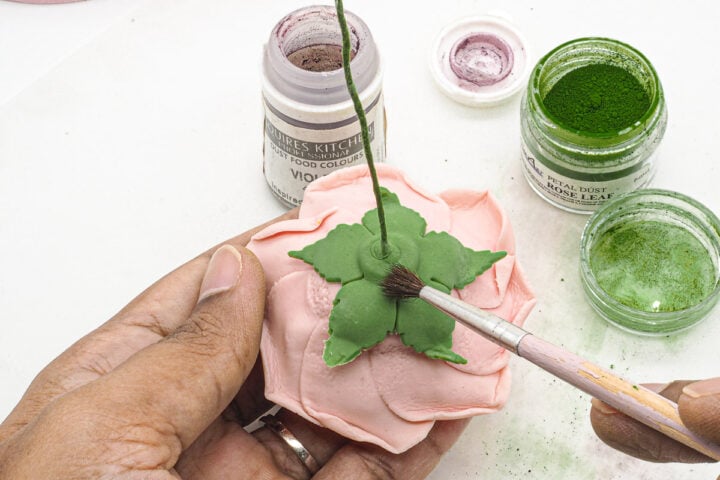
Start by tinting the gum paste in moss green (Wilton). And then pinch a small piece of the paste and roll it into a ball. Apply glue to the base of your rose. Insert the green gum paste ball into the flower wire as shown. The purpose is to add a small bump at the bottom of the gum paste rose before adding the calyx for a more realistic looking rose calyx.
And then roll the remaining green gum paste and cut out a calyx with your calyx cutter.
Thin the edges slightly with your ball tool. Apply glue in the center. And slowly insert the flower wire in the center until the calyx reaches the base of the rose. And in attaching the calyx to the gum paste rose, curl the edges of the calyx tips slightly for a more natural look.
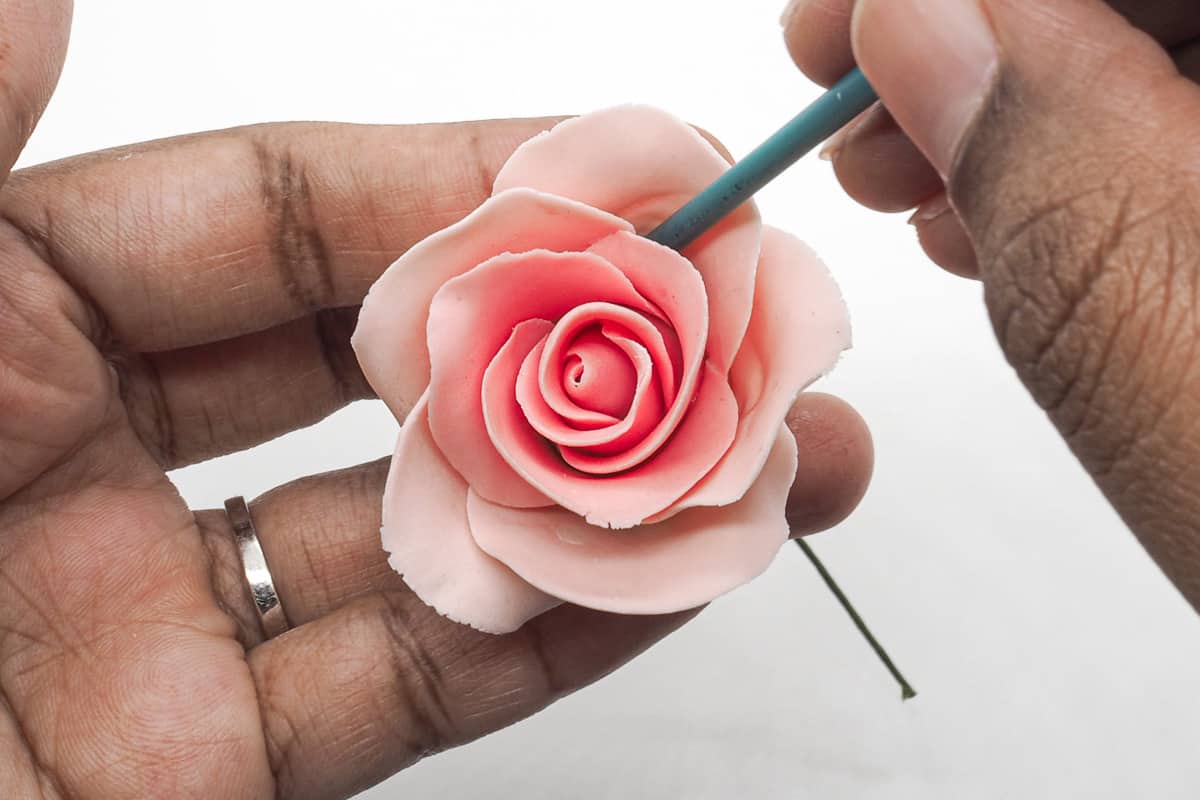
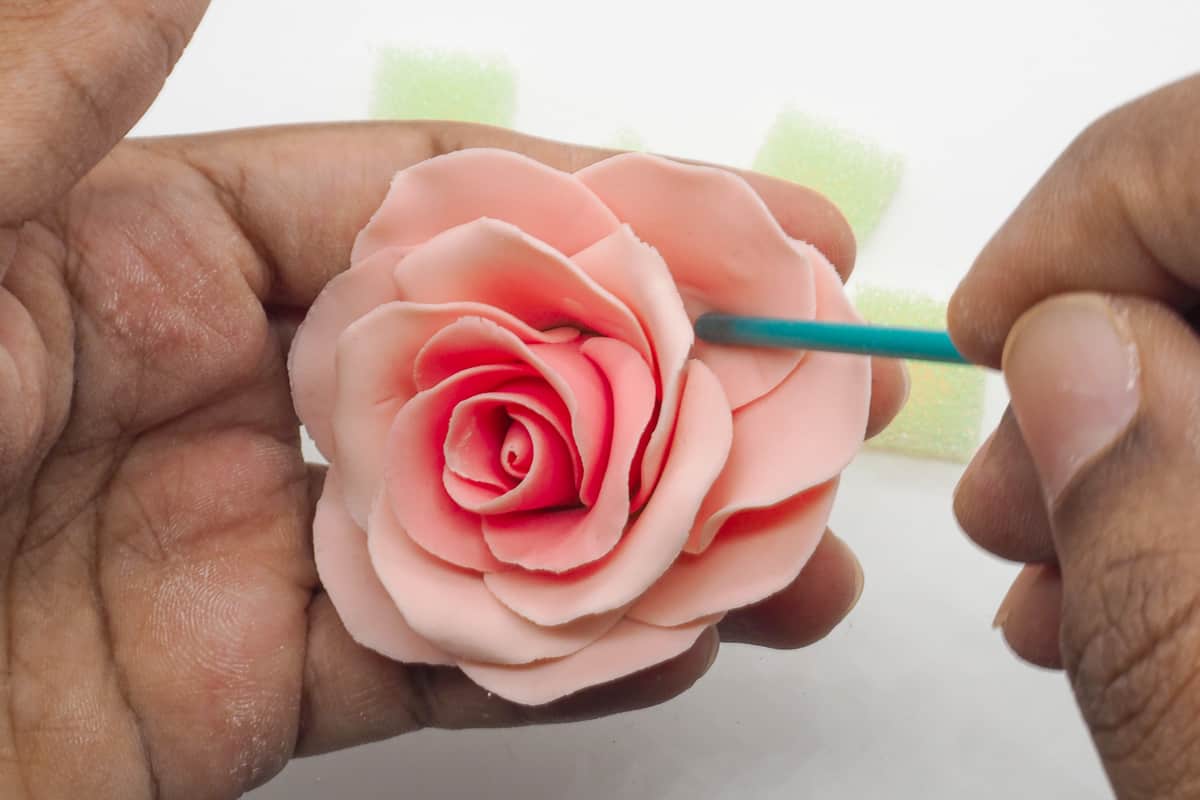
For the final touches, once the calyx has set, use the green and violet petal dusts to create a darker shade of green and with a hint of dark violet hue. If you dust your calyx immediately, the brush bristles will leave marks on the soft gum paste.
Step 6: Make the gum paste rose leaves
The gum paste rose is essentially complete once its calyx has been added. But knowing how to make the rose leaves is definitely useful especially when your cake deco involves placing a bouquet of roses with leaves in it.
To make the leaves, you would need rose leaf cutters, leaf veiner, wire and petal dusts ( all these are listed in the supplies section of this page).
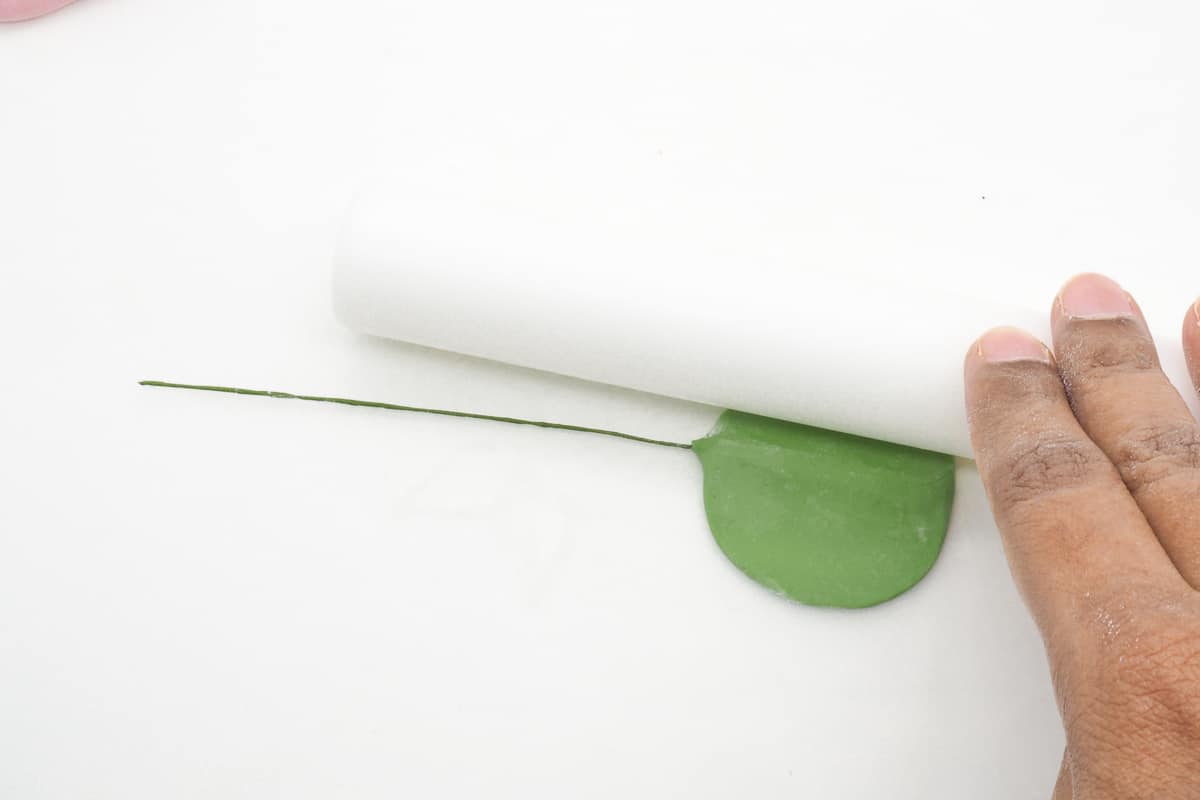
To start, tint your gum paste in the same green used for the calyx, i.e moss green. Take a small amount of the green gum paste and form a small sausage-like roll. Insert your flower wire (dipped into fondant glue first) into it. And then pinch the end to secure the wire in place.
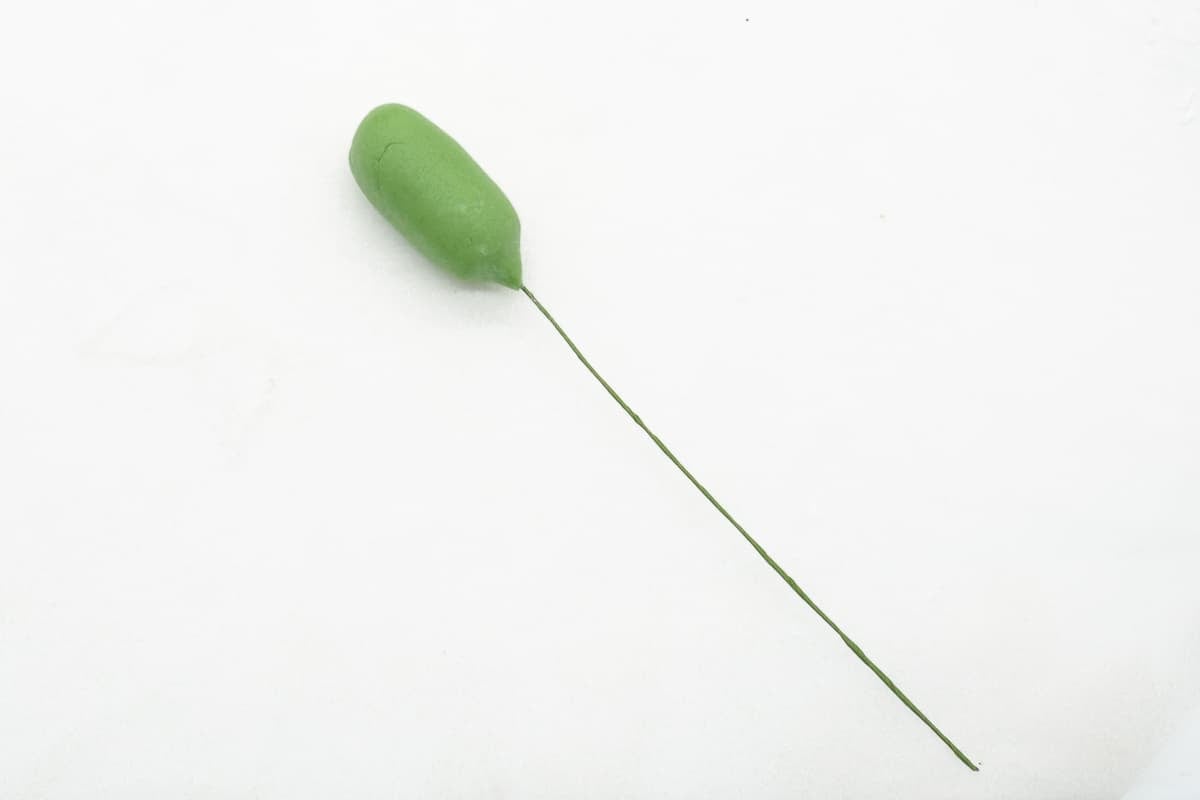
Next, flatten the gum paste roll slightly by hand before using a rolling pin to roll the sides thin. At this stage, avoid rolling on the wire or else the wire will detach from the gum paste.
Once the sides are rolled as thin as possible, use the rose leaf cutter to cut the petal out as shown below:

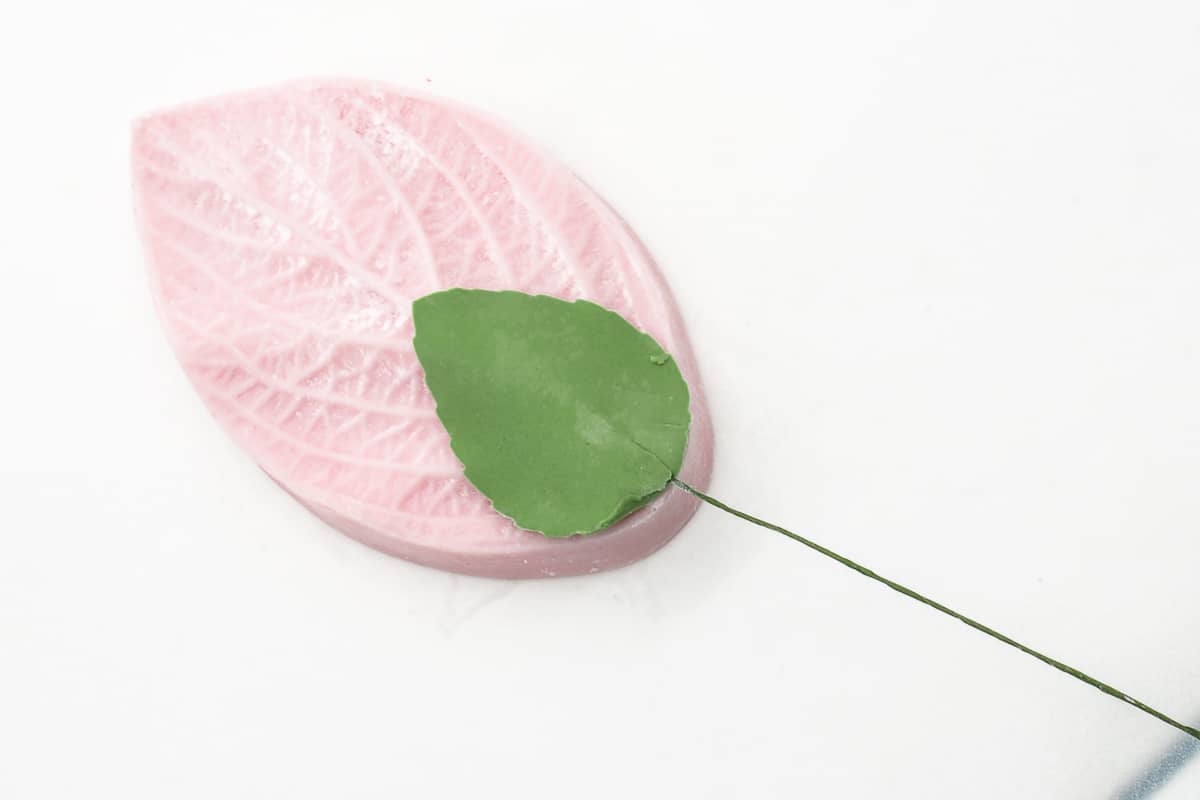
Place the cut out leaf on a leaf veiner and gently press it to imprint the veins on the gum paste leaf. The veiner I used in this tutorial is a general leaf veiner. Make sure to dust it well (you can use a DIY dusting pouch) with cornstarch before placing the leaf to avoid it from sticking to the veiner.
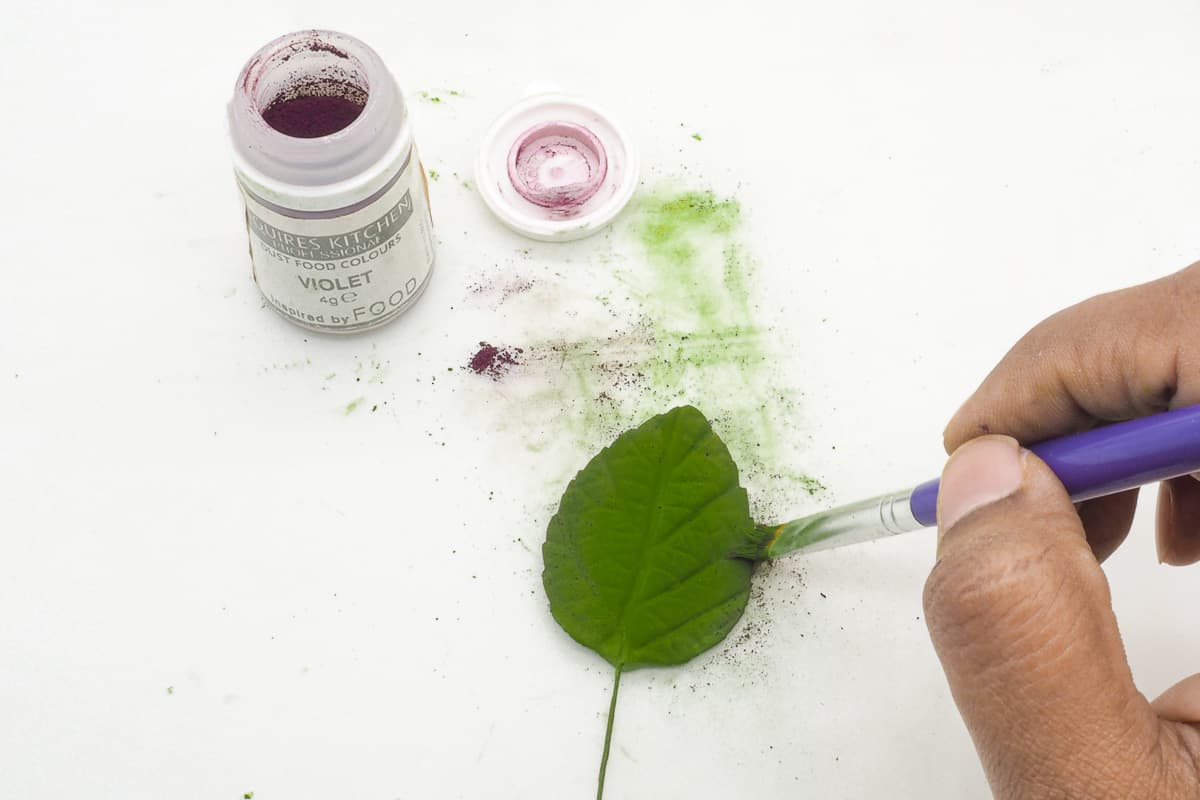
After the veining process, the next step is to dust the leaf. Again, similar to the calyx, let the gum paste set a bit before dusting. You can use the same rose-leaf green and violet dust colors as used for the calyx above. Start by dusting the entire leaf in green first.
After that, use the violet dust to highlight the edges of the leaf for a darker shade of green.
Here's how the completed gum paste rose leave should look like:
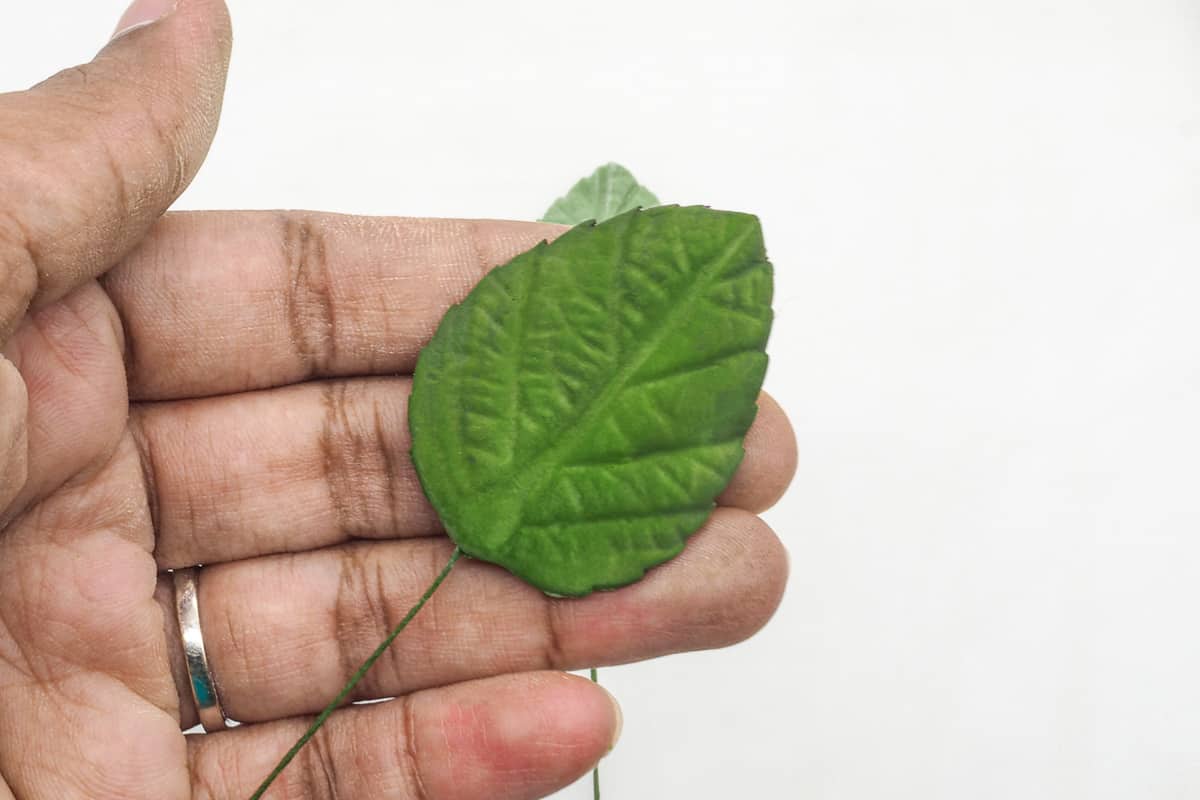
You can attach the leave to the flower with floral tape.
And that's pretty much my gum paste rose tutorial.

Hope this was useful.


Leave a Reply