

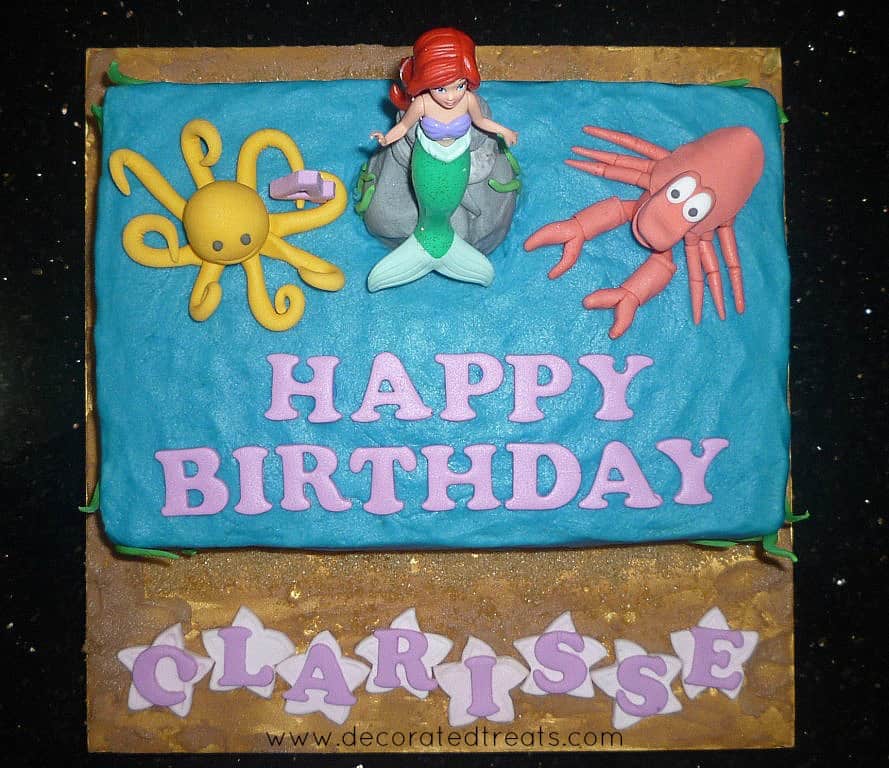
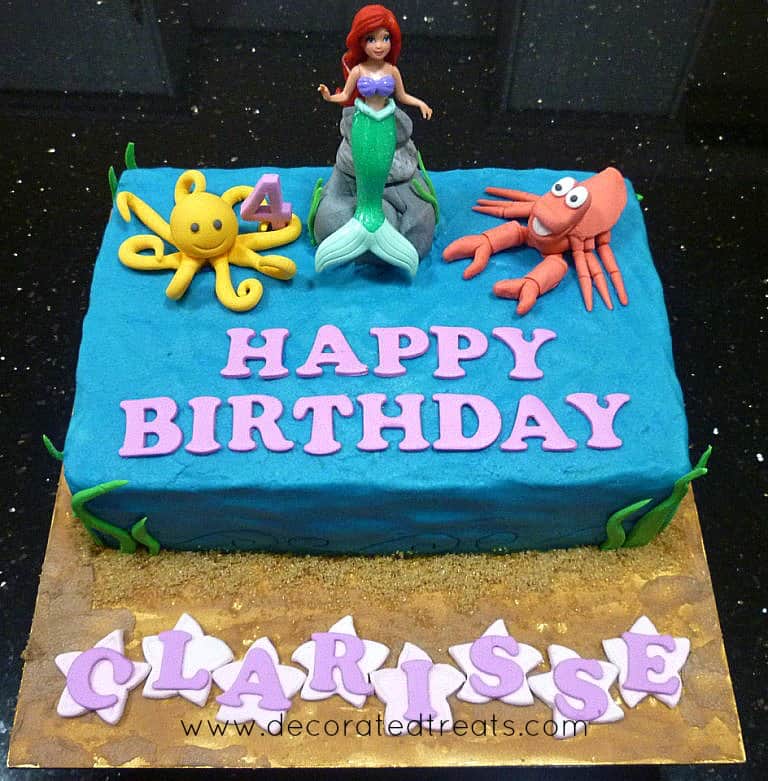
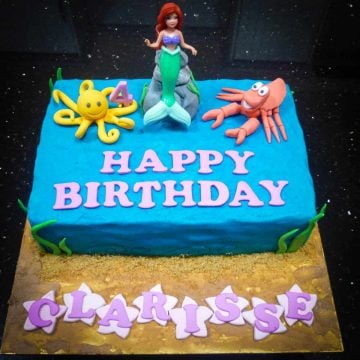
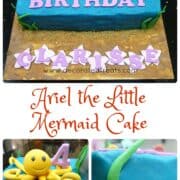
If your child is a Little Mermaid fan, you will love this Little Mermaid birthday cake. Baked into a rectangle cake and covered in buttercream, the cake is topped with a toy Little Mermaid figure and handmade fondant Sebastian and octopus. It is easy to put together and real fun too!
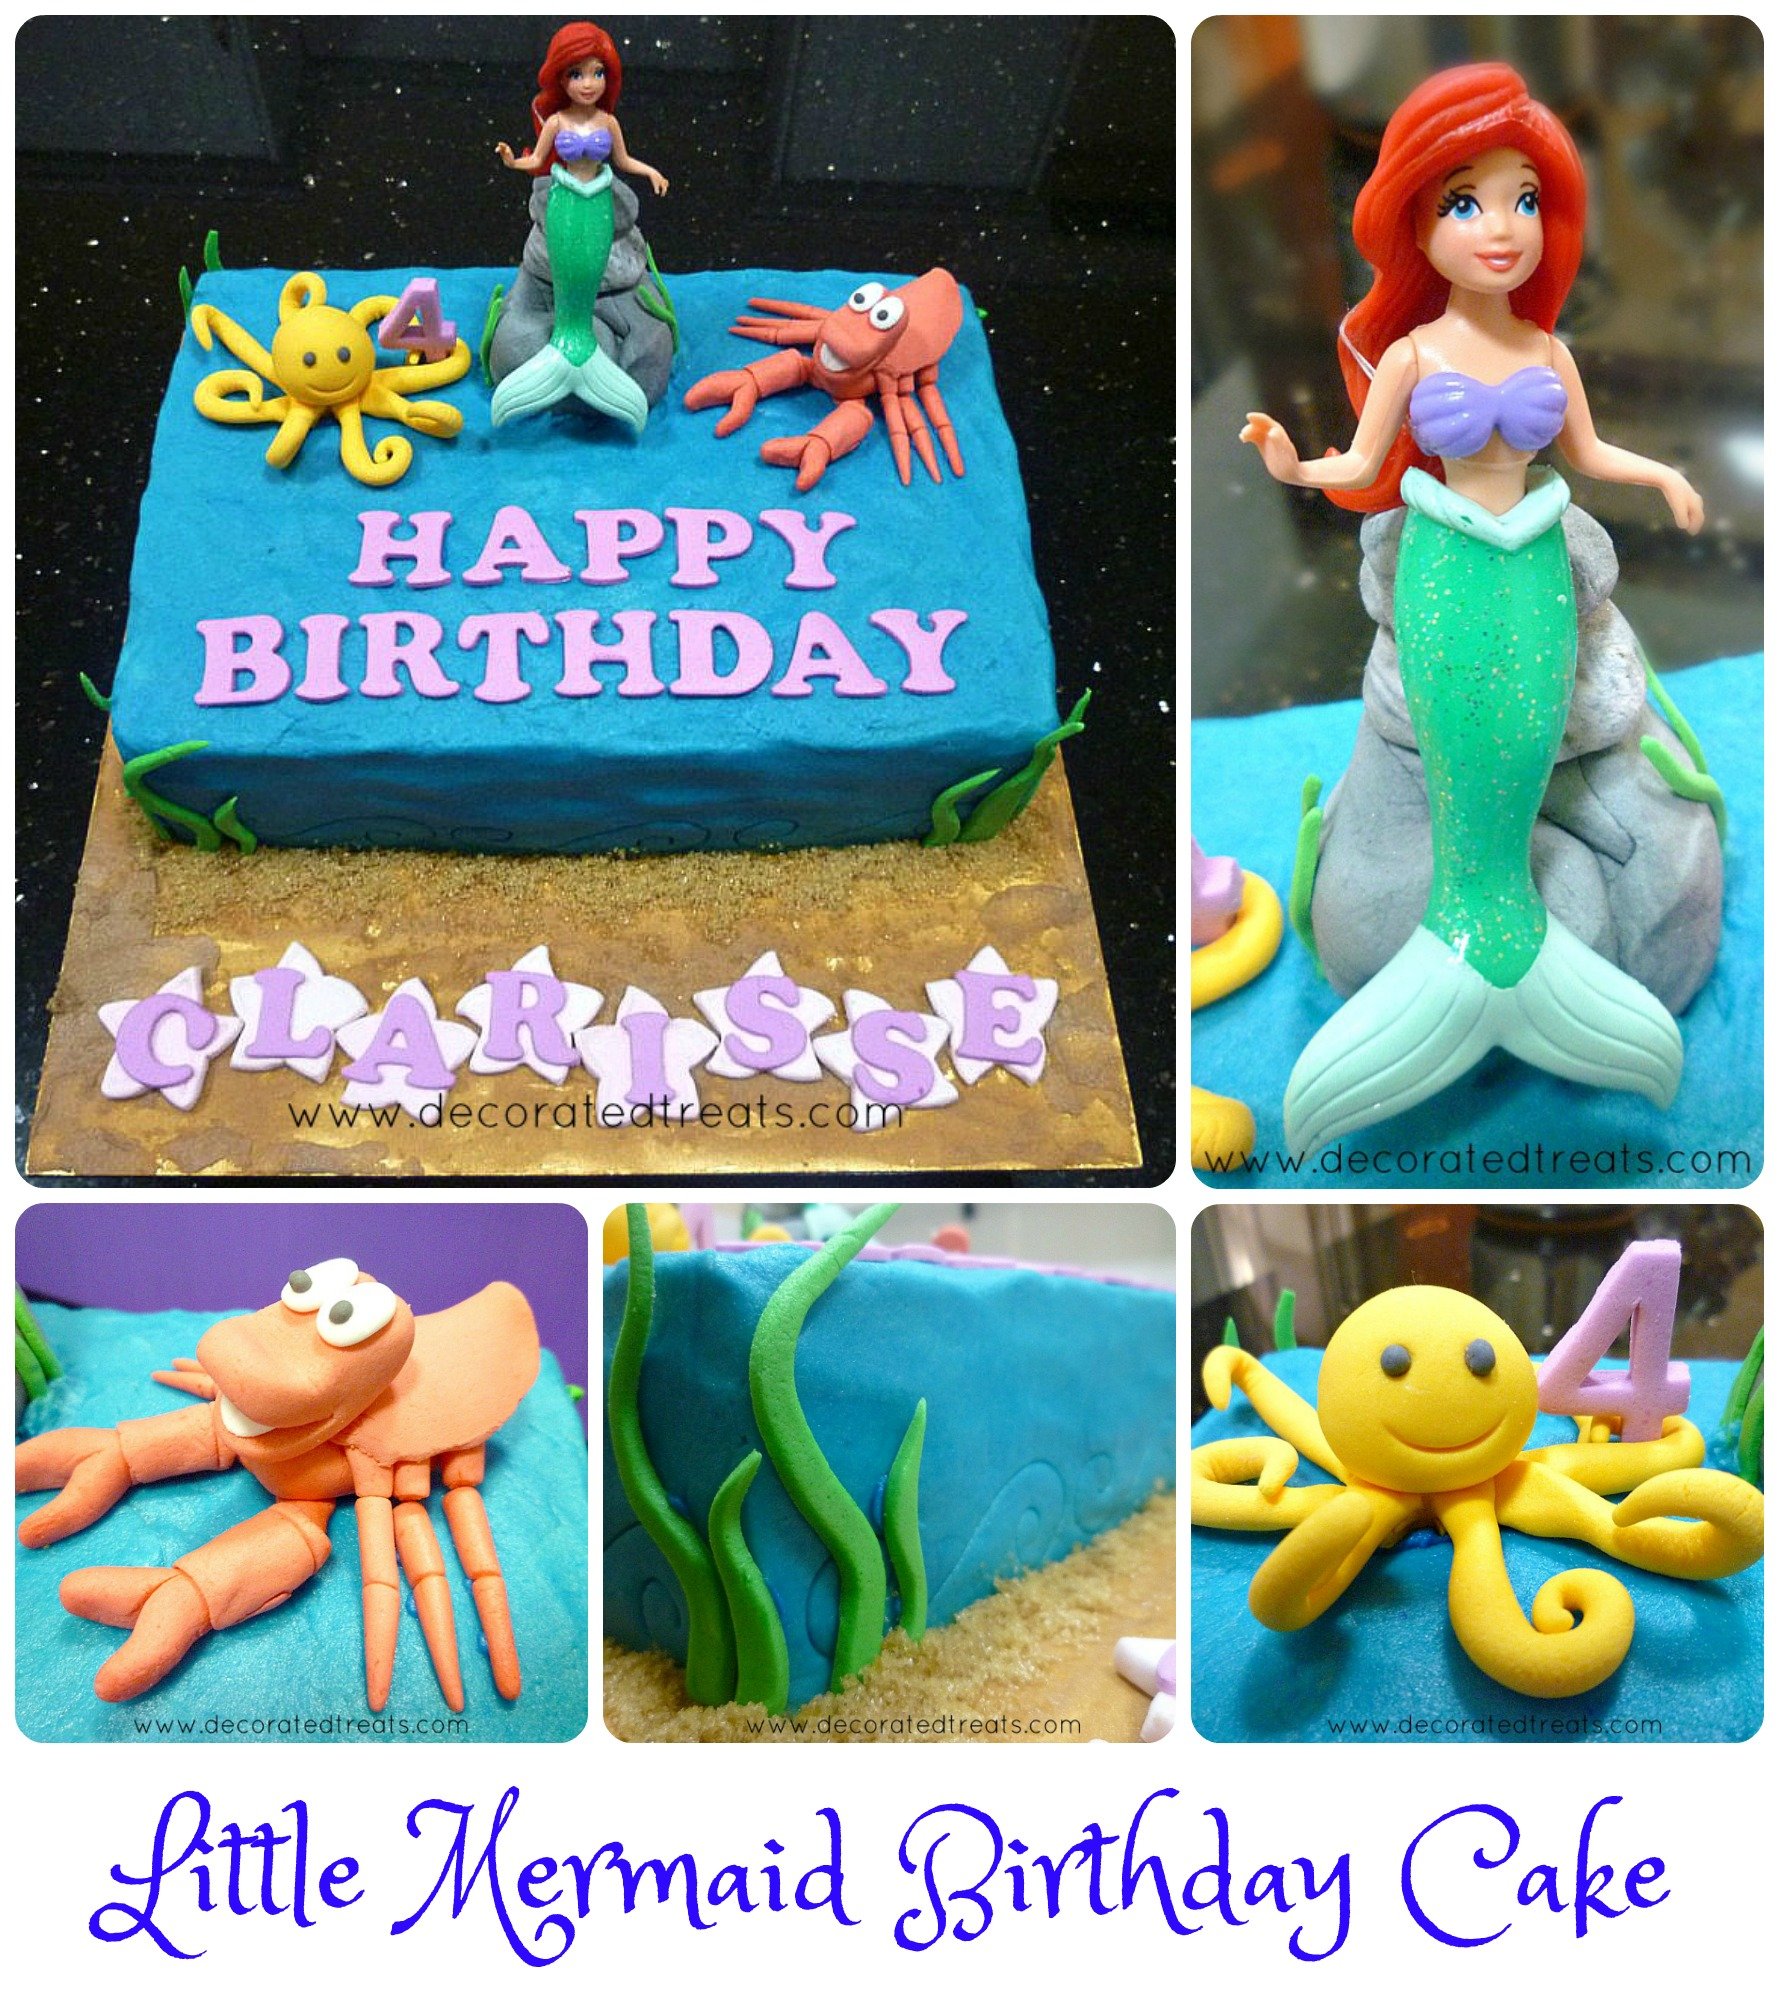
I made this Ariel Little Mermaid birthday cake back in 2012. It was for a 4-year-old girl. The mom had also separately ordered a castle cake for the school celebration (click here to see how I made the castle cake). This Disney Little Mermaid birthday cake was meant for celebration at home with family.
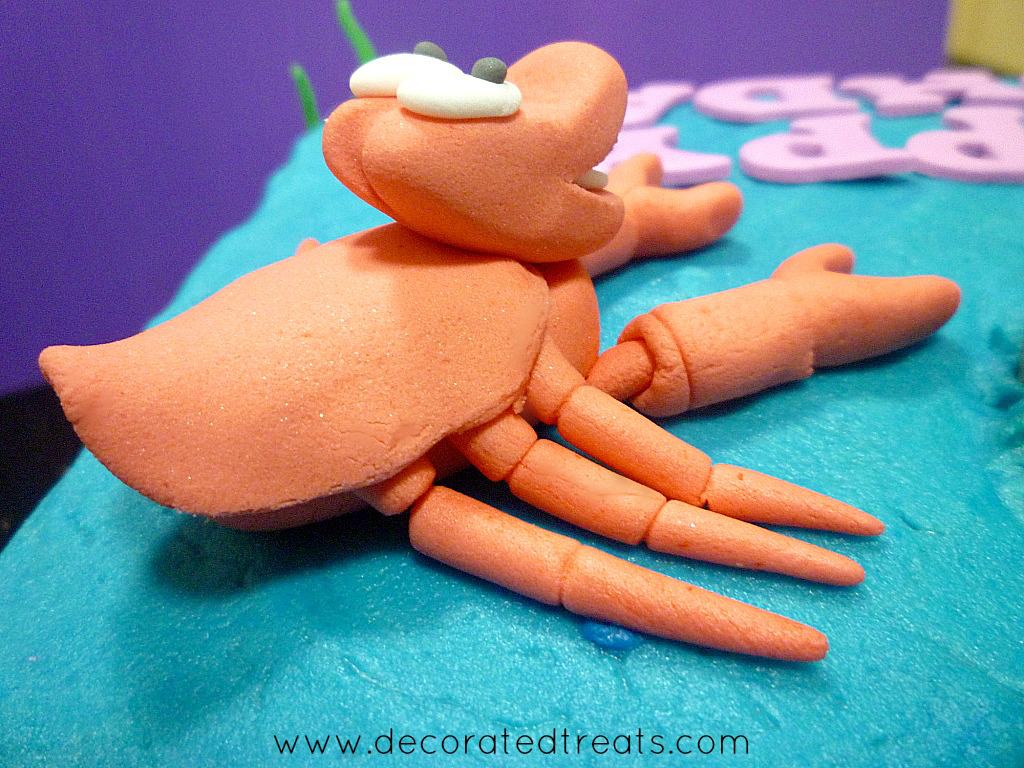
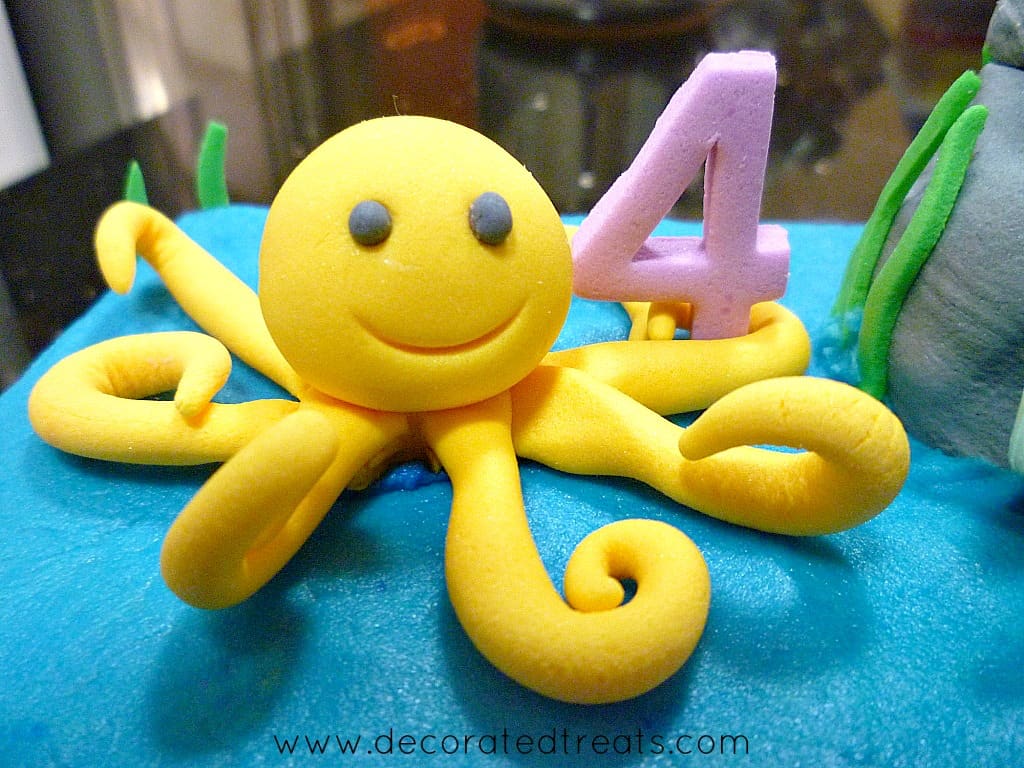
The buttercream birthday cake was fairly easy to decorate. Ariel on the cake was a toy figurine. And the only other 3D fondant decoration on the cake were Sebastian and an octopus. The cake itself was covered in butter icing and accented with fondant decorations.
If you like this cake, you should also check out this other Ariel Little Mermaid cake design. And for more princess themed cakes, check out this Belle cake, Olaf cake and cupcakes and this buttercream castle cake with Princess toppers.
🧾Supplies Required
- Cake - this was a one layer birthday cake, baked in 6 inches by 10 inches rectangle cake pan. I used half the measurement of my pound cake recipe calculated for an eight-inch square cake.
- Butter icing - Since the cake was only one layer (with a height of about 2 inches), I did not layer and fill it further. I only covered the cake with butter icing. This icing is a much stiffer version of buttercream.
- Fondant - I used this for the accents as well as to make the sea animals - Sebastian and the octopus. I used my homemade recipe and you can find it here.
- Food color - I used Wilton gel colors in red
, yellow
- Star cutters
- Alphabet cutters.
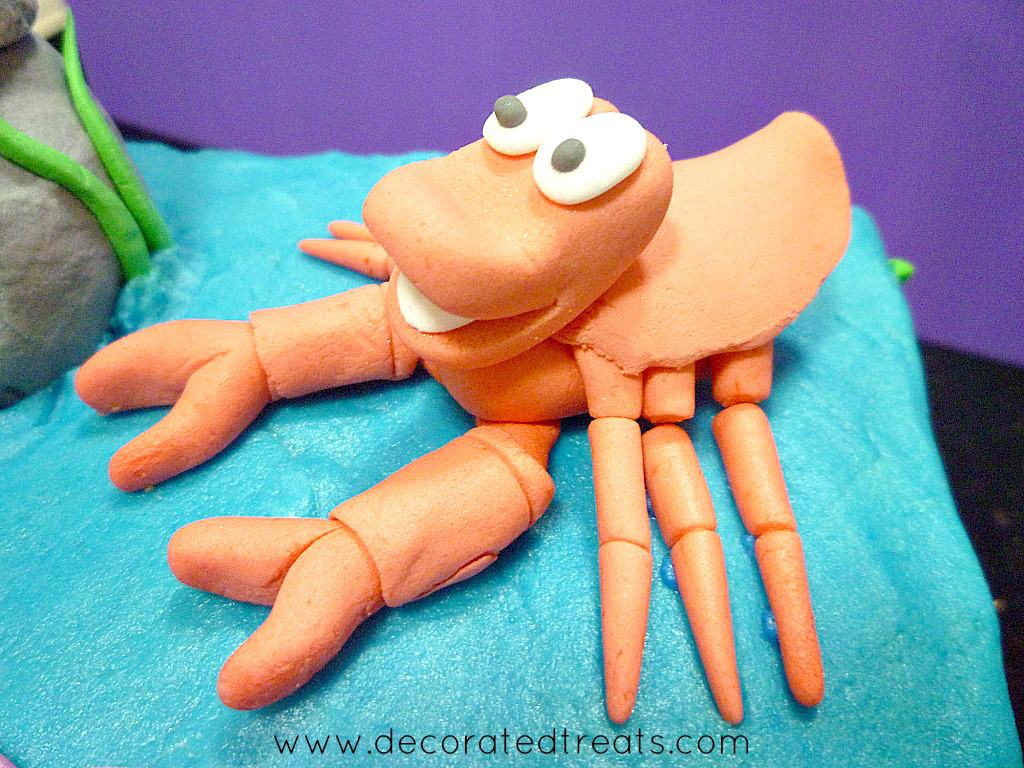
- Ariel Little Mermaid cake topper
- Brown sugar - I used brown sugar to decorate the cake board, to give it a sandy beach feel.
- Pizza cutting wheel.
👩🍳How to Make
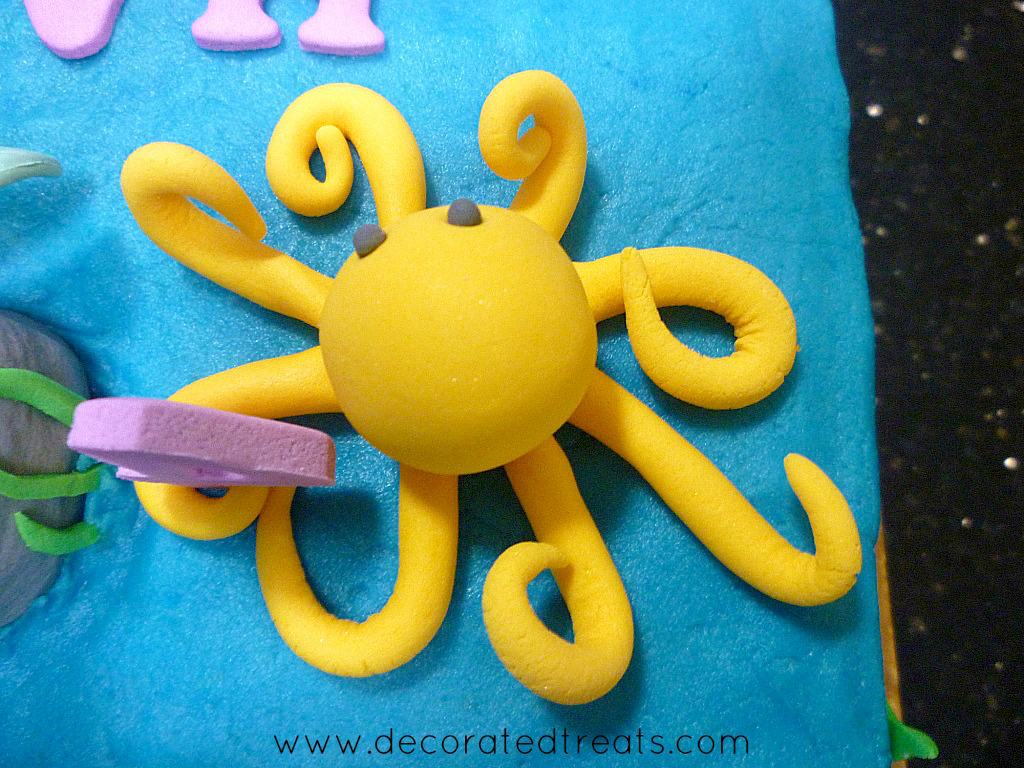
Step 1: Make Fondant Sebastian and the Octopus Toppers
I prepared Sebastian and the octopus toppers for the Little Mermaid cake ahead of time. And made them both out of my homemade fondant which dries hard. Hence, there was no need to add any tylose or CMC to it.
But if you use store-bought fondant, it is best to add tylose or CMC to it before shaping into these toppers.
Step 2: Bake the Cake and Cover with Butter Icing
Next was the Little Mermaid birthday cake. I baked a single layer cake (hence it is not filled with any buttercream) and covered it with icing. As I mentioned earlier, butter icing is a much stiffer version of buttercream. It is stiff enough that you can take it with hand without it sticking all over.
And because of this stiff consistency, piping this icing with a piping bag is not very easy. What I did was take a little of the icing at a time in my hands and flatten it directly onto the cake. I purposely left the finishing rough so that it looked like sea waves on the cake.
To make the waves, all I did was use my fingertips to press on the icing and make the dents on the cake).
Step 3: Assemble the Birthday Cake
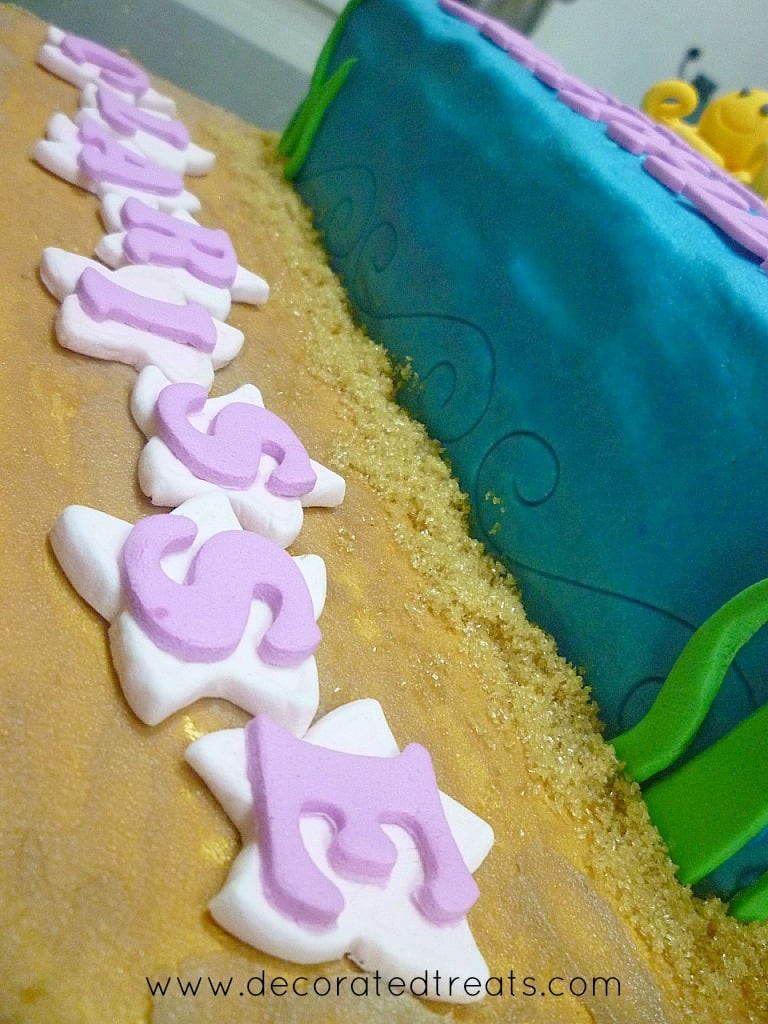
I used a large square cake board for this Little Mermaid birthday cake. I purposely placed the cake on one side of the board. This is so that there is ample space at the front for me to place the birthday girl's name.
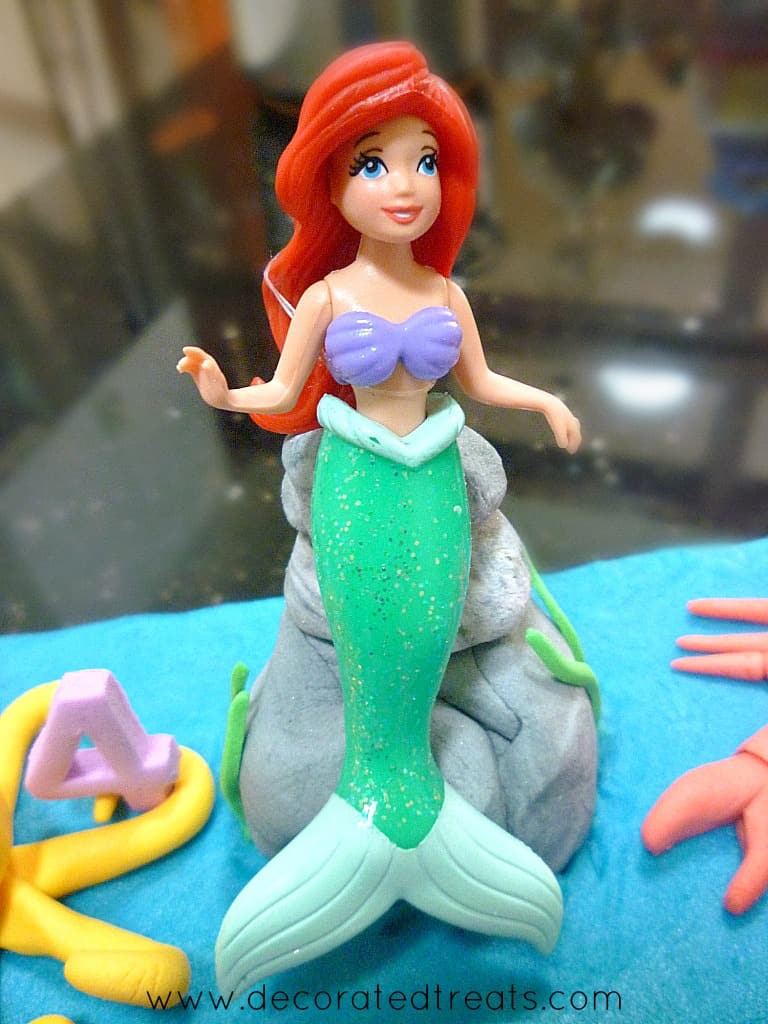
Next, I made the fondant stones for the Ariel cake topper to sit on. To make the stones, I added some black coloring into white fondant. For the marbled effect, I kneaded it by twisting both colors until the white and black were only just mixed. I then formed rough balls and stacked them on one another.
And then I placed Ariel Little Mermaid figurine on the stones while they were still soft. This is so that the stones could be adjusted to hold the Little Mermaid in place.
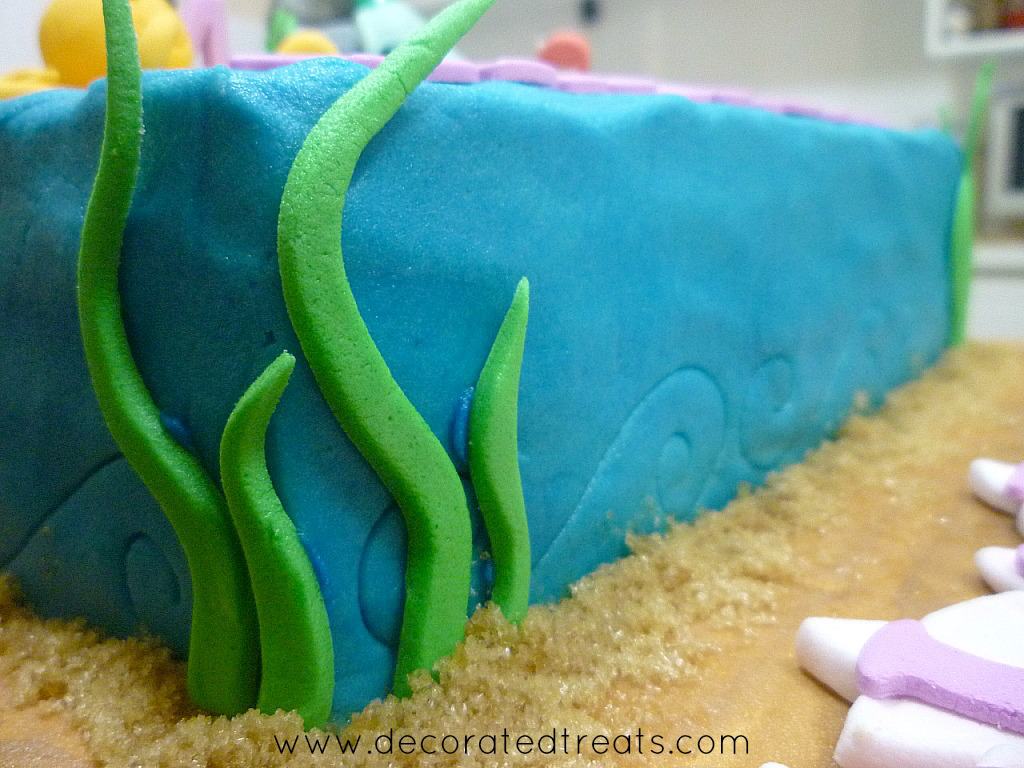
Step 4: Add the Decoration to the Sides of the Cake
For the sides of the Little Mermaid birthday cake, I used Wilton Pattern Press Set to imprint scrolls all around the cake.
And then, I cut seagrass out of fondant. I cut these freehand using my pizza cutter. And attached them randomly to the sides of the cake as well as the stones earlier. Since the cake was covered in butter icing, the grease was enough to hold the grass in place. No glue was required. The fondant had no trouble sticking to the icing.
Step 5: Attach the Lettering
Once the main decorations on the Little Mermaid birthday cake was done, I placed Sebastian cake topper and the octopus cake topper on the cake. And then I sprinkled brown sugar on the cake board.
Next, I did the lettering on the cake. The words "Happy Birthday" were cut out of fondant. I placed them on the cake itself. The birthday girl's name was placed on star cutouts, on the cake board.
And I cut out a 3D number "4" for the girl's age, poked a toothpick to it and inserted it near one of the octopus's tentacles, as if the octopus was holding it.
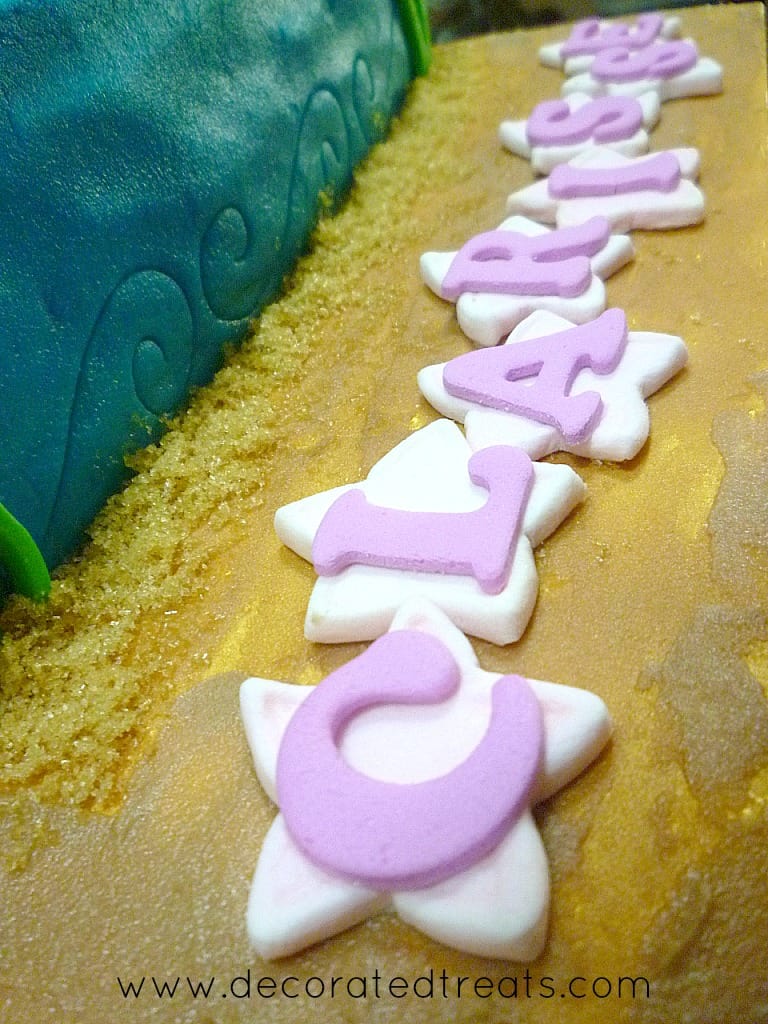
Letters cut out of fondant for the Little Mermaid birthday cake
Letters cut out of fondant for the Little Mermaid birthday cake
And that was it! An easy to make Little Mermaid birthday cake.
❤️More Cake Designs You Will Love


Do you like this tutorial? Please leave a 5-star ⭐⭐⭐⭐⭐rating in the recipe card below and consider a review further down this page. I would love to hear from you. Thank you!
📖Recipe
Little Mermaid Birthday Cake
Equipment
- Star cutters
- Alphabet cutters
- Ariel Little Mermaid cake topper
- Pizza cutting wheel
For best results, use the metrics measurements. US customary measurements have not been tested and are only meant for guide.
Ingredients
Cake
- 300 g butter
- 300 g granulated sugar
- 300 g self-raising flour
- 5 eggs
- 75 ml milk
- ¼ teaspoon salt
- ½ teaspoon baking powder
- 1 teaspoon vanilla extract
Frosting and decoration
- Butter icing
- Fondant
- Brown Sugar
- Food color in red yellow, green, black, and violet.
Instructions
Baking the cake
- Preheat oven to 170 °Celsius.
- Beat butter and sugar till soft and creamy for about 2 minutes. Add eggs, one at a time, beating well after each addition.
- In a separate bowl, sift flour, baking powder, and salt. Fold in the sifted ingredients into the creamed mixture alternately with milk, starting and ending with flour.
- Finally, add in vanilla extract and combine well. Pour batter into a well greased and floured cake pan and bake for 45 to 50 minutes until the top of the cake springs back when lightly pressed. The cake is done when a skewer inserted in the center of the cake comes out without any wet batter.
- Remove the cake from oven and let it cool completely before icing and decorating.
Sebastian cake topper and the Octopus cake topper
- Prepare the Sebastian and the octopus toppers for the Little Mermaid cake ahead of time. Make them both out of fondant. Add some CMC powder to the fondant before shaping these toppers to help them set firm.
Preparing the cake
- Once the cake has completely cooled down, level the top and crumb coat it. This is a single layer cake, hence there is no need to fill it with buttercream.
- Cover the cake with blue tinted butter icing. Butter icing is a much stiffer version of buttercream. It is stiff enough that you can take it with hand without it sticking all over.
- And because of this stiff consistency, piping this icing with a piping bag is not very easy. To cover the cake with butter icing, simply take a little of the icing at a time in your fingers and flatten it directly onto the cake. In doing this, you need not smooth the icing so much. Leave the finishing rough so that the icing looks like sea waves on the cake.
- To make the waves, all you need to do is use your fingertips to press on the icing and make the dents on it.
Assembling the Ariel Little Mermaid birthday cake
- Place the cake on a large square cake board, making sure there is ample space on the front of the cake board to place the birthday girl's name.
- Next, make the fondant stones for the Ariel cake topper to sit on. To make the stones, add some black coloring into white fondant. For the marbled effect, knead it by twisting both colors until the white and black are only just mixed.
- Form rough balls and stack them on one another. And then place Ariel Little Mermaid figurine on the stones while they are still soft. This is so that the stones could be adjusted to hold the Little Mermaid in place.
- Next, place Sebastian cake topper and the octopus cake topper on the cake. And then sprinkle brown sugar on the cake board.
The decoration on the sides of the sheet cake
- For the sides of the Little Mermaid birthday cake, you can use Wilton Pattern Press Set to imprint scrolls all around the cake.
- And then, cut the seagrass out of fondant. You can cut these freehand using a pizza cutter. And attach them randomly to the sides of the cake as well as the stones earlier. Since the cake is covered in butter icing, the grease would be enough to hold the grass in place. No glue is required.
Lettering on the cake
- Cut the words "Happy Birthday" out of fondant. Place them on the cake itself. The birthday girl's name is placed on star cutouts, on the cake board.
- Next, cut out a 3D number "4" for the girl's age, poke a toothpick to it and insert it near one of the octopus's tentacles, as if the octopus is holding it to complete the cake decoration.
Leave a Reply