

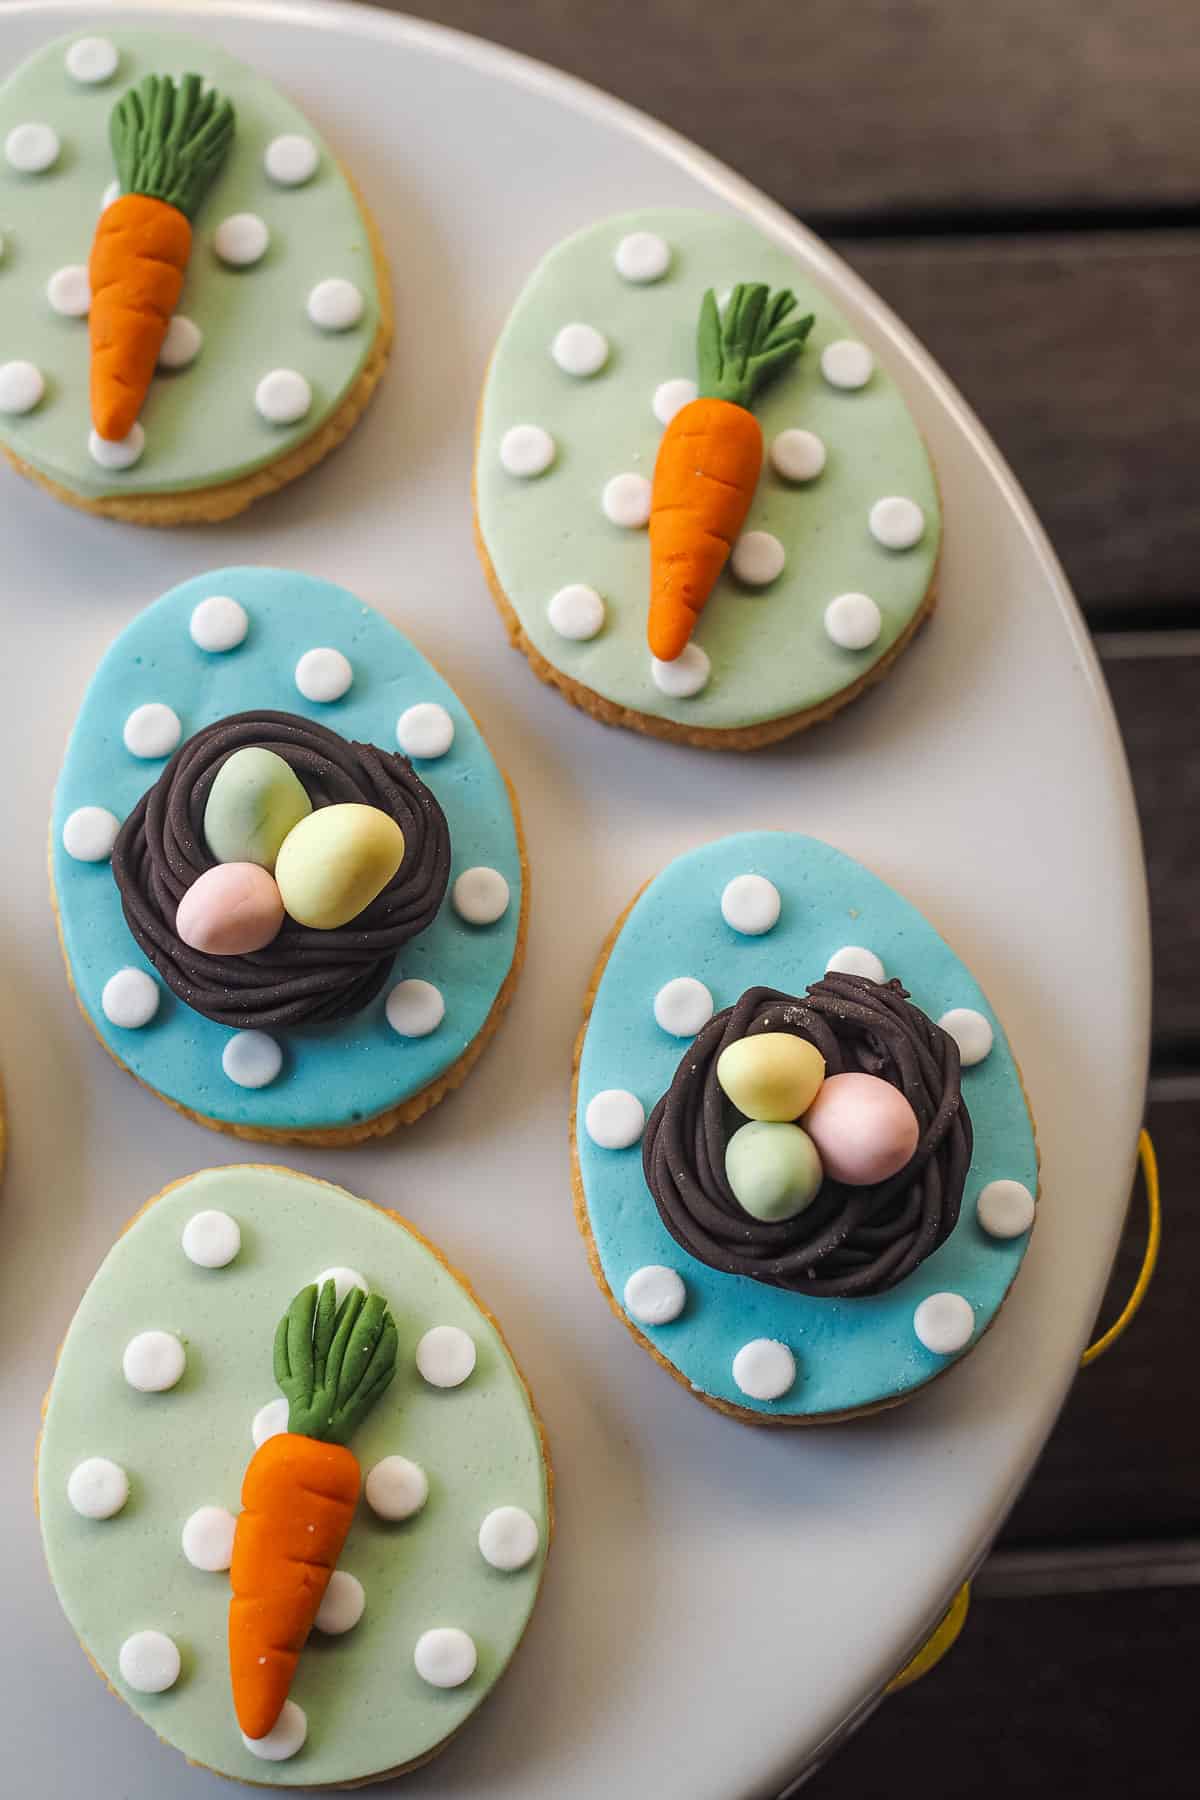
This Easter egg sugar cookies recipe makes super cute egg shaped cookies decorated in fondant with pretty pastel colors. With my detailed step by step decorating guide below, these cookies are simple and easy to make (no piping skills required) and make perfect treats for Easter.
The cookies are baked using my no-spread sugar cookies recipe. They hold their shape perfectly after baking and are excellent for making decorated cut out cookies.
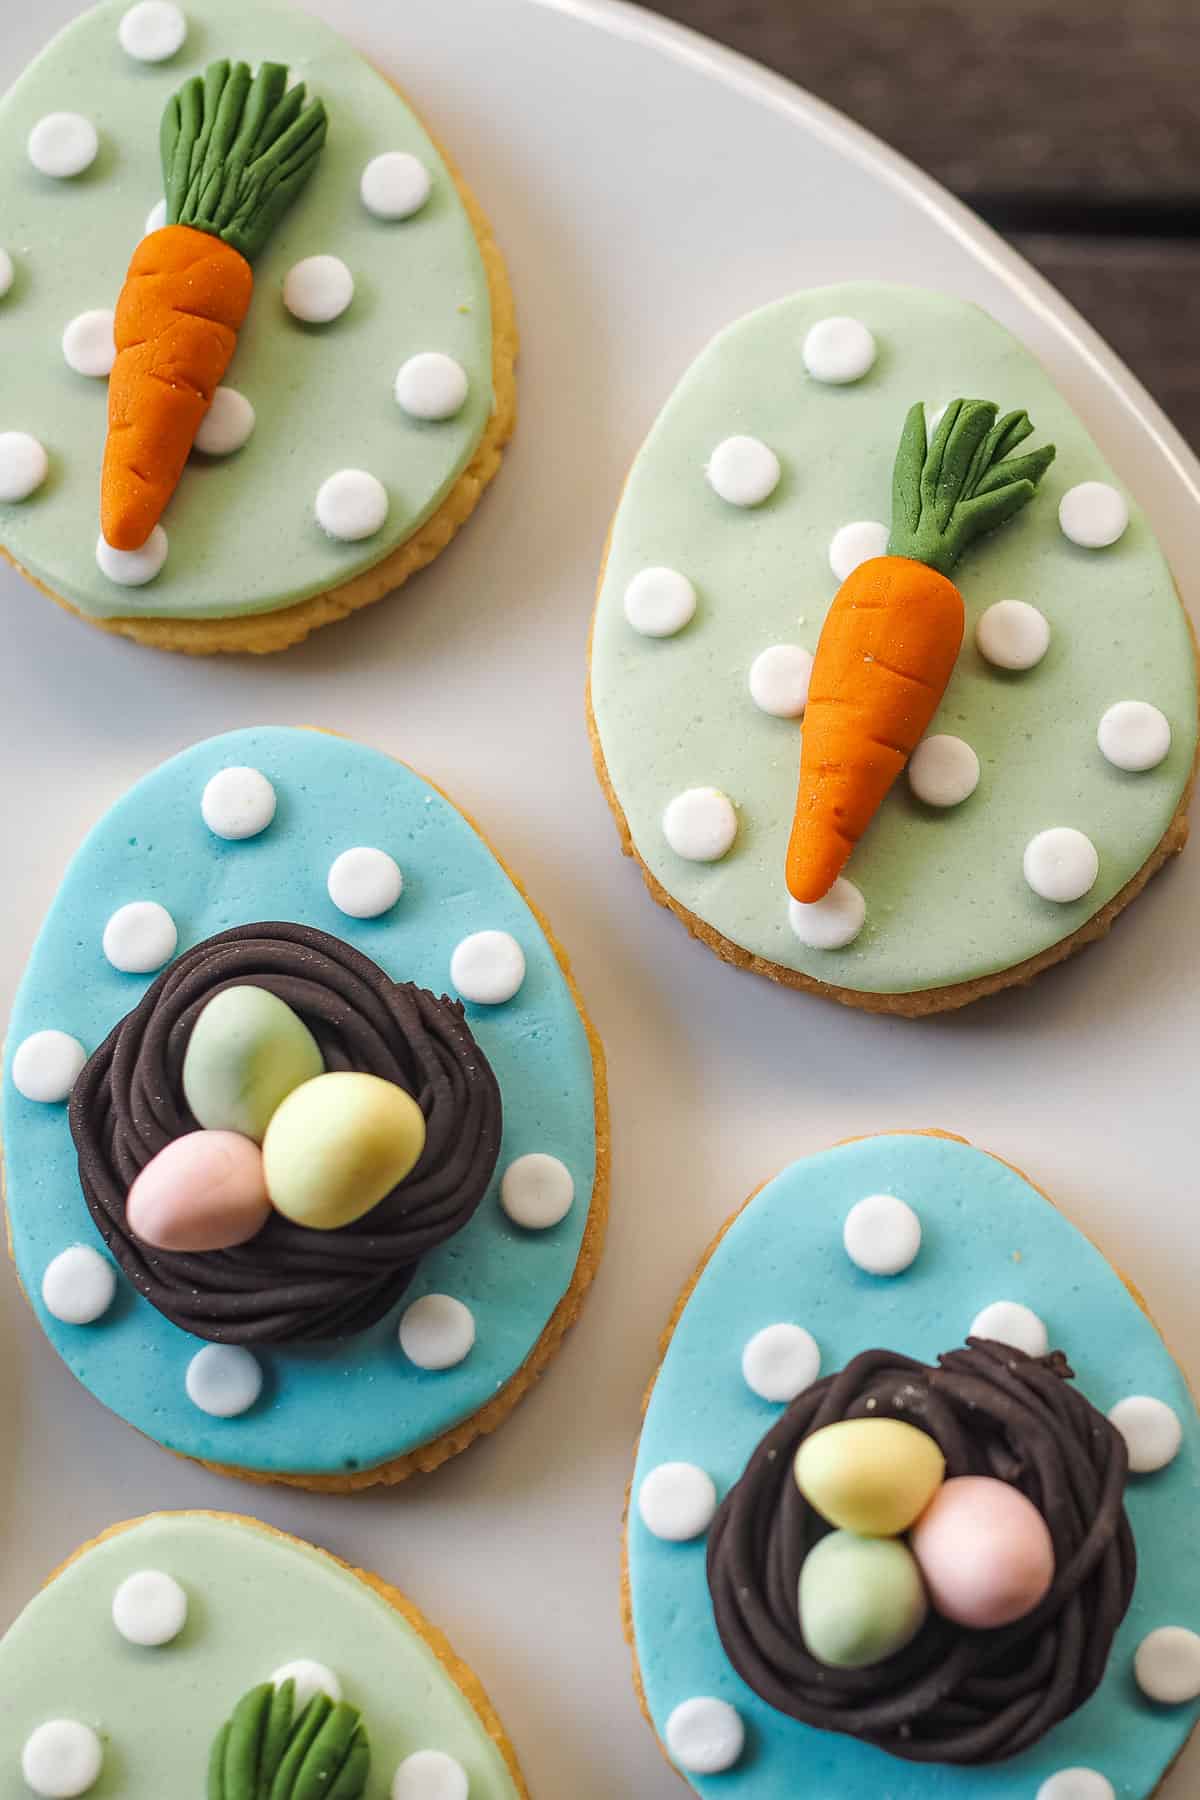
The design for these Easter egg sugar cookies comes in a set of 2. The first cookie set is with a pastel blue background and has a bird’s nest filled with pastel-colored eggs. The second cookie set has a pastel green background and cute little carrot toppers (Easter bunny themed). All decorations are made of fondant and completely edible.
If you like these decorated cookies, you should also check out my other festive treats like these Christmas wreath cookies, heart sugar cookies with fondant, snowflake cookies, gingerbread boys and girls cookies and daisy cookies.
Jump to:
❤️Why You Will Love This Recipe
- The cookies are super cute.
- These are not typical royal icing iced cookies and no piping skills are required to decorate them.
- All decorations on the cookies are made of fondant and completely edible.
- The cookies make great treats for Easter and perfect for gifting too.
📋Ingredients
For the Cookies:
- All purpose flour - best sifted before using to break any lumps and to aerate it.
- Granulated sugar (caster sugar) - fine sugar works best for these cookies. Coarse sugar will leave sugar specks on the cookies after baking.
- Butter - salted butter is preferred as salt enhances the taste of the cookies. If you wish to use unsalted butter, add ⅛ teaspoon of fine salt to flour and sift together.
- Egg - helps to bind and hold the dough together. Use large egg.
- Vanilla extract - for flavoring and aroma. See the Variations section below for other flavor options.
For the Decoration:
- Fondant – I used Satin Ice in white, orange (for the carrots), yellow (for the eggs), baby pink (for the eggs) and dark chocolate (for the nests). You can also make your own fondant with my made from scratch homemade fondant recipe or marshmallow fondant recipe.
- Food coloring – These were basically used to tint the white fondant. For the blue background, I used Wilton Royal Blue with a very slight hint of Wilton Black. For the green background, I used Wilton Juniper Green. I used the same green for carrot leaves but increased the amount of color to give the leaves a deeper shade of green.
- Edible glue
Tools and Other Supplies:
- Extruder tool – I used the multiple holes disc to pipe out the birds’ nests.
- Sugarcraft knife
- Medium-sized round piping tip – This was used to make the white polka dots for the cookies.
*Refer to the recipe card below for full list of ingredients and exact quantities. For best results, use a digital kitchen scale where applicable*
🧾Variations
Other flavor options for the Easter egg sugar cookies you can try:
- Lemon or orange - replace vanilla extract with 1 tablespoon of grated lemon rind or 1 tablespoon of grated orange rind.
- Almond - replace vanilla extract with almond extract.
- Funfetti - add some colorful sprinkles into the cookie dough before chilling it. Roll and cut as usual.
- Chocolate - replace 50g of flour with cocoa powder. Add to the flour and sift to break any lumps before adding to the creamed mixture.
This recipe has not been tested with other substitutions or variations. If you do try, please let me know in the comments section below!
👩🏻🍳How to Make
Step 1: Prepare the baking trays
Line the trays with parchment paper. The cookies need to be chilled before baking, so make sure there is sufficient space in your fridge to place the cookie trays.
Step 2: Mix the cookie dough
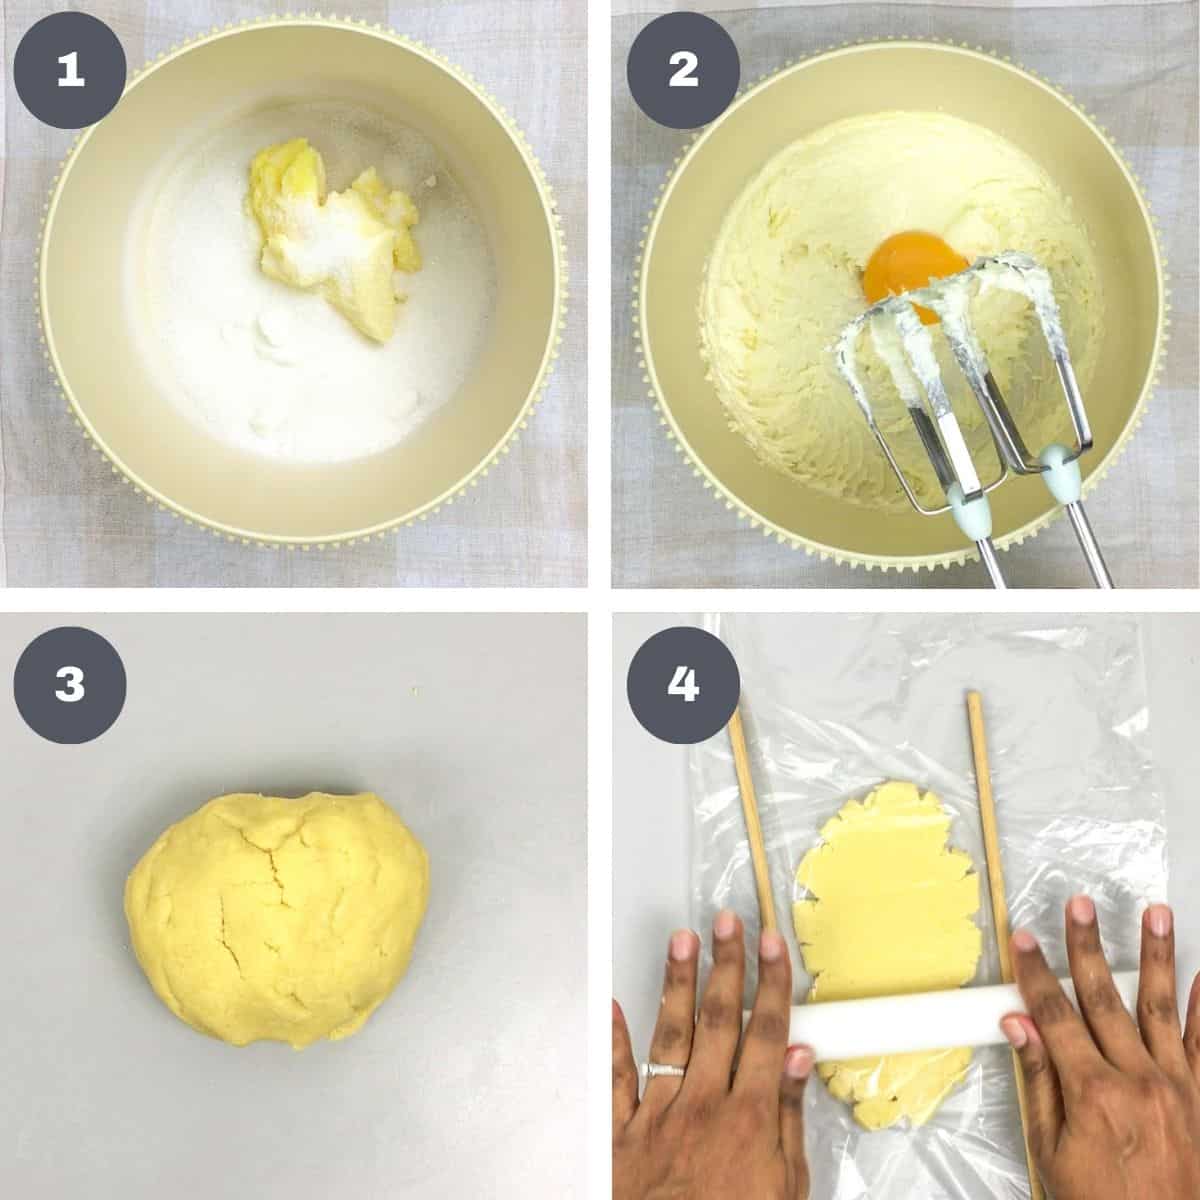
Measure butter and sugar into a large bowl and beat on medium speed until creamy (image 1). Scrape the sides of the bowl halfway through.
Next, add the egg (image 2), followed by the vanilla extract. Beat the egg until well combined before adding the vanilla.
Add the flour and mix on low speed until it is well moistened and appear crumbly. Turn out onto a clean surface and bring together into a ball (image 3).
Wrap the dough with plastic wrap and place it in the fridge for approximately 10 to 15 minutes.
Note: Leaving the dough in the fridge for too long will make it hard to roll.
Remove the dough from the fridge and place it between 2 layers of plastic sheets or parchment paper sheets. Place dowel rods on either side of the dough and roll the dough (image 4).
Note: The plastic sheets (or parchment paper) will avoid the dough from sticking to your rolling pin and work surface. The dowel rods will help ensure consistent thickness for your cookies.
Cut the cookies. Use an egg shaped cookie cutter.
Note: If you do not have a cookie cutter, cut out a paper template and using it to cut the dough with a small knife.
Place the cut out cookies on the prepared baking tray and refrigerate for at least 30 minutes. In the meantime, pre heat the oven to 175 degrees Celsius.
Note: You can refrigerate for longer than 30 minutes or overnight. Pre heat the oven at least 20 minutes before you intend to bake the cookies.
Step 3: Bake the cookies
Bake for approximately 12 minutes until the sides start to turn golden brown.
Note: These cookies will be crisp on the edges and crumbly on the inside. If you wish to make soft cookies, reduce the baking time slightly.
Remove cookies from the oven, place on a wire rack to cool completely before decorating.
Note: The cookies can be made a few days in advance and stored in an airtight container before decorating.
Step 4: Cover the cookies with fondant
Tint some white fondant with blue and green food coloring. I used Wilton Royal Blue and Wilton Juniper Green. Use very little food coloring to achieve pastel shades.
Note: Gel-based food colors are concentrated and a little goes a long way to achieve pastel tones.
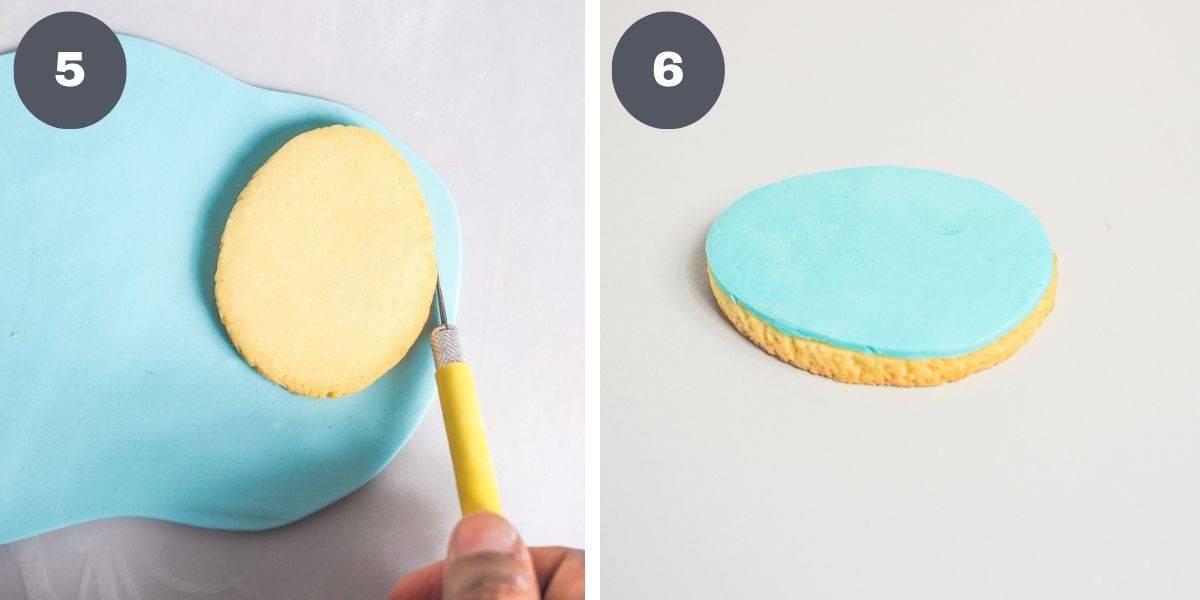
Roll the fondant thin (about one tenth of an inch thick). Apply edible glue to the cookie tops before placing the tops facing down on the rolled fondant. Use a sugar craft knife to cut the fondant along the outline of the cookies (image 5).
Turn the cookies over and smooth the edges (image 6). Repeat the process for all the Easter egg cookies (both the blue and green backgrounds).
Note: You can also use the egg cookie cutter used to cut the cookie dough to cut the fondant. Apply some edible glue on the cookies before attaching the fondant.
Step 5: Add the polka dots
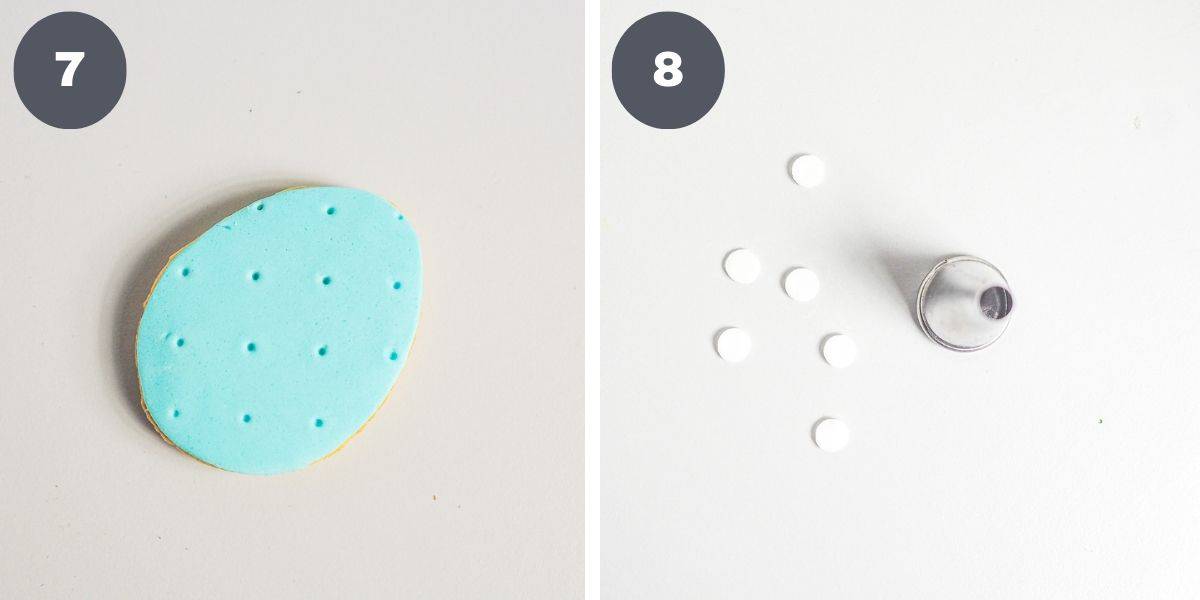
To make sure the dots were all consistently spaced out, measure and mark tiny dots on the cookies with a skewer or toothpick (image 7).
Cut out the polka dots in thinly rolled white fondant using a round medium-sized piping tip (image 8).
Note: If you find it hard to remove the dots from the tip, use the end of your cake decorating brush or anything similar to that to gently push the dots out. Dipping the tip into icing sugar can also help.
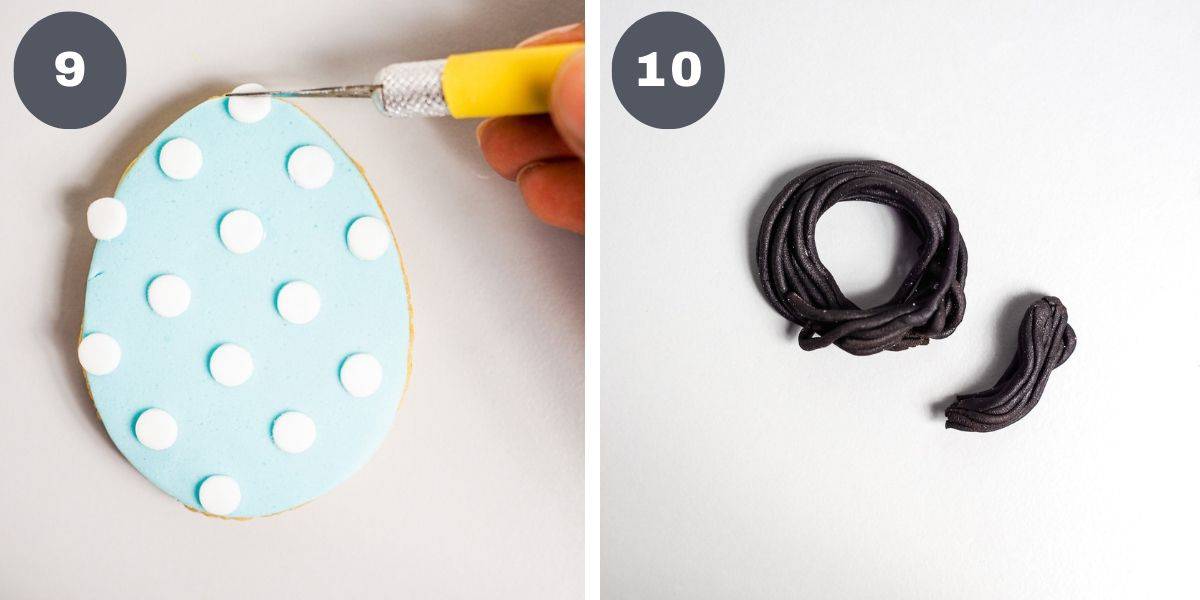
Attach the polka dots onto the cookies with glue. Trim off excess polka dots on the edges (image 9). Do this for all the blue and green cookies.
Step 6: Make the bird nests and eggs
Use an extruder tool fitted with the multi-holes disc to pipe out thin strands of chocolate fondant. Twist and wrap the strands into a nest. And then trim off the excess to form a neat nest (image 10).
Note: You can also roll the strands by hand like I did to make fondant wreath in this Christmas cake decoration.
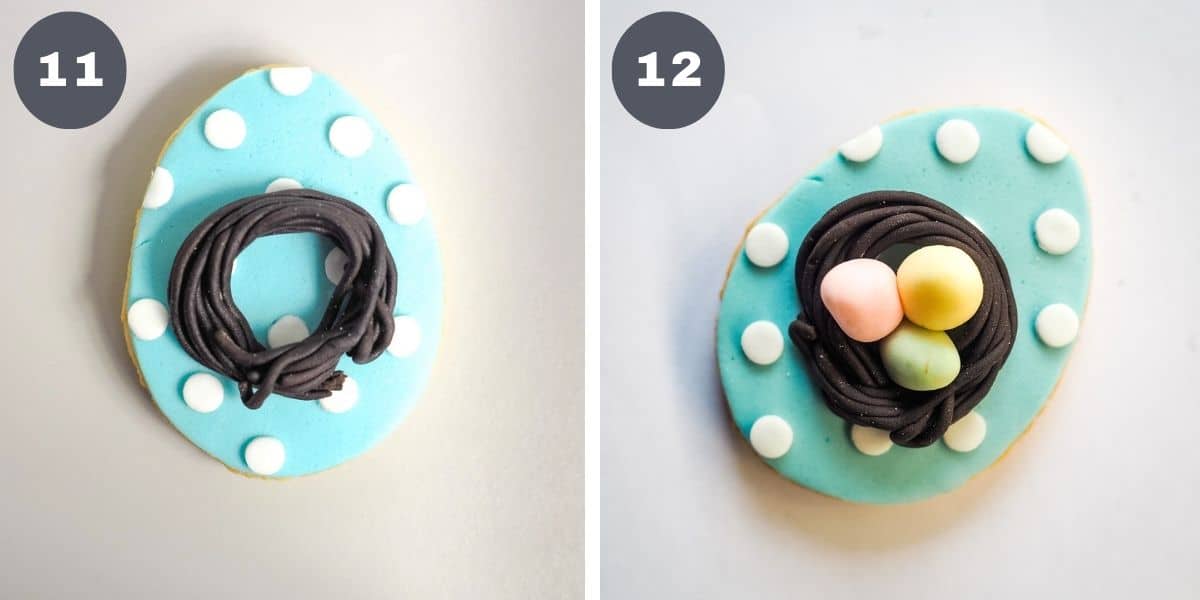
Apply fondant glue to the cookies (where you wish to place the nests) and attach the nests (image 11).
Shape the fondant eggs by hand. For the pastel yellow eggs, mix yellow fondant with white, for the pink ones, mix baby pink fondant with white and for the green eggs, use the same green fondant used for the green cookies background. Apply some glue to the eggs and position them into the nests (image 12).
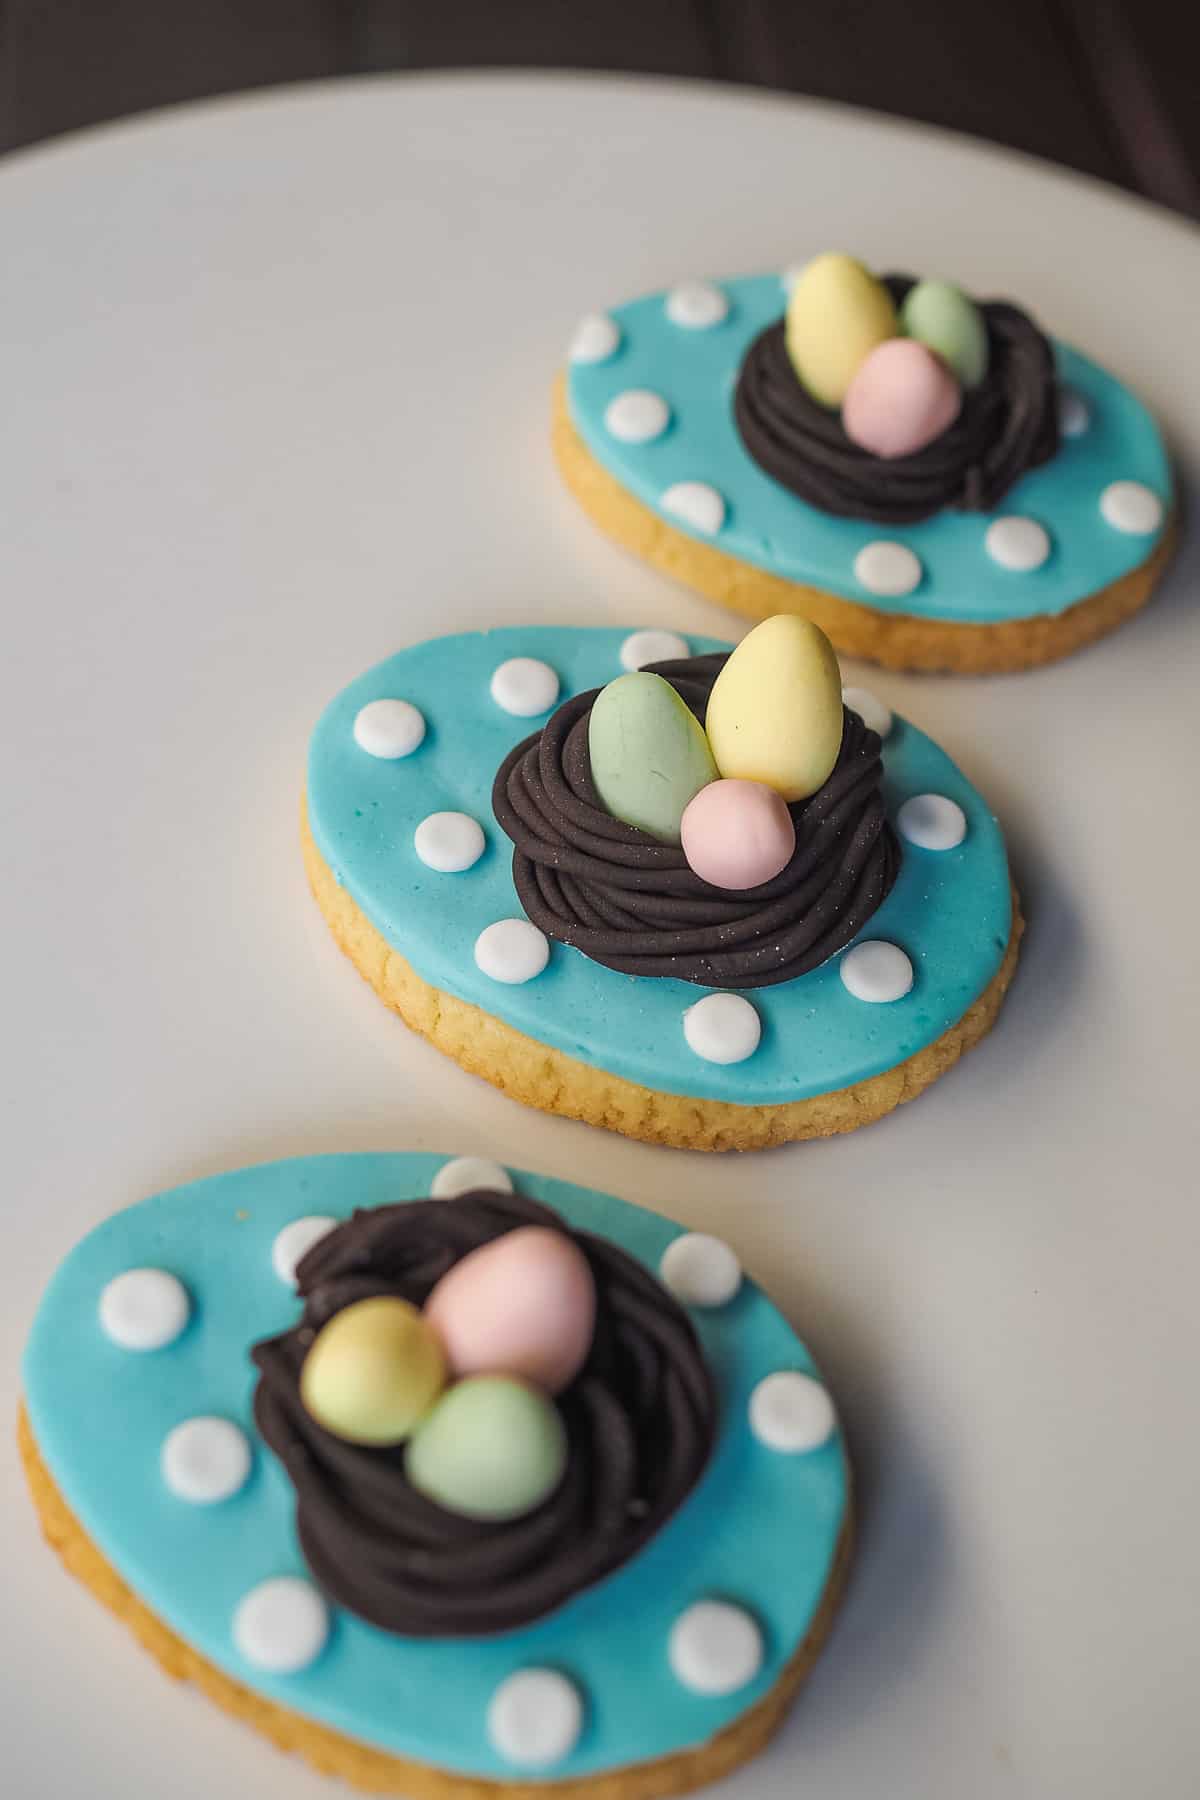
And that completes the eggs and nest design for the Easter egg sugar cookies.
Step 7: Make and attach the fondant carrots
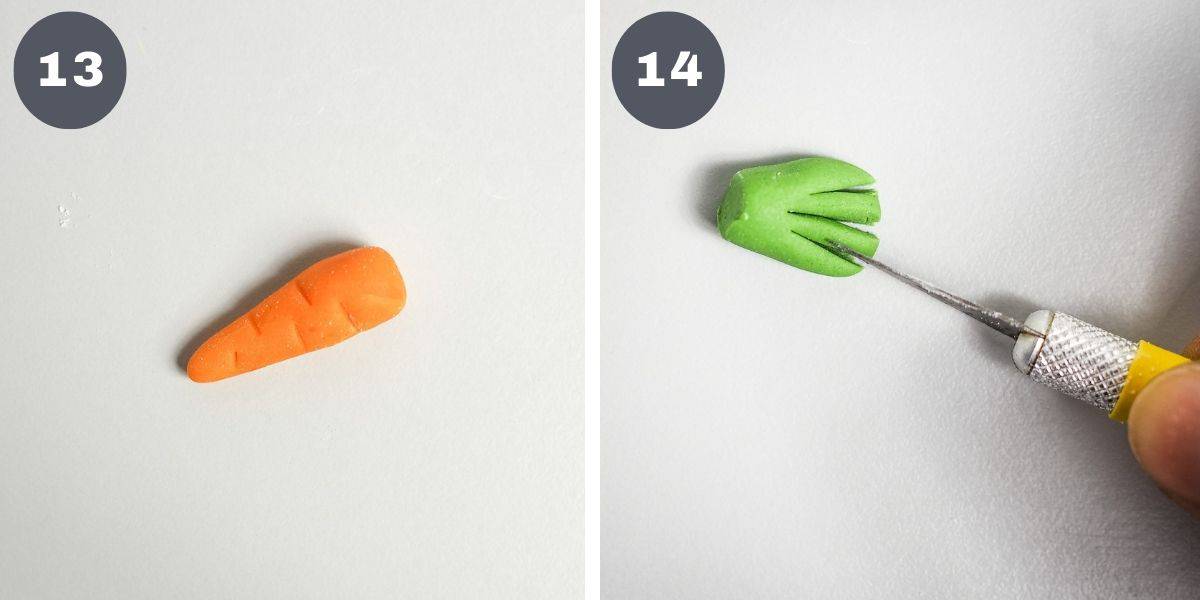
Pinch some orange fondant and shape it into a carrot by hand. Use the sugar craft knife to mark the lines in random order on the carrot, similar to the lines that appear on real carrots (image 13).
For the leaves, tint some white fondant with Wilton Juniper Green food color. Roll it into a fat short sausage. Use the sugarcraft knife to slice one end of the sausage multiple times until you get close lines that resemble the leaves of a carrot (image 14).
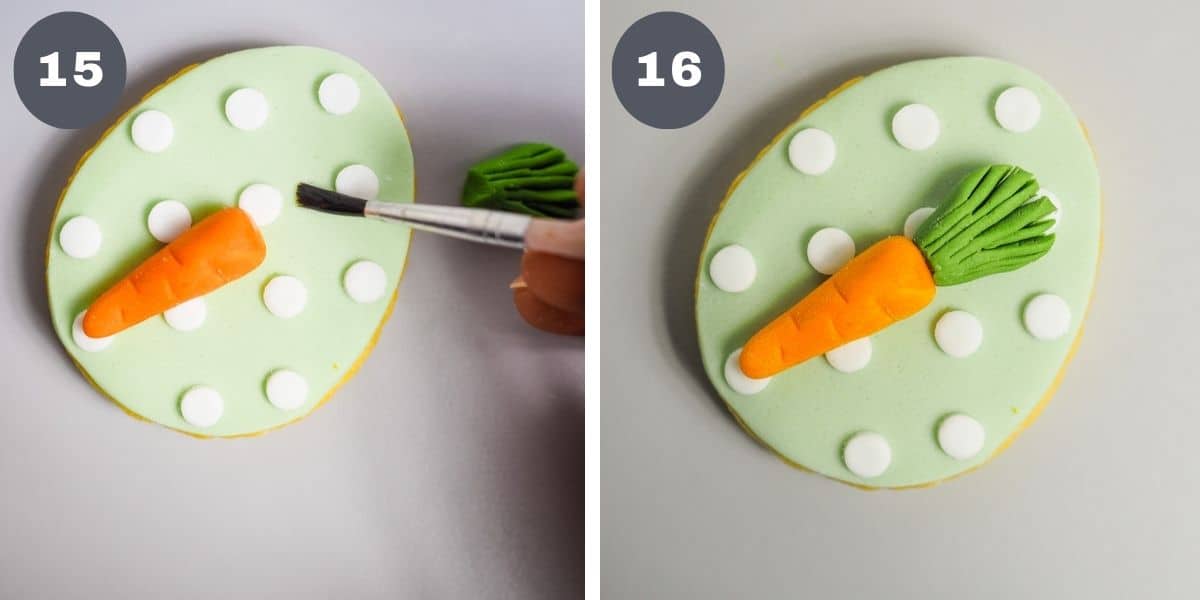
Apply some fondant glue to the bottom of the orange carrot and place it on the cookie (image 15).
Add on the leaves (attach to the carrot and the cookie with glue) (image 16).
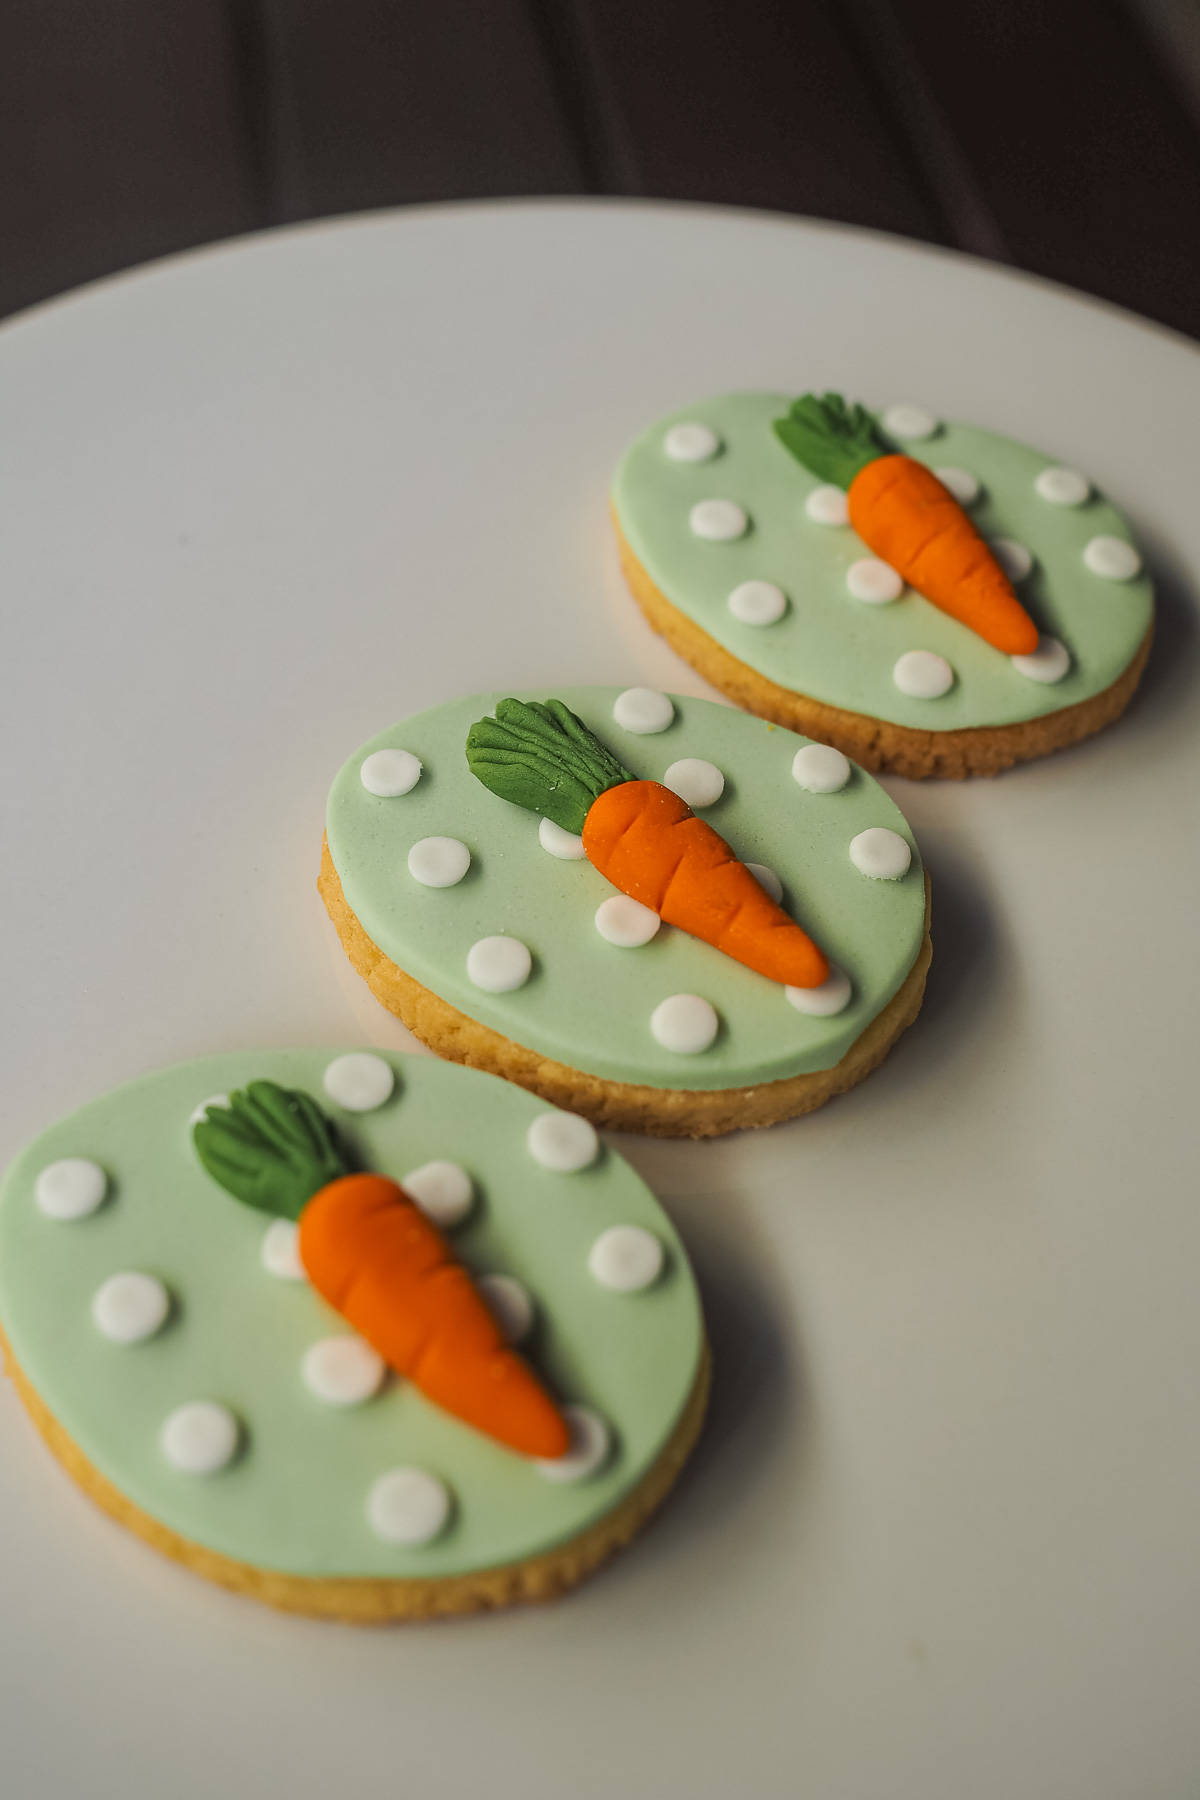
And that completes the second design of the Easter egg sugar cookies.
💡Expert tips
- Adjust the baking time if you want to make soft cookies or if your cookie sizes are larger or smaller - this recipe makes crisp and crumbly cookies. For soft cookies, reduce the baking time by at least 2 to 3 minutes. Start with a small batch to get the right baking time. For larger cookies (more than 6 inches diameter from top to bottom), increase the baking time accordingly.
- Do not chill the dough for too long before rolling and cutting - it will become too hard to roll. Should this happen, let the dough sit at room temperature until it softens to a rolling consistency.
- Consistent cookie thickness - using dowel rods on either side of the dough and rolling on the rods will ensure your cookies are all of the same thickness.
💭FAQs
These Easter egg sugar cookies last well for a good 2 to 3 weeks. You can also make them in advance and decorate later.
Always keep the cookies in an airtight container. Once decorated with fondant, keep them in a cool and dry place. Humidity can cause the fondant to turn sticky.
❤️More Recipes You Will Love


Do you like this recipe? Please leave a 5-star ⭐⭐⭐⭐⭐rating in the recipe card below and consider a review further down this page. I would love to hear from you. Thank you!
📖Recipe

Easter Egg Sugar Cookies
For best results, use the metrics measurements. US customary measurements have not been tested and are only meant for guide.
Ingredients
Cookies
- 400 g all purpose flour
- 180 g granulated sugar
- 200 g butter (salted)
- 1 egg
- ½ teaspoon vanilla extract
Decoration
- Fondant (white, orange (for the carrot), yellow (for the eggs), baby pink (for the eggs) and dark chocolate (for the nest)
- Food coloring (Wilton Royal Blue, Wilton Black, Wilton Juniper Green)
- Fondant glue
Instructions
- Line baking tray with parchment paper.
- Place butter in a clean bowl. Add the granulated sugar and cream both until the mixture turns light and creamy. Do not over mix.
- Next, add the egg and continue beating until it is well incorporated into the creamed mixture. Add vanilla extract and mix again.
- Finally, add the flour and mix on low speed until the mixture turns crumbly. Turn it out onto a clean surface and press together to form a dough ball. Place the dough in a covered bowl or wrap with plastic wrap and refrigerate for approximately 10 minutes (see Note 1).
- Remove dough from the fridge and roll it between parchment paper or plastic sheets (see Note 2). Use dowel rods as a guide for the thickness of your cookies. Cut the dough into egg shapes (with a cookie cutter or a paper template guide) and refrigerate them again until they are firm (for at least 30 minutes) (see Note 3).
- Bake the cookies in a pre-heated oven at 170°Celsius for about 12 minutes (depending on the size of your cookies) until they turn golden brown on the sides.
- Remove cookies from the oven and cool them on a wire rack. Keep cookies in an airtight container until ready to be decorated (see Note 4).
- To decorate the cookies, start by covering the backgrounds with fondant.
- For the blue background, mix Wilton Royal Blue into white fondant and then add a tiny amount of black color to it. For the green background, mix Wilton Juniper Green color to white fondant (see Note 5).
- Roll the colored fondant thin (about one tenth of an inch thick). Brush a little glue on top of each cookie. Press the cookies gently onto the rolled fondant and cut it following the outline of the cookies. Turn the cookies over and smooth the top. Repeat for all the cookies, for both blue and green backgrounds (see Note 6).
- Cut out small polka dots in thinly rolled white fondant with a medium-sized round piping tip (see Note 7).
- Attach the polka dots onto the cookies with glue.
- For the bird nests, pipe out thin strands of chocolate fondant with the extruder tool (see Note 8).
- Twist and wrap the strands into a nest. Cut off the excess and secure the ends with fondant glue and attach the nest to the cookies (also with some glue to hold them in place).
- For the eggs, pinch small amounts of pastel yellow (white fondant mixed with a tiny hint of yellow fondant), pastel pink (white fondant mixed with a little baby pink fondant), and pastel green (the same color used for background of the cookies) and form them into eggs by hand.
- To assemble the nests on the cookies, arrange 3 eggs into each nest. Secure them in place with glue.
- For the carrots, pinch some orange fondant and shape into carrots by hand. Use sugar craft knife to mark random lines on the carrots, similar to the lines on real carrots.
- For the leaves, roll some green fondant into a fat short sausage. Cut one end of the sausage multiple times until it resembles the leaves of a carrot.
- To assemble the carrot, attach the carrot onto the Easter egg sugar cookies (with glue). Next, attach the leaves to the carrot and secure them in place with glue to complete the decoration.
Notes
- Leaving the dough in the fridge for too long will make it hard to roll. If this happens, let the dough rest at room temperature until it becomes easier to roll.
- The plastic sheets (or parchment paper) will avoid the dough from sticking to your rolling pin and work surface.
- You can refrigerate for longer than 30 minutes or overnight. Pre heat the oven at least 20 minutes before you intend to bake the cookies.
- The cookies can be made a few days in advance and stored in an airtight container before decorating.
- Gel-based food colors are concentrated and a little goes a long way to achieve pastel tones.
- You can also use the egg cookie cutter used to cut the cookie dough to cut the fondant. Apply some edible glue on the cookies before attaching the fondant.
- If you find it hard to remove the dots from the tip, use the end of your cake decorating brush or anything similar to that to gently push the dots out. Dipping the tip into icing sugar can also help.
- You can also roll the strands by hand like I did to make fondant wreath in this Christmas cake decoration.
- This recipe makes crisp and crumbly cookies. For soft cookies, reduce the baking time by at least 2 to 3 minutes. Start with a small batch to get the right baking time. For larger cookies (more than 6 inches diameter from top to bottom), increase the baking time accordingly.


Leave a Reply