

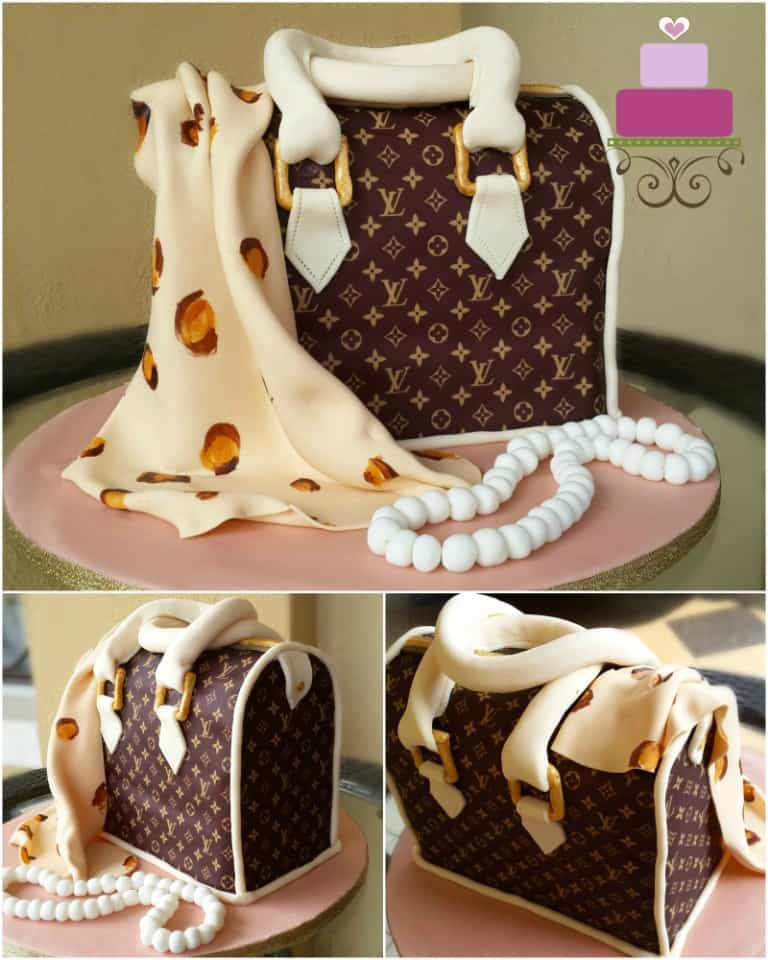
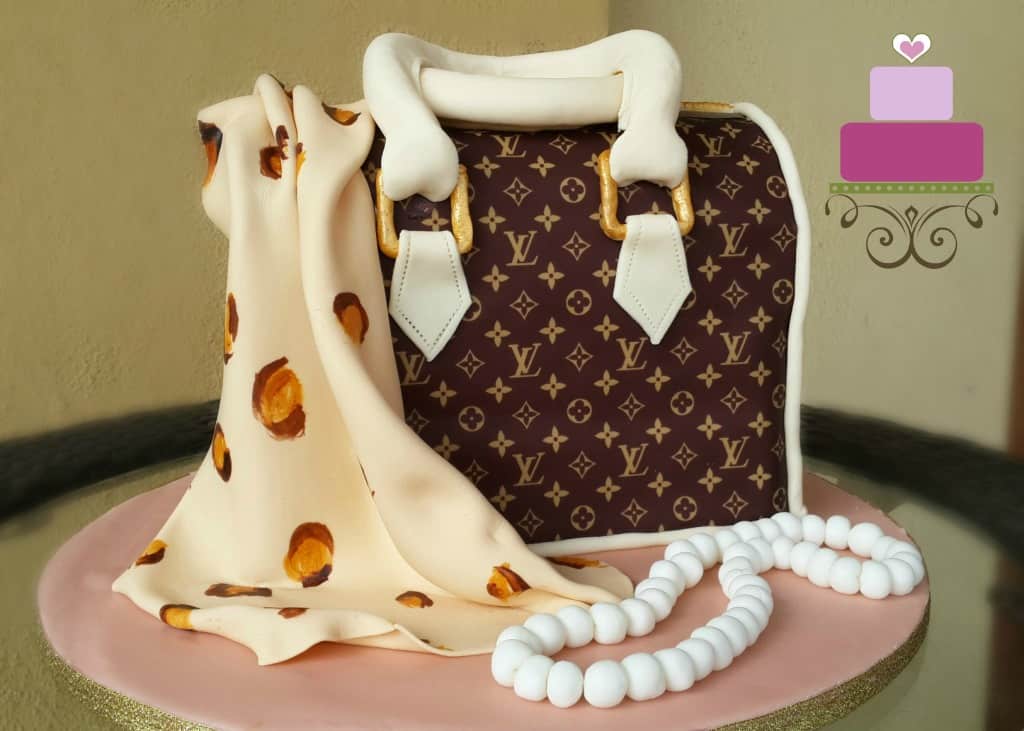
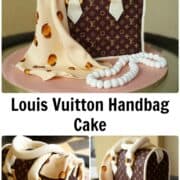
A designer handbag cake (purse cake) can never go wrong with ladies. What more if it is designed after a favorite brand or model. If you're a fashion enthusiast or simply appreciate luxury accessories, you'll love this tutorial on how to make a Louis Vuitton handbag cake.
This is a remake cake, and full credits go to the original designer.
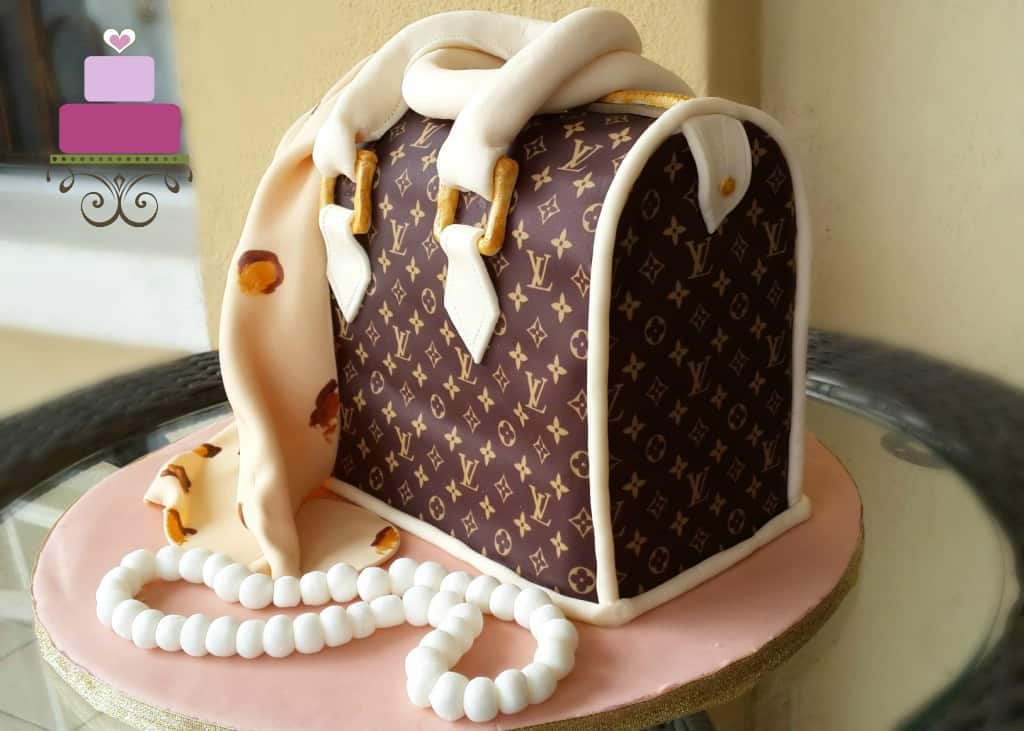
The cake is carved out of a pound cake and is decorated in fondant and Louis Vuitton edible image. The scarf is made of gum paste and the pearls are made of fondant.
Note: This is an intermediate cake decorating tutorial and some basic knowledge about frosting a cake with buttercream and fondant is required.
Jump to:
❤️Why You Will Love This Tutorial
- A fun and creative way to celebrate a special occasion, whether it's a birthday, graduation, or any other milestone event especially if the celebrated person is a fashion enthusiast.
- A unique and impressive way to show off your decorating skills and impress your guests.
- Allows you to customize the design and flavors to your liking, making it a more personalized and meaningful experience.
- A more affordable alternative to purchasing an actual designer handbag, making it a great option for those who appreciate luxury fashion but may not be able to afford the real thing.
📋Supplies Required
- Butter pound cake – Two layers of 7 inches square cakes (measuring approximately 2 inches high each)
- Buttercream – To fill and to crumb coat the cake.
- Fondant – To cover the entire cake and for the pearl necklace. I used Satin Ice in white and ivory for most parts. For others, I used brown and peach food coloring to tint white fondant. You can also make your own fondant if you wish.
- Gum paste – I used white Satin Ice gum paste and tinted it Ivory (with Wilton ivory food color ) to make the scarf on the cake.
- LV edible print – Three pieces of A4 sized Louis Vuitton logo prints for the handbag. These can be ordered from a local edible image supplies store or an online store. (You may want to order an extra sheet for contingency)
- Edible gold dust + lemon extract – Mixed to make gold paint for all the gold metal parts of the handbag.
- Wilton Ivory, Peach and Brown gel colors.
- Cake decorating brush – To paint the leopard spots on the scarf (medium tipped).
- Fondant stitch tool – To imprint the stitch marks on the handbag.
- Dental floss & needle – To make and string the fondant pearl necklace.
- Sugarcraft knife + pizza cutting wheel – General cutting tools used throughout the project.
- Fondant glue
👩🍳How to Make
Step 1: Bake and Carve the Cake
Bake two 7 inches square cakes with each cake measuring approximately 2 inches high. Cut each layer into 2, making 4 blocks of cake, each measuring 7 inches by 3.5 inches each.
Next, level the layers and stack them, with buttercream in between each layer.
Carve the top portion of the cake such that the top long edges of the cake are rounded and look like the body of a handbag.
Step 2: Attach the LV Edible Image
Once the carving is complete, clean the cake of all loose crumbs. Apply a thin coat of buttercream all over the cake and cover it in rolled ivory fondant. You can do this with 3 pieces - 1 large piece to cover the main body of the handbag, from base to base. The other 2 pieces to cover the 2 smaller opposite sides of the bag.
After that, attach the edible LV image sheets. Use one piece for the front and one for the back. And cut the 3rd sheet into 2 and attach it to both sides of the bag cake. To attach the edible images, applying a light brush to water onto the fondant and gently lay the images over from one end all the way to the other. This will help avoid air bubbles from being trapped.
Step 3: Add the Fondant Seams
To make the seams, use the extruder tool to pipe out the medium sized ivory strips. Carefully attach these to the edges of the handbag using fondant glue. The seams are at the base as well as on the sides of the handbag cake.
Step 4: Add the Bag Zipper
For the zipper, manually cut out a rectangle piece of brown fondant. Attach it to the handbag cake with some fondant glue. Use the stitch tool to imprint the stitch marks on both sides.
Next, roll out some white fondant into a long piece. Cut it out into a thin strip. Using the pizza cutting wheel, mark the lines for the zipper. And then attach it to the handbag cake with glue. Paint the white part of the zipper with the gold edible paint.
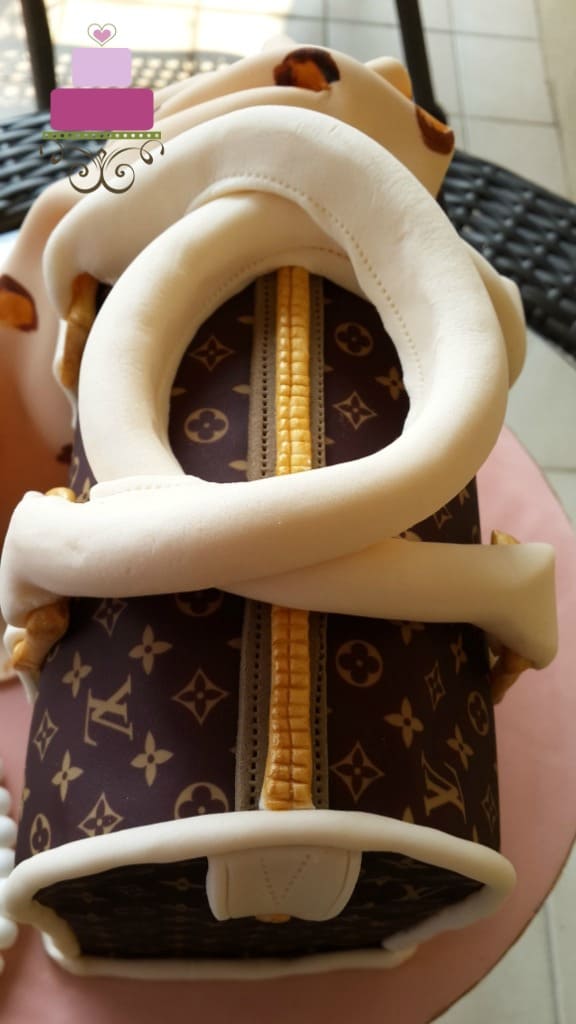
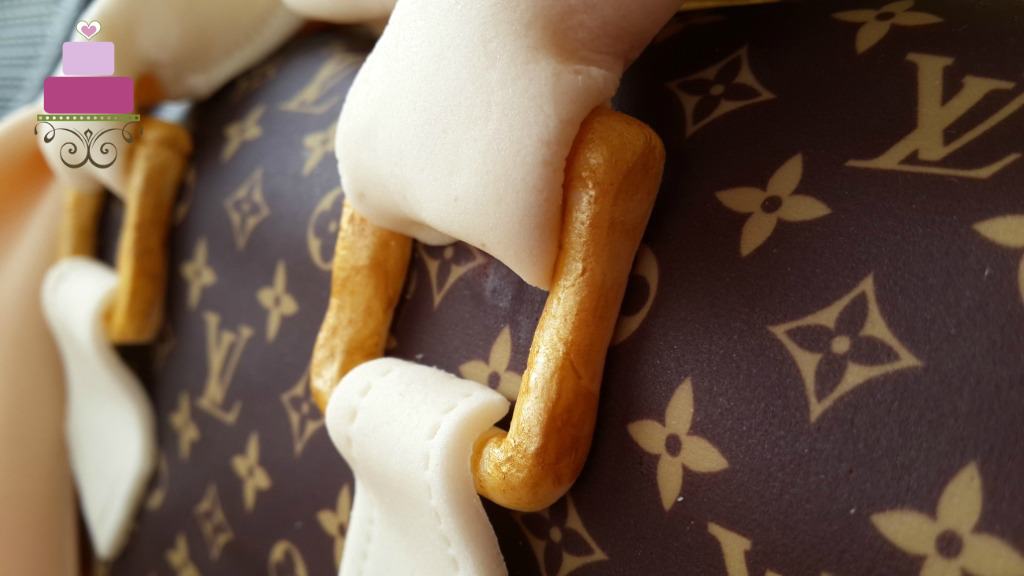
Step 5: Make the Bag Handles
Next are the bag handles. Start with the gold square parts first. Cut them out free hand with the sugar craft knife, smooth the sides, and paint them gold.
After that, put them aside until the paint dries. While waiting, cut out the hexagon pieces and shape the handles. Use the stitch tool to make the stiches on the edges. To assemble, attach the hexagon pieces first and then attach the gold parts.
In attaching these, make sure the hexagon pieces are slightly longer on the top. This is so that you can fold that extra bit around the gold pieces. After that, add the handles. To make the handles, shape long fondant sausages and flatten the ends. Use a stitch tool to mark the stitching lines along the sides.
And similar to the hexagon pieces, fold the flattened ends around the gold cutouts. And that completes the handbag cake.
Step 6: Paint Leopard Prints on the Scarf
To make the scarf, use white gum paste and tint it ivory. And then roll it as thin as possible and paint the leopard prints on the scarf.
Here is an illustration on how to paint the leopard spots:
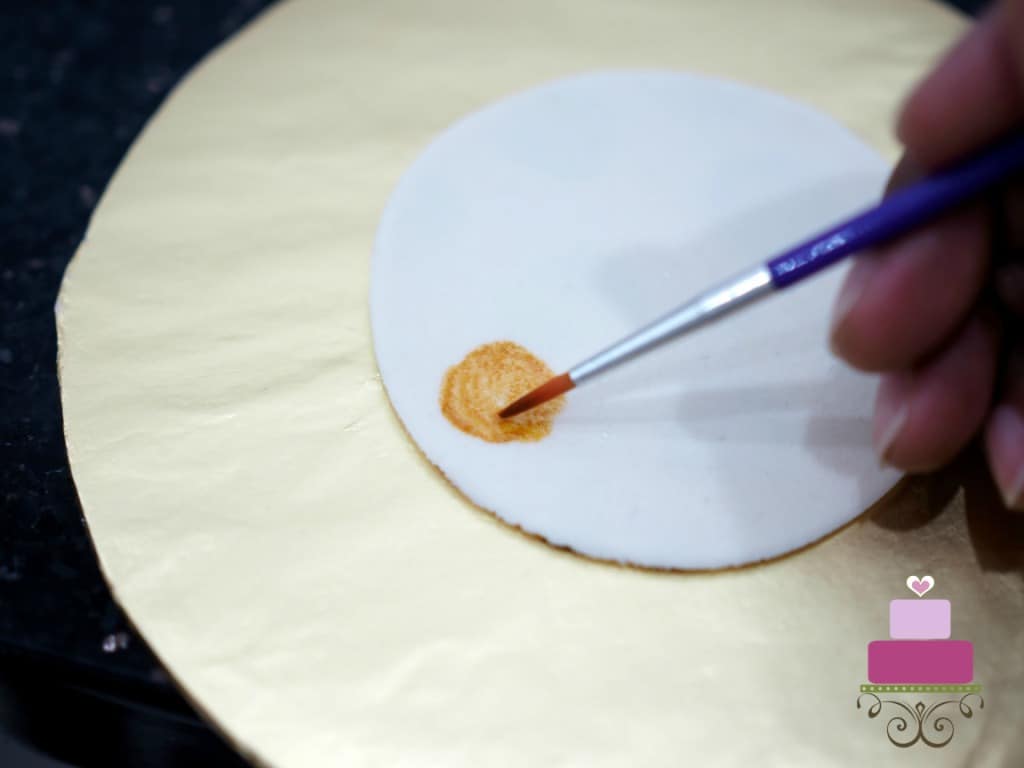
Start with the ivory paint. Use a clean cake decorating brush, dip the tip into the ivory food color and then dip it lightly in water. Use the brush and paint a round spot as shown below. The spot does not have to be perfectly round.
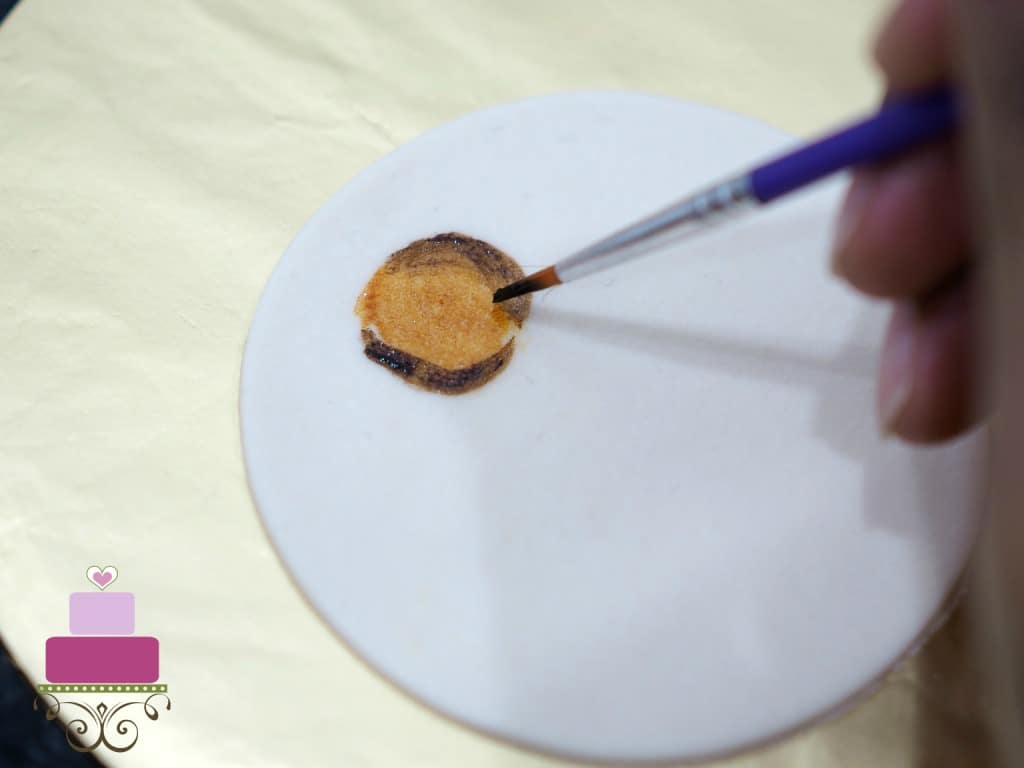
Next, dip the brush into brown food color. And then dip it lightly in water. Add a stroke of 'C' on one side of the ivory spot, then another one on the opposite.
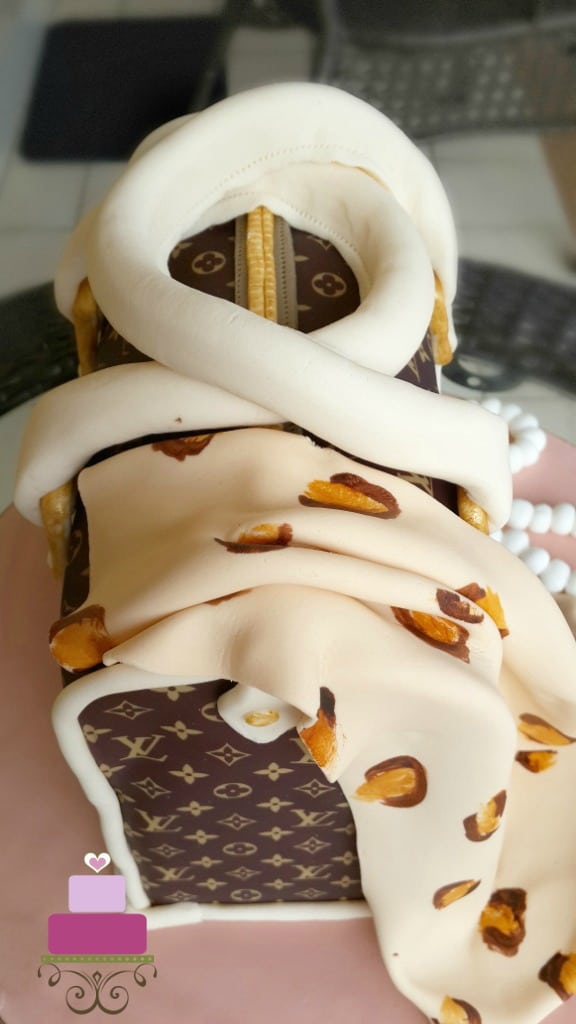
Once the painting is completed, place the scarf of the handbag cake. Position it so that it is ruffled in the most natural position possible. To make sure the scarf remains in place, apply glue to the scarf where it is in contact with the bag and the cake board.
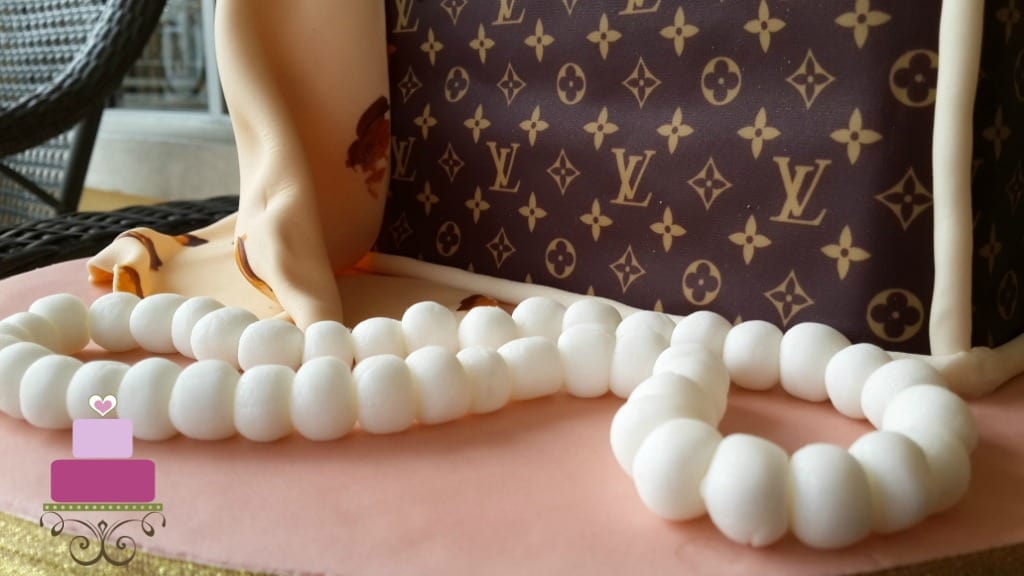
Step 7: Make the Fondant Pearl Necklace
The pearl necklace is literally beaded with fondant pearls using dental floss. To make the beads, pinch small pieces of white fondant and form them into smooth balls. The balls should be the size of pearls. String the dental floss into a clean sewing needle and poke the needle and the floss through each of the fondant pearls.
To complete the necklace, tie the ends of the dental floss together. Adjust the pearl beads so that one of the pearls cover the knot completely before placing the necklace on the cake. Position the necklace on the cake first. Once you are happy with the position, secure it in place with fondant glue.
And that completes the Louis Vuitton bag cake decoration.
💡Expert Tips
- Order the edible image prints in advance to avoid delays in receiving them. It is also advisable to order extras for contingency.
- You can change the cake flavor or use your choice of cake recipes to make the handbag cake. However, since this is a carved and fairly tall stacked cake, the cake should be sturdy to hold the weight of the fondant. Pound cakes are highly advisable. Other pound cake flavors you can choose include chocolate pound cake, orange cake, marble pound cake and coffee cake.
- In cutting and attaching the edible image on the cake, pay attention to the direction of the logo on the sheet to avoid positioning it upside down on the cake.
- Humidity will cause fondant to sag and become sticky. If you living in a humid country, it is best to work in an airconditioned room.
❤️More Tutorials You Will Love

Do you like this tutorial? Please leave a 5-star ⭐⭐⭐⭐⭐rating in the recipe card below and consider a review further down this page. I would love to hear from you. Thank you!
📖Recipe

Louis Vuitton Handbag Cake
Equipment
- Cake decorating brush
- Fondant stitch tool
- Dental floss & needle
- Sugar craft knife
- Pizza cutting wheel
For best results, use the metrics measurements. US customary measurements have not been tested and are only meant for guide.
Ingredients
- 1 seven-inch square cakes measuring approximately 2 inches high each
- Buttercream
- Fondant
- Gum paste
- LV edible image print
- Edible gold dust
- Lemon extract
- Food coloring Ivory, Peach and Brown gel colors.
- Fondant glue
Instructions
Baking and carving the cake
- Bake two 7 inches square cakes with each cake measuring approximately 2 inches high. Cut each layer into 2, making 4 blocks of cake, each measuring 7 inches by 3.5 inches each.
- Next, level the layers and stack them, with buttercream in between each layer.
- Carve the top portion of the cake such that the top long edges of the cake are rounded.
Attaching the LV edible image
- Once the carving is complete, clean the cake of all loose crumbs. Apply a thin coat of buttercream all over the cake and cover it in rolled ivory fondant. You can do this with 3 pieces - 1 large piece to cover the main body of the handbag, from base to base. The other 2 pieces to cover the 2 smaller opposite sides of the bag.
- After that, attach the edible LV image sheets. Use one piece for the front and one for the back. And cut the 3rd sheet into 2 and attach it to both sides of the bag cake. To attach the edible images, applying a light brush to water onto the fondant and gently lay the images over from one end all the way to the other. This will help avoid air bubbles from being trapped.
Adding the seams
- To make the seams, use the extruder tool to pipe out the medium sized ivory strips. Carefully attach these to the edges of the handbag using fondant glue. The seams are at the base as well as on the sides of the handbag cake.
Adding the bag zipper
- For the zipper, manually cut out a rectangle piece of brown fondant. Attach it to the cake with some fondant glue. Use the stitch tool to imprint the stitch marks on both sides.
- Next, roll out some white fondant into a long piece. Cut it out into a thin strip. Using the pizza cutting wheel, mark the lines for the zipper. And then attach it to the bag with glue. Paint the white part of the zipper with the gold edible paint.
Making the handbag handles
- Next are the bag handles. Start with the gold square parts first. Cut them out free hand with the sugar craft knife, smooth the sides, and paint them gold. After that, put them aside until the paint dries. While waiting, cut out the hexagon pieces and shape the handles. Use the stitch tool to make the stiches on the edges. To assemble, attach the hexagon pieces first and then attach the gold parts.
- In attaching these, make sure the hexagon pieces are slightly longer on the top. This is so that you can fold that extra bit around the gold pieces. After that, add the handles. To make the handles, shape long fondant sausages and flatten the ends. Use a stitch tool to mark the stitching lines along the sides. And similar to the hexagon pieces, fold the flattened ends around the gold cutouts. And that completes the handbag cake.
Leopard spots on the scarf
- To make the scarf, use white gum paste and tint it ivory. And then roll it as thin as possible and paint the leopard prints on the scarf.
- To paint the leopard spots, start with the ivory paint. Use a clean cake decorating brush, dip the tip into the ivory food color and then dip it lightly in water. Use the brush and paint a round spot as shown below. The spot does not have to be perfectly round.
- Next, dip the brush into brown food color. And then dip it lightly in water. Add a stroke of 'C' on one side of the ivory spot, then another one on the opposite.
- Once the painting is completed, place the scarf of the handbag cake. Position it so that it is ruffled in the most natural position possible. To make sure the scarf remains in place, apply glue to the scarf where it is in contact with the bag and the cake board.
Making the edible pearl necklace
- The pearl necklace is literally beaded with fondant pearls using dental floss. To make the beads, pinch small pieces of white fondant and form them into smooth balls. The balls should be the size of pearls. String the dental floss into a clean sewing needle and poke the needle and the floss through each of the fondant pearls.
- To complete the necklace, tie the ends of the dental floss together. Adjust the pearl beads so that one of the pearls cover the knot completely before placing the necklace on the cake. Position the necklace on the cake first. Once you are happy with the position, secure it in place with fondant glue.
- And that completes the handbag cake decoration.
Notes
- Order the edible image prints in advance to avoid delays in receiving them. It is also advisable to order extras for contingency.
- You can change the cake flavor or use your choice of cake recipes to make the handbag cake. However, since this is a carved and fairly tall stacked cake, the cake should be sturdy to hold the weight of the fondant. Pound cakes are highly advisable.
- In cutting and attaching the edible image on the cake, pay attention to the direction of the logo on the sheet to avoid positioning it upside down on the cake.
- Humidity will cause fondant to sag and become sticky. If you living in a humid country, it is best to work in an airconditioned room.
Leave a Reply