

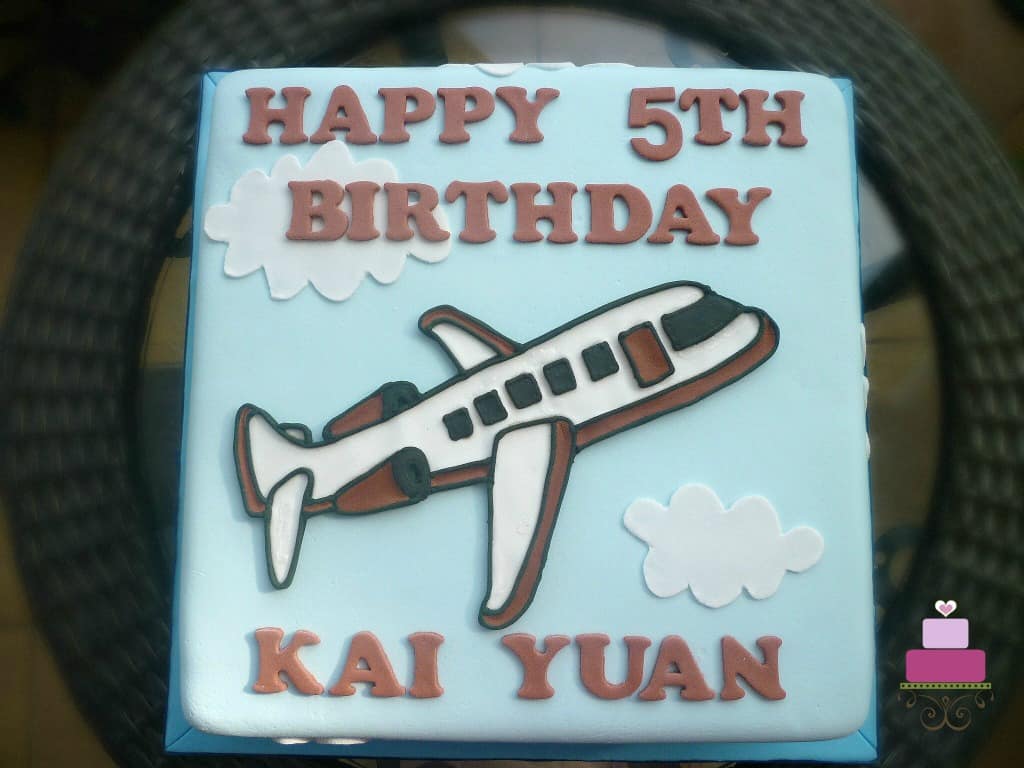
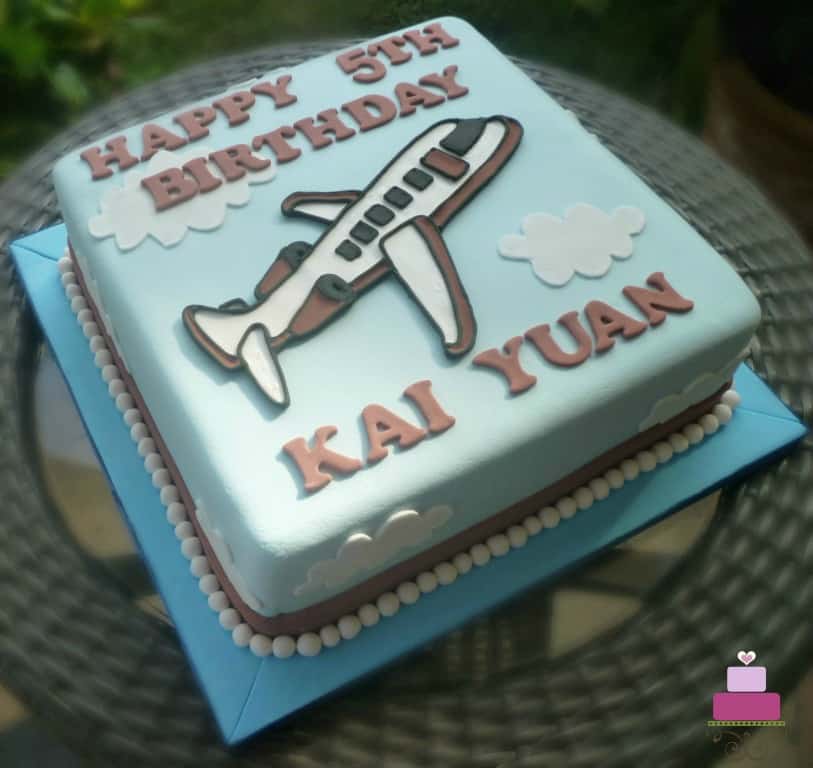
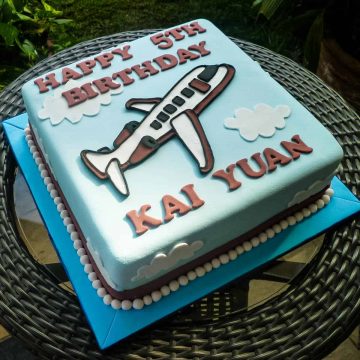
This airplane cake (aeroplane cake) is a single-tier chocolate cake covered in fondant and topped with a 2d royal icing airplane. The fondant clouds randomly added to the cake match the overall theme of a flying airplane. An absolutely easy and creative idea for anyone attempting to make an airplane (aeroplane) themed cake!
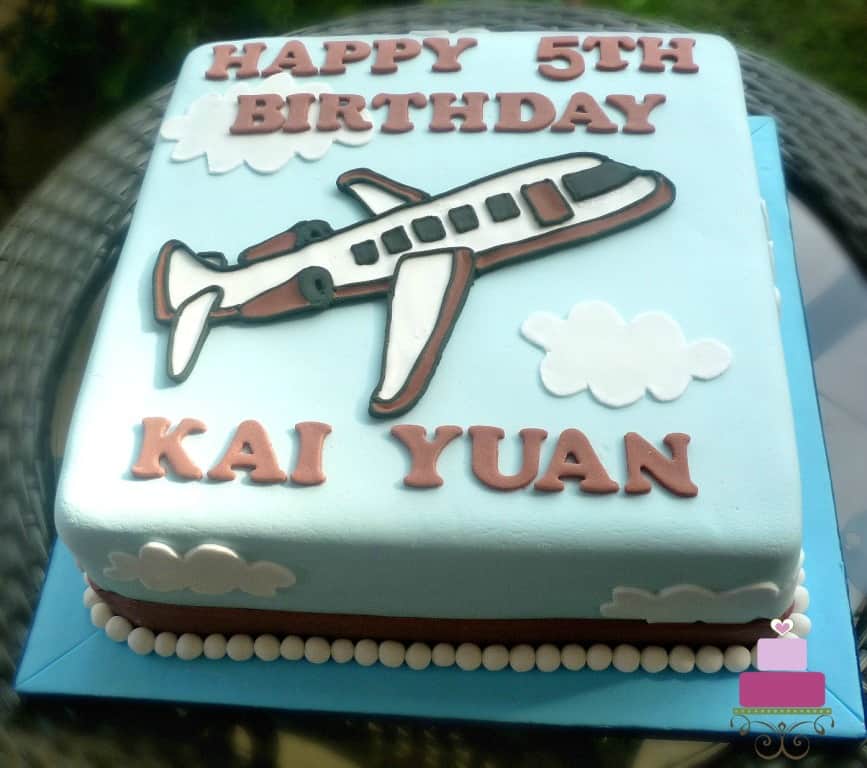
This is a 10 inches square chocolate cake covered in fondant. The airplane design on the cake is made using royal icing, while the rest of the decoration is in fondant.
Jump to:
❤️Why You Will Love This Tutorial
- It is easy to make, there any no special fondant skills required.
- The tutorial has a list of supplies and tools required to make the cake as well as step by step guide, so making this cake is well guided.
- You can use the techniques described in this tutorial and customize the airplane design to one that you like
- You can hone your cake decorating skills and show them off to others.
- It is a lot cheaper to make your own decorated cake than to custom order one.
📋Supplies Required
- Cake – Two layers of 10 inches square cakes (approximately 2 inches high each).
- Buttercream - To fill and crumb coat the cake.
- Fondant – To cover the cake and to make the decoration on the cake (except the airplane)
- Royal icing – To make (pipe) the airplane. I used the color flow technique to create the airplane in royal icing on a parchment paper and once the airplane was dry and set, I removed it from the parchment paper and attached it to the cake.
- Fondant glue
- Airplane template – can be hand drawn or traced from a favorite coloring book or downloaded from the internet.
- Food coloring – Wilton and Americolor food colors in royal blue , black and maroon.
- Block letters alphabet cutters
- Disposable piping bags and piping tip 3 – For the color flow technique of the airplane.
- Sugar craft knife
👩🍳How to Make
Step 1: Prepare the Airplane Template
Start off by getting the airplane template ready. If you are good at drawing, you can always draw one by hand. Or you can find an image that you could trace from. Kids coloring books are a good place to look for a basic airplane templates.
Another option is to search for airplane coloring pages on the internet and print a template from there. Make sure the size of the airplane template fits the size of the cake. You can use this guide on how to resize your cake template. If the design you like is complicated, tweak it to remove the intricate details for easier piping.
Step 2: Make the Airplane Outline with Royal Icing
Once the image is ready, trace it onto a parchment paper. And then place another piece of parchment paper on top and clip both together, preferably onto a cake board so that you get the template on a flat surface.
Next, prepare the royal icing. Portion some into a small bowl and mix black food coloring into it. Fill the piping bag with the black icing (in stiff consistency) and pipe the outline of the airplane on the parchment paper using a small round tip (Wilton tip #3).
Step 3: Fill Up the Airplane Design
Once the outline is done, next is to fill the airplane sections with royal icing. For the filling, the consistency of the royal icing has to be sufficiently runny.
To make the runny royal icing, place some stiff royal icing into a bowl. Add one teaspoon of water. Mix well. Cut the icing with your spoon or a butter knife. If it smooths out in the count of 10 seconds, your icing is ready. If it smooths too fast, your icing is too runny. And you need to correct it by adding some stiff royal icing to it. Similarly, if the icing takes longer than 10 seconds to smooth out, it is still stiff. And you would need to add more water to it.
Similar method is used to make these royal icing butterflies, and you can check out the video tutorial how to make the royal icing butterflies too.
Once the icing is ready, transfer it into a piping bag. Snip the tip (a small hole) and fill the white sections of the airplane.
Repeat the process with maroon and black icing for the other parts of the airplane. To finish off the airplane cake topper, pipe another round of black outline (both outside and inside sections) on the airplane before putting it aside to dry and set.
Leave the airplane aside to set overnight. It is advisable that you make at least 2 of these royal icing airplane cake toppers just in case one of them chips or breaks.
Step 4: Bake and Prepare the Cake
Bake the cakes and let them cool completely to room temperature before decorating.
Level the cake tops, and stack them together with some buttercream in between.
And the crumb coat the whole cake with a thin layer of buttercream.
Next, tint some white fondant with blue food coloring (very lightly) and roll it to about one eight inch of thickness. Cover the cake with the fondant.
For the border, roll and cut cut a long strip of maroon fondant and attach it all around the lower edge of the cake. You can use warm water to attach the maroon fondant strip to the cake. After that, shape tiny white fondant balls by hand and attach them all around the cake as the border, with some fondant glue.
Step 5: Assemble the Cake
Once the royal icing airplanes are completely set and dry, peel them off the parchment paper. If properly and well dried, the paper to peel off automatically. If it does not, let the airplane dry more.
Position the royal icing airplane on the cake and secure it in place with dots of royal icing.
Next, roll some maroon fondant thin and cut out the alphabets using the alphabet cutters. Attach them to the cake with a damp brush. And finally, for added decoration, add white clouds randomly on the top of the cake as well as the sides. Cut these free hand out of white fondant using the sugar craft knife.
💡Expert Tips
- Make the royal icing airplane at least one day in advance so that it has sufficient to dry completely for easy peeling of the parchment paper.
- Make sure to use parchment paper and not greaseproof paper or it will be very difficult to peel the dried plane from the paper.
- It is important that you lay your template on a flat surface when piping with royal icing so that the final result will be flat. Or else, you will find the airplane to be uneven when placed on the cake and this in turn can cause it to crack.
- It is advisable to make an extra airplane image with royal icing for contingency, in case the first one breaks.
- The purpose of laying and piping on a blank piece of parchment paper laid on the airplane template is to avoid the pencil lead from being transferred to the royal icing.
❤️More Tutorials You Will Love

Do you like this tutorial? Please leave a 5-star ⭐⭐⭐⭐⭐rating in the recipe card below and consider a review further down this page. I would love to hear from you. Thank you!
📖Recipe
Airplane Cake
Equipment
- Block letters alphabet cutters
- Disposable piping bags and piping tip 3
- Sugarcraft knife
- Airplane template
For best results, use the metrics measurements. US customary measurements have not been tested and are only meant for guide.
Ingredients
- 2 Ten inches square cakes approximately 2 inches high each.
- Buttercream
- Fondant
- Royal icing
- Fondant glue
- Food coloring Wilton and Americolor food colors in royal blue, black and maroon.
Instructions
Preparing the airplane template
- Start off by getting the airplane template ready. If you are good at drawing, you can always draw one by hand. Or you can find an image that you could trace from. Kids coloring books are a good place to look for a basic airplane templates.
- Another option is to search for airplane coloring pages on the internet and print a template from there. Make sure the size of the airplane fits the size of the cake. If the design you like is complicated, tweak it to remove the intricate details for easier piping.
Making the airplane with royal icing
- Once the image is ready, trace it onto a parchment paper. And then place another piece of parchment paper on top and clip both together, preferably onto a cake board so that you get the template on a flat surface.
- Next, prepare the royal icing. Portion some into a small bowl and mix black food coloring into it. Fill the piping bag with the black icing (in stiff consistency) and pipe the outline of the airplane on the parchment paper using a small round tip (Wilton tip #3).
Filling up the airplane template
- Once the outline is done, next is to fill the airplane sections with royal icing. For the filling, the consistency of the royal icing has to be sufficiently runny.
- To make the runny royal icing, place some stiff royal icing into a bowl. Add one teaspoon of water. Mix well. Cut the icing with your spoon or a butter knife. If it smooths out in the count of 10 seconds, your icing is ready. If it smooths too fast, your icing is too runny. And you need to correct it by adding some stiff royal icing to it. Similarly, if the icing takes longer than 10 seconds to smooth out, it is still stiff. And you would need to add more water to it.
- Similar method is used to make these royal icing butterflies, and you can check out the video tutorial how to make the royal icing butterflies too.
- Once the icing is ready, transfer it into a piping bag. Snip the tip (a small hole) and fill the white sections of the airplane.
- Repeat the process with maroon and black icing for the other parts of the airplane. To finish off the airplane cake topper, pipe another round of black outline (both outside and inside sections) on the airplane before putting it aside to dry and set.
- Leave the airplane aside to set overnight. It is advisable that you make at least 2 of these royal icing airplane cake toppers just in case one of them chips or breaks.
Getting the cake ready
- Bake the cakes and let them cool completely to room temperature before decorating.
- Level the tops, and stack them together with some buttercream in between.
- And the crumb coat the whole cake with a thin layer of buttercream.
- Next, tint some white fondant with blue food coloring (very lightly) and roll it to about one eight inch of thickness. Cover the cake with the fondant.
- For the border, roll and cut cut a long strip of maroon fondant and attach it all around the lower edge of the cake. You can use warm water to attach the maroon fondant strip to the cake. After that, shape tiny white fondant balls by hand and attach them all around the cake as the border, with some fondant glue.
Assembling the cake
- Once the royal icing airplanes are completely set and dry, peel them off the parchment paper. If properly and well dried, the paper to peel off automatically. If it does not, let the airplane dry more.
- Position the royal icing airplane on the cake and secure it in place with dots of royal icing.
- Next, roll some maroon fondant thin and cut out the alphabets using the alphabet cutters. Attach them to the cake with a damp brush. And finally, for added decoration, add white clouds randomly on the top of the cake as well as the sides. Cut these free hand out of white fondant using the sugar craft knife.
Notes
- Make the royal icing airplane at least one day in advance so that it has sufficient to dry completely for easy peeling of the parchment paper.
- Make sure to use parchment paper and not greaseproof paper or it will be very difficult to peel the dried plane from the paper.
- It is important that you lay your template on a flat surface when piping with royal icing so that the final result will be flat. Or else, you will find the airplane to be uneven when placed on the cake and this in turn can cause it to crack.
- It is advisable to make an extra airplane image with royal icing for contingency, in case the first one breaks.
- The purpose of laying and piping on a blank piece of parchment paper laid on the airplane template is to avoid the pencil lead from being transferred to the royal icing.

Jagadeesh
Hi,
i like your Aeroplane cake very much. i am planning to get the same cake for my sons 2nd birthday.
if we can get a photo copy or soft copy, our baker will get it done for us. our baker told me to get the printout, so that she will scan it and apply it on cake.
Could you please send me a photo copy or scanned copy of it.
please please please.
Thank you.
Priya Maha
Hi Jagadeesh,
I don't have a copy of the image anymore. I made this cake quite some time ago. If you do a google search for airplane coloring pages, you might find something similar. Hope this helsp.
chukwu chioma
u r really talented ma but pls ma I want to state a cake training under your care as a learner how do I register