

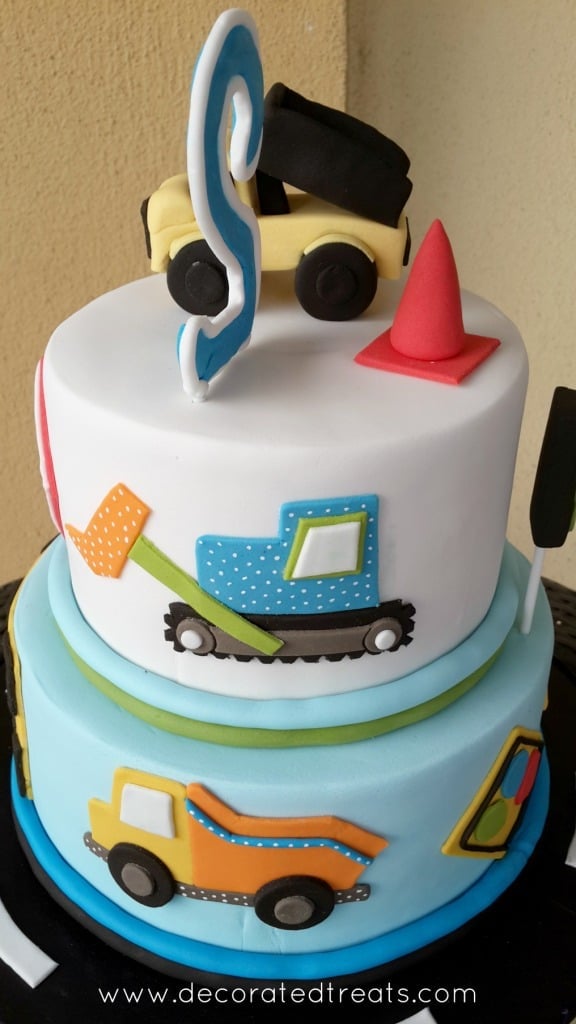
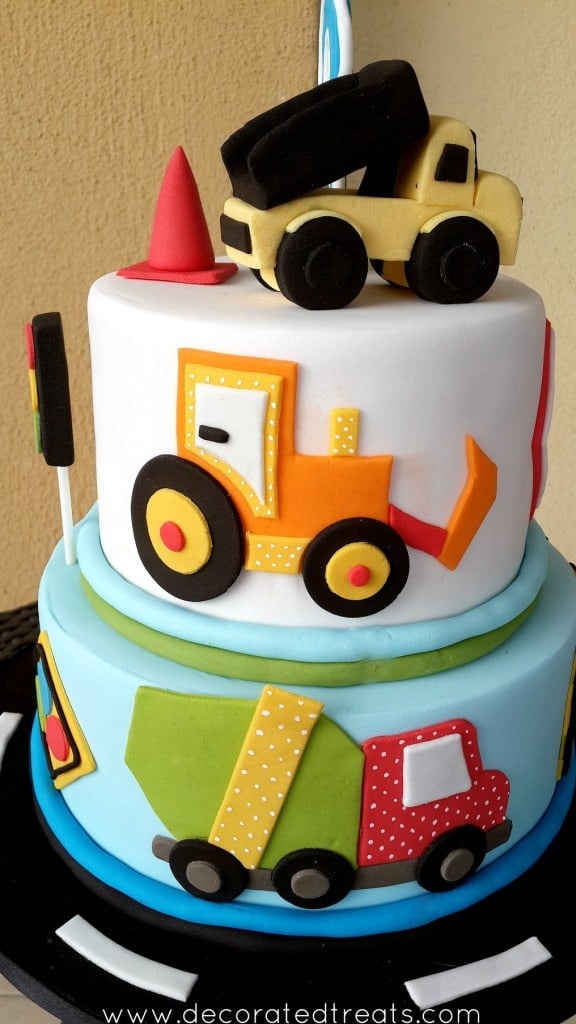
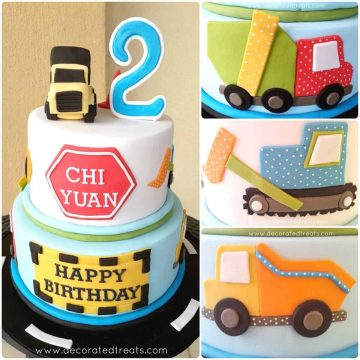
Learn how to make a truck cake with this easy tutorial. Topped with a handmade 3D fondant truck, a fondant traffic cone and a large number 2 topper, this cake is perfect for anyone looking for a transportation themed cake.
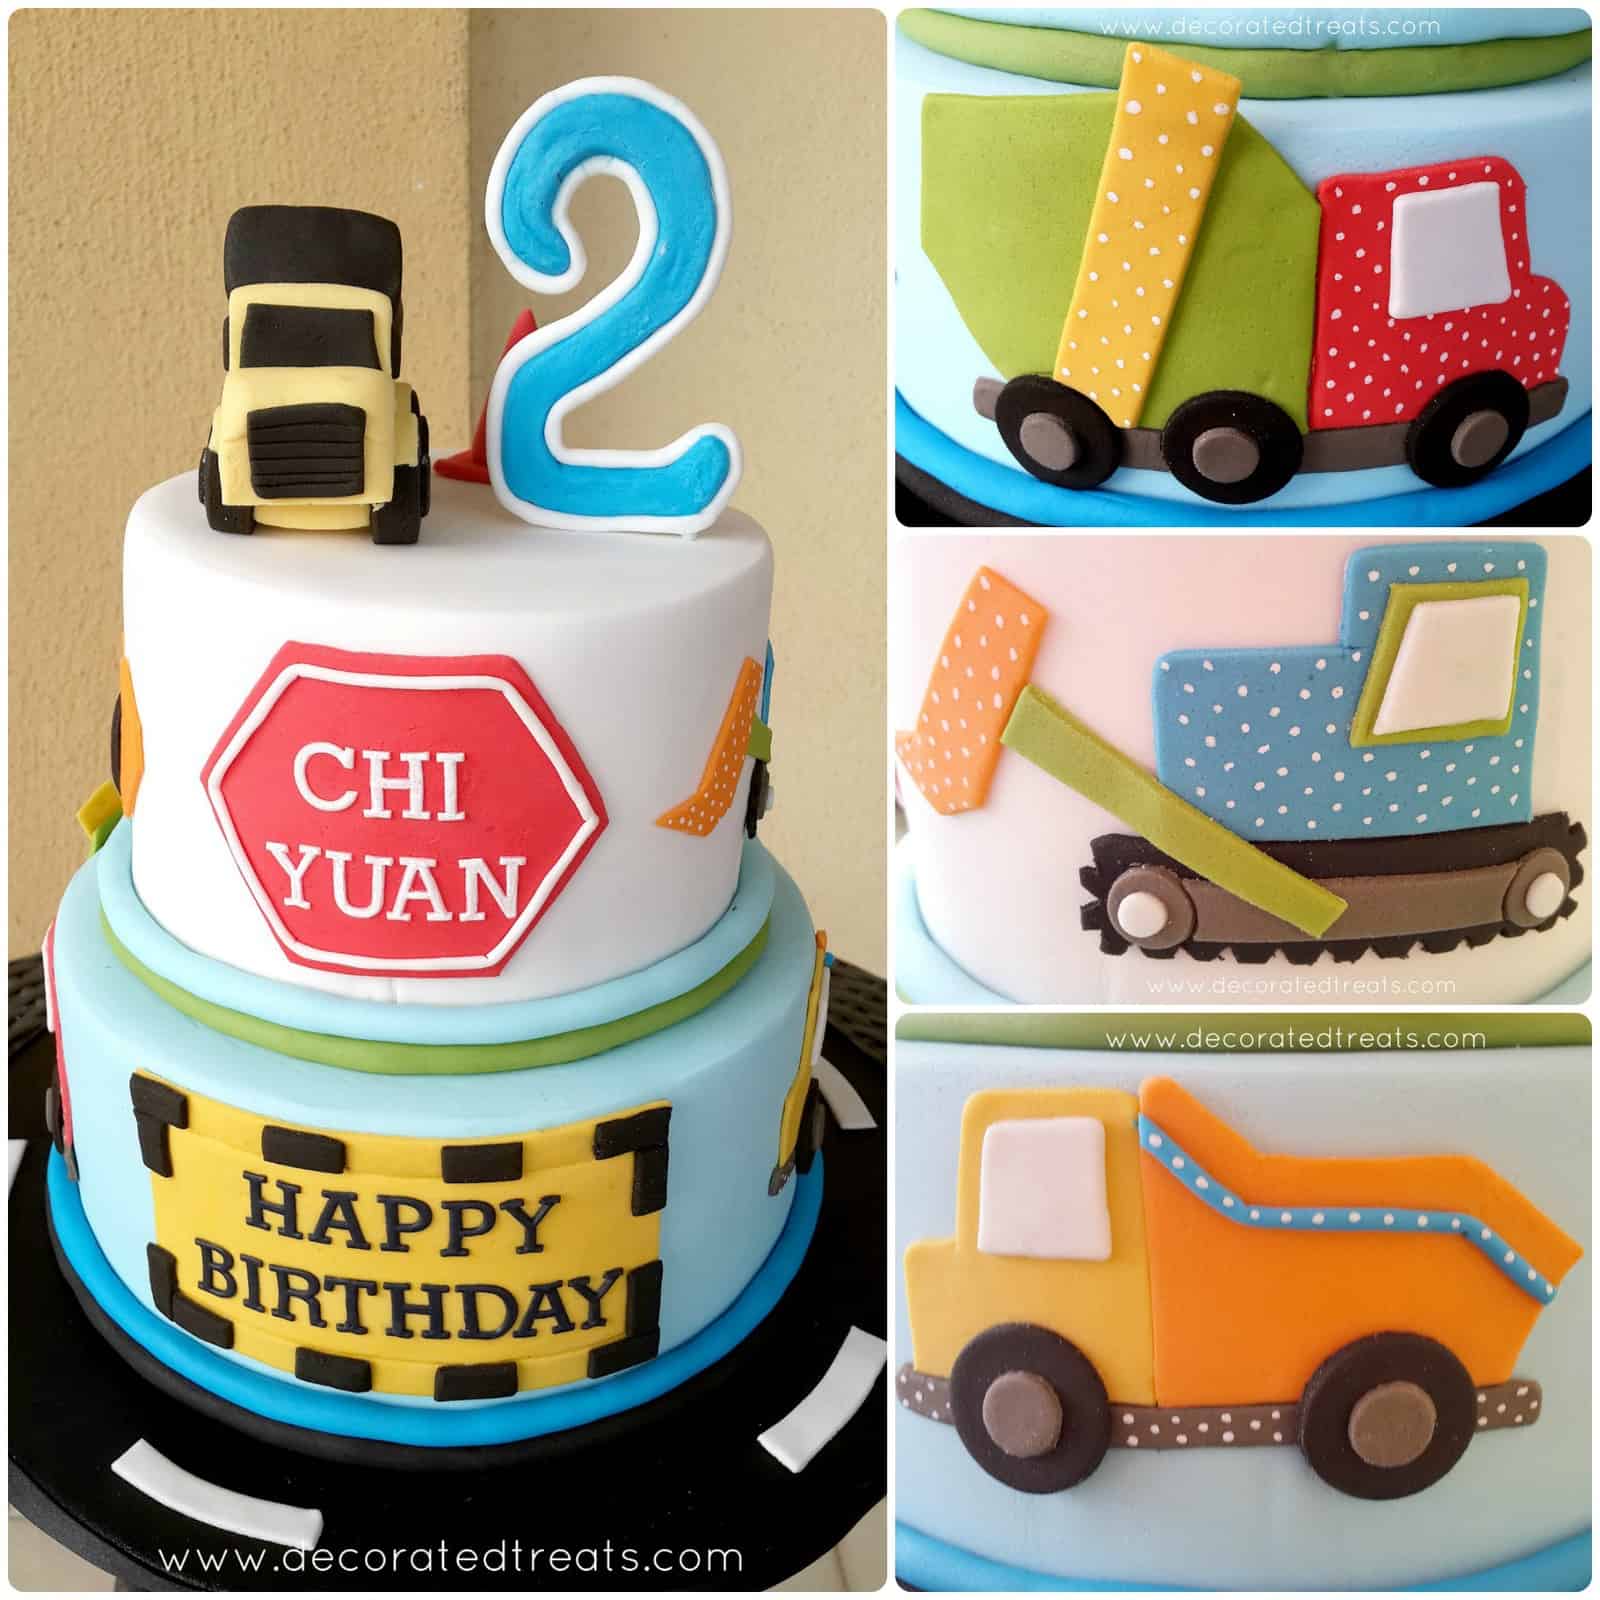
I made this truck cake for little boy who was turning 2. The theme for his birthday party was transportation hence the mother requested a cake that centered around that theme.
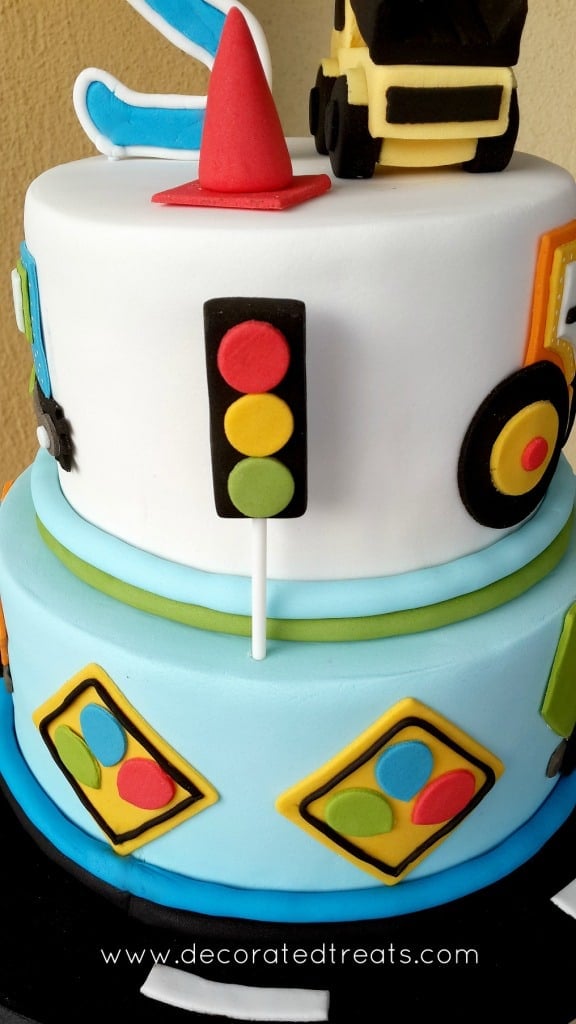
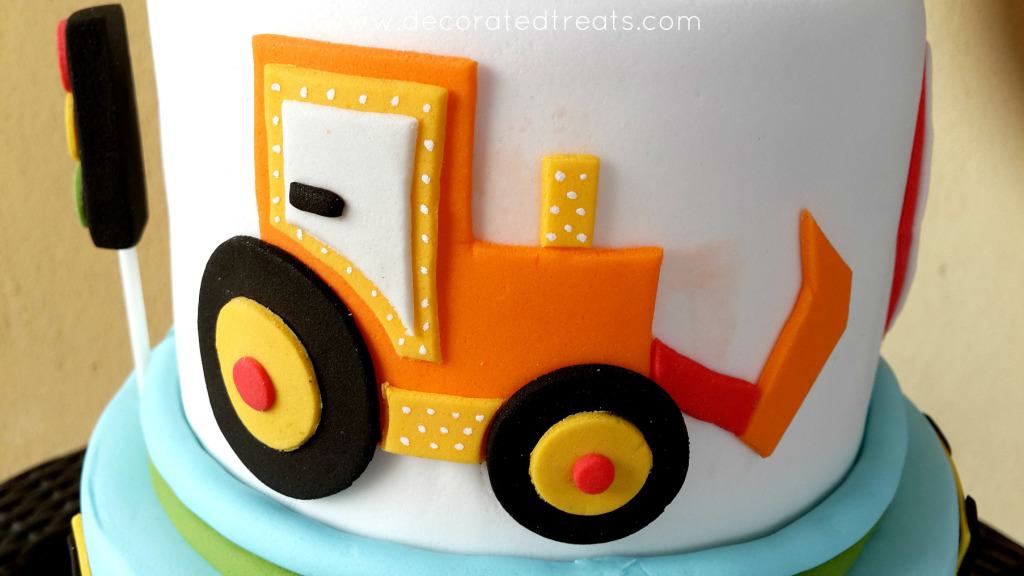
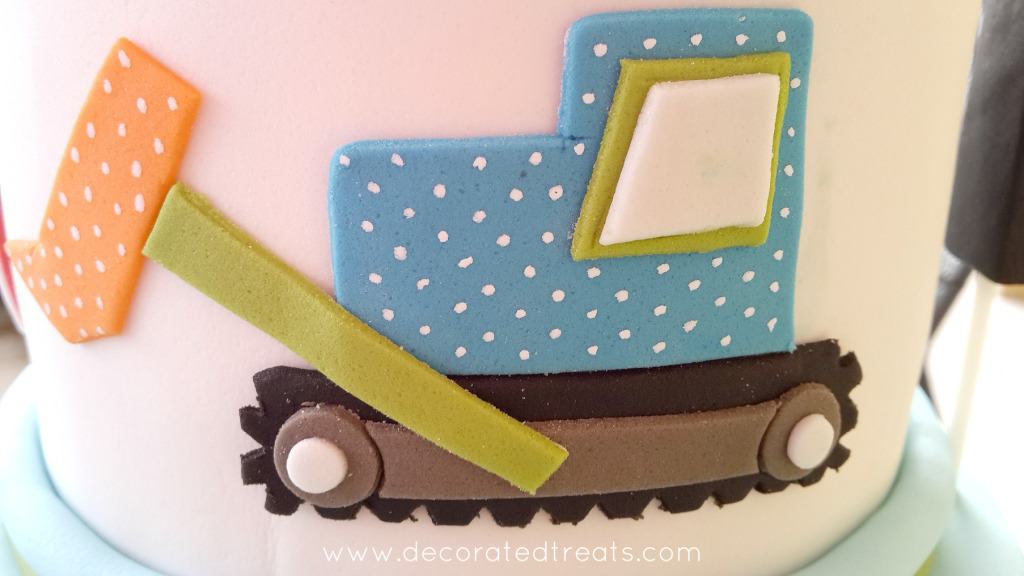
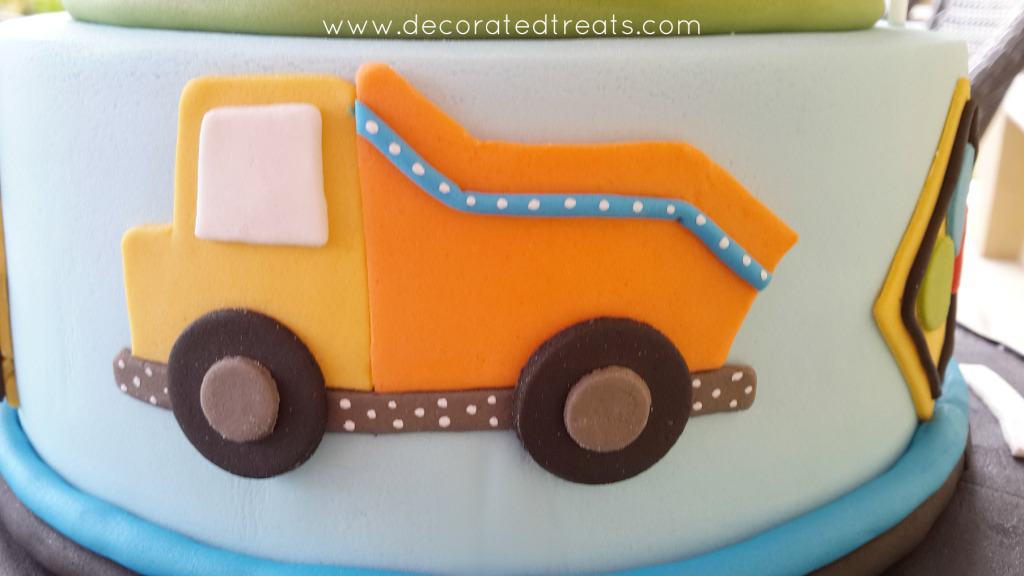
I made one 3D truck for the cake which I used as the cake topper. The rest were 2D road heavy vehicles on the sides of the cake which I cut out using paper templates. And I also added a 3D red cone and traffic lights on the cake.
If you like this cake, you should also check out this dump truck cake, airplane cake, 3D car cake and 3D Lightning McQueen cake. They are make great transportation themed cakes.
🧾Supplies Required
- Cake - this was a 2 tier cake, measuring 6 inches and 9 inches in diameter. I used my butter pound cake recipe for the top tier and chocolate cake recipe for the bottom tier.
- Buttercream - this was used to fill and crumb coat the cake.
- Fondant - I used Satin Ice to cover the entire cake as well as for all the deco on the cake. You can also make your own fondant with this homemade fondant recipe or marshmallow fondant recipe.
- Gum paste - The “HAPPY BIRTHDAY’ wordings and the birthday boy’s name are cut out of gum paste.
- Extruder tool – I used this for all extrude thin fondant strips for all the border work on the cake.
- Floral wire – I used wire to form the number “2” on the cake.
- Lollipop sticks – these were used to hold the wire for the number "2". I also used these sticks for the 3D traffic light pole.
- CMC – I added CMC to the fondant I used to make the 3D truck, the red cone, and the traffic lights.
- Fine tipped brush (food grade) – this brush was to create the tiny white polka dots on the 2d vehicles on the sides of the cake.
- Americolor white food coloring - I used this for the tiny polka dots on the vehicles.
- Round cutters – I used these mostly for the wheels on the vehicles. I used two types of cutters, one which is from my set of large circle cutters , and the others from my round plunger cutters.
- Templates for 2D vehicles – I got the templates from the internet. I then modified them to suit my cake.
- Sugarcraft knife – I used this knife quite a lot in this project, particularly when cutting out the 2d vehicles.
- FMM alphabet cutters- These were for the "HAPPY BIRTHDAY" message and the birthday boy's name.
- Fondant glue and shortening.
👩🍳How to Make
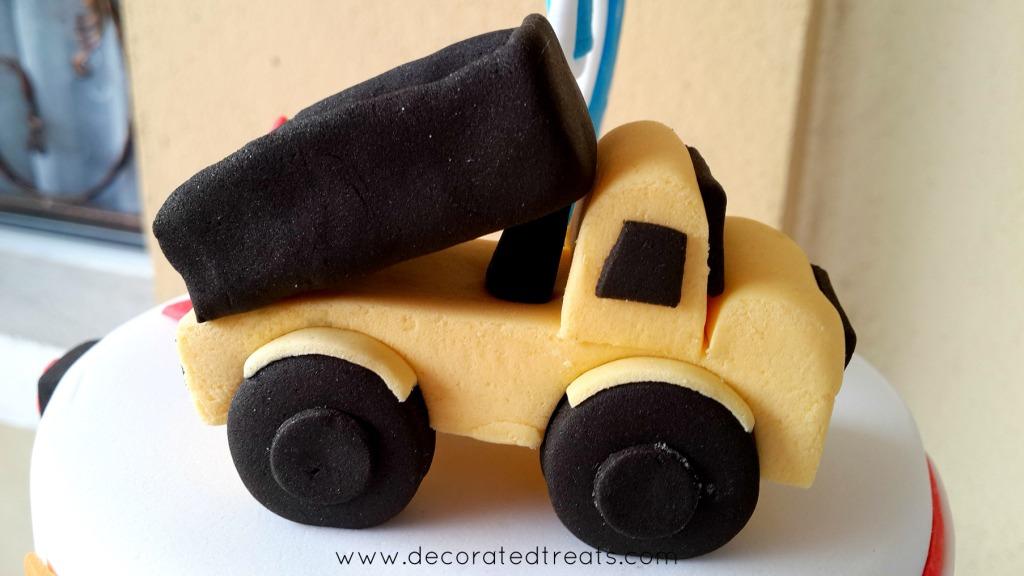
Step 1: Make the 3D Truck Topper
To make the truck, start with a thick rectangle base. Knead some CMC to yellow fondant. Roll and cut out the thick rectangle base. To that, add the front part of the truck. Form the wheels separately and let them rest overnight so that they harden.
Similarly, make the black container at the back of the lorry into a rectangle shape. Set is to dry and harden as well.
Once all these components are set, assemble the lorry. That way, the lorry could hold shape once it's fully assembled. Use fondant glue to attach all the parts together.
Note: The topper is best made a few days in advance to allow it time to set.
Step 2: Make the Number Topper
Draw a number ‘2’ template on a paper and shape the floral wire to follow the template. And then roll light blue fondant and cut out 2 pieces of number two with the guide of the paper template.
Once done, glue both the cutouts with the shaped wire in between them. And in shaping the floral wire, make sure the wire ends at the base on the number 2 so that I could use it to poke the topper into the cake.
Once the fondant has set, pipe out a thin roll of white strip with the extruder tool and attach it all around the sides of the number two with glue. And then leave it aside to set completely.
Note: You can also make this topper in advance.

Step 3: Make the Red Fondant Cone Topper and Traffic Lights
To make the red cone, roll and cut a square piece of red fondant. Form a cone shape with some more red fondant and attach to the square.
To make the traffic lights, roll and cut a thick black rectangle in fondant. Use the round plunger cutter to cut out 3 circles in green, red and orange fondant. Attach to the rectangle with fondant glue. Dip a lollipop stick in fondant glue and insert to the rectangle.
Note: Make sure the order of the traffic lights color is correct and that you insert the stick in the correct direction.
Step 4: Bake and Assemble the Truck Cake
Bake the cakes and let them cool completely.
Level the tops. Sandwich the cake layers with buttercream and cover each tier with a thin crumb coat.
Cover the top tier with white fondant and the bottom tier with blue fondant.
For the side cake decoration, use the sugar craft knife to cut out the parts of the vehicles separately from thinly rolled fondant and attach them to the cake with shortening. For the white polka dots, use the fine-tipped brush to dip into white food coloring (I used Americolor White) and mark the tiny white dots on the vehicles.

Cut the wordings on the cake with FMM alphabet cutters. Attach to the cake with shortening.
Step 5: Decorate the Cake Board
Cover the cake board with black fondant. Cut long white strips of fondant in equal lengths and attach on the cake board to resemble the road. To make the cake border, hand roll strips of black and blue fondant for the bottom tier and attach with fondant glue. For the top tier, use green and blue.
Step 6: Attach the Cake Toppers
The final step is to attach the truck (I used glue to hold it in place), the red cone, the traffic light, and the ‘2’. Before inserting the number topper into the cake, insert the wire into a lollipop stick first to avoid direct contact of the wire to cake.
❤️More Tutorials You Will Love


Do you like this tutorial? Please leave a 5-star ⭐⭐⭐⭐⭐rating in the recipe card below and consider a review further down this page. I would love to hear from you. Thank you!
📖Recipe
Truck Cake
Equipment
- Extruder tool
- Floral wire
- Lollipop sticks
- Fine tipped brush (food grade)
- Round cutters
- Templates for 2D vehicles
- Sugarcraft knife
- FMM alphabet cutters
For best results, use the metrics measurements. US customary measurements have not been tested and are only meant for guide.
Ingredients
6 inches round cakes
- 240 g butter
- 240 g granulated sugar
- 240 g self raising flour
- 4 eggs
- 60 ml milk
- ⅛ teaspoon salt
- ½ teaspoon baking powder
- ¾ teaspoon vanilla extract
9 inches round cake
- 600 g butter
- 600 g granulated sugar
- 550 g self raising flour
- 50 g cocoa powder
- 10 eggs
- 150 ml milk
- ⅓ teaspoon salt
- ¼ baking powder
- 1½ vanilla extract
Buttercream
- 800 g butter
- 400 g powdered sugar
- 2 tablespoon milk
- 1½ teaspoon vanilla extract
Decoration
- Fondant
- Gum paste
- CMC powder
- Fondant glue
- Shortening
- White food coloring (gel based)
Instructions
Make the 3D Truck Topper
- Knead some CMC powder into yellow fondant. Roll and cut out a thick rectangle. This will be the base for the truck.
- TTo that, add the front part of the truck. Form the wheels separately and let them rest overnight so that they harden.
- Similarly, make the black container at the back of the lorry into a rectangle shape. Set is to dry and harden as well.
- Once all these components are set, assemble the lorry. That way, the lorry could hold shape once it's fully assembled. Use fondant glue to attach all the parts together (see Note 1).
Make the Number Topper
- Draw a number ‘2’ template on a paper and shape the floral wire to follow the template. And then roll light blue fondant (CMC added) and cut out 2 pieces of number two with the guide of the paper template.
- Once done, glue both the cutouts with the shaped wire in between them. And in shaping the floral wire, make sure the wire ends at the base on the number 2 so that I could use it to poke the topper into the cake.
- Once the fondant has set, pipe out a thin roll of white strip with the extruder tool and attach it all around the sides of the number two with glue. And then leave it aside to set completely (see Note 2).
Make the Red Fondant Cone Topper and Traffic Lights
- To make the red cone, roll and cut a square piece of red fondant (also CMC added). Form a cone shape with some more red fondant and attach to the square.
- To make the traffic lights, roll and cut a thick black rectangle in fondant. Use the round plunger cutter to cut out 3 circles in green, red and orange fondant. Attach to the rectangle with fondant glue. Dip a lollipop stick in fondant glue and insert to the rectangle (see Note 3).
Bake the Butter Pound Cakes
- Preheat oven to 170°Celsius. Grease and flour two 6-inch round cake tins. Set aside.
- Cream butter and sugar until light and fluffy for approximately 2 minutes. Scrape the sides and bottom of the bowl half way through.
- Add the eggs, one at a time, beating well after each addition.
- In a separate bowl, sift the flour, baking powder and salt. Fold this flour mixture into the creamed wet ingredients alternately with milk. Start and end with the dry ingredients. You can do it in 3 batches for the dry ingredients and 2 batches for the milk.
- Finally, fold in the vanilla extract.
- Divide batter into the prepared cake tins and bake for 45 to 50 minutes, until a skewer or cake tester inserted in the center of the cakes come out without any wet batter.
- Remove cakes from oven and let them rest in the cake tins for a few minutes before loosening the sides with a jam knife and turning them over onto to wire racks. Turn the cakes over to face upwards and let them cool completely to room temperature before decorating.
Bake the Chocolate Cakes
- Preheat oven to 170°Celsius. Grease and flour two 9-inch round cake tins. Set aside.
- Cream butter and sugar until light and fluffy for approximately 2 minutes. Scrape the sides and bottom of the bowl half way through.
- Add the eggs, one at a time, beating well after each addition.
- In a separate bowl, sift the flour, cocoa powder, baking powder and salt. Fold this flour mixture into the creamed wet ingredients alternately with milk. Start and end with the dry ingredients. You can do it in 3 batches for the dry ingredients and 2 batches for the milk.
- Finally, fold in the vanilla extract.
- Divide batter into the prepared cake tins and bake for 45 to 50 minutes, until a skewer or cake tester inserted in the center of the cakes come out without any wet batter.
- Remove cakes from oven and let them rest in the cake tins for a few minutes before loosening the sides with a jam knife and turning them over onto to wire racks. Turn the cakes over to face upwards and let them cool completely to room temperature before decorating.
Assemble the Truck Cake
- Once the cakes have completely cooled down, level the tops. Sandwich the cake layers with buttercream and cover each tier with a thin crumb coat.
- Cover the top tier with white fondant and the bottom tier with blue fondant.
- For the side cake decoration, use the sugar craft knife to cut out the parts of the vehicles separately from thinly rolled fondant and attach them to the cake with shortening. For the white polka dots, use the fine-tipped brush to dip into white food coloring (I used Americolor White) and mark the tiny white dots on the vehicles.
- Cut the wordings on the cake with FMM alphabet cutters. Attach to the cake with shortening.
Decorate the Cake Board
- Cover the cake board with black fondant. Cut long white strips of fondant in equal lengths and attach on the cake board to resemble the road. To make the cake border, hand roll strips of black and blue fondant for the bottom tier and attach with fondant glue. For the top tier, use green and blue.
Attach the Cake Toppers
- The final step is to attach the truck (I used glue to hold it in place), the red cone, the traffic light, and the ‘2’. Before inserting the number topper into the cake, insert the wire into a lollipop stick first to avoid direct contact of the wire to cake.
Notes
- The truck topper is best made a few days in advance to allow it time to set.
- You can also make this number topper in advance.
- Make sure the order of the traffic lights color is correct and that you insert the stick in the correct direction.
Leave a Reply