

Here is a 60th birthday cake decorating guide. This 2 tier cake is decorated in fondant with fondant stars and handmade 60th cake topper in gorgeous silver, black and white theme colors.
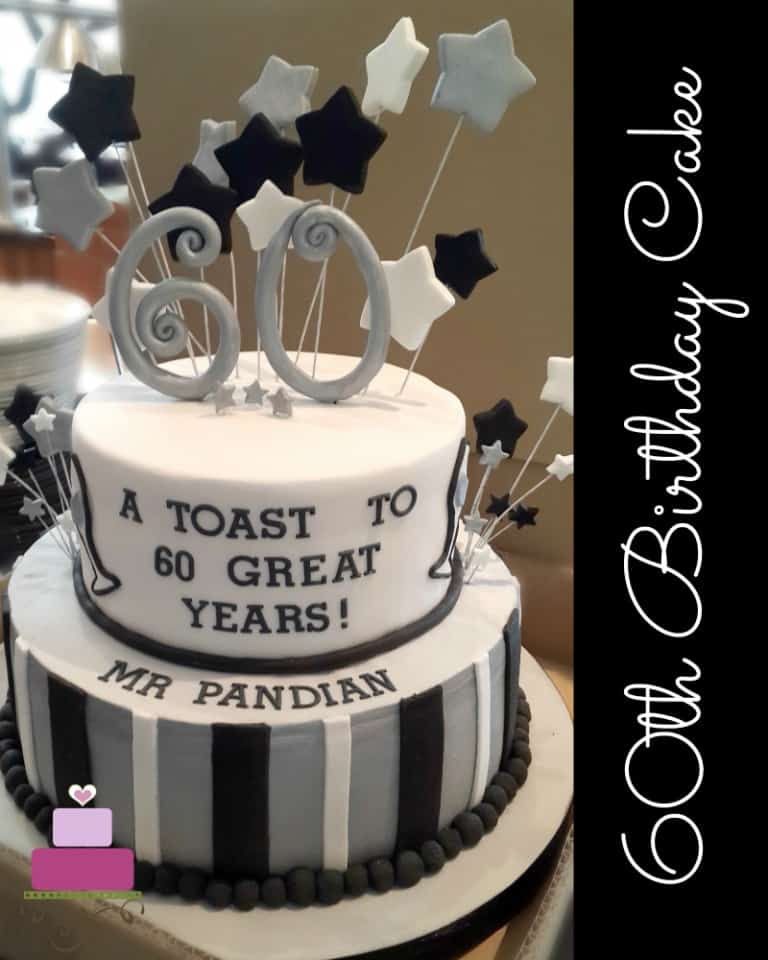
I decorated this birthday cake for a customer who was looking for a cake to celebrate her husband's 60th birthday. She had her own idea of how she wanted the cake to look like and presented me with a photo of the design. I did a search on this 60th birthday cake design on the internet. And found it to be originally designed by The Pink Cake Box.
For more cake ideas, check out this Louis Vuitton birthday cake with handbag toppers, a handbag shaped Louis Vuitton themed bag, guitar cake design, pink 21st birthday cake and laptop cake for 71st birthday.
🧾Supplies Required
- Cake - This was a 2 tier 60th birthday cake, the top tier was 6 inches round and the bottom tier was 9 inches round. Both were baked using my butter pound cake recipe.
- Buttercream - I used buttercream as the cake filling as well as the crumb coat.
- Fondant - The entire cake was covered in fondant. I used Satin Ice in white and black .
- CMC powder - I added this to fondant when making the 3D decorations ie. the stars and the number toppers.
- Shortening & fondant glue - these were the glues I used in this project.
- Floral wire - I used gauge 20 white wire.
- Star cutters - These cutters come in a set of 5. I used them for all the stars on the cake.
- Star plunger cutters - I used the largest cutter in this set to cut out the 3 smallest stars that were placed in front of the number toppers on the cake as well as the sides of the cake.
- FMM Block Letters cutter - This was for all the wordings on the cake.
- Wilton silver color mist.
- Extruder tool - this was used to pipe out the black strips to frame the champagne glass decoration as well as for the border of the first tier.
- Pizza cutting wheel - I used this to cut out the strips for the second tier of the 60th birthday cake. Other than that, I also used the cutting wheel as a general cutting tool throughout the project.
- Lollipop sticks - I used these on all wires that were poked into the cake to make sure there was no direct contact between the wires and the cake.
- Champagne glass template - This was a hand-drawn template on a piece of paper. I cut out and used as a template when cutting out the fondant champagne glasses for the cake decoration.
- Sugar craft knife
👩🍳How to Make
Step 1: Make the Star Toppers
I started by preparing the star and number toppers ahead of time. For the star toppers, I used white and black fondant that has been added CMC powder.
I made the stars in a few different sizes and made the whites more than the blacks. I then spray painted some of the whites into silver and so had a balanced combination of all three colors.
And I attached wires to all the stars and let them firm up in a horizontal lying down position until they were ready to go onto the cake. For the silver ones, I poked wires into half of the white stars, then removed the wires before spraying on them. Once the paint was set, I inserted the wires back into them. To make sure the stars were secured to the wires, I dipped the ends of the wire into the glue before inserting them into the stars.
Step 2: The Number Topper Template
As for the number toppers, I printed out a number template (in Microsoft Word application) in the exact size I wanted the number toppers to be on the cake (see my tutorial here on how to size templates to the exact size you want). And I used the templates as a guide when shaping the number toppers.
Step 3: Make the '60' Numbers
To make the numbers, I used white fondant, added some CMC powder to it, and hand-rolled it to form the numbers 60, with my template as a guide. I secured the ends with the glue (for the number '0') and then inserted 2 floral wires to the base of each number, one on each side.
2 wires because the base of these numbers was rounded and so I had to shape the tips of my wire to be curved (for about 1 and a half inches long), brushed them lightly with glue and carefully inserted them into the numbers' base, one curve on either side of the numbers. I had to adjust the numbers again after inserting the wires so that they were all well rounded and smooth.
I placed the numbers 60 in a horizontal position on a cake board and left them to set and harden completely ( I left them overnight). Once they were firmed up, I sprayed them in silver.
Step 4: Prepare the Cake
Next was the cake itself. Once baked and completely cooled down, I leveled the layers, sandwiched and crumb coated them with buttercream and covered both in white fondant.
For the bottom tier, once covered in white fondant, I turned it upside down on a cake board and spray painted it in silver. And then I turned it over again and left it aside until the paint dried.
Step 5: Make the Champagne Glass Decoration
While waiting, I prepared the champagne glass decoration. I used my paper template (which I drew by hand) as a guide to cut out the champagne glass cutouts. A made a few of these cutouts.
Once done, I attached them to the top tier with shortening. And then, for the champagne in the glasses, I used grey fondant (also from a hand-drawn paper template). And I attached these to the glasses with shortening.
Step 6: Add the Black and White Stripes
Next, I stacked the cakes using bubble tea straws for support. And then I added the black and white strips on the bottom tier. To make sure the strips were uniformly placed all around the tier, I used my old Wilton rolling mat (which had circle patterns drawn on them and guiding lines running from the center of the mat to the edges, something like a pie chart that has been marked at various intervals, largest being ¼ portions all the way to 1/12 portions).
I used the guiding lines to help make sure the stripes were placed at consistent intervals. And then, I cut off the excess, both on the top as well at the bottom. For the bottom tier border, I shaped round balls in black and added them to the base of the cake, followed by a plain thin black strip as the border for the top tier. All these were attached to the cake with shortening.
Step 7: Add the Cake Wordings
Next was the wordings on the 60th birthday cake. I used FMM alphabet cutter in block letters. I added some CMC to the black fondant so that it was more pliable and could be rolled thin. And then, I cut out all the letters I needed (click here to learn how to use the alphabet cutter correctly).
Once the sides were done, I attached the letters on the cake. And finally, I inserted the number toppers and the stars. To make sure there was no direct contact of the wires with the cake, I inserted all the wires into lollipop sticks before poking them into the cake.
And with that, the black and silver 60th birthday cake was complete.
Transporting the Cake
I removed the stars and the number toppers when transporting the cake and only put them on once I reached the event venue. It was so much less stressful that way and safer too! For more tips on transporting cakes, read my tutorial on how to transport cakes.
Happy Decorating 🙂


Leave a Reply