

Learn how to make a Louis Vuitton birthday cake with this easy decorating guide. Topped with cute, handmade fondant 3D handbag cake toppers, this designer themed cake is perfect for LV fans.
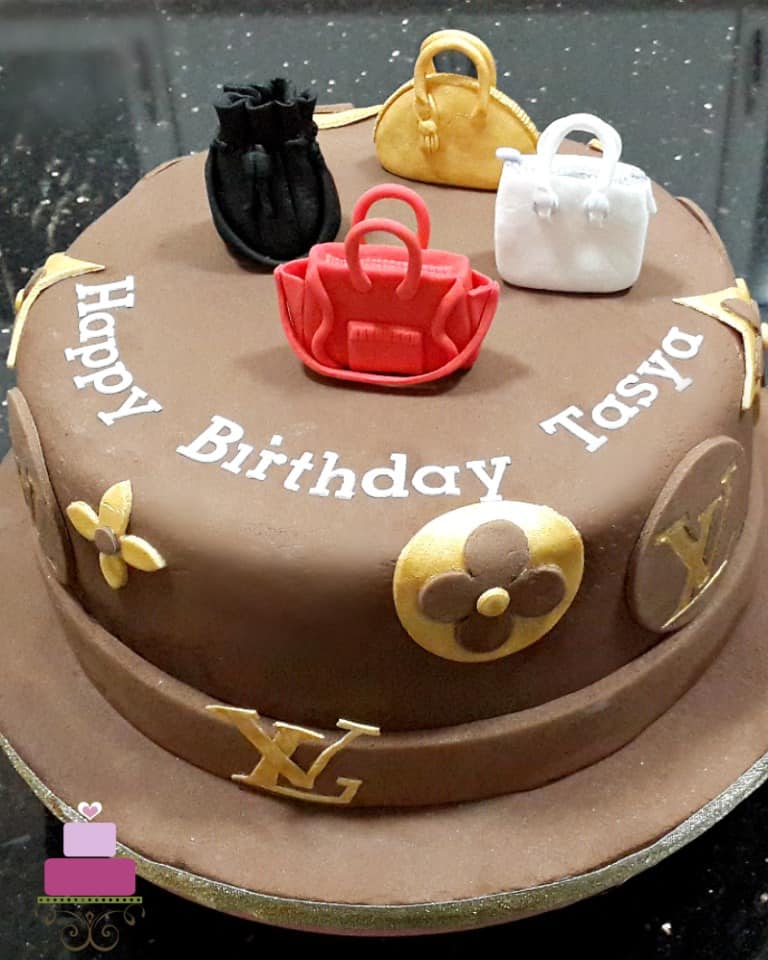
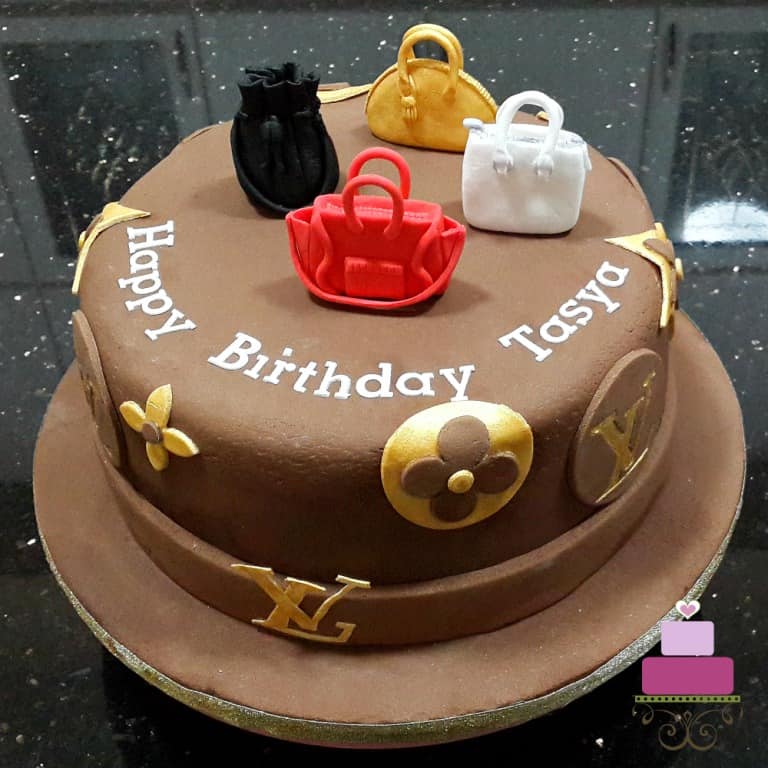
This was a single-tier cake measuring about 8 inches in diameter. I covered the entire cake in brown and used Louis Vuitton monogram and pattern all over the cake. Since I did not have any special Louis Vuitton design molds, all the patterns on the cake were made using my round, 5 petal flower, and daisy flower cutters. And I used gold paint to add gold color to them.
If you like this cake, you should also check out Louis Vuitton designer handbag cake. It is a 3D shaped cake in the shape of a handbag.
And for more cake decorating ideas, check out how to make this elegant birthday cake with molded fondant roses, unicorn cake, rosette cake, pig birthday cake, black and silver 60th birthday cake and 70th birthday cake with flowers.
🧾Supplies Required
- Cake - this was a single tier, 8 inches round cake baked using my chocolate cake recipe.
- Buttercream - this was used to fill the cake layers and crumb coat the cake.
- Fondant - I used my own homemade recipe for this project. You can also use marshmallow fondant.
- Sugar craft knife & pizza cutting wheel - these were used as general cutting tools throughout the project.
- Edible gold paint - to paint the logos as well as one of the handbags.
- Round cutter set - for the logos.
- Daisy petal cutter - also to make the logos.
- 5 petals flower cutter - to cut the LV logo.
- FMM block letters cutter set - for the lettering on the cake.
- Fondant shaping tools - to shape the handbags
- Louis Vuitton monogram template - I made this on my own, using cardboard. I downloaded the monogram from the Internet and cut it out in hard cardboard. I used it as a guide to creating the LV monograms on the cake.
- Fondant glue
👩🍳How to Make
Step 1: Make the Handbag Toppers
I started by making the toppers in advance. That way, I had more time to focus on decorating the cake closer to the delivery date.
The Black Handbag Topper
This was formed by hand in 2 sections. The top section is the frilly part of the bag and is only about half the height of the bottom section which is the rest of the bag. To make the bottom section, I took a small lump of black fondant and shaped it to resemble the image below with the help of my shaping tools.
For the frilly top section, I rolled some black fondant thin, cut out a small strip, and formed a frilled circle, with the diameter matching that of the top of the bottom section of the bag. And then I attached both sections together with glue. To hide the joints between the 2 sections, I hand-rolled a thin strip and attached it all around the bag where there 2 sections were glued together.
And then I attached another 2 similar sized strips vertically at the front of the bag and wrapped a small piece of black square around the top of the 2 strips. Not only did the strip hide the joints, it really resembled a handbag string.

The Gold Handbag Topper
I made this in a half-circle shape in white. And then I attached a zipper which was basically a long thin strip of white fondant that has been marked as a zipper. I attached the zipper to the bag and made 2 handles for the bag.
Next, I added a small tassel to one of the handles. To make the tassel, I rolled a short medium-sized sausage in white and used my sugar craft knife to randomly slit one end of the sausage. And then I wrapped the un-slit side of the sausage with a small piece of white fondant and added a loop to it.
Before securing both ends of the loop to the tassel, I placed it on one of the handbag handles. And then I painted the entire bag is gold. You cannot see the tassel in the image below, as it was on the other side of the bag. But you would be able to see a blurry image of it in the image of the red handbag further below on this page.

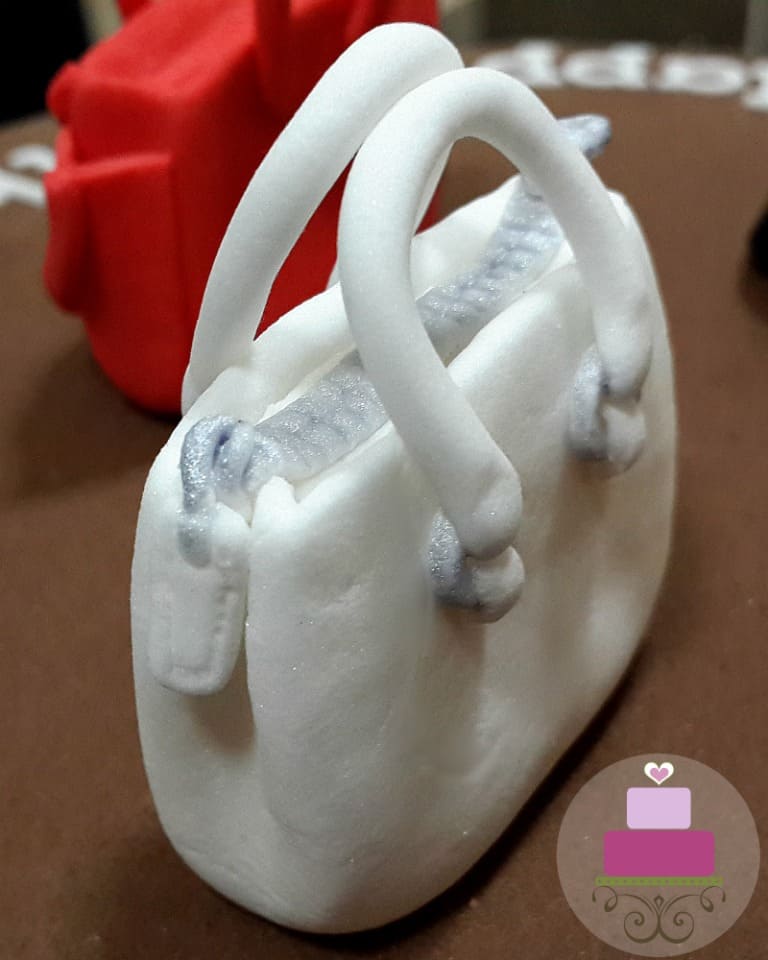
The White Handbag Topper
I made this handbag in white and silver colors. The entire bag was in white with the silver added to the 'hardware' on the bag such as the zipper and the handle loops. To make this bag, I started with the body. I shaped this by hand with the help of my fondant shaping tools.
And then I added the zipper which was a long thin white strip that has been marked to look like a zipper and painted it silver.
Next, I added a small rectangle tag at the end of the zipper before making and attaching the handles. To attach the handles, I formed the loops first using my round piping tips. I attached all 4 loops and painted them silver.
And then I rolled some fondant for the handles and attached the ends of the handles to the top section of the loops. For the bottom section. I rolled a long thin strip of fondant, sliced it out into short pieces, and flattened them slightly. And then I placed them over the bottom of the loops.
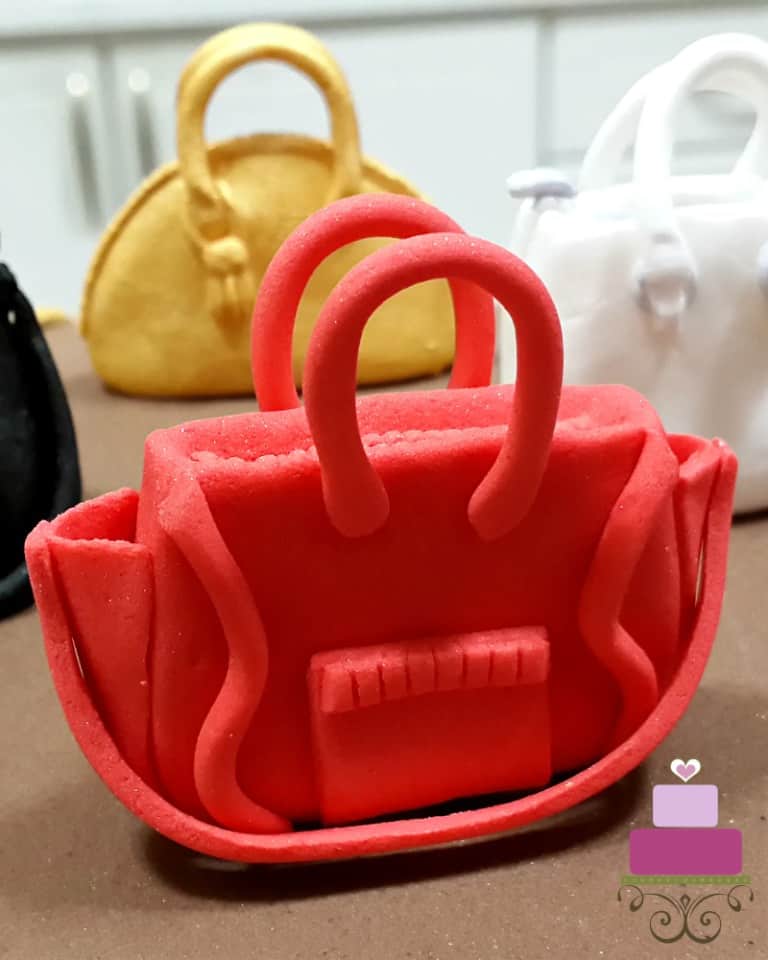
The Red Handbag Topper
This handbag was formed almost similar to the white one. The only difference is that there is no contrast colored hardware on the bag. I started with a rectangle cube of fondant and then used my fondant shaping tools to form a long dent for the zipper on the bag. And then I added a red zipper.
Next, I rolled some red fondant, cut out tiny rectangle pieces (2 pieces to be exact), and added them to the sides of the bag to form tiny pockets. After that, I formed 2 strips and added to the front of the bag, in an almost zig-zag pattern. And then I added a tiny square pocket in between the 2 strips. And finally, I added the handles, 2 on the top, and one long one on the side.
With that, all my toppers were ready. I left them aside in a cool, dry place to allow them to set.
Step 2: Bake and Assemble the Cake
Next was the cake itself. Once baked and completely cooled down, I crumb coated it with buttercream and covered the cake with brown fondant. And then I added the wide brown ribbon border to the cake.
Next, I added the LV design on the sides. I started with the bulging ones first. I used my daisy cutter, 5 petals flower cutter, and my round cutter to make the patterns, one by one. For the flowers, I had to carefully slice out additional petals and rearrange them to make the 4 petal flowers.
Once that was done, I painted some sections in gold as can be seen on the cake image. I attached these to the cake with glue.
Step 3: Add the Louis Vuitton Monogram
Next was the Louis Vuitton monogram. I cut out an LV monogram template (which I downloaded from the internet) using hard cardboard and used it to imprint the monogram on the fondant pieces. And then I painted the imprinted monogram patterns in gold.
I also made one LV monogram in 3D. To do this, I used gum paste that has been rolled thin and using my monogram template, cut the monogram out. I let it set completely in a horizontal position until it has firmed up. And then I attached it to the front of the cake with glue.
The final step was adding the birthday message. These letters were made in white gum paste using FCC Block Letter cutter. To finish off the deco, I attached all the 4 toppers above onto the cake. I used toothpicks to hold them in place.
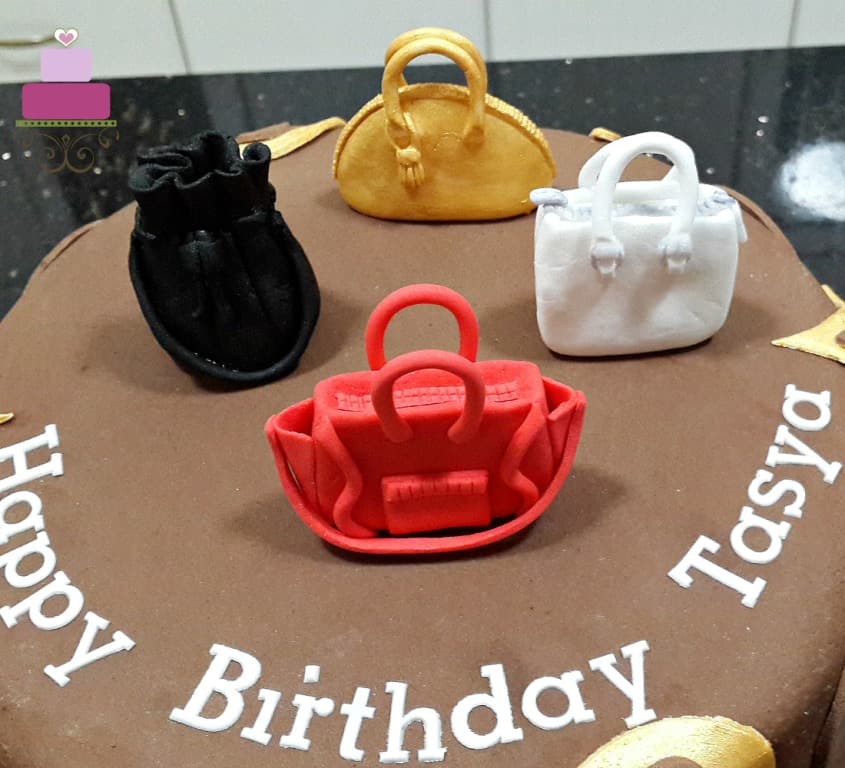
And with that, my Louis Vuitton cake was complete.


Leave a Reply