

This gorgeous happy birthday cupcakes in floral theme make the most perfect cupcakes for the women in your life. They are completely homemade, quick and easy, and will definitely make a happy birthday celebration!
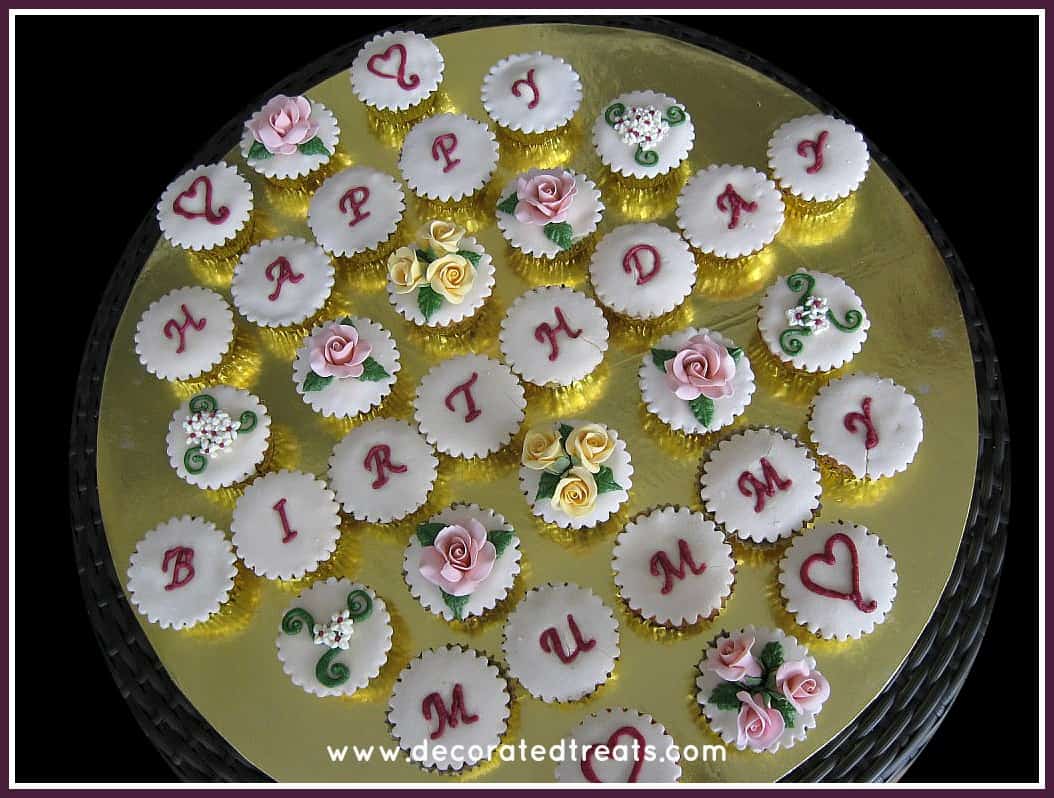
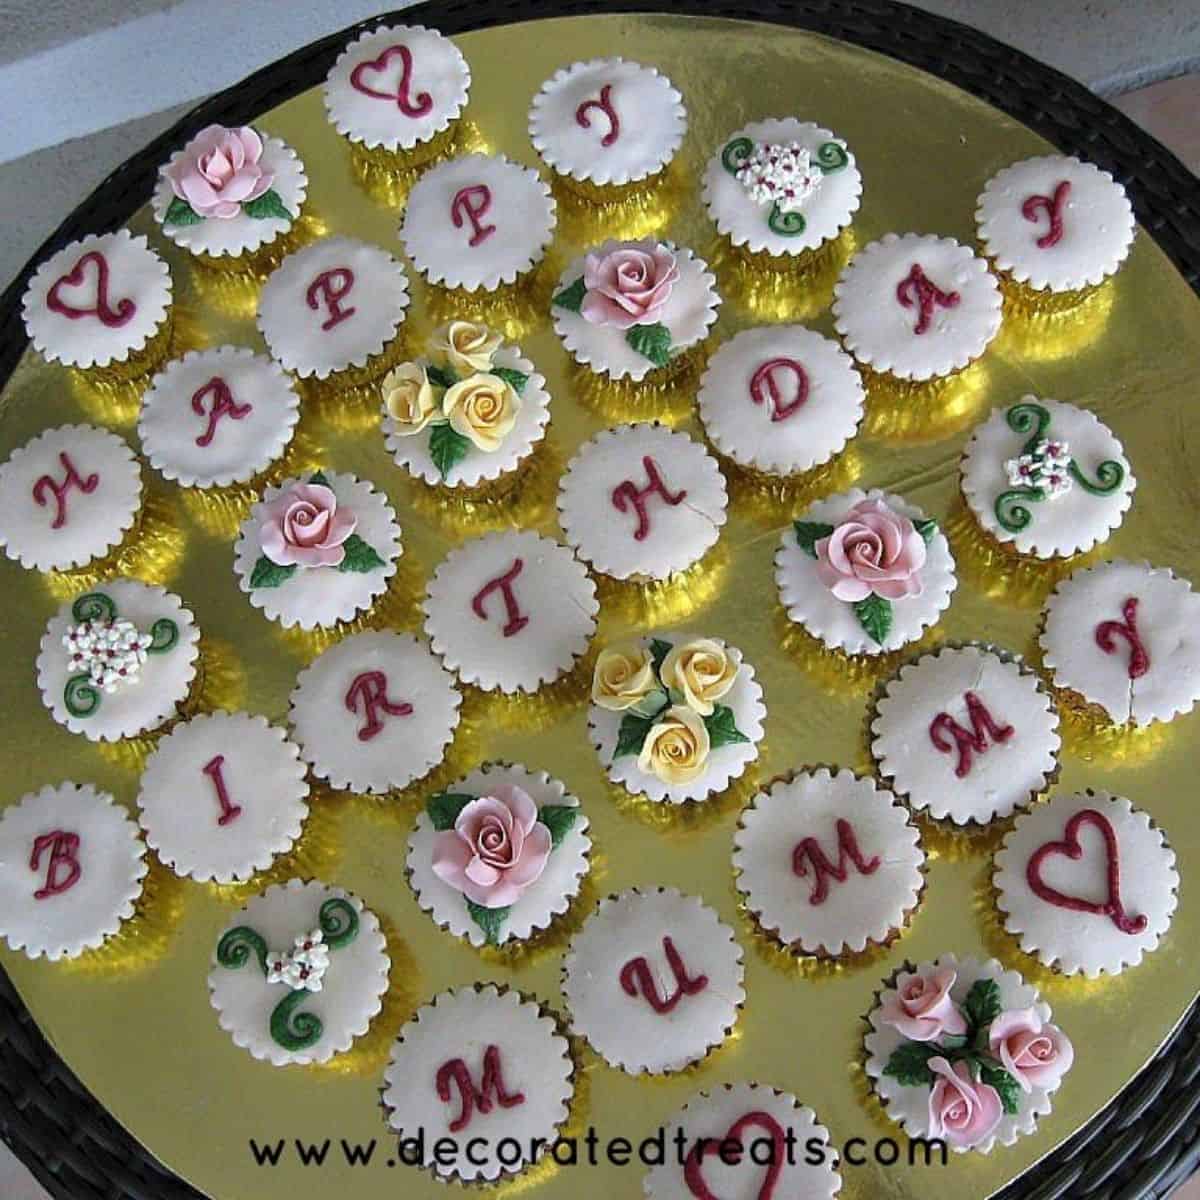
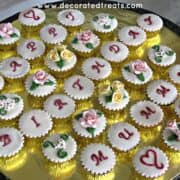
I created this happy birthday cupcakes design for my mom’s birthday. The focus of the birthday cupcakes decoration was on the 'happy birthday' letters, so I made sure I had enough cupcakes to cater for each letter in the phrase 'Happy Birthday Mummy' and the rest were for the decoration.
I choose an overall floral theme for these birthday cupcakes with main emphasis on small sugar roses in pink and yellow. The rest were with hearts design as well as simple white filler flowers in buttercream.
Jump to:
❤️Why You Will Love These Cupcakes
- They are a great alternative to standard birthday cakes. They are much easier to serve.
- You can make these cupcake in a number of different flavors instead of just one.
- The floral design on the cupcakes is very pretty and everything is handmade.
If you like these floral themed treats, you will also like these buttercream flowers cake, elegant birthday cake with molded fondant roses, rosette cake, flower cake with edible butterflies, flower pot cake and 70th birthday cake with flowers.
🧾Supplies Required
- Cupcakes – You need a total of 34 cupcakes. 18 are for the phrase “Happy Birthday Mummy”. The rest are decorated to match the floral theme. I used my vanilla pound cake recipe for cupcakes with the phrase “Happy Birthday Mummy”, the rest were baked using my chocolate cupcake recipe.
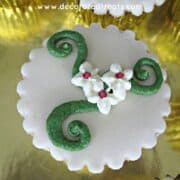
- Buttercream and fondant – Buttercream is to cover the cupcakes before attaching fondant. It is also used to pipe the letters, white flowers, green scrolls, the heart shapes, and leaves. Fondant is for the white background on the cupcakes.
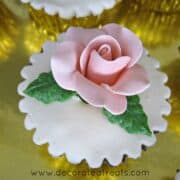
- Gum paste – To make the pink and yellow roses. These were not wired and are placed directly on the cupcakes.
- Piping tips #224, #3, #2, #352
- Disposable piping bags
- Alphabet press set
- Round scallop cutter
- Food coloring in white, burgundy and green.
👩🍳How to Make
Step 1: Make the Gum Paste Roses
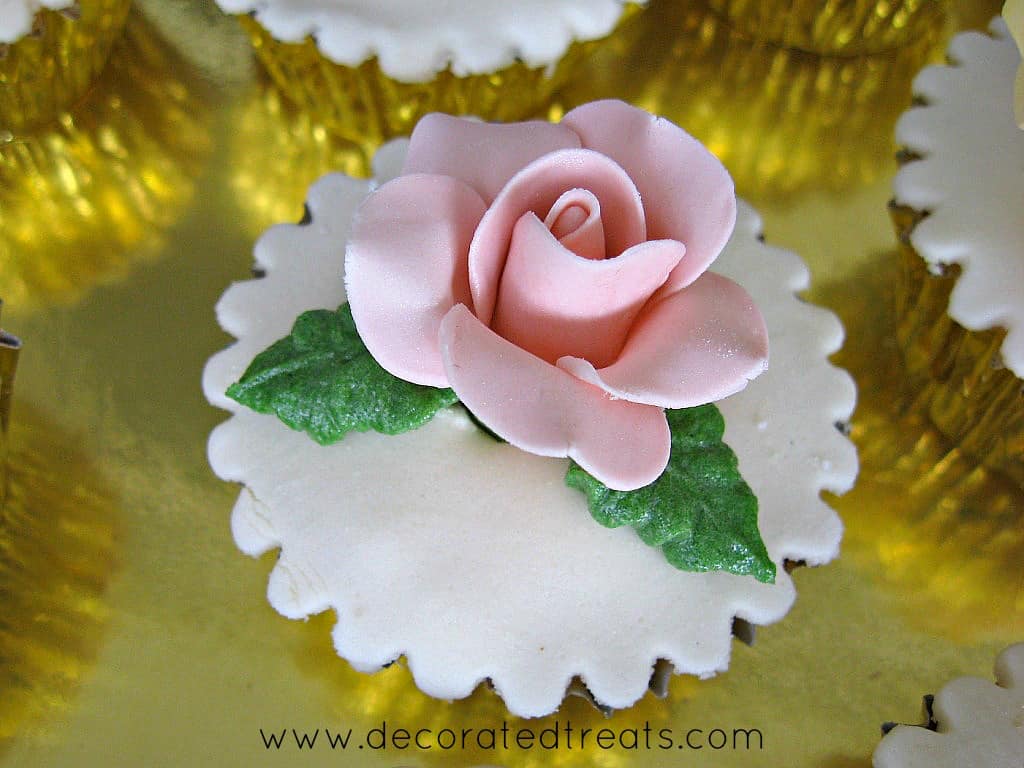
Eight cupcakes in this 'Happy Birthday Cupcakes' set were decorated with gum paste roses. 4 cupcakes had one full bloom pink rose each, while the remaining 4 were decorated with rose buds in pink and yellow. Each cupcake had 3 rose buds on them.
I have a full tutorial on how to make gum paste roses and you can read all about how to make the roses here. While the tutorial focuses on making large roses, you only need to make small one for these cupcakes and omit the wires.
Note: Make the gum paste roses in advance to allow sufficient time to set and dry.
Step 2: Bake the Cupcakes
You need a total of 34 cupcakes for this birthday cupcakes design.
I made 2 batches of cupcakes, one in vanilla flavor and the other in chocolate flavor. All the 'happy birthday mummy' letters were on vanilla cupcakes, while the rest of the rose cupcakes, buttercream flower cupcakes and the heart cupcakes were in chocolate flavor.
Step 3: Cover with Buttercream and Fondant
Once the cupcakes are baked and have completely cooled down, cover them with a thin layer of buttercream.
And then roll and cut out white fondant circles with a round scalloped cutter. Attach the cut outs to all the cupcakes except for 18 chocolate cupcakes that are used to for the Happy Birthday letters.
The buttercream layer on the cupcakes help to hold these fondant cutouts in place.
Step 4: Pipe the Letters on the Cupcakes
For the remaining unattached fondant cut outs, embossed the letters Happy Birthday on them, one letter on each cut out.
Place the cutouts on the buttercream covered chocolate cupcakes. Using some maroon buttercream, pipe the letters (with round tip #2) guided by the embossed letter marks.
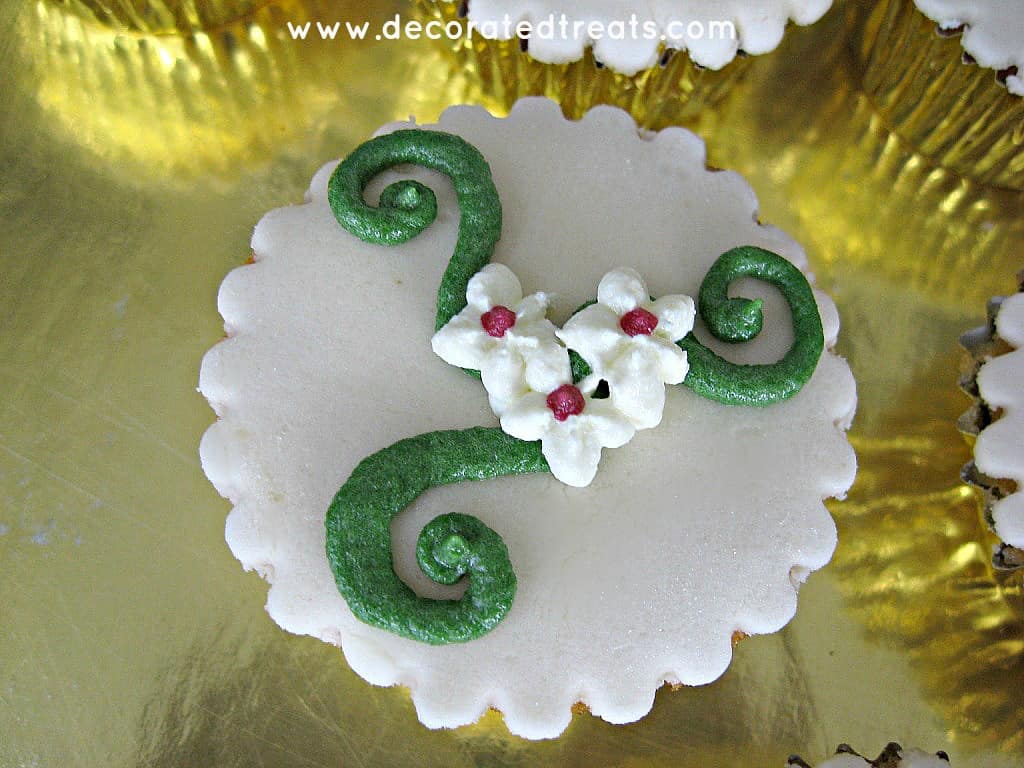
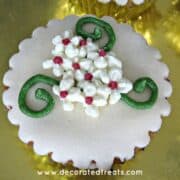
Step 5: Add the White Buttercream Flowers and Green Buttercream Scrolls
Pipe the buttercream flowers on 4 cupcakes, 2 with a cluster of 8 to 9 flowers and the other 2 with a cluster of 3 flowers. Use tip #224 for the flowers and tip #3 for the centers.
Add 3 green scrolls of each of the cupcakes in green buttercream. Use round tip #3.

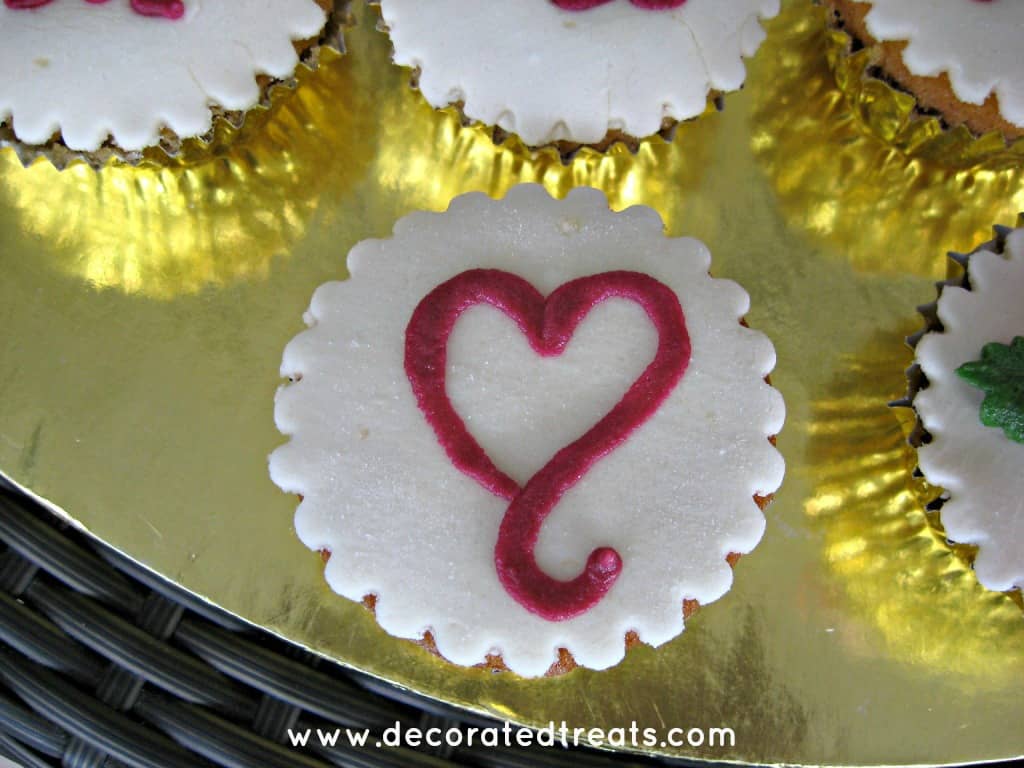
Step 5: Pipe the Hearts Design
These hearts are piped free hand. Use round tip #3 and pink buttercream.
Step 6: Assemble the Cupcakes
Once all the decoration is complete, arrange the birthday cupcakes on a large board in the order as shown below.
Note: Make sure your cake board is large enough and sturdy enough to hold all the cupcakes. You can make your own cake boards with this DIY cake boards tutorial. Alternatively, you can also arrange the cupcakes in a DIY cupcake holder or cupcake stand.
❤️More Tutorials You Will Love


Do you like this tutorial? Please leave a 5-star ⭐⭐⭐⭐⭐rating in the recipe card below and consider a review further down this page. I would love to hear from you. Thank you!
📖Recipe

Happy Birthday Cupcakes
Equipment
- Piping tips #224, #3, #2, #352
- Disposable piping bags
- Alphabet press set
- Round scallop cutter
- Food coloring in white, maroon and green.
For best results, use the metrics measurements. US customary measurements have not been tested and are only meant for guide.
Ingredients
Vanilla Cupcakes
- 120 g self-raising flour
- 120 g granulated sugar
- 120 g butter at room temperature
- 2 eggs at room temperature
- 30 ml milk
- ¼ teaspoon baking powder
- ⅛ teaspoon salt
- ⅓ teaspoon vanilla extract
Chocolate Cupcakes
- 120 g butter
- 75 g granulated sugar
- 25 g brown sugar
- 2 eggs
- 100 g self-raising flour
- 30 g cocoa powder
- ¼ teaspoon baking powder
- 4 tablespoon milk
- ¾ teaspoon vanilla extract
- ¼ teaspoon salt
- 5 tablespoon chocolate sprinkles
Buttercream Frosting
- 300 g powdered sugar sifted
- 150 g butter salted
- 1 tablespoon milk optional
- ½ teaspoon vanilla extract
Instructions
Bake the vanilla cupcakes
- Preheat oven to 170 °Celsius. Prepare the cupcake casings.
- Beat butter and sugar till soft and creamy for about 2 minutes. Add eggs, one at a time, beating well after each addition.
- In a separate bowl, sift flour, baking powder, and salt. Fold in the sifted ingredients into the creamed mixture alternately with milk, starting and ending with flour.
- Finally, add in vanilla extract and combine well. Pour batter into the prepared cup casings. Bake for 15 minutes until the top of the cupcakes spring back when pressed lightly. A toothpick inserted in the center of the cupcakes should come out without any wet batter sticking to it.
- Remove the cupcakes from oven and let them cool completely before icing and decorating.
Bake the chocolate cupcakes
- Preheat oven to 170°Celsius. Prepare the cupcake casings.
- Beat butter and both sugars till light and fluffy. Add eggs, one at a time, beating well after each addition.
- Sift the flour, cocoa powder, baking powder and salt. Fold in the sifted ingredients into the creamed mixture alternately with milk, starting and ending with flour.
- Add in the vanilla extract and mix well.
- Pour batter into the cupcake casings until they are about two thirds full. Sprinkle about ½ teaspoon for chocolate sprinkles on top of the cupcakes batter.
- Bake the chocolate cupcakes for 15 to 20 minutes (depending on the size of the casing you use) or until a toothpick inserted in the center of the cupcakes comes out without any wet batter sticking to it.
- Remove the cupcakes from oven and let them cool completely before decorating.
Make the buttercream
- To make the buttercream frosting, place butter in a large bowl. Beat until creamy.
- Add the sifted powdered sugar and continue to beat until the icing turns light and fluffy. Add the vanilla extract and beat again until the vanilla is well incorporated. If the icing is too stiff, add some milk and beat again.
Frost the cupcakes and cover with fondant
- Once the cupcakes are baked and have completely cooled down, cover them with a thin layer of buttercream. Set aside.
- Roll and cut out white fondant circles with a round scalloped cutter.
Pipe the letters
- For the first 18 fondant cut outs, emboss the letters H-A-P-P-Y-B-I-R-T-H-D-A-Y-M-U-M-M-Y onto them. And then attach them to the vanilla cupcakes. Using some maroon buttercream, pipe the letters (with round tip #2) guided by the embossed letter marks.
- Attach the remaining fondant cut outs (without any decoration or embossing) onto the chocolate cupcakes.
Attach the gum paste roses
- Follow the link in the Equipment list above for the tutorial on how to make gum paste roses. You will need 5 full bloom roses in pink, 3 buds in pink and 6 buds in yellow. Attach all the 5 full bloom pink roses onto one cupcake each (5 cupcakes). For the buds, attach 3 buds to one cupcake (3 cupcakes).
- Pipe some green leaves on the sides of the roses and buds.
Pipe the white buttercream flowers and green buttercream scrolls
- Decorate 4 cupcakes with clusters of white buttercream flowers using tip #224. Pipe maroon dots for the flower centers and complete the design with green scrolls on the sides with tip#3.
Make the buttercream hearts design
- With maroon buttercream and piping tip #3, pipe the buttercream hearts, free hand, on 4 cupcakes.
Assemble the cupcakes
- Once all the decoration is complete, arrange the birthday cupcakes on a large board.
Notes
- Make the gum paste roses in advance to allow sufficient time to set and dry.
- Make sure your cake board is large enough and sturdy enough to hold all the cupcakes. You can make your own cake boards with this DIY cake boards tutorial. Alternatively, you can also arrange the cupcakes in a DIY cupcake holder or cupcake stand.


Leave a Reply