

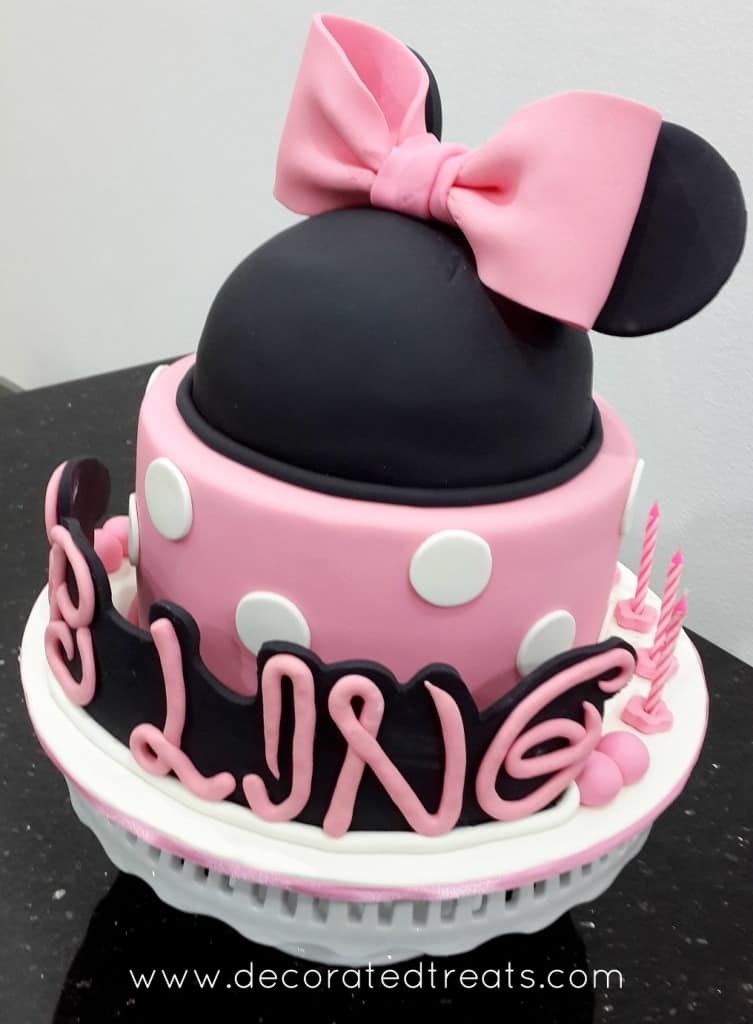
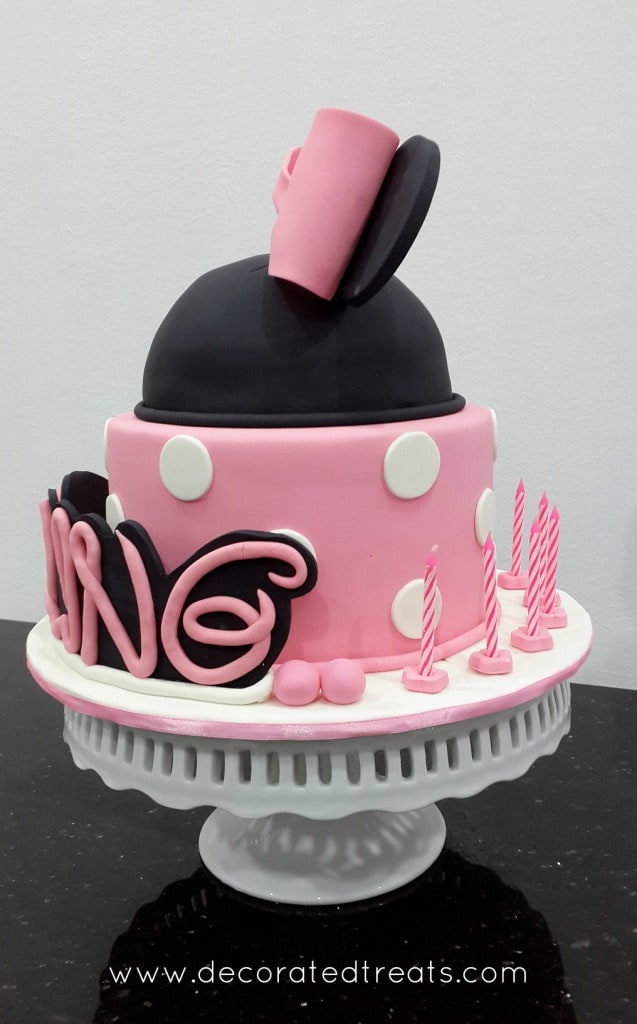
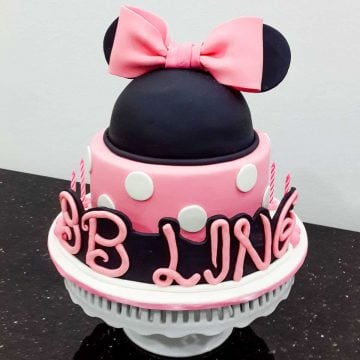
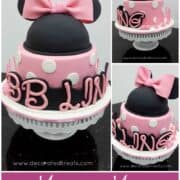
Here is a pretty Minnie Mouse cake design for Minnie Mouse fans. It is a 2 tier cake with a round cake for the bottom tier and a semi circle cake for the top tier. The cake is covered in fondant with pretty white polka dots, Minnie's ears and a large pink bow. It makes a truly sweet cake for Minnie fans!
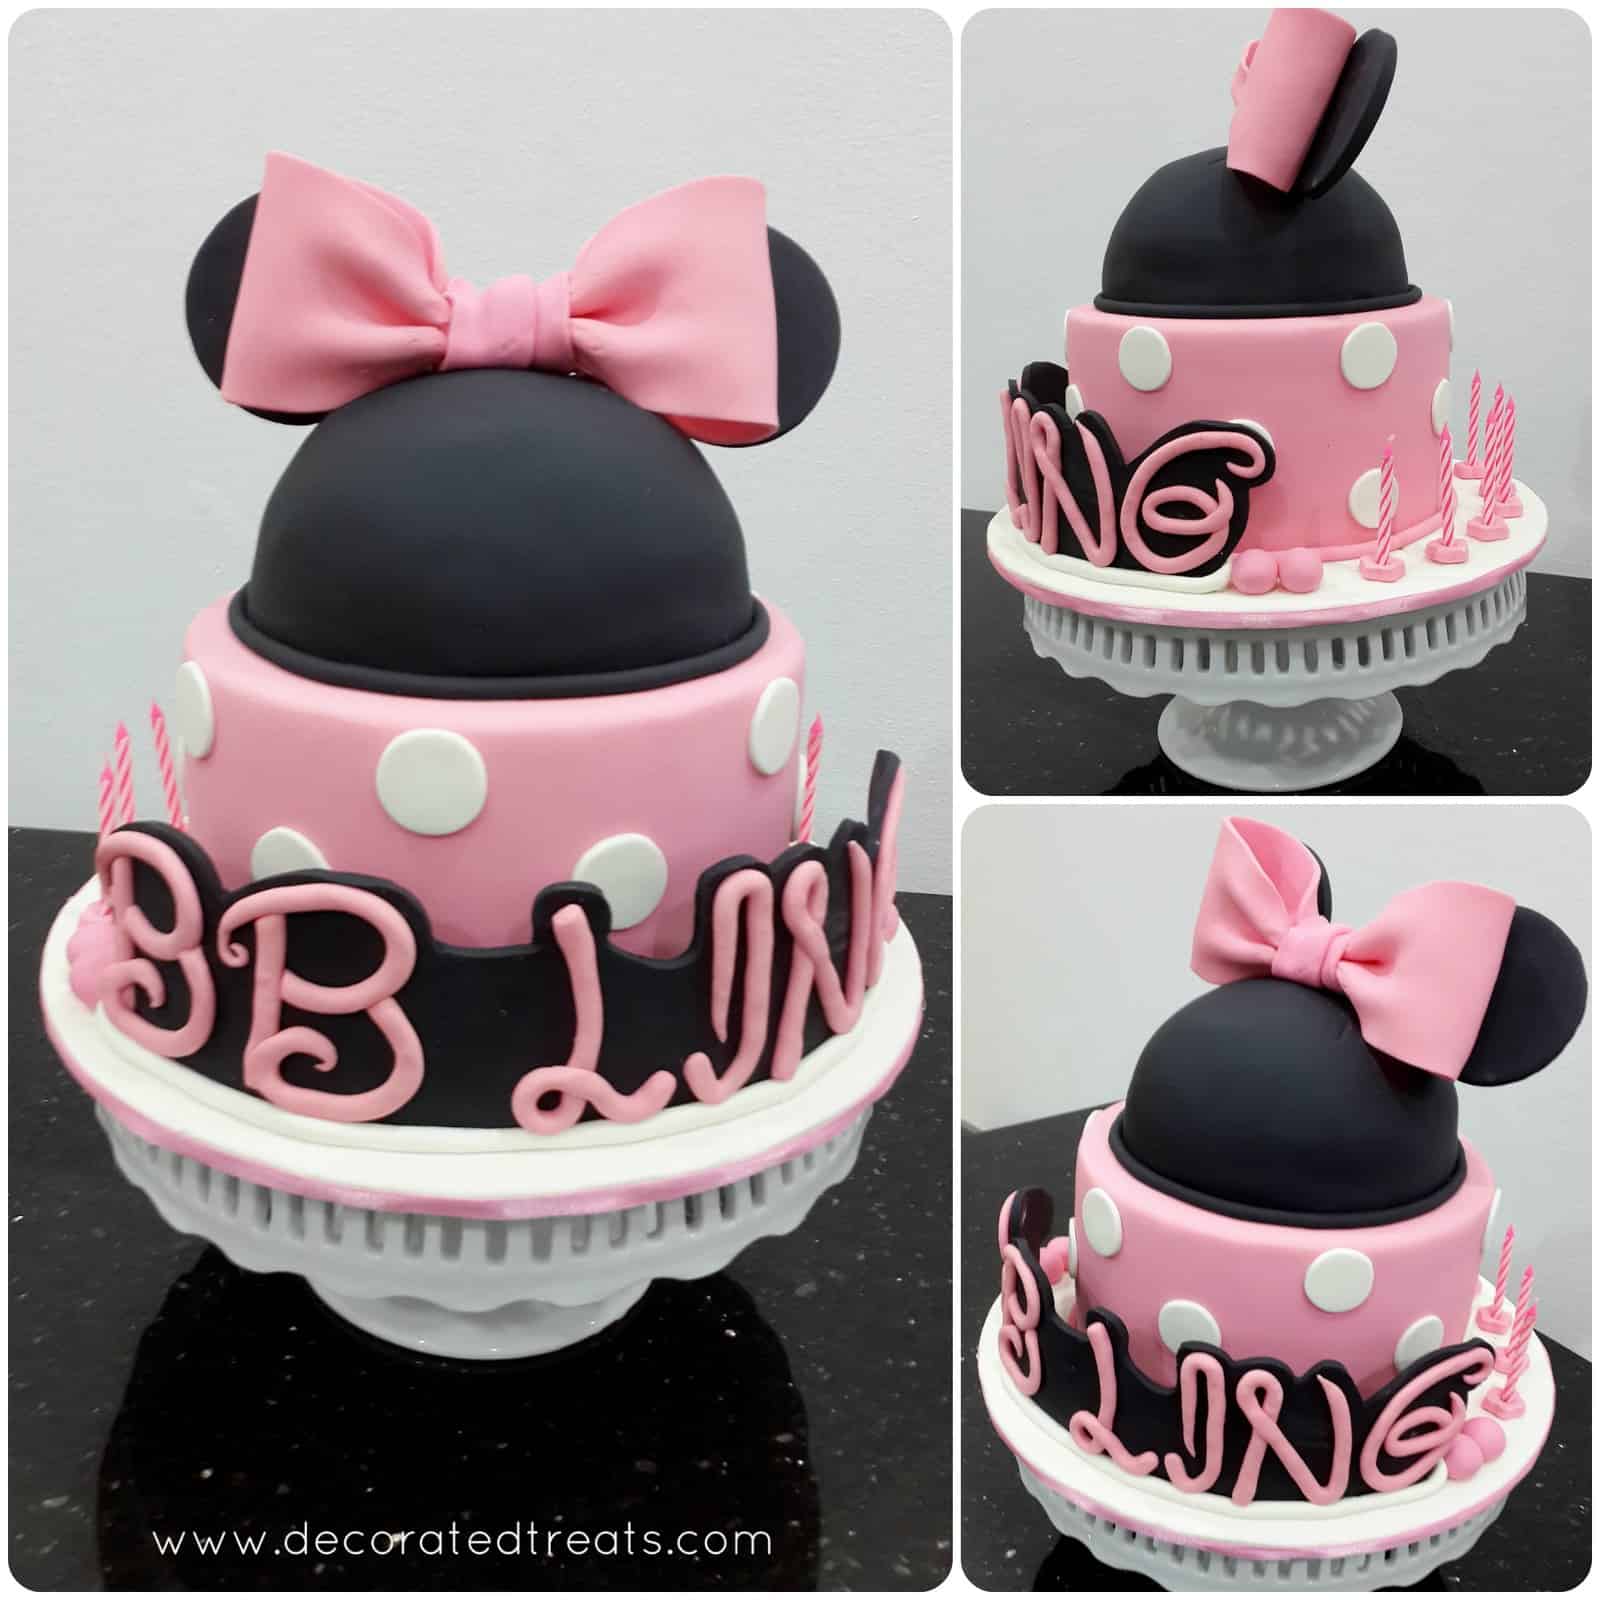
This one was recreated based on an image provided from my customer who requested for the cake to be made in the exact same design as the image, except that the name is customized to hers.
This cake was decorated a couple of years ago and I tried to locate the image that my customer gave and even did an internet search to locate it, but I could not find it. This cake is almost an exact remake of that cake except for the name on the front of the cake.
If you like this cake, you should also check out my other cake designs like this Minnie Mouse buttercream cake, purple Minnie Mouse cake, Minnie Mouse 1st birthday cake and this 2 tier Minnie Mouse cake.
🧾Supplies Required
- Cake – this was a 7-inch round cake, baked using my chocolate cake recipe. And Minnie Mouse's 3D head was also cake. I baked it in a stainless steel bowl, also using my chocolate cake recipe.
- Buttercream – I used buttercream to fill the bottom tier as well as to crumb coat the entire cake.
- Fondant – I used Satin Ice in 3 colors, namely baby pink , black and white .
- CMC – I used CMC to help my fondant set firmer and harder. I added CMC for Minnie Mouse's ears, the bow on Minnie’s head, and the name plaque in black around the cake.
- Flower plunger cutter - I used this cutter to cut out tiny flowers that were placed on the cake board to hold the candles.
- Extruder tool – to pipe out the pink strip of fondant for the birthday girl’s name.
- Round cutters – I used these for Minnie Mouse’s ears as well as the polka dots on the Minnie Mouse cake design.
- Lollipop sticks – These were what I used to hold Minnie Mouse’s ears in place.
- Disney font template – I did a search on the internet for Disney font, printed the letters that spell the birthday girl’s name, and used it as a template for my cake. Before printing, I resized to make sure they are in the exact same size I wanted them on the cake. Click here to learn how to resize images for cake decorating.
- Fondant glue
👩🍳How to Make
Step 1: Make the Bow for the 3D Minnie Mouse Head Cake
I did the bow for this cake design in advance. I made it using fondant that has been added CMC. In making the bow, I used the stainless steel bowl I used to bake the semi-circle cake (i.e. Minnie's head) as a guide so that once set, the bow could fit well on Minnie Mouse’s head. You can refer to this tutorial to learn how to make the bow.
Step 2: Make the Name Plaque
I also did the name plaque for this cake design in advance. To do this, I cut out the letters I printed and arranged them to make the birthday girl's name. I glued the name to a large piece of paper. And then, I drew a line one inch away from the letters. This was how I decided on the shape of the black name plaque. I cut the shape following the outline and used it as a template to cut out my black fondant piece.
To form the curved shaped for the plaque, I rested the black cut out on the sides of a 9 inch styrofoam cake dummy to allow it to set in a curved shape. Before kneading and cutting the black plaque, I added CMC to it so that it dries hard.
Next were the letters. Again, I used my printouts as a guide to form each letter. I used my extruder tool fitted with a small circle disc and piped long strips of pink fondant. I then guided the strip by hand to follow the shape of the letters on my template. Where there are joints or connections, I used glue to connect them. Once all the letters were completed, I left them aside to set a little. And then, I slowly lifted them and arranged them on the name plaque which was still on the cake dummy.
Next, I carefully applied glue to the bottom of each letter and attached them to the name plaque. I left the plaque with the letters on it to set and dry completely while decorating the rest of the Minnie cake.
Step 3: Make Minnie Mouse's Fondant Ears
Next were Minnie Mouse’s ears. I also made these in advance so that on the day I put them on the cake, they are all set and firm and able to hold their shape. These were cut out using large round cutters in black fondant.
Similar to the bow and the name plague, I kneaded some CMC to the fondant. I attached a lollipop stick to each ear so that it is easier to hold them in place on the cake.
Step 4: Assemble the Minnie Mouse Cake
As for the cake, once completely cooled, I leveled the tops. for the bottom round tier which consists of 2 cake layers, I filled them with buttercream and crumb coated with a thin layer of buttercream.
For the semi round cake, I was just one layer, hence I crumb coated it with buttercream. I covered both the cakes with fondant, separately. For the bottom tier cake, I used pink fondant. And then I added white fondant polka dots randomly all over.
For the 3D head shaped cake, I used black fondant. And then I tier constructed it on the base cake (with bubble straws).
For the cake border, I attached a thin black strip for the top tier and pink strip for the bottom tier.
Next to go on the cake was the fondant plaque. Since it was heavy, making it stand upright without any support was quite hard. I had to support the front with a strip of white fondant at the base.
And then I added 2 layers of the fondant strip at the back of it. And I used fondant glue to hold all the components together. While waiting for the glue to set completely, I supported the plaque with my food coloring bottles. I arranged them in a row, on the front and back so that the plaque set straight.
Step 5: Attach Minnie's Ears onto the Cake
Once the plaque was stable, I completed 3D Minnie Mouse themed cake tier by poking the ears into place and gluing the bow. The bow was attached using fondant glue. The fact that Minnie Mouse’s ears were at the back made it so much easier to attach the bow as the ears helped to support the bow while the glue was drying.
Finally, I cut out tiny flowers in pink fondant. I attached them to the cake board, at the back of the cake. And while the fondant was still soft, I poked the candles into the center of each flower. For this purpose, I cut the flowers quite thick.
And that's pretty much how I completed my Minnie Mouse cake design.
❤️More Cake Designs You Will Love


Do you like this tutorial? Please leave a 5-star ⭐⭐⭐⭐⭐rating in the recipe card below and consider a review further down this page. I would love to hear from you. Thank you!
📖Recipe
Minnie Mouse Cake Design
Equipment
- Flower plunger cutters
- Extruder tool
- Round cutters
- Lollipop sticks
- Disney font template
For best results, use the metrics measurements. US customary measurements have not been tested and are only meant for guide.
Ingredients
7 inch round tier
- 360 g self-raising flour
- 360 g granulated sugar
- 360 g butter
- 6 eggs
- 90 ml milk
- ¾ teaspoon baking powder
- ¼ teaspoon salt
- 1 teaspoon vanilla extract
Bowl shaped cake tier
- 180 g self-raising flour
- 180 g granulated sugar
- 180 g butter
- 3 eggs
- 45 ml milk
- ½ teaspoon baking powder
- ⅛ teaspoon salt
- ½ teaspoon vanilla extract
Frosting and Decoration
- Buttercream
- Fondant
- CMC powder
Instructions
Baking the cakes (The cakes are best baked in 2 batches (by tier). Follow the instructions below for each tier)
- Preheat oven to 170 °Celsius.
- Beat butter and sugar till soft and creamy for about 2 minutes. Add eggs, one at a time, beating well after each addition.
- In a separate bowl, sift flour, baking powder, and salt. Fold in the sifted ingredients into the creamed mixture alternately with milk, starting and ending with flour.
- Finally, add in vanilla extract and combine well. Pour batter into two greased and floured cake pans and bake for 45 to 50 minutes until the top of the cake springs back when lightly pressed. The cakes are done when a skewer inserted in the center of the cake comes out without any wet batter.
- Remove cakes from oven and let them cool completely before icing and decorating.
The bow
- You can make the bow in advance. Add some CMC to the fondant so that the bow sets firm. Follow this tutorial to make the bow.
- In making the bow, use the stainless steel bowl used to bake the semi-circle cake (i.e. Minnie's head) as a guide so that once set, the bow could fit well on Minnie Mouse’s head.
The name plaque
- Before cutting the name plaque, prepare a paper template to guide with the size.
- Start by cutting out all the letters required for the birthday person's name from the paper template. Arrange the name on a large sheet of paper and glue them to it.
- Next, draw an outline around the name, leaving about 1 inch margin all around.
- Cut the paper following the outline. This will be the template for the name plaque.
- Next, add some CMC powder into black fondant and knead well. Roll the fondant thin and place the plaque template on it. Cut it out.
- Rest the cut plaque on the sides of a 9 inches round dummy so that the plaque sets in that curved shape.
- To make the pink lettering, use the earlier font printout as a guide to form each letter. Insert a small circle disc into the extruder tool and pipe out long strips of pink fondant. Guide the strip by hand to follow the shape of the letters on the template. Where there are joints or connections, use fondant glue to secure them. Once all the letters are completed, leave them aside to set a little. And then, slowly lift them and arrange them on the name plaque which is still on the cake dummy.
- Once you are satisfied with the position of the letters, carefully apply fondant glue to the bottom of each letter and attach them to the name plaque. Let the plaque with the letters on it to set and dry completely.
Minnie Mouse ears
- Add some CMC to some black fondant. Knead well and roll it.
- Use a round cookie cutter to cut out 2 circles. Insert a lollipop stick into each of the black circles. Let the circles set completely before using on the cake. It is better to make the ears one day in advance so that they get to set properly before being used on the cake.
Assembling the Minnie Mouse cake
- Once the baked cakes have completely cooled down, level the tops.
- For the 7 inches round cake, fill the layers with buttercream and crumb coat the whole cake tier with buttercream.
- Repeat the crumb coat process for the bowl shaped cake tier.
- Next, cover the bottom tier cake with pink fondant. Roll some white fondant and use the round plunger cutter to cut out the white dots for the cake. Attach these cut outs randomly on the pink fondant covered cake later.
- As for Minnie Mouse’s head, cover it in black fondant. And then tier construct it on the base cake (with bubble straws). After that, attach the borders for both cake tiers, with black strip for the top cake tier and pink strip for the bottom tier.
- Next to go on the cake is the fondant plaque. Since it is rather heavy, making it stand upright without any support will be quite hard. Support the front of the plaque with a strip of white fondant at the base. And then add 2 layers of the fondant strip at the back of it. Use fondant glue to hold all the components together. While waiting for the glue to set completely, support the plaque . I used my food coloring bottles. I arranged them in a row, on the front and back so that the plaque sets straight.
Attaching Minnie's ears and the bow
- Once the plaque is stable, complete Minnie Mouse’s head by poking her ears into place and gluing the bow. Attach the bow with fondant glue. The fact that Minnie Mouse’s ears were at the back will make it easier to attach the bow as the ears help to support the bow while the glue dries.
- Finally, cut out tiny flowers in pink fondant. Attach them to the cake board, at the back of the cake. And while the fondant is still soft, poke the candles into the center of each flower.
Leave a Reply