

Learn how to make Timmy Time birthday cake with this decorating guide. It is a single tier cake covered in buttercream and decorated with fondant cut outs and handmade fondant characters from the Timmy Time show. This makes a really cute cake, perfect for toddlers and little children.
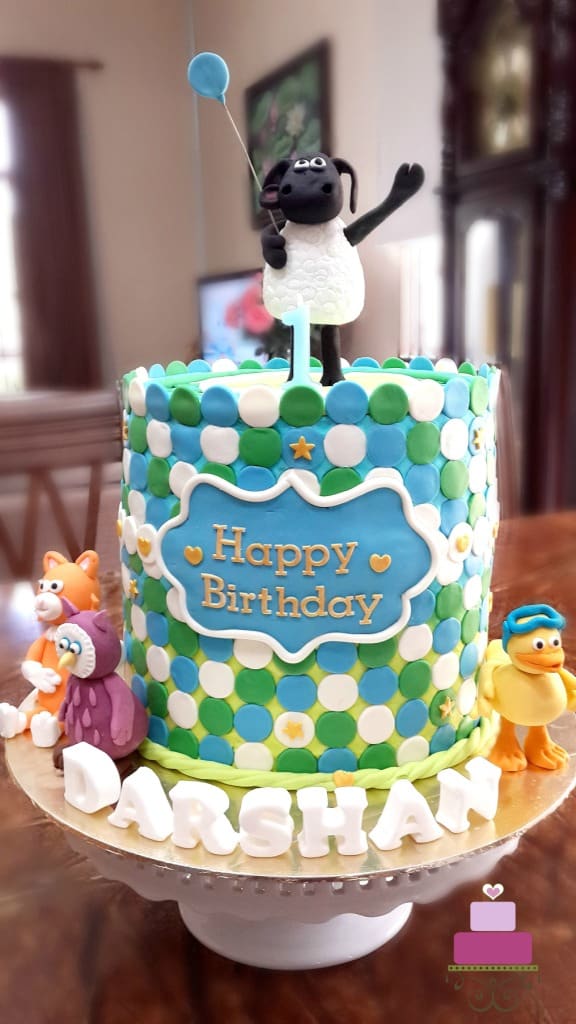
The main character in the Timmy Time show is Timmy the lamb and each episode will depict his various adventures in school, along with his friends, Yabba the duckling, Mittens the kitten, Otus the owlet and a handful of other animal characters.
I used these characters to decorate the cake. This was a double barrel cake measuring 7 inches in diameter. The cake was decorated in both buttercream and fondant and I made 4 toppers based on the characters from the show with Timmy being the main topper.
If you like this cake, you should also check out this princess castle cake, puppy dog cake, baby shower cake with baby stroller, Smurfs birthday cake, simple dog cake design, Minion cake and Hello Kitty cake design.
🧾Supplies Required
- Cake – This was a 7 inches double barrel cake, with a total height of 8 inches. I baked the cake in 2 batches, 2 layers in each batch. I used my butter pound cake recipe for the cake.
- Buttercream – I used buttercream to fill the cake as well as to cover the cake.
- Fondant – I used Satin Ice for all the fondant work on this cake, including the 3D Timmy Time characters. The colors I used were blue, green, white, black and orange. For the yellow and maroon, I tinted white with Wilton Golden Yellow and Americolor Maroon food colors.
- Gum paste – I used very little gum paste on this cake and that was only for the “Happy Birthday” wordings. This was Satin Ice too.
- CMC powder – I added this powder to my fondant when making the 3D characters as well as the 3D lettering on the cake. CMC helps fondant dry faster and harder, making it easier for the 3D decorations to hold their shape.
- Gold edible dust and lemon extract – I mixed these to make edible gold paint which I painted on the star and heart cutouts on the cake as well as the “Happy Birthday” wordings.
- Fondant glue & shortening.
- Floral wire –The balloon string on the cake was actually wire, and I used one 26 gauge wire for this.
- Plaque cutter – I used this to cut out the plaque that carries the words ‘Happy Birthday” on the cake.
- Alphabet cutters – I used 2 different types of cutters. The smaller font for “Happy Birthday” was cut using Tappit block letter cutters while the larger ones on the cake board that spelled my boy’s name were cut from a set of alphabet cutters I purchased from a local cake decorating supplies shop.
- Extruder tool – I used this to pipe out thin fondant strips which I used to frame the plaque on the side of the cake as well as to decorate the cake top. I also used the extruder tool to make the rope border for the cake.
- Plunger cutters – I used plunger cutters in round, star and heart shapes.
- Fondant shaping tools – these were used mainly when making the 3D figurines.
👩🍳How to Make
Step 1: Make the 3D Cake Toppers
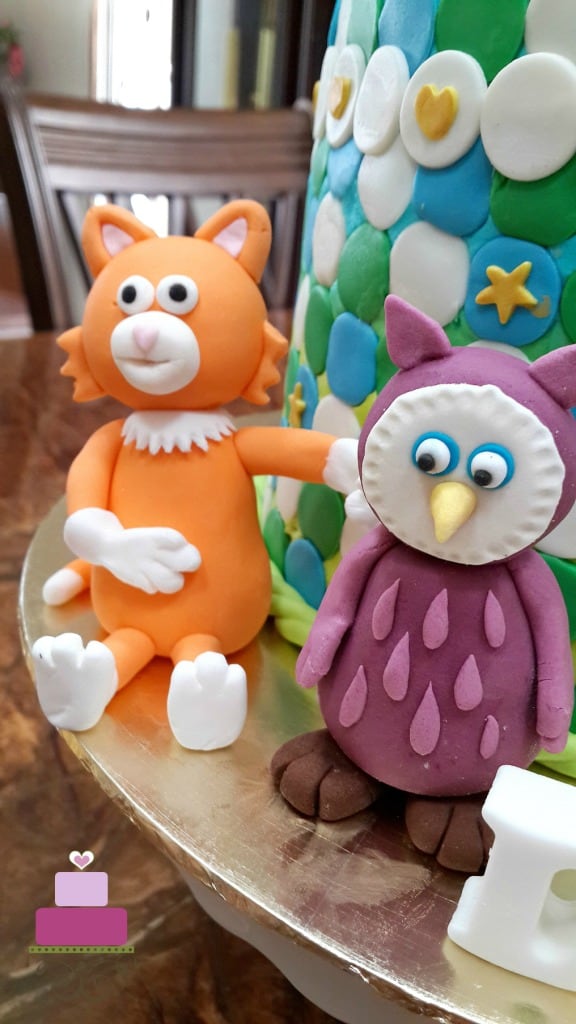
I started with the 3D figurines ahead of time. That gave these figurines adequate time to dry and set hard. All the figurines were formed by hand with the help of my fondant tools for shaping the different parts of the figurines.
To make sure I get the figurines as close as possible to the actual Timmy Time characters, I printed out the images from the internet and had them close by to refer to while making them.
I made a total of 4 characters – Yabba the duckling, Mittens the kitten, Otus the owlet and finally the hero, Timmy the lamb. Since Timmy was standing on his feet on the cake, I had to use a wooden skewer to support his structure. I had the thin skewer inserted through one of his legs so that the weight of Timmy’s body does not compress his legs when put up on the cake.
Also, the skewer helped in making sure Timmy was able to stand stable on the cake. The rest of the figurines were not supported.


Step 2: Make the 3D Letters and Balloon
I also made the 3D letters and the balloon Timmy was holding in advance. These were made using fondant that has been added CMC. To make the 3D letters, follow this tutorial on how to make 3D fondant letters for cake decorating.
Step 3: Bake the Cake
As for the cake itself, once baked, I leveled all layers, sandwiched them with buttercream and stacked them all up. And then I applied a thin layer of buttercream crumb coat.
Step 4: Cover the Cake in Buttercream and Decorate with Fondant Cut Outs
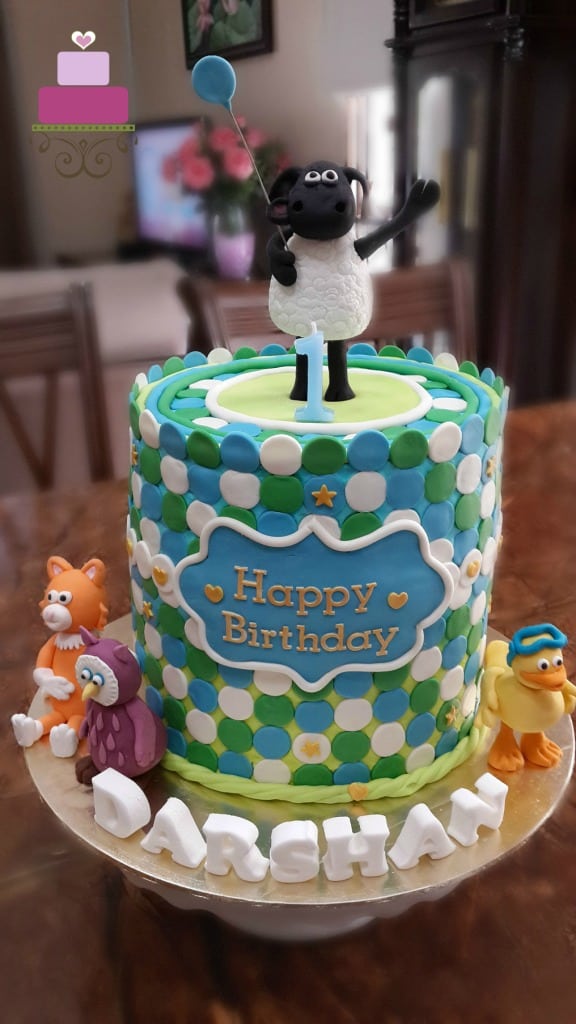
To decorate the cake, I started with the background colors of bright green and blue. I divided my buttercream into 2 bowls and tinted one with Americolor electric green and the other in royal blue food colors.
And then I filled the icing into 2 different piping bags. I started with the green and halfway up the cake, I switched to blue. I continued with the blue icing right to the top of the cake and including the top. And then, using an icing scraper, I smoothed the sides of the cake as well as the top.
Next, I cut out lots of circles using my round plunger cutter in blue, green and white fondant. And then, I attached them to the cake, starting from the bottom all the way to the top. Since I was putting them on buttercream, I did not need to use any ‘glue’. The buttercream was able to hold them in place well.
I also used the circle cut outs for the cake top, in addition to a large light green cut out in the center of the cake and a couple of layers of fondant strips from my extruder tool.
Step 5: Make the Happy Birthday Plaque
Next was the “Happy Birthday” plaque and the letters themselves. The plaque was cut out of fondant while the letters were cut in white gum paste. I painted the gum paste letters with edible gold paint.
I then let the paint dry completely before attaching the letters onto the plaque with shortening. And then I attached the plaque onto the side of the cake (used shortening as the glue) before adding a white frame to it. The frame was piped out using my extruder tool.
After the plaque, I cut out more white circles. I attached them in one row, all around the middle of the cake. And then I added gold painted heart cut outs on them, leaving a gap of one circle cut out in between each heart.
I also added gold painted stars on the cake at distant intervals before adding a light green rope border around the cake. The border was piped out of my extruder tool too.
Next to go onto the cake was my son’s name. I ‘glued’ the letters onto the cake border, to make sure they are remained in place intact. And, in placing the name on, I made sure its balanced and centered and in line with the plaque I attached to the cake earlier.
Step 6: Attach the Cake Toppers
And finally, I added the animal toppers on. Except for Timmy, all the other 3 were just placed on the side of the cake, on the cake board. I did not glue them down as they were quite stable that way already.
As for Timmy, the wooden skewer I had on one of his legs helped to hold him in place on the birthday cake.
Happy Decorating 🙂


Leave a Reply